fold seats MERCEDES-BENZ SL ROADSTER 2012 Owners Manual
[x] Cancel search | Manufacturer: MERCEDES-BENZ, Model Year: 2012, Model line: SL ROADSTER, Model: MERCEDES-BENZ SL ROADSTER 2012Pages: 637, PDF Size: 20.68 MB
Page 51 of 637

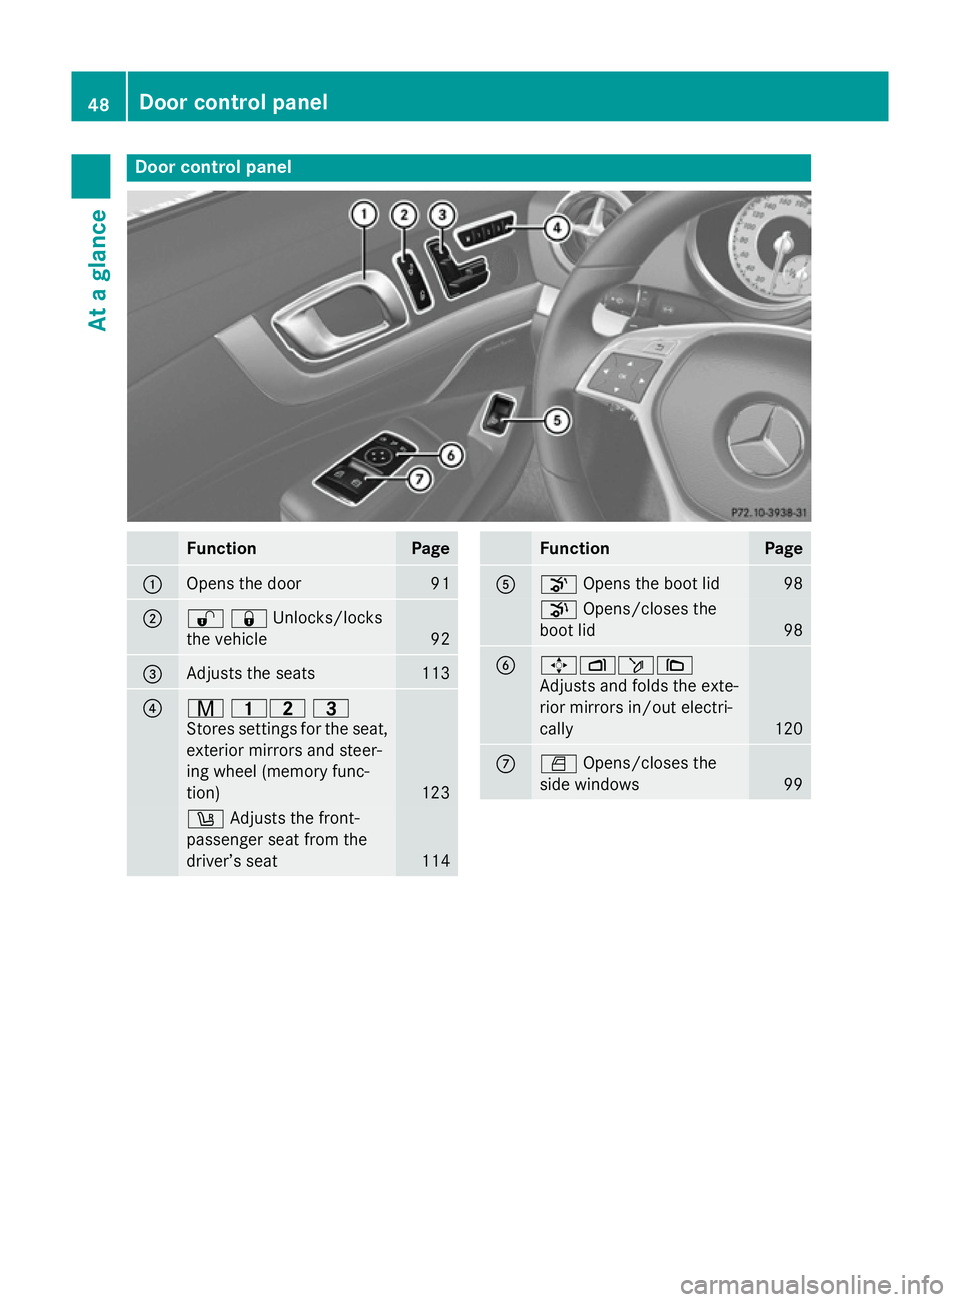
Door control panel
Function Page
:
Opens the door 91
;
%&Unlocks/locks
the vehicle 92
=
Adjusts the seats 113
?
r
45 =
Stores settings for the seat, exterior mirrors and steer-
ing wheel (memory func-
tion) 123
w
Adjusts the front-
passenger seat from the
driver’s seat 114 Function Page
A
o
Opens the boot lid 98
p
Opens/closes the
boot lid 98
B
7Zö\
Adjusts and folds the exte-
rior mirrors in/out electri-
cally
120
C
W
Opens/closes the
side windows 9948
Door control panelAt a glance
Page 118 of 637

X
To activate/deactivate: press button:.
If the indicator lamp in button :is lit, you can
access the following functions for the front-
passenger seat:
R seat adjustment
R call up the memory function Removing the seat belt from the seat
belt guide
G
WARNING
When driving off-road, your body is subject to forces from all directions due to the uneven
surface. You could be thrown from your seat,
for instance. There is a danger of injury.
Always wear a seat belt, even when driving off-
road. Both the driver's seat belt and the front-
passenger seat belt can be removed from the
seat belt guide. This makes it easier to move
the seats forward.
Before you drive off, the seat belt must be
inserted into the seat belt guide.
Observe the safety guidelines for seat belts
(Y page 57).
X To remove: open up magnetic head ;and
fold the tab up in the direction of the arrow.
X Take the seat belt out of seat belt guide :.
X To insert: fold the tab up in the direction of
the arrow.
X Insert the seat belt back into the seat belt
guide and fold the tab back down. Adjusting the head restraints
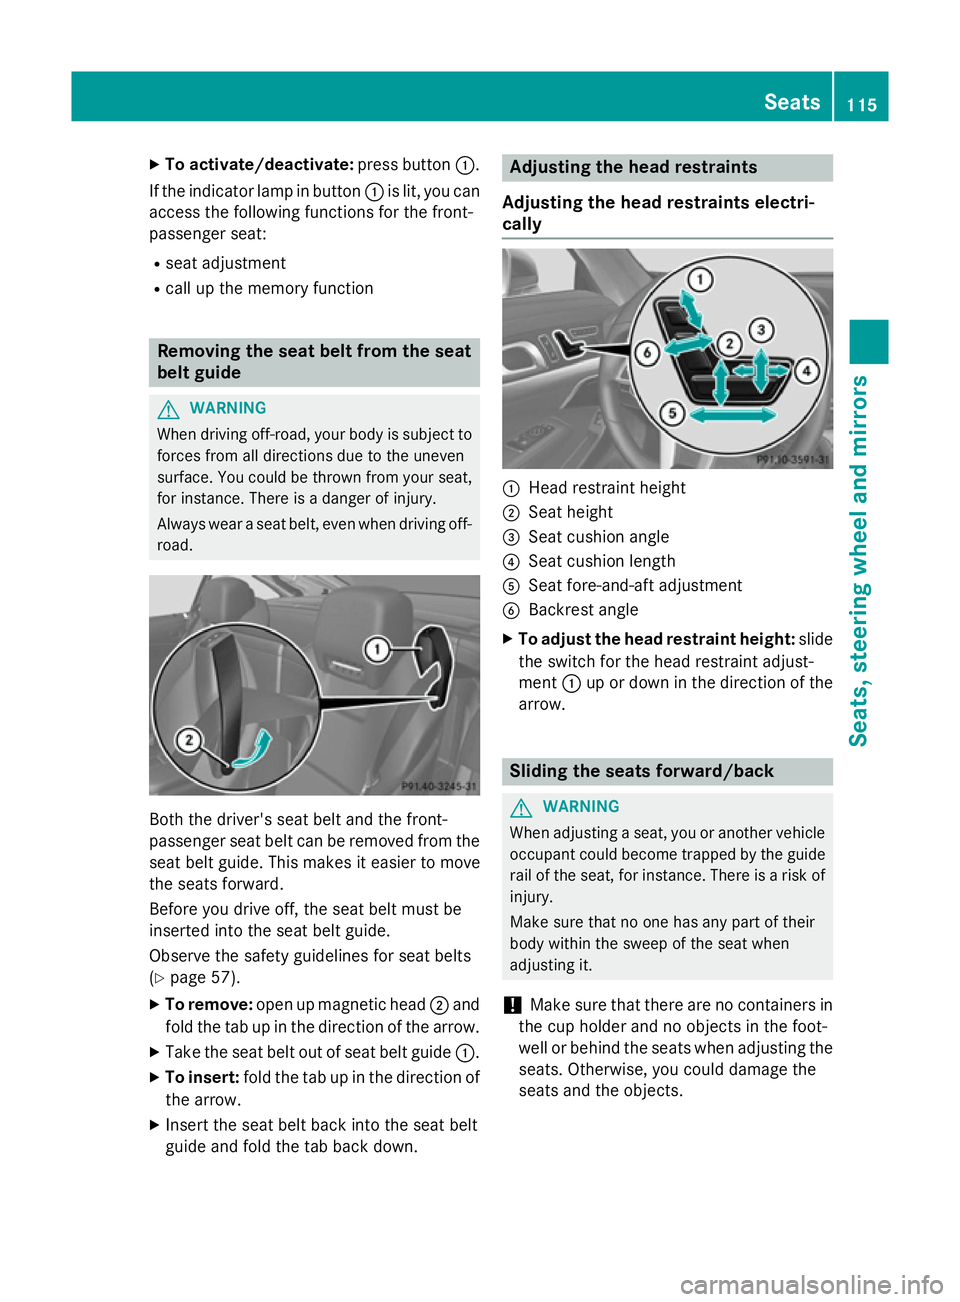
Adjusting the head restraints electri-
cally :
Head restraint height
; Seat height
= Seat cushion angle
? Seat cushion length
A Seat fore-and-aft adjustment
B Backrest angle
X To adjust the head restraint height: slide
the switch for the head restraint adjust-
ment :up or down in the direction of the
arrow. Sliding the seats forward/back
G
WARNING
When adjusting a seat, you or another vehicle occupant could become trapped by the guiderail of the seat, for instance. There is a risk of
injury.
Make sure that no one has any part of their
body within the sweep of the seat when
adjusting it.
! Make sure that there are no containers in
the cup holder and no objects in the foot-
well or behind the seats when adjusting the
seats. Otherwise, you could damage the
seats and the objects. Seats
115Seats, steering wheel and mirrors Z
Page 124 of 637

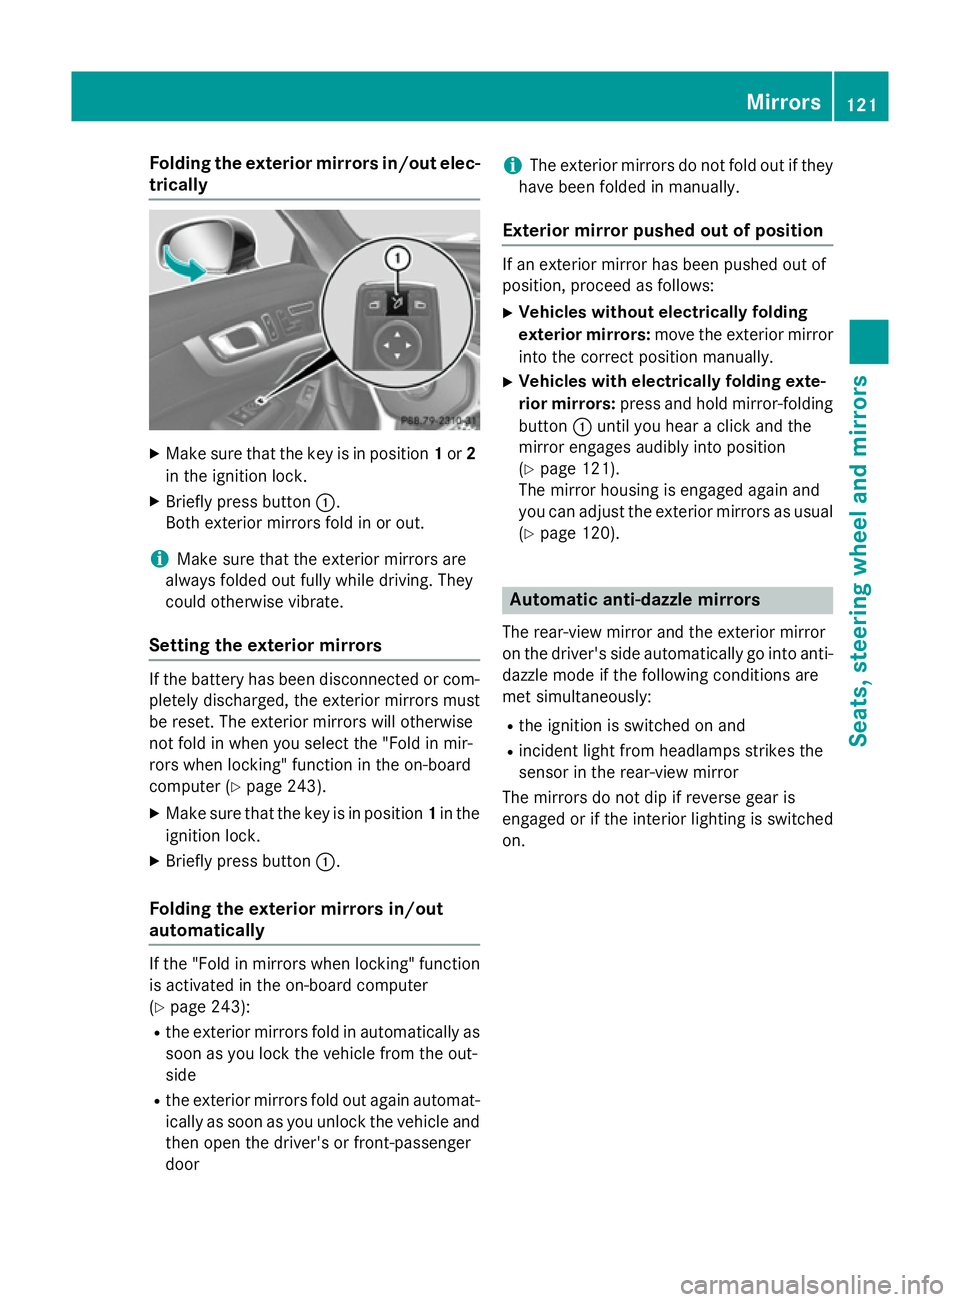
Folding the exterior mirrors in/out elec-
trically X
Make sure that the key is in position 1or 2
in the ignition lock.
X Briefly press button :.
Both exterior mirrors fold in or out.
i Make sure that the exterior mirrors are
always folded out fully while driving. They
could otherwise vibrate.
Setting the exterior mirrors If the battery has been disconnected or com-
pletely discharged, the exterior mirrors must
be reset. The exterior mirrors will otherwise
not fold in when you select the "Fold in mir-
rors when locking" function in the on-board
computer (Y page 243).
X Make sure that the key is in position 1in the
ignition lock.
X Briefly press button :.
Folding the exterior mirrors in/out
automatically If the "Fold in mirrors when locking" function
is activated in the on-board computer
(Y page 243):
R the exterior mirrors fold in automatically as
soon as you lock the vehicle from the out-
side
R the exterior mirrors fold out again automat-
ically as soon as you unlock the vehicle and
then open the driver's or front-passenger
door i
The exterior mirrors do not fold out if they
have been folded in manually.
Exterior mirror pushed out of position If an exterior mirror has been pushed out of
position, proceed as follows:
X Vehicles without electrically folding
exterior mirrors: move the exterior mirror
into the correct position manually.
X Vehicles with electrically folding exte-
rior mirrors: press and hold mirror-folding
button :until you hear a click and the
mirror engages audibly into position
(Y page 121).
The mirror housing is engaged again and
you can adjust the exterior mirrors as usual
(Y page 120). Automatic anti-dazzle mirrors
The rear-view mirror and the exterior mirror
on the driver's side automatically go into anti- dazzle mode if the following conditions are
met simultaneously:
R the ignition is switched on and
R incident light from headlamps strikes the
sensor in the rear-view mirror
The mirrors do not dip if reverse gear is
engaged or if the interior lighting is switched
on. Mirrors
121Seats, steering wheel and mirrors Z
Page 531 of 637

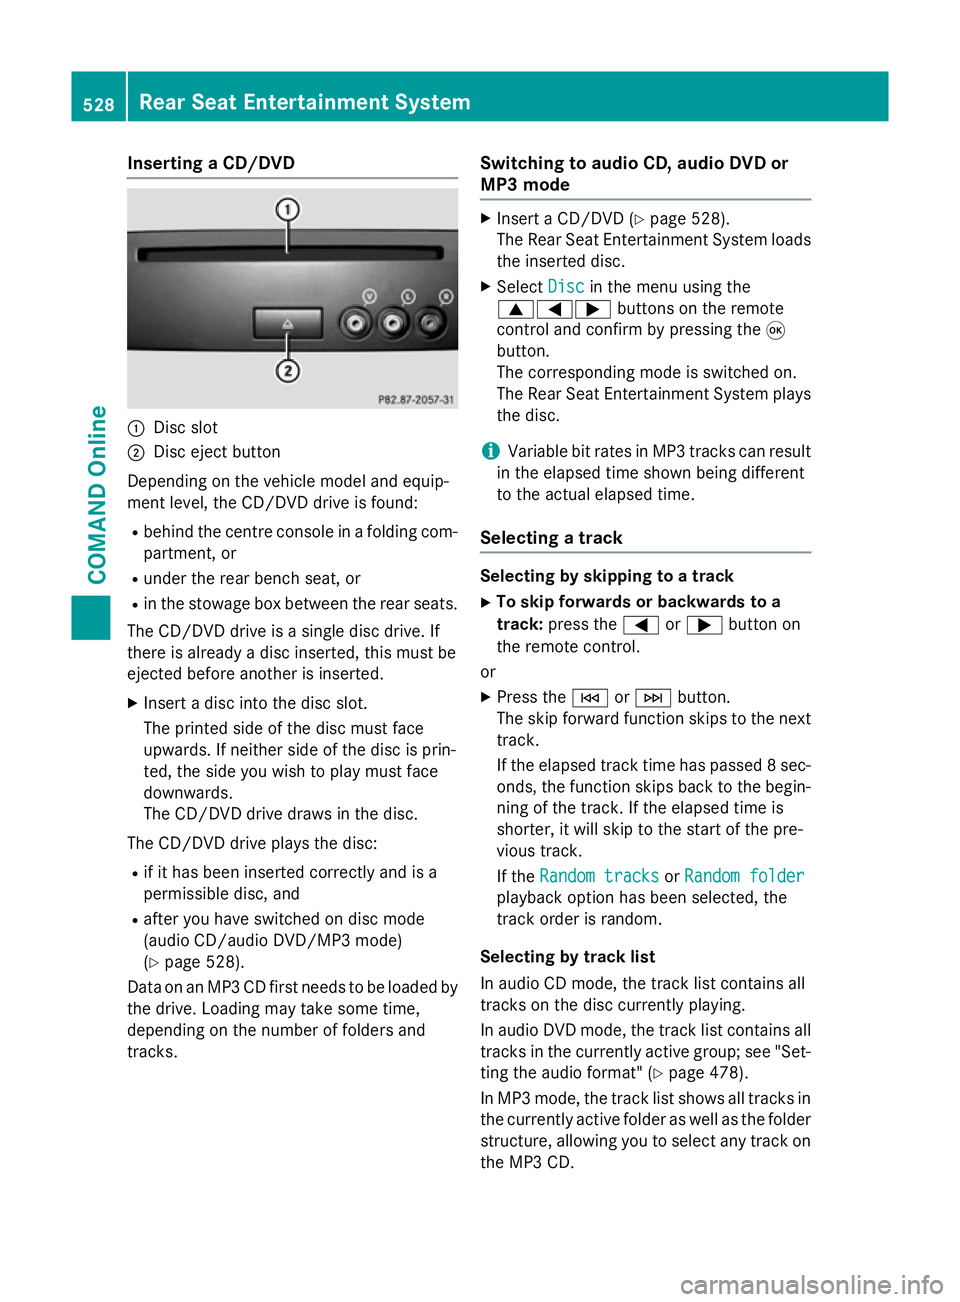
Inserting a CD/DVD
:
Disc slot
; Disc eject button
Depending on the vehicle model and equip-
ment level, the CD/DVD drive is found:
R behind the centre console in a folding com-
partment, or
R under the rear bench seat, or
R in the stowage box between the rear seats.
The CD/DVD drive is a single disc drive. If
there is already a disc inserted, this must be
ejected before another is inserted.
X Insert a disc into the disc slot.
The printed side of the disc must face
upwards. If neither side of the disc is prin-
ted, the side you wish to play must face
downwards.
The CD/DVD drive draws in the disc.
The CD/DVD drive plays the disc:
R if it has been inserted correctly and is a
permissible disc, and
R after you have switched on disc mode
(audio CD/audio DVD/MP3 mode)
(Y page 528).
Data on an MP3 CD first needs to be loaded by
the drive. Loading may take some time,
depending on the number of folders and
tracks. Switching to audio CD, audio DVD or
MP3 mode X
Insert a CD/DVD (Y page 528).
The Rear Seat Entertainment System loads
the inserted disc.
X Select Disc Discin the menu using the
9=; buttons on the remote
control and confirm by pressing the 9
button.
The corresponding mode is switched on.
The Rear Seat Entertainment System plays
the disc.
i Variable bit rates in MP3 tracks can result
in the elapsed time shown being different
to the actual elapsed time.
Selecting a track Selecting by skipping to a track
X To skip forwards or backwards to a
track: press the =or; button on
the remote control.
or X Press the EorF button.
The skip forward function skips to the next track.
If the elapsed track time has passed 8 sec- onds, the function skips back to the begin-
ning of the track. If the elapsed time is
shorter, it will skip to the start of the pre-
vious track.
If the Random tracks Random tracks orRandom folder
Random folder
playback option has been selected, the
track order is random.
Selecting by track list
In audio CD mode, the track list contains all
tracks on the disc currently playing.
In audio DVD mode, the track list contains all
tracks in the currently active group; see "Set-
ting the audio format" (Y page 478).
In MP3 mode, the track list shows all tracks in
the currently active folder as well as the folder
structure, allowing you to select any track on
the MP3 CD. 528
Rear Seat Entertainment SystemCOMAND Online