battery MERCEDES-BENZ SL ROADSTER 2018 User Guide
[x] Cancel search | Manufacturer: MERCEDES-BENZ, Model Year: 2018, Model line: SL ROADSTER, Model: MERCEDES-BENZ SL ROADSTER 2018Pages: 322, PDF Size: 5.43 MB
Page 80 of 322
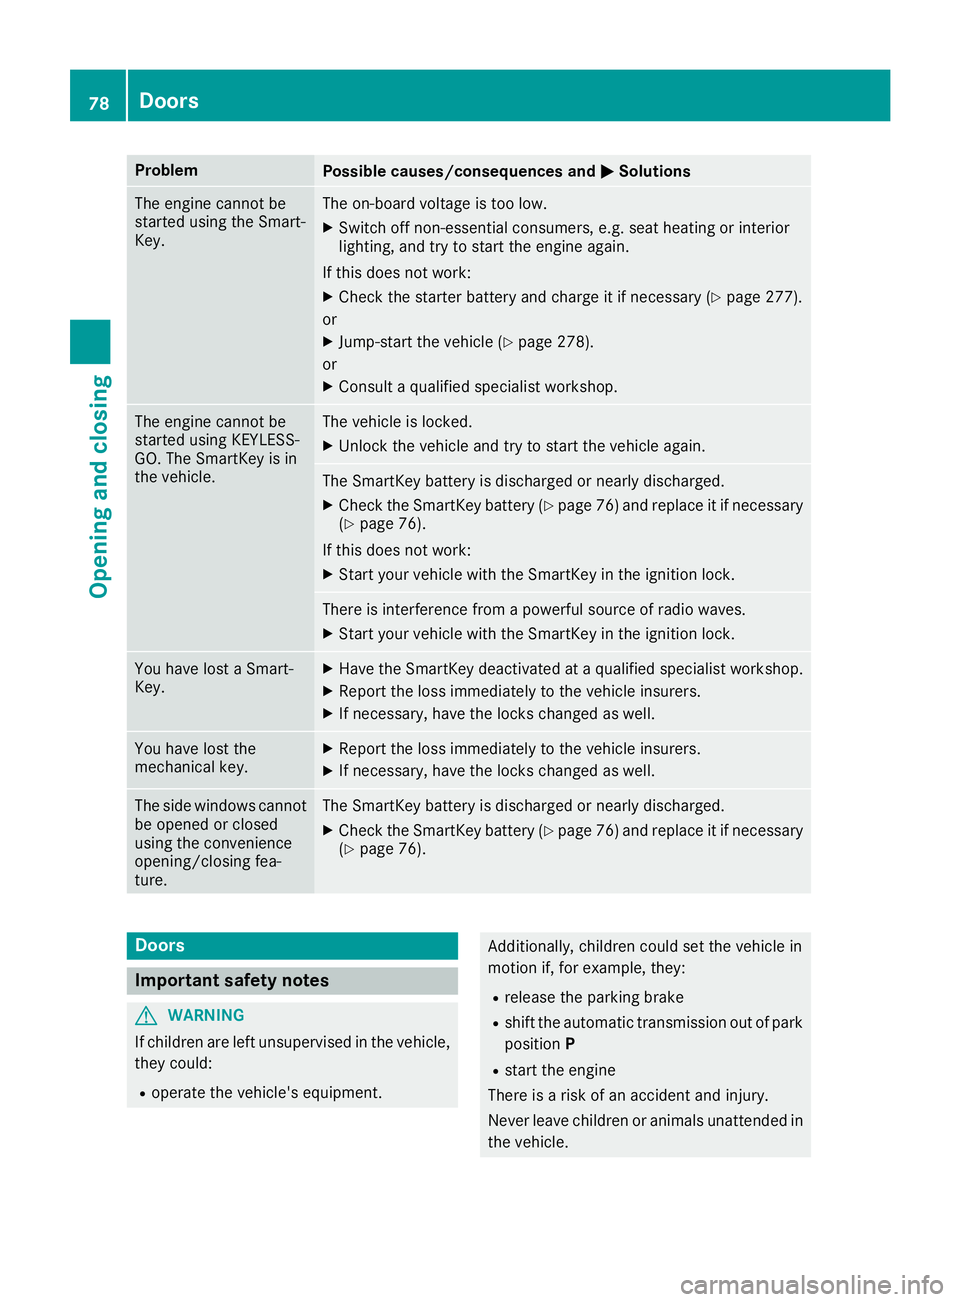
ProblemPossible causes/consequences andMSolutions
The engine cannot be
started using the Smart-
Key.The on-board voltage is too low.
XSwitch off non-essential consumers, e.g. seat heating or interior
lighting, and try to start the engine again.
If this does not work:
XCheck the starter battery and charge it if necessary (Ypage 277).
or
XJump-start the vehicle (Ypage 278).
or
XConsult a qualified specialist workshop.
The engine cannot be
started using KEYLESS-
GO. The SmartKey is in
the vehicle.The vehicle is locked.
XUnlock the vehicle and try to start the vehicle again.
The SmartKey battery is discharged or nearly discharged.
XCheck the SmartKey battery (Ypage 76) and replace it if necessary
(Ypage 76).
If this does not work:
XStart your vehicle with the SmartKey in the ignition lock.
There is interference from a powerful source of radio waves.
XStart your vehicle with the SmartKey in the ignition lock.
You have lost a Smart-
Key.XHave the SmartKey deactivated at a qualified specialist workshop.
XReport the loss immediately to the vehicle insurers.
XIf necessary, have the locks changed as well.
You have lost the
mechanical key.XReport the loss immediately to the vehicle insurers.
XIf necessary, have the locks changed as well.
The side windows cannot
be opened or closed
using the convenience
opening/closing fea-
ture.The SmartKey battery is discharged or nearly discharged.
XCheck the SmartKey battery (Ypage 76) and replace it if necessary
(Ypage 76).
Doors
Important safety notes
GWARNING
If children are left unsupervised in the vehicle,
they could:
Roperate the vehicle's equipment.
Additionally, children could set the vehicle in
motion if, for example, they:
Rrelease the parking brake
Rshift the automatic transmission out of park
position P
Rstart the engine
There is a risk of an accident and injury.
Never leave children or animals unattended in
the vehicle.
78Doors
Opening and closing
Page 81 of 322
When leaving the vehicle, always take the
SmartKey with you and lock the vehicle. This
also applies to mobile phones if the "Digital
Car Key in smartphone" function is activated
via the Mercedes me connect web app.
Unlocking and opening doors from
the inside
!
The side windows will not open/close if the
battery is discharged or if the side windows
have iced up. It will then not be possible to
close the door. Do not attempt to force the
door closed. You could otherwise damage the door or the side window.
You can open a door from inside the vehicle
even if it has been locked.
If the vehicle has previously been locked from
the outside, opening a door from the inside will
trigger the anti-theft alarm system. Switch off
the alarm (
Ypage 72).
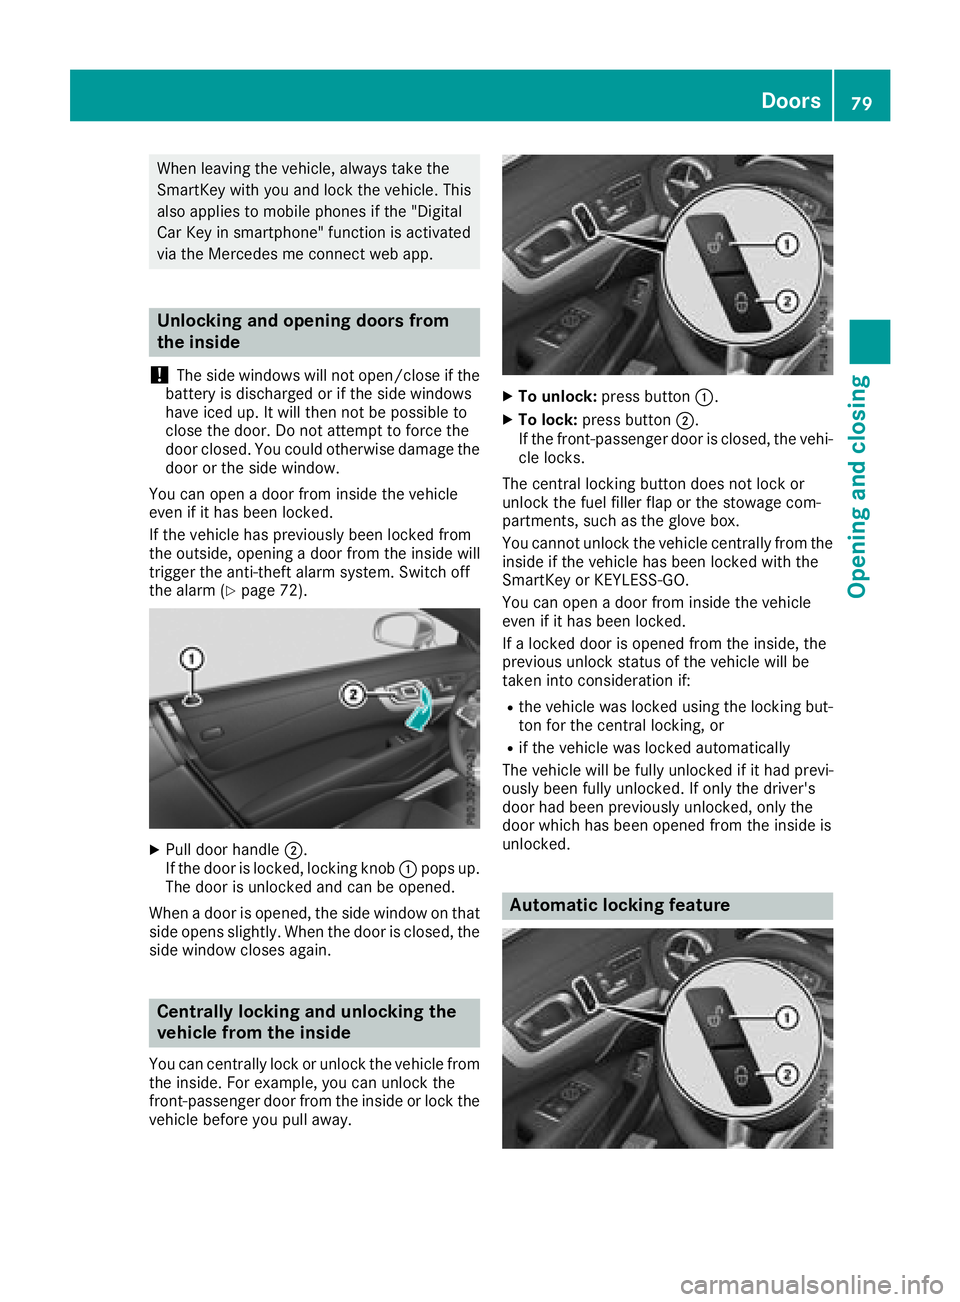
XPull door handle ;.
If the door is locked, locking knob :pops up.
The door is unlocked and can be opened.
When a door is opened, the side window on that
side opens slightly. When the door is closed, the
side window closes again.
Centrally locking and unlocking the
vehicle from the inside
You can centrally lock or unlock the vehicle from
the inside. For example, you can unlock the
front-passenger door from the inside or lock the
vehicle before you pull away.
XTo unlock: press button :.
XTo lock:press button ;.
If the front-passenger door is closed, the vehi-
cle locks.
The central locking button does not lock or
unlock the fuel filler flap or the stowage com-
partments, such as the glove box.
You cannot unlock the vehicle centrally from the
inside if the vehicle has been locked with the
SmartKey or KEYLESS-GO.
You can open a door from inside the vehicle
even if it has been locked.
If a locked door is opened from the inside, the
previous unlock status of the vehicle will be
taken into consideration if:
Rthe vehicle was locked using the locking but-
ton for the central locking, or
Rif the vehicle was locked automatically
The vehicle will be fully unlocked if it had previ-
ously been fully unlocked. If only the driver's
door had been previously unlocked, only the
door which has been opened from the inside is
unlocked.
Automatic locking feature
Doors79
Opening and closing
Z
Page 87 of 322
XRemove themechanical key.
XInser tth emechanical ke yint oth eSmartKey.
Unlocking the trunk (mechanical key)
!
The trunk lid swings upwards when opened.
Therefore ,mak esur ethat there is sufficien t
clearance abov eth etrunk lid.
If th etrunk canno tbe unlocked wit hth eSmart -
Key or KEYLESS-GO ,use th emechanical key.
If you use th emechanical ke yto unlock and
open th etrunk lid, th eanti-thef talarm system
will be triggered .Switc hoff th ealarm
(
Ypage 72).
XTak eth emechanical ke yout of th eSmartKey
(Ypage 75).
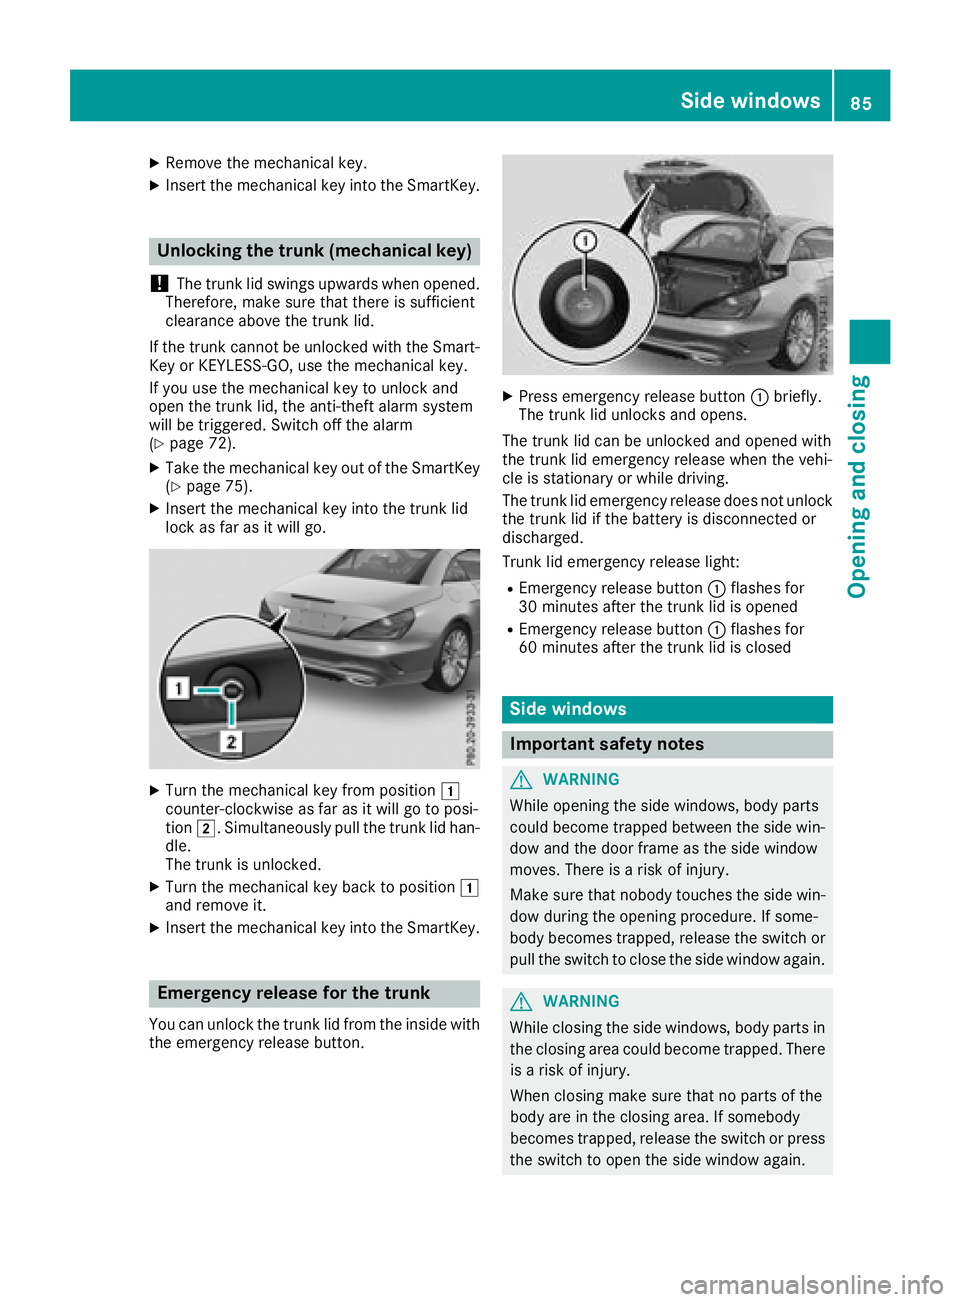
XInser tth emechanical ke yint oth etrunk lid
loc kas far as it will go.
XTurn th emechanical ke yfrom position 1
counter-clockwise as far as it will go to posi-
tion 2.Simultaneously pull th etrunk lid han -
dle.
The trunk is unlocked.
XTurn th emechanical ke ybac kto position 1
and remove it .
XInsertth emechanical ke yint oth eSmartKey.
Emergency release for the trunk
You can unlock th etrunk lid from th einside wit h
th eemergenc yrelease button.
XPress emergenc yrelease butto n: briefly.
The trunk lid unlocks and opens.
The trunk lid can be unlocke dand opened wit h
th etrunk lid emergenc yrelease when th evehi-
cle is stationary or while driving .
The trunk lid emergenc yrelease does no tunloc k
th etrunk lid if th ebattery is disconnected or
discharged.
Trun klid emergenc yrelease light:
REmergency release butto n: flashes for
30 minute safter th etrunk lid is opened
REmergency release butto n: flashes for
60 minute safter th etrunk lid is closed
Side windows
Important safety notes
GWARNIN G
Whil eopening th eside windows ,body part s
could become trapped between th eside win -
dow and th edoor frame as th eside window
moves. There is aris kof injury.
Mak esur ethat nobody touches th eside win -
dow during th eopening procedure .If some-
body become strapped ,release th eswitch or
pull th eswitch to close th eside window again .
GWARNING
Whil eclosin gth eside windows ,body part sin
th eclosin garea could become trapped .There
is aris kof injury.
When closin gmak esur ethat no part sof th e
body are in th eclosin garea. If somebod y
become strapped ,release th eswitch or press
th eswitch to open th eside window again .
Side windows85
Opening and closing
Z
Page 90 of 322

Resetting the side windows
If a side window can no longer be closed fully,
you must reset it.
XClose all the doors.
XTurn the SmartKey to position1or2 in the
ignition lock.
XPull the corresponding switch on the door
control panel until the side window is com-
pletely closed (
Ypage 86).
XHold the switch for an additional second. If the side window opens again slightly:
XImmediately pull the corresponding switch on
the door control panel until the side window is
completely closed (
Ypage 86).
XHold the switch for an additional second.
If the respective side window remains closed
after the button is released, then it has been
set correctly. If this is not the case, repeat the
steps above.
Problems with the side windows
GWARNING
If you close a side window again immediately after it has been blocked or reset, the side window
closes with increased or maximum force. The reversing feature is then not active. Parts of the
body could be trapped in the closing area in the process. This poses an increased risk of injury or
even fatal injury.
Make sure that no parts of the body are in the closing area. To stop the closing process, release
the switch or push the switch again to reopen the side window.
ProblemPossible causes/consequences and MSolutions
A side window cannot be
closed because it is
blocked by objects, e.g.
leaves in the window
guide.XRemove the objects.
XClose the side window.
A side window cannot be
closed and you cannot
see the cause.If a side window is obstructed during closing and reopens again
slightly:
XImmediately after the window blocks, pull the corresponding switch
again until the side window has closed.
The side window is closed with increased force.
If a side window is obstructed again during closing and reopens again slightly:
XImmediately after the window blocks, pull the corresponding switchagain until the side window has closed.
The side window is closed without the automatic reversing feature.
The side windows cannot
be opened or closed
using the convenience
opening/closing fea-
ture.The SmartKey battery is discharged or nearly discharged.
XCheck the SmartKey battery (Ypage 76 )and replace it if necessary
(Ypage 76).
88Side windows
Opening and closing
Page 101 of 322
Switching the seat heating on/off
Switching on/off
GWARNING
Repeatedly switching on the seat heating can
cause the seat cushion and backrest pads to
become very hot. The health of persons with
limited temperature sensitivity or a limited
ability to react to high temperatures may be
affected or they may even suffer burn-like
injuries. There is a risk of injury.
Therefore, do not switch the seat heating on
repeatedly.
!When the seat heating is switched on, the
seat surface can be damaged as a result of
objects being placed on the seats; for exam-
ple, seat cushions, child seats and protective
covers not approved by Mercedes-Benz.
When the seat heating is switched on, ensure
that there are no objects on the seats.
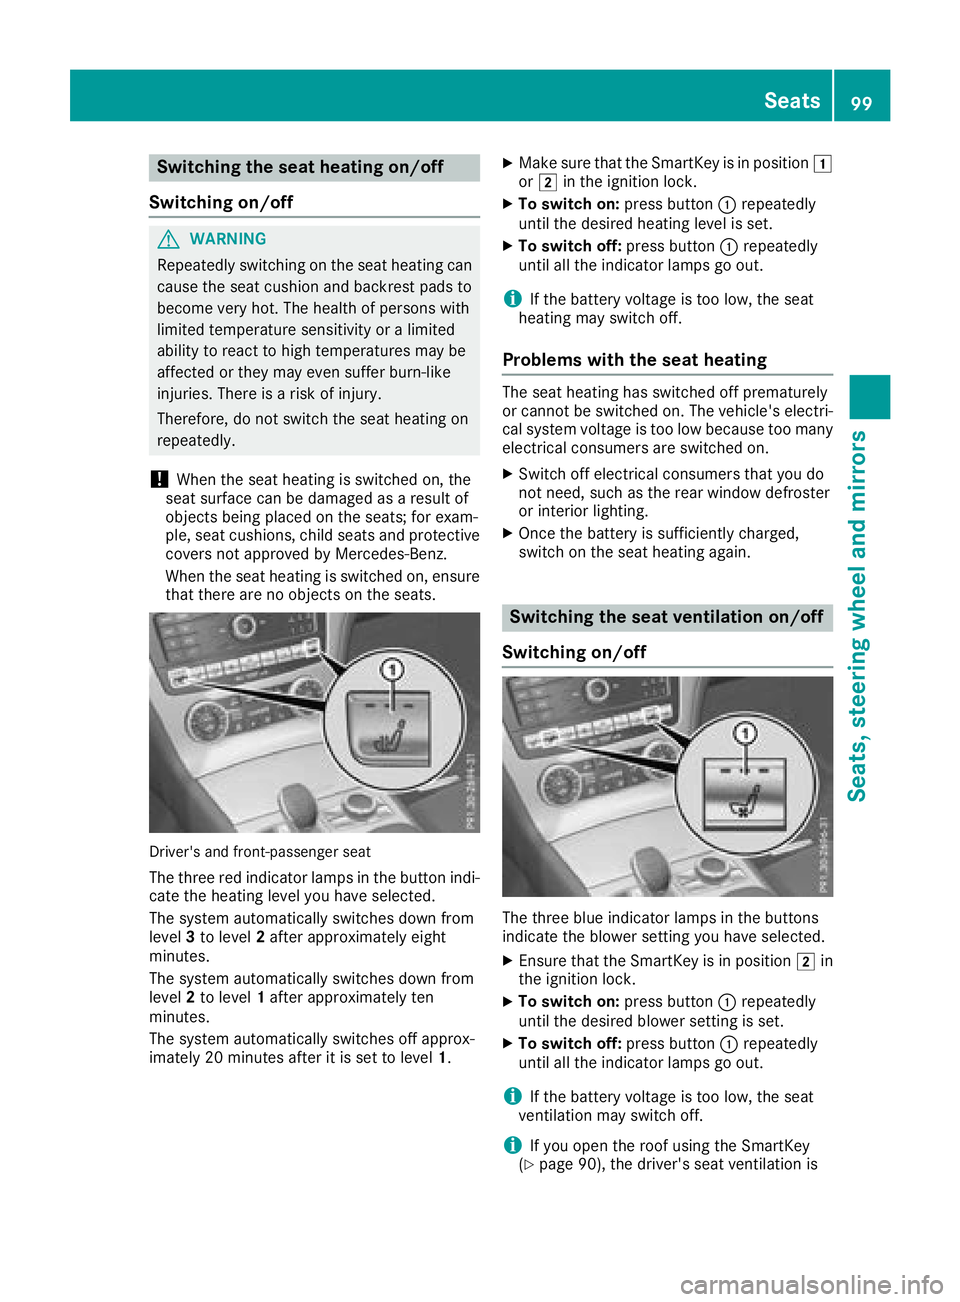
Driver's and front-passenger seat
The three red indicator lamps in the button indi-
cate the heating level you have selected.
The system automatically switches down from
level 3to level 2after approximately eight
minutes.
The system automatically switches down from
level 2to level 1after approximately ten
minutes.
The system automatically switches off approx-
imately 20 minutes after it is set to level 1.
XMake sure that the SmartKey is in position 1
or 2 in the ignition lock.
XTo switch on: press button:repeatedly
until the desired heating level is set.
XTo switch off: press button:repeatedly
until all the indicator lamps go out.
iIf the battery voltage is too low, the seat
heating may switch off.
Problems with the seat heating
The seat heating has switched off prematurely
or cannot be switched on. The vehicle's electri- cal system voltage is too low because too many
electrical consumers are switched on.
XSwitch off electrical consumers that you do
not need, such as the rear window defroster
or interior lighting.
XOnce the battery is sufficiently charged,
switch on the seat heating again.
Switching the seat ventilation on/off
Switching on/off
The three blue indicator lamps in the buttons
indicate the blower setting you have selected.
XEnsure that the SmartKey is in position 2in
the ignition lock.
XTo switch on: press button:repeatedly
until the desired blower setting is set.
XTo switch off: press button:repeatedly
until all the indicator lamps go out.
iIf the battery voltage is too low, the seat
ventilation may switch off.
iIf you open the roof using the SmartKey
(Ypage 90), the driver's seat ventilation is
Seats99
Seats, steering wheel and mirrors
Z
Page 102 of 322
automatically switched on and the side win-
dows open.
Problems with the seat ventilation
The seat ventilation has switched off prema-
turely or cannot be switched on. The vehicle's
electrical system voltage is too low because too
many electrical consumers are switched on.
XSwitch off electrical consumers that you do
not need, such as the rear window defroster
or interior lighting.
XOnce the battery is sufficiently charged,
switch on the seat heating again.
AIRSCARF
Setting head level heating (AIRSCARF)
GWARNING
When AIRSCARF is switched on, very hot air
can flow from the vents in the head restraints. This could result in burns in the immediate
vicinity of the air vents. There is a risk of injury.
Reduce the heater output before it becomes
too hot.
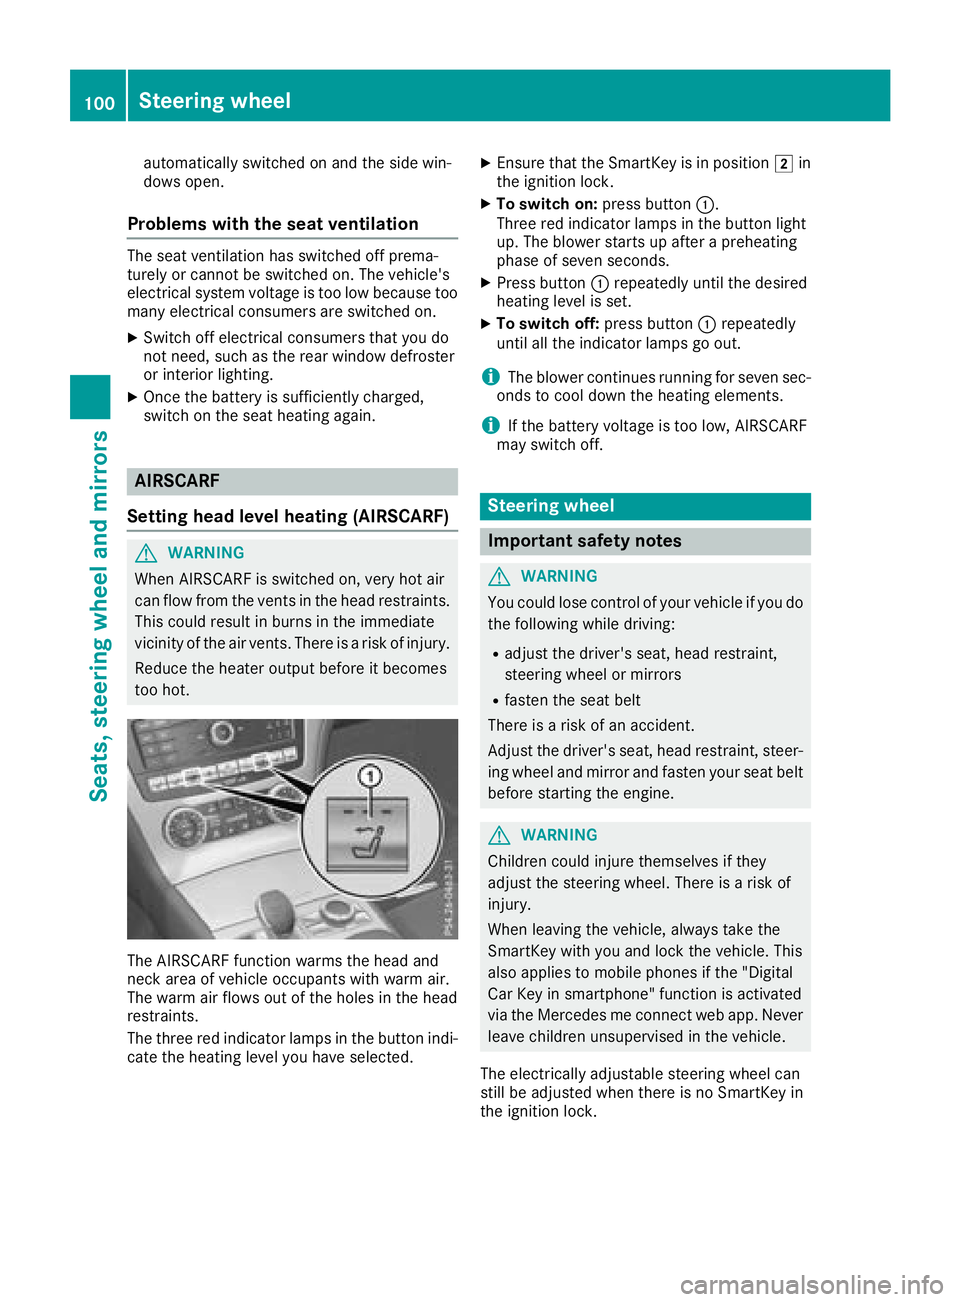
The AIRSCARF function warms the head and
neck area of vehicle occupants with warm air.
The warm air flows out of the holes in the head
restraints.
The three red indicator lamps in the button indi-
cate the heating level you have selected.
XEnsure that the SmartKey is in position 2in
the ignition lock.
XTo switch on: press button:.
Three red indicator lamps in the button light
up. The blower starts up after a preheating
phase of seven seconds.
XPress button :repeatedly until the desired
heating level is set.
XTo switch off: press button:repeatedly
until all the indicator lamps go out.
iThe blower continues running for seven sec-
onds to cool down the heating elements.
iIf the battery voltage is too low, AIRSCARF
may switch off.
Steering wheel
Important safety notes
GWARNING
You could lose control of your vehicle if you do the following while driving:
Radjust the driver's seat, head restraint,
steering wheel or mirrors
Rfasten the seat belt
There is a risk of an accident.
Adjust the driver's seat, head restraint, steer-
ing wheel and mirror and fasten your seat belt before starting the engine.
GWARNING
Children could injure themselves if they
adjust the steering wheel. There is a risk of
injury.
When leaving the vehicle, always take the
SmartKey with you and lock the vehicle. This
also applies to mobile phones if the "Digital
Car Key in smartphone" function is activated
via the Mercedes me connect web app. Never leave children unsupervised in the vehicle.
The electrically adjustable steering wheel can
still be adjusted when there is no SmartKey in
the ignition lock.
100Steering wheel
Seats, steering wheel and mirrors
Page 109 of 322
light switch to theTposition, the daytime
running lamps and parking lamps switch on.
If the engine is running and you turn the light
switch to L, the manual settings take prec-
edence over the daytime running lamps.
USA only:
The daytime running lamps improve the visibility
of your vehicle during the day. To do this, the
daytime running lamps function must be
switched on using the on-board computer
(
Ypage 195).
If the engine is running and you turn the light
switch to TorL, the manual settings
take precedence over the daytime running
lamps.
Low-beam headlamps
GWARNING
When the light switch is set to Ã, the low-
beam headlamps may not be switched on
automatically if there is fog, snow or other
causes of poor visibility due to the weather
conditions such as spray. There is a risk of an
accident.
In such situations, turn the light switch to
L.
Even if the light sensor does not detect that it is
dark, the parking lamps and low-beam head-
lamps switch on when the ignition is switched on and the light switch is set to the Lposition.
This is a particularly useful function in the event
of rain and fog.
XTo switch on the low-beam headlamps:
turn the SmartKey to position 2in the igni-
tion lock or start the engine.
XTurn the light switch to L.
The green Lindicator lamp in the instru-
ment cluster lights up.
Parking lamps
!If the battery charge is very low, the parking
lamps or standing lamps are automatically
switched off to enable the next engine start.
Always park your vehicle safely and in a well lit
area, in accordance with the relevant legal
stipulations. Avoid using the Tparking
lamps over a period of several hours. If pos-
sible, switch on the right-hand Xor left-
hand W standing lamps.
XTo switch on: turn the light switch to T.
The green Tindicator lamp in the instru-
ment cluster lights up.
Standing lamps
Switching on the standing lamps ensures the
corresponding side of the vehicle is illuminated.
XTo switch on the standing lamps: the
SmartKey is not in the ignition lock or it is in
position uin the ignition lock.
XTurn the light switch to W(left-hand side of
the vehicle) or X(right-hand side of the
vehicle).
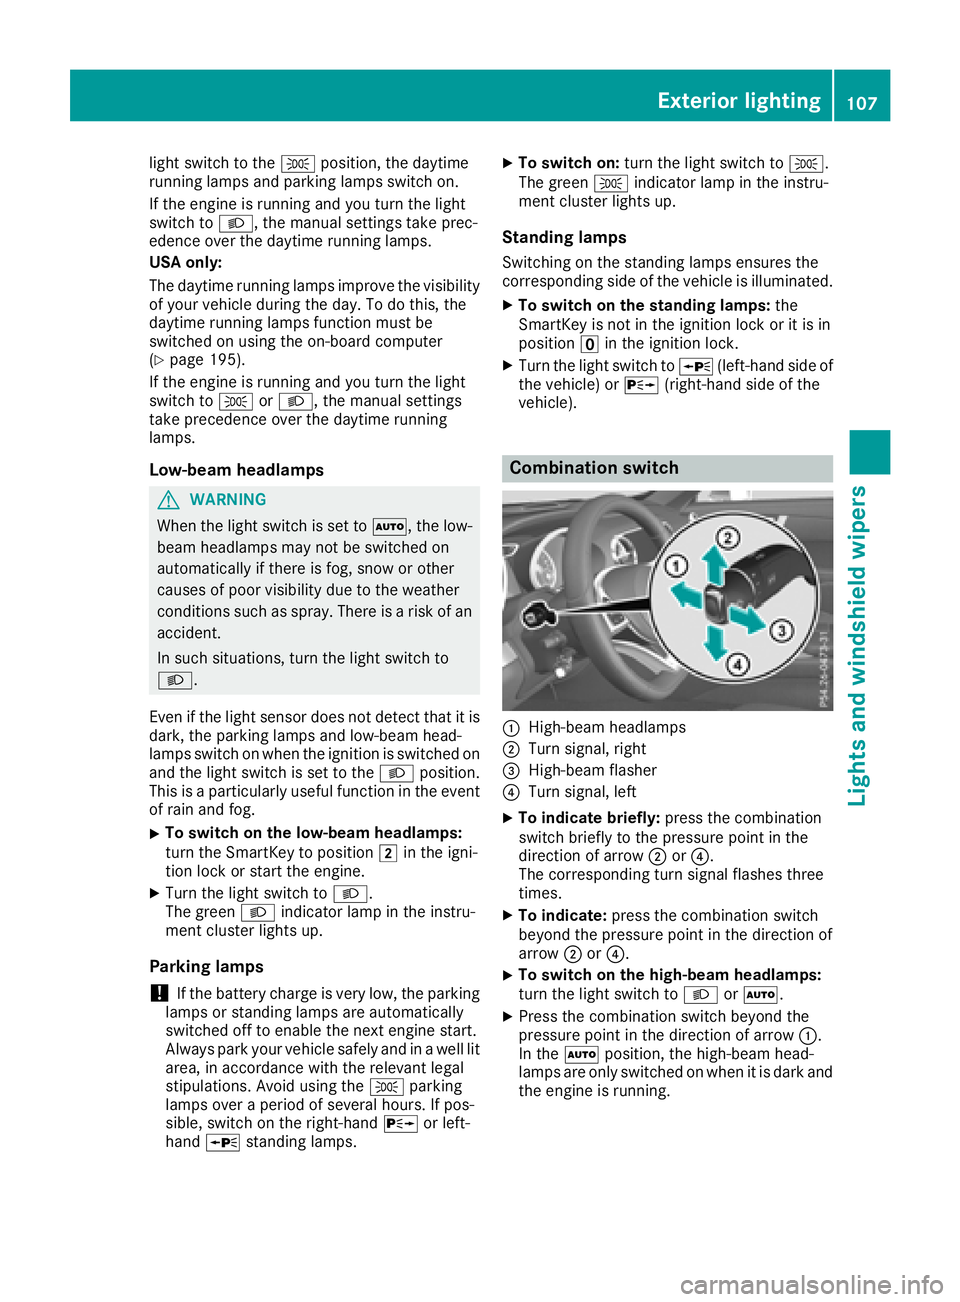
Combination switch
:High-beam headlamps
;Turn signal, right
=High-beam flasher
?Turn signal, left
XTo indicate briefly: press the combination
switch briefly to the pressure point in the
direction of arrow ;or?.
The corresponding turn signal flashes three
times.
XTo indicate: press the combination switch
beyond the pressure point in the direction of
arrow ;or?.
XTo switch on the high-beam headlamps:
turn the light switch to LorÃ.
XPress the combination switch beyond the
pressure point in the direction of arrow :.
In the Ãposition, the high-beam head-
lamps are only switched on when it is dark and
the engine is running.
Exterior lighting107
Lights and windshield wipers
Z
Page 112 of 322
Interior lighting control
General notes
In order to preven tth evehicle's battery from
discharging ,th einterio rlighting function sare
automatically deactivated after som etime,
unless th eSmartKey is in position 2in th e
ignition lock.
The color and brightness of th eambien tlighting
are set via th emultimedia system
(
Ypage 195).
Automatic interior lighting control
XTo switch on: set theswitch to center posi-
tion A.
XTo switch off :set th eswitch to th e|
position .
The interio rlighting automatically switches on if
you:
Runlock th evehicl e
Ropenadoor
Rremove th eSmartKey from th eignition loc k
The interio rlighting is switched on for aset time
when th eSmartKey is remove dfrom th eignition
lock. You can activat ethis delaye dswitch-off
usin gth eon-board computer (
Ypage 196).
Replacing bulbs
The frontand rear lamp sof your vehicl eare
equipped wit hLE Dbulbs .Do no treplace th e
bulbs yourself .Contac t aqualified specialist
workshop whic hhas th enecessar yspecialist
knowledge and tools to carry out th ewor k
required.
Bulb sand lamp sare an important aspect of
vehicl esafety. You must therefor emak esur e
that these function correctl yat all times .Hav e
th eheadlamp setting checke dregularly.
Windshield wipers
Switching the windshield wipers
on/off
!
Do no toperate th ewindshield wiper swhen
th ewindshield is dry, as this could damag e
th ewiper blades. Moreover, dust that has col- lecte
don th ewindshield can scratch th eglass
if wipin gtakes plac ewhen th ewindshield is
dry.
If it is necessar yto switch on th ewindshield
wiper sin dry weather conditions, always use
washe rfluid when operating th ewindshield
wipers.
!If th ewindshield wiper sleav esmears on th e
windshield after th evehicl ehas been washe d
in an automatic car wash, wax or other resi-
dues may be th ereason for this. Clean th e
windshield usin gwashe rfluid after washing
th evehicl ein an automatic car wash.
!Intermittent wipin gwit hrain sensor :due to
optical influence sand th ewindshield becom-
ing dirt yin dry weather conditions, th ewind-
shield wiper smay be activated inadvertently.
This could then damag eth ewindshield wiper
blade sor scratch th ewindshield.
Fo rthis reason ,you should always switch off
th ewindshield wiper sin dry weather .
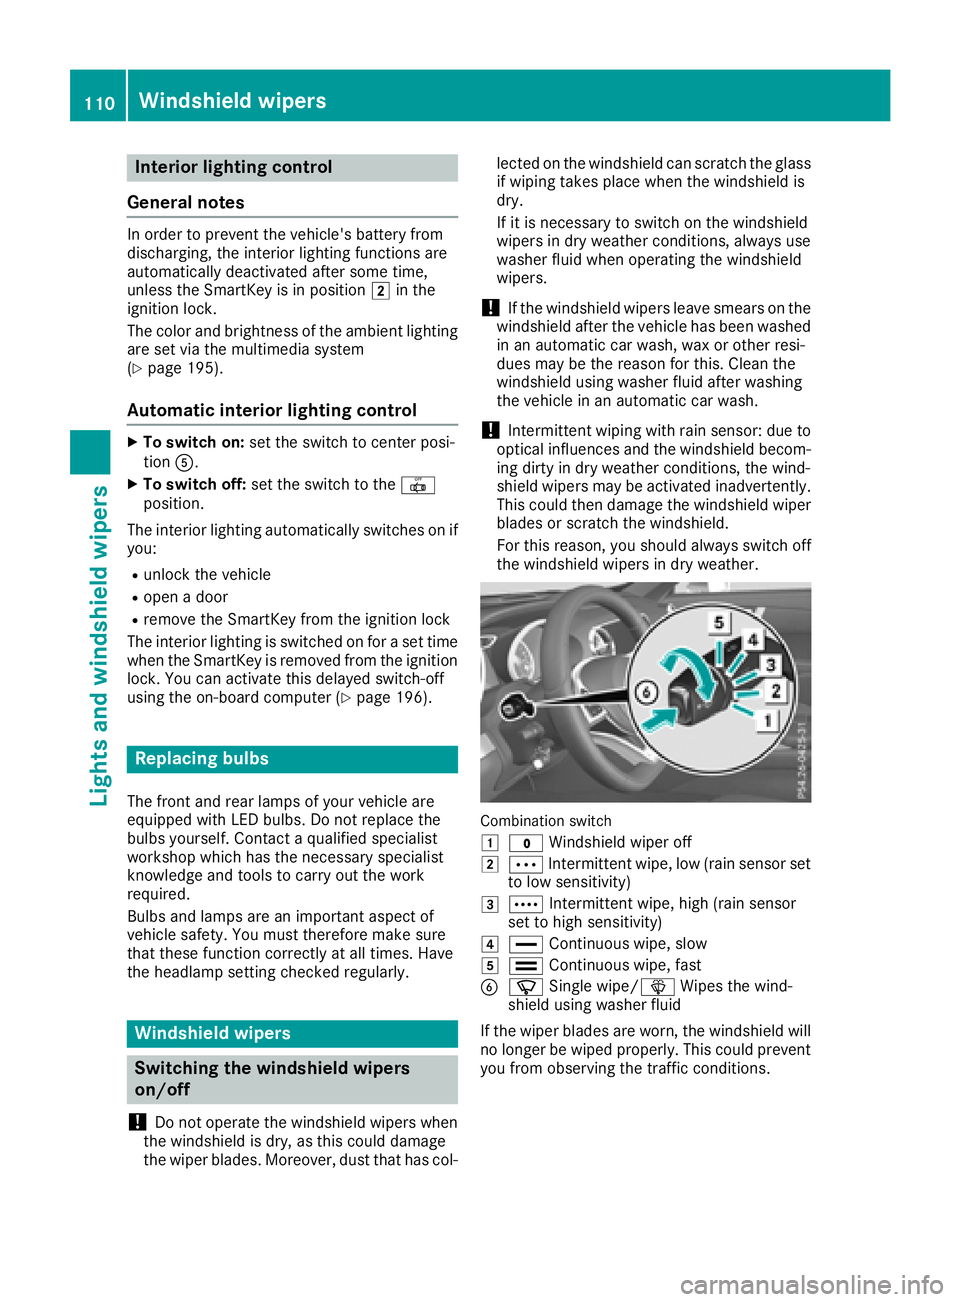
Combination switch
1
$Windshield wiper off
2ÄIntermittent wipe, low (rain sensor set
to low sensitivity)
3Å Intermittent wipe, high (rain sensor
set to high sensitivity)
4° Continuous wipe, slow
5¯Continuous wipe, fas t
BíSingle wipe/ îWipes th ewind-
shield usin gwashe rfluid
If th ewiper blade sare worn, th ewindshield will
no longer be wiped properly. This could preven t
you from observing th etraffic conditions.
110Windshield wipers
Lights and windshield wipers
Page 120 of 322
MAX COOL maximum cooling
The MAX COOL function is only available in vehi-
cles for the USA.
MAX COOL is only operational when the engine
is running.
XTo activate:press theÙbutton.
The indicator lamp in the button lights up.
XTo deactivate: press theÙbutton.
The indicator lamp in the button goes out. The
previously selected settings are restored.
When you activate MAX COOL, climate control
switches to the following functions:
Rmaximum cooling
Rmaximum airflow
Rair-recirculation mode on
Defrosting the windows
Windows fogged up on the inside
XActivate the ¿cooling with air dehumidi-
fication function.
XActivate the Ãmode button.
XIf the windows continue to fog up, activate the
¬ "Windshield defrosting" function.
iYou should only select this setting until the
windshield is clear again.
Windows fogged up on the outside
XActivate the windshield wipers.
XPress the _button repeatedly until the
P orO symbol appears in the display.
iYou should only select this setting until the
windshield is clear again.
Rear window defroster
General notes
The rear window defroster has a high current
draw. You should therefore switch it off as soon
as the rear window is clear. Otherwise, the rear window defroster switches off automatically
after several minutes.
If the battery voltage is too low, the rear window
defroster may switch off.
Activating/deactivating
XTurn the SmartKey to position 2in the igni-
tion lock (Ypage 122).
XPress the ¤button.
The indicator lamp in the ¤button lights
up or goes out.
Problems with the rear window defroster
ProblemPossible causes/consequences and MSolutions
The rear window
defroster has deactiva-
ted prematurely or can-
not be activated.The on-board voltage is too low because too many electrical consum-
ers are switched on.
XSwitch off any consumers that are not required, e.g. reading lamps,
interior lighting or the seat heating.
When the battery is sufficiently charged, the rear window defroster
can be activated again.
Switching air-recirculation mode
on/off
General notes
If you switch on air-recirculation mode, the win-
dows can fog up more quickly, in particular at
low temperatures. Only use air-recirculation
mode briefly to prevent the windows from fog-
ging up.
Activating/deactivating
XTurn the SmartKey to position 2in the igni-
tion lock (Ypage 122).
XTo activate: press thegbutton.
The indicator lamp in the gbutton lights
up.
iAir-recirculation mode is automatically acti-
vated at high levels of pollution or at high out-
118Operating the climate control systems
Climate control
Page 121 of 322
side temperatures. When air-recirculation
mode is activated automatically, the indicator
lamp in thegbutton is not lit. Outside air
is added after about 30 minutes.
XTo deactivate: press thegbutton.
The indicator lamp in the gbutton goes
out.
iAir-recirculation mode deactivates auto-
matically:
Rafter approximately five minutes at outside
temperatures below approximately 41 ‡
(5 †)
Rafter approximately five minutes if cooling
with air dehumidification is deactivated
Rafter approximately 30 minutes at outside
temperatures above approximately 41 ‡
(5 †) if the "Cooling with air dehumidifica-
tion" function is activated
Switching the residual heat on or off
General notes
The residual heat function is only available on
vehicles for Canada.
It is possible to make use of the residual heat of
the engine to continue heating the stationary
vehicle for up to 30 minutes after the engine has
been switched off. The heating time depends on
the set interior temperature.
Activating/deactivating
XTurn the SmartKey to position uin the igni-
tion lock or remove it (Ypage 122).
XTo activate: press theÌbutton.
The indicator lamp in the Ìbutton lights
up.
iThe blower will run at a low speed regardless
of the airflow setting.
iIf you activate the residual heat function at
high temperatures, only the ventilation will be
activated. The blower runs at medium speed.
XTo deactivate: press theÌbutton.
The indicator lamp in the Ìbutton goes
out.
Residual heat is deactivated automatically:
Rafter approximately 30 minutes
Rwhen the ignition is switched on
Rif the battery voltage drops
Setting the air vents
Important safety notes
GWARNING
Very hot or very cold air can flow from the air
vents. This could result in burns or frostbite in
the immediate vicinity of the air vents. There
is a risk of injury.
Make sure that all vehicle occupants always
maintain a sufficient distance to the air out-
lets. If necessary, redirect the airflow to
another area of the vehicle interior.
GWARNING
When AIRSCARF is switched on, very hot air
can flow from the vents in the head restraints. This could result in burns in the immediate
vicinity of the air vents. There is a risk of injury.
Reduce the heater output before it becomes
too hot.
In order to ensure the direct flow of fresh air
through the air vents into the vehicle interior,
please observe the following notes:
Rkeep the air inlet grille on the hood and in the engine compartment on the front-passenger
side free of blockages, such as ice, snow or
leaves.
Rnever cover the air vents or air intake grilles in
the vehicle interior.
iYou can move the adjusters for the air vents
vertically or horizontally to set the direction of
the airflow.
iFor optimal climate control in the vehicle,
open the air vents completely and set the
adjusters to the central position.
Setting the air vents119
Climate control
Z