dashboard MERCEDES-BENZ SL ROADSTER 2018 Owner's Manual
[x] Cancel search | Manufacturer: MERCEDES-BENZ, Model Year: 2018, Model line: SL ROADSTER, Model: MERCEDES-BENZ SL ROADSTER 2018Pages: 322, PDF Size: 5.43 MB
Page 13 of 322
F
FavoritesOverview ........................................ 238
Filler cap
see Refueling
Filling capacities (Technical data) ...3 12
First-aid kit ......................................... 269
Flat tire
MOExtended tires .......................... 271
Preparing the vehicle ..................... 271
TIREFIT kit ...................................... 272
Floormats ...........................................2 56
Frequencies
Mobile phone ................................. 310
Two-way radio ................................ 310
Front-passenger seat
Adjusting from the driver's seat ....... 97
Fuel
Additives ........................................ 314
Consumption statistics .................. 188
Displaying the current consump-
tion ................................................ 188
Displaying the range ......................1 88
Driving tips ....................................1 44
Fuel gauge ....................................... 33
Grade (gasoline) ............................ 313
Important safety notes .................. 313
Problem (malfunction) ................... 141
Refueling ........................................ 140
Tank content/reserve fuel ............. 313
Fuel filler flap
Opening ......................................... 140
Fuel level
Calling up the range (on-board
computer) ...................................... 188
Fuel tank
Capacity ........................................ 313
Problem (malfunction) ................... 141
Fuse allocation chart (vehicle tool
kit) ...................................................... 270
Fuses
Allocation chart .............................2 82
Before changing .............................2 83
Dashboard fuse box ....................... 283
Fuse box in the engine compart-
ment .............................................. 283
Fuse box in the rear compartment .. 284 Important safety notes .................. 282G
Garage door opener
Clearing the memory ..................... 255
General notes ................................ 252
Important safety notes .................. 253
Opening/closing the garage door .. 255
Problems when programming ........2 54
Programming (button in the rear-
view mirror) ................................... 253
Synchronizing the rolling code ....... 253
Gear indicator (on-board com-
puter, Mercedes-AMG vehicles) ....... 197
Genuine parts ...................................... 24
Glove box ...........................................2 42
Google™ Local Search
see also Digital Operator's Man-
ual ..................................................2 36
H
HANDS-FREE ACCESS.......................... 82
Hazard warning lamps
Display message ............................ 225
Switching on/off ........................... 108
Head bags
Display message ............................ 209
Operation ......................................... 47
Head level heating (AIRSCARF) ........100
Head restraints
Adjusting ......................................... 98
see NECK-PRO head restraints
Headlamps
see Automatic headlamp mode
Heating
see Climate control
High beam flasher .............................1 07
High-beam headlamps
Display message ............................ 212
Switching on/off ........................... 107
Hill start assist .................................. 125
HOLD function
Activating ....................................... 160
Activation conditions ..................... 160
Deactivating ................................... 160
Display message ............................ 217
Index11
Page 51 of 322
GWARNING
If the PASSENGER AIR BAG OFF indicator
lamp is lit, the front-passenger front air bag is
disabled. It will not be deployed in the event of
an accident and cannot perform its intended
protective function. A person in the front-
passenger seat could then, for example, come
into contact with the vehicle's interior, espe-
cially if the person is sitting too close to the
dashboard. This poses an increased risk of
injury or even fatal injury.
When the front-passenger seat is occupied,
always ensure that:
Rthe classification of the person in the front- passenger seat is correct and the front-
passenger front air bag is enabled or disa-
bled in accordance with the person in the
front-passenger seat
Rthe front-passenger seat has been moved
back as far back as possible.
Rthe person is seated correctly.
Make sure, both before and during the jour-
ney, that the status of the front-passenger
front air bag is correct.
GWARNING
If you secure a child in a rearward-facing child
restraint system on the front-passenger seat
and the PASSENGER AIR BAG OFF indicator
lamp is off, the front-passenger front air bag
can deploy in the event of an accident. The
child could be struck by the air bag. This poses an increased risk of injury or even fatal injury.
Make sure that the front-passenger front air
bag has been deactivated. The PASSENGER
AIR BAG OFF indicator lamp must be lit.
NEVER use a rearward-facing child restraint
on a seat protected by an ACTIVE FRONT AIR-
BAG in front of it; DEATH or SERIOUS INJURY
to the child can occur.
If the PASSENGER AIR BAG OFF indicator lamp
stays off, do not install a rearward-facing child
restraint system on the front-passenger seat.
You can find more information on OCS under
"Problems with the Occupant Classification Sys-
tem" (
Ypage 51).
GWARNING
If you secure a child in a forward-facing child
restraint system on the front-passenger seat
and you position the front-passenger seat too close to the dashboard, in the event of an
accident, the child could:
Rcome into contact with the vehicle's inte-
rior if the PASSENGER AIR BAG OFF indi-
cator lamp is lit, for example
Rbe struck by the air bag if the PASSENGER
AIR BAG OFF indicator lamp is off
This poses an increased risk of injury or even fatal injury.
Always move the front-passenger seat as far
back as possible and fully retract the seat
cushion length. Always make sure that the
shoulder belt strap is correctly routed from
the vehicle seat belt guide to the shoulder belt
guide on the child restraint system. The shoul-
der belt strap must be routed forwards and
downwards from the seat belt guide. Always
observe the child restraint system manufac-
turer's installation instructions.
If OCS determines that:
RThe front-passenger seat is unoccupied, the
PASSENGER AIR BAG OFF indicator lamp
lights up after the system self-test and
remains lit. This indicates that the front-
passenger front air bag is deactivated.
RThe front-passenger seat is occupied by a
child of up to twelve months old, in a standard
child restraint system, the PASSENGER AIR
BAG OFF indicator lamp lights up after the
system self-test and remains lit. This indi-
cates that the front-passenger front air bag is
deactivated.
But even in the case of a twelve-month-old
child, in a standard child restraint system, the
PASSENGER AIR BAG OFF indicator lamp can
go out after the system self-test. This indi-
cates that the front-passenger front air bag is
activated. The result of the classification is
dependent on, among other factors, the child
restraint system and the child's stature. Make
sure that the conditions for a correct classi-
fication are met. If the PASSENGER AIR BAG
OFF indicator lamp remai ns off, do not i
nstall
Occupant safety49
Safety
Z
Page 171 of 322
Warning displays
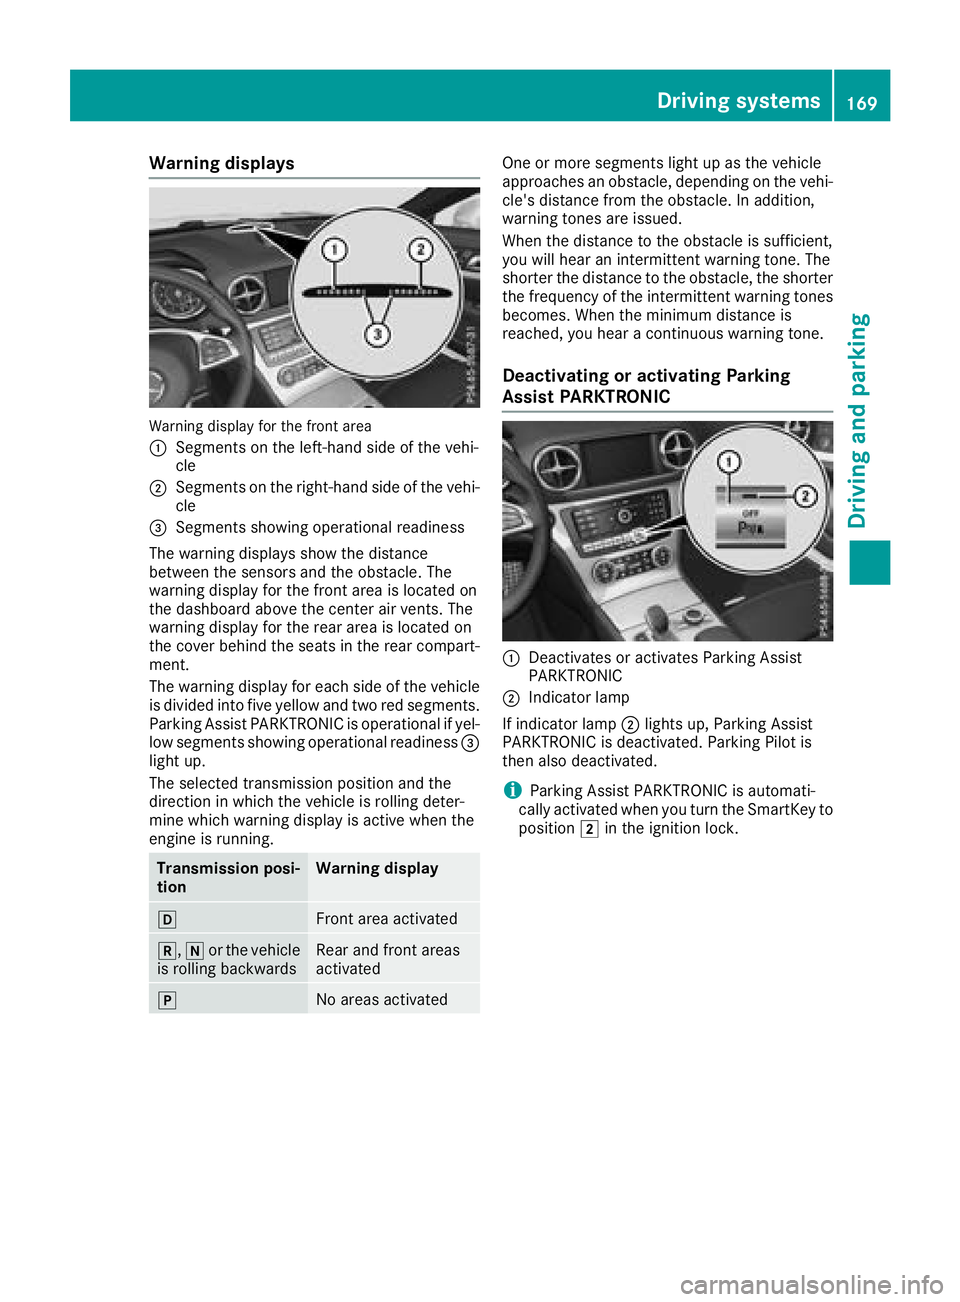
Warning display for the front area
:
Segments on the left-hand side of the vehi-
cle
;Segments on the right-hand side of the vehi-cle
=Segments showing operational readiness
The warning displays show the distance
between the sensors and the obstacle. The
warning display for the front area is located on
the dashboard above the center air vents. The
warning display for the rear area is located on
the cover behind the seats in the rear compart-
ment.
The warning display for each side of the vehicle
is divided into five yellow and two red segments. Parking Assist PARKTRONIC is operational if yel-
low segments showing operational readiness =
light up.
The selected transmission position and the
direction in which the vehicle is rolling deter-
mine which warning display is active when the
engine is running.
Transmission posi-
tionWarning display
hFront area activated
k, ior the vehicle
is rolling backwardsRear and front areas
activated
jNo areas activated
One or more segments light up as the vehicle
approaches an obstacle, depending on the vehi-
cle's distance from the obstacle. In addition,
warning tones are issued.
When the distance to the obstacle is sufficient,
you will hear an intermittent warning tone. The
shorter the distance to the obstacle, the shorter
the frequency of the intermittent warning tones
becomes. When the minimum distance is
reached, you hear a continuous warning tone.
Deactivating or activating Parking
Assist PARKTRONIC
:Deactivates or activates Parking Assist
PARKTRONIC
;Indicator lamp
If indicator lamp ;lights up, Parking Assist
PARKTRONIC is deactivated. Parking Pilot is
then also deactivated.
iParking Assist PARKTRONIC is automati-
cally activated when you turn the SmartKey to
position 2in the ignition lock.
Driving systems169
Driving and parking
Z
Page 285 of 322
The fuse allocation chart is located in the vehicle
tool kit in the stowage compartment under the
trunk floor (
Ypage 270).
If a newly inserted fuse also blows, have the
cause traced and rectified at a qualified special-
ist workshop, e.g. an authorized Mercedes-Benz Center.
!Only use fuses that have been approved for
Mercedes-Benz vehicles and which have the
correct fuse rating for the system concerned.
Otherwise, components or systems could be
damaged.
!Make sure that no moisture can enter the
fuse box when the cover is open.
!When closing the cover, make sure that it is
lying correctly on the fuse box. Moisture seep-
ing in or dirt could otherwise impair the oper-
ation of the fuses.
The fuses in your vehicle serve to close down
faulty circuits. If a fuse blows, all the compo-
nents on the circuit and their functions stop
operating.
Before changing a fuse
XSwitch off the engine.
XSwitch off all electrical consumers.
XMake sure that the ignition is switched off
(Ypage 122).
or
XWhen using the SmartKey, turn the SmartKey to position uin the ignition lock and remove
it (
Ypage 122).
XSecure the vehicle against rolling away
(Ypage 142).
All indicator lamps in the instrument cluster
must be off.
The fuses are located in various fuse boxes:
RFuse box in the engine compartment on the
right-hand side of the vehicle, when viewed in
the direction of travel
RDashboard fuse box
RFuse box in the rear compartment on the
right-hand side of the vehicle, when viewed in
the direction of travel
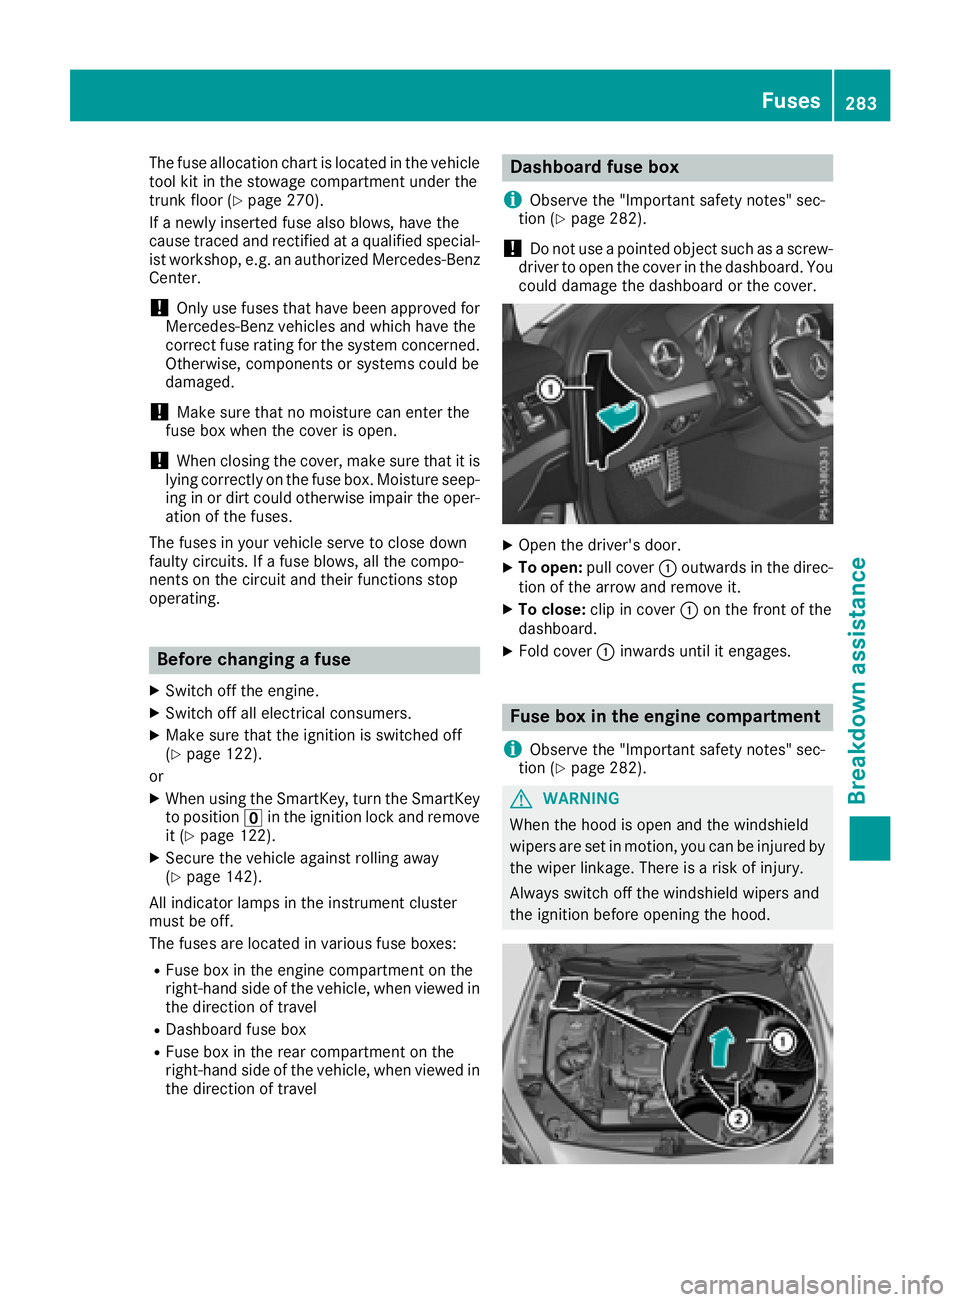
Dashboard fuse box
i
Observe the "Important safety notes" sec-
tion (Ypage 282).
!Do not use a pointed object such as a screw-
driver to open the cover in the dashboard. You
could damage the dashboard or the cover.
XOpen the driver's door.
XTo open: pull cover :outwards in the direc-
tion of the arrow and remove it.
XTo close: clip in cover :on the front of the
dashboard.
XFold cover :inwards until it engages.
Fuse box in the engine compartment
i
Observe the "Important safety notes" sec-
tion (Ypage 282).
GWARNING
When the hood is open and the windshield
wipers are set in motion, you can be injured by
the wiper linkage. There is a risk of injury.
Always switch off the windshield wipers and
the ignition before opening the hood.
Fuses283
Breakdown assistance
Z