parking brake MERCEDES-BENZ SL600 2000 R129 Owner's Manual
[x] Cancel search | Manufacturer: MERCEDES-BENZ, Model Year: 2000, Model line: SL600, Model: MERCEDES-BENZ SL600 2000 R129Pages: 297, PDF Size: 8.33 MB
Page 6 of 297

3 ContentsStorage compartment
(eyeglasses compartment)
in the dashboard ....................... 124
Interior central
locking system ............................ 125
Integration with vehicle
central locking system .............. 126
Separate locking of storage
compartments ............................. 126
Armrest ........................................... 127
Console storage
compartments ............................ 127
Cup holder ...................................... 128
Parcel net in
passenger footwell .................... 128
Door pockets ................................... 129
Rear storage compartment ........... 129
Ashtray with lighter ...................... 130
Lighter ............................................. 131
Telephone, general ........................ 132
Garage door opener ....................... 133
Hardtop or panorama roof ............ 137
Removing hardtop ...................... 137
Attaching hardtop ...................... 140Soft top ............................................ 143
Lowering soft top ....................... 144
Raising soft top .......................... 145
Wind screen ................................... 148
Antenna ...........................................151
DrivingControl and operation of radio
transmitters ................................153
Radio, telephone and
two-way radio ..............................153
Telep ho n es an d
two-way radio ..............................153
The first 1 000 miles
(1 500 km) ..................................154
Maintenance ...................................154
Tele Aid ............................................155
Catalytic converter .........................163
Emission control .............................164
Steering lock ...................................165
Starting and turning off
the engine ...................................167
Before starting .............................167
Starting .........................................167Turning off .................................. 167
Automatic transmission ............... 168
Driving ......................................... 168
Accelerator Position ................... 169
Selector lever positions ............. 169
Maneuvering ............................... 172
Stopping ....................................... 172
Program mode
selector switch ............................ 173
Emergency Operation ................ 174
Parking brake ................................. 175
Driving instructions ...................... 176
Drive sensibly - Save fuel .......... 176
Drinking and driving ................. 176
Pedals ........................................... 176
Power assistance ........................ 177
Brakes .......................................... 177
Driving off ................................... 178
Parking ........................................ 178
Tires ............................................. 179
Aquaplaning ............................... 180
Tire traction ................................ 180
Tire speed rating ........................ 181
Snow chains ................................ 181
Page 26 of 297
23 Instruments and controls
Technical
data Instruments
and controlsOperation DrivingInstrument
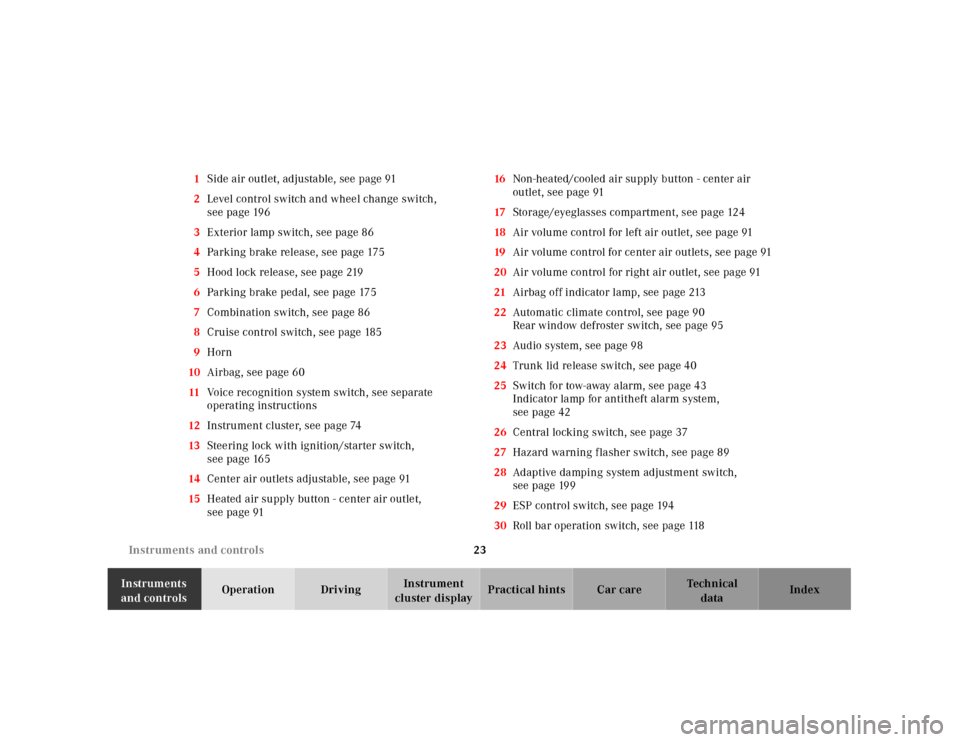
cluster displayPractical hints Car care Index 1Side air outlet, adjustable, see page 91
2Level control switch and wheel change switch,
see page 196
3Exterior lamp switch, see page 86
4Parking brake release, see page 175
5Hood lock release, see page 219
6Parking brake pedal, see page 175
7Combination switch, see page 86
8Cruise control switch, see page 185
9Horn
10Airbag, see page 60
11Voice recognition system switch, see separate
operating instructions
12Instrument cluster, see page 74
13Steering lock with ignition/starter switch,
see page 165
14Center air outlets adjustable, see page 91
15Heated air supply button - center air outlet,
see page 9116Non-heated/cooled air supply button - center air
outlet, see page 91
17Storage/eyeglasses compartment, see page 124
18Air volume control for left air outlet, see page 91
19Air volume control for center air outlets, see page 91
20Air volume control for right air outlet, see page 91
21Airbag off indicator lamp, see page 213
22Automatic climate control, see page 90
Rear window defroster switch, see page 95
23Audio system, see page 98
24Trunk lid release switch, see page 40
25Switch for tow-away alarm, see page 43
Indicator lamp for antitheft alarm system,
see page 42
26Central locking switch, see page 37
27Hazard warning f lasher switch, see page 89
28Adaptive damping system adjustment switch,
see page 199
29ESP control switch, see page 194
30Roll bar operation switch, see page 118
Page 80 of 297
76 Instrument cluster
Technical
data Instruments
and controlsOperationDrivingInstrument
cluster displayPractical hints Car care Index
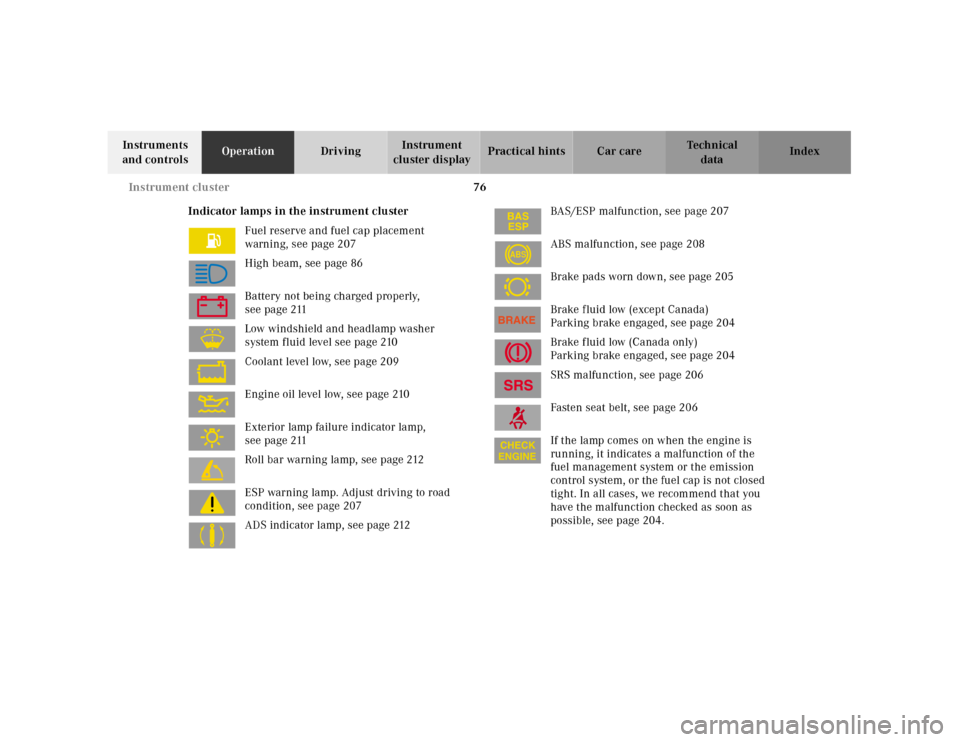
Indicator lamps in the instrument cluster
Fuel reserve and fuel cap placement
warning, see page 207
High beam, see page 86
Battery not being charged properly,
see page 211
Low windshield and headlamp washer
system fluid level see page 210
Coolant level low, see page 209
Engine oil level low, see page 210
Exterior lamp failure indicator lamp,
see page 211
Roll bar warning lamp, see page 212
ESP warning lamp. Adjust driving to road
condition, see page 207
ADS indicator lamp, see page 212BAS/ESP malfunction, see page 207
ABS malfunction, see page 208
Brake pads worn down, see page 205
Brake fluid low (except Canada)
Parking brake engaged, see page 204
Brake fluid low (Canada only)
Parking brake engaged, see page 204
SRS malfunction, see page 206
Fasten seat belt, see page 206
If the lamp comes on when the engine is
running, it indicates a malfunction of the
fuel management system or the emission
control system, or the fuel cap is not closed
tight. In all cases, we recommend that you
have the malfunction checked as soon as
possible, see page 204.
ABS
Page 134 of 297
130 Interior equipment
Technical
data Instruments
and controlsOperationDrivingInstrument
cluster displayPractical hints Car care Index
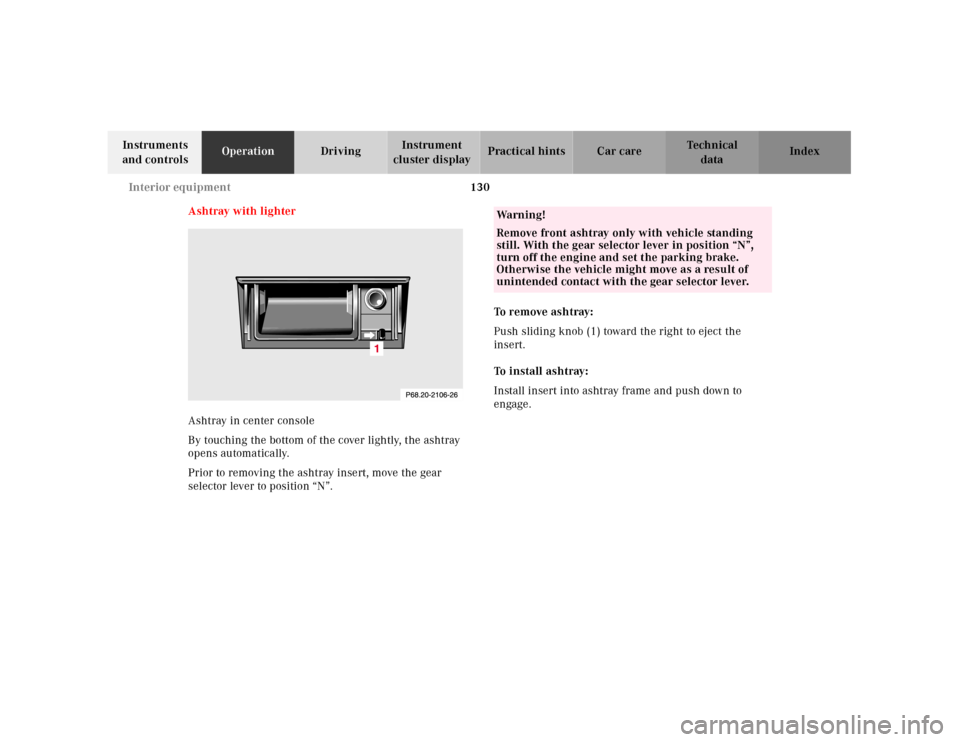
Ashtray with lighter
Ashtray in center console
By touching the bottom of the cover lightly, the ashtray
opens automatically.
Prior to removing the ashtray insert, move the gear
selector lever to position “N”.To remove ashtray:
Push sliding knob (1) toward the right to eject the
insert.
To install ashtray:
Install insert into ashtray frame and push down to
engage.
Wa r n i n g !
Remove front ashtray only with vehicle standing
still. With the gear selector lever in position “N”,
turn off the engine and set the parking brake.
Otherwise the vehicle might move as a result of
unintended contact with the gear selector lever.
Page 141 of 297
137 Hardtop
Technical
data Instruments
and controlsOperationDrivingInstrument
cluster displayPractical hints Car care Index Hardtop or
panorama roof (optional)
The removal or attachment of the hardtop can be carried
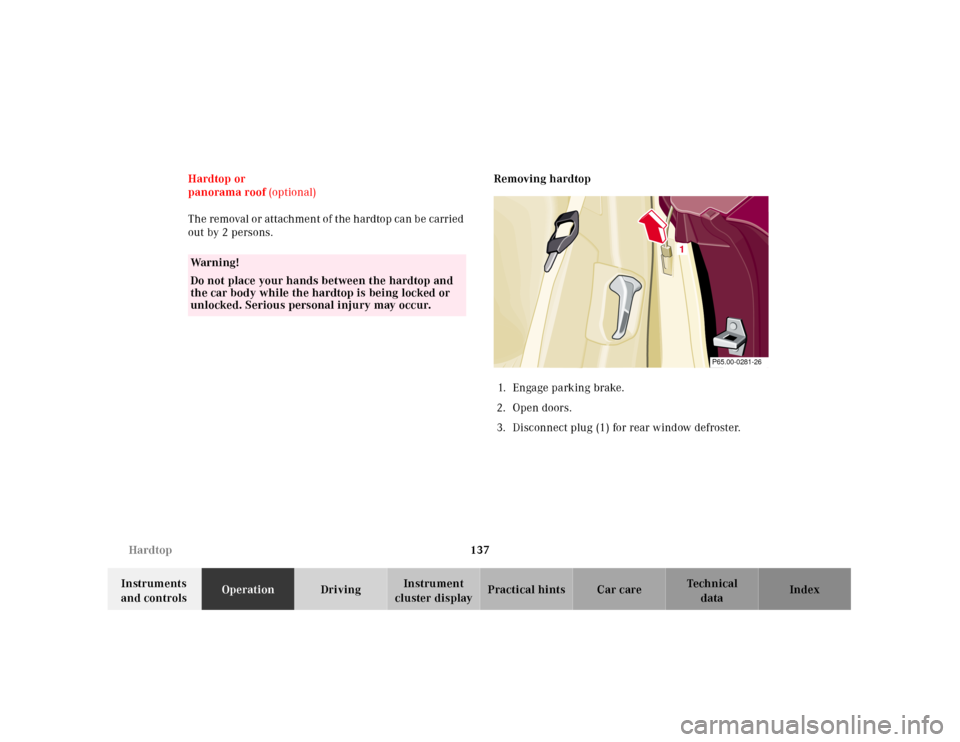
out by 2 persons.Removing hardtop
1. Engage parking brake.
2. Open doors.
3. Disconnect plug (1) for rear window defroster.
Wa r n i n g !
Do not place your hands between the hardtop and
the car body while the hardtop is being locked or
unlocked. Serious personal injury may occur.
1
P65.00-0281-26
Page 144 of 297
140 Hardtop
Technical
data Instruments
and controlsOperationDrivingInstrument
cluster displayPractical hints Car care Index
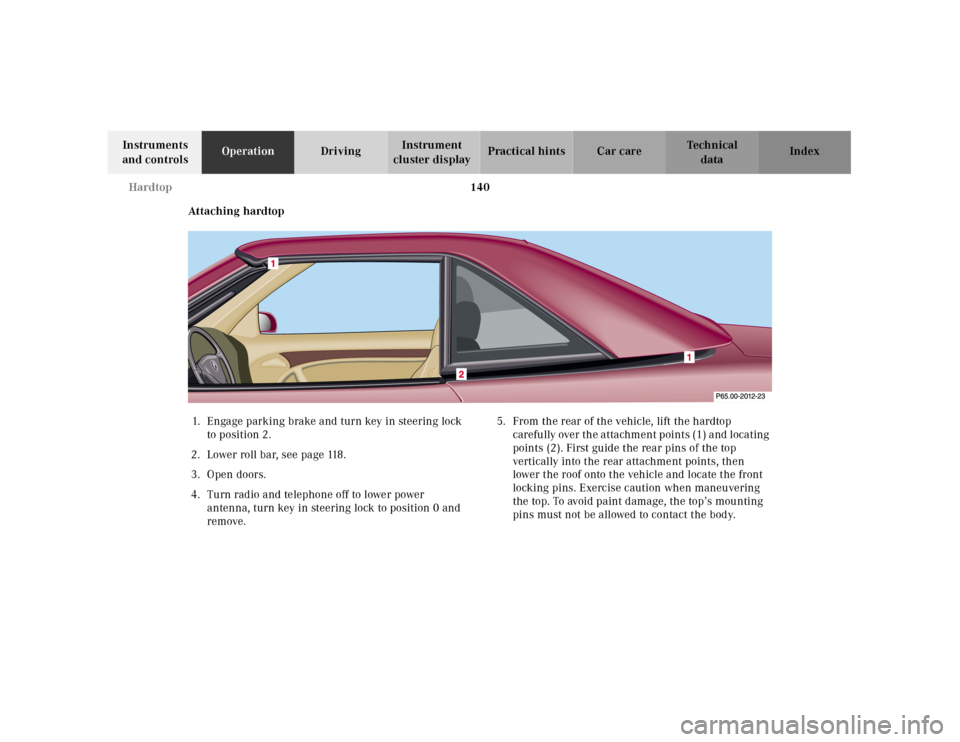
Attaching hardtop
1. Engage parking brake and turn key in steering lock
to position 2.
2. Lower roll bar, see page 118.
3. Open doors.
4. Turn radio and telephone off to lower power
antenna, turn key in steering lock to position 0 and
remove.5. From the rear of the vehicle, lift the hardtop
c a r e f u l ly ove r t h e a t ta ch m e n t p oi n t s ( 1 ) a nd l oc a t in g
points (2). First guide the rear pins of the top
vertically into the rear attachment points, then
lower the roof onto the vehicle and locate the front
locking pins. Exercise caution when maneuvering
the top. To avoid paint damage, the top’s mounting
pins must not be allowed to contact the body.
Page 149 of 297
145 Soft top
Technical
data Instruments
and controlsOperationDrivingInstrument
cluster displayPractical hints Car care Index Raising soft top1. Engage parking brake
2. Turn key in steering lock to position 2.
3. Fold down sun visors.
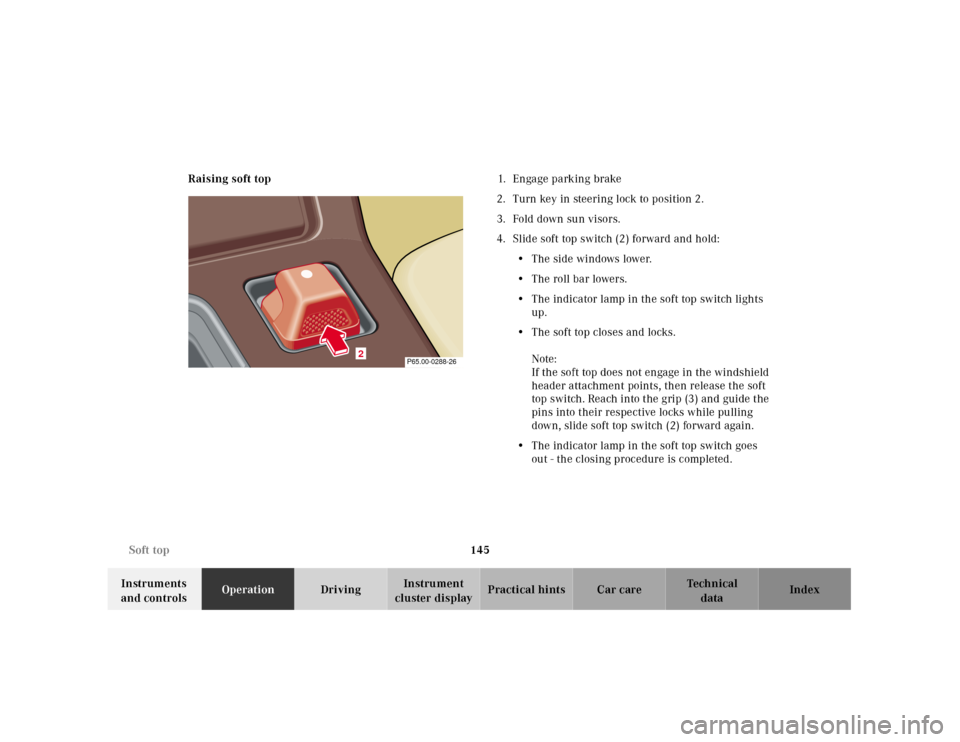
4. Slide soft top switch (2) forward and hold:
• The side windows lower.
•The roll bar lowers.
• The indicator lamp in the soft top switch lights
up.
• The soft top closes and locks.
Note:
If the soft top does not engage in the windshield
header attachment points, then release the soft
top switch. Reach into the grip (3) and guide the
pins into their respective locks while pulling
down, slide soft top switch (2) forward again.
• The indicator lamp in the soft top switch goes
out - the closing procedure is completed.
2
P65.00-0288-26
Page 156 of 297
152 Contents – Driving
Technical
data Instruments
and controlsOperationDrivingInstrument
cluster displayPractical hints Car care Index
DrivingControl and operation of radio
transmitters ............................... 153
Radio, telephone and
two-way radio .............................. 153
The first 1 000 miles
(1 500 km) ................................. 154
Maintenance ................................... 154
Tele Aid ........................................... 155
Catalytic converter ........................ 163
Emission control ............................ 164
Steering lock ................................... 165
Starting and turning off
the engine .................................. 167
Before starting ............................ 167
Starting ........................................ 167
Turning off .................................. 167
Automatic transmission ............... 168
Driving ......................................... 168
Accelerator Position ................... 169
Selector lever positions ............. 169
Maneuvering ............................... 172
Stopping ....................................... 172Program mode
selector switch ........................... 173
Emergency Operation ................174
Parking brake ................................ 175
Driving instructions ....................... 176
Drive sensibly - Save fuel .......... 176
Drinking and driving ................. 176
Pedals ........................................... 176
Power assistance ........................ 177
Brakes .......................................... 177
Driving off ................................... 178
Parking ........................................ 178
Tires ............................................. 179
Aquaplaning ................................180
Tire traction .................................180
Tire speed rating ........................181
Snow chains ................................ 181
Ve h i c l e s w i t h s p o r t
package ........................................181
Winter driving
instructions .................................182
Winter driving .............................183
Block heater .................................183
Deep water ...................................184Traveling abroad ........................ 184
Cruise control ................................. 185
Brake assist system (BAS) ............ 188
Antilock brake system (ABS) ....... 190
ABS control ................................. 191
Electronic Stability Program
(ESP) ........................................... 192
Synchronizing ESP .................... 193
ESP Control Switch .................... 194
Level control system ...................... 196
Level control switch
positions ...................................... 196
Normal Level ............................... 197
Wheel Change Switch ............... 198
Adaptive Damping System
(ADS) ........................................... 199
Adaptive damping system
adjustment .................................. 199
What you should know at the gas
station .........................................200
Fuel supply ..................................200
Fuel ...............................................200
Check regularly and before
a long trip ...................................202
Page 171 of 297

167 Starting and turning off the enging
Technical
data Instruments
and controlsOperationDrivingInstrument
cluster displayPractical hints Car care Index Starting and turning off the engine
Before starting
Ensure that parking brake is engaged and that selector
lever is in position “P” or “N”. Turn key in steering lock
to position 2.
Starting
Do not depress accelerator. Briefly turn key in steering
lock clockwise to the stop and release. The starter will
engage until the engine is running.
If engine will not run, and the starting procedure stops,
turn key completely to the left and repeat starting the
engine.
After several unsuccessful attempts, have the system
checked at the nearest authorized Mercedes-Benz
Center.Important!
Due to the installed starter nonrepeat feature, the key
must be turned completely to the left before attempting
to start the engine again.
In areas where temperatures frequently drop below
-4°F (-20°C) we recommend that an engine block heater
be insta lled . You r a ut horized Mercedes-Benz Center will
advise you on this subject.
Turning off
Turn th e key in th e steering lock to position 0 to stop the
engine.
Vehicles with automatic transmission:
The key can only be removed with your foot off the
brake pedal and the selector lever in position “P”.
Page 172 of 297
168 Automatic transmission
Technical
data Instruments
and controlsOperationDrivingInstrument
cluster displayPractical hints Car care Index
Automatic transmission
The automatic transmission selects individual gears
automatically, dependent upon
•Selector lever position
• Program mode selector
• Accelerator position
• Vehicle speed
The gear shifting process is continuously adapted,
dependent on the driving style, the driving situation
and the road characteristics.
Important!
When parking the car or before working on the vehicle
with the engine running, firmly engage the parking
brake and shift the selector lever into “P”.
Driving
The selector lever is automatically locked while in
position “P”. To move the selector lever out of position
“P”, the service brake pedal must be firmly depressed
before the shift lock will release.Shift selector lever to the desired position only when the
engine is idling normally and the service brake is
applied. Do not release the brake until ready to drive.
The vehicle may otherwise start creeping when the
selector lever is in drive or reverse position.
Important!
After selecting any driving position from “N” or “P”,
wait a moment to allow the gear to fully engage before
accelerating, especially when the engine is cold.
Wa r n i n g !
It is dangerous to shift the selector lever out of “P”
or “N” i f th e engine speed is h igher t han idle speed.
If your foot is not firmly on the brake pedal, the
vehicle could accelerate quickly forward or in
reverse. You could lose control of the vehicle and
hit someone or something. Only shift into gear
when the engine is idling normally and when your
right foot is firmly on the brake pedal.