MERCEDES-BENZ SL63AMG 2011 R230 Owner's Manual
Manufacturer: MERCEDES-BENZ, Model Year: 2011, Model line: SL63AMG, Model: MERCEDES-BENZ SL63AMG 2011 R230Pages: 316, PDF Size: 7.21 MB
Page 221 of 316
To clean Distronic system sensor cover :
and the bumper area near sensors ; observe
the following:
R Use a mild vehicle wash detergent, such as
Mercedes-Benz approved Car Shampoo,
with plenty of water.
R Use a soft, non-scratching cloth.
! If you use a power washer to clean the
sensor covers, observe the following:
R Follow the instructions provided by the
power washer manufacturer.
R Maintain a distance between the sensor
covers and the nozzle of the power
washer.
Cleaning the windows and the wiper
blades
! The windshield wipers must be in a
vertical position before folding them away
from the windshield. They could otherwise
damage the hood.
Never open the hood when the wiper arms
are folded forward.
XMake sure the hood is fully closed.XSwitch on the ignition.XTurn combination switch to wiper setting
II (Y page 95).XWith wiper arms in vertical position, switch
off the ignition.GWarning!
For safety reasons, switch off wipers and
remove SmartKey from starter switch before
cleaning the windshield and/or the wiper
blades. Vehicles with KEYLESS-GO: Make
sure the vehicle’s on-board electronics have
status 0. Otherwise, the wiper motor could
suddenly turn on and cause injury.
! Do not pull on the wiper blade inserts.
They could tear.
XFold the wiper arms forward until they snap
into place.XClean the windshield and the wiper blade
inserts with a clean cloth and mild
detergent solution.XUse a soft, clean cloth and a mild window
cleaning solution on all outside and inside
glass surfaces.
An automotive glass cleaner is
recommended.
! Fold the windshield wiper arms back onto
the windshield before turning the SmartKey
in the starter switch or pressing the
KEYLESS-GO start/stop button.
Hold on to the wiper when folding the wiper
arm back. If released, the force of the
impact from the tensioning spring could
crack the windshield.
! To clean the window interior, do not use
a dry cloth, abrasives, solvents or cleaners
containing solvents. Do not touch the
inside of the windows with hard objects
such as an ice scraper or ring. Doing so may
damage the windows.
Rear window cleaning
Clean the rear window with the hardtop fully
raised and closed.
GWarning!
Do not clean the rear window with the hardtop
in a position other than the fully raised and
closed position. Otherwise, the hardtop may
move unexpectedly which may result in
personal injury to you or others.
XUse a soft, clean cloth and a mild window
cleaning solution on all outside and inside
glass surfaces.
An automotive glass cleaner is
recommended.Vehicle care219Operation230_AKB; 6; 22, en-USd2ureepe,Version: 2.11.8.12009-07-28T18:49:58+02:00 - Seite 219Z
Page 222 of 316
Light alloy wheels
If possible, clean wheels once a week.
XUse Mercedes-Benz approved Wheel Care,
a soft bristle brush and a strong spray of
water for cleaning the light alloy wheels.
! Only use acid-free cleaning materials.
Acid may cause corrosion or damage the
clear coat.
! The vehicle should not be parked for an
extended period of time immediately after
it has been cleaned. This applies especially
after the wheel rims have been cleaned
with wheel rim cleaner. Wheel rim cleaners
can lead to increased corrosion of the
brake disks and brake pads. Non-approved
wheel cleaners may also damage the wheel
paint if the vehicle is not driven after
cleaning.
Therefore, the vehicle’s brake system
should always be warmed-up before it is
parked after cleaning. Drive your vehicle for
several minutes to allow the brakes to dry.
When applying Mercedes-Benz approved
Tire Care and Mercedes-Benz approved
Wheel Care products, take care not to
spray them on the brake disks.
Plastic and rubber parts
XUse a gentle dishwashing detergent or mild
detergent for delicate fabrics as a washing
solution.XWipe with a cloth moistened in a lukewarm
solution.
The surface may temporarily change color.
If this is the case, wait for it to dry.GWarning!
Do not use cleaners or cockpit care sprays
containing solvents to clean the cockpit or the
steering wheel. Cleaners containing solvents
will make the surface porous and vehicle
occupants could suffer serious injuries from
plastic parts coming loose in the event of air
bag deployment.
! Do not use oil, wax or scouring agents.
Otherwise you may scratch or damage the
surface.
Hard plastic trim items XUse Mercedes-Benz approved Interior Care
on a soft, lint-free cloth and apply with light
pressure.
COMAND display
! You must switch off the COMAND display
and allow it to cool prior to cleaning.
! Do not use any liquids or cleaning agents.
These can damage or even destroy the
COMAND display screen.
XUse a standard microfiber cloth and apply
with light pressure.
Steering wheel and gear selector lever
XWipe with a damp cloth and dry thoroughly
or clean with Mercedes-Benz approved
Leather Care.
Carpets
XUse Mercedes-Benz approved Carpet and
Fabric Care for cleaning the carpets.
Headliner
XUse a soft bristle brush or a dry-shampoo
cleaner in case of excessive dirt.
Seat belts
XOnly use clear, lukewarm water and soap.
! The seat belts must not be treated with
chemical cleaning agents. Do not dry the
seat belts at temperatures above 176‡
(80†) or in direct sunlight.
220Vehicle careOperation
230_AKB; 6; 22, en-USd2ureepe,Version: 2.11.8.12009-07-28T18:49:58+02:00 - Seite 220
Page 223 of 316
GWarning!
Do not bleach or dye seat belts as this may
severely weaken them. In a crash they may
not be able to provide adequate protection.
Upholstery
Using aftermarket seat covers or wearing
clothing that have the tendency to give off
coloring (e.g. when wet, etc.) may cause the
upholstery to become permanently
discolored. By lining the seats with a proper
intermediate cover, contact-discoloration will
be prevented.
Leather upholstery
Please note that leather upholstery is a
natural product and is therefore subject to a
natural aging process. Leather upholstery
may also react to certain ambient influences
such as high humidity or high temperature by
showing wrinkles for example.
XWipe leather upholstery with a damp cloth
and dry thoroughly or clean with Mercedes-
Benz approved Leather Care.
! To avoid damage to leather upholstery:
R Wipe with light pressure only.
R Do not clean with abrasive cleaning
agents such as scouring milk or powder.
R Do not soak the leather upholstery.
As leather is a natural product, it could
otherwise harden or become porous.
R Exercise particular care when cleaning
perforated leather as its underside
should not become wet.
Wood trims
XOnly use water and a damp cloth to clean
wood trims in your vehicle.
! Do not use solvents like tar remover or
wheel cleaner nor polishes or waxes as
these may be abrasive.
Chrome-plated exhaust tip
Regular cleaning and care of chrome-plated
exhaust tips will help to maintain their shine
and the classy appearance.
XUse Mercedes-Benz approved Chrome
Polishing Paste each time the vehicle has
been washed, especially during the winter.
! Do not use alkaline cleaners such as
wheel cleaners as they could cause
corrosion.
Vehicle care221Operation230_AKB; 6; 22, en-USd2ureepe,Version: 2.11.8.12009-07-28T18:49:58+02:00 - Seite 221Z
Page 224 of 316

222230_AKB; 6; 22, en-USd2ureepe,Version: 2.11.8.12009-07-28T18:49:58+02:00 - Seite 222
Page 225 of 316
Vehicle equipment ............................224
Where will I find ...? ..........................224
Vehicle status messages in the
multifunction display .......................226
What to do if … ..................................254
Unlocking/locking manually ...........267
Replacing SmartKey batteries .........269
Replacing bulbs .................................271
Replacing wiper blades ....................275
Flat tire ..............................................276
Battery ...............................................283
Jump starting ....................................285
Towing the vehicle ............................287
Fuses ..................................................291
223Practical hints230_AKB; 6; 22, en-USd2ureepe,Version: 2.11.8.12009-07-28T18:49:58+02:00 - Seite 223
Page 226 of 316
Vehicle equipment
iThis Operator’s Manual describes all
features, standard or optional, potentially
available for your vehicle at the time of
purchase. Please be aware that your
vehicle might not be equipped with all
features described in this manual.
Where will I find ...?
First aid kit
! Always keep the storage compartment
under the passenger seat closed while the
vehicle is in motion.
iCheck expiration dates and contents for
completeness at least once a year and
replace missing/expired items.
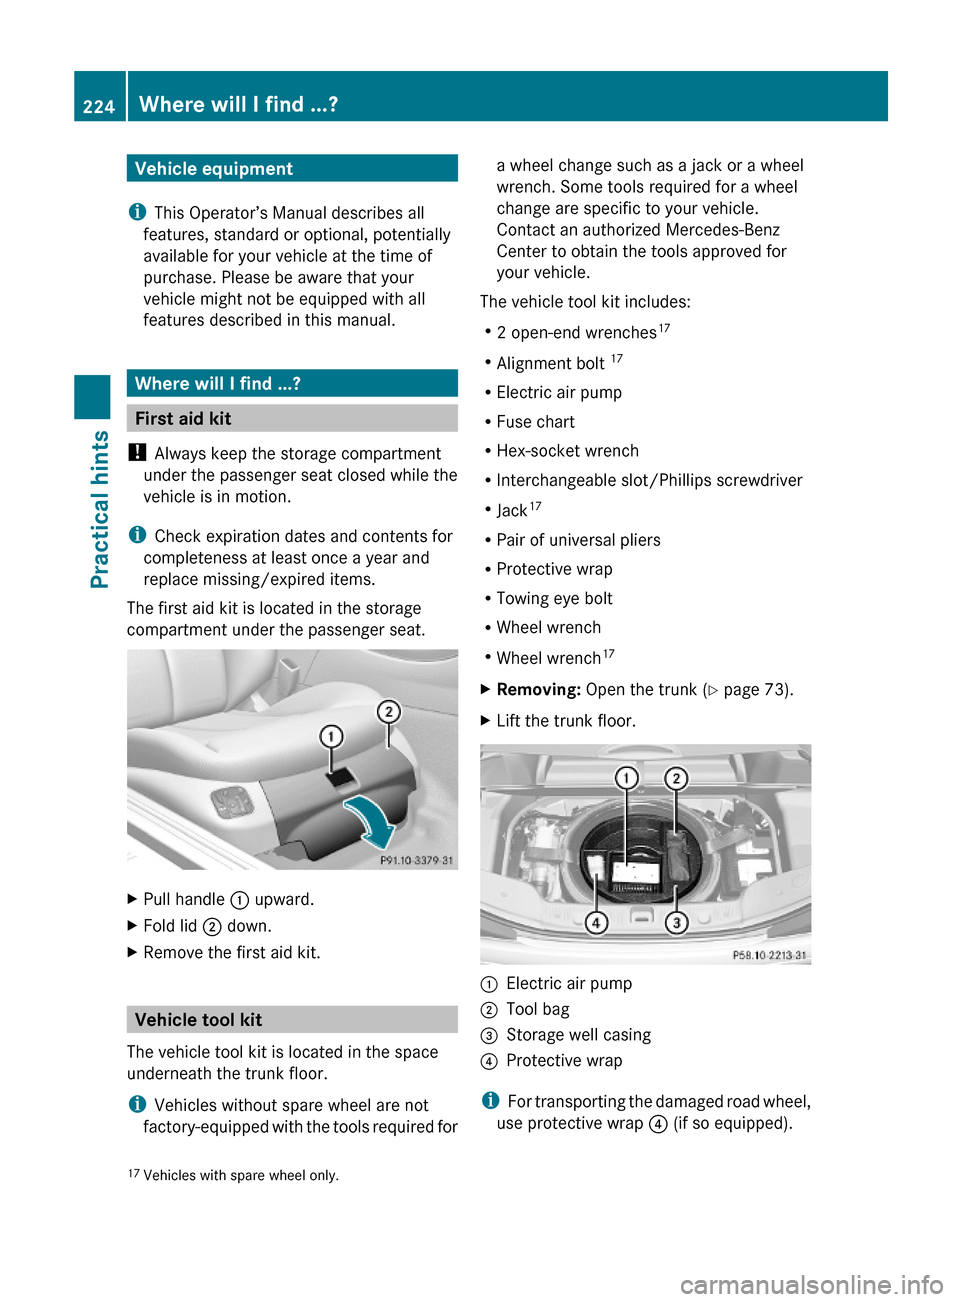
The first aid kit is located in the storage
compartment under the passenger seat.
XPull handle : upward.XFold lid ; down.XRemove the first aid kit.
Vehicle tool kit
The vehicle tool kit is located in the space
underneath the trunk floor.
iVehicles without spare wheel are not
factory-equipped with the tools required for
a wheel change such as a jack or a wheel
wrench. Some tools required for a wheel
change are specific to your vehicle.
Contact an authorized Mercedes-Benz
Center to obtain the tools approved for
your vehicle.
The vehicle tool kit includes:
R2 open-end wrenches17
RAlignment bolt 17
RElectric air pump
RFuse chart
RHex-socket wrench
RInterchangeable slot/Phillips screwdriver
RJack17
RPair of universal pliers
RProtective wrap
RTowing eye bolt
RWheel wrench
RWheel wrench17
XRemoving: Open the trunk (Y page 73).XLift the trunk floor.:Electric air pump;Tool bag=Storage well casing?Protective wrap
iFor transporting the damaged road wheel,
use protective wrap ? (if so equipped).
17Vehicles with spare wheel only.224Where will I find ...?Practical hints
230_AKB; 6; 22, en-USd2ureepe,Version: 2.11.8.12009-07-28T18:49:58+02:00 - Seite 224
Page 227 of 316
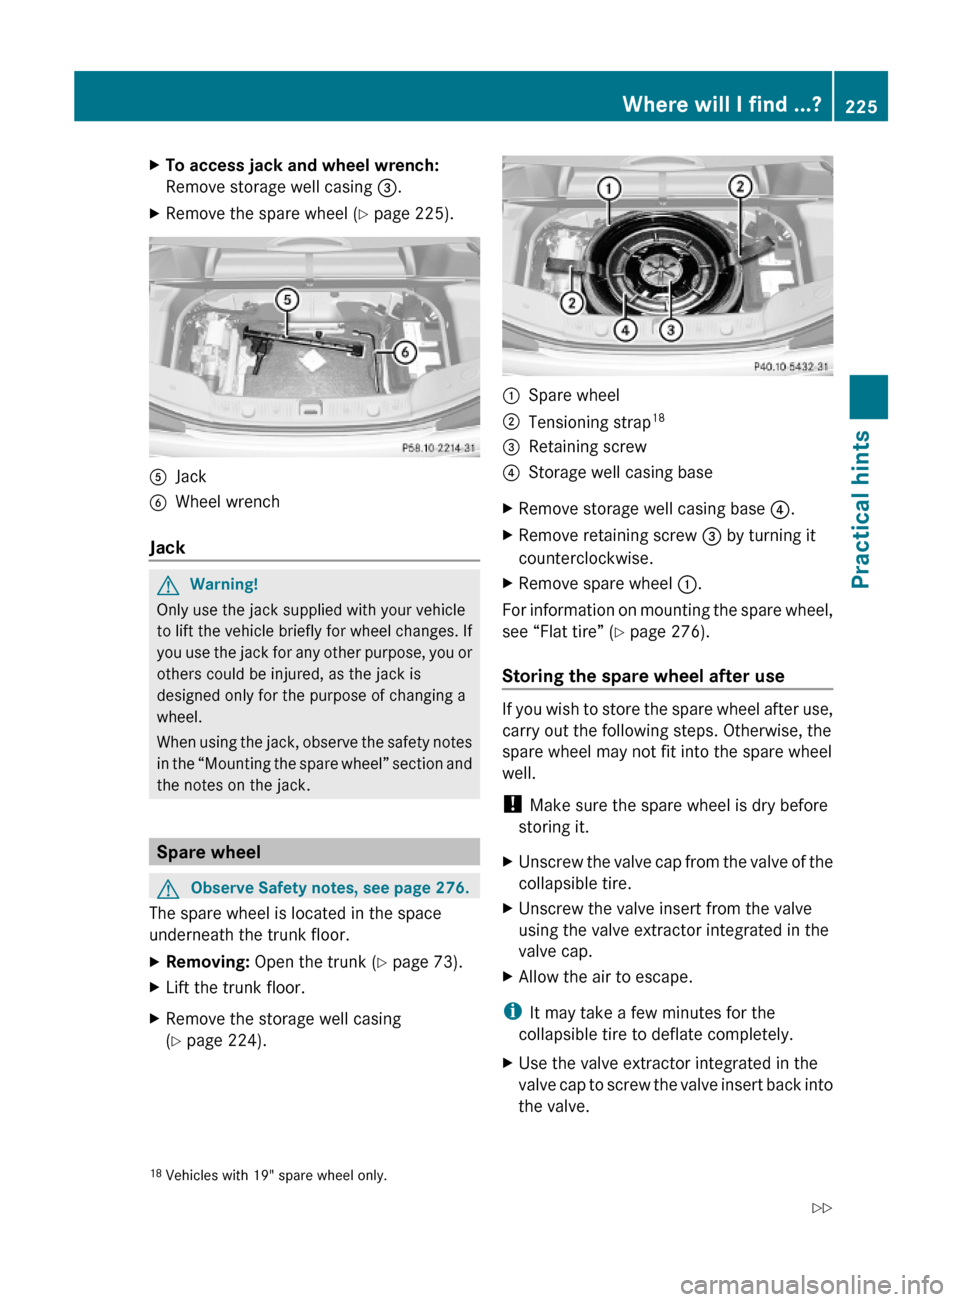
XTo access jack and wheel wrench:
Remove storage well casing =.
XRemove the spare wheel (Y page 225).AJackBWheel wrench
Jack
GWarning!
Only use the jack supplied with your vehicle
to lift the vehicle briefly for wheel changes. If
you use the jack for any other purpose, you or
others could be injured, as the jack is
designed only for the purpose of changing a
wheel.
When using the jack, observe the safety notes
in the “Mounting the spare wheel” section and
the notes on the jack.
Spare wheel
GObserve Safety notes, see page 276.
The spare wheel is located in the space
underneath the trunk floor.
XRemoving: Open the trunk (Y page 73).XLift the trunk floor.XRemove the storage well casing
(Y page 224).:Spare wheel;Tensioning strap18=Retaining screw?Storage well casing baseXRemove storage well casing base ?.XRemove retaining screw = by turning it
counterclockwise.
XRemove spare wheel :.
For information on mounting the spare wheel,
see “Flat tire” (Y page 276).
Storing the spare wheel after use
If you wish to store the spare wheel after use,
carry out the following steps. Otherwise, the
spare wheel may not fit into the spare wheel
well.
! Make sure the spare wheel is dry before
storing it.
XUnscrew the valve cap from the valve of the
collapsible tire.
XUnscrew the valve insert from the valve
using the valve extractor integrated in the
valve cap.
XAllow the air to escape.
iIt may take a few minutes for the
collapsible tire to deflate completely.
XUse the valve extractor integrated in the
valve cap to screw the valve insert back into
the valve.
18Vehicles with 19" spare wheel only.Where will I find ...?225Practical hints230_AKB; 6; 22, en-USd2ureepe,Version: 2.11.8.12009-07-28T18:49:58+02:00 - Seite 225Z
Page 228 of 316
XScrew the valve cap back onto the valve.
iVehicles with 19" spare wheel only:
Before placing the spare wheel in the spare
wheel well fasten tensioning straps, see
“Compressing the collapsible tire”
(Y page 226).
XPlace the spare wheel into the spare wheel
well.
XSecure the spare wheel by turning retaining
screw = clockwise.
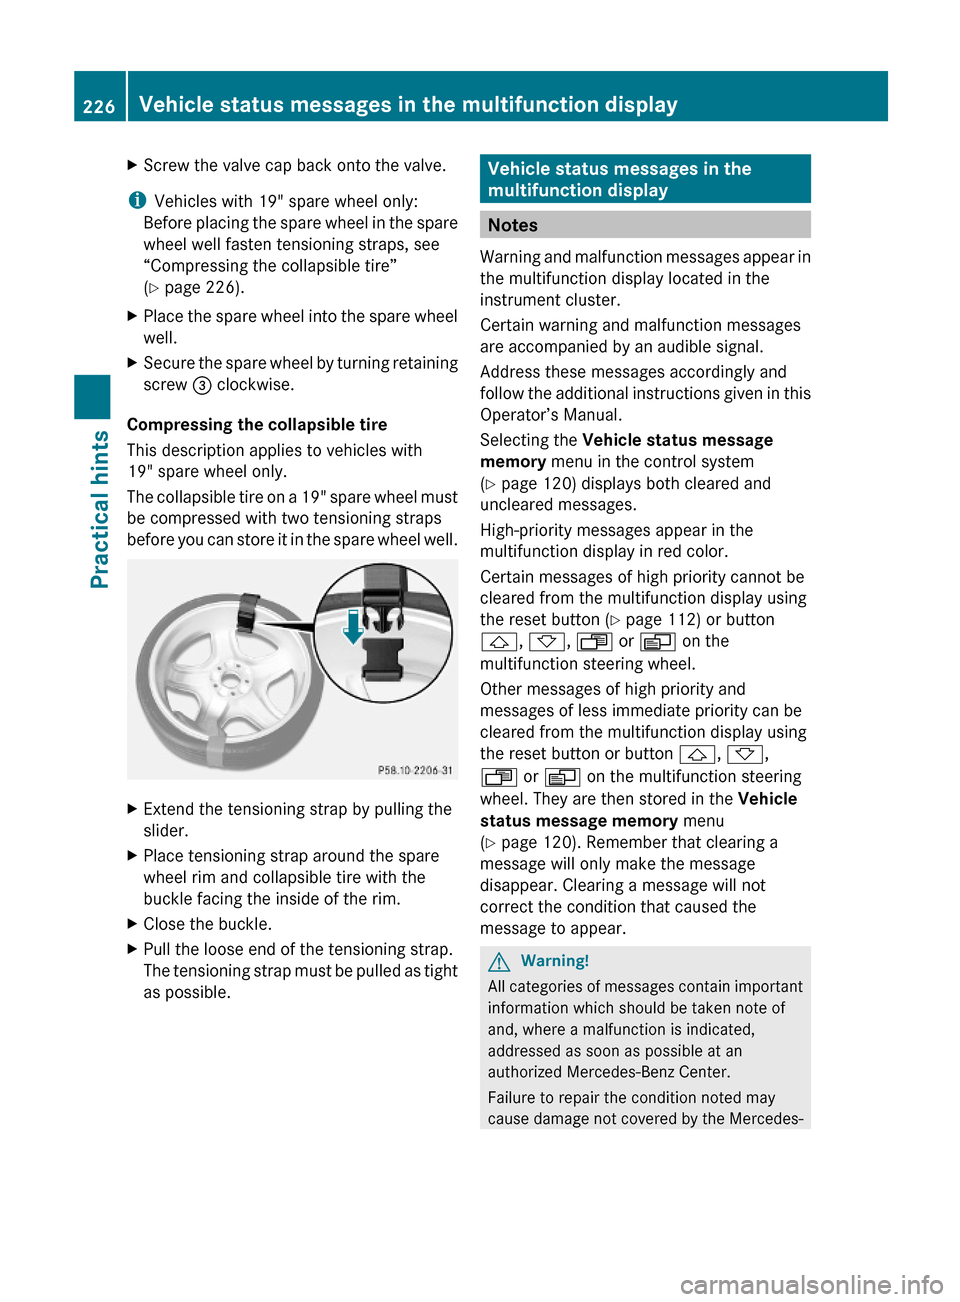
Compressing the collapsible tire
This description applies to vehicles with
19" spare wheel only.
The collapsible tire on a 19" spare wheel must
be compressed with two tensioning straps
before you can store it in the spare wheel well.
XExtend the tensioning strap by pulling the
slider.
XPlace tensioning strap around the spare
wheel rim and collapsible tire with the
buckle facing the inside of the rim.
XClose the buckle.XPull the loose end of the tensioning strap.
The tensioning strap must be pulled as tight
as possible.
Vehicle status messages in the
multifunction display
Notes
Warning and malfunction messages appear in
the multifunction display located in the
instrument cluster.
Certain warning and malfunction messages
are accompanied by an audible signal.
Address these messages accordingly and
follow the additional instructions given in this
Operator’s Manual.
Selecting the Vehicle status message
memory menu in the control system
(Y page 120) displays both cleared and
uncleared messages.
High-priority messages appear in the
multifunction display in red color.
Certain messages of high priority cannot be
cleared from the multifunction display using
the reset button (Y page 112) or button
&, *, U or V on the
multifunction steering wheel.
Other messages of high priority and
messages of less immediate priority can be
cleared from the multifunction display using
the reset button or button &, *,
U or V on the multifunction steering
wheel. They are then stored in the Vehicle
status message memory menu
(Y page 120). Remember that clearing a
message will only make the message
disappear. Clearing a message will not
correct the condition that caused the
message to appear.
GWarning!
All categories of messages contain important
information which should be taken note of
and, where a malfunction is indicated,
addressed as soon as possible at an
authorized Mercedes-Benz Center.
Failure to repair the condition noted may
cause damage not covered by the Mercedes-
226Vehicle status messages in the multifunction displayPractical hints
230_AKB; 6; 22, en-USd2ureepe,Version: 2.11.8.12009-07-28T18:49:58+02:00 - Seite 226
Page 229 of 316
Benz Limited Warranty, or result in property
damage or personal injury.GWarning!
No messages will be displayed if either the
instrument cluster or the multifunction
display is inoperative.
As a result, you will not be able to see
information about your driving conditions,
such as
R speed
R outside temperature
R warning/indicator lamps
Rmalfunction/warning messages
R failure of any systems
Driving characteristics may be impaired.
If you must continue to drive, do so with added
caution. Contact an authorized Mercedes-
Benz Center as soon as possible.
On the pages that follow, you will find a
compilation of the most important warning
and malfunction messages that may appear.
For your convenience the messages are
divided into text messages ( Y page 227) and
symbol messages ( Y page 237).
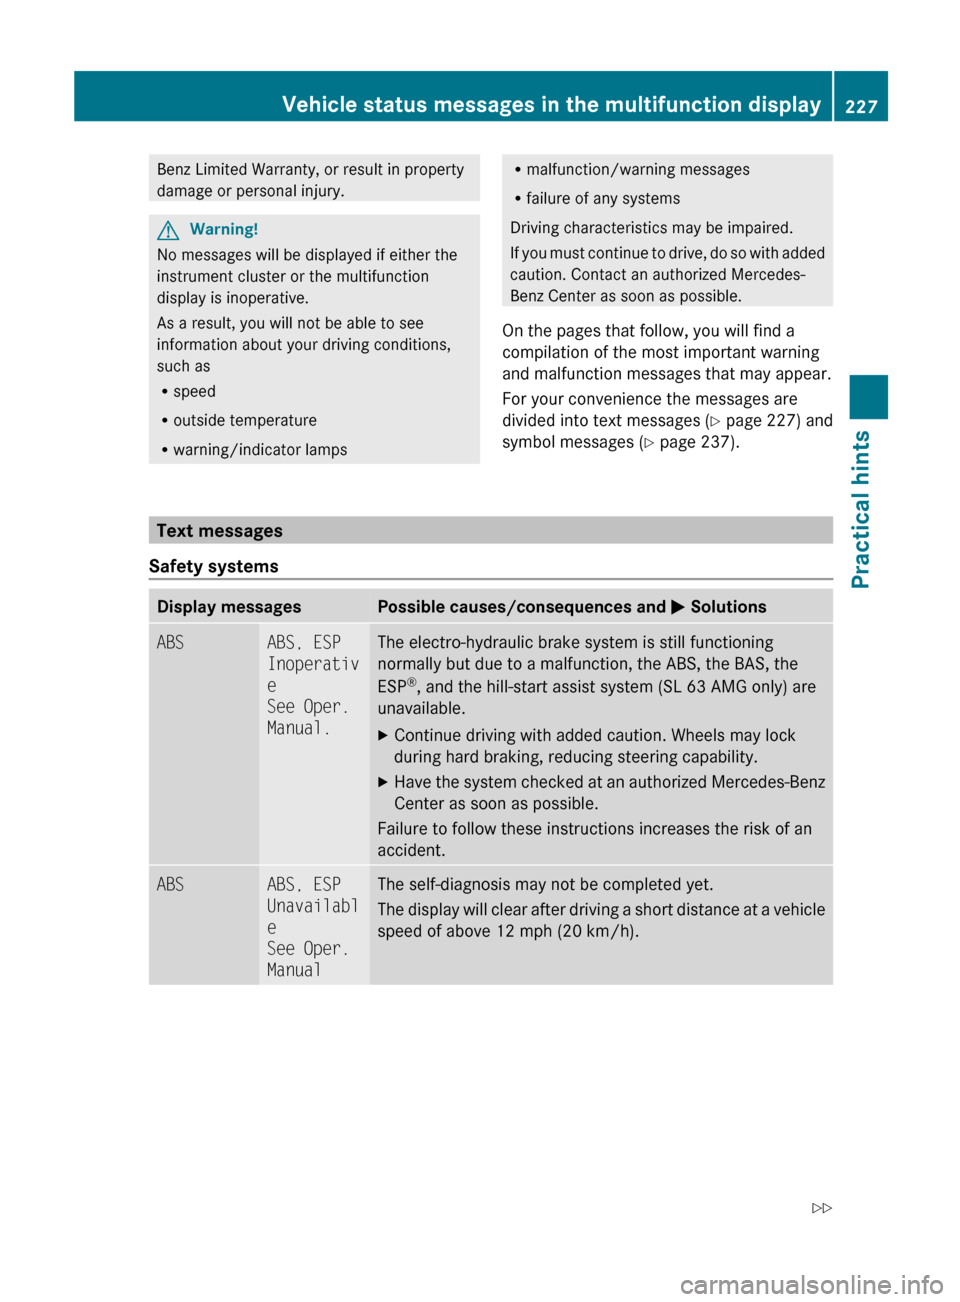
Text messages
Safety systems
Display messagesPossible causes/consequences and M SolutionsABSABS, ESP
Inoperativ
e
See Oper.
Manual.The electro-hydraulic brake system is still functioning
normally but due to a malfunction, the ABS, the BAS, the
ESP ®
, and the hill-start assist system (SL 63 AMG only) are
unavailable.XContinue driving with added caution. Wheels may lock
during hard braking, reducing steering capability.XHave the system checked at an authorized Mercedes-Benz
Center as soon as possible.
Failure to follow these instructions increases the risk of an
accident.
ABSABS, ESP
Unavailabl
e
See Oper.
ManualThe self-diagnosis may not be completed yet.
The display will clear after driving a short distance at a vehicle
speed of above 12 mph (20 km/h).Vehicle status messages in the multifunction display227Practical hints230_AKB; 6; 22, en-USd2ureepe,Version: 2.11.8.12009-07-28T18:49:58+02:00 - Seite 227Z
Page 230 of 316
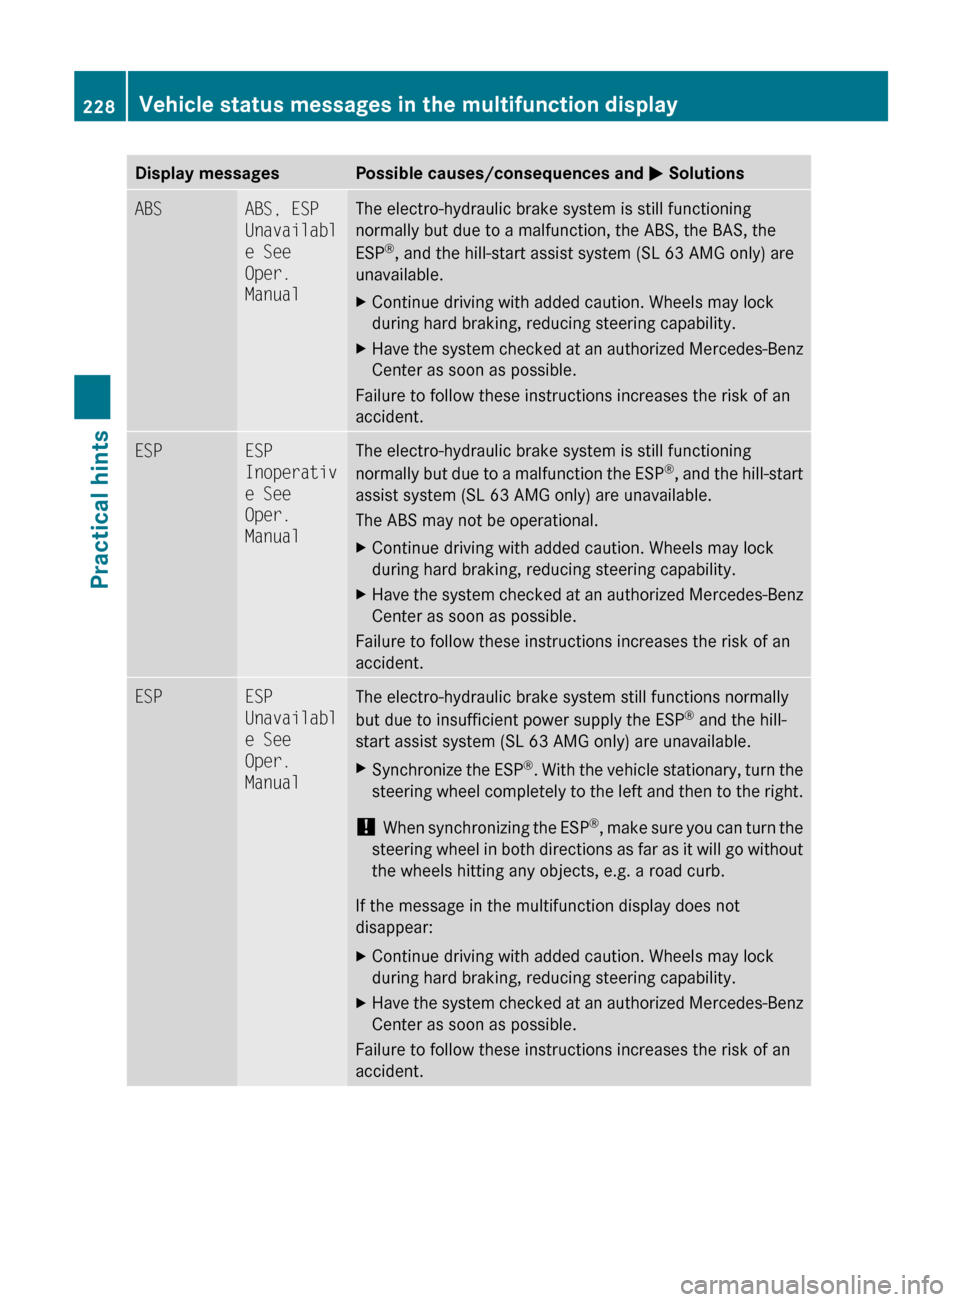
Display messagesPossible causes/consequences and M SolutionsABSABS, ESP
Unavailabl
e See
Oper.
ManualThe electro-hydraulic brake system is still functioning
normally but due to a malfunction, the ABS, the BAS, the
ESP ®
, and the hill-start assist system (SL 63 AMG only) are
unavailable.XContinue driving with added caution. Wheels may lock
during hard braking, reducing steering capability.XHave the system checked at an authorized Mercedes-Benz
Center as soon as possible.
Failure to follow these instructions increases the risk of an
accident.
ESPESP
Inoperativ
e See
Oper.
ManualThe electro-hydraulic brake system is still functioning
normally but due to a malfunction the ESP ®
, and the hill-start
assist system (SL 63 AMG only) are unavailable.
The ABS may not be operational.XContinue driving with added caution. Wheels may lock
during hard braking, reducing steering capability.XHave the system checked at an authorized Mercedes-Benz
Center as soon as possible.
Failure to follow these instructions increases the risk of an
accident.
ESPESP
Unavailabl
e See
Oper.
ManualThe electro-hydraulic brake system still functions normally
but due to insufficient power supply the ESP ®
and the hill-
start assist system (SL 63 AMG only) are unavailable.XSynchronize the ESP ®
. With the vehicle stationary, turn the
steering wheel completely to the left and then to the right.
! When synchronizing the ESP ®
, make sure you can turn the
steering wheel in both directions as far as it will go without
the wheels hitting any objects, e.g. a road curb.
If the message in the multifunction display does not
disappear:
XContinue driving with added caution. Wheels may lock
during hard braking, reducing steering capability.XHave the system checked at an authorized Mercedes-Benz
Center as soon as possible.
Failure to follow these instructions increases the risk of an
accident.
228Vehicle status messages in the multifunction displayPractical hints
230_AKB; 6; 22, en-USd2ureepe,Version: 2.11.8.12009-07-28T18:49:58+02:00 - Seite 228