sensor MERCEDES-BENZ SL65AMG 2011 R230 Owner's Guide
[x] Cancel search | Manufacturer: MERCEDES-BENZ, Model Year: 2011, Model line: SL65AMG, Model: MERCEDES-BENZ SL65AMG 2011 R230Pages: 316, PDF Size: 7.21 MB
Page 193 of 316
the system is not operating properly. The
TPMS malfunction indicator is combined with
the low tire pressure telltale. When the
system detects a malfunction, the telltale will
flash for approximately 1 minute and then
remain continuously illuminated. This
sequence will continue upon subsequent
vehicle start-ups as long as the malfunction
exists. When the malfunction indicator is
illuminated, the system may not be able to
detect or signal low tire pressure as intended.
TPMS malfunctions may occur for a variety of
reasons, including the installation of
incompatible replacement or alternate tires
or wheels on the vehicle that prevent the
TPMS from functioning properly. Always
check the TPMS malfunction telltale after
replacing one or more tires or wheels on your
vehicle to ensure that the replacement or
alternate tires and wheels allow the TPMS to
continue to function properly.
iUSA only:
If a condition causing the TPMS to
malfunction develops, it may take up to
10 minutes for the system to signal a
malfunction using the TPMS telltale
flashing and illumination sequence.
The telltale extinguishes after a few
minutes driving if the malfunction has been
corrected.
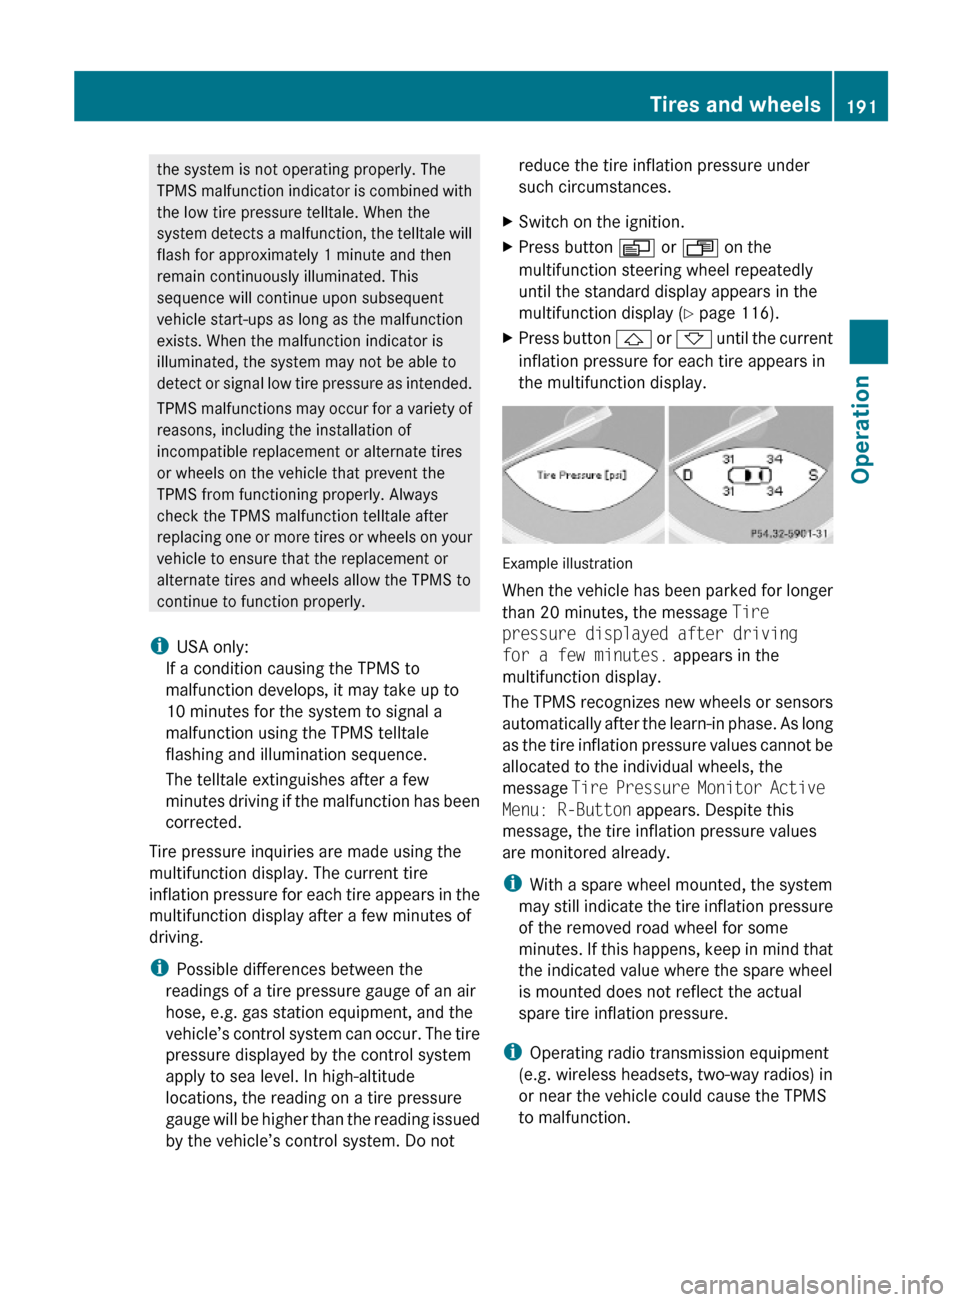
Tire pressure inquiries are made using the
multifunction display. The current tire
inflation pressure for each tire appears in the
multifunction display after a few minutes of
driving.
iPossible differences between the
readings of a tire pressure gauge of an air
hose, e.g. gas station equipment, and the
vehicle’s control system can occur. The tire
pressure displayed by the control system
apply to sea level. In high-altitude
locations, the reading on a tire pressure
gauge will be higher than the reading issued
by the vehicle’s control system. Do not
reduce the tire inflation pressure under
such circumstances.
XSwitch on the ignition.XPress button V or U on the
multifunction steering wheel repeatedly
until the standard display appears in the
multifunction display (Y page 116).
XPress button & or * until the current
inflation pressure for each tire appears in
the multifunction display.
Example illustration
When the vehicle has been parked for longer
than 20 minutes, the message Tire
pressure displayed after driving
for a few minutes. appears in the
multifunction display.
The TPMS recognizes new wheels or sensors
automatically after the learn-in phase. As long
as the tire inflation pressure values cannot be
allocated to the individual wheels, the
message Tire Pressure Monitor Active
Menu: R-Button appears. Despite this
message, the tire inflation pressure values
are monitored already.
iWith a spare wheel mounted, the system
may still indicate the tire inflation pressure
of the removed road wheel for some
minutes. If this happens, keep in mind that
the indicated value where the spare wheel
is mounted does not reflect the actual
spare tire inflation pressure.
iOperating radio transmission equipment
(e.g. wireless headsets, two-way radios) in
or near the vehicle could cause the TPMS
to malfunction.
Tires and wheels191Operation230_AKB; 6; 22, en-USd2ureepe,Version: 2.11.8.12009-07-28T18:49:58+02:00 - Seite 191Z
Page 220 of 316
Do not allow cleaning agents to dry on the
finish.
Automatic car wash
You can have your vehicle washed in an
automatic car wash from the start. Brushless
car washes are preferable.
XTo protect the filter system, activate the air
recirculation mode using button g on
the climate control panel.
! Do not clean your vehicle in an automatic
touchless car wash which uses caustic
spray. Caustic spray will damage the paint
or ornamental moldings.
If the vehicle is very dirty, prewash it before
running it through the automatic car wash.
! Make sure the combination switch is set
to wiper setting 0. Otherwise, the rain
sensor could activate and cause the wipers
to move unintentionally. This may lead to
vehicle damage.
Due to the width of the vehicle, fold in
exterior rear view mirrors prior to running
the vehicle through an automatic car wash
to prevent damage to the mirrors.
XWhen taking the vehicle through an
automatic conveyor-type car wash:
Make sure the automatic transmission
remains in neutral position N.
When leaving the automatic car wash, make
sure the mirrors are folded out.
After running the vehicle through an
automatic car wash, wipe any wax off of the
windshield and the wiper blade inserts. This
will prevent smears and reduce wiping noise
which can be caused by residual wax on the
windshield.
Ornamental moldings
XFor regular cleaning and care of ornamental
moldings, use a damp cloth.
! Do not use chrome cleaner on ornamental
moldings. Although ornamental moldings
may have chrome appearance, they could
be made of anodized aluminum that will be
damaged when cleaned with chrome
cleaner. Instead, use a damp cloth to clean
those ornamental moldings.
For very dirty ornamental moldings of
which you are sure are chrome-plated, use
a chrome cleaner. If in doubt whether an
ornamental molding is chrome-plated,
contact an authorized Mercedes-Benz
Center.
Headlamps, brake lamps, tail lamps,
side markers, turn signal lenses
XUse a mild vehicle wash detergent, such as
Mercedes-Benz approved Car Shampoo,
with plenty of water.
! Only use window cleaning solutions that
are suitable for plastic lamp lenses.
Window cleaning solutions which are not
suitable may damage the plastic lamp
lenses of the headlamps. Therefore, do not
use abrasives, solvents or cleaners that
contain solvents.
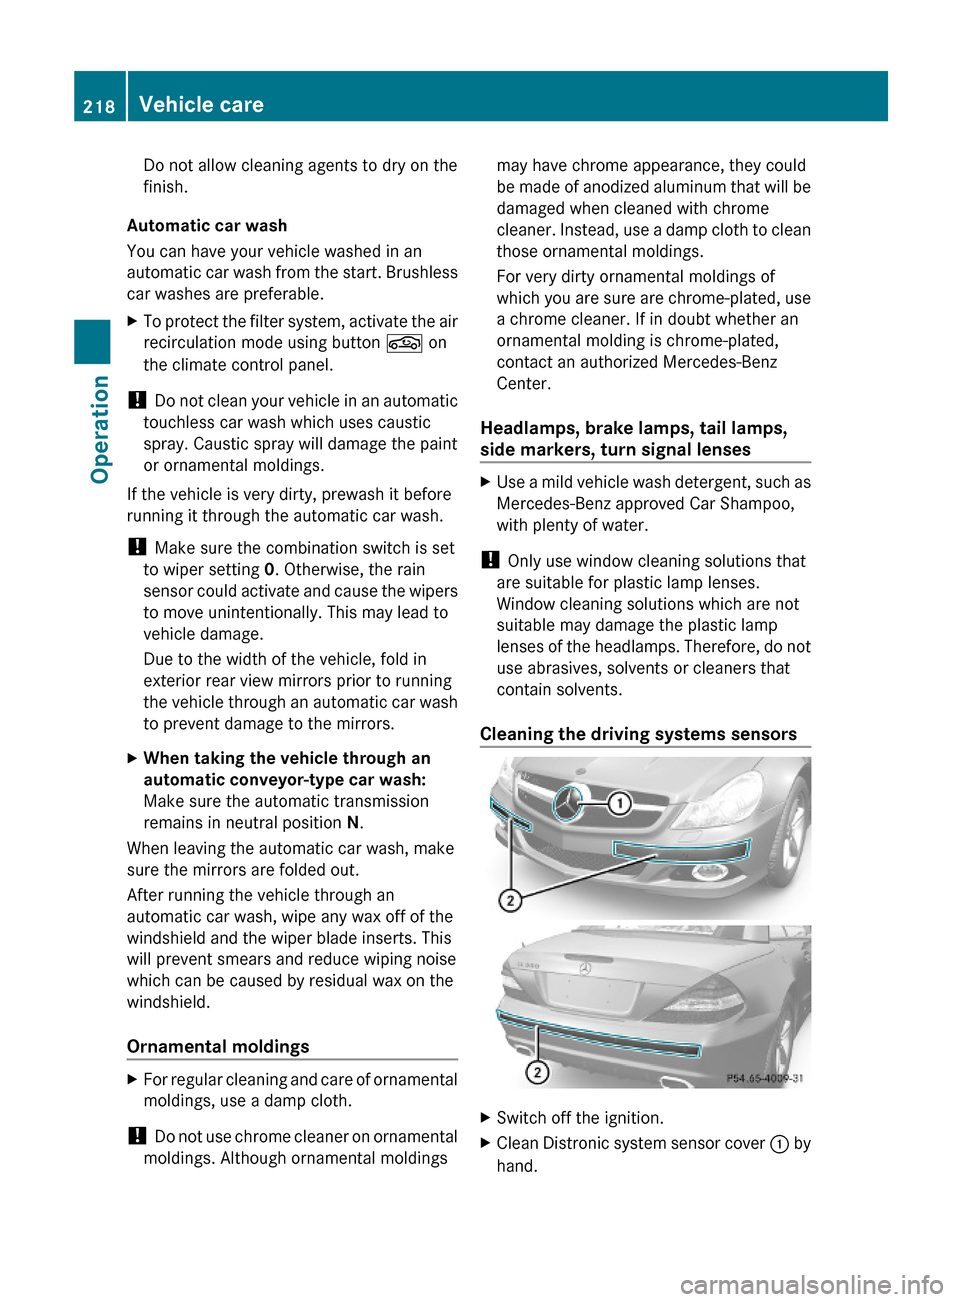
Cleaning the driving systems sensors
XSwitch off the ignition.XClean Distronic system sensor cover : by
hand.
218Vehicle careOperation
230_AKB; 6; 22, en-USd2ureepe,Version: 2.11.8.12009-07-28T18:49:58+02:00 - Seite 218
Page 221 of 316
To clean Distronic system sensor cover :
and the bumper area near sensors ; observe
the following:
R Use a mild vehicle wash detergent, such as
Mercedes-Benz approved Car Shampoo,
with plenty of water.
R Use a soft, non-scratching cloth.
! If you use a power washer to clean the
sensor covers, observe the following:
R Follow the instructions provided by the
power washer manufacturer.
R Maintain a distance between the sensor
covers and the nozzle of the power
washer.
Cleaning the windows and the wiper
blades
! The windshield wipers must be in a
vertical position before folding them away
from the windshield. They could otherwise
damage the hood.
Never open the hood when the wiper arms
are folded forward.
XMake sure the hood is fully closed.XSwitch on the ignition.XTurn combination switch to wiper setting
II (Y page 95).XWith wiper arms in vertical position, switch
off the ignition.GWarning!
For safety reasons, switch off wipers and
remove SmartKey from starter switch before
cleaning the windshield and/or the wiper
blades. Vehicles with KEYLESS-GO: Make
sure the vehicle’s on-board electronics have
status 0. Otherwise, the wiper motor could
suddenly turn on and cause injury.
! Do not pull on the wiper blade inserts.
They could tear.
XFold the wiper arms forward until they snap
into place.XClean the windshield and the wiper blade
inserts with a clean cloth and mild
detergent solution.XUse a soft, clean cloth and a mild window
cleaning solution on all outside and inside
glass surfaces.
An automotive glass cleaner is
recommended.
! Fold the windshield wiper arms back onto
the windshield before turning the SmartKey
in the starter switch or pressing the
KEYLESS-GO start/stop button.
Hold on to the wiper when folding the wiper
arm back. If released, the force of the
impact from the tensioning spring could
crack the windshield.
! To clean the window interior, do not use
a dry cloth, abrasives, solvents or cleaners
containing solvents. Do not touch the
inside of the windows with hard objects
such as an ice scraper or ring. Doing so may
damage the windows.
Rear window cleaning
Clean the rear window with the hardtop fully
raised and closed.
GWarning!
Do not clean the rear window with the hardtop
in a position other than the fully raised and
closed position. Otherwise, the hardtop may
move unexpectedly which may result in
personal injury to you or others.
XUse a soft, clean cloth and a mild window
cleaning solution on all outside and inside
glass surfaces.
An automotive glass cleaner is
recommended.Vehicle care219Operation230_AKB; 6; 22, en-USd2ureepe,Version: 2.11.8.12009-07-28T18:49:58+02:00 - Seite 219Z
Page 235 of 316
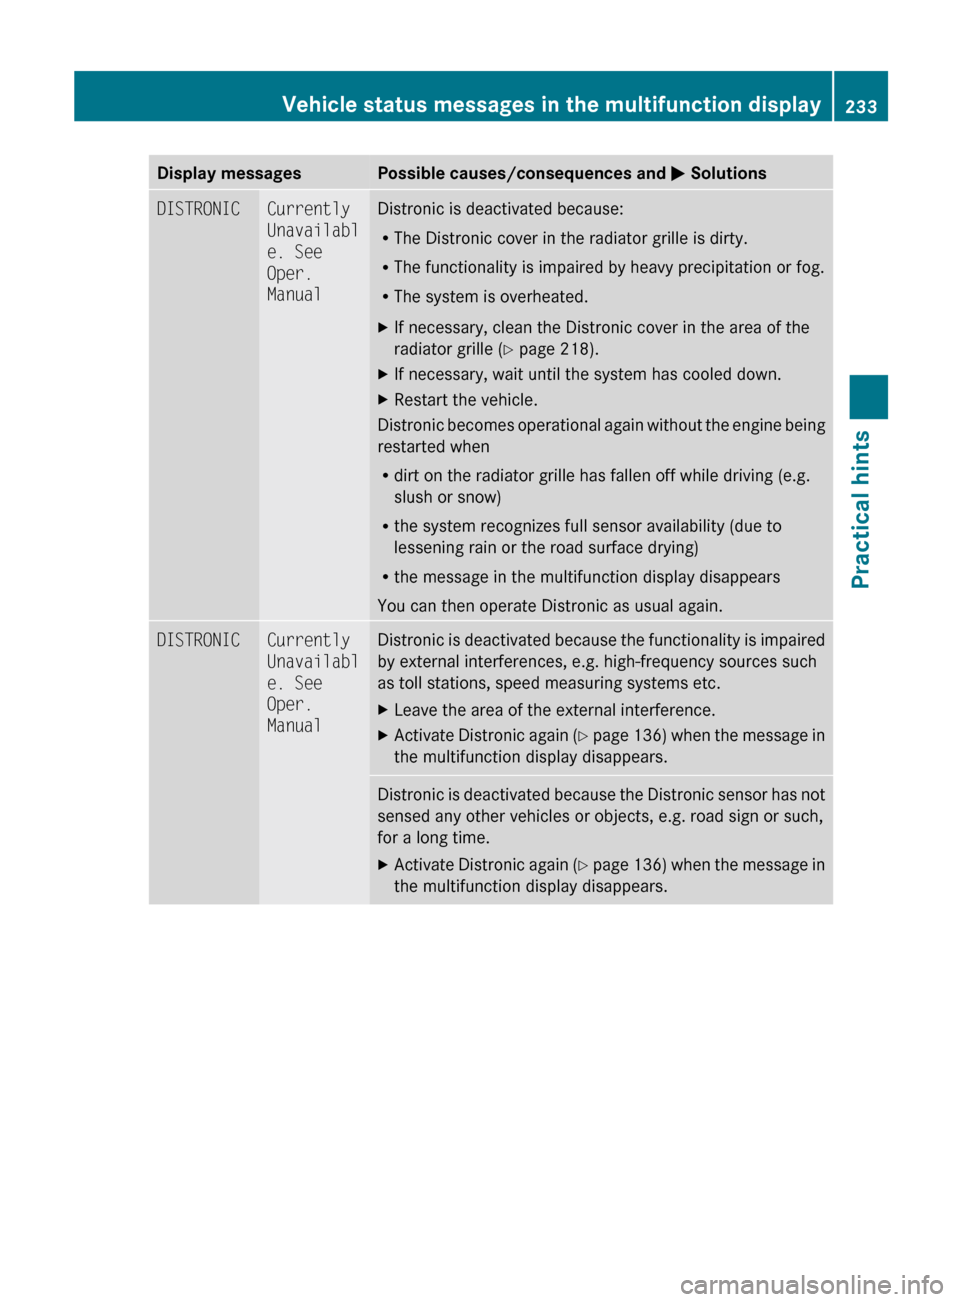
Display messagesPossible causes/consequences and M SolutionsDISTRONICCurrently
Unavailabl
e. See
Oper.
ManualDistronic is deactivated because:
R The Distronic cover in the radiator grille is dirty.
R The functionality is impaired by heavy precipitation or fog.
R The system is overheated.XIf necessary, clean the Distronic cover in the area of the
radiator grille ( Y page 218).XIf necessary, wait until the system has cooled down.XRestart the vehicle.
Distronic becomes operational again without the engine being
restarted when
R dirt on the radiator grille has fallen off while driving (e.g.
slush or snow)
R the system recognizes full sensor availability (due to
lessening rain or the road surface drying)
R the message in the multifunction display disappears
You can then operate Distronic as usual again.
DISTRONICCurrently
Unavailabl
e. See
Oper.
ManualDistronic is deactivated because the functionality is impaired
by external interferences, e.g. high-frequency sources such
as toll stations, speed measuring systems etc.XLeave the area of the external interference.XActivate Distronic again (Y page 136) when the message in
the multifunction display disappears.Distronic is deactivated because the Distronic sensor has not
sensed any other vehicles or objects, e.g. road sign or such,
for a long time.XActivate Distronic again (Y page 136) when the message in
the multifunction display disappears.Vehicle status messages in the multifunction display233Practical hints230_AKB; 6; 22, en-USd2ureepe,Version: 2.11.8.12009-07-28T18:49:58+02:00 - Seite 233Z
Page 236 of 316
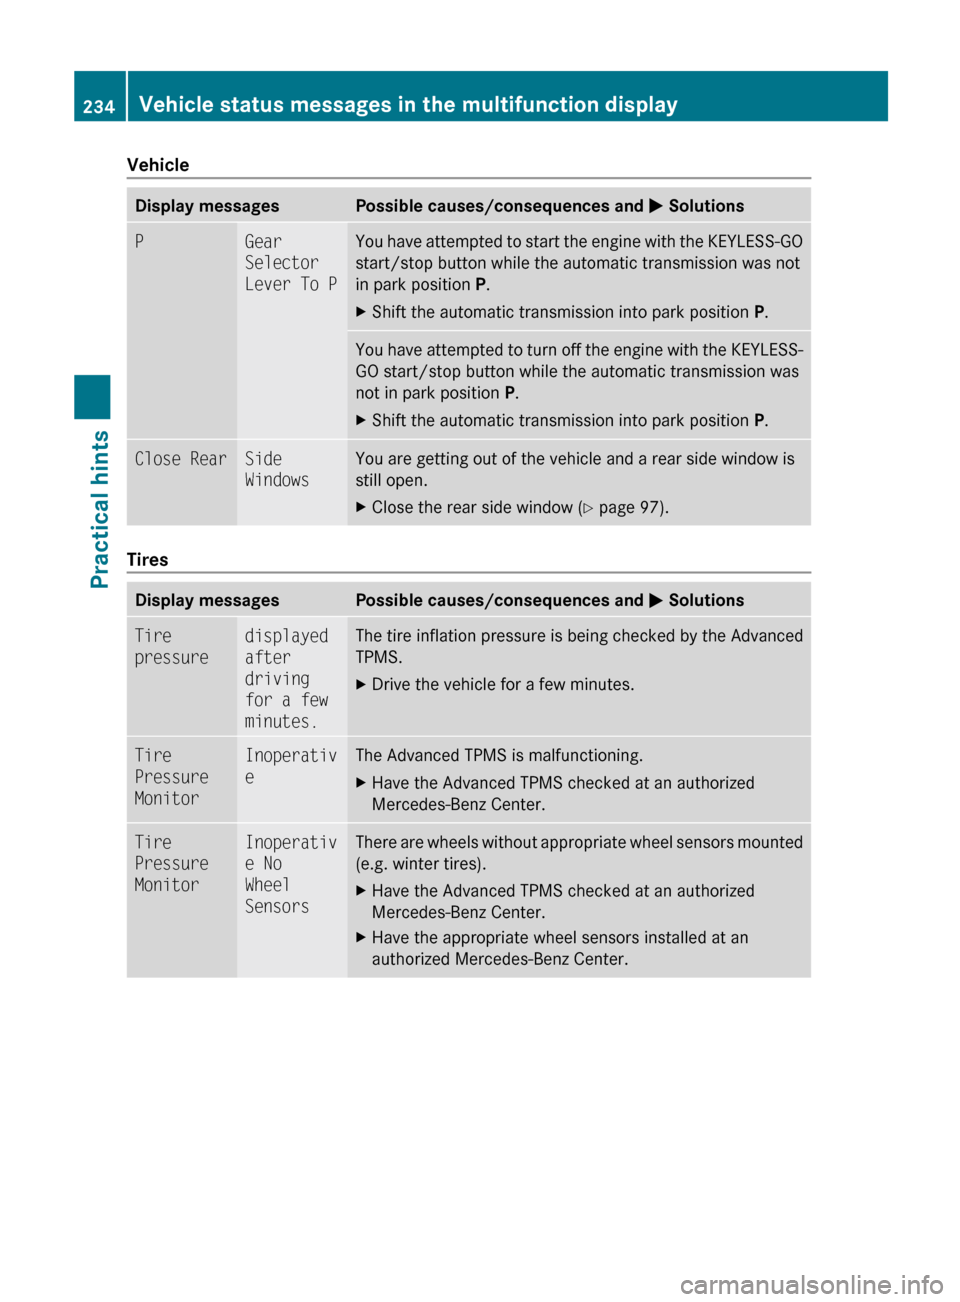
VehicleDisplay messagesPossible causes/consequences and M SolutionsPGear
Selector
Lever To PYou have attempted to start the engine with the KEYLESS-GO
start/stop button while the automatic transmission was not
in park position P.XShift the automatic transmission into park position P.You have attempted to turn off the engine with the KEYLESS-
GO start/stop button while the automatic transmission was
not in park position P.XShift the automatic transmission into park position P.Close RearSide
WindowsYou are getting out of the vehicle and a rear side window is
still open.XClose the rear side window ( Y page 97).
Tires
Display messagesPossible causes/consequences and M SolutionsTire
pressuredisplayed
after
driving
for a few
minutes.The tire inflation pressure is being checked by the Advanced
TPMS.XDrive the vehicle for a few minutes.Tire
Pressure
MonitorInoperativ
eThe Advanced TPMS is malfunctioning.XHave the Advanced TPMS checked at an authorized
Mercedes-Benz Center.Tire
Pressure
MonitorInoperativ
e No
Wheel
SensorsThere are wheels without appropriate wheel sensors mounted
(e.g. winter tires).XHave the Advanced TPMS checked at an authorized
Mercedes-Benz Center.XHave the appropriate wheel sensors installed at an
authorized Mercedes-Benz Center.234Vehicle status messages in the multifunction displayPractical hints
230_AKB; 6; 22, en-USd2ureepe,Version: 2.11.8.12009-07-28T18:49:58+02:00 - Seite 234
Page 237 of 316
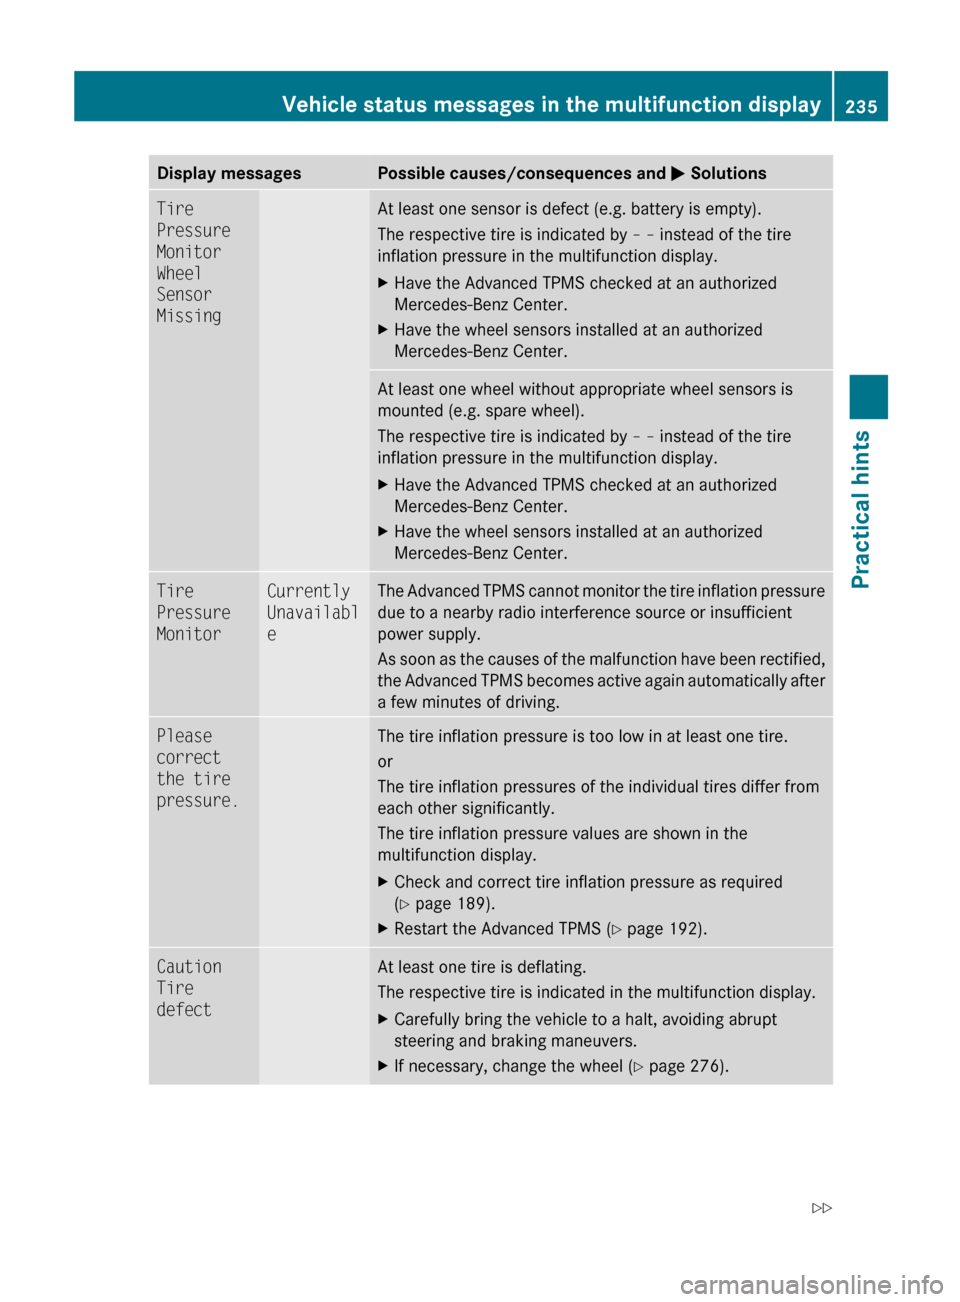
Display messagesPossible causes/consequences and M SolutionsTire
Pressure
Monitor
Wheel
Sensor
MissingAt least one sensor is defect (e.g. battery is empty).
The respective tire is indicated by – – instead of the tire
inflation pressure in the multifunction display.XHave the Advanced TPMS checked at an authorized
Mercedes-Benz Center.XHave the wheel sensors installed at an authorized
Mercedes-Benz Center.At least one wheel without appropriate wheel sensors is
mounted (e.g. spare wheel).
The respective tire is indicated by – – instead of the tire
inflation pressure in the multifunction display.XHave the Advanced TPMS checked at an authorized
Mercedes-Benz Center.XHave the wheel sensors installed at an authorized
Mercedes-Benz Center.Tire
Pressure
MonitorCurrently
Unavailabl
eThe Advanced TPMS cannot monitor the tire inflation pressure
due to a nearby radio interference source or insufficient
power supply.
As soon as the causes of the malfunction have been rectified,
the Advanced TPMS becomes active again automatically after
a few minutes of driving.Please
correct
the tire
pressure.The tire inflation pressure is too low in at least one tire.
or
The tire inflation pressures of the individual tires differ from
each other significantly.
The tire inflation pressure values are shown in the
multifunction display.XCheck and correct tire inflation pressure as required
( Y page 189).XRestart the Advanced TPMS ( Y page 192).Caution
Tire
defectAt least one tire is deflating.
The respective tire is indicated in the multifunction display.XCarefully bring the vehicle to a halt, avoiding abrupt
steering and braking maneuvers.XIf necessary, change the wheel ( Y page 276).Vehicle status messages in the multifunction display235Practical hints230_AKB; 6; 22, en-USd2ureepe,Version: 2.11.8.12009-07-28T18:49:58+02:00 - Seite 235Z
Page 253 of 316
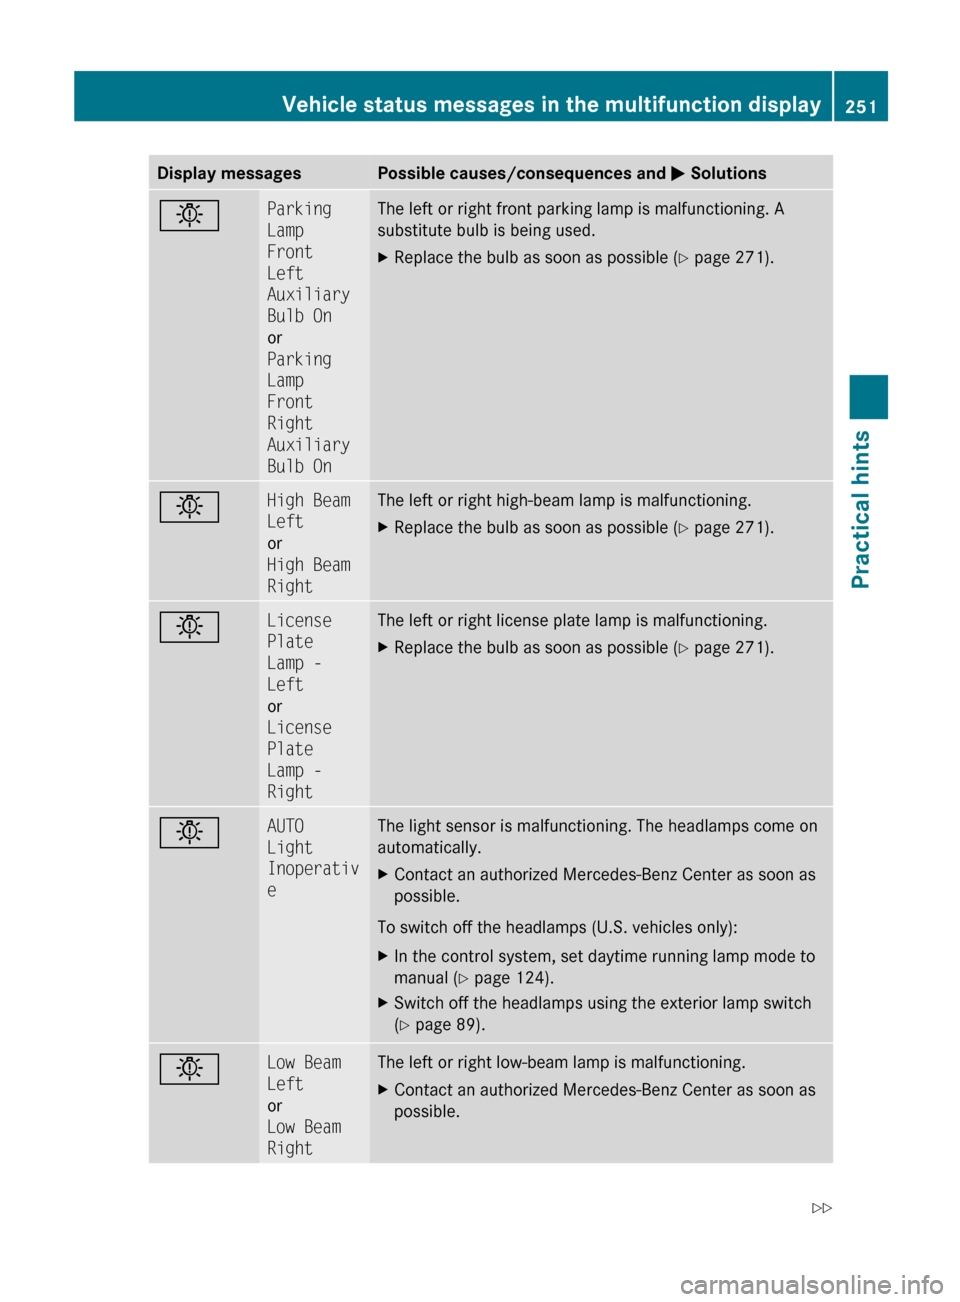
Display messagesPossible causes/consequences and M SolutionsbParking
Lamp
Front
Left
Auxiliary
Bulb On
or
Parking
Lamp
Front
Right
Auxiliary
Bulb OnThe left or right front parking lamp is malfunctioning. A
substitute bulb is being used.XReplace the bulb as soon as possible ( Y page 271).bHigh Beam
Left
or
High Beam
RightThe left or right high-beam lamp is malfunctioning.XReplace the bulb as soon as possible ( Y page 271).bLicense
Plate
Lamp -
Left
or
License
Plate
Lamp -
RightThe left or right license plate lamp is malfunctioning.XReplace the bulb as soon as possible ( Y page 271).bAUTO
Light
Inoperativ
eThe light sensor is malfunctioning. The headlamps come on
automatically.XContact an authorized Mercedes-Benz Center as soon as
possible.
To switch off the headlamps (U.S. vehicles only):
XIn the control system, set daytime running lamp mode to
manual ( Y page 124).XSwitch off the headlamps using the exterior lamp switch
( Y page 89).bLow Beam
Left
or
Low Beam
RightThe left or right low-beam lamp is malfunctioning.XContact an authorized Mercedes-Benz Center as soon as
possible.Vehicle status messages in the multifunction display251Practical hints230_AKB; 6; 22, en-USd2ureepe,Version: 2.11.8.12009-07-28T18:49:58+02:00 - Seite 251Z
Page 264 of 316
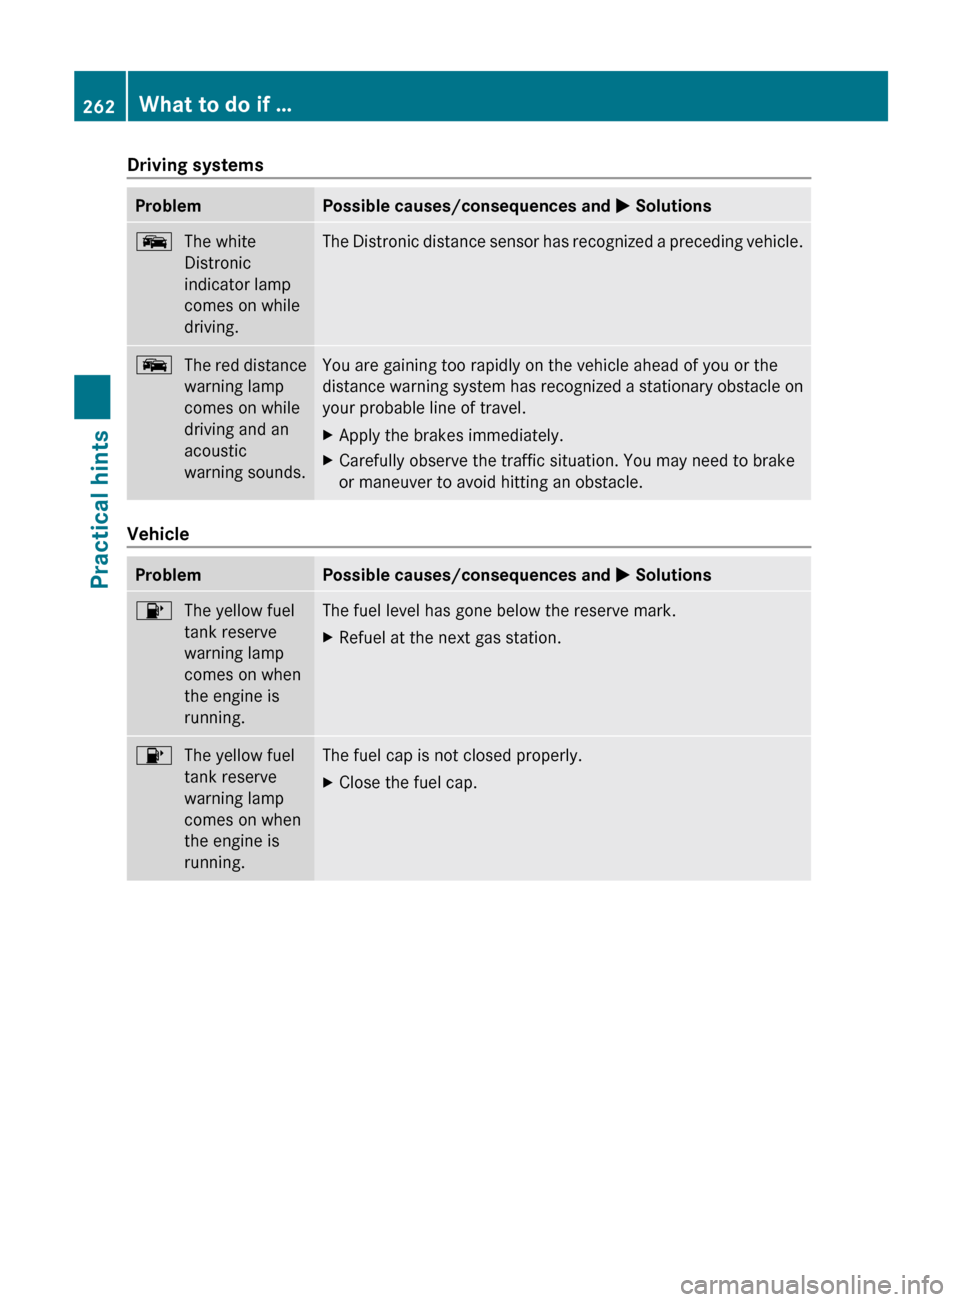
Driving systemsProblemPossible causes/consequences and M SolutionsÒThe white
Distronic
indicator lamp
comes on while
driving.The Distronic distance sensor has recognized a preceding vehicle.ÒThe red distance
warning lamp
comes on while
driving and an
acoustic
warning sounds.You are gaining too rapidly on the vehicle ahead of you or the
distance warning system has recognized a stationary obstacle on
your probable line of travel.XApply the brakes immediately.XCarefully observe the traffic situation. You may need to brake
or maneuver to avoid hitting an obstacle.
Vehicle
ProblemPossible causes/consequences and M Solutions8The yellow fuel
tank reserve
warning lamp
comes on when
the engine is
running.The fuel level has gone below the reserve mark.XRefuel at the next gas station.8The yellow fuel
tank reserve
warning lamp
comes on when
the engine is
running.The fuel cap is not closed properly.XClose the fuel cap.262What to do if …Practical hints
230_AKB; 6; 22, en-USd2ureepe,Version: 2.11.8.12009-07-28T18:49:58+02:00 - Seite 262
Page 284 of 316
pressure as specified for your vehicle
(Y page 303), decrease tire pressure using
the vent screw on air hose ?.
XVersion 2 only: If the tire inflation pressure
is above the recommended tire inflation
pressure as specified for your vehicle
(Y page 303), decrease tire pressure using
deflate button B.
GObserve Safety notes, see page 189.XDetach the electric air pump.XReinstall collapsible tire valve cap.XVersion 1 only: Store electrical plug =
and air hose ? behind flap :.
XVersion 2 only: Store electrical plug =
and the air hose back into the pump
housing bottom.
XPlace the electric air pump back in its
designated storage space.
XLower the vehicle.
Lowering the vehicle
GWarning!
Inflate collapsible tire only after the wheel is
properly attached.
Inflate the collapsible tire using the electric
air pump before lowering the vehicle.
XLower the vehicle by turning the crank
counterclockwise until the vehicle is
resting fully on its own weight.
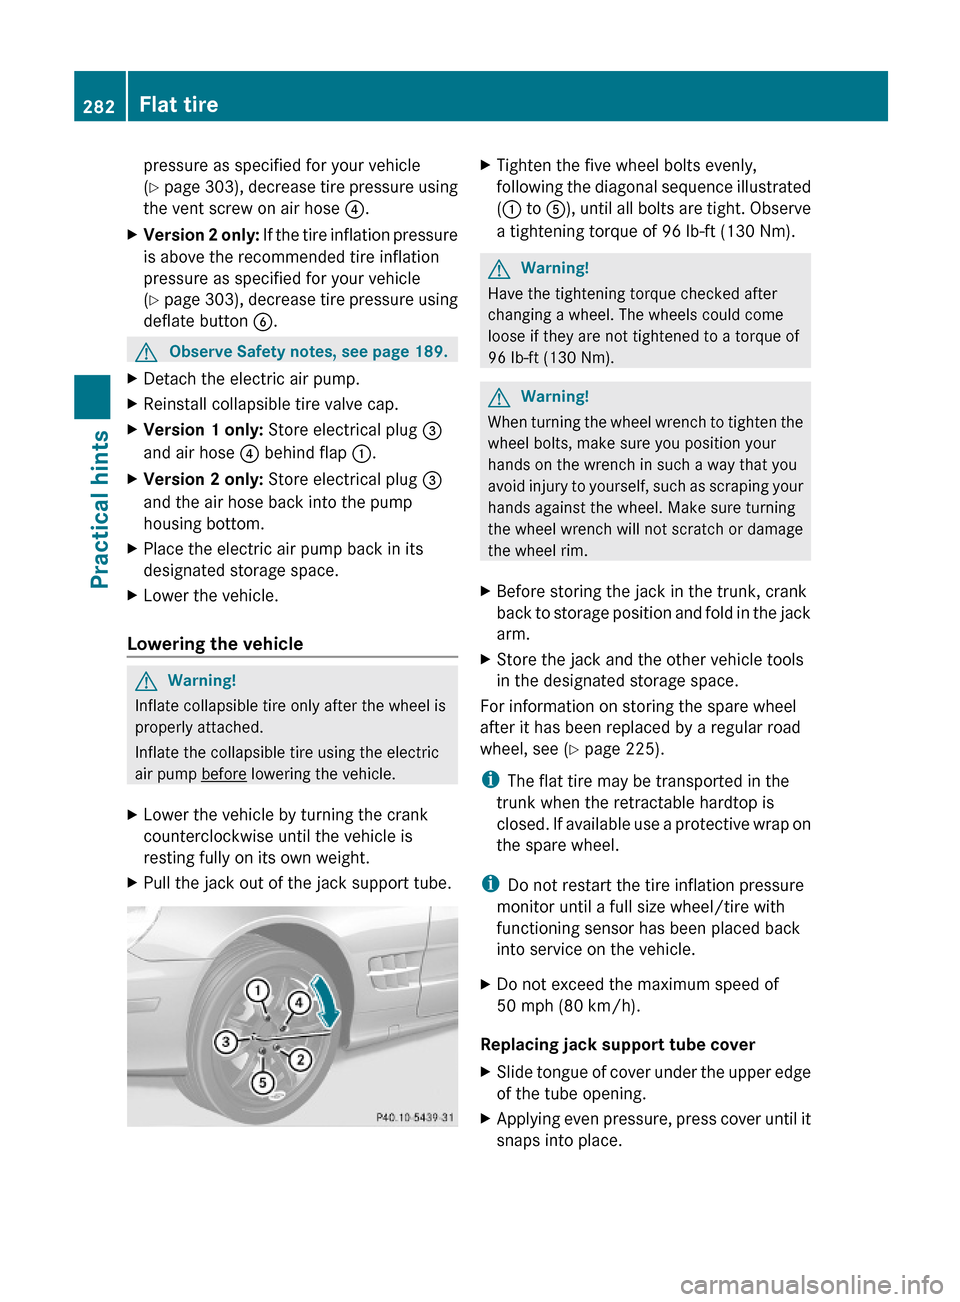
XPull the jack out of the jack support tube.XTighten the five wheel bolts evenly,
following the diagonal sequence illustrated
(: to A), until all bolts are tight. Observe
a tightening torque of 96 lb-ft (130 Nm).
GWarning!
Have the tightening torque checked after
changing a wheel. The wheels could come
loose if they are not tightened to a torque of
96 lb-ft (130 Nm).
GWarning!
When turning the wheel wrench to tighten the
wheel bolts, make sure you position your
hands on the wrench in such a way that you
avoid injury to yourself, such as scraping your
hands against the wheel. Make sure turning
the wheel wrench will not scratch or damage
the wheel rim.
XBefore storing the jack in the trunk, crank
back to storage position and fold in the jack
arm.
XStore the jack and the other vehicle tools
in the designated storage space.
For information on storing the spare wheel
after it has been replaced by a regular road
wheel, see (Y page 225).
iThe flat tire may be transported in the
trunk when the retractable hardtop is
closed. If available use a protective wrap on
the spare wheel.
iDo not restart the tire inflation pressure
monitor until a full size wheel/tire with
functioning sensor has been placed back
into service on the vehicle.
XDo not exceed the maximum speed of
50 mph (80 km/h).
Replacing jack support tube cover
XSlide tongue of cover under the upper edge
of the tube opening.
XApplying even pressure, press cover until it
snaps into place.
282Flat tirePractical hints
230_AKB; 6; 22, en-USd2ureepe,Version: 2.11.8.12009-07-28T18:49:58+02:00 - Seite 282