run flat MERCEDES-BENZ SLC-Class 2017 R172 User Guide
[x] Cancel search | Manufacturer: MERCEDES-BENZ, Model Year: 2017, Model line: SLC-Class, Model: MERCEDES-BENZ SLC-Class 2017 R172Pages: 294, PDF Size: 7.28 MB
Page 246 of 294
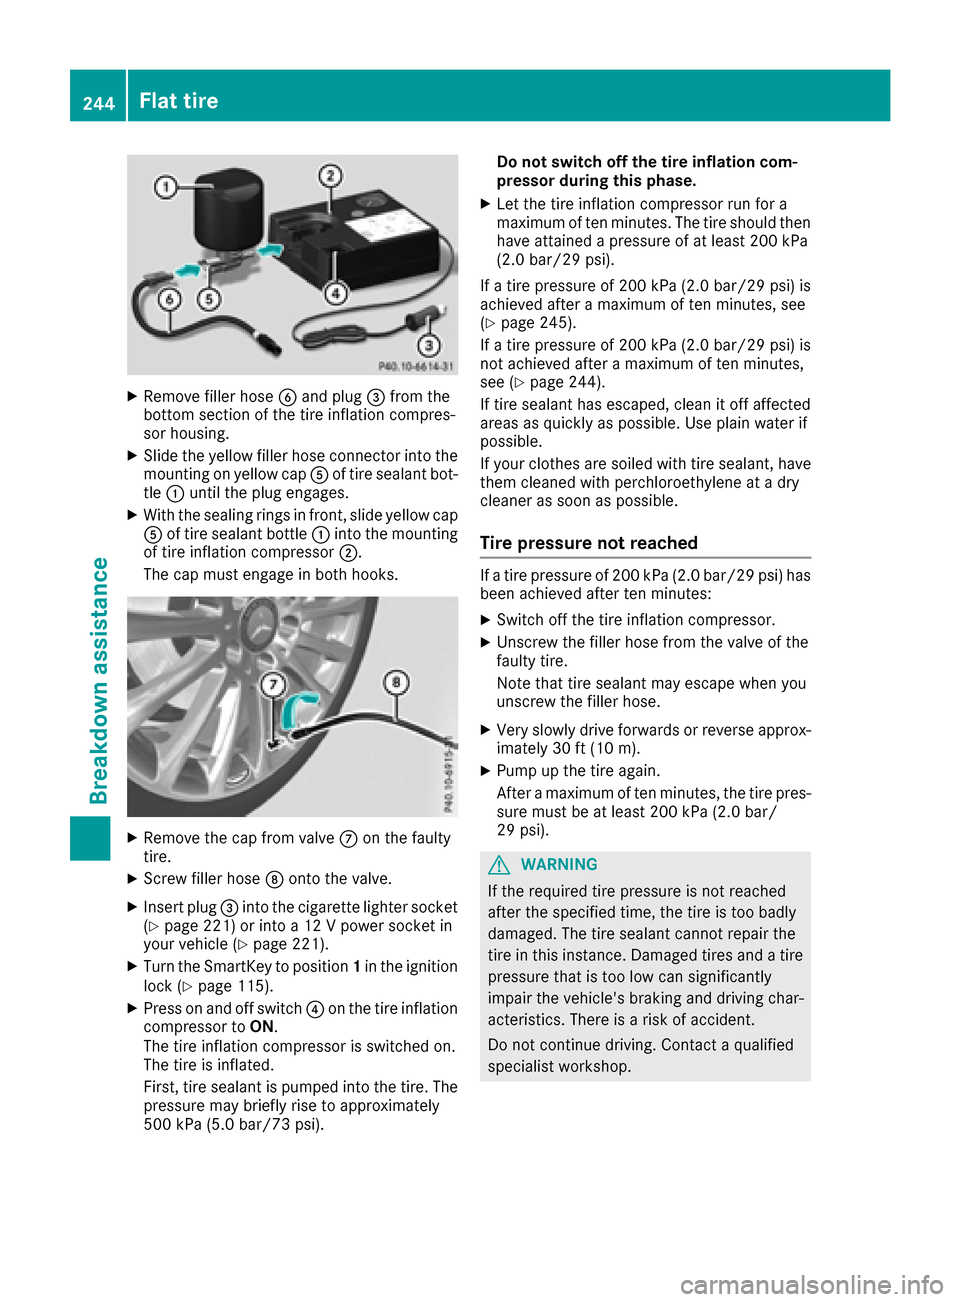
XRemove filler hoseB and plug =from th e
botto msection of th etirei nflation compres-
sor housing .
XSlide theyellow filler hos econnector intothe
mounting on yellow cap Aof tire sealan tbot-
tl e : until th eplug engages.
XWit hthe sealing rings in front, slid eyellow cap
A of tire sealan tbottl e: intothe mounting
of tire inflation compressor ;.
The cap mus tengage in bot hhooks .
XRemove th ecap from valv eC on th efault y
tire.
XScrew filler hos eD onto th evalve.
XInser tplug =intothe cigarette lighte rsocke t
(Ypage 221) or int oa12Vpower socke tin
your vehicl e(Ypage 221).
XTurn theSma rtKey to position 1in th eignition
loc k(Ypage 115).
XPress on and off switch ?on th etirei nflation
compressor to ON.
The tire inflation compressor is switched on .
The tire is inflated.
First ,tires ealan tispumped int othe tire. The
pressur emay briefly ris etoapproximately
50 0k Pa(5.0b ar/7 3psi). Do not switch off th
etirei nflation com -
pressor during this phase .
XLet thetirei nflation compressor run for a
maximum of te nminutes. The tire should then
hav eattained apressur eofatl east 200kPa
(2. 0b ar/29 psi) .
If at irep ressur eof200 kPa( 2.0b ar/29 psi) is
achieved after amaximum of te nminutes, see
(
Ypage 245).
If at irep ressur eof200 kPa( 2.0b ar/29 psi) is
no ta chieved after amaximum of te nminutes,
see (
Ypage 244).
If tire sealan thas escaped, clean it off affecte d
areas as quickly as possible. Use plain water if
possible.
If your clothes are soiled wit htires ealant, hav e
them cleane dwithp erchloroethylen eatadry
cleane rassoo
nasp o
ssible.
Tire pressure not reached
Ifat irep ressur eof200 kPa(2.0 bar/29 psi) has
beena chieved after ten minutes:
XSwitch off the tire inflation compressor.
XUnscrew the filler hose from the valve of the
faulty tire.
Note that tire sealant may escap ewheny ou
unscrew the filler hose.
XVery slowly drive forwards or reverse approx- imately 30 ft (10 m).
XPump up the tire again.
After amaximu moften minutes ,the tire pres-
sure must be at least 200 kPa (2.0 bar/
29 psi).
GWARNING
If the required tire pressure is not reached
after the specified time, the tire is too badly
damaged. The tire sealant cannot repair the
tire in this instance. Damaged tires and atire
pressure that is too low can significantly
impair the vehicle's braking and driving char-
acteristics. There is arisk of accident.
Do not continue driving. Contact aqualified
specialist workshop.
244Flat tire
Breakdowna ssistance
Page 257 of 294
Important safety notes
GWARNING
If wheels and tires of th ewrong siz eare used,
th ew hee lbrakes or suspension component s
may be damaged. Ther eisariskofana cci-
dent.
Always replace wheels and tires wit hthose
that fulfill th especification softheoriginal
part .
When replacing wheels, mak esuretou se the
correct:
Rdesignation
Rmodel
When replacing tires ,makes uretou se the
correct:
Rdesignation
Rmanufacturer
Rmodel
GWARNIN G
Af lat tire severely impairs th edriving ,steer -
ing and braking characteristics of th evehicle.
Ther eisar iskofa ccident.
Tires without run-flat characteristics :
Rdo notdrivew ithaf lat tire.
Rimmediately replace th eflat tire wit hyour
emergenc yspar ew hee lors parew heel, or
consult aqualified specialist workshop.
Tires wit hrun-flat characteristics :
Rpay attention to theinformation and warn -
ing notice sonMOExtended tires (tire swith
run-flat characteristics).
Accessories that are no tapprove dfor your vehi-
cle by Mercedes-Ben zorare notbein gused cor-
rectl ycan impair th eoperating safety.
Before purchasing and usin gnon-ap proved
accessories, visit aqualified specialist work-
sho pand ask about :
Rsuitability
Rlegal stipulation s
Rfactory recommendation sFurther information regarding wheels and tires
can be foun
dunder "Wheel/tire combinations"
(
Ypage 278).
You can ask for information regarding permitte d
wheel-tire combination satanauthorized
Mercedes-Ben zCenter.
Information on tire pressur ecan be found:
Ron th eTirea nd Loading Information placard
on th eB-pillar on th edriver' sside
(
Ypage 265)
Rin th etirep ressur etable in th efuel filler flap
(Ypage 130)
Rin th e"Tirep ressure" section
Operation
Information on driving
Chec kthe tire pressur ewhen th evehicl eis
heavily laden and adjust prio rtoatrip.
While driving ,pay attention to vibrations, noises
and unusual handlin gcharacteristics ,e.g.p ull-
ing to on eside .This may indicat ethatthe
wheels or tires are damaged. If you suspec ttha t
at ireisd efective, reduce your spee dimmedi-
ately. Stop th evehicl eass oonasp ossible to
chec kthe wheels and tires for damage. Hidden
tire damag ecould also be causing th eunusual
handlin gcharacteristics .Ifyou fin dnos ignsof
damage, hav ethe tires and wheels checke data
qualified specialist workshop.
When parking your vehicle, mak esuret hatthe
tires do no tget deformed by th ecurboro ther
obstacles. If they canno tbeavoided, driv eover
obstacles suc hascurbs slowly and at an obtuse
angle. Otherwise, you may damag ethe wheels
or tires .
Regula rchecking of wheels and tires
GWARNIN G
Damaged tires can caus etirei nflation pres-
sur eloss .Asar esult,you could lose control of
your vehicle. Ther eisariskofa ccident.
Chec kthe tires regularly for sign sofdamage
and replace any damaged tires immediately.
Operation255
Wheels and tires
Z
Page 258 of 294
Checkwheelsand tires for damag eatleast once
am onth .Checkw heelsa nd tires after driving
off-road or on roug hroads. Damaged wheels
can caus ealoss of tir epressure. Pay particular
attentio ntodamagesucha s:
Rcutsint hetires
Rpunctures
Rtears inthet ires
Rbulges on tires
Rdeformatio norsevere corrosiononw heels
Regularly check thetiret read dept hand the
conditio nofthetread across th ewhole widthof
th et ire(
Ypage 256). Ifnecessary, tur nthe
frontw heelstof ull lockino rder to inspectt he
inner sideof thetires urface.
All wheelsm ust haveavalvec ap to protect the
valv eagainst dirtand moisture. Do no tmount
anythingo ntot he valv eother than th estandard
valv ecap or other valv ecaps approved by
Mercedes-Ben zfor your veh icle.Don otuse any
other valv ecaps or systems ,e.g.t irep ressure
monitorin gsystems.
Regularly check thepressureofa llth et ires par-
ticularly priortol ongt rips. Adjus tthe tirep res-
sure as necessary (
Ypage 258).
Observ ethe note sont heemergenc yspare
wheel (
Ypage 279).
The servic elife of tires depends, amon gother
things, on th efollowin gfactors:
RDrivin gstyle
RTire pressure
RDistance covered
Notes on tir etread
GWAR NING
In suff icient tir etread will reduce tir etraction.
The tir eisnol ongerabletodissipat ewater.
This mean stha tonw et road surfaces ,the risk
of hydroplaning increases, inparticular where
speedisn otadapted to suit th edriving con-
dit ions. Thereisar iskofa cciden t.
If th et irep ressureist oohigh or to olow, tires
may exhibit diff erent levelsof wear at differ-
entl ocations on th etiret read. Thus,y ou
should regularly check th etread dept hand
th ec onditio noft hetread across th eentire
widt hofa lltires.
Minimum tir etread depthf or:
RSummer tires: âin(3 mm)
RM+S tires: ãin(4 mm)
For safety reasons, replace th etires before
th el egally prescribe dlimit for th eminimum
tir et read depthisr eached.
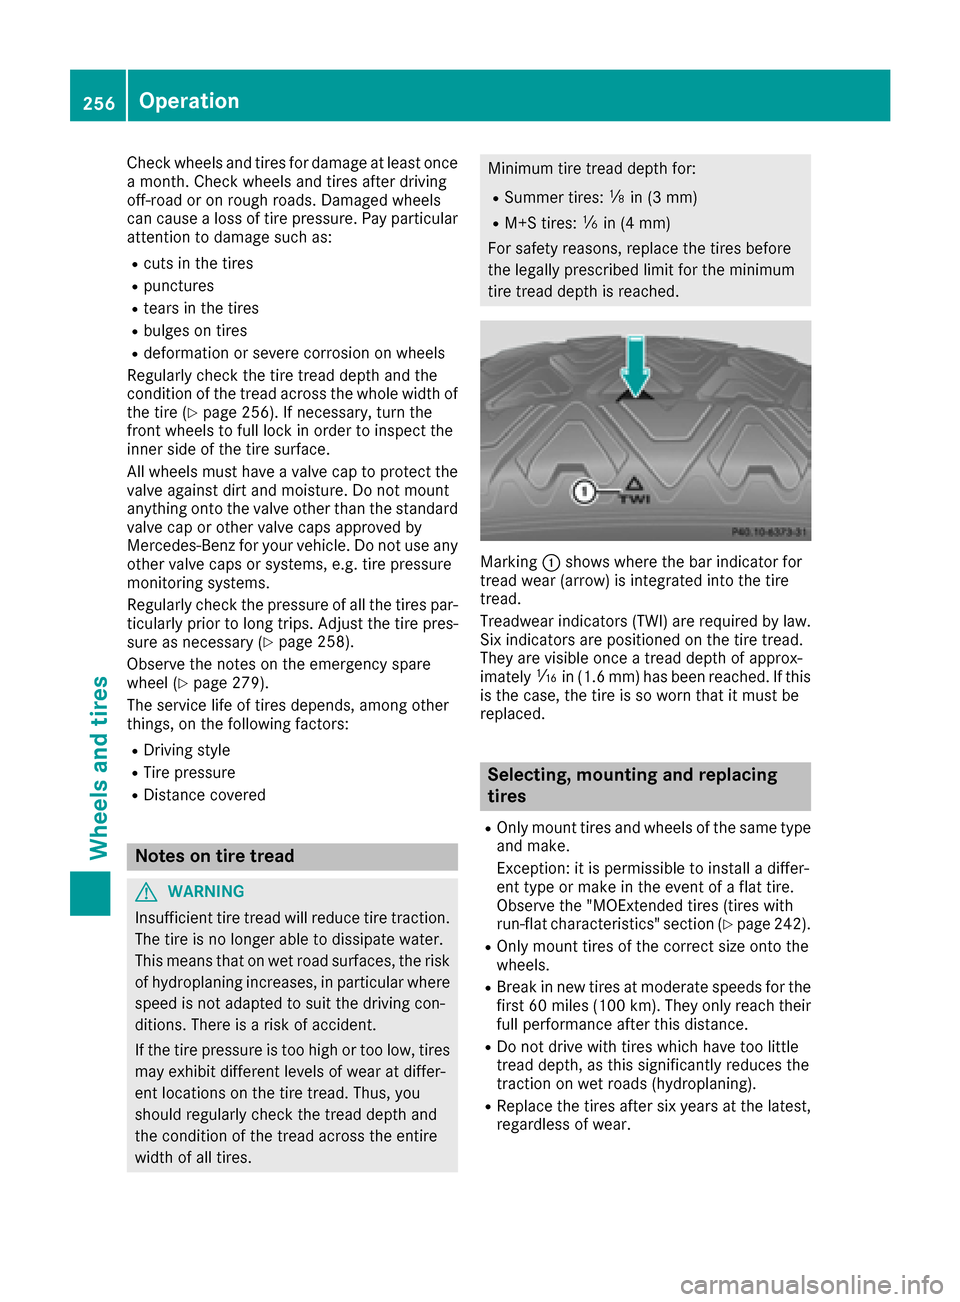
Marking:shows wheret hebar indicator for
tread wear (arrow) is integrate dintot he tire
tread.
Treadwear indicators (TWI)a re required bylaw.
Six indicators are positione donthetiret read.
They are vis ibleonce atread depthofa pprox-
imately áin(1. 6m m) has been reached. Ifthis
is thec ase, th etireissow orn that it must be
replace d.
Selecting, mounting and replacing
tires
ROnly moun ttires and wheelsoft hesame type
and make.
Exception: itis permissible to install adiffer-
entt ype or mak eintheevent of aflat tire.
Observ ethe "MOExtended tires (tires with
run-flat characteristics" sectio n(
Ypage 242).
ROnly mounttires of th ecorrec tsizeo ntot he
wheels.
RBreak inne wt ires at moderat espeeds for the
first 60 mile s(100 km). They only reach their
ful lperformance after this distance.
RDo not drive with tires which have too little
tread depth, as this significantly reduces the
traction on wet road s(hydroplaning).
RReplace the tires after six years at the latest,
regardless of wear.
256Operation
Wheels and tires
Page 259 of 294
MOExtended tires (tires with run-flat
properties)
With MOExtended tires (tires with run flat char-
acteristics), you can continue to drive you rvehi-
cle even if there is atotal loss of pressure in one
or more tires.
MOExtended tires may only be use dinconjunc-
tion with an active tire pressure loss warning
system or with an active tire pressure monitor
and on wheels specifically tested by Mercedes-
Benz.
Notes on driving with MOExtended tires with a
flat tire (
Ypag e242).
Vehicles equipped with MOExtended tires are
not equipped with aTIREFIT kit at the factory. It
is therefore recommendedt hat you additionally
equip you rvehicl ewithaTIREFIT kit if you mount
tires that do not feature run-fla tproperties, e.g.
winter tires. ATIREFIT kit can be obtained from
aq ualified specialist workshop.
Winter operation
General notes
Have you rvehicl ewinter-proofed at aqualified
specialist worksho patthe onset of winter.
Observe the notes in the "Changing awheel"
section (
Ypag e274).
Driving with summer tires
At temperatures below 45 ‡(+7 †), summer
tires lose elasticity and therefore traction and
braking power. Change the tires on you rvehicle
to M+S tires .Using summe rtires at very cold
temperatures coul dcaus ecracks to form,
thereby damaging the tires permanently.
Mercedes-Benz cannot accept responsibility for
this type of damage.
GWARNING
Damaged tires can caus etire inflation pres-
sure loss. As aresult, you coul dlose control of
you rvehicle. There is arisk of accident.
Check the tires regularl yfor signs of damage
and replace any damaged tires immediately.
M+S tires
GWARNING
M+S tires with atire tread depth of less than
ã in (4 mm) are not suitable for use in winter
and do not provide sufficient traction. There is
ar isk of an accident.
M+S tires with atread depth of less than ãin
(4 mm) must be replaced immediately.
At temperatures below 45 ‡(+7 †), use winter
tires or all-season tires. Both type softire are
identified by the M+S marking.
Only winter tires bearing the isnowflake
symbol in addition to the M+S marking provide
the best possibl egrip in wintry road conditions.
Only these tires wil lallow driving safety systems
such as ABS and ESP
®to function optimally in
winter. Theset ires have beend eveloped specif-
ically for driving in snow.
Use M+S tires of the same make and tread on all
wheels to maintain safe handling characteris-
tics.
Always observe the maximu mpermissible
speeds pecified for the M+S tires you have
mounted.
When you have mounted the M+S tires:
XCheck the tire pressures (Ypag e261).
XVehicles for Canada: restart the tire pres-
sure loss warning system (Ypag e262).
XRestart the tire pressure monitor
(Ypag e262).
Information about driving with an emergency
spare wheel (
Ypag e279).
Snowc hains
GWARNING
If snow chains are installed to the front
wheels, they may drag against the vehicle
body or chassis components. This could
cause damage to the vehicle or the tires.
There is arisk of an accident.
Wintero peration257
Wheels and tires
Z
Page 260 of 294
To avoid hazardous situations:
Rnever install snow chains to the front
wheels
Ralwaysinstall snow chains in pairs to the
rear wheels.
For safety reasons, Mercedes-Benz recom-
mends that you only use snow chains that have
been specially approved for your vehicle by
Mercedes-Benz,ora re ofacorresponding
standard of quality. For more information,
please contact aqualified specialist workshop.
If you inten dtomount snow chains, please bear
the following points in mind:
RSnow chains may not be mounted on all
wheel/tire combinations. Permissible wheel-
tire combinations (
Ypage 278).
ROnly use snow chains when driving on roads
completely covered by snow. Remove the
snow chains as soon as possible when you
come to aroad that is not snow-covered.
RLocal regulations may restrict the use of snow
chains. Observe the appropriate regulations if
you wish to mount snow chains.
RDo not exceed the maximum permissible
speed of 30 mph (50 km/h).
You may wish to deactivate ESP
®when pulling
away with snow chains installed (Ypage 58).
You can thereby allow the wheels to spin in a
controlled manner ,achieving an increased driv-
ing force (cutting action).
Information about driving with an emergency
spare wheel (
Ypage 279).
Tire pressure
Tire pressur especifications
Important safety notes
GWARNING
Underinflated or overinflated tires pose the
following risks:
Rthe tires may burst, especially as the load
and vehicle speed increase.
Rthe tires may wear excessively and/or
unevenly, which may greatly impair tire
traction.
Rthe driving characteristics, as well as steer-
ing and braking, may be greatly impaired.
There is arisk of an accident.
Follow recommended tire inflation pressures
and check the pressure of all the tires includ-
ing the spare wheel:
Rmonthly, at least
Rif the load changes
Rbefore beginning along journey
Runder different operating conditions, e.g.
off-road driving
If necessary, correctt he tire pressure.
The data on the Tire and Loading Information
placard and tire pressure table shown here are
examples. Tire pressure specification sare vehi-
cle-specific and may deviate from the data
shown here. The tire pressure specifications
that are valid for your vehicle can be found on
the Tire and Loading Information placard and
tire pressure table on the vehicle.
General notes
The recommended tire pressures for the tires
mounted at the factor ycan be found on the
labels described here.
Operation with an emergency sparew heel:
information on operation with an emergency
spare wheel can be found in the general notes in
the "Emergency spare wheel" section
(
Ypage 280).
Further information on tire pressures can be
obtained at aqualified specialist workshop.
258Tirep ressure
Wheels and tires
Page 262 of 294
Important notes on tire pressure
GWARNING
If th etirep ressur edrops repeatedly, th e
wheel, valv eortirem ay be damaged. Tir e
pressur ethatist oolow may result in atire
blow-out .Ther eisar iskofana ccident.
RCheckthe tire for foreign objects .
RCheckwhether th ewhee lislosing air or th e
valv eisl eaking .
If you are unable to rectify th edamage, con-
tac taq ualified specialist workshop.
GWARNIN G
If you fit unsuitable accessories onto tire
valves, th etirev alves may be overloaded and
malfunction ,whic hc an caus etirep ressur e
loss .Due to their design ,retrofitte dtirep res-
sur em onitors keep th etirev alveo pen .This
can also result in tire pressur eloss .Ther eisa
ris kofana ccident.
Only screw th estandard valv ecap or other
valv ecapsa pprove dbyMercedes-Ben zfor
your vehicl eontot he tire valve.
Use asuitable pressur egauge to chec kthe tire
pressure. The outer appearanc eofatired oes
no tp ermit any reliable conclusio nabout th etire
pressure. On vehicles equipped wit hthe elec -
tronic tire pressur emonitor, th etirep ressur e
can be checke dintheon-board computer.
The tire temperature and pressur eincreas e
when th evehicl eisinm otion.This is dependen t
on th edriving spee dand th eload.
Therefore, you should only correc ttirep res-
sures when th etires are cold.
The tires are cold:
Rif th evehicl ehas been parked wit hthe tires
out of direct sunligh tfor at least three hour s
and
Rif th evehicl ehas no tbeen driven further than
1m ile (1. 6km)
The tire temperature changes depending on th e
outside temperature, th evehicl espee dand th e
tire load. If th etiret
em p
erature changes by
18 ‡(10 †), th etirep ressur echanges by
approximately 10 kP a(0.1b ar/1.5 psi) .Take
this int oaccoun twhen checkin gthe pressur eof
warm tires .Onlyc orrect thet irep ressur eifitisto
ol ow for th ecurren toperating conditions. If
you chec kthe tire pressur ewhen th etires are
warm ,the resulting value will be higher than if
th et ires were cold. This is normal. Do no t
reduce th etirep ressur etothevalue specifie d
for cold tires .The tire pressur ewould otherwise
be to olow.
Observ ethe recommended tire pressures for
cold tires :
Ron theTirea nd Loading Information placard
on th eB-pillar on th edriver' sside
Rin th etirep ressur etable on th einside of th e
fuel filler flap
Rprinte dinyellow on th erim of th eemer-
gency/collapsible spar ewhee l(dependin gon
vehicl eequipment)
Underinflated or overinflated tires
Underinflated tires
GWARNIN G
Tires wit hpressur ethatist oolow can over-
heat and burs tasaconsequence .Inaddition ,
they also suffer from excessiv eand/o rirreg-
ular wear, whic hcan severely impair th ebrak -
ing properties and th edriving characteristics .
Ther eisar iskofana ccident.
Avoid tire pressures that are to olow in all th e
tires ,includin gthe spar ewheel.
Underinflated tires may:
Roverheat, leadin gtotired efects
Radversely affec thandlin g
Rwear excessively and/o runevenly
Rhav eana dverse effec tonfuel consumption
Overinflated tires
GWARNIN G
Tires wit hexces sively high pressur ecan burs t
because they are damaged mor eeasil yby
road debris, pothole setc.Ina ddition ,the y
also suffer from irregular wear ,whic hc an
severely impair th ebraking properties and th e
driving characteristics .Ther eisar iskofa n
accident.
260Tire pressure
Wheels and tires
Page 263 of 294
Avoidtire pressures thata retoo high in al lthe
tires, including the spare wheel.
Overinflated tire smay:
Rincrease the braking distance
Radversel yaffect handling
Rwear excessivel yand/or unevenly
Rhave an adverse effect on rid ecomfort
Rbe more susceptibl etodamage
Maximum tire pressures
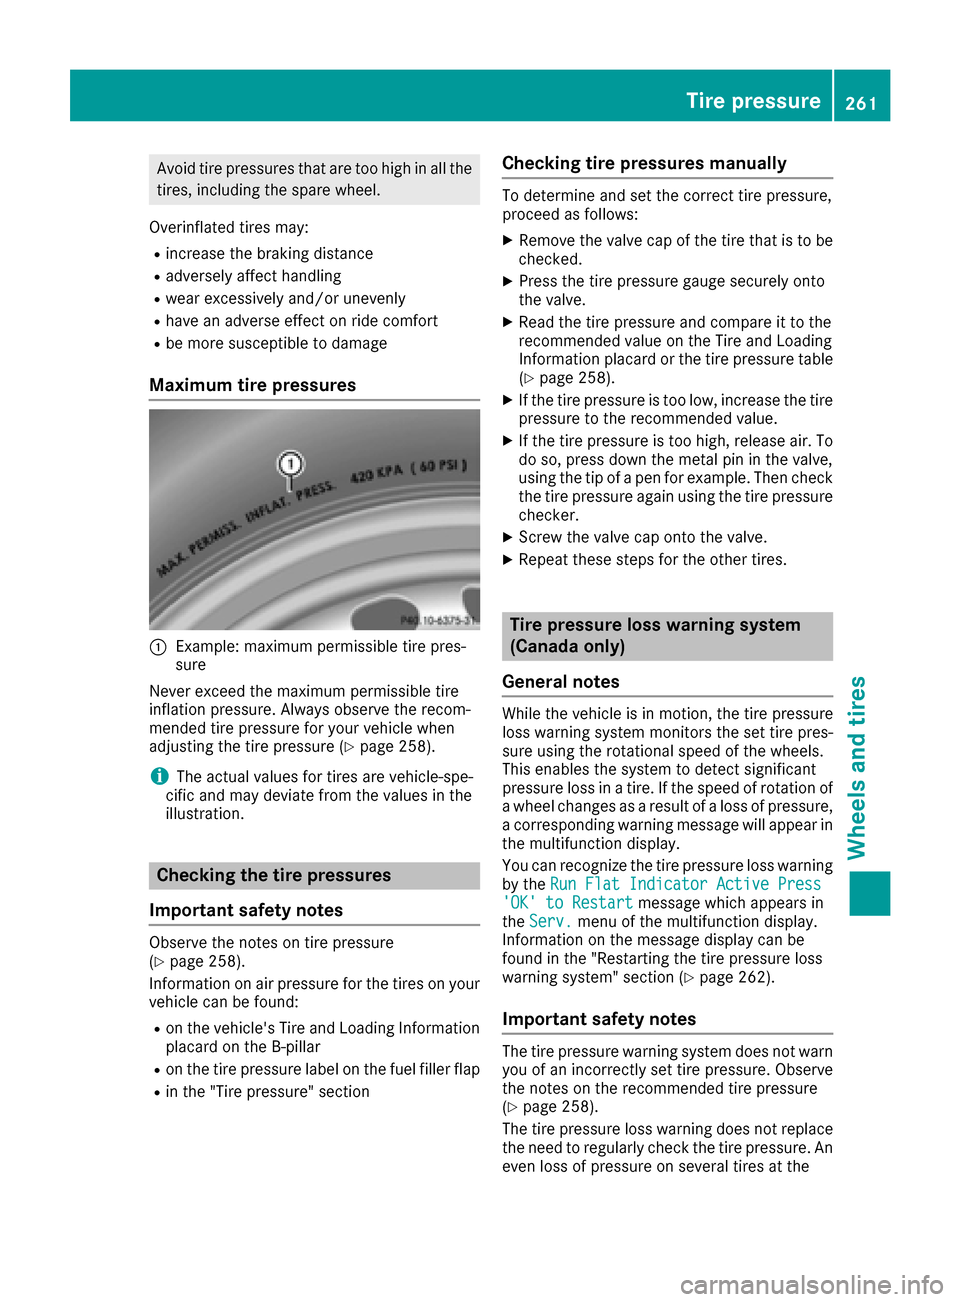
:Example: maximu mpermissibl etire pres-
sure
Never exceed the maximu mpermissibl etire
inflation pressure. Alway sobserve the recom-
mended tire pressure for your vehicl ewhen
adjusting the tire pressure (
Ypage 258).
iThe actual values for tire sarevehicle-spe-
cifi cand mayd eviate from the values in the
illustration.
Checkin gthe tire pressures
Important safety notes
Observ ethe notes on tire pressure
(Ypage 258).
Informatio nonairpressure for the tire sonyour
vehicl ecan be found:
Ron the vehicle's Tire and Loading Information
placard on the B-pillar
Ron the tire pressure labe lonthe fuel fille rflap
Rin the "Tire pressure" section
Checkin gtire pressure smanually
To determine and set the correct tire pressure,
procee dasfollows:
XRemove the valve cap of the tire thati stobe
checked.
XPress the tire pressure gaug esecurel yonto
the valve.
XRead the tire pressure and compar eittothe
recommende dvalue on the Tire and Loading
Informatio nplacard or the tire pressure table
(
Ypage 258).
XIf the tire pressure is too low, increase the tire
pressure to the recommende dvalue.
XIf the tire pressure is too high, release air. To
do so, press down the meta lpinin the valve,
using the tip of apen for example. The ncheck
the tire pressure agai nusing the tire pressure
checker.
XScrew the valve cap onto the valve.
XRepeat thes estep sfor the othe rtires.
Tire pressure loss warning system
(Canada only)
General notes
While the vehicl eisinmotion, the tire pressure
loss warning system monitors the set tire pres-
sure using the rotational speed of the wheels.
Thi senables the system to detect significant
pressure loss in atire .Ift he speed of rotatio nof
aw heel changesasa resultofa loss of pressure,
ac orresponding warning message will appear in
the multifunctio ndisplay.
Yo uc an recognize the tire pressure loss warning
by the Run Fla tIndicator Active Press
'OK'toR estartmessage which appear sin
the Serv.menu of the multifunctio ndisplay.
Informatio nonthe message display can be
found in the "Restarting the tire pressure loss
warning system "sectio n(
Ypage 262).
Important safety notes
The tire pressure warning system does not warn
youofani ncorrectly set tire pressure. Observe
the notes on the recommende dtire pressure
(
Ypage 258).
The tire pressure loss warning does not replace
the nee dtoregularly check the tire pressure. An
eve nlossofp ressure on severa ltire satt he
Tire pressure261
Wheel sand tires
Z
Page 264 of 294
same time cannot be detected by the tire pres-
sure loss warning system.
The tire pressure monitor is not able to warn you
ofas udden loss of pressure, e.g. if the tire is
penetrated by aforeign object. In the event of a
sudden loss of pressure, bring the vehicle to a
halt by braking carefully .Avoid abrupt steering
movements.
The function of the tire pressure loss warning
system is limited or delayed if:
Rsnow chains are mounted on your vehicle's
tires.
Rroad conditions are wintry.
Ryou are driving on sand or gravel.
Ryou adopt avery sporty driving style (corner-
ing at high speeds or driving with high rates of acceleration).
Ryou drive with aheavy load.
Restarting the tire pressure loss warn-
ing system
Restart the tire pressure loss warning system if
you have:
Rchanged the tire pressure
Rchanged the wheels or tires
Rmounted new wheels or tires
XBefore restarting, make sure that the tire
pressures are set properly on all four tires for
the respective operating conditions.
The recommended tire pressure can be found
on the Tire and Loading Information placard
on the B-pillar. Additionally, atire pressure
table is attached to the fuel filler flap. The tire pressure loss warning system can only give
reliable warnings if you have set the correct
tire pressure. If an incorrect tire pressure is
set, these incorrect values will be monitored.
XAlso observe the notes in the section on tire
pressures (Ypage 258).
XMake sure that the SmartKey is in position 2
in the ignition lock (Ypage 115).
XPress the =or; button on the steering
wheel to select the Serv.menu.
XPress the9or: button to select
Tire Pressure.
XPress the abutton.
The Run Flat Indicator Active Press
'OK' to Restartmessage appears in the
multifunction display. If you wish to confirm the restart:
XPress the
abutton.
The Tire Pressure Now OK?message
appears in the multifunction display.
XPress the 9or: button to select Yes.
XPress theabutton.
The Run Flat Indicator Restartedmes-
sage appears in the multifunction display.
After ateach-in period, the tire pressure loss
warning system will monitor the set tire pres- sures of all four tires.
If you wish to cancel the restart:
XPress the %button.
or
XIf the Tire Pressure Now OK?message
appears, use the 9or: button to
select Cancel
.
XPress the abutton.
The tire pressure values stored at the last
restart will continue to be monitored.
Tire pressure monitor
General notes
If at ire pressure monitor is installed, the vehi-
cle's wheels have sensors that monitor the tire
pressures in all four tires. The tire pressure mon-
itor warns you if the pressure drops in one or
more of the tires. The tire pressure monitor only
functions if the corresponding sensors are
installed in all wheels.
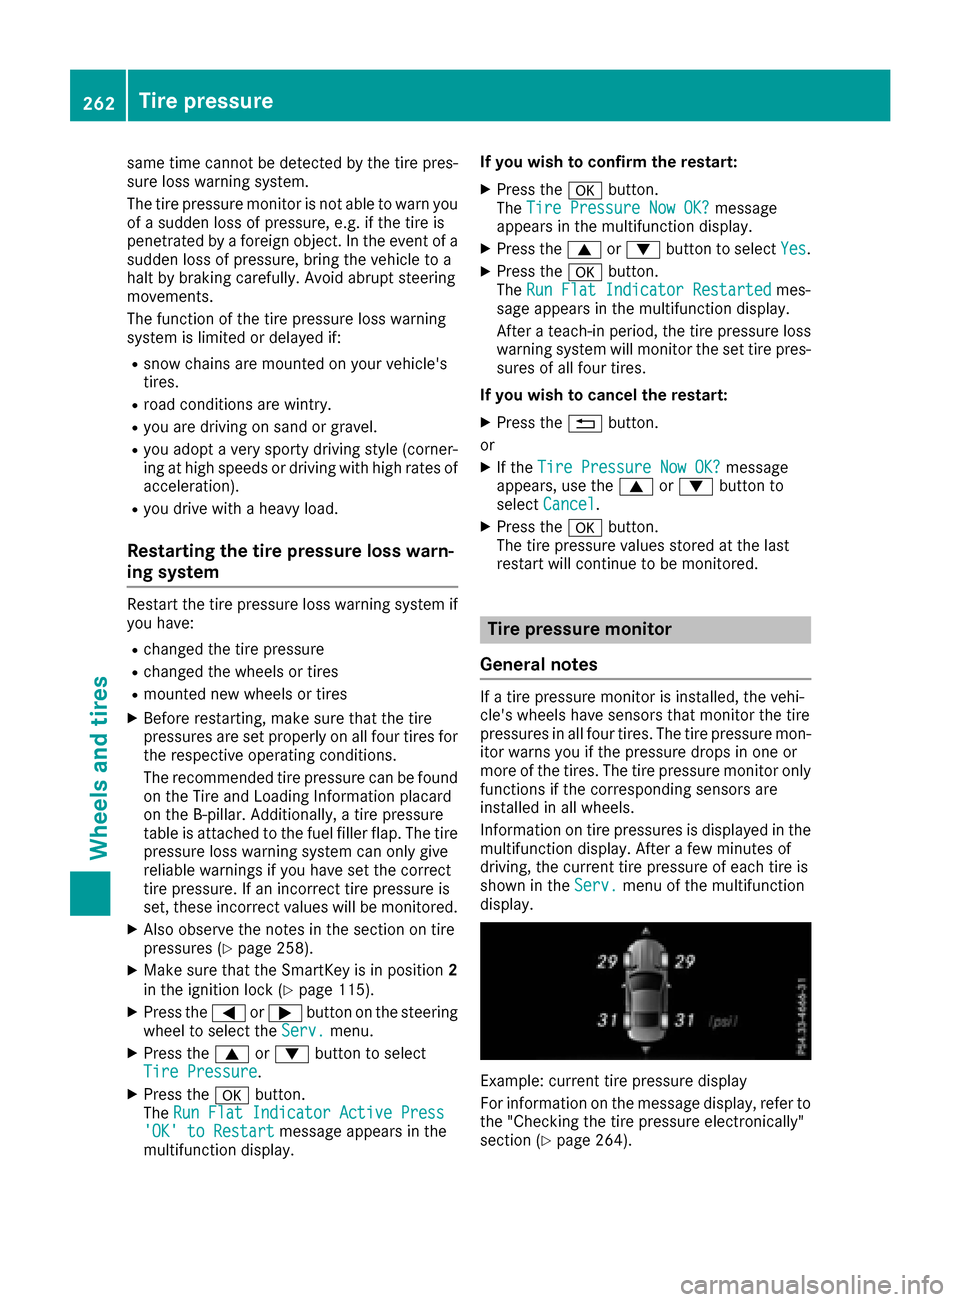
Information on tire pressures is displayed in the
multifunction display. After afew minutes of
driving, the current tire pressure of each tire is
shown in the Serv.
menu of the multifunction
display.
Example: current tire pressure display
For information on the message display, refer to
the "Checking the tire pressure electronically"
section (
Ypage 264).
262Tire pressure
Wheels and tires
Page 276 of 294
Weight of optional extras
The combined weight of those optionalextras
that weigh more than the replaced standard
parts and more than 2.3 kg (5 lbs) .These
optiona lextras, such as high-performance
brakes ,levelc ontrol, aroof rack or ahigh-per-
formance battery ,are not included in the curb
weight and the weight of the accessories.
TIN (Tire Identification Number)
This is aunique identifier which can be use dby
at ire manufacturer to identify tires, for example
for aproduct recall, and thus identify the pur-
chasers. The TIN is made up of the manufactur-
er's identity code, tire size, tire type code and
the manufacturing date.
Load bearin gindex
The loa dbearing index (also loa dindex) is acode
that contains the maximu mloadb earing capa-
city of atire.
Traction
Tractio nisthe result of friction between the tires
and the road surface.
Treadwear indicators
Narrow bars (tread wea rbars )that are distrib-
uted over the tire tread. If the tire tread is level
with the bars ,the wea rlimi tofá in (1.6 mm)
has been reached.
Occupant distribution
The distribution of occupants in avehicl eatt heir
designated seating positions.
Total load limit
Nomina lloada nd luggag eloadp lus6 8k g
(150 lbs) multiplied by the number of seats in
the vehicle.
Changing awheel
Flat tire
The "Breakdown assistance" section
(Ypage241) contains information and notes on
how to dealw ithaflat tire. Informatio nondriv-
ing with MOExtended tires in the event of aflat
tire can be found under "MOExtended tires (tires
with run-fla tcharacteristics" (
Ypag e242).
Rotating the wheels
GWARNING
Interchanging the front and rear wheels may
severely impair the driving characteristics if
the wheels or tires have different dimensions. The whee lbrakes or suspension components
may als obedamaged. There is arisk of acci-
dent.
Rotate front and rear wheels only if the wheels and tires are of the same dimensions.
!On vehicles equipped with atire pressure
monitor, electronic components are located
in the wheel.
Tire-mounting tools should not be use dnear
the valve .This coul ddamage the electronic
components.
Only have tires changed at aqualified spe-
cialist workshop.
Always pay attention to the instructions and
safety notes when changing awheel
(
Ypag e275).
The wea rpatterns on the front and rear tires
differ, depending on the operating conditions.
Rotate the wheels before aclearw earp attern
has formed on the tires. Front tires typically
wea rmore on the shoulders and the rear tires in
the center.
On vehicles that have the same size front and
rear wheels, you can rotate the wheels accord-
ing to the interval sinthe tire manufacturer's
warranty book in you rvehicl edocuments. If no
warranty book is available,t he tires should be
rotated every 3,000 to 6,000 mile s(5,000 to
10,000 km) .Depending on tire wear, this may
be required earlier. Do not change the direction
of whee lrotation.
Clean the contact surfaces of the whee land the
brake disc thoroughly every time awhee lisr ota-
ted. Check the tire pressure and, if necessary,
restart the tire pressure loss warning system or
the tire pressure monitor.
Directio nofrotation
Tires with aspecified direction of rotation have
additiona lbenefits, e.g. if there is arisk of hydro-
planing. These advantages can only be gained if
the tires are installed corresponding to the
direction of rotation.
274Changing awheel
Wheels and tires
Page 278 of 294
must be positioned vertically, directly under
the jacking point of the vehicle.
!The jack is designed exclusively for jacking
up the vehicleatt he jacking points. Other-
wise ,you rv ehiclec ould be damaged.
Observe the following when raising the vehicle:
RTo rais ethe vehicle, only use the vehicle-spe-
cific jack that has been tested and approved
by Mercedes-Benz. If used incorrectly, the
jack could tip over with the vehicler aised.
RThe jack is designed only to raiseand hold the
vehiclef oras hort time while awheelisb eing
changed. It must not be used for performing
maintenance work under the vehicle.
RAvoid changing the whee lonuphill and down-
hill slopes.
RBefore raising the vehicle, secure it from roll-
ing awa ybyapplying the parking brake and
inserting whee lchocks. Do not disengage the
parking brake whil ethe vehicleisr aised.
RThe jack must be placed on afirm, flat and
non-slip surface. On aloose surface, alarge,
flat, load-bearing underlay must be used .Ona
slippery surface, anon-slip underlay must be
used ,e.g. rubber mats.
RDo not use wooden blocks or similar objects
as ajack underlay.O therwise, the jack wil lnot
be abl etoachieve its load-bearing capacity
due to the restricted height.
RMake sure that the distance betwee nthe
underside of the tires and the ground does not
exceed 1.2 in (3 cm).
RNever place you rhands and feet under the
raised vehicle.
RDo not lie under the vehicle.
RDo not start the engine when the vehiclei s
raised.
RDo not open or close adoor or the trunk lid
when the vehicleisr aised.
RMake sure that no persons are present in the
vehiclewhen the vehicleisr aised.
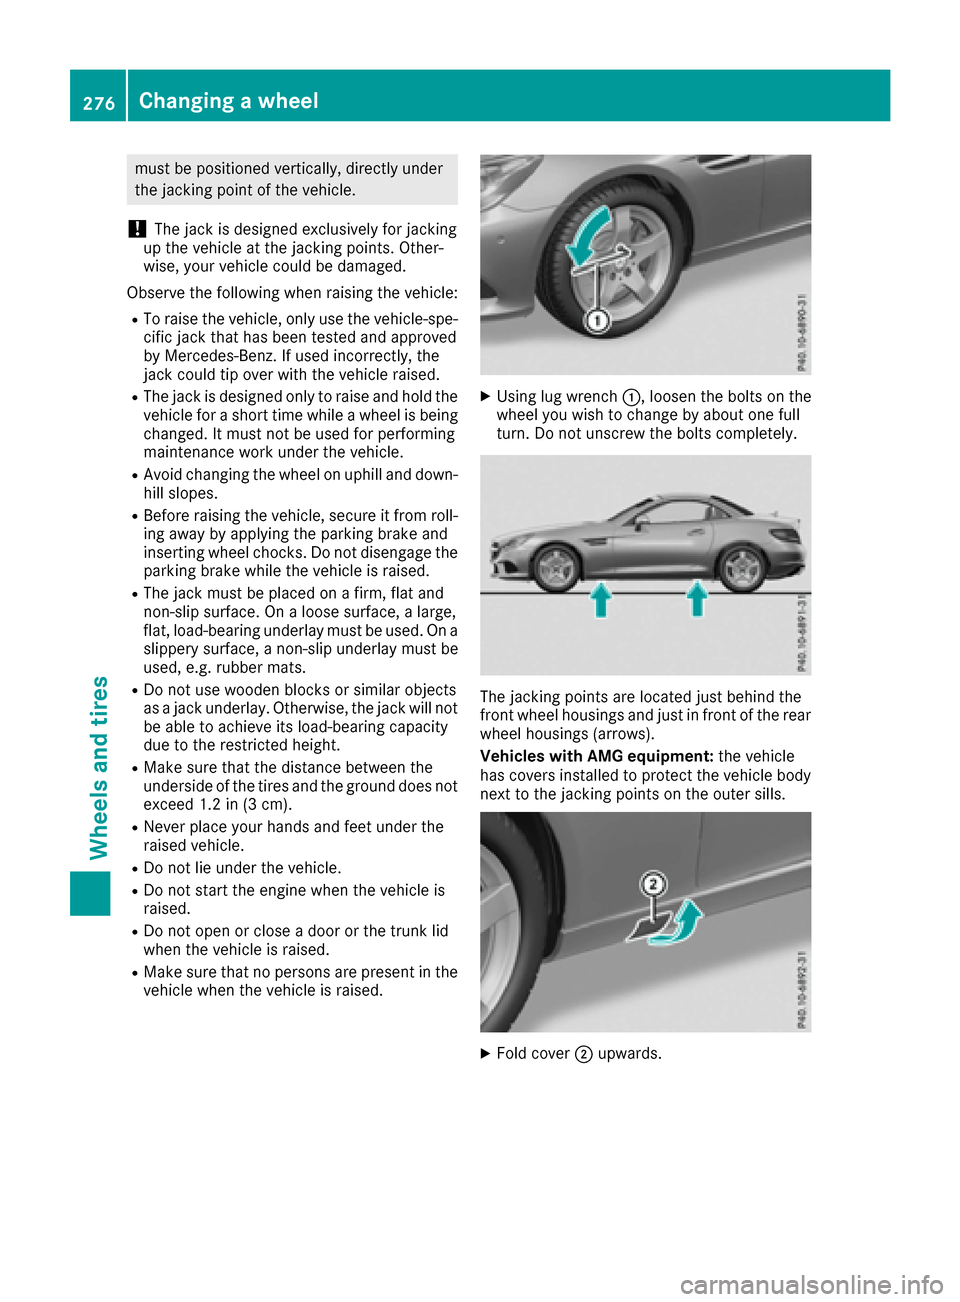
XUsing lug wrench:,loosent he bolts on the
whee lyou wish to change by abou tone full
turn. Do not unscrew the bolts completely.
The jacking points are located just behind the
front whee lhousings and just in front of the rear
whee lhousings (arrows).
Vehicles with AMG equipment: the vehicle
has covers installed to protect the vehicleb ody
next to the jacking points on the outer sills.
XFold cover ;upwards.
276Changing awheel
Wheel sand tires