heating MERCEDES-BENZ SLC-Class 2017 R172 Owner's Manual
[x] Cancel search | Manufacturer: MERCEDES-BENZ, Model Year: 2017, Model line: SLC-Class, Model: MERCEDES-BENZ SLC-Class 2017 R172Pages: 294, PDF Size: 7.28 MB
Page 12 of 294
Hazard warninglamps
Display message ............................ 201
Head bags
Display message ............................ 186
Operation .........................................4 4
Head level heating (AIRSCARF) .......... 85
Head restraints
Adjusting .........................................8 4
see NECK-PRO head restraints
Headlamps
see Automatic headlamp mode
Heating
see Climate control
High beam flasher ...............................9 4
High-beam headlamps
Changing bulbs ................................ 98
Display message ............................ 189
Switching on/off .............................. 94
Hill start assist .................................. 117
HOLD function
Activating ....................................... 148
Activation conditions .....................1 48
Deactivating ................................... 148
Display message ............................ 192
General notes ................................ 148
Home address
see also Digita lOperator's Man-
ua l..................................................2 11
Hood
Closing ...........................................2 32
Display message ............................ 200
Important safety notes .................. 231
Opening ......................................... 231
Horn ...................................................... 30
Hydroplaning ..................................... 138
I
Ignitionlock
see Key positions
Immobilizer .......................................... 61
Indicator lamps
see Warning and indicator lamps
Indicators
see Turn signals
Instrument cluster
Overview .......................................... 31
Instrument cluster lighting .............. 163Interior lighting
Automatic control ............................ 97
Delaye dswitch-off (on-board
computer) ...................................... 173
Overview .......................................... 97
Reading lamp ................................... 97
Setting the brightness of the
ambient lighting (on-board com-
puter) ............................................. 172
Setting the color of the ambient
lighting (on-board computer) ......... 173
iPod
®
see also Digita lOperator's Man-
ua l..................................................2 11
J
Jack
Storage location ............................ 241
Using ............................................. 275
Jump starting (engine) ......................249
K
Keyp ositions
KEYLESS-GO .................................. 115
SmartKey ....................................... 115
KEYLESS-GO
Activating ......................................... 63
Convenience closing feature ............ 74
Deactivation ..................................... 63
Display message ............................ 202
Locking ............................................ 63
Removing the Start/Stop button ... 116
Start/Stop button .......................... 115
Starting the engine ........................ 117
Unlocking ......................................... 63
Kickdown
Driving tips ....................................1 25
Manual gearshifting ....................... 127
Kne ebag.............................................. 43
L
Lamps
see Warning and indicator lamps
Lane Keepin gAssist
Activating/deactivating ................. 171
Display message ............................ 193
10Index
Page 17 of 294
see also Digital Operator's Man-
ual .................................................. 211
Selecting ........................................169
Search&S end
see also Digita lOperator's Man-
ua l..................................................2 11
Seat belts
Adjusting the driver's and front-
passenger seatb elt......................... 41
Correct usag e.................................. 40
Fastening ......................................... 40
Important safety guideline s............. 39
Introduction ..................................... 38
Releasing ......................................... 41
Switching belt adjustment on/off
(on-board computer) ...................... 174
Warning lamp ................................. 203
Warning lamp (function) ................... 41
Seats
Adjusting (electrically) ..................... 84
Adjusting (manually) ........................ 84
Adjusting the 4-wa ylum bars up-
por t.................................................. 84
Adjusting the hea drestraint ............ 84
Correct driver' sseatp osition ........... 82
Important safety notes .................... 82
Overview .......................................... 82
Seath eating problem ...................... 85
Storing settings (memory func-
tion) ................................................. 91
Switching AIRSCAR Fon/of f............ 85
Switching sea theating on/of f......... 85
Selecto rlever
Positions ........................................ 122
Sensors (cleaning instructions) ....... 240
Servic emenu( on-board com-
puter) .................................................. 172
Servic emessage
see ASSYST PLUS
Servic eproducts
Brake fluid ..................................... 287
Coolant (engine) ............................ 287
Engine oil. ...................................... 286
Fue l................................................ 285
Important safety notes .................. 284
Refrigerant (air-conditioning sys-
tem) ............................................... 288
Washe rfluid ................................... 288 Setting the air distribution
............... 109
Setting the airflow ............................ 109
Setting the date/time format
see also Digital Operator's Man-
ual.................................................. 211
Setting the language
see al so Di
gital Operator's Man-
ua l.................................................. 211
Setting the time
see also Digital Operator's Man-
ual.................................................. 211
Settings
Factory (on-board computer) ......... 175
On-board compute r....................... 172
SETUP (on-board computer) ............. 175
Side impac tair bag ............................. 43
Side marker lamp
Changing bulb s(rear) ....................... 99
Side marker lamp (display mes-
sage) ................................................... 189
Side windows
Cleaning ......................................... 239
Convenience closing feature ............ 74
Important safety information ........... 72
Opening/closing (all )....................... 73
Opening/closing (front) ................... 73
Overview .......................................... 72
Problem (malfunction) ..................... 75
Resetting ......................................... 74
Reversing feature ............................. 72
SIRIU Sservices
see also Digital Operator's Man-
ua l.................................................. 211
SmartKey
Changing the battery ....................... 66
Changing the programming ............. 64
Checking the battery ....................... 66
Displa ymessage ............................ 201
Door centra lloc king/unlocking ....... 63
Important safety notes .................... 63
Loss. ................................................ 67
Mechanical key ................................ 65
Opening/closing the roo f................ 77
Overview .......................................... 63
Positions (ignition lock) ................. 115
Problem (malfunction) ..................... 67
Starting the engine ........................ 117
Index15
Page 35 of 294
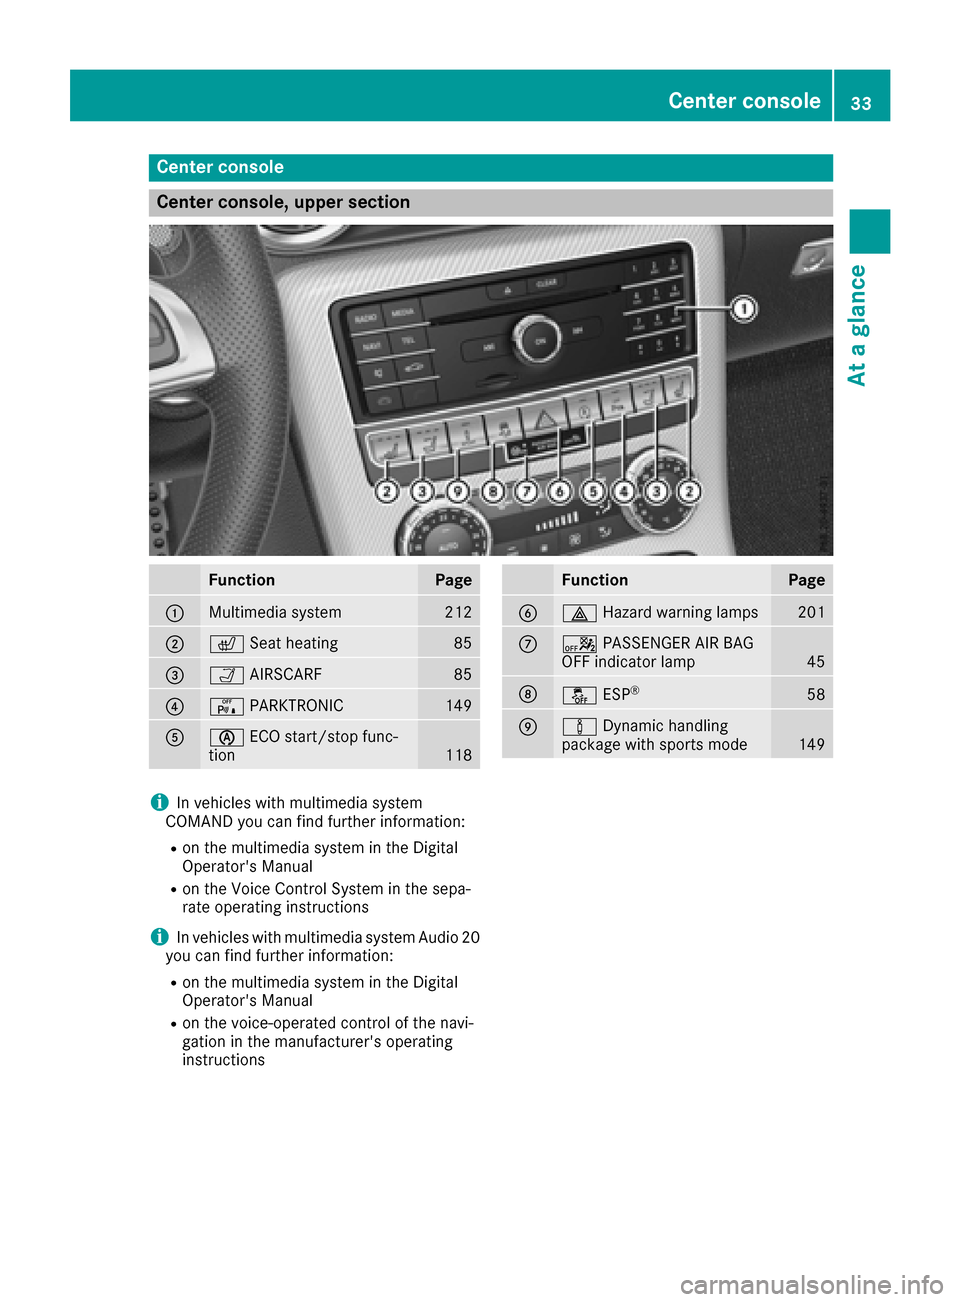
Center console
Center console, upper section
FunctionPage
:Multimedia system212
;cSeat heating85
=ÒAIRSCARF85
?cPARKTRONIC149
AèECO start/sto pfunc-
tion118
FunctionPage
B£ Hazard warning lamps201
CaPASSENGER AI RBAG
OFFi ndicator lamp45
Då ESP®58
EàDynamic handling
package withs ports mode149
iIn vehicleswithm ultimedia system
COMAND you can fin dfurther information:
Ron th emultimedia system in th eDigital
Operator's Manual
Ron th eVoiceC ontrol Syste minthesepa-
rat eo peratin ginstructions
iIn vehicle swithm ultimedia system Audi o20
you can fin dfurther information:
Ron th emultimedia system in th eDigital
Operator's Manual
Ron th evoice-operate dcontrol of th enavi-
gation in th emanufacturer'so perating
instructions
Center console33
At ag lance
Page 70 of 294
ProblemPossible causes/consequences andMSolutions
The engine cannot be
started using the Smart-
Key.The on-board voltage is too low.
XSwitch off non-essential consumers, e.g. seat heating or interior
lighting, and try to start the engine again.
If this does not work:
XCheck the starter battery and charge it if necessary (Ypage 248).
or
XJump-start the vehicle (Ypage 249).
or
XConsult aqualified specialist workshop.
The engine cannot be
started using KEYLESS-
GO. The SmartKey is in
the vehicle.The vehicle is locked.
XUnlock the vehicle and try to start the vehicle again.
The SmartKey battery is discharged or nearly discharged.
XCheck the SmartKey battery (Ypage 66) and replace it if necessary
(Ypage 66).
If this does not work:
XStart your vehicle with the SmartKey in the ignition lock.
There is interference from apowerful source of radio waves.
XStart your vehicle with the SmartKey in the ignition lock.
You have lost aSmart-
Key.XHave the SmartKey deactivated at aqualified specialist workshop.
XReport the loss immediately to the vehicle insurers.
XIf necessary, have the locks changed as well.
You have lost the
mechanical key.XReport the loss immediately to the vehicle insurers.
XIf necessary, have the locks changed as well.
Doors
Important safety notes
GWARNING
If children are left unsupervised in the vehicle,
they could:
Ropen the doors, thus endangering other
people or road users.
Rget out and disrupt traffic.
Roperate the vehicle's equipment.
Additionally, children could set the vehicle in
motion if, for example, they:
Rrelease the parking brake.
Rshifting the automatic transmission out of
park position P
RStart the engine.
There is arisk of an accident and injury.
When leaving the vehicle, always take the
SmartKey with you and lock the vehicle. Never
leave children or animals unattended in the
vehicle. Always keep the SmartKey out of
reach of children.
68Doors
Opening and closing
Page 85 of 294
The seats can still be adjusted when there is no
SmartKey in the ignition lock.
GWARNING
When you adjust aseat, you or other vehicle
occupantsc ould become trapped, e.g. on the
seat guide rail. There is arisk of injury.
Make sure when adjusting aseat that no one
has any body parts in the sweep of the seat.
Observe the safety notes on "Air bags"
(
Ypage 42) and "Children in the vehicle"
(Ypage 51).
GWARNING
If the driver's seat is not engaged, it could
move unexpectedly while the vehicle is in
motion .This could cause you to lose control of
the vehicle. There is arisk of an accident.
Always make sure that the driver's seat is
engaged before starting the vehicle.
GWARNING
If you adjust the seat height carelessly, you or
other vehicle occupantsc ould be trapped and
thereby injured. Children in particular could
accidentally press the electrical seat adjust-
ment button sand become trapped. There is a
risk of injury.
While moving the seats, make sure that your
hands or other body parts do not get under the
lever assembly of the seat adjustmen tsys-
tem.
GWARNING
If the head restraints are not installed or not
adjusted correctly, they cannot provide pro-
tection as intended. There is an increased risk
of injury in the head and neck area, e.g. in the event of an accident or when braking.
Always drive with the head restraints instal-
led. Before driving off, make sure for every
vehicle occupant that the center of the head
restraint supports the back of the head at
about eye level.
GWARNING
You could lose control of your vehicle if you do the following while driving:
Radjust the driver's seat, head restraint,
steerin gwheel or mirrors
Rfasten the seat belt
There is arisk of an accident.
Adjust the driver's seat, head restraint, steer-
ing wheel and mirror and fasten your seat belt before starting the engine.
!To avoid damage to the seats and the seat
heating, observe the following information:
Rkeep liquids from spilling on the seats. If
liquid is spilled on the seats, dry them as
soon as possible.
Rif the seat covers are damp or wet, do not
switch on the seat heating. The seat heat-
ing should also not be used to dry the seats.
Rclean the seat covers as recommended;
see the "Interior care" section.
Rdo not transport heavy loads on the seats.
Do not place sharp object sonthe seat
cushions, e.g. knives, nails or tools. The
seats should only be occupied by passen-
gers, if possible.
Rwhen the seat heating is in operation, do
not cover the seats with insulating materi-
als, e.g. blankets ,coats, bags, seat covers,
child seats or booster seats.
!Make sure that there are no object sinthe
footwell under or behind the seats when mov-
ing the seats back. There is arisk that the
seats and/or the object scould be damaged.
iThe head restraints are equipped with the
NECK-PRO system (Ypage 50). For this rea-
son, it is not possible to remove the head
restraints from the seats.
For more information, contact aqualified spe-
cialist workshop.
Seats83
Seats, steering wheel and mirrors
Z
Page 87 of 294
You can adjust the contour of the seat backrests
individually to provide optimum support for your
back.
Switching theseat heating on/off
Switching on/off
GWARNING
Repeatedly switching on the seat heatin gcan
cause the seat cushio nand backrest pads to
becom every hot.T he health of personsw ith
limited temperature sensitivity or alimited
ability to react to excessively high tempera-
ture smay be affected or the ymay even suffer
burn-like injuries. There is arisk of injury.
Therefore, do not switc hthe seat heatin gon
repeatedly.
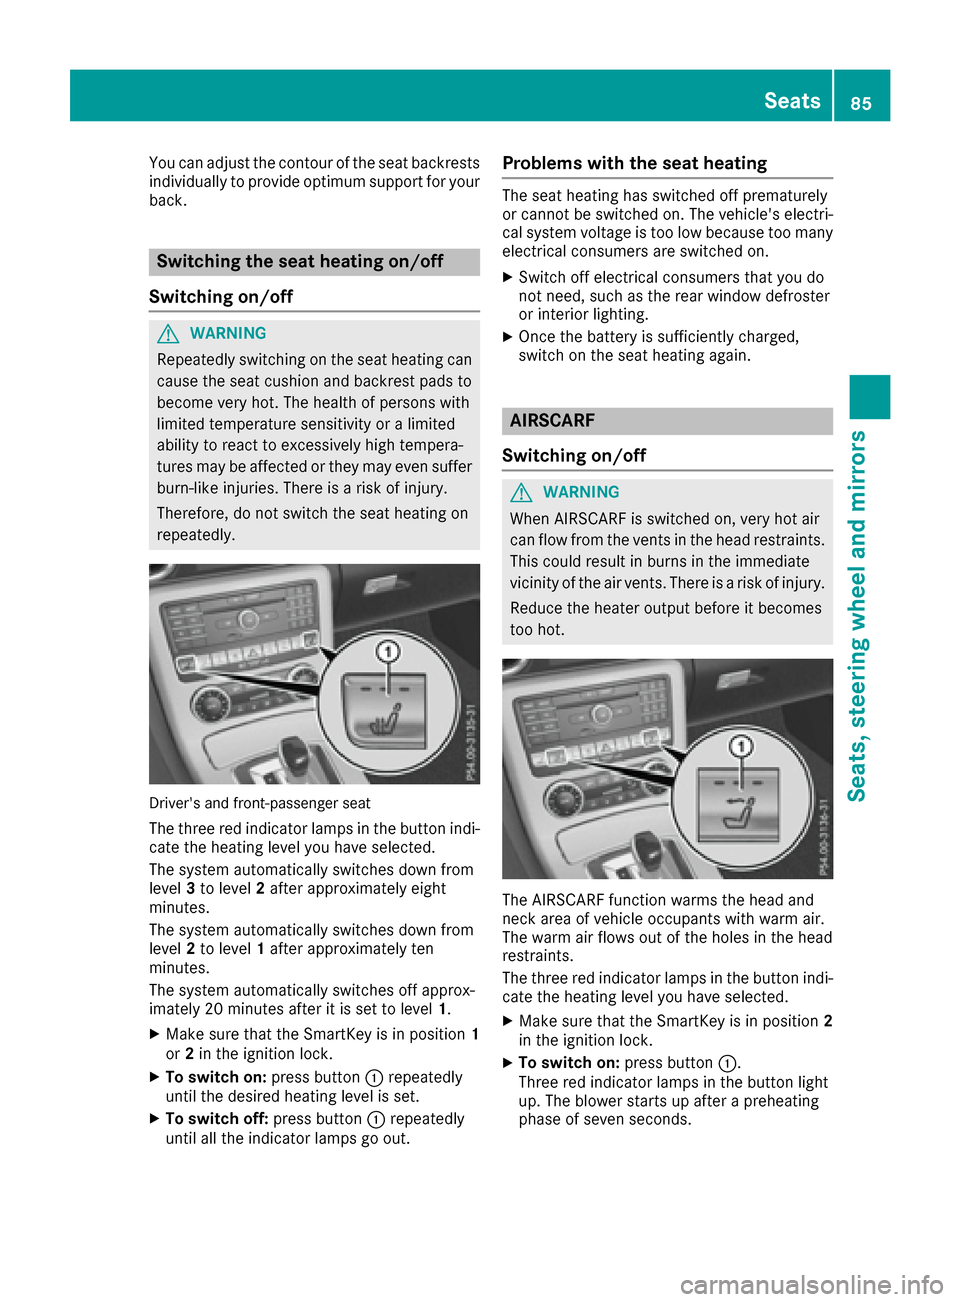
Driver'sa nd front-passenger seat
The three red indicator lamps in the button indi-
cat ethe heatin glevel you have selected.
The syste mautomatically switches down from
level 3to level 2afte rapproximately eight
minutes.
The syste mautomatically switches down from
level 2to level 1afte rapproximately ten
minutes.
The syste mautomatically switches off approx-
imately 20 minutes afte ritisset to level 1.
XMake sure that the SmartKey is in position 1
or 2in the ignition lock.
XTo switch on: press button:repeatedly
until the desired heatin glevel is set.
XTo switch off: press button:repeatedly
until all the indicator lamps go out.
Problem swith th eseat heating
The seat heatin ghas switched off prematurely
or cannot be switched on. The vehicle's electri-
cal syste mvoltage is too low because too many
electrical consumers are switched on.
XSwitch off electrical consumers that you do
not need, such as the rear window defroster
or interior lighting.
XOnc ethe battery is sufficiently charged,
switc hont he seat heatin gagain.
AIRSCARF
Switching on/off
GWARNING
When AIRSCARF is switched on, very hot air
can flow from the vents in the head restraints. This could result in burns in the immediate
vicinity of the air vents. There is arisk of injury.
Reduce the heater output beforeitb ecomes
too hot.
The AIRSCARF function warms the head and
nec karea of vehicle occupant swith warm air.
The warm air flows out of the holes in the head
restraints.
The three red indicator lamps in the button indi-
cat ethe heatin glevel you have selected.
XMake sure that the SmartKey is in position 2
in the ignition lock.
XTo switch on: press button:.
Three red indicator lamps in the button light
up. The blower starts up afte rapreheating
phase of seven seconds.
Seats85
Seats, steering wheel and mirrors
Z
Page 88 of 294
XPress button:repeatedly until the desired
heating level is set.
XTo switch off: press button:repeatedly
until all the indicator lamps go out.
iThe blower continues runnin gfor seven sec-
onds to cool down the heating elements.
iIf the battery voltage is too low, AIRSCARF
may switch off.
Problems with AIRSCARF
AIRSCARF has switched off prematurely or will
not switch on. The vehicle's electrical system
voltage is too low because too many electrical
consumers are switched on.
XSwitc hoff electrical consumers that you do
not need, such as the rear window defroster
or interior lighting.
XSwitc honA IRSCARF again.
Steering wheel
Important safety notes
GWARNING
You could lose control of your vehicle if you do the following while driving:
Radjust the driver's seat, head restraint,
steerin gwheel or mirrors
Rfasten the seat belt
There is arisk of an accident.
Adjust the driver's seat, head restraint, steer-
ing wheel and mirror and fasten your seat belt before starting the engine.
GWARNING
Children could injure themselves if they
adjust the steerin gwheel. There is arisk of
injury.
When leaving the vehicle, alwayst ake the
SmartKey with you and lock the vehicle. Never
leave children unsupervised in the vehicle.
The electrically adjustable steerin gwheel can
still be adjusted when there is no SmartKey in
the ignition lock.
Adjusting the steering wheel man-
ually
GWARNING
If the steerin gwheel is unlocked while the
vehicle is in motion ,itcould change position
unexpectedly. This could cause you to lose
control of the vehicle. There is arisk of an
accident.
Before starting off, make sure the steering
wheel is locked. Never unlock the steering
wheel while the vehicle is in motion.
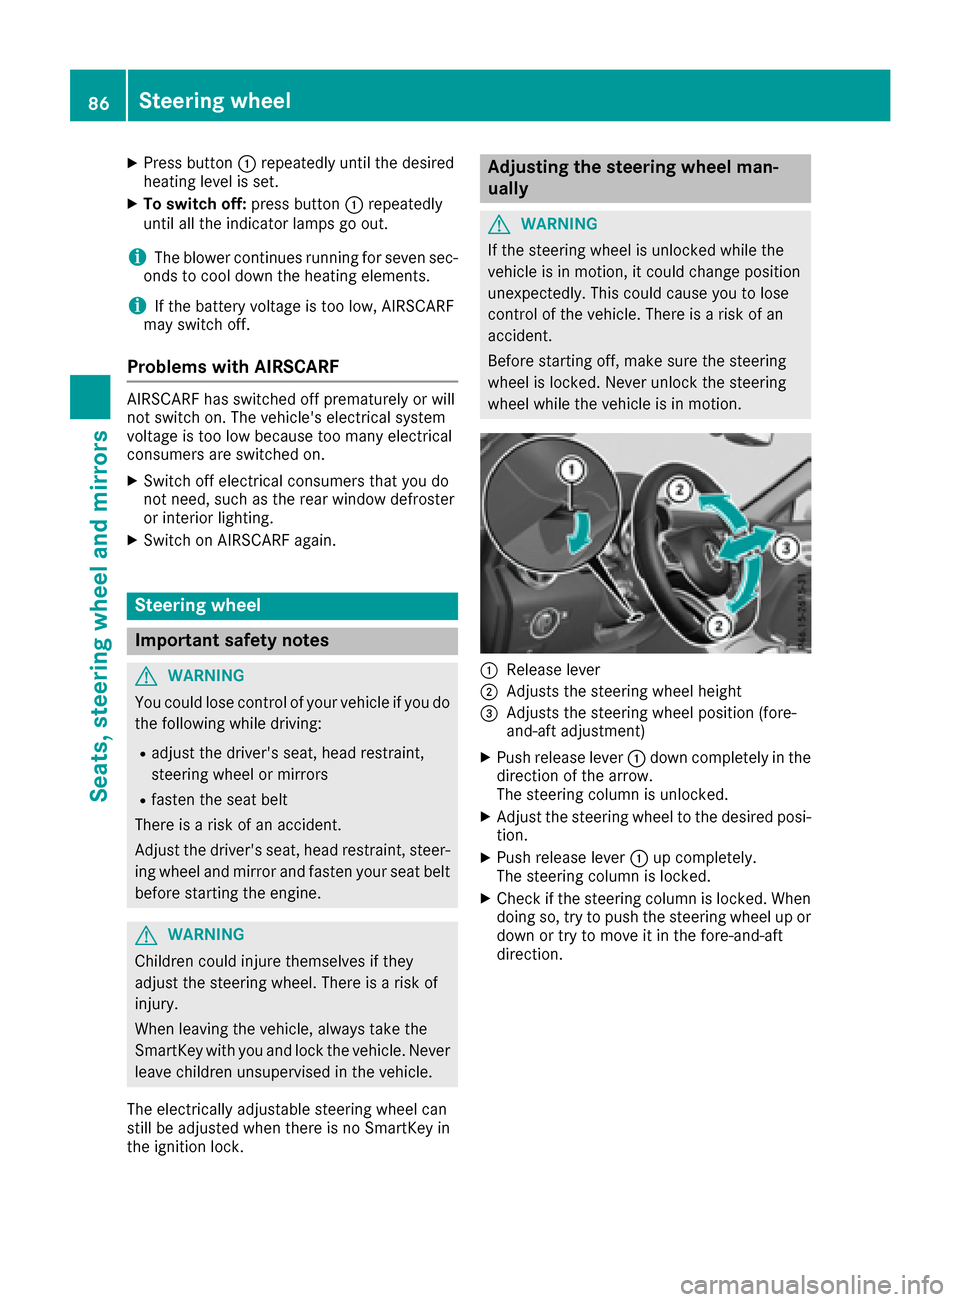
:Release lever
;Adjust sthe steerin gwheel height
=Adjust sthe steerin gwheel position (fore-
and-aft adjustment)
XPush release lever :down completely in the
direction of the arrow.
The steerin gcolumn is unlocked.
XAdjust the steerin gwheel to the desired posi-
tion.
XPush release lever :up completely.
The steerin gcolumn is locked.
XCheck if the steerin gcolumn is locked. When
doing so, try to push the steerin gwheel up or
down or try to move it in the fore-and-aft
direction.
86Steering wheel
Seats, steering wheel and mirrors
Page 91 of 294
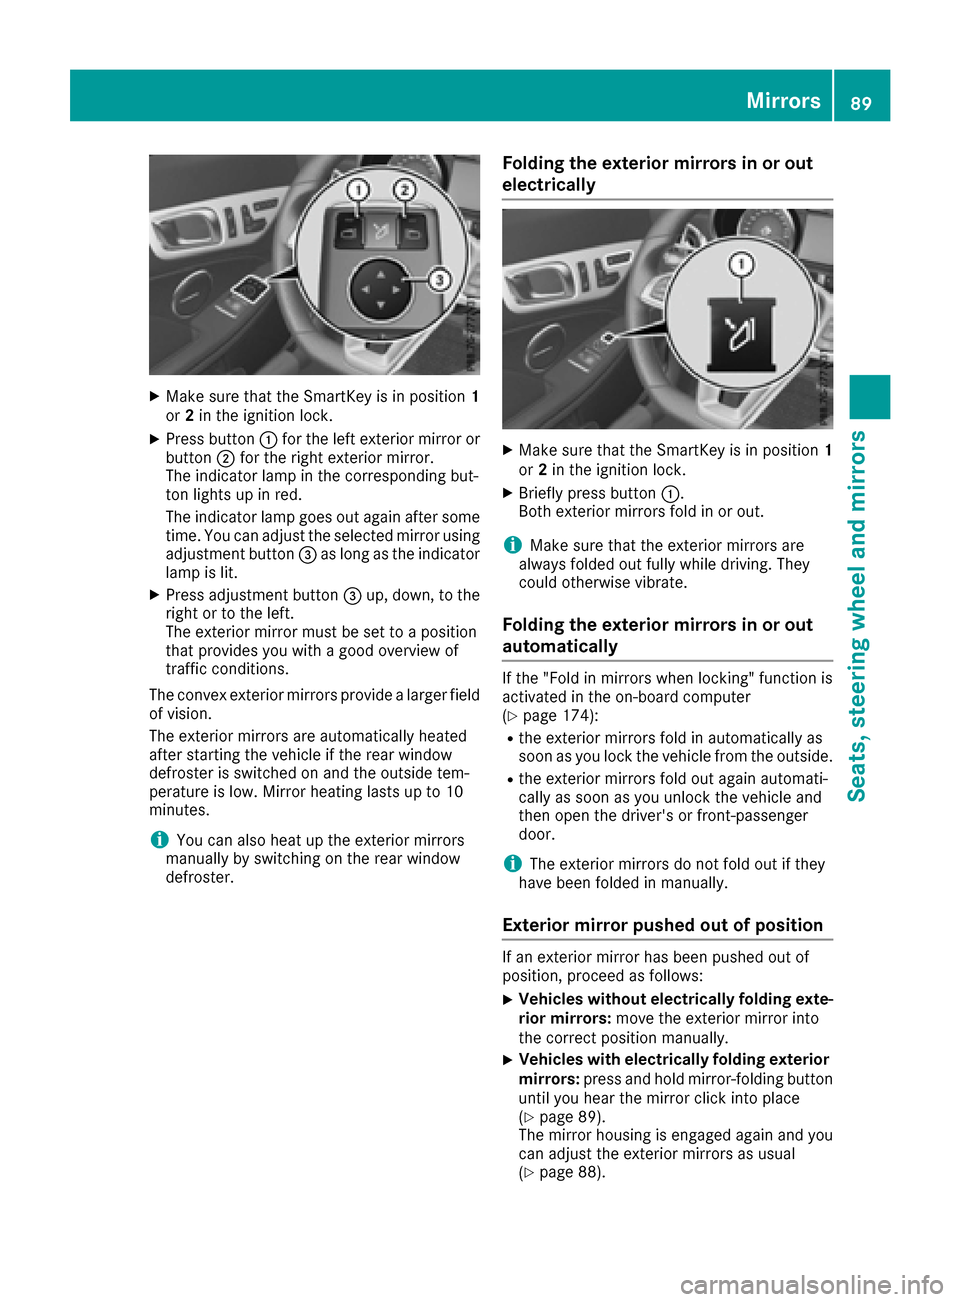
XMake sure that the SmartKey is in position1
or 2in the ignition lock.
XPress button :for the left exterior mirror or
button ;for the right exterior mirror.
The indicator lamp in the corresponding but-
ton lights up in red.
The indicator lamp goes out again after some
time. You can adjust the selected mirror using
adjustment button =as long as the indicator
lamp is lit.
XPress adjustment button =up, down, to the
right or to the left.
The exterior mirror must be set to aposition
that provides you with agood overview of
traffic conditions.
The convex exterior mirrors provide alarger field
of vision.
The exterior mirrors are automatically heated
after startin gthe vehicle if the rear window
defroster is switched on and the outside tem-
perature is low. Mirror heating lasts up to 10
minutes.
iYou can also heat up the exterior mirrors
manually by switching on the rear window
defroster.
Folding the exterior mirrors in or out
electrically
XMake sure that the SmartKey is in position 1
or 2in the ignition lock.
XBriefly press button :.
Both exterior mirrors fold in or out.
iMake sure that the exterior mirrors are
always folded out fully while driving. They
could otherwise vibrate.
Folding the exterior mirrors in or out
automatically
If the "Fold in mirrors when locking" function is
activated in the on-board computer
(
Ypage 174):
Rthe exterior mirrors fold in automatically as
soon as you lock the vehicle from the outside.
Rthe exterior mirrors fold out again automati-
cally as soon as you unlock the vehicle and
then open the driver's or front-passenger
door.
iThe exterior mirrors do not fold out if they
have been folded in manually.
Exterior mirror pushed out of position
If an exterior mirror has been pushed out of
position, proceed as follows:
XVehicles without electrically folding exte-
rior mirrors: move the exterior mirror into
the correct position manually.
XVehicles with electrically folding exterior
mirrors: press and hold mirror-folding button
until you hear the mirror click into place
(
Ypage 89).
The mirror housing is engaged again and you
can adjust the exterior mirrors as usual
(
Ypage 88).
Mirrors89
Seats, steering whee land mirrors
Z
Page 113 of 294
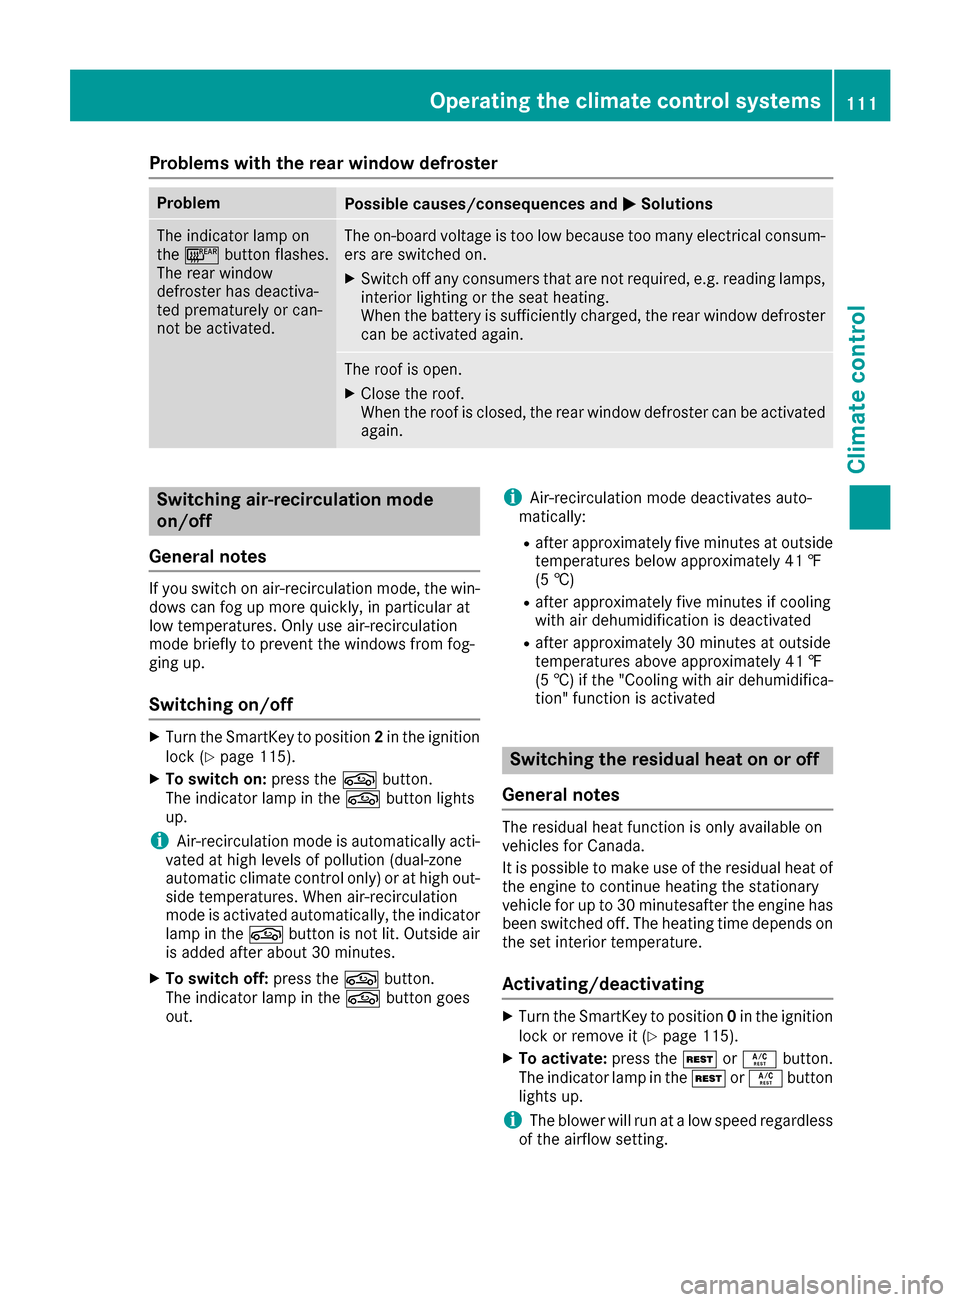
Problems with the rear window defroster
ProblemPossible causes/consequences andMSolutions
The indicator lamp on
the¤ button flashes.
The rear window
defroster has deactiva-
ted prematurely or can-
not be activated.The on-board voltage is too low because too many electrical consum-
ers are switched on.
XSwitch off any consumers that are not required, e.g. reading lamps, interior lighting or the seat heating.
When the battery is sufficiently charged, the rear window defroster
can be activated again.
The roof is open.
XClose the roof.
When the roof is closed, the rear window defroster can be activated
again.
Switching air-recirculation mode
on/off
General notes
If you switch on air-recirculation mode, the win-
dows can fog up more quickly, in particular at
low temperatures. Only use air-recirculation
mode briefly to prevent the windows from fog-
ging up.
Switching on/off
XTurn the SmartKey to position 2in the ignition
lock (Ypage 115).
XTo switch on: press thegbutton.
The indicator lamp in the gbutton lights
up.
iAir-recirculation mode is automatically acti-
vated at high levels of pollution (dual-zone
automatic climate control only) or at high out-
side temperatures. When air-recirculation
mode is activated automatically, the indicator
lamp in the gbutton is not lit. Outside air
is added after about 30 minutes.
XTo switch off: press thegbutton.
The indicator lamp in the gbutton goes
out.
iAir-recirculation mode deactivates auto-
matically:
Rafter approximately five minutes at outside
temperatures below approximately 41 ‡
(5 †)
Rafter approximately five minutes if cooling
with air dehumidification is deactivated
Rafter approximately 30 minutes at outside
temperatures above approximately 41 ‡
(5 †) if the "Cooling with air dehumidifica-
tion" function is activated
Switching the residual heat on or off
General notes
The residual heat function is only available on
vehicles for Canada.
It is possible to make use of the residual heat of
the engine to continue heating the stationary
vehicle for up to 30 minutesafter the engine has
been switched off. The heating time depends on
the set interior temperature.
Activating/deactivating
XTurn the SmartKey to position 0in the ignition
lock or remove it (Ypage 115).
XTo activate: press theÌorÁ button.
The indicator lamp in the ÌorÁ button
lights up.
iThe blower will run at alow speed regardless
of the airflow setting.
Operating the climate control systems111
Climatec ontrol
Page 131 of 294
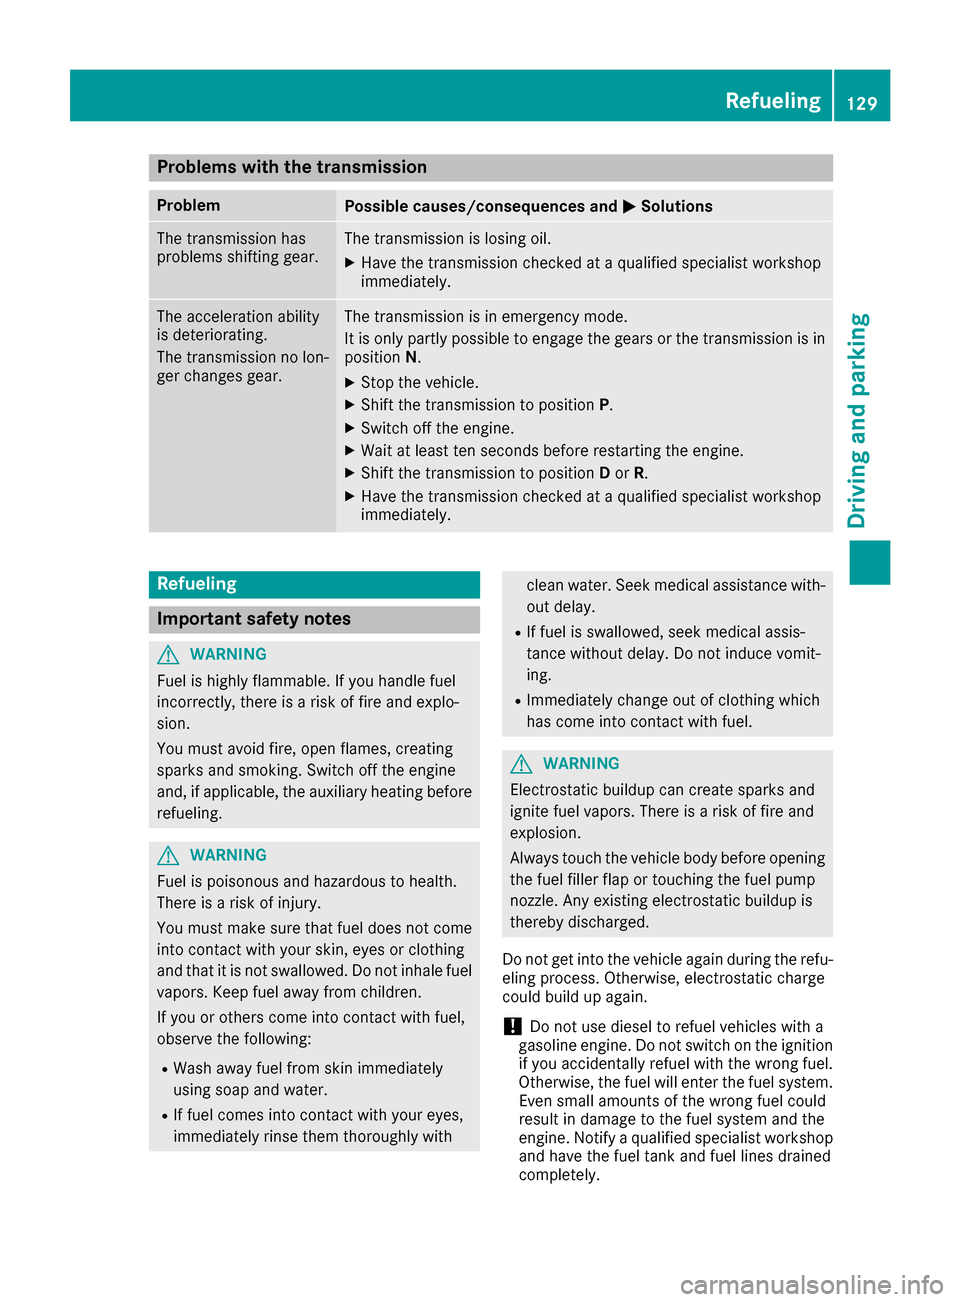
Problems with the transmission
ProblemPossible causes/consequences andMSolutions
The transmission has
problems shifting gear.The transmission is losing oil.
XHave the transmission checked ataqualified specialist workshop
immediately.
The acceleration ability
is deteriorating.
The transmission no lon-
ger changes gear.The transmission is in emergency mode.
It is only partly possible to engage the gears or the transmission is in
position N.
XStop the vehicle.
XShift the transmission to position P.
XSwitch off the engine.
XWait at least ten seconds before restarting the engine.
XShift the transmission to positionDor R.
XHave the transmission checked at aqualified specialist workshop
immediately.
Refueling
Important safety notes
GWARNING
Fuel is highly flammable. If you handle fuel
incorrectly, there is arisk of fire and explo-
sion.
You must avoid fire, open flames, creating
sparks and smoking. Switch off the engine
and, if applicable, the auxiliary heating before refueling.
GWARNING
Fuel is poisonous and hazardous to health.
There is arisk of injury.
You must make sure that fuel does not come into contact with your skin, eyes or clothing
and that it is not swallowed. Do not inhale fuel
vapors. Keep fuel away from children.
If you or others come into contact with fuel,
observe the following:
RWash away fuel from skin immediately
using soap and water.
RIf fuel comes into contact with your eyes,
immediately rinse them thoroughly with
clean water. Seek medical assistance with-
out delay.
RIf fuel is swallowed, seek medical assis-
tance without delay.Don ot induce vomit-
ing.
RImmediately change out of clothing which
has come into contact with fuel.
GWARNING
Electrostatic buildupc an create sparks and
ignite fuel vapors. There is arisk of fire and
explosion.
Always touch the vehicle body before opening
the fuel filler flap or touching the fuel pump
nozzle. Any existing electrostatic buildupi s
thereby discharged.
Do not get into the vehicle again during the refu-
eling process. Otherwise, electrostatic charge
could build up again.
!Do not use diesel to refuel vehicles with a
gasoline engine. Do not switch on the ignition
if you accidentally refuel with the wrong fuel.
Otherwise, the fuel will enter the fuel system. Even small amounts of the wrong fuel could
result in damage to the fuel system and the
engine. Notify aqualified specialist workshop
and have the fuel tank and fuel lines drained
completely.
Refueling129
Driving and parking
Z