MERCEDES-BENZ SLC ROADSTER 2018 Owner's Manual
Manufacturer: MERCEDES-BENZ, Model Year: 2018, Model line: SLC ROADSTER, Model: MERCEDES-BENZ SLC ROADSTER 2018Pages: 298, PDF Size: 5.26 MB
Page 111 of 298
Problems with the "Cooling with air dehumidification" function
ProblemPossible causes/consequences andMSolutions
The indicator lamp in the
¿orÁ button
flashes three times or
remains off. The "Cool-
ing with air dehumidifi-
cation" function cannot
be switched on.Cooling with air dehumidification has been deactivated due to amal-
function.
XVisit aqualified specialist workshop.
Setting climate control to automatic
General notes
Automatic mode is only available with 3-zone
automatic climate control.
In automatic mode, the set temperature is main-
tained automatically at aconstant level. The
system automatically regulates the temperature
of the dispensed air, the airflow and the air dis-
tribution.
The automatic mode functions optimally when
the "Cooling with air dehumidification" function
is activated. If necessary, cooling with air dehu-
midification can be deactivated.
If you deactivate the "Cooling with air-dehumid- ification" function, the air inside the vehicle will
not be cooled. The air inside the vehicle will also
not be dehumidified.T he windows can fog up
more quickly. Therefore, deactivate the cooling
with air-dehumidification function only briefly.
Automatic control
XTurn the SmartKey to position 2in the igni-
tion lock (Ypage 116).
XSet the desired temperature.
XTo activate: press theÃbutton.
The indicator lamp in the Ãbutton lights
up. Automatic air distribution and airflow are
activated.
XTo switch to manualm ode:press the _
button.
or
XPress the IorK button.
The indicator lamp in the Ãbutton goes
out.
Setting the temperature
Air-conditioning system
XTurn the SmartKey to position 2in the igni-
tion lock (Ypage 116).
XTo increase or reduce: turn control:
clockwise or counter-clockwise (Ypage 104).
Only change the temperature settingins mall
increments. Start at 72 ‡(22 †).
iIf you turn control :counter-clockwise to
the lowest temperature setting, air-recircula-
tion mode may activate automatically,
depending on the outside temperature.
3-zone automatic climate control
Differentt emperatures can be set for the driv-
er's and front-passenger sides.
XTurn the SmartKey to position 2in the igni-
tion lock (Ypage 116).
XTo increase or decrease: turn control:or
B clockwise or counter-clockwise
(
Ypage 106).
Only change the temperature settingins mall
increments. Start at 72 ‡(22 †).
iIf you turn controls :and Bcounter-
clockwise to the lowest temperature setting,
air-recirculation mode may activate automat-
ically, depending on the outside temperature.
Operating the climate control systems109
Climatec ontrol
Page 112 of 298
Setting the air distribution
Air-conditioning system
XTurn the SmartKey to position 2in the igni-
tion lock (Ypage 116).
XPress one or more of the P,O,¯
buttons.
The correspondingi ndicator lamp lights up
briefly.
The following air distribution settings can be
selected:
¯ Directsa ir through the defroster vents
O Directsa ir through the footwell air vents
P Directsa ir through the center and side air
vents
iYou can also activate several air distribution
settings simultaneously. To do this, press
multiple air distribution buttons. The air is
then directed through various vents.
3-zone automatic climate control
XTurn the SmartKey to position 2in the igni-
tion lock (Ypage 116).
XPress the _button repeatedly until the
desired symbol appears in the display.
The following air distribution settings can be
selected:
P Directsa ir through the center and side air
vents
O Directsa ir through the footwell air vents
S Directsa ir through the center, side and
footwell vents
¯ Directsa ir through the defroster vents
b Directst he airflow through the defroster,
center and side air vents( Canada only)
a Directsa ir through the defroster and
footwell vents
_ Directst he airflow through the defroster
vents, the center and side air ventsa s
well as the footwell air vents( Canada
only)
iRegardless of the air distribution setting,
airflow is always directed through the side air
vents. You can only close the side air vents, by fully closing the adjuster on the side air vents
(
Ypage 113).
Setting the airflow
Air-conditioning system
XTurn the SmartKey to position 2in the igni-
tion lock (Ypage 116).
XTo increase or reduce: turn controlC
clockwise or counter-clockwise (Ypage 104).
3-zone automatic climate control
XTurn the SmartKey to position 2in the igni-
tion lock (Ypage 116).
XTo increase or reduce: press theKor
I button.
Switching the ZONE function on/off
This function is only available with 3-zone auto-
matic climate control on vehicles for Canada.
XTo switch on: press theábutton.
The indicator lamp in the ábutton lights
up. The temperature settingf or the driver's
side is not adopted for the front-passenger
side.
XTo switch off: press theábutton.
The indicator lamp in the ábutton goes
out. The temperature settingf or the driver's
side is adopted for the front-passenger side.
Defrosting the windshield
General notes
You can use this function to defrost the wind-
shield or to defrost the inside of the windshield
and the side windows.
Switch off the "Windshield defrosting" function
as soon as the windshield is clear again.
Switching the "windshield defrosting"
function on or off
XTurn the SmartKey to position 2in the igni-
tion lock (Ypage 116).
XTo switch on: press the¬button.
The indicator lamp in the ¬button lights
up.
110Operating the climate control systems
Climatec ontrol
Page 113 of 298
The climate control system switches to the
following functions:
Rhigh airflow
Rhigh temperature
Rair distribution to the windshield and front
side windows
Rair-recirculation mode off
XTo switch off:press the¬button.
The indicator lamp in the ¬button goes
out. The previously selected settings are
restored. Air-recirculation mode remains
deactivated.
or
XDual-zon eautomatic climate control: press
the à button.
The indicator lamp in the ¬button goes
out. Airflow and air distribution are set to
automatic mode.
MAX COOL maximum cooling
The MAX COOL function is only availableinv ehi-
cles for the USA.
MAX COOL is only operational when the engine
is running.
XTo activate: press theÙbutton.
The indicator lamp in the button lights up.
XTo deactivate: press theÙbutton.
The indicator lamp in the button goes out. The
previously selected settings are restored.
When you activate MAX COOL, climate control
switches to the following functions:
Rmaximum cooling
Rmaximum airflow
Rair-recirculation mode on
Defrosting the windows
Windows fogged up on the inside
XActivate the ¿orÁ cooling with air
dehumidification function.
XDual-zon eautomatic air conditioning: acti-
vate the Ãmode button.
XIf the windows continue to fog up, activate the
¬ "Windshield defrosting" function.
iYou should only select this setting until the
windshield is clear again.
Windows fogged up on the outside
XActivate the windshield wipers.
XAir-conditioning system: press the Por
O button.
XDual-zon eautomatic air conditioning: press
the _ button until the PorO sym-
bol appears in the display.
iYou should only select this setting until the
windshield is clear again.
Rear window defroster
General notes
The rear window defroster has ahigh current
draw. You should therefor eswitch it off as soon
as the rear window is clear. Otherwise, the rear window defroster switches off automatically
after several minutes.
If the battery voltage is too low, the rear window
defroster may switch off.
Activating/deactivating
XTurn the SmartKey to position 2in the igni-
tion lock (Ypage 116).
XPress the ¤button.
The indicator lamp in the ¤button lights
up or goes out.
Operating the climate control systems111
Climate control
Page 114 of 298
Problems with the rear window defroster
ProblemPossible causes/consequences andMSolutions
The indicator lamp on
the¤ button flashes.
The rear window
defroster has deactiva-
ted prematurely or can-
not be activated.The on-board voltage is too low because too many electrical consum-
ers are switched on.
XSwitch off any consumers that are not required, e.g. reading lamps, interior lighting or the seat heating.
When the battery is sufficiently charged, the rear window defroster
can be activated again.
The roof is open.
XClose the roof.
When the roof is closed, the rear window defroster can be activated
again.
Switching air-recirculation mode
on/off
General notes
If you switch on air-recirculation mode, the win-
dows can fog up more quickly, in particular at
low temperatures. Only use air-recirculation
mode briefly to prevent the windows from fog-
ging up.
Activating/deactivating
XTurn the SmartKey to position 2in the igni-
tion lock (Ypage 116).
XTo activate: press thegbutton.
The indicator lamp in the gbutton lights
up.
iAir-recirculation mode is automatically acti-
vated at high levels of pollution (dual-zone
automatic climate control only) or at high out-
side temperatures. When air-recirculation
mode is activated automatically, the indicator
lamp in the gbutton is not lit. Outside air
is added after about 30 minutes.
XTo deactivate: press thegbutton.
The indicator lamp in the gbutton goes
out.
iAir-recirculation mode deactivates auto-
matically:
Rafter approximately five minutes at outside
temperatures below approximately 41 ‡
(5 †)
Rafter approximately five minutes if cooling
with air dehumidification is deactivated
Rafter approximately 30 minutes at outside
temperatures above approximately 41 ‡
(5 †) if the "Cooling with air dehumidifica-
tion" function is activated
Switching the residual heat on or off
General notes
The residual heat function is only available on
vehicles for Canada.
It is possible to make use of the residual heat of
the engine to continue heating the stationary
vehicle for up to 30 minutes after the engine has
been switched off. The heating time depends on
the set interior temperature.
Activating/deactivating
XTurn the SmartKey to position uin the igni-
tion lock or remove it (Ypage 116).
XTo activate: press theÌorÁ button.
The indicator lamp in the ÌorÁ button
lights up.
iThe blower will run at alow speed regardless
of the airflow setting.
112Operating the climate control systems
Climatec ontrol
Page 115 of 298
iIf you activate the residual heat function at
high temperatures, only the ventilation willb e
activated. The blower runs at mediums peed.
XTo deactivate:press theÌorÁ but-
ton.
The indicator lamp in the ÌorÁ button
goes out.
Residualh eat is deactivated automatically:
Rafter approximately 30 minutes
Rwhen the ignition is switched on
Rif the battery voltage drops
Setting the air vents
Important safety notes
GWARNING
Very hot or very cold air can flow from the air
vents. This could resultinb urns or frostbite in
the immediate vicinity of the air vents. There
is ar isk of injury.
Make sure that all vehicle occupants always
maintain asufficient distance to the air out-
lets. If necessary,r edirect the airflow to
another area of the vehicle interior.
GWARNING
When AIRSCARF is switched on, very hot air
can flow from the vents in the head restraints. This could resultinb urns in the immediate
vicinity of the air vents. There is arisk of injury.
Reduce the heater outputb efore it becomes
too hot.
In order to ensure the direct flow of fresh air
through the air vents into the vehicle interior,
please observe the following notes:
Rkeep the air inlet grilleont he hood and in the
engine compartment on the front-passenger
side free of blockages, such as ice, snow or
leaves.
Rnever cover the air vents or air intake grilles in
the vehicle interior.
iYou can move the adjusters for the air vents
verticallyorh orizontally to set the direction of
the airflow.
iFor optimal climate control in the vehicle,
open the air vents completely and set the
adjusters to the central position.
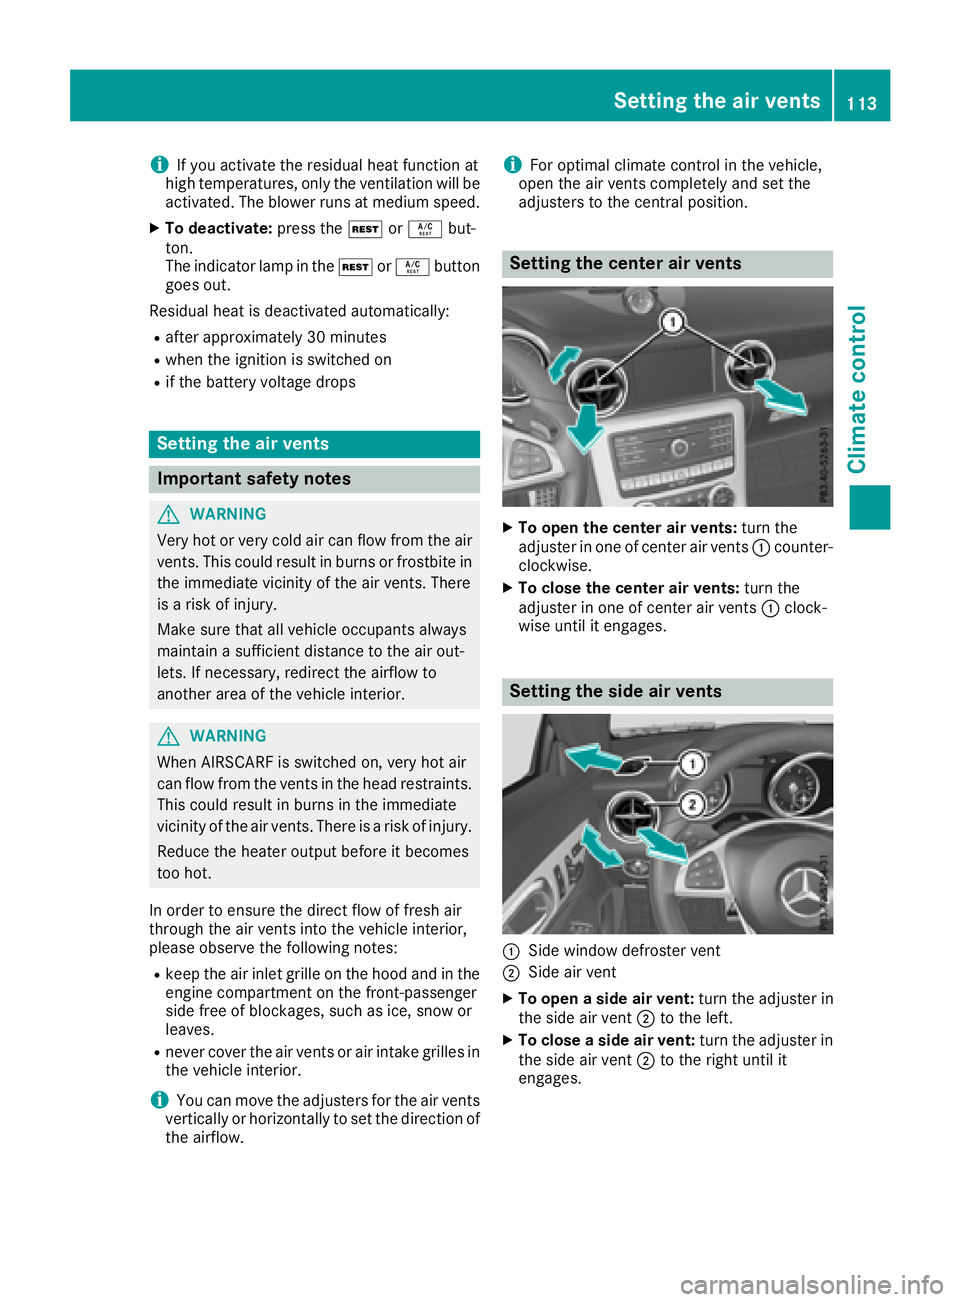
Setting the center air vents
XTo open the center air vents: turn the
adjuster in one of center air vents :counter-
clockwise.
XTo close the center air vents: turn the
adjuster in one of center air vents :clock-
wise until it engages.
Setting the side air vents
:Side window defroster vent
;Side air vent
XTo open aside air vent: turn the adjuster in
the side air vent ;to the left.
XTo close aside air vent: turn the adjuster in
the side air vent ;to the right until it
engages.
Setting the air vents113
Climate control
Z
Page 116 of 298
Setting the blower outputofthe AIR-
SCARF vents
GWARNING
When AIRSCARF is switched on, very hot air
can flow from the ventsint he head restraints.
This could result in burns in the immediate
vicinity of the air vents. There is arisk of injury.
Reduce the heater output before it becomes
too hot.
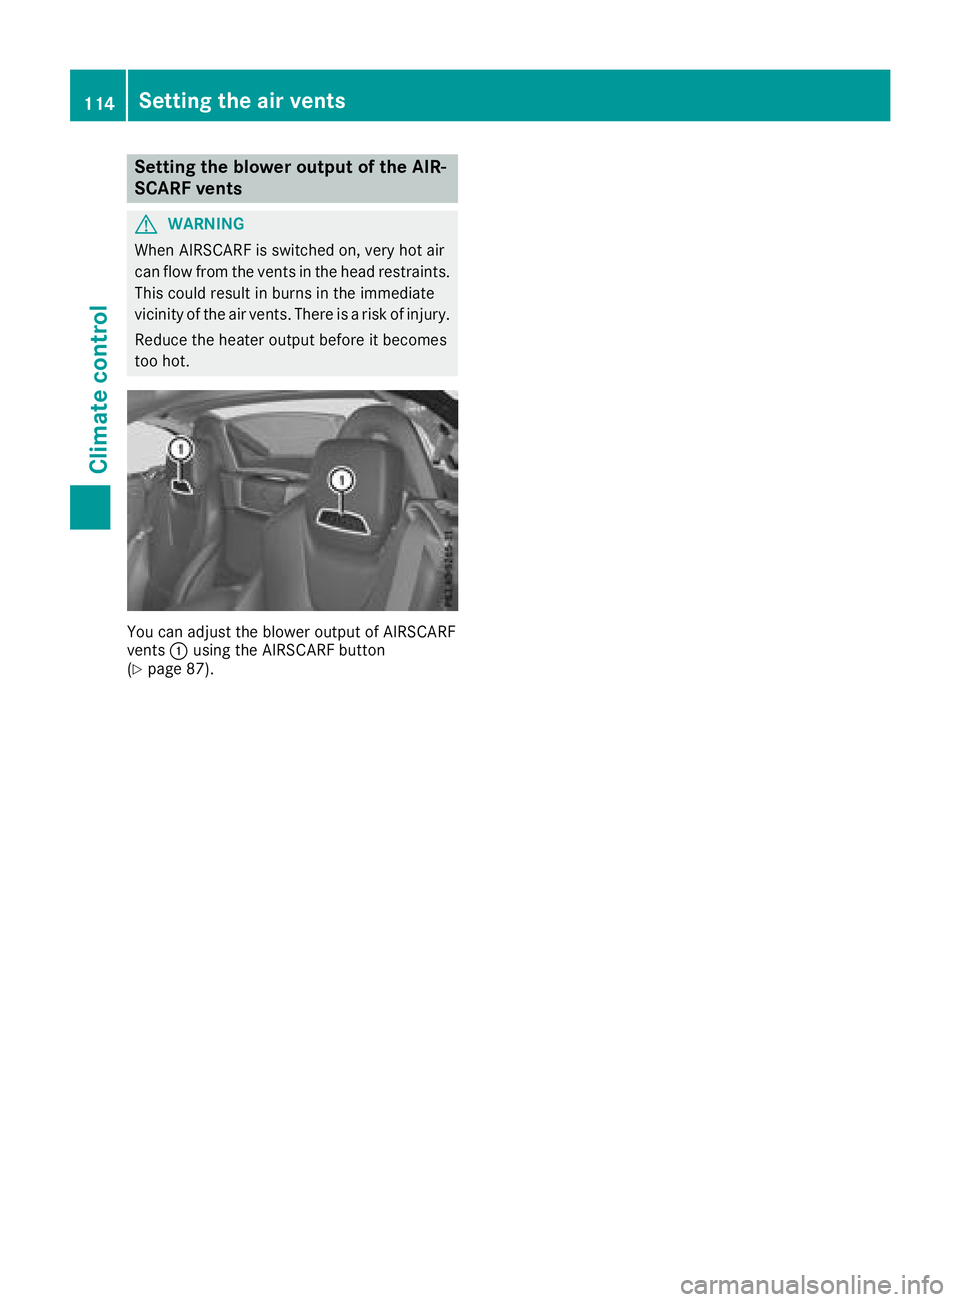
You can adjust the blower output of AIRSCARF
vents :using the AIRSCARF button
(
Ypage 87).
114Setting the air vents
Climatec ontrol
Page 117 of 298
Notesonb reaking-in anew vehicle
Important safety notes
Thes ensors ystemofs omedriving and driving
safety systems adjusts automaticall ywhile a
certai ndistance is being driven after the vehicle
ha sb eend elivere dorafter repairs. Full system
effectiveness is not reachedu ntilthe end of this
teach-inp rocedure.
New and replaced brake pads and discs only
reach their optimum braking effect after several hundred kilometers of driving. Compensate for
thi sb yapplyin ggreate rforce to the brake pedal.
The first 1000 miles (150 0km)
Them orey ou look after the engine when it is
new ,the mor esatisfied yo uwillbew ithi ts per-
formance in the future.
RYo us houl dtherefore drive at varying vehicle
and engine speeds for the first 1,000 miles
(1,500 km).
RAvoi dheavy loads, e.g .driving at full throttle,
during thi speriod.
RChang egearing oodt ime, befor ethe tach-
ometer needl eisÔ of the wa ytothe red area
of the tachometer.
RDo not manuall yshift to alower gear to brake
the vehicle.
RTry to avoi ddepressing the accelerator pedal
beyond the point of resistanc e(kickdown).
After 1000 mile s(1500 km),y oucan increase
the engine spee dgradually and accelerate the
vehicl etofulls peed.
Yo us houl dalsoo bser ve these note sonbreak-
ing in if the engine or parts of the drive train on
your vehicl ehaveb eenr eplaced.
Alway sobser ve the maximum permissible
speed.
Driving
Important safety notes
GWARNING
Objects in the driver's footwell mayr estrict
the clearanc earound the pedals or block a
depresse dpedal. This jeopardizes the oper-
ating and roa dsafety of the vehicle. There is a
risk of an accident.
Stow al lobjects securel yinthe vehicl esothat
the ydon ot getinto the driver's footwell.
When using floormats or carpets, make sure
tha tthe ya reproperlys ecured so tha tthe yd o
not slip or obstruct the pedals .Donot place
several floormats or carpets on top of one
another.
GWARNING
Unsuitabl efootwear can hinde rcorrec tusage
of the pedals ,e.g.:
Rshoes with thick soles
Rshoes with high heels
Rslippers
There is ariskofana ccident.
Wear suitabl efootwear to ensur ecorrect
usag eoft he pedals.
GWARNING
If yo uswitch off the ignition whil edriving,
safety-relevant functions ar eonlya vailable
with limitations ,ornot at all. This could affect,
for example, the powe rsteering and the brake
boosting effect. Yo uwillr equire considerably
mor eeffort to steer and brake. There is arisk
of an accident.
Do not switch off the ignition whil edriving.
GWARNING
If the parking brake ha snot been fully
releasedw hend riving, the parking brake can:
Roverheat and cause afire
Rlose its hold function.
There is ariskoff irea nd an accident. Release
the parking brake full ybefor ed riving off.
!Do not warm up the engine whil estationary.
Pull away immediately. Avoi dhighe ngine
speeds and full throttle unti lthe engine has
reachedi ts operating temperature.
In vehicles with automatic transmission,
engag eposit ions Pand Ro nlyw hent he vehi-
cle is stationary.
Driving115
Dr iving an dparking
Z
Page 118 of 298
Where possible, avoid spinningthe drive
wheels when pulling away on slippery roads.
You could otherwise damage the drive train.
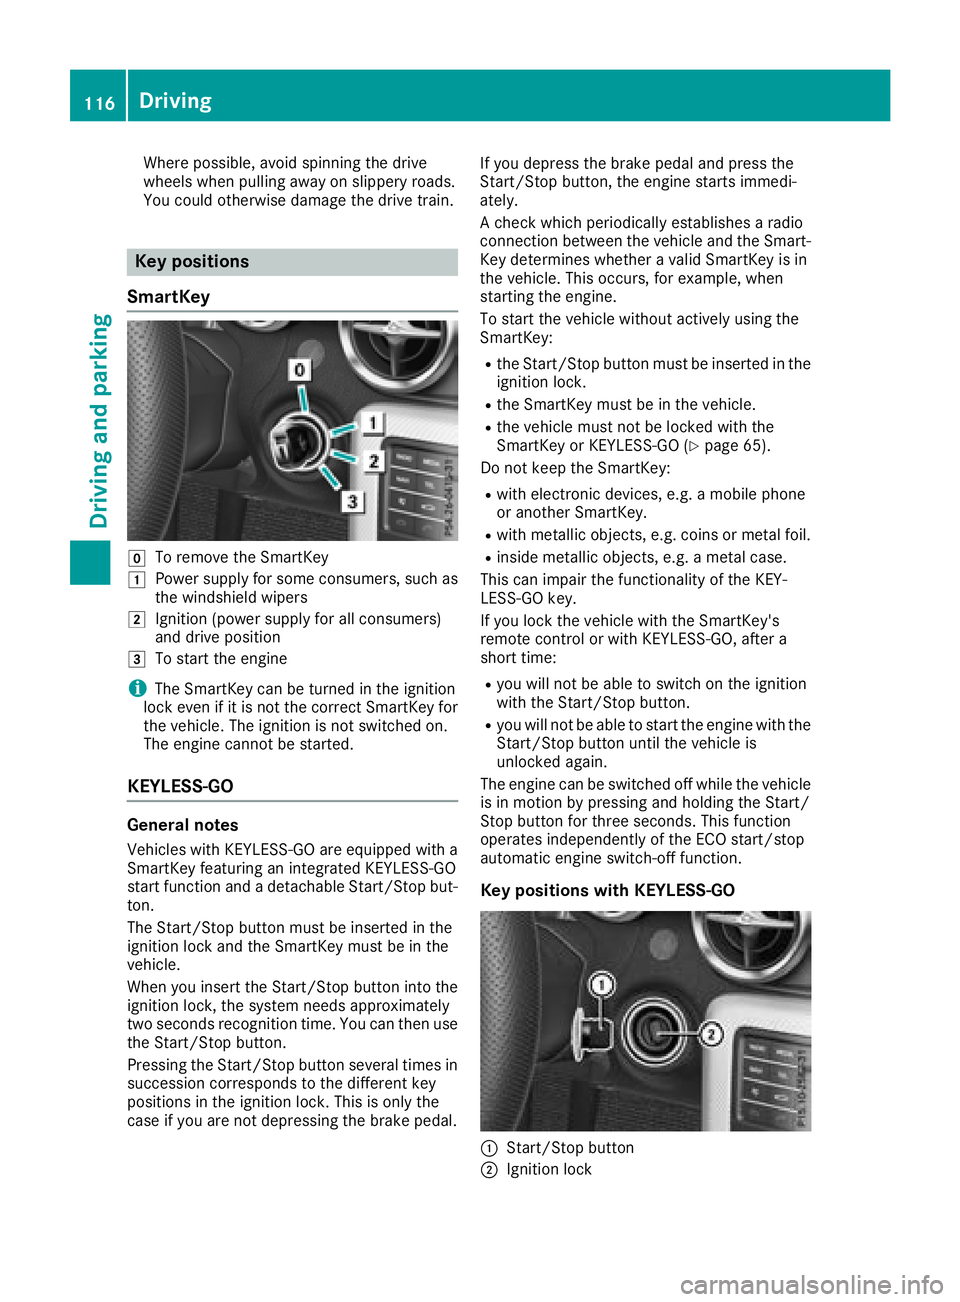
Key positions
SmartKey
gTo remove the SmartKey
1Power supply for some consumers, such as
the windshield wipers
2Ignition (power supply for all consumers)
and drive position
3To start the engine
iThe SmartKey can be turned in the ignition
lock even if it is not the correct SmartKey for
the vehicle. The ignition is not switched on.
The engine cannot be started.
KEYLESS-GO
General notes
Vehicles with KEYLESS-GO are equipped with a
SmartKey featuring an integrated KEYLESS-GO
start function and adetachable Start/Stop but-
ton.
The Start/Stop button must be inserted in the
ignition lock and the SmartKey must be in the
vehicle.
When you insert the Start/Stop button into the
ignition lock, the system needs approximately
two seconds recognition time. You can then use
the Start/Stop button.
Pressing the Start/Stop button several times in
succession corresponds to the differentk ey
positions in the ignition lock. This is only the
case if you are not depressing the brake pedal. If you depress the brake pedal and press the
Start/Stop button
,the engine start simmedi-
ately.
Ac heck which periodically establishes aradio
connection between the vehicle and the Smart-
Key determines whether avalid SmartKey is in
the vehicle. This occurs,f or example, when
starting the engine.
To start the vehicle without actively using the
SmartKey:
Rthe Start/Stop button must be inserted in the
ignition lock.
Rthe SmartKey must be in the vehicle.
Rthe vehicle must not be locked with the
SmartKey or KEYLESS-GO (Ypage 65).
Do not keep the SmartKey:
Rwith electronic devices, e.g. amobile phone
or another SmartKey.
Rwith metallic objects, e.g. coins or metal foil.
Rinside metallic objects, e.g. ametal case.
This can impair the functionality of the KEY-
LESS-GO key.
If you lock the vehicle with the SmartKey's
remotec ontrol or with KEYLESS-GO, after a
short time:
Ryou will not be able to switch on the ignition
with the Start/Stop button.
Ryou will not be able to start the engine with the
Start/Stop button until the vehicle is
unlocked again.
The engine can be switched off while the vehicle
is in motion by pressing and holding the Start/
Stop button for three seconds. This function
operates independently of the ECO start/stop
automatic engine switch-off function.
Key positions with KEYLESS-GO
:Start/Stop button
;Ignition lock
116Driving
Driving and parking
Page 119 of 298
As soonasthe ignition is switched on, al lthe
indicator lamps in the instrument cluster light
up .Further informatio nonsituations where an
indicator lamp either fails to go outa fterstarting
the engine or lights up whil edriving
(
Ypage 204).
If Start/Stop button :hasn ot yetbeen
pressed, thisc orrespondstot he key being
removedf rom the ignition.
XTo switchonthe power supply: press
Start/Stop button :once.
The powe rsuppl yiss witched on. Yo ucan now
activate the windshield wipers, for example.
The powe rsuppl yiss witched off agai nif:
Rthe driver's door is opene dand
Ryoup ress Start/Stop button :twice when
in thisp osition
XTo switc honthe ignition: press Start/Stop
button :twice.
The ignition is switched on.
If yo upress Start/Stop button :once when
in thisp osition, the ignition is switched off
again.
Removing the Start/Stopb utton
Youc an remove the Start/Stop button from the
ignition lock and start the vehicl easnormal
using the SmartKey.
XRemove Start/Stop button :from ignition
lock ;.
Yo udon ot have to remove the Start/Stop but-
ton from the ignition lock when yo uleave the
vehicle. Yo ushould, however, always take the
SmartKeyw ithy ou when leaving the vehicle. As
long as the Sma rtKey
isint
he vehicle:
Rthe vehiclecan be started using the Start/
Stop button
Rthe electrically powered equipment can be
operated
Starting the engine
Important safety notes
GWARNING
If children ar eleftu nsupervised in the vehicle,
they could:
Roperate the vehicle's equipment.
Additionally, children could set the vehicl ein
motion if, for example, they:
Rrelease the parking brake
Rshift the automatic transmission outofp ark
position P
Rstart the engine
There is ariskofana ccident and injury.
Never leav echildren or animals unattended in
the vehicle.
Whe nleavi ng the vehicle, always take the
SmartKeyw ithy ou and lock the vehicle. This
also applie stomobilephones if the "Digital
Ca rK ey in smartphone"f unctio nisa ctivated
via the Mercedes me connect we bapp.
GWARNING
Combustion engine semitp oiso nousexhaust
gases such as carbo nmonoxide. Inhaling
thes eexhaus tgases lead stopoisoning. There
is ar iskoff atalinjury.T herefore neve rleave
the engine running in enclose dspaces with-
outs ufficient ventilation.
GWARNING
Flammabl ematerial sintroduced through
environmentali nfluence or by animals can
ignite if in contact with the exhaus tsystem or
parts of the engine thath eatu p.There is arisk
of fire.
Carry outr egular checks to make sure that
ther eareno flammabl eforeig nmaterial sin
the engine compartment or in the exhaust
system.
During acolds tart, the engine runs at higher
speed stoenablethe catalytic converter to
reach its operating temperature .The sound of
the engine mayc hange during thist ime.
Automatictransmission
XDepres sthe brake peda land kee pit
depressed.
XShift the transmission to position j.
Transmission positio ndisplay jis shown in
the multifunctio ndisplay.
Driving117
Driving an dparking
Z
Page 120 of 298
iYou can startthe engin eintransmission
position jand i.
Starting procedur ewith th eSmartKey
To star tthe engin eusing the SmartKey instead
of KEYLESS-GO, pull the Start/Stop button out
of the ignition lock.
XTurn the SmartKey to position 3in the igni-
tion lock (Ypage 116)a nd release it as soon
as the engin eisrunning.
Using KEYLESS-GO to start th eengine
The Start/Stop button can be used to star tthe
vehicle manually without insertin gthe SmartKey
int ot he ignition lock .The Start/Stop button
must be inserted in the ignition lock and the
SmartKey must be in the vehicle. This mode for
startin gthe engin eoperates independently of
the ECO start/sto pautomatic engin estar tfunc-
tion.
XDepress the brakep edal and keep it
depressed.
XPress the Start/Stop button once
(Ypage 116).
The engin estarts.
Pulling away
Genera lnotes
GWARNING
If the engin espeed is above the idling speed
and you engage transmission position Dor R,
the vehicle could pull away suddenly. There is
ar isk of an accident.
When engagin gtransmission position Dor R,
always firmly depresst he brakepedal and do
not simultaneously accelerate.
!Change gear in good tim eand avoid spin-
nin gthe wheels. You could otherwise damage
the vehicle.
Depress the accelerator carefully when pulling
away.
The vehicle lock scentrally onc eyou have pulled
away. The locking knobs in the doors drop down.
You can open the doors from the inside at any
time. You can also deactivate the automatic locking
feature (
Ypage 173).
It is only possible to shift the transmission from
position jto the desired position if you
depresst he brakep edal. Only the nisthe shift
lock released.
iUpshifts tak eplace at higher engin espeeds
afte rac old start. This helps the catalytic con-
verter to reach its operating temperature
more quickly.
Information on the automatic release of the
electric parking brake(
Ypage 133).
Hill start assist
Hill star tassist helps you when pulling away
forwardorinr everse on an uphill gradient. It
holds the vehicle for ashortt imea fteryou have
removed your foot from the brakep edal. This
gives you enough tim etomove your foot from
the brakep edal to the accelerator pedal and to
depressitb eforethe vehicle begins to roll.
GWARNING
After ashortt ime, hill star tassist will no lon-
ger brakey our vehicle and it could roll away.
There is arisk of an accident and injury.
Therefore, quickly move your foot from the
brakep edal to the accelerator pedal. Never
leave the vehicle when it is held by hill start
assist.
Hill star tassist is not active if:
Ryou are pulling away on alevel road or on a
downhill gradient
Rthe transmission is in position i
Rthe electric parking brakeisapplied
RESP®is malfunctioning
ECO start/stop function
Introduction
The ECO start/sto pfunction switches the
engin eoff automatically if the vehicle is stopped
under certain conditions.
The engin estarts automatically when the driver
want stop ull away again. The ECO start/stop
function thereby helps you to reduce the fuel
consumption and emissions of your vehicle.
118Driving
Driving and parking