change time MERCEDES-BENZ SLC ROADSTER 2018 Owner's Manual
[x] Cancel search | Manufacturer: MERCEDES-BENZ, Model Year: 2018, Model line: SLC ROADSTER, Model: MERCEDES-BENZ SLC ROADSTER 2018Pages: 298, PDF Size: 5.26 MB
Page 3 of 298
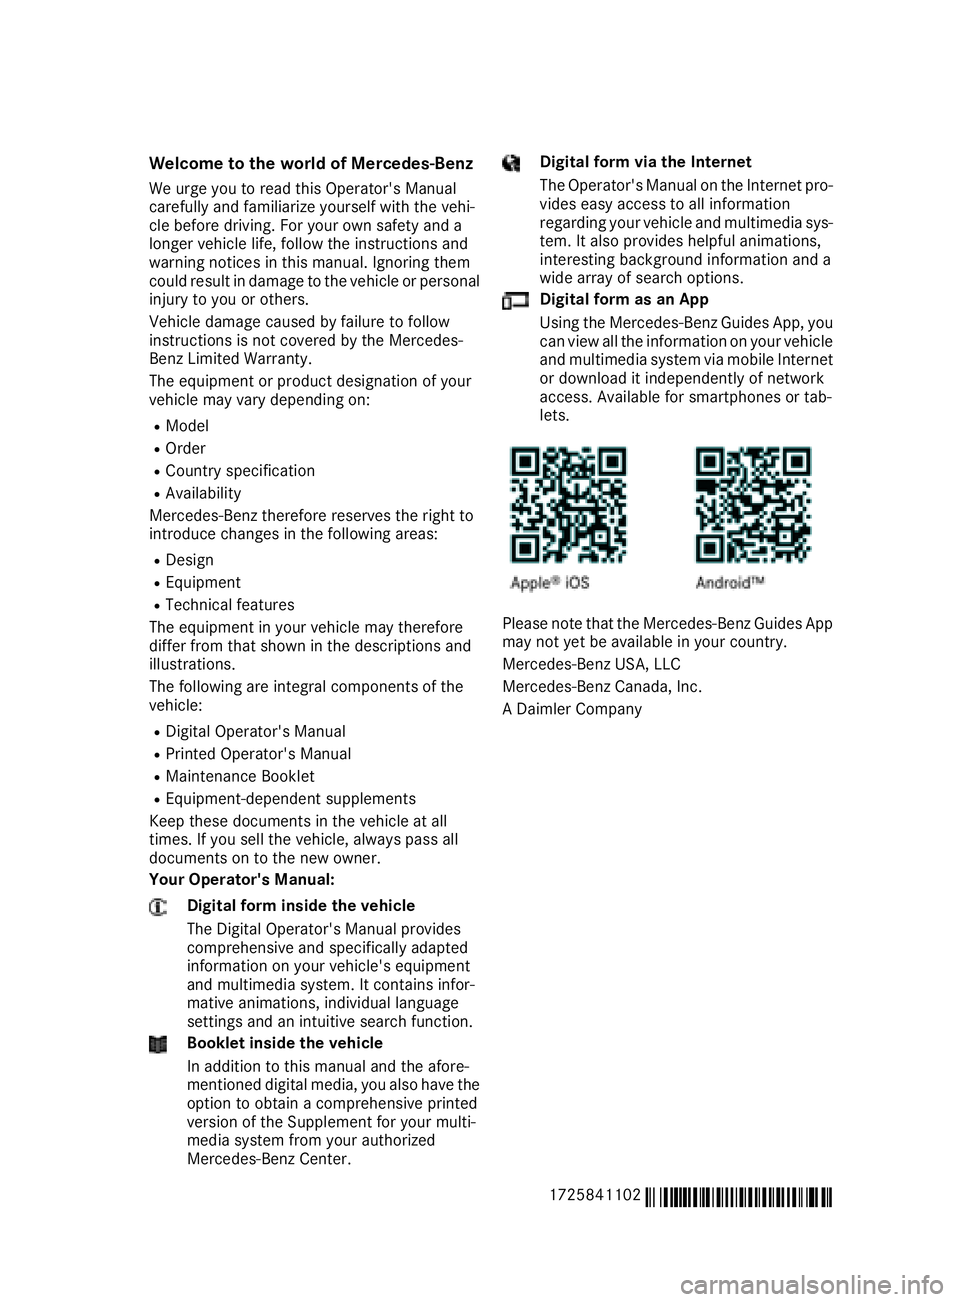
Welcome to the world of Mercedes-Benz
We urge you to read this Operator's Manual
carefully and familiarize yourself with the vehi-
cle before driving. For yourown safety and a
longer vehiclel ife,follow the instructions and
warning notices in this manual. Ignoring them
coul dresult in damage to the vehicleorp ersonal
injury to you or others.
Vehicle damage caused by failure to follow
instructions is not covered by the Mercedes-
Benz Limited Warranty.
The equipment or product designation of your
vehiclem ay vary depending on:
RModel
ROrder
RCountry specification
RAvailability
Mercedes-Benz therefore reservest he right to
introduce changes in the following areas:
RDesign
REquipment
RTechnicalf eatures
The equipment in you rvehiclem ay therefore
differf rom that shownint he descriptions and
illustrations.
The following are integralc omponents of the
vehicle:
RDigita lOperator's Manual
RPrinted Operator's Manual
RMaintenance Booklet
REquipment-dependent supplements
Keep these documents in the vehicleata ll
times. If you sell the vehicle, alway spassa ll
documents on to the new owner.
Your Operator's Manual:
Digital form inside the vehicle
The Digita lOperator's Manual provides
comprehensive and specifically adapted
information on you rvehicle's equipment
and multimedias ystem. It contains infor-
mative animations, individua llanguage
settings and an intuitive search function.
Booklet inside the vehicle
In addition to this manua land the afore-
mentioned digital media, you als ohave the
option to obtai nacomprehensive printed
versionoft he Supplement for you rmulti-
medias ystem from you rauthorized
Mercedes-Benz Center.
Digital form via the Internet
The Operator's Manual on the Internet pro-
videse asy access to all information
regarding you rvehiclea nd multimedias ys-
tem. It als oprovides helpful animations,
interesting background information and a
wid earrayofs earch options.
Digital form as an App
Using the Mercedes-Benz GuidesA pp, you
can view all the information on you rvehicle
and multimedias ystem via mobile Internet
or download it independently of network
access. Availabl efor smartphones or tab-
lets.
Please note that the Mercedes-Benz GuidesA pp
may not yet be available in you rcountry.
Mercedes-Benz USA, LLC
Mercedes-Benz Canada,I nc.
AD aimler Company
1725841102
É1725841102~ËÍ
Page 20 of 298
System .......................................... 224
VehicleHealth Check .................... 227
Telephone
Accepting acall( multifunction
steering wheel ).............................. 170
Authorizing amobilephone (con-
necting )......................................... 215
Authorizing amobil ephone via the
device manager (connecting )......... 216
Connecting amobilephone
(device manager )........................... 216
Connecting amobilephone (gen-
erali nformation) ............................ 215
Displa ymessage ............................ 200
Menu (on-board computer) ............ 169
Numbe rfrom the phone boo k........ 170
Redialing ........................................ 170
Rejecting/ending acall. ................ 170
see also Digital Operator's Man-
ua l.................................................. 211
Temperature
Coolant .......................................... 164
Coolant (on-board computer,
Mercedes-AMGS LC 43) ................ 175
Engine oil( on-board computer,
Mercedes-AMGS LC 43) ................ 175
Outsid etemperature ...................... 163
Setting (climate control )................ 109
Transmission oil( on-board com-
puter, Mercedes-AMGS LC 43) ...... 175
Timing (RACETIMER) ......................... 175
Tire pressure
Calling up (on-board computer) ..... 267
Checking manually ........................ 266
Displa ymessage ............................ 196
Maximu m....................................... 266
Not reached (TIREFIT) .................... 249
Notes. ............................................ 265
Reached (TIREFIT) .......................... 249
Recommended ............................... 263
Tire pressure loss warnin gsystem
Generaln otes ................................ 266
Important safety notes .................. 267
Restarting ...................................... 267
Tire pressure monitor
Checking the tire pressure elec-
tronically ........................................ 269
Function/note s............................. 267 Generaln
otes ................................ 267
Important safety notes .................. 268
Radi otypea pproval for the tire
pressure monitor ........................... 270
Restarting ...................................... 270
Warning lamp ................................. 210
W
arning message .......................... 269
Tire-changet oolkit........................... 246
TIREFI Tkit.......................................... 247
Important safety notes .................. 247
Storage location ............................ 246
Tire pressure not reached .............. 249
Tire pressure reached .................... 249
Tires
Aspect rati o(definition) ................. 279
Average weight of the vehicle
occupants (definition) .................... 278
Bar (definition) ............................... 278
Changing awheel .......................... 280
Characteristics .............................. 278
Checking ........................................ 260
Curb weight (definition) ................. 279
Definition of terms ......................... 278
Directio nofrotation ...................... 280
Displa ymessage ............................ 196
Distribution of the vehicl eoccu-
pants (definition) ............................ 280
DOT (Department of Transporta-
tion) (definition) ............................. 278
DOT, Tire Identification Number
(TIN) ............................................... 277
GAW R(GrossA xle Weight Rating)
(definition) ..................................... 278
GV W( GrossV ehicleWeight) (def-
inition) ........................................... 279
GVWR (GrossV ehicleWeight Rat-
ing )(de finition) .............................. 279
Important safety notes .................. 260
Increased vehicl eweigh tdue to
optionale quipment (definition) ...... 278
Information on driving .................... 260
Kilopascal( kPa)(de finition) ........... 279
Labeling (overview) ........................ 275
Loadb earing index (definition) ...... 280
Loadi ndex ..................................... 277
Loadi ndex (definition) ................... 279
M+S tire s....................................... 262
18Index
Page 25 of 298
Protecting the environment
General notes
HEnvironmental note
Daimler's declared policy is one of compre-
hensive environmental protection.
The objectives are for the natural resources
that form the basis of our existence on this
planet to be used sparingly and in amanner
that takes the requirements of both nature
and humanity into account.
You too can help to protect the environment
by operating your vehicle in an environmen-
tally responsible manner.
Fuel consumption and the rate of engine,
transmission, brake and tire wear are affected by these factors:
Roperating conditionsofy our vehicle
Ryour personal driving style
You can influence both factors. You should
bear the following in mind:
Operating conditions:
Ravoid short trips as these increase fuel con-
sumption.
Ralways make sure that the tire pressures
are correct.
Rdo not carry any unnecessary weight.
Rremove roof racks once you no longer need
them.
Rar egularly serviced vehicle will contribute
to environmental protection. You should
therefore adhere to the service intervals.
Ralways have service work carried out at a
qualified specialist workshop.
Personal driving style:
Rdo not depress the accelerator pedal when
startin gthe engine.
Rdo not warm up the engine when the vehicle
is stationary.
Rdrive carefully and maintain asafe distance
from the vehicle in front.
Ravoid frequent, sudden acceleration and
braking.
Rchange gear in good time and use each gear
only up to Ôof its maximum engine speed.
Rswitch off the engine in stationary traffic.
Rkeep an eye on the vehicle's fuel consump-
tion.
Environmental concerns and recom-
mendations
Wherever the operating instructions require you
to dispose of materials, first try to regenerate or
re-use them. Observe the relevant environmen-
tal rules and regulations when disposing of
materials. In this way you will help to protect the
environment.
Genuine Mercedes-Benz parts
HEnvironmental note
Daimler AG also suppliesr econditioned major
assemblies and parts which are of the same
quality as new parts. They are covered by the
same Limited Warranty entitlements as new
parts.
!Air bags and Emergency Tensioning Devi-
ces, as well as control units and sensors for
these restraint systems, may be installed in
the following areas of your vehicle:
Rdoors
Rdoor pillars
Rdoor sills
Rseats
Rcockpit
Rinstrumentc luster
Rcenter console
Do not install accessories such as audio sys-
tems in these areas. Do not carry out repairs or welding. You could impair the operating
efficiency of the restraint systems.
Have aftermarket accessories installed at a
qualified specialist workshop.
You could jeopardize the operating safety of
your vehicle if you use parts, tires and wheels as
well as accessories relevant to safety which
have not been approved by Mercedes-Benz. This
could lead to malfunction sinsafety-relevant
Genuine Mercedes-Benz parts23
Introduction
Z
Page 27 of 298
have directly notified Mercedes-BenzUSA,
LLC in writing of the need for its repair.
(2) the same substantial defect or malfunction ofaless serious nature than category (1)
has been subject to repair four or more
times and you have directly notified
Mercedes-Benzinw riting of the need for its
repair.
(3) the vehicle is out of service by reason of repair of the same or different substantial
defects or malfunctions for acumulative
total of more than 30 calendar days.
Please send your written notice to:
Mercedes-BenzU SA, LLC
Customer Assistanc eCenter
3M ercedes Drive
Montvale, NJ 07645-0350
Maintenance
The Service and Warranty Booklet describes all
the necessary maintenanc ework which should
be done at regular intervals.
Always have the Service and Warranty Booklet
with you when you bring the vehicle to an
authorized Mercedes-BenzC enter. The service
advisor will record every service for you in the
Service and Warranty Booklet.
Roadside Assistance
The Mercedes-BenzR oadside AssistancePro-
gram offers technical help in the event of a
breakdown. Callstot he toll-free Roadside Assis-
tance Hotline are answered by our agents 24
hours aday, 365 days ayear.
1-800-FOR-MERCedes(1-800-367-6372)
(USA)
1-800-387-0100 (Canada)
For additional information, refer to the
Mercedes-BenzR oadside Assistanc eProgram
brochure (USA) or the "Roadside Assistance"
section in the Service and Warranty booklet
(Canada). You will find both in your vehicle lit-
erature portfolio.
Change of address or change of own-
ership
In the event of achange of address, please send
us the "Notification of Address Change" in the
Service and Guarantee booklet or simply call the
Mercedes-BenzC ustomer Assistanc eCenter
(USA) at the hotline number
1-800-FOR-MERCedes(1-800-367-6372) or
Customer Service Center (Canada)a t
1-800-387-0100 .This will assist us in contact-
ing you in atimely manner should the need arise.
If you sell your Mercedes, please leave the entire
literature in the vehicle so that it is available to
the next owner.
If you have purchased aused car, please send us
the "Notification of Used Car Purchase" in the
Service and Guarantee booklet or simply call the
Mercedes-BenzC ustomer Assistanc eCenter
(USA) at the hotline number
1-800-FOR-MERCedes(1-800-367-6372) or
Customer Service (Canada)a t1-800-387-0100.
Vehicle operation outside the USA
and Canada
If you plan to operate your vehicle in foreign
countries, please be aware that:
Rservice facilities or replacement parts may
not be readily available.
Runleaded fuel for vehicles with acatalytic
converter may not be available. Leaded fuel
may cause damage to the catalytic converter.
Rthe fuel may have aconsiderably lower octane
rating. Unsuitable fuel can cause engine dam-
age.
Some Mercedes-Benzm odels are available for
delivery in Europe through our European Deliv-
ery Program. For details, consult an authorized
Mercedes-BenzC enter or write to one of the
following addresses.
In the USA
Mercedes-BenzU SA, LLC
European Delivery Department
One Mercedes Drive
Montvale, NJ 07645-0350
In Canada
Mercedes-BenzC anada,Inc.
European Delivery Department
98 Vanderhoof Avenue
Toronto, Ontario M4G 4C9
Service and vehicleo peration25
Introduction
Z
Page 68 of 298
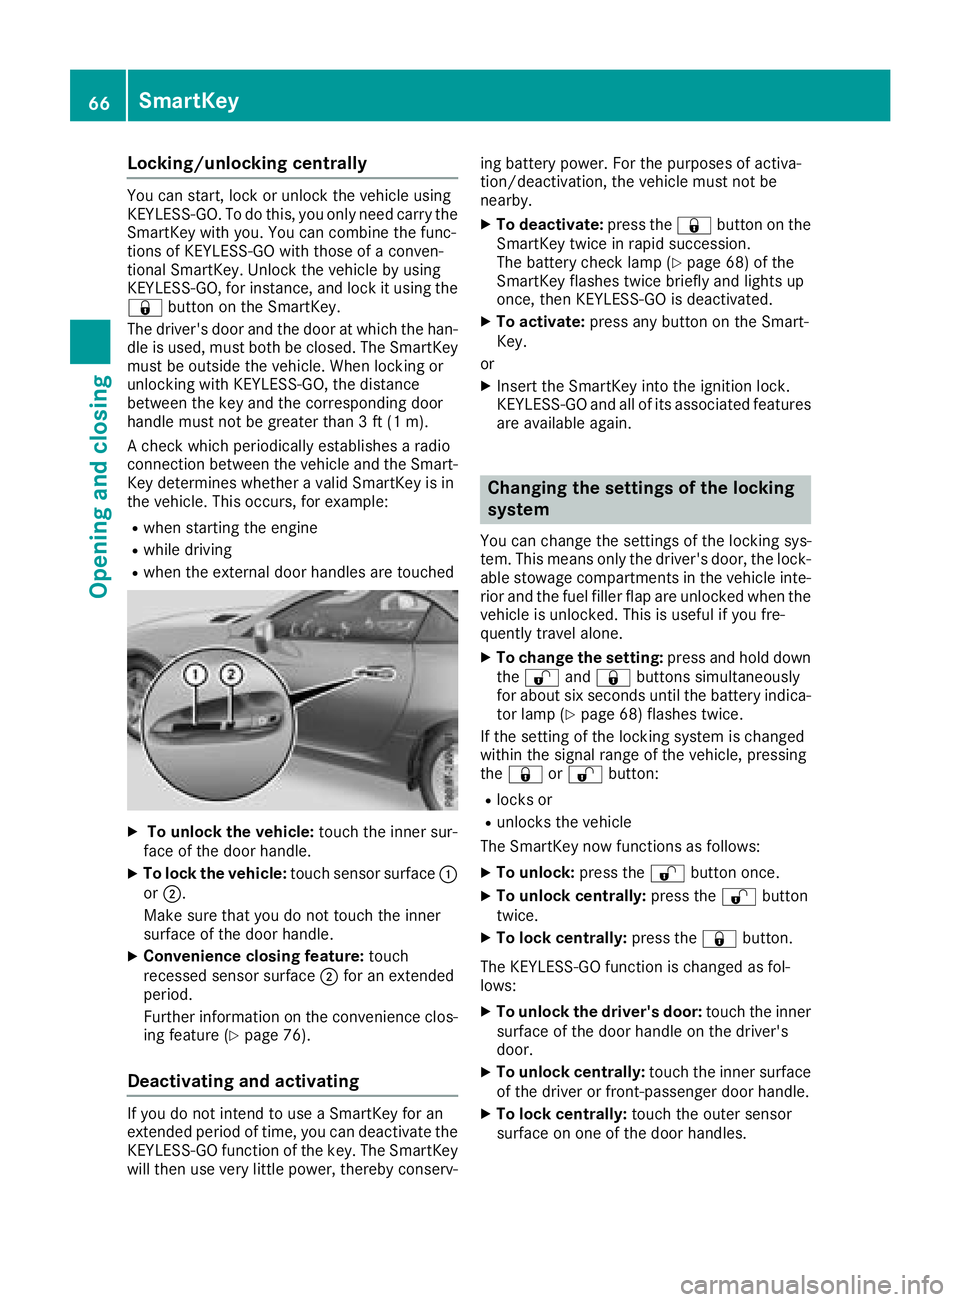
Locking/unlockingcentrally
You can start,lockorunlock thevehicle using
KEYLESS-GO .Todothis, you onl yneedc arry the
SmartKey with you. You can combine th efunc-
tions of KEYLESS-GO with those of aconven-
tional SmartKey. Unlockt hevehicle by using
KEYLESS-GO ,for instance, and lockitu singthe
& button on th eSmartKey.
The driver' sdoor and th edoor at whicht hehan-
dle is used, must bothbec losed. The SmartKey
must be outside th evehicle .When locking or
unlocking with KEYLESS-GO ,the distance
between th ekey and th ecorresponding door
handle must not be greater than 3ft(1m).
Ac heck whichp eriodicallyestablishesar adio
connectio nbetween th evehicle and th eSmart-
Key determine swhether avalid SmartKey is in
th ev ehicle .This occurs, for example:
Rwhen starting th eengine
Rwhile driving
Rwhen th eexternal door handles are touched
XTo unlock th evehicle: touch th einner sur-
fac eoft hedoor handle.
XTo lock th evehicle: touch sensor surface :
or ;.
Makes ure that you do not touch th einner
surface of th edoor handle.
XConvenience closing feature: touch
recesseds ensor surface ;for an extended
period.
Further informatio nontheconvenience clos-
ing feature (
Ypage 76).
Deactivating and activating
If you do not intend to use aSmartKey for an
extended perio doftime, you can deactivate the
KEYLESS-GO function of th ekey. The SmartKey
will then use veryl ittle power,therebyc onserv- ing battery power.F
or thepurposes of activa-
tion/deactivation, th evehicle must not be
nearby.
XTo deactivate: pressthe& button on the
SmartKey twic einrapid succession.
The battery check lamp (
Ypage 68 )ofthe
SmartKey flashes twic ebriefly and lightsu p
once, then KEYLESS-GO is deactivated.
XTo activate: pressany button on th eSmart-
Key.
or
XInsertt heSmartKey int othe ignitio nlock.
KEYLESS-GO and all of its associate dfeatures
are available again.
Changing th esettings of th elocking
system
You can change th esettings of th elockin gsys-
tem .This meanso nlyt he driver' sdoor,t helock-
able stowage compartments in th evehicle inte-
rior and th efuel filler flap are unlocked when the
vehicle is unlocked. This is useful if you fre-
quently travel alone.
XTo change th esetting: pressand hold down
the % and& buttons simultaneously
for about six second suntil th ebattery indica-
to rlamp (
Ypage 68 )flashes twice.
If th esettin goft helockin gsystem is changed
within th esignal range of th evehicle ,pressing
the & or% button:
Rlocks or
Runlock sthe vehicle
The SmartKey now functionsasf ollows:
XTo unlock:pressthe % button once.
XTo unlock centrally: pressthe % button
twice.
XTo lock centrally: pressthe& button.
The KEYLESS-GO function is changed as fol-
lows:
XTo unlock th edriver's door: touch theinner
surface of th edoor handle on th edriver's
door.
XTo unlock centrally: touch theinner surface
of th edriver or front-passenger door handle.
XTo lock centrally: touch theouter sensor
surface on one of th edoor handles.
66SmartKey
Opening and closing
Page 79 of 298
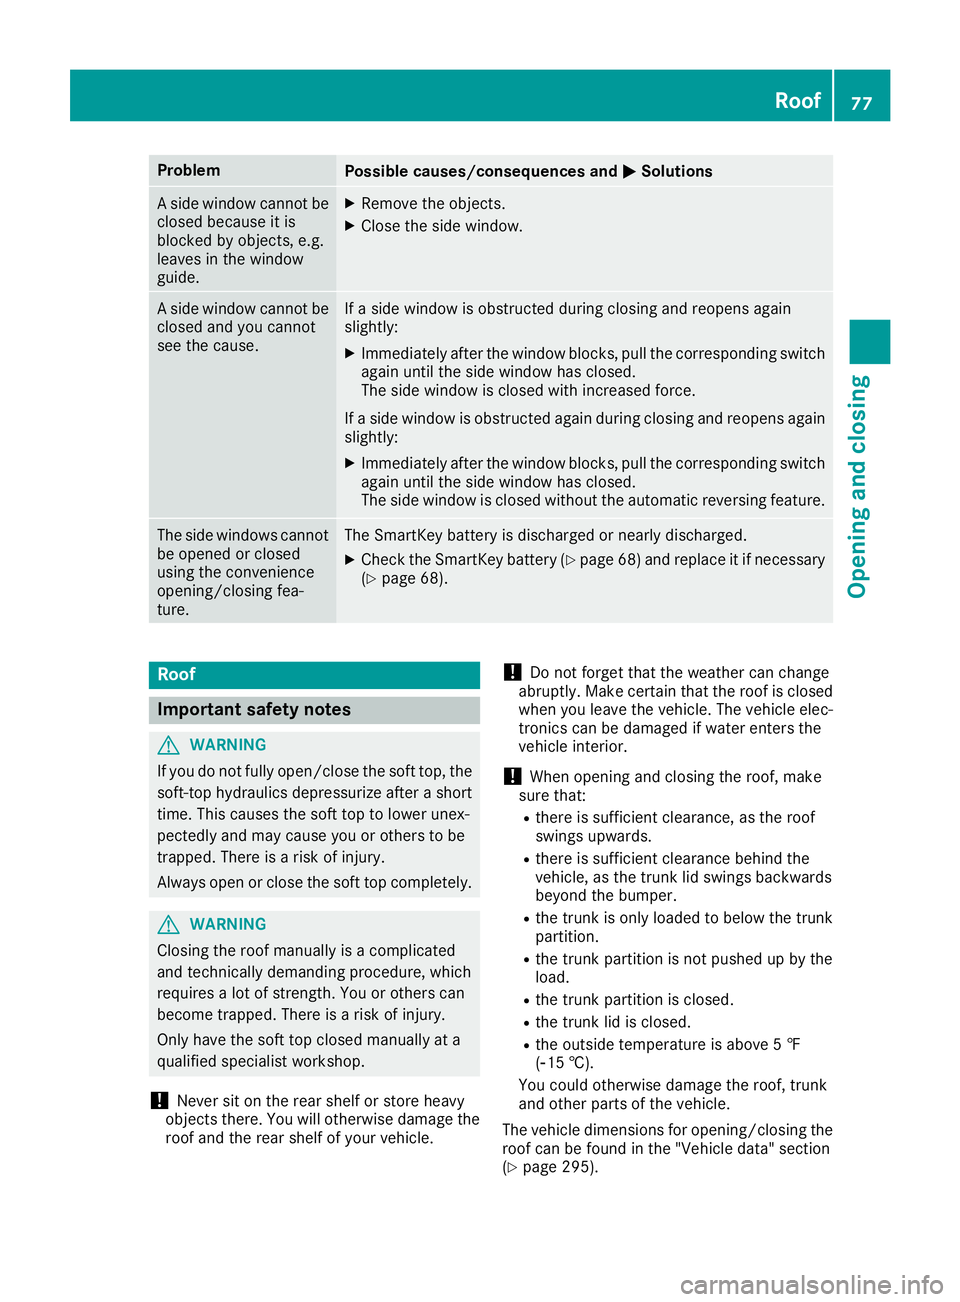
ProblemPossible causes/consequences andMSolutions
Aside window cannot be
closed because it is
blocked by objects, e.g.
leaves in the window
guide.XRemove the objects.
XClose the side window.
As ide window cannot be
closed and you cannot
see the cause.If as ide window is obstructed during closing and reopens again
slightly:
XImmediately after the window blocks, pull the correspondings witch
again until the side window has closed.
The side window is closed with increased force.
If as ide window is obstructed again during closing and reopens again
slightly:
XImmediately after the window blocks, pull the correspondings witch
again until the side window has closed.
The side window is closed without the automatic reversing feature.
The side windows cannot
be opened or closed
using the convenience
opening/closing fea-
ture.The SmartKey battery is discharged or nearly discharged.
XCheck the SmartKey battery (Ypage 68) and replace it if necessary
(Ypage 68).
Roof
Important safety notes
GWARNING
If you do not fully open/close the soft top, the
soft-top hydraulics depressurize after ashort
time. This causes the soft top to lower unex-
pectedly and may cause you or others to be
trapped. There is arisk of injury.
Always open or close the soft top completely.
GWARNING
Closing the roof manually is acomplicated
and technically demanding procedure, which
requires alot of strength. You or others can
become trapped. There is arisk of injury.
Only have the soft top closed manually at a
qualified specialist workshop.
!Never sit on the rear shelf or store heavy
object sthere. You will otherwise damage the
roof and the rear shelf of your vehicle.
!Do not forget that the weather can change
abruptly. Make certain that the roof is closed
when you leave the vehicle. The vehicle elec-
tronics can be damaged if water enters the
vehicle interior.
!When opening and closing the roof, make
sure that:
Rthere is sufficient clearance, as the roof
swings upwards.
Rthere is sufficient clearance behind the
vehicle, as the trunk lid swings backwards
beyond the bumper.
Rthe trunk is only loaded to below the trunk
partition.
Rthe trunk partition is not pushed up by the
load.
Rthe trunk partition is closed.
Rthe trunk lid is closed.
Rthe outside temperature is above 5‡
(Ò15 †).
You could otherwise damage the roof, trunk
and other parts of the vehicle.
The vehicle dimensions for opening/closing the
roof can be found in the "Vehicle data" section
(
Ypage 295).
Roof77
Opening and closing
Z
Page 84 of 298
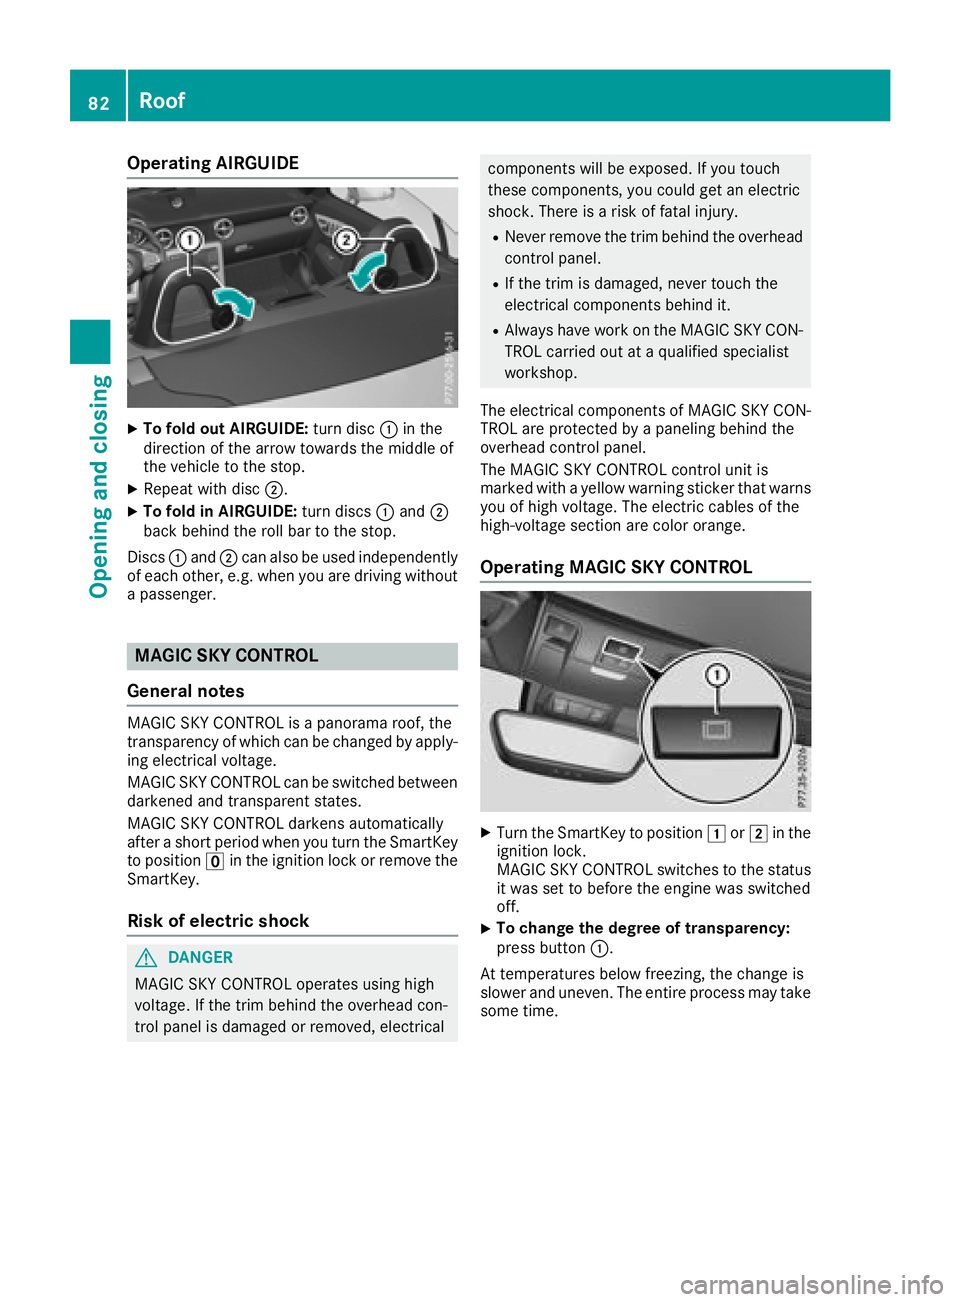
Operating AIRGUIDE
XTo fold out AIRGUIDE:turn disc:in the
direction of the arrow towards the middle of
the vehicle to the stop.
XRepeat with disc ;.
XTo fold in AIRGUIDE: turn discs:and ;
back behind the roll bar to the stop.
Discs :and ;can also be used independently
of each other ,e.g. when you are driving without
ap assenger.
MAGIC SKY CONTROL
General notes
MAGIC SKY CONTROL is apanorama roof, the
transparenc yofwhich can be changed by apply-
ing electrical voltage.
MAGIC SKY CONTROL can be switched between
darkened and transparent states.
MAGIC SKY CONTROL darken sautomatically
after ashort period when you turn the SmartKey
to position uin the ignition lock or remove the
SmartKey.
Risk of electric shock
GDANGER
MAGIC SKY CONTROL operates using high
voltage. If the trim behind the overhead con-
trol panel is damaged or removed, electrical
component swill be exposed. If you touch
these components, you could get an electric
shock.T here isarisk of fatal injury.
RNever remove the trim behind the overhead
control panel.
RIf the trim is damaged, never touch the
electrical component sbehind it.
RAlways have work on the MAGIC SKY CON-
TROL carried out at aqualified specialist
workshop.
The electrical component sofMAGIC SKY CON-
TROL are protected by apaneling behind the
overhead control panel.
The MAGIC SKY CONTROL control unit is
marked with ayellow warning sticker that warns
you of high voltage. The electric cables of the
high-voltage section are color orange.
Operating MAGIC SKY CONTROL
XTurn the SmartKey to position 1or2 in the
ignition lock.
MAGIC SKY CONTROL switches to the status
it was set to before the engin ewas switched
off.
XTo change the degree of transparency:
press button :.
At temperatures below freezing, the change is
slower and uneven .The entire process may take
some time.
82Roof
Opening and closing
Page 99 of 298
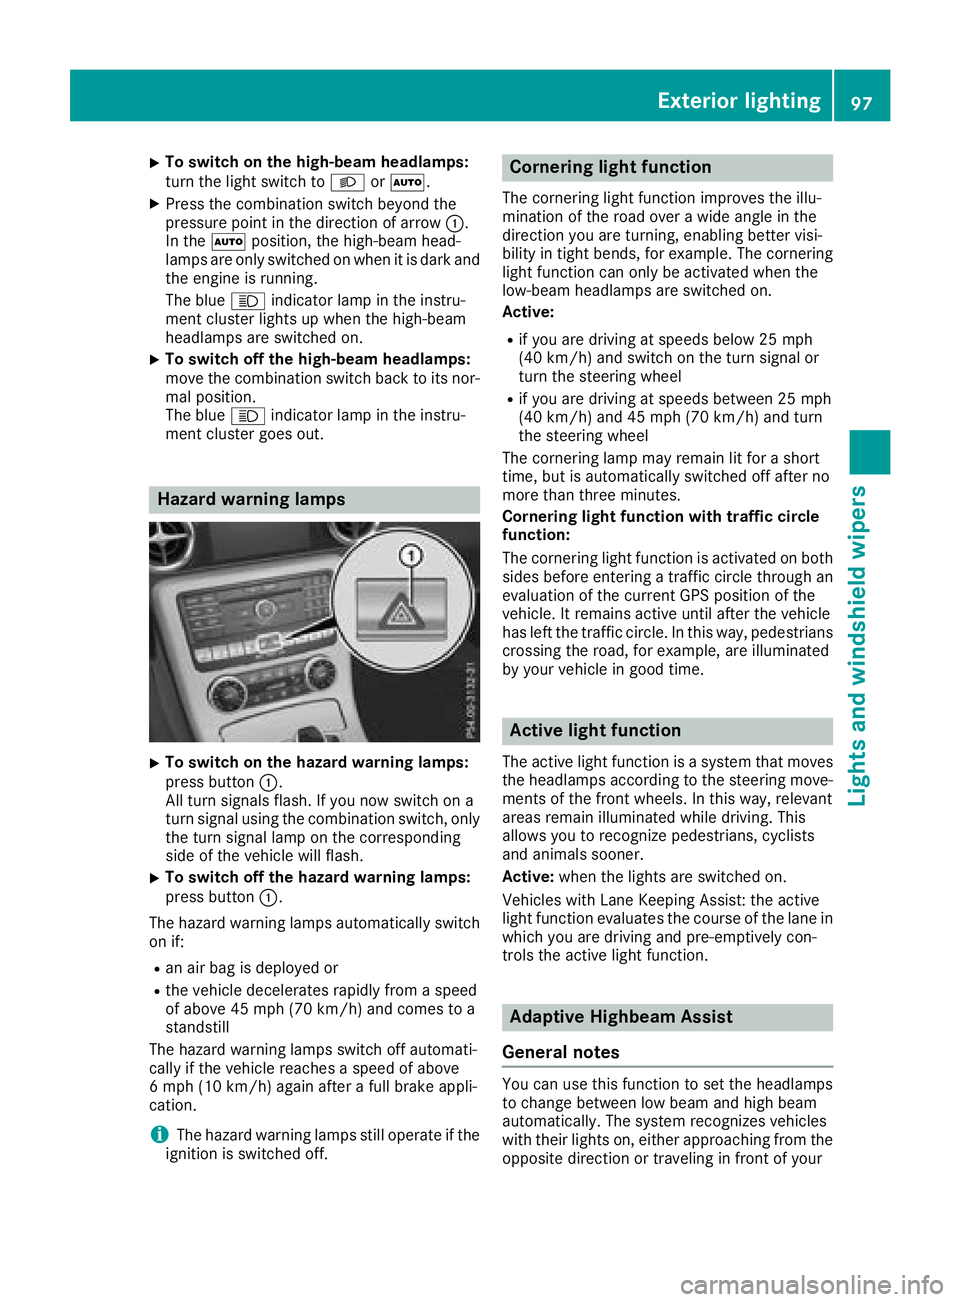
XTo switchonthe high-beam headlamps:
turn the light switch to LorÃ.
XPress the combinatio nswitch beyond the
pressure point in the direction of arrow :.
In the Ãposition, the high-bea mhead-
lamps are onlys witched on when it is dark and
the engine is running.
The blue Kindicator lamp in the instru-
ment cluster lights up when the high-beam
headlamps are switched on.
XTo switc hoff the high-beam headlamps:
move the combinatio nswitch back to its nor-
malp osition.
The blue Kindicator lamp in the instru-
ment cluster goe sout.
Hazard warning lamps
XTo switc honthe hazard warning lamps:
press button :.
All turn signals flash. If yo unow switch on a
turn signalu sing the combinatio nswitch ,only
the turn signall ampont he corresponding
side of the vehicl ewillf lash.
XTo switc hoff the hazard warning lamps:
press button :.
The hazard warning lamps automaticall yswitch
on if:
Ran ai rbag is deployed or
Rthe vehicl edecelerates rapidly from aspeed
of above 45 mph (70 km/h )and comestoa
standstill
The hazard warning lamps switch off automati-
cally if the vehicl ereachesas peed of above
6m ph (10 km/h )again afteraf ullb rake appli-
cation.
iThe hazard warning lamps stil lope rate if the
ignition is switched off.
Cornerin glight function
The cornering light functio nimprovest he illu-
minatio nofthe roado veraw idea ngle in the
direction yo uare turning, enabling better visi-
bility in tight bends, for example. The cornering
light functio ncan onlybea ctivatedwhent he
low-bea mheadlamps are switched on.
Active:
Rif yo uare driving at speed sbelow 25 mph
(40 km/h )and switch on the turn signalo r
turn the steering wheel
Rif yo uare driving at speed sbetween 25 mph
(40 km/h )and 45 mph (70 km/h )and turn
the steering wheel
The cornering lamp mayr emainlitfor ashort
time ,but is automaticall yswitched off afte rno
more thant hreeminutes.
Cornerin glight functio nwitht rafficc ircle
function:
The cornering light functio nisa ctivate donboth
side sbefore entering atraffic circle throug han
evaluation of the current GP Sposition of the
vehicle. It remains active unti lafte rthe vehicle
hasl eftt he traffic circle .Inthisw ay,pedes trians
crossing the road, for example, are illuminated
by your vehicl eingoodt ime.
Active light function
The active light functio nisas ystem thatm oves
the headlamps according to the steering move-
ments of the front wheels .Inthisw ay,relevant
areas remai nillum inated whil edriving .This
allows yo utorecognize pedestrians ,cyclists
and animals sooner.
Active: when the lights are switched on.
Vehicles with Lane Keeping Assist: the active
light functio nevaluate sthe course of the lane in
which yo uare driving and pre-emptively con-
trolst he active light function.
Adaptiv eHighbeam Assist
General notes
Yo uc an us ethisf unctio ntoset the headlamps
to change between lo wbeama nd high beam
automatically. The system recognizes vehicles
with thei rlights on, either approaching from the
opposite direction or traveling in front of your
Exterior lighting97
Lights and windshield wiper s
Z
Page 111 of 298
Problems with the "Cooling with air dehumidification" function
ProblemPossible causes/consequences andMSolutions
The indicator lamp in the
¿orÁ button
flashes three times or
remains off. The "Cool-
ing with air dehumidifi-
cation" function cannot
be switched on.Cooling with air dehumidification has been deactivated due to amal-
function.
XVisit aqualified specialist workshop.
Setting climate control to automatic
General notes
Automatic mode is only available with 3-zone
automatic climate control.
In automatic mode, the set temperature is main-
tained automatically at aconstant level. The
system automatically regulates the temperature
of the dispensed air, the airflow and the air dis-
tribution.
The automatic mode functions optimally when
the "Cooling with air dehumidification" function
is activated. If necessary, cooling with air dehu-
midification can be deactivated.
If you deactivate the "Cooling with air-dehumid- ification" function, the air inside the vehicle will
not be cooled. The air inside the vehicle will also
not be dehumidified.T he windows can fog up
more quickly. Therefore, deactivate the cooling
with air-dehumidification function only briefly.
Automatic control
XTurn the SmartKey to position 2in the igni-
tion lock (Ypage 116).
XSet the desired temperature.
XTo activate: press theÃbutton.
The indicator lamp in the Ãbutton lights
up. Automatic air distribution and airflow are
activated.
XTo switch to manualm ode:press the _
button.
or
XPress the IorK button.
The indicator lamp in the Ãbutton goes
out.
Setting the temperature
Air-conditioning system
XTurn the SmartKey to position 2in the igni-
tion lock (Ypage 116).
XTo increase or reduce: turn control:
clockwise or counter-clockwise (Ypage 104).
Only change the temperature settingins mall
increments. Start at 72 ‡(22 †).
iIf you turn control :counter-clockwise to
the lowest temperature setting, air-recircula-
tion mode may activate automatically,
depending on the outside temperature.
3-zone automatic climate control
Differentt emperatures can be set for the driv-
er's and front-passenger sides.
XTurn the SmartKey to position 2in the igni-
tion lock (Ypage 116).
XTo increase or decrease: turn control:or
B clockwise or counter-clockwise
(
Ypage 106).
Only change the temperature settingins mall
increments. Start at 72 ‡(22 †).
iIf you turn controls :and Bcounter-
clockwise to the lowest temperature setting,
air-recirculation mode may activate automat-
ically, depending on the outside temperature.
Operating the climate control systems109
Climatec ontrol
Page 120 of 298
iYou can startthe engin eintransmission
position jand i.
Starting procedur ewith th eSmartKey
To star tthe engin eusing the SmartKey instead
of KEYLESS-GO, pull the Start/Stop button out
of the ignition lock.
XTurn the SmartKey to position 3in the igni-
tion lock (Ypage 116)a nd release it as soon
as the engin eisrunning.
Using KEYLESS-GO to start th eengine
The Start/Stop button can be used to star tthe
vehicle manually without insertin gthe SmartKey
int ot he ignition lock .The Start/Stop button
must be inserted in the ignition lock and the
SmartKey must be in the vehicle. This mode for
startin gthe engin eoperates independently of
the ECO start/sto pautomatic engin estar tfunc-
tion.
XDepress the brakep edal and keep it
depressed.
XPress the Start/Stop button once
(Ypage 116).
The engin estarts.
Pulling away
Genera lnotes
GWARNING
If the engin espeed is above the idling speed
and you engage transmission position Dor R,
the vehicle could pull away suddenly. There is
ar isk of an accident.
When engagin gtransmission position Dor R,
always firmly depresst he brakepedal and do
not simultaneously accelerate.
!Change gear in good tim eand avoid spin-
nin gthe wheels. You could otherwise damage
the vehicle.
Depress the accelerator carefully when pulling
away.
The vehicle lock scentrally onc eyou have pulled
away. The locking knobs in the doors drop down.
You can open the doors from the inside at any
time. You can also deactivate the automatic locking
feature (
Ypage 173).
It is only possible to shift the transmission from
position jto the desired position if you
depresst he brakep edal. Only the nisthe shift
lock released.
iUpshifts tak eplace at higher engin espeeds
afte rac old start. This helps the catalytic con-
verter to reach its operating temperature
more quickly.
Information on the automatic release of the
electric parking brake(
Ypage 133).
Hill start assist
Hill star tassist helps you when pulling away
forwardorinr everse on an uphill gradient. It
holds the vehicle for ashortt imea fteryou have
removed your foot from the brakep edal. This
gives you enough tim etomove your foot from
the brakep edal to the accelerator pedal and to
depressitb eforethe vehicle begins to roll.
GWARNING
After ashortt ime, hill star tassist will no lon-
ger brakey our vehicle and it could roll away.
There is arisk of an accident and injury.
Therefore, quickly move your foot from the
brakep edal to the accelerator pedal. Never
leave the vehicle when it is held by hill start
assist.
Hill star tassist is not active if:
Ryou are pulling away on alevel road or on a
downhill gradient
Rthe transmission is in position i
Rthe electric parking brakeisapplied
RESP®is malfunctioning
ECO start/stop function
Introduction
The ECO start/sto pfunction switches the
engin eoff automatically if the vehicle is stopped
under certain conditions.
The engin estarts automatically when the driver
want stop ull away again. The ECO start/stop
function thereby helps you to reduce the fuel
consumption and emissions of your vehicle.
118Driving
Driving and parking