interior lights MERCEDES-BENZ SLC ROADSTER 2018 Owner's Manual
[x] Cancel search | Manufacturer: MERCEDES-BENZ, Model Year: 2018, Model line: SLC ROADSTER, Model: MERCEDES-BENZ SLC ROADSTER 2018Pages: 298, PDF Size: 5.26 MB
Page 4 of 298
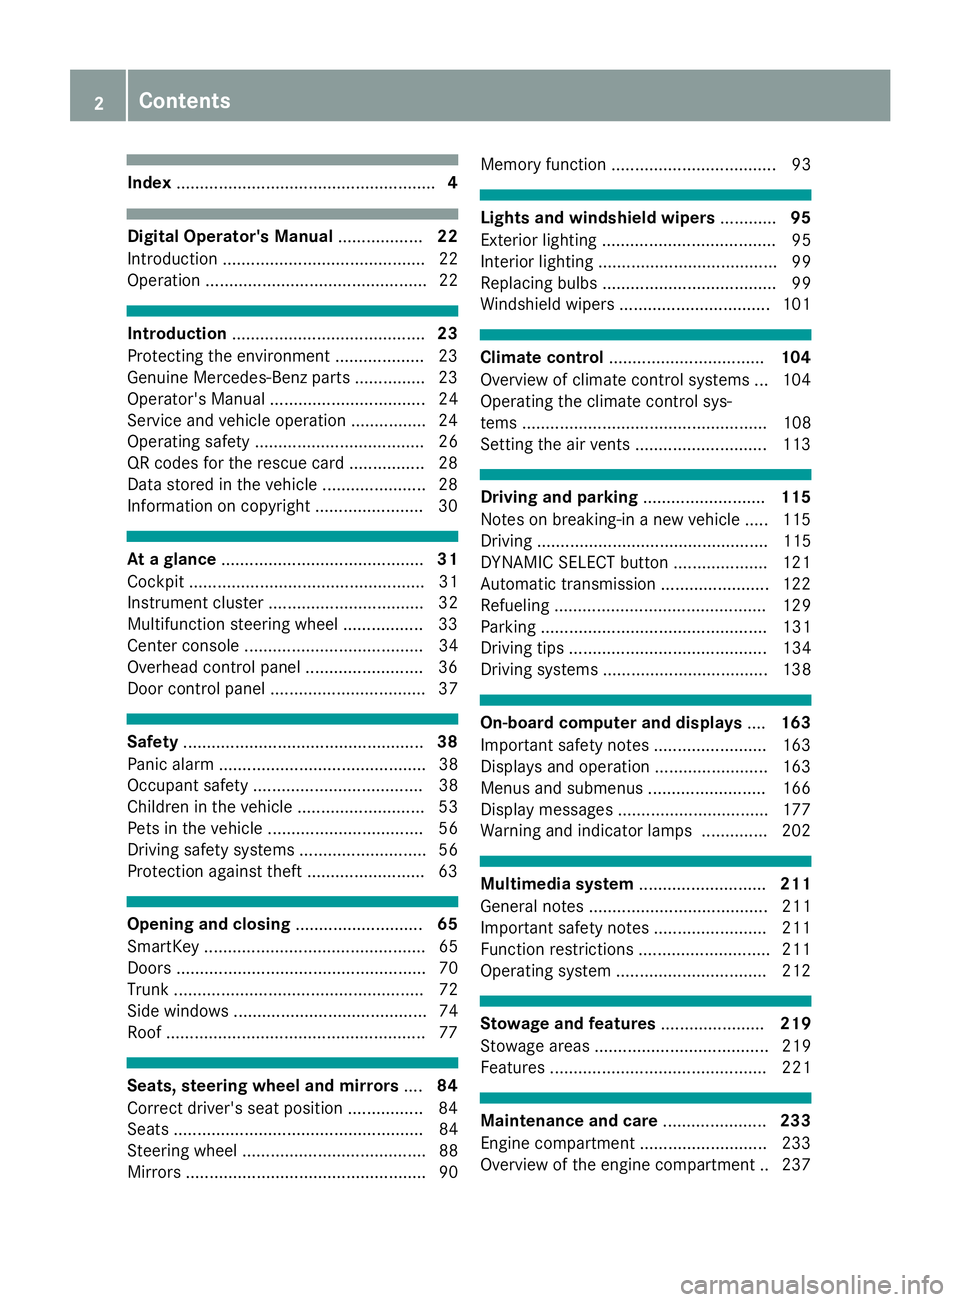
Index....................................................... 4
Digital Operator's Manual..................22
Introductio n........................................... 22
Operation ............................................... 22
Introduction ......................................... 23
Protecting the environment ...................2 3
Genuine Mercedes-Ben zparts............... 23
Operator's Manual ................................. 24
Service and vehicle operation ................2 4
Operating safety .................................... 26
QR codes for the rescue card ................2 8
Data stored in the vehicl e...................... 28
Informatio noncopyright ....................... 30
Atag lance ........................................... 31
Cockpi t.................................................. 31
Instrument cluster. ................................ 32
Multifunctio nsteering whee l................. 33
Center consol e...................................... 34
Overhead contro lpan el .........................3 6
Doorc ontrolpan el ................................. 37
Safety ................................................... 38
Panic alar m............................................ 38
Occupant safety .................................... 38
Childre ninthe vehicl e........................... 53
Pets in the vehicl e................................. 56
Driving safety systems ........................... 56
Protection against theft .........................6 3
Opening and closing...........................65
SmartKey ............................................... 65
Doors ..................................................... 70
Trunk ..................................................... 72
Side windows ......................................... 74
Roof .......................................................7 7
Seats, steering wheel and mirrors....84
Correct driver's seat position ................8 4
Seats ..................................................... 84
Steering wheel ....................................... 88
Mirrors. .................................................. 90 Memory function ................................... 93
Lights and windshield wipers
............95
Exterior lighting ..................................... 95
Interior lighting ...................................... 99
Replacing bulb s..................................... 99
Windshield wipers ................................ 101
Climate control ................................. 104
Overview of climate control systems ... 104
Operating the climate control sys-
tems .................................................... 108
Setting the ai rvents ............................ 113
Drivin gand parking .......................... 115
Notesonb reaking-inanew vehicl e..... 115
Driving ................................................. 115
DYNAMIC SELECT button .................... 121
Automati ctransmissio n....................... 122
Refueling ............................................. 129
Parking ................................................ 131
Driving tip s.......................................... 134
Driving systems ................................... 138
On-board computer and displays ....163
Important safety notes ........................ 163
Displays and operation ........................ 163
Menusa nd submenus ......................... 166
Displa ymessages ................................ 177
Warning and indicator lamps .............. 202
Multimedi asystem ........................... 211
Generaln otes ...................................... 211
Important safety notes ........................ 211
Function restrictions ............................ 211
Operating system ................................ 212
Stowag eand features ...................... 219
Stowag eareas ..................................... 219
Feature s.............................................. 221
Maintenancea nd care...................... 233
Engine compartment ........................... 233
Overview of the engine compartment .. 237
2Contents
Page 14 of 298
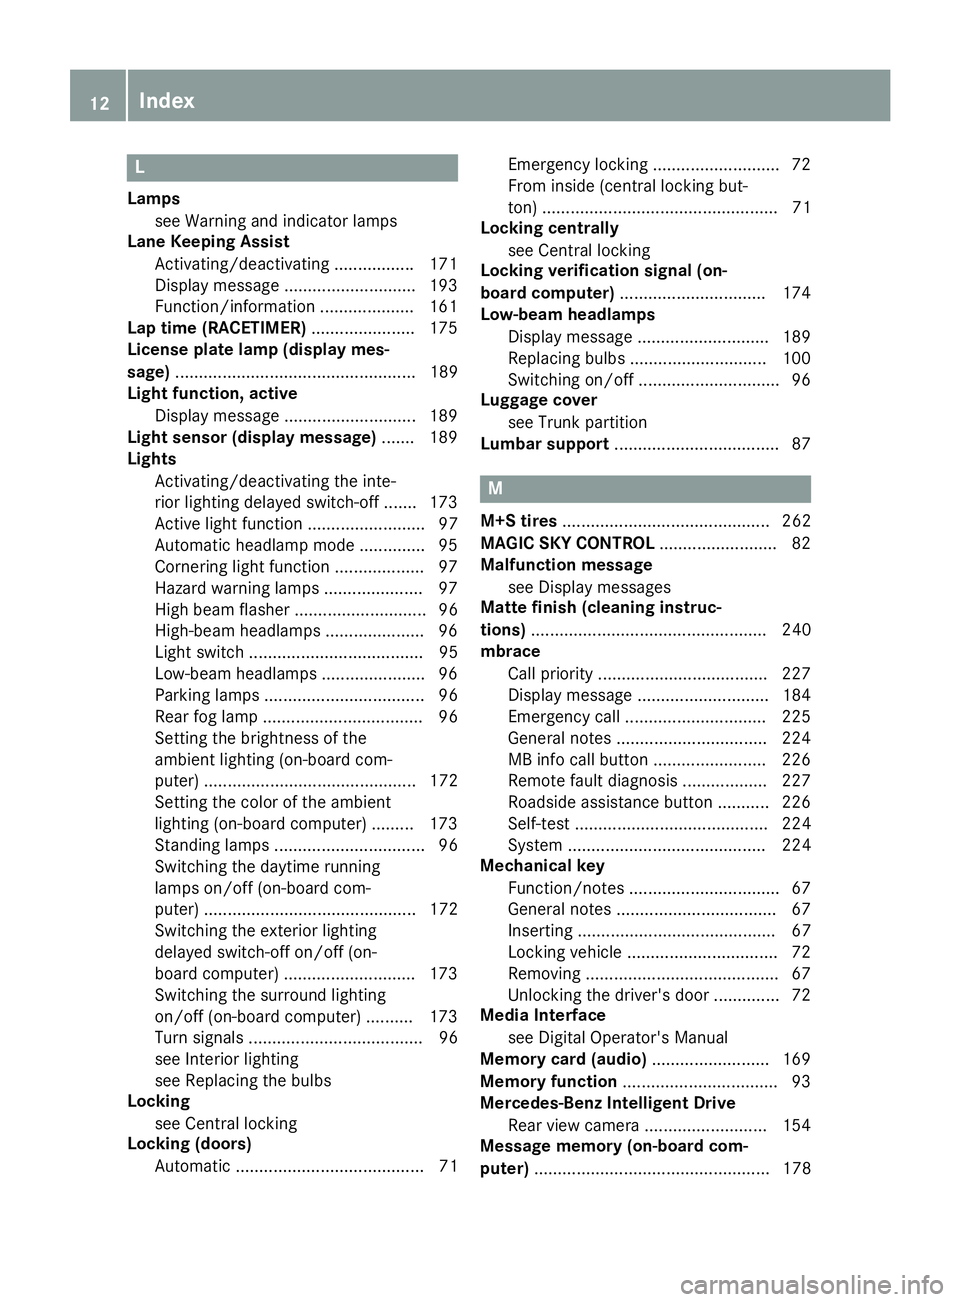
L
Lampssee Warning and indicator lamps
Lane Keeping Assist
Activating/deactivating ................ .171
Display message ............................ 193
Function/informatio n.................... 161
Lap time (RACETIMER) ...................... 175
License plate lamp (display mes-
sage) ................................................... 189
Light function, active
Displa ymessage ............................ 189
Light senso r(display message) ....... 189
Lights
Activating/deactivating the inte-
riorlighting delaye dswitch-off ....... 173
Active light function ......................... 97
Automati cheadlamp mode. ............. 95
Cornering light function ................... 97
Hazard warning lamps ..................... 97
Hig hbeamf lasher. ........................... 96
High-beam headlamp s..................... 96
Light switch ..................................... 95
Low-bea mheadlamp s...................... 96
Parking lamps .................................. 96
Rear fog lamp .................................. 96
Setting the brightness of the
ambient lighting (on-board com-
puter) ............................................. 172
Setting the color of the ambient
lighting (on-board computer) ......... 173
Standing lamps ................................ 96
Switching the daytime running
lamps on/off( on-board com-
puter) ............................................. 172
Switching the exterio rlighting
delaye dswitch-off on/off( on-
board computer) ............................ 173
Switching the surround lighting
on/off( on-board computer) .......... 173
Turn signal s..................................... 96
see Interior lighting
see Replacing the bulbs
Locking
see Central locking
Locking (doors)
Automati c........................................ 71 Emergency locking ........................... 72
From inside (central locking but-
ton) .................................................. 71
Locking centrally
see Central locking
Locking verification signal (on-
board computer) ............................... 174
Low-b eam he
adlamps
Displa ymessage ............................ 189
Replacing bulb s............................. 100
Switching on/off. ............................. 96
Luggag ecover
see Trunk partition
Lumbar support ................................... 87
M
M+S tires............................................ 262
MAGIC SKYC ONTROL ......................... 82
Malfunctio nmessage
see Displa ymessages
Matte finis h(clea ning instruc-
tions) .................................................. 240
mbrace
Call priority .................................... 227
Displa ymessage ............................ 184
Emergency cal l.............................. 225
Generaln otes ................................ 224
MB info cal lbutton ........................ 226
Remote fault diagnosis. ................. 227
Roadsid eassis tance button ........... 226
Self-test ......................................... 224
System .......................................... 224
Mechanical key
Function/note s................................ 67
Genera lnotes .................................. 67
Inserting .......................................... 67
Locking vehicl e................................ 72
Removing ......................................... 67
Unlocking the driver'sd oor.............. 72
Medi aInterface
see Digital Operator's Manual
Memory card (audio) ......................... 169
Memory function ................................. 93
Mercedes-Benz Intelligent Drive
Rear vie wcamera .......................... 154
Messagem emory (on-board com-
puter) .................................................. 178
12Index
Page 41 of 298
regular intervalswhile the engine is running.
Therefore, malfunctions can be detected in
good time.
The 6 restraint system warning lamp on the
instrument cluster lights up when the ignitio nis
switched on. It goes out no later than afew sec-
onds after the vehicleiss tarted. The compo-
nents of the restraint system are in operational
readiness.
Am alfunction has occurred if the 6restraint
system warning lamp:
Rdoes not light up after the ignitio nisswitched
on
Rdoes not go out after afew seconds with the
engine running
Rlights up again while the engine is running
GWARNING
If the restraint system is malfunctioning,
restraint system components may be trig-
gered unintentionally or may not deploy as
intended during an accident. This can affect
for examplet he Emergency Tensioning
Device or the air bag .This poses an increased
risk of injury or even fatal injury.
Have the restraint system checked and
repaired in aqualified specialist workshop as
soon as possible.
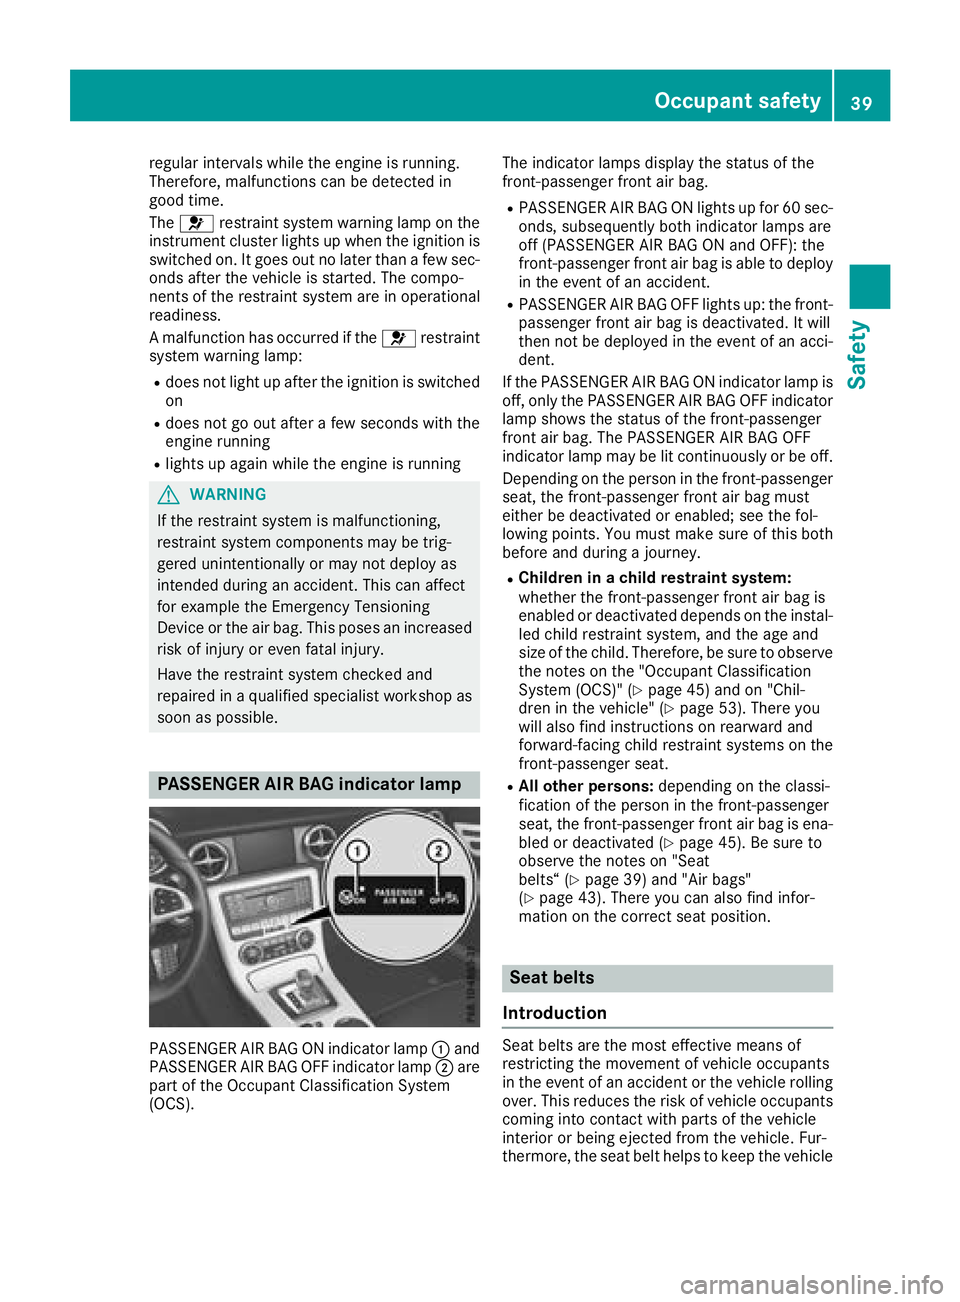
PASSENGER AI RBAG indicator lamp
PASSENGER AIR BAG ON indicator lamp :and
PASSENGER AIR BAG OFF indicator lamp ;are
part of the Occupant Classification System
(OCS). The indicator lamp
sdisplay the status of the
front-passenge rfront air bag.
RPASSENGER AIR BAG ON lights up for 60 sec-
onds, subsequently both indicator lamp sare
off (PASSENGER AIR BAG ON and OFF): the
front-passenge rfront air bag is abl etodeploy
in the event of an accident.
RPASSENGER AIR BAG OFF lights up: the front-
passenger front air bag is deactivated. It will
then not be deploye dinthe event of an acci-
dent.
If the PASSENGER AIR BAG ON indicator lamp is
off, only the PASSENGER AIR BAG OFF indicator lamp shows the status of the front-passenger
front air bag .The PASSENGER AIR BAG OFF
indicator lamp may be lit continuously or be off.
Depending on the person in the front-passenger
seat, the front-passenge rfront air bag must
either be deactivated or enabled; see the fol-
lowing points. You must make sure of this both
before and during ajourney.
RChildren in achildr estraint system:
whethert he front-passenge rfront air bag is
enabled or deactivated depends on the instal- led child restraint system, and the age and
size of the child.T herefore, be sure to observe
the notes on the "Occupant Classification
System (OCS)" (
Ypag e45) and on "Chil-
dren in the vehicle" (Ypag e53). There you
wil lalsof ind instructions on rearward and
forward-facing child restraint systems on the
front-passenge rseat.
RAll other persons: depending on the classi-
ficatio nofthe person in the front-passenger
seat, the front-passenge rfront air bag is ena-
bled or deactivated (
Ypag e45). Be sure to
observe the notes on "Seat
belts“ (
Ypag e39) and "Air bags"
(Ypag e43).T here you can als ofind infor-
mation on the correct seat position.
Seat belts
Introduction
Seat belts are the most effective means of
restricting the movement of vehicleo ccupants
in the event of an accident or the vehicler olling
over. This reduces the risk of vehicleo ccupants
coming into contact with parts of the vehicle
interior or being ejected from the vehicle. Fur-
thermore, the seat belt helpstok eep the vehicle
Occupant safety39
Safety
Z
Page 49 of 298
GWARNING
If the PASSENGER AIR BAG OFF indicator
lamp is lit, the front-passenge rfront air bag is
disabled. It wil lnot be deploye dinthe event of
an accident and cannot perform its intended
protective function. Apersonint he front-
passenger seat coul dthen, for example, come
into contact with the vehicle's interior, espe-
cially if the personiss itting too close to the
dashboard. This posesani ncreased risk of
injury or even fatal injury.
When the front-passenge rseat is occupied,
alway sensure that:
Rthe classification of the personint he front-
passenger seat is correct and the front-
passenger front air bag is enabled or disa-
bledina ccordance with the personint he
front-passenge rseat
Rthe front-passenge rseat has been moved
back as far back as possible.
Rthe personiss eated correctly.
Make sure ,both before and during the jour-
ney, that the status of the front-passenger
front air bag is correct.
GWARNING
If you secure achild in arearward-facing child
restraint system on the front-passenge rseat
and the PASSENGER AIR BAG OFF indicator
lamp is off, the front-passenge rfront air bag
can deploy in the event of an accident. The
child coul dbestruck by the air bag .This poses
an increased risk of injury or even fatal injury.
Make sure that the front-passenge rfront air
bag has been deactivated. The PASSENGER
AIR BAG OFF indicator lamp must be lit.
NEVER use arearward-facing child restraint
on aseat protected by an ACTIVE FRONT AIR-
BAG in front of it; DEATH or SERIOUS INJURY
to the child can occur.
If the PASSENGER AIR BAG OFF indicator lamp
stays off, do not instal larearward-facing child
restraint system on the front-passenge rseat.
You can find more information on OCS under
"Problems with the Occupant Classification Sys-
tem" (
Ypage4 9).
GWARNING
If you secure achild in aforward-facing child
restraint system on the front-passenge rseat
and you position the front-passenge rseat too
close to the dashboard, in the event of an
accident, the child could:
Rcome into contact with the vehicle's inte-
rior if the PASSENGER AIR BAG OFF indi-
cator lamp is lit, for example
Rbe struck by the air bag if the PASSENGER
AIR BAG OFF indicator lamp is off
This poses an increased risk of injury or even fatal injury.
Move the front-passenge rseat as far back as
possible.A lways make sure that the shoulder
belts trap is correctly routed from the vehicle
beltg uide to the shoulderb eltguide on the
child restraint system. The shoulderb eltstrap
must be routed forwards and downwards
from the vehicleb eltguide. Always observe
the child restraint system manufacturer's
installation instructions.
If OCS determines that:
RThe front-passenge rseat is unoccupied,t he
PASSENGER AIR BAG OFF indicator lamp
lights up after the system self-test and
remains lit. This indicates that the front-
passenger front air bag is deactivated.
RThe front-passenge rseat is occupied by a
child of up to twelve months old, in astandard
child restraint system, the PASSENGER AIR
BAG OFF indicator lamp lights up after the
system self-test and remains lit. This indi-
cates that the front-passenge rfront air bag is
deactivated.
But even in the case of atwelve-month-old
child ,inas tandard child restraint system, the
PASSENGER AIR BAG OFF indicator lamp can
go out after the system self-test. This indi-
cates that the front-passenge rfront air bag is
activated. The result of the classification is
dependent on, among other factors, the child
restraint system and the child's stature. Make
sure that the conditions for acorrect classi-
ficatio nare met. If the PASSENGER AIR BAG
OFF indicator lamp remains off, do not install
ac hild restraint system on the front-
pa
ssenger seat.
Occupant safety47
Safety
Z
Page 50 of 298
RThe front-passenger seat is occupied by a
person of smaller stature (e.g.ateenager or
small adult), the PASSENGER AIR BAG OFF
indicator lamp lights up and remains lit after
the system self-test depending on the result
of the classification or, alternatively, goes out.
-If the PASSENGER AIR BAG OFF indicator
lamp is off, move the front-passenger seat
as far back as possible.
-If the PASSENGER AIR BAG OFF indicator
lamp is lit, aperson of smaller stature
should not use the front-passenger seat.
RThe front-passenger seat is occupied by an
adult or aperson of adult stature, the
PASSENGER AIR BAG OFF indicator lamp
goes out after the system self-test. This indi-
cates that the front-passenger front air bag is
activated.
If children are traveling in the vehicle, be sure to observe the notes on "Children in the vehicle"
(
Ypage 53).
When the Occupant Classification System
(OCS) is malfunctioning, the red 6restraint
system warning lamp on the instrument cluster
and the PASSENGER AIR BAG OFF indicator
lamp light up simultaneously. The front-
passenger front air bag is deactivated in this
case and does not deploy during an accident.
Have the Occupant Classification System (OCS)
checked and repaired immediately at aqualified
specialist workshop. Mercedes-Benz recom-
mends that you use an authorized Mercedes-
Benz Center for this purpose.
If the front-passenger seat, the seat cover or the seat cushion are damaged, have the necessary
repair work carried out at aqualified specialist
workshop. Mercedes-Benz recommends that
you use an authorized Mercedes-Benz Center
for this purpose.
For safety reasons, Mercedes-Benz recom-
mends that you only use seat accessories that
have been approved by Mercedes-Benz.
If the driver's air bag deploys, this does not
mean that the front-passenger front air bag will
also deploy. The Occupant Classification Sys-
tem (OCS) categorizes the occupant on the
front-passenger seat. Dependin gonthat result,
the front-passenger front air bag is either ena-
bled or deactivated.
System self-test
GDANGER
If both the PASSENGER AIR BAG OFF and
PASSENGER AIR BAG ON indicator lamps do
not light up during the system self-test, the
system is malfunctioning. The front-
passenger front air bag might be triggered
unintentionally or might not be triggered at all
in the event of an accident with high deceler-
ation. This poses an increased risk of injury or
even fatal injury.
In this case the front-passenger seat may not
be used. Do not install achild restraint system
on the front-passenger seat. Have the Occu-
pant Classification System (OCS) checked
and repaired immediately at aqualified spe-
cialist workshop.
GWARNING
If the PASSENGER AIR BAG OFF indicator
lamp remains lit after the system self-test, the
front-passenger front air bag is disabled. It will
not be deployed in the event of an accident .In
this case, the front-passenger front air bag
cannot perform its intended protective func-
tion, e.g. when aperson is seated in the front-
passenger seat.
That person could, for example, come into
contact with the vehicle's interior, especially
if the person is sittin gtoo close to the dash-
board. This poses an increased risk of injury or
even fatal injury.
When the front-passenger seat is occupied,
alwayse nsure that:
Rthe classification of the person in the front-
passenger seat is correcta nd the front-
passenger front air bag is enabled or disa-
bled in accordanc ewith the person in the
front-passenger seat
Rthe person is seated properly with acor-
rectly fastened seatbelt
Rthe front-passenger seat has been moved
as far back as possible
If the PASSENGER AIR BAG OFF indicator
lamp remains lit when it should not,t he front-
48Occupant safety
Safety
Page 101 of 298
Interior lighting
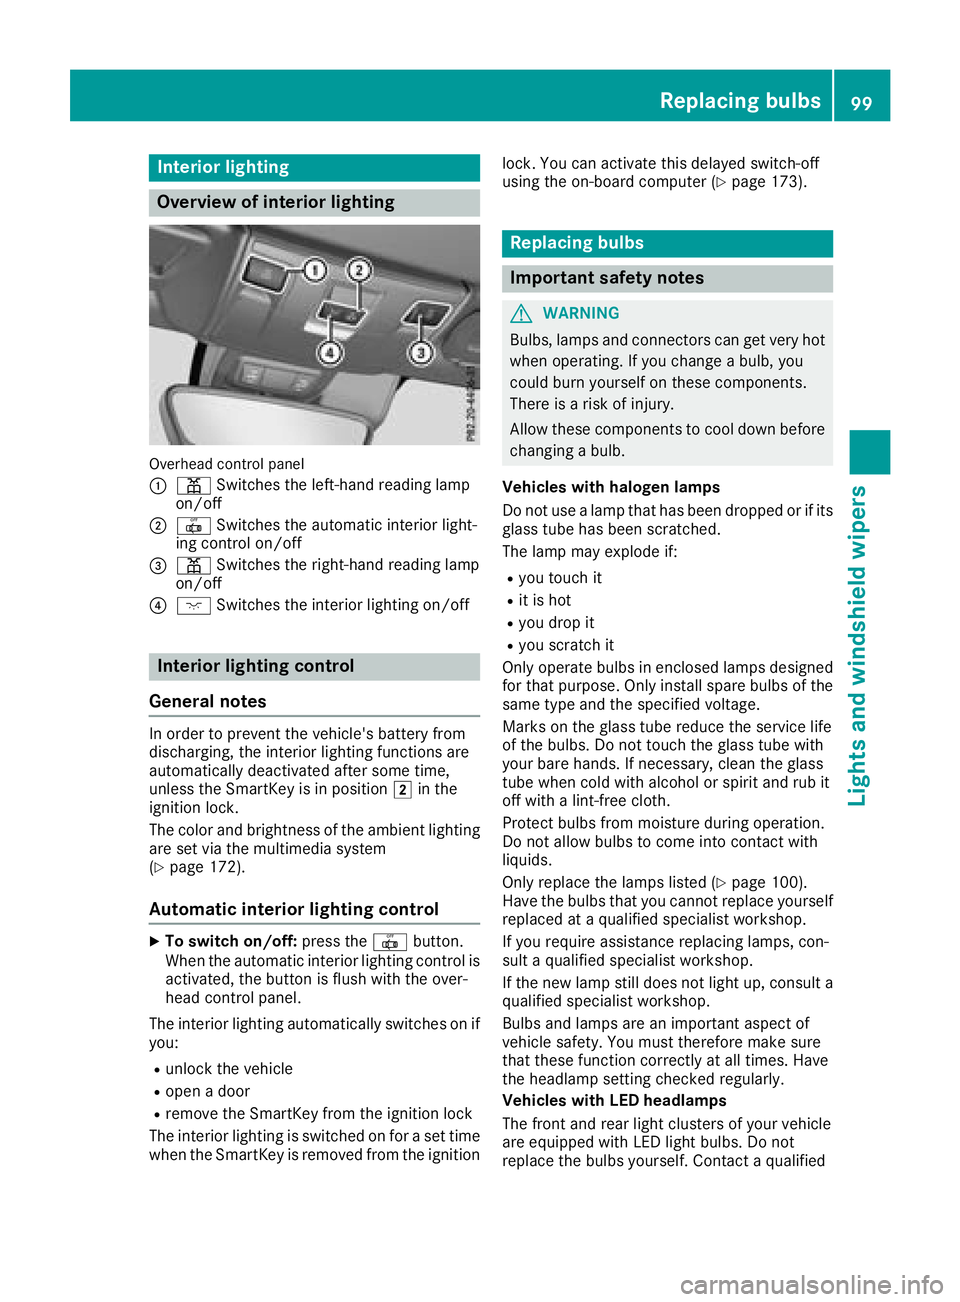
Overview of interior lighting
Overhead control panel
:
pSwitches th eleft-han dreading lamp
on/off
;| Switches th eautomatic interio rlight-
ing control on/off
=p Switches th eright-hand reading lamp
on/off
?c Switches th einterio rlighting on/off
Interior lighting control
General notes
In order to preven tthe vehicle's battery from
discharging ,the interio rlighting function sare
automatically deactivated after som etime,
unless th eSmartKey is in position 2in th e
ignition lock.
The color and brightness of th eambien tlighting
are set via th emultimedia system
(
Ypage 172).
Automati cinterior lighting control
XTo switch on/off: press the| button.
When th eautomatic interio rlighting control is
activated, th ebutto nisf lushw itht he over-
head control panel.
The interio rlighting automatically switches on if
you:
Runlock th evehicl e
Ropen adoor
Rremove th eSmartKey from th eignition loc k
The interio rlighting is switched on for aset time
when th eSma rtKey is remove dfromt heignition lock. You can activat
ethisd elaye dswitch-off
usin gthe on-board computer (
Ypage 173).
Replacingbulbs
Important safety notes
GWARNIN G
Bulbs, lamp sand connectors can get ver yhot
when operating .Ifyou chang eabulb, you
could burn yourself on these components.
Ther eisar iskofi njury.
Allow these component stocooldown before
changing abulb.
Vehicles with halogen lamps
Do no tuse alamp that has been dropped or if it s
glass tub ehas been scratched.
The lamp may explod eif:
Ryou touch it
Rit is hot
Ryou dro pit
Ryou scratch it
Only operate bulbs in enclosed lamp sdesigned
for that purpose .Onlyi nstal lspar ebulbs of th e
sam etypea nd th especifie dvoltage.
Mark sont heglass tub ereduce th eservic elife
of th ebulbs .Don ottouch th eglass tub ewith
your bare hands. If necessary, clean th eglass
tub ew hen cold wit halcohol or spirit and rub it
off wit halint-free cloth .
Protect bulbs from moisture during operation .
Do no tallow bulbs to come int ocontac twith
liquids.
Only replace th elamp slisted (
Ypage 100).
Hav ethe bulbs that you canno treplace yourself
replace dataq ualified specialist workshop.
If you require assistanc ereplacing lamps, con-
sult aqualified specialist workshop.
If th enew lamp still does no tligh tup, consult a
qualified specialist workshop.
Bulb sand lamp sare an important aspect of
vehicl esafety. You must therefor emakes ure
that these function corre
ctl
yatall times .Have
th eh eadlamp setting checke dregularly.
Vehicles with LED headlamp s
The fron tand rear ligh tclusters of your vehicl e
are equipped wit hLED ligh tbulbs .Don ot
replace th ebulbs yourself .Contac taqualified
Replacingb ulbs99
Lightsand windshield wipers
Z
Page 114 of 298
Problems with the rear window defroster
ProblemPossible causes/consequences andMSolutions
The indicator lamp on
the¤ button flashes.
The rear window
defroster has deactiva-
ted prematurely or can-
not be activated.The on-board voltage is too low because too many electrical consum-
ers are switched on.
XSwitch off any consumers that are not required, e.g. reading lamps, interior lighting or the seat heating.
When the battery is sufficiently charged, the rear window defroster
can be activated again.
The roof is open.
XClose the roof.
When the roof is closed, the rear window defroster can be activated
again.
Switching air-recirculation mode
on/off
General notes
If you switch on air-recirculation mode, the win-
dows can fog up more quickly, in particular at
low temperatures. Only use air-recirculation
mode briefly to prevent the windows from fog-
ging up.
Activating/deactivating
XTurn the SmartKey to position 2in the igni-
tion lock (Ypage 116).
XTo activate: press thegbutton.
The indicator lamp in the gbutton lights
up.
iAir-recirculation mode is automatically acti-
vated at high levels of pollution (dual-zone
automatic climate control only) or at high out-
side temperatures. When air-recirculation
mode is activated automatically, the indicator
lamp in the gbutton is not lit. Outside air
is added after about 30 minutes.
XTo deactivate: press thegbutton.
The indicator lamp in the gbutton goes
out.
iAir-recirculation mode deactivates auto-
matically:
Rafter approximately five minutes at outside
temperatures below approximately 41 ‡
(5 †)
Rafter approximately five minutes if cooling
with air dehumidification is deactivated
Rafter approximately 30 minutes at outside
temperatures above approximately 41 ‡
(5 †) if the "Cooling with air dehumidifica-
tion" function is activated
Switching the residual heat on or off
General notes
The residual heat function is only available on
vehicles for Canada.
It is possible to make use of the residual heat of
the engine to continue heating the stationary
vehicle for up to 30 minutes after the engine has
been switched off. The heating time depends on
the set interior temperature.
Activating/deactivating
XTurn the SmartKey to position uin the igni-
tion lock or remove it (Ypage 116).
XTo activate: press theÌorÁ button.
The indicator lamp in the ÌorÁ button
lights up.
iThe blower will run at alow speed regardless
of the airflow setting.
112Operating the climate control systems
Climatec ontrol
Page 175 of 298
Setting the ambient lighting color
XPress the=or; button on the steering
wheel to select the Sett.menu.
XPress the:or9 button to select the
Lightsubmenu.
XPress ato confirm.
XPress the :or9 button to select the
Amb. Light Col.function.
XPress ato confirm.
XPress the :or9 button to set the color
to SOLAR,SOLAR Orangeor SOLAR Red.
XPress the aor% button to save the
setting.
Activating/deactivating surround light-
ing and exterior lighting delayed switch-
off
XPress the =or; button on the steering
wheel to select the Sett.menu.
XPress the:or9 button to select the
Lightssubmenu.
XPress ato confirm.
XPress :or9 to select the SurroundLightingfunction.
If the SurroundLightingfunction is activa-
ted, the multifunction display shows the light
cone and the area around the vehicle in
orange.
XPress the abutton to save the setting.
Deactivating exterior lighting delayed switch-off
temporarily:
XBefore leaving the vehicle, turn the SmartKey to position uin the ignition lock.
XTurn the SmartKey to position 2in the igni-
tion lock.
Exterior lighting delayed switch-of fisdeacti-
vated.
Exterior lighting delayed switch-offisr eactiva-
ted the next time you start the engine.
If you have activated the Surround Lighting
function and you turn the light switch to Ã,
the following functions are activated when it is
dark:
Rsurround lighting: the exterior lighting
remains lit for 40 seconds after unlocking
with the SmartKey. If you start the engine, the
surround lighting is switched off and auto- matic headlamp mode is activated
(
Ypage 95).
Rexterior lighting delayed switch-off:
the
exterior lighting remains lit for 60 seconds
after the engine is switched off. If you close all
the doors and the trunk lid, the exterior light- ing goes off after 15 seconds.
Depending on your vehicle's equipment, when
the surround lighting and delayed switch-off
exterior lighting are on, the following light up:
Rparking lamps
Rlow-beam headlamps
Rdaytime running lamps
Rside marker lamps
Rsurround lighting in the exterior mirrors
Activating/deactivating the interior light-
ing delayed switch-off
If you activate the Interior Lighting Delayfunction, the interior lighting remains on for
20 seconds after you remove the SmartKey from
the ignition lock.
XPress the=or; button on the steering
wheel to select the Sett.menu.
XPress the:or9 button to select the
Lightsubmenu.
XPress ato confirm.
XPress the :or9 button to select the
Interior Lighting Delayfunction.
When the Interior Lighting Delayfunc-
tion is activated, the vehicle interior is dis-
played in orange in the multifunction display.
XPress the abutton to save the setting.
Vehicle
Activating/deactivating the automatic
door locking mechanism
If you activate the AutomaticDoorLockfunc-
tion, the vehicle is centrally locked above a
speed of approximately 9mph (15 km/h).
XPress the =or; button on the steering
wheel to select the Sett.menu.
XPress the:or9 button to select the
Vehiclesubmenu.
XPress ato confirm.
Menus and submenus173
On-board computer and displays
Z