tow bar MERCEDES-BENZ SLC ROADSTER 2018 Owner's Manual
[x] Cancel search | Manufacturer: MERCEDES-BENZ, Model Year: 2018, Model line: SLC ROADSTER, Model: MERCEDES-BENZ SLC ROADSTER 2018Pages: 298, PDF Size: 5.26 MB
Page 84 of 298
Operating AIRGUIDE
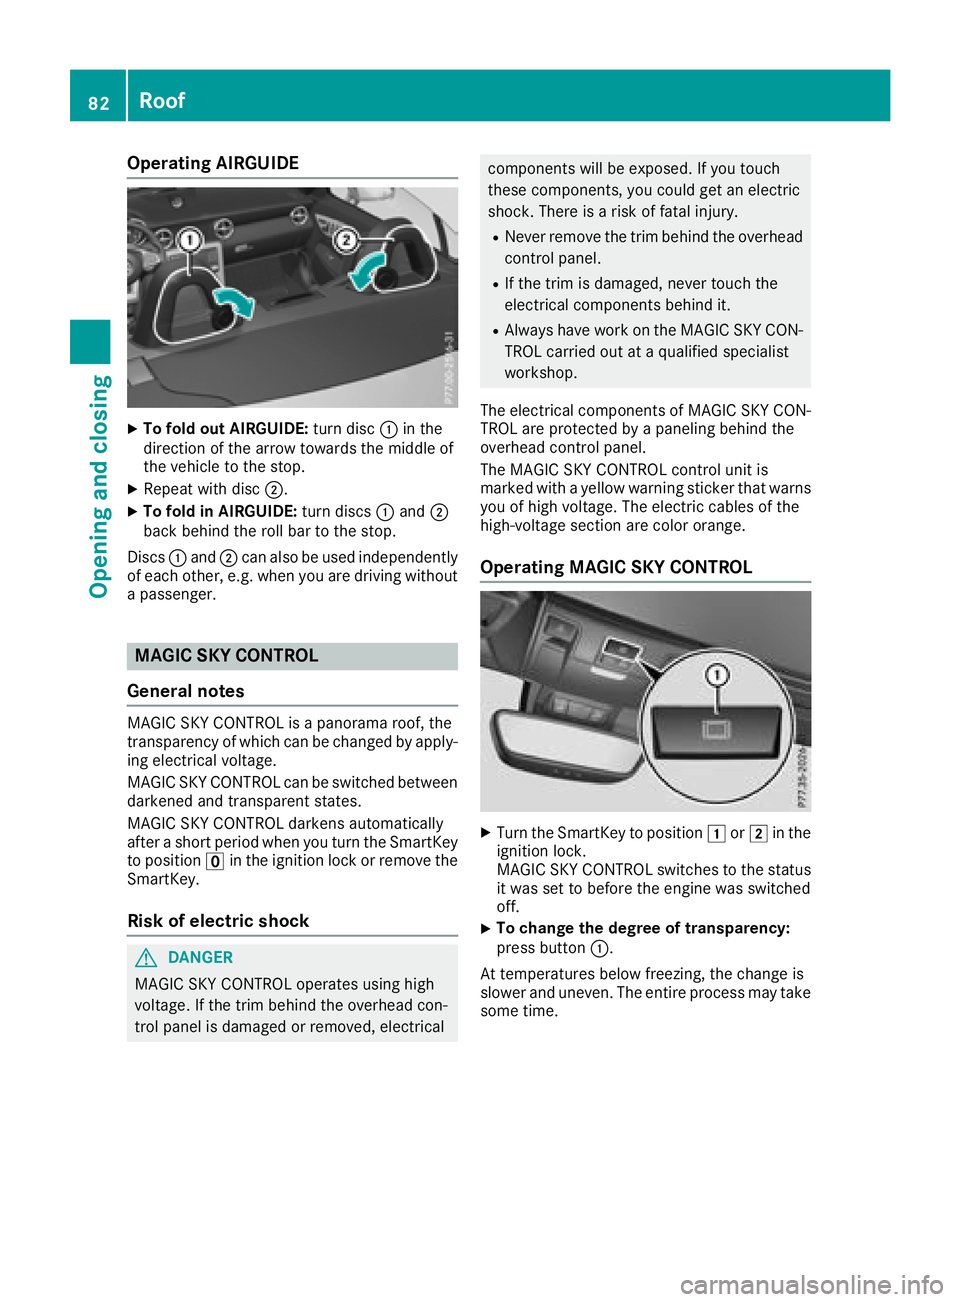
XTo fold out AIRGUIDE:turn disc:in the
direction of the arrow towards the middle of
the vehicle to the stop.
XRepeat with disc ;.
XTo fold in AIRGUIDE: turn discs:and ;
back behind the roll bar to the stop.
Discs :and ;can also be used independently
of each other ,e.g. when you are driving without
ap assenger.
MAGIC SKY CONTROL
General notes
MAGIC SKY CONTROL is apanorama roof, the
transparenc yofwhich can be changed by apply-
ing electrical voltage.
MAGIC SKY CONTROL can be switched between
darkened and transparent states.
MAGIC SKY CONTROL darken sautomatically
after ashort period when you turn the SmartKey
to position uin the ignition lock or remove the
SmartKey.
Risk of electric shock
GDANGER
MAGIC SKY CONTROL operates using high
voltage. If the trim behind the overhead con-
trol panel is damaged or removed, electrical
component swill be exposed. If you touch
these components, you could get an electric
shock.T here isarisk of fatal injury.
RNever remove the trim behind the overhead
control panel.
RIf the trim is damaged, never touch the
electrical component sbehind it.
RAlways have work on the MAGIC SKY CON-
TROL carried out at aqualified specialist
workshop.
The electrical component sofMAGIC SKY CON-
TROL are protected by apaneling behind the
overhead control panel.
The MAGIC SKY CONTROL control unit is
marked with ayellow warning sticker that warns
you of high voltage. The electric cables of the
high-voltage section are color orange.
Operating MAGIC SKY CONTROL
XTurn the SmartKey to position 1or2 in the
ignition lock.
MAGIC SKY CONTROL switches to the status
it was set to before the engin ewas switched
off.
XTo change the degree of transparency:
press button :.
At temperatures below freezing, the change is
slower and uneven .The entire process may take
some time.
82Roof
Opening and closing
Page 155 of 298
Parking tips:
Ron narrow roads, drive as closely as possible
past the parking space
Rparking spaces that are littered or overgrown
might be identified or measured incorrectly
Rparking spaces that are partially occupied by
trailer drawbars might not be identified as
such or be measured incorrectly
Rsnowfall or heavy rain may lead to aparking
space being measured inaccurately
Rpay attention to the Active Parking Assist
PARKTRONIC warning messages during the
parking procedure (
Ypage 151)
Rwhen transportin gaload which protrudes
from your vehicle, you should not use Parking
Guidance
Rnever use Parking Guidance with snow chains
or an emergencys pare wheel fitted
Rmake sure that the tire pressures are always
correct. This hasadirect effect on the steer-
ing instructions
Rthe way your vehicle is positioned in the park-
ing space after parking is dependent on vari-
ous factors. These include the position and
shape of the vehicles parked in fronta nd
behind it and the conditions of the location. In
some cases, Parking Guidance may guide you
too far or not far enough into aparking space.
In some cases, it may also lead you across or
ont othe curb. If necessary, cancel the park-
ing procedure with Parking Guidance.
Detecting parking spaces
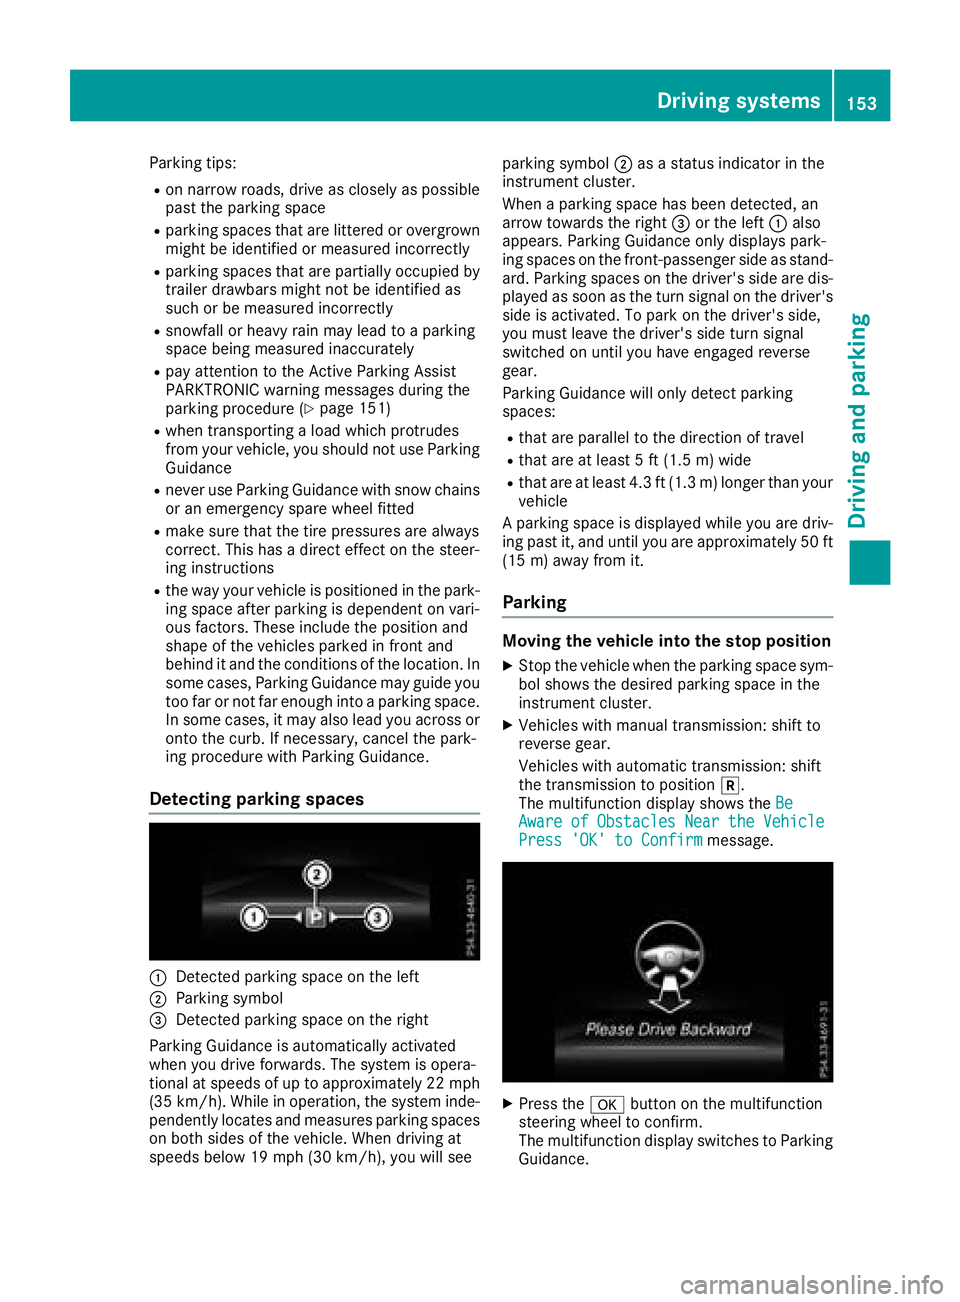
:Detected parking space on the left
;Parking symbol
=Detected parking space on the right
Parking Guidance is automatically activated
when you drive forwards. The system is opera-
tional at speeds of up to approximately 22 mph (3 5k m/ h).W hile in operation, the system inde-
pendently locate sand measures parking spaces
on both sides of the vehicle. Whend riving at
speeds below 19 mph (30 km/h), yo uwills ee parking symbol
;asastatu sindicator in the
instrument cluster.
Whenap arking space hasb eend etected, an
arrow towards the right =or the left :also
appears. Parking Guidance only display spark-
ing spaces on the front-passenger sid easstand-
ard .Parking spaces on the driver'ss idea re dis-
played as soona sthe turn signal on the driver's
sid eisa ctivated. To park on the driver'ss ide,
yo um ustlea ve the driver'ss idet urn signal
switched on unti lyou have engaged reverse
gear.
Parking Guidance will only detect parking
spaces:
Rthat are paralle ltothe direction of travel
Rthat are at leas t5ft(1.5 m) wid e
Rthatareat leas t4.3 ft (1.3 m) longer thany our
vehicle
Ap arking space is displayed whil eyou are driv-
ing past it, and unti lyou are approximately5 0ft
(15 m) away from it.
Parking
Movin gthe vehicle into the stopp osition
XStop the vehiclewhent he parking space sym-
bo lshows the desired parking space in the
instrument cluster.
XVehicles with manua ltransmission: shift to
reverse gear.
Vehicles with automatic transmission: shift
the transmission to position k.
The multifunctio ndisplay shows the Be
AwareofObstaclesNeartheVehiclePress 'OK'toC onfirmmessage.
XPress theabutton on the multifunction
steering whee ltoconfirm.
The multifunctio ndisplay switches to Parking
Guidance.
Driving systems153
Driving an dparking
Z
Page 248 of 298
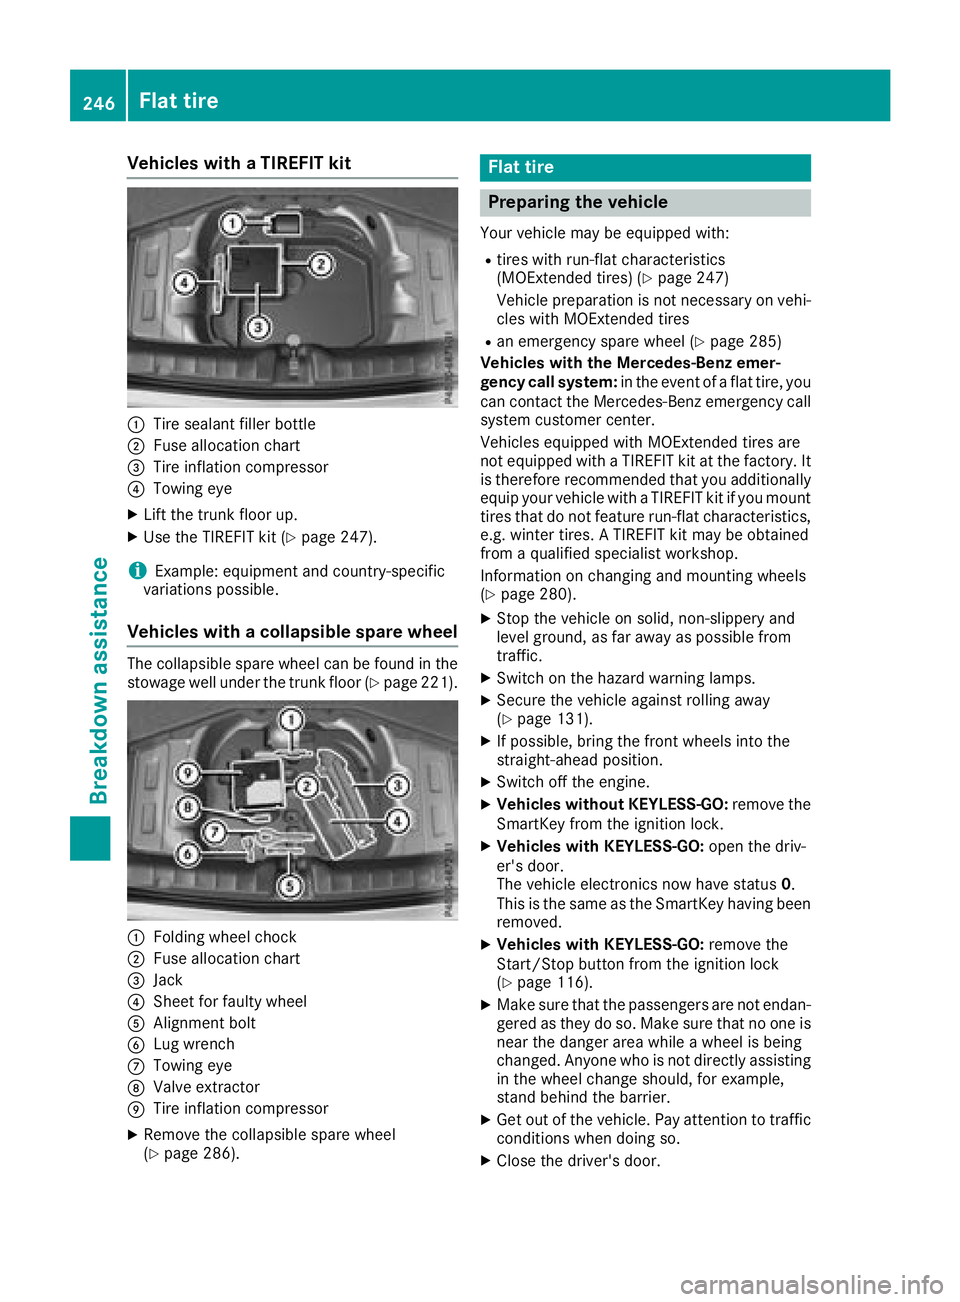
Vehicles withaTIREFI Tkit
:Tire sealant fille rbottle
;Fus ealloc ation chart
=Tire inflation compressor
?Towing eye
XLiftthe trunk floor up.
XUse the TIREFIT kit (Ypage 247).
iExample :equipment and country-specific
variations possible.
Vehicles with acolla psibl espare wheel
The collapsibl espare whee lcan be found in the
stowag ewellu nder the trunk floor (Ypage 221).
:Folding whee lchock
;Fus ealloc ation chart
=Jack
?Shee tfor faulty wheel
AAlignment bolt
BLugw rench
CTowing eye
DValve extractor
ETire inflation compressor
XRemove the collapsibl espare wheel
(Ypage 286).
Flat tire
Preparin gthe vehicle
Your vehicl emaybe equipped with:
Rtire sw ithr un-fla tcharacteristics
(MOExtended tires) (Ypage 247)
Vehicl epreparation is not necessary on vehi-
cle sw ithM OExtende dtires
Ran emergency spare whee l(Ypage 285)
Vehicles with the Mercedes-Benz emer-
genc ycalls ystem: in the event of aflatt ire ,you
can contact the Mercedes-Benz emergency call
system customerc enter.
Vehicles equipped with MOExtende dtiresa re
not equipped with aTIREFIT kit at the factory .It
is therefore recommende dthaty ouadditionally
equi pyourvehicl ewithaT IREFIT kit if yo umount
tire sthatd onot feature run-fla tcharacteristics,
e.g .winter tires. ATIREFIT kit maybeo btained
from aquali fied specialist workshop.
Informatio nonchanging and mounting wheels
(
Ypage 280).
XStop the vehicl eonsolid,non-slippery and
level ground ,asfar away as possibl efrom
traffic.
XSwitch on the hazard warning lamps.
XSecure the vehicl eagain st rolling away
(Ypage 131).
XIf possible, bring the front wheels into the
straight-ahea dposition.
XSwitch off the engine.
XVehicles withou tKEYLESS -GO:remove the
SmartKey from the ignition lock.
XVehicles with KEYLESS-GO: open the driv-
er' sd oor.
T he vehicl eelectronics now have status 0.
Thi sist he same as the SmartKey having been
removed.
XVehicles with KEYLESS-GO: remove the
Start/Stop button from the ignition lock
(
Ypage 116).
XMake sure thatt he passengersare not endan-
gered as they do so. Make sure thatnoo ne is
nea rthe danger are awhile awheel is being
changed .Anyone wh oisnot directlya ssisting
in the whee lchange should, for example,
stand behind the barrier.
XGe toutof the vehicle. Paya ttentiontotraffic
conditions when doing so.
XClose the driver'sd oor.
246Flat tire
Breakdo wn assis tance
Page 252 of 298
HEnvironmentalnote
Hav ethe used tir esealantb ottle disposed of
professionally, e.g .ataqualifieds pecialist
workshop.
If tir epressure of 20 0kPa(2.0 ba r/29 psi )has
beena chieved after amaximu mperiod of ten
minutes:
XSwitch off the tire inflation compressor.
XUnscrew the filler hose from the valve of the
faulty tire.
XStow the tire sealant bottle and the tire infla- tion compressor.
XPull away immediately.
XStop after driving for approximately ten
minutes and check the tire pressure with the
tire inflation compressor.
The tire pressure must now be at least
130 kPa (1.3 bar/19 psi).
GWARNING
If the required tire pressure is not reached
after driving for ashort period, the tire is too
badly damaged. The tire sealant cannot repair
the tire in this instance. Damaged tires and a
tire pressure that is too low can significantly
impair the vehicle's braking and driving char-
acteristics. There is arisk of accident.
Do not continue driving. Contact aqualified
specialist workshop.
iIn cases such as the one mentioned above,
contact an authorized Mercedes-Benz Cen-
ter. Or call 1-800-FOR-MERCedes( in the
USA) or 1-800-387-0100 (in Canada).
XCorrect the tire pressure if it is still at least
130 kPa (1.3 bar/19 psi).S ee the Tire and
Loading Information placard on the driver's
side B-pillar or the tire pressure tabl einthe
fuel filler flapf or values.
XTo increase the tire pressure: switch on the
tire inflation compressor.
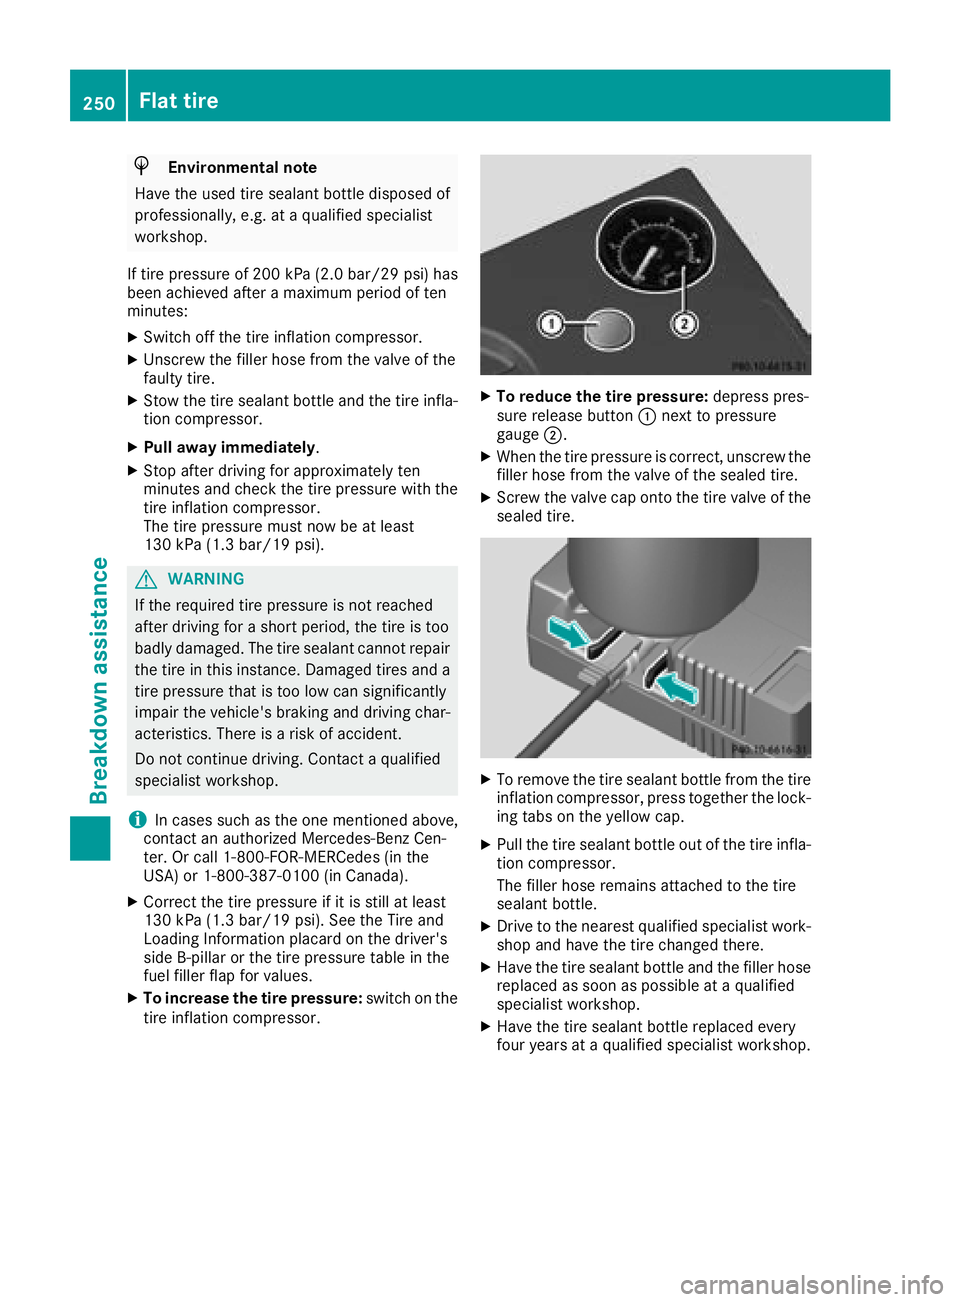
XTo reduce the tire pressure: depress pres-
sure release button :next to pressure
gauge ;.
XWhen the tire pressure is correct, unscrew the
filler hose from the valve of the sealed tire.
XScrew the valve cap onto the tire valve of the
sealed tire.
XTo remove the tire sealant bottle from the tire
inflation compressor, press together the lock-
ing tabs on the yellow cap.
XPullthe tire sealant bottle out of the tire infla-
tion compressor.
The filler hose remains attache dtothe tire
sealant bottle.
XDrive to the nearest qualified specialist work-
shop and have the tire change dthere.
XHave the tire sealant bottle and the filler hose
replaced as soon as possibleataq ualified
specialist workshop.
XHave the tire sealant bottle replaced every
four years at aqualified specialist workshop.
250Flat tire
Breakdowna ssistance
Page 259 of 298
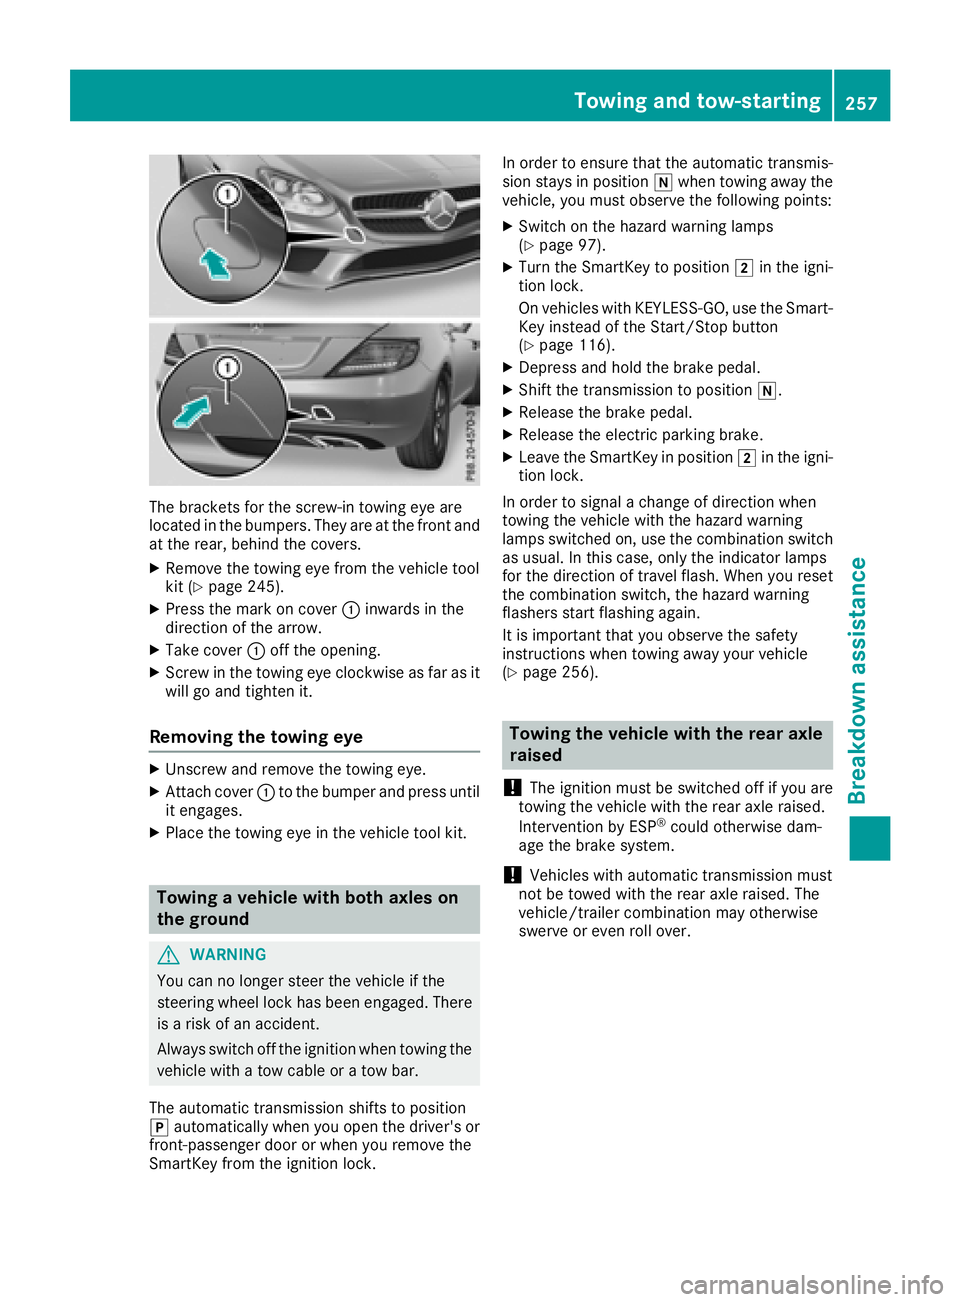
The bracketsfor the screw-in towing eye are
located in the bumpers. They are at the front and
at the rear, behind the covers.
XRemove the towing eye from the vehicle tool
kit (Ypage 245).
XPress the mark on cover :inwards in the
direction of the arrow.
XTake cover :off the opening.
XScrew in the towing eye clockwise as far as it
will go and tighten it.
Removing the towing eye
XUnscrew and remove the towing eye.
XAttach cover :to the bumper and press until
it engages.
XPlace the towing eye in the vehicle tool kit.
Towing avehicle with both axles on
the ground
GWARNING
You can no longer steer the vehicle if the
steerin gwheel lock has been engaged. There
is ar isk of an accident.
Always switch off the ignition when towing the
vehicle with atow cable or atow bar.
The automatic transmission shifts to position
j automatically when you open the driver's or
front-passenger door or when you remove the
SmartKey from the ignition lock. In order to ensure that the automatic transmis-
sion stays in position
iwhen towing away the
vehicle, you must observe the following points:
XSwitch on the hazard warning lamps
(Ypage 97).
XTurn the SmartKey to position 2in the igni-
tion lock.
On vehicles with KEYLESS-GO, use the Smart-
Key instead of the Start/Stop button
(
Ypage 116).
XDepress and hold the brake pedal.
XShift the transmission to position i.
XRelease the brake pedal.
XRelease the electric parking brake.
XLeave the SmartKey in position2in the igni-
tion lock.
In order to signal achange of direction when
towing the vehicle with the hazard warning
lamps switched on, use the combination switch
as usual. In this case, only the indicator lamps
for the direction of travel flash. When you reset
the combination switch, the hazard warning
flashers start flashing again.
It is important that you observe the safety
instructions when towing away your vehicle
(
Ypage 256).
Towing the vehicle with the rear axle
raised
!
The ignition must be switched off if you are
towing the vehicle with the rear axle raised.
Intervention by ESP
®could otherwise dam-
age the brake system.
!Vehicles with automatic transmission must
not be towed with the rear axle raised. The
vehicle/trailer combination may otherwise
swerve or even roll over.
Towing and tow-starting257
Breakdown assistance
Z