washer fluid MERCEDES-BENZ SLC ROADSTER 2018 Owner's Manual
[x] Cancel search | Manufacturer: MERCEDES-BENZ, Model Year: 2018, Model line: SLC ROADSTER, Model: MERCEDES-BENZ SLC ROADSTER 2018Pages: 298, PDF Size: 5.26 MB
Page 8 of 298
Brake fluidDispla ymessage ............................ 184
Notes. ............................................ 293
Brake forc edistribution
see EBD (electronicb rake force
distribution)
Brake lamps
Adaptive ........................................... 60
Displa ymessage ............................ 189
Brakes
ABS .................................................. 57
Adaptive Brake Assist ...................... 59
BAS .................................................. 57
Brake fluid (notes) ......................... 293
Displa ymessage ............................ 179
EBD .................................................. 63
High-performance brake system .... 137
Important safety notes .................. 136
Maintenance .................................. 137
Parking brake ................................ 132
Riding tip s...................................... 136
Warning lamp ................................. 204
Breakdow nassistance
Reflective safety jacke t.................. 244
Where will Ifind...? ........................ 244
see Fla ttire
see Towing away
Brightness control( instrument
clusterl ighting) ................................... 32
Bulbs
see Replacing bulbs
C
CaliforniaImportant notic efor retail cus-
tomers and lessees .......................... 24
Calling up amalfunction
see Displa ymessages
Car
see Vehicle
Care
Carw ash. ....................................... 238
Exhaus tpipe. ................................. 243
Exterior lights ................................ 242
Matte finish ................................... 240
Notes. ............................................ 238
Paint .............................................. 240 Power washer.
............................... 239
Rear vie wcamera .......................... 242
Sensors ......................................... 242
Washing by hand ........................... 239
Wheels. .......................................... 241
Window s........................................ 241
Wipe rblade s.................................. 241
CD
see also Digital Operator's Man-
ual.................................................. 211
CD player (on-board computer) ........ 169
Centerc onsole
Lower section .................................. 35
Upper section .................................. 34
Central locking
Automati cloc king (on-board com-
puter) ............................................. 173
Locking/unlocking (SmartKey). ....... 65
Changin gbulbs
Sid em arker lamps (rear) ............... 101
Child
Restraint system .............................. 55
Child seat
Forward-facing restraint system ...... 56
On the front-passenger seat. ........... 55
Rearward-facing restraint system .... 56
Children
Specia lseatb eltr etractor ............... 54
Childrenint he vehicle
Important safety notes .................... 53
Cigarette lighter ................................ 223
Cleaning
Mirror turn signa l........................... 242
Climate control
Air-conditioning system ................. 104
Automati cclimate control (dual-
zone) .............................................. 106
Controlling automaticall y............... 109
Cooling with ai rdehumidifica tion .. 108
Defrosting the window s................. 111
Defrosting the windshield .............. 110
Generaln otes ................................ 104
Indicato rlam p................................ 109
Information aboutu sing auto-
mati cclimate control ..................... 107
Ma
ximu mcooling .......................... 111
Notesonu sing the air-condition-
ing system ..................................... 105
6Index
Page 18 of 298
S
SafetyChildren in the vehicle ..................... 53
see Occupant safety
Safety system
see Driving safety systems
SD card
Inserting ........................................2 17
Inserting/removing ........................ 217
Removing ....................................... 217
SD memory card
see also Digita lOperator's Man-
ua l..................................................2 11
Selecting ........................................ 169
Search&S end
see also Digita lOperator's Man-
ua l..................................................2 11
Seat
Correct driver's seatp osition ........... 84
Seat belts
Adjusting the driver's and front-
passenger seatb elt......................... 42
Correct usag e.................................. 41
Fastening ......................................... 42
Important safety guideline s............. 40
Introduction ..................................... 39
Releasing ......................................... 42
Switching belt adjustment on/off
(on-board computer) ...................... 174
Warning lamp ................................. 203
Warning lamp (function) ................... 42
Seats
Adjusting (electrically) ..................... 86
Adjusting (manually) ........................ 86
Adjusting the 4-wa ylum bars up-
por t.................................................. 87
Adjusting the headr estraint ............ 86
Important safety notes .................... 84
Overview .......................................... 84
Seath eating problem ...................... 87
Storing settings (memory func-
tion) ................................................. 93
Switching AIRSCAR Fon/off. ........... 87
Switching seath eating on/off......... 87
Selecto rlever
Positions ........................................ 122
Sensors (cleaning instructions) ....... 242Servic
emenu( on-board com-
puter) .................................................. 171
Servic emessage
see ASSYST PLUS
Servic eproducts
Brake fluid ..................................... 293
Coolant (engine) ............................ 293
Engine oil. ...................................... 292
Fue l................................................ 291
Important safety notes .................. 290
Refrigerant (air-conditioning sys-
tem) ............................................... 294
Washerf lui
d ................................... 294
Settingt he air distribution ............... 110
Setting the airflow ............................ 110
Setting the date/time format
see also Digital Operator's Man-
ual.................................................. 211
Setting the language
see also Digital Operator's Man-
ual.................................................. 211
Setting the time
see also Digital Operator's Man-
ual.................................................. 211
Settings
Factory (on-board computer) ......... 175
On-board compute r....................... 172
SETUP (on-board computer,
Mercedes-AMG vehicles) .................. 175
Side impac tair bag ............................. 44
Side marker lamp
Changing bulb s(rear) .................... 101
Side marker lamp (display mes-
sage) ................................................... 189
Side windows
Cleaning ......................................... 241
Convenience closing feature ............ 76
Important safety information ........... 74
Opening/closing (all )....................... 75
Opening/closing (front) ................... 75
Overview .......................................... 74
Problem (malfunction) ..................... 76
Resetting ......................................... 76
Reversing feature ............................. 74
SIRIU Sservices
see also Digital Operator's Man-
ua l.................................................. 211
16Index
Page 22 of 298
From inside the vehicle (central
unlocking button) ............................. 71
Upshift indicator
(on-board computer, Mercedes-
AMG SLC 43) .................................1 75
USB devices
Connecting to the MediaI nter-
face ............................................... 218
V
Vehicle
Correct use ...................................... 27
Data acquisition ............................... 28
Display message ............................ 198
Electronics ..................................... 288
Equipment ....................................... 24
Individua lsettings .......................... 172
Limited Warranty .............................2 8
Loading .......................................... 271
Locking (in an emergency) ............... 72
Locking (SmartKey) .......................... 65
Lowering ........................................ 284
Maintenance .................................... 25
Parking for along period. ............... 133
Pulling awa y................................... 118
Raising ........................................... 281
Reporting problems ......................... 27
Securing from rolling away ............ 281
Tow-starting ................................... 256
Towing away .................................. 256
Transporting .................................. 258
Unlocking (i nanemergency) ........... 72
Unlocking (SmartKey). ..................... 65
Vehicl edata. .................................. 295
Vehicl ebattery
see Battery (vehicle)
Vehicl edata ....................................... 295
Vehicl edimensions ........................... 295
Vehicl eemergencyl ocking ................ 72
Vehicl eidentificatio nnumber
see VIN
Vehicl eidentificatio nplate .............. 289
Vehicl etoolkit.................................. 245
Video
Operating the DVD ......................... 169
see also Digital Operator's Man-
ual.................................................. 211 VIN
Seat. .............................................. 290
Type plate ...................................... 289
W
Warning and indicator lamps
ABS ................................................ 204
Active Brake Assist ........................ 209
Brake Assist ................................... 209
Brakes ........................................... 204
Check Engine ................................. 207
Coolant .......................................... 207
Distance Pilo tDISTRONIC ............. 209
Distance warning ........................... 209
ESP
®.............................................. 205
ESP®OFF ....................................... 206
Fue ltank ........................................ 207
Generaln otes ................................ 202
Parking brake ................................ 206
PASSENGER AIR BAG ...................... 39
Reserve fue l................................... 207
Restraint system ............................ 206
Seatb elt. ....................................... 203
SPORTh andling mode. .................. 206
Tire pressure monitor .................... 210
Warning triangle ................................ 244
Warranty .............................................. 24
Washer fluid
Displa ymessage ............................ 201
Weather display (COMAND)
see also Digital Operator's Man-
ual.................................................. 211
Wheel and tire combinations
Tires ............................................... 284
Wheel bolt tightenin gtorque ........... 284
Wheel chock ...................................... 281
Wheels
Changing awheel .......................... 280
Checking ........................................ 260
Cleaning ......................................... 241
Emergency spare wheel. ................ 285
Important safety notes .................. 260
Information on driving .................... 260
Interchanging/changing ................ 280
Mounting anew wheel. .................. 283
Mounting awheel .......................... 281
Overview ........................................ 260
20Index
Page 23 of 298
Removingawheel.......................... 283
Storing ........................................... 281
Tightening torque ........................... 284
Wheel size/tire size ....................... 284
Win dscreen
Inserting and removing .................... 80
Preparing for installation .................. 80
see AIRGUIDE
Windows
see Sid ewindows
Windshield
Defrosting ...................................... 110
Windshiel dwasher fluid
see Windshield washers ystem
Windshiel dwasher system
Adding washerf luid ....................... 236
Important safety notes .................. 294
Windshiel dwipers
Displa ymessage ............................ 201
Problem (malfunction) ................... 103
Replacing the wipe rblade s............ 101
Switching on/off. .......................... 101
Winter driving
Important safety notes .................. 262
Slippery roads urfaces ................... 138
Snow chains .................................. 262
Winter operation
Overview ........................................ 262
Winter tires
M+S tire s....................................... 262
Wipe rblades
Cleaning ......................................... 241
Important safety notes .................. 101
Replacing ....................................... 101
Workshop
see Qualifie dspecialist workshop
Z
ZONE function
Switching on/off. .......................... 110
Index21
Page 103 of 298
XTurn housing cover:counter-clockwise and
pull it out.
XAt the bulb holder, push the bulb upwards,
disconnect it and pull it out of bulb holder ;.
XInsert the new bulb into bulb holder;at the
top, push it down and secure it in place.
XAttach housing cover :and turn it clockwise
until it engages.
Side marker lamp s(halogen head-
lamps)
Due to their location, have the bulbs in the side
marker lamp changed at aqualified specialist
workshop.
Windshield wipers
Switching the windshield wipers
on/off
!
Do not operate the windshield wipers when
the windshield is dry, as this could damage
the wiper blades. Moreover, dust that has col-
lected on the windshield can scratc hthe glass
if wiping takes place when the windshield is
dry.
If it is necessary to switch on the windshield
wipers in dry weather conditions, alwaysu se
washer fluid when operating the windshield
wipers.
!If the windshield wipers leave smears on the
windshield after the vehicle has been washed
in an automatic car wash, wax or other resi-
dues may be the reason for this. Clean the
windshield using washer fluid after washing
the vehicle in an automatic car wash.
!Intermittent wiping with rain sensor: due to
optical influences and the windshield becom-
ing dirty in dry weather conditions, the wind-
shield wipers may be activated inadvertently.
This could then damage the windshield wiper
blades or scratc hthe windshield.
For this reason, you should alwayss witch off
the windshield wipers in dry weather.
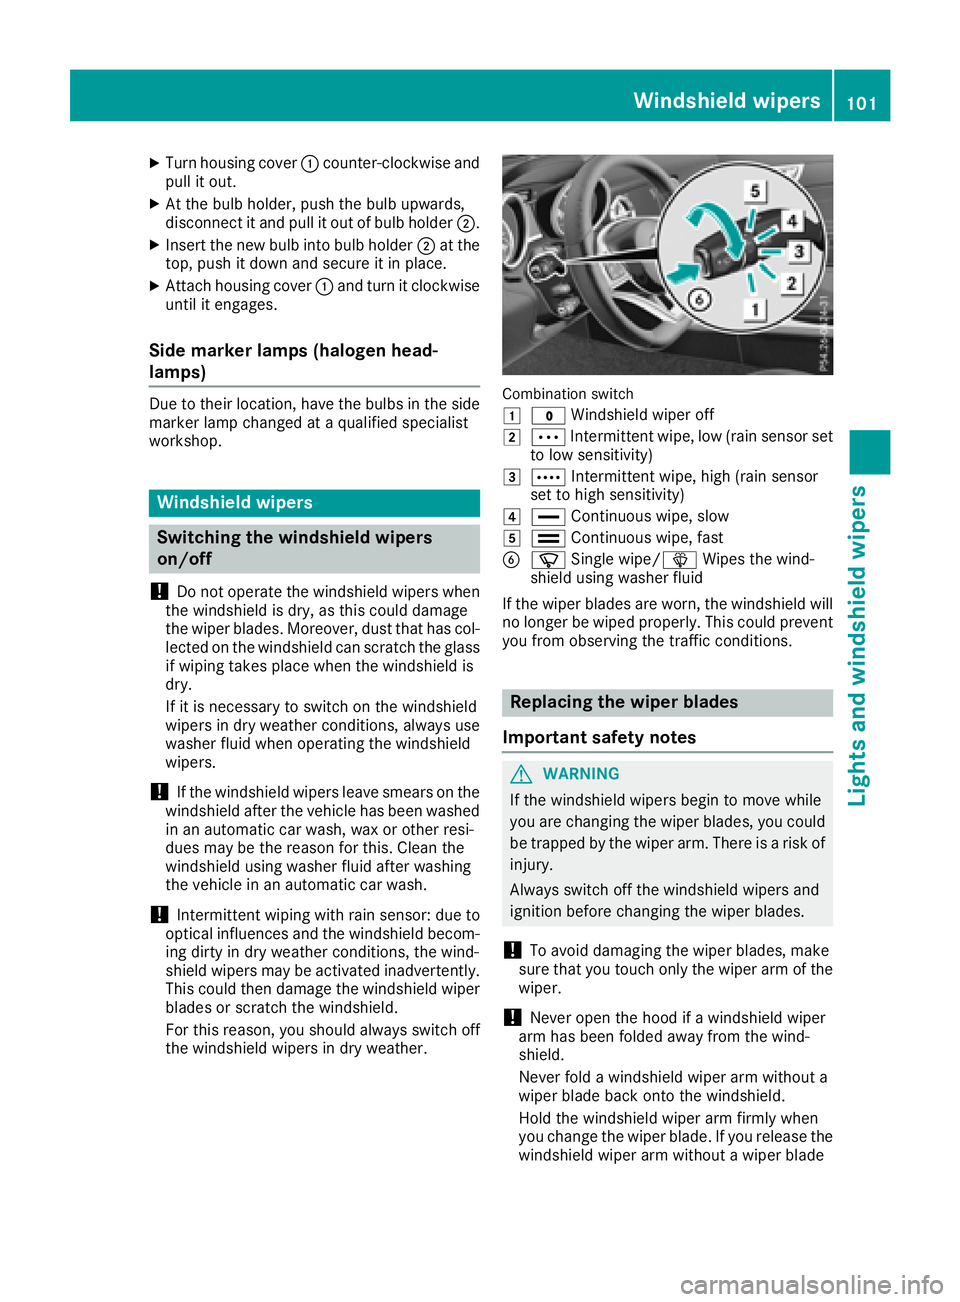
Combination switch
1
$ Windshield wiper off
2ÄIntermittent wipe, low (rain sensor set
to low sensitivity)
3Å Intermittent wipe, high (rain sensor
set to high sensitivity)
4° Continuous wipe, slow
5¯Continuous wipe, fast
BíSingle wipe/î Wipes the wind-
shield using washer fluid
If the wiper blades are worn, the windshield will
no longer be wiped properly. This could prevent
you from observing the traffic conditions.
Replacing the wiper blades
Important safety notes
GWARNING
If the windshield wipers begin to move while
you are changing the wiper blades, you could be trapped by the wiper arm. There is arisk of
injury.
Always switch off the windshield wipers and
ignition before changing the wiper blades.
!To avoid damaging the wiper blades, make
sure that you touch only the wiper arm of the
wiper.
!Never open the hood if awindshield wiper
arm has been folded away from the wind-
shield.
Never fold awindshield wiper arm without a
wiper blade back ontot he windshield.
Hold the windshield wiper arm firmly when
you change the wiper blade. If you release the
windshield wiper arm without awiper blade
Windshield wipers101
Lights and windshield wipers
Z
Page 105 of 298
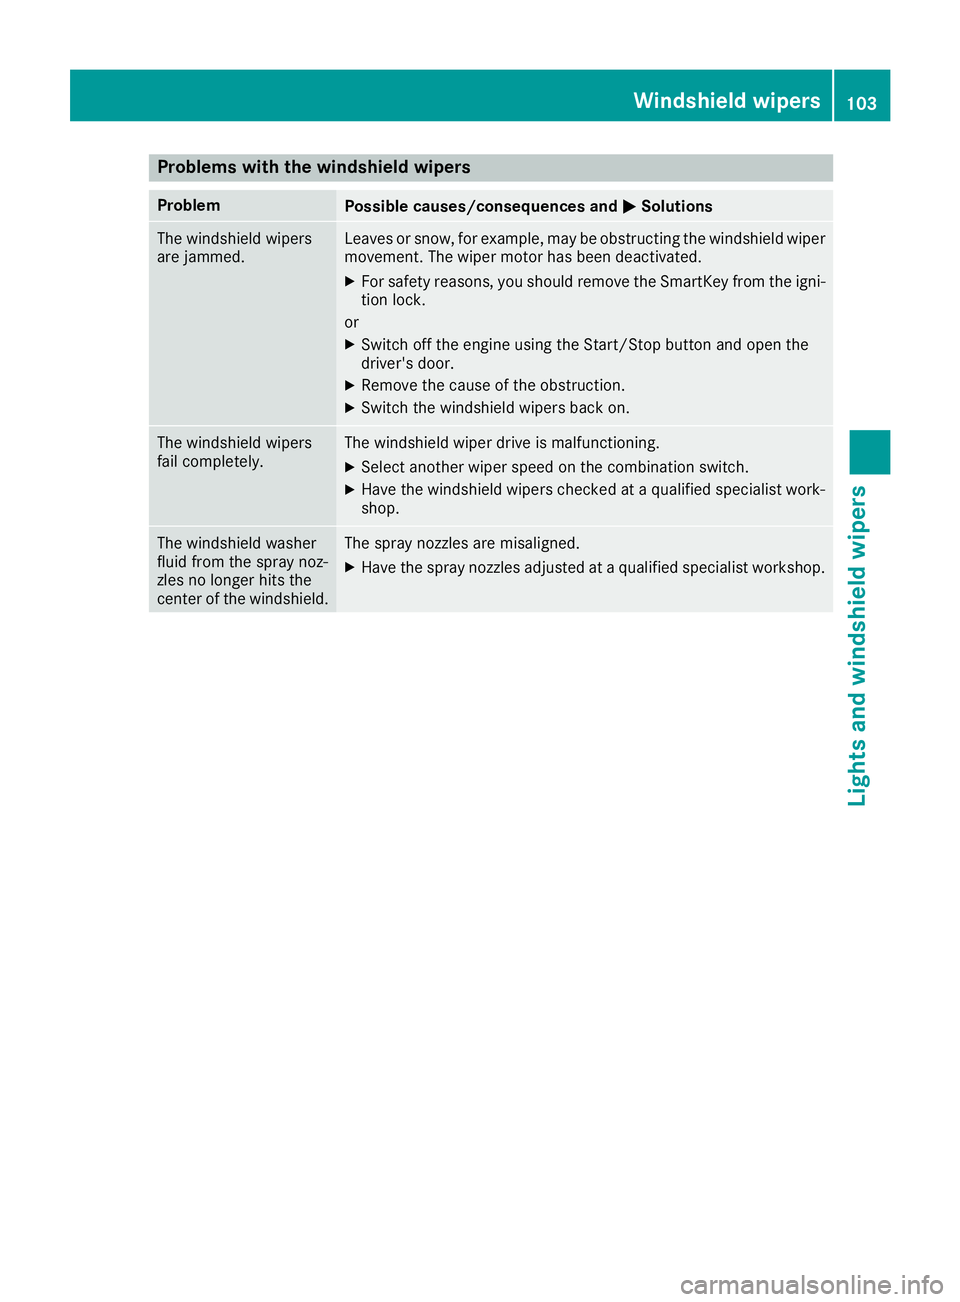
Problems with the windshield wipers
ProblemPossible causes/consequences andMSolutions
The windshield wipers
are jammed.Leaves or snow, for example, may be obstructing the windshield wiper
movement.The wiper motor has been deactivated.
XFor safety reasons, you should remove the SmartKey from the igni-
tion lock.
or
XSwitch off the engine using the Start/Stop button and open the
driver's door.
XRemove the cause of the obstruction.
XSwitch the windshield wipers back on.
The windshield wipers
fail completely.The windshield wiper drive is malfunctioning.
XSelect another wiper speed on the combination switch.
XHave the windshield wipers checked at aqualified specialist work-
shop.
The windshield washer
fluid from the spray noz-
zles no longer hits the
center of the windshield.The spray nozzles are misaligned.
XHave the spray nozzles adjusted at aqualified specialist workshop.
Windshield wipers103
Lights and windshieldw ipers
Z
Page 203 of 298
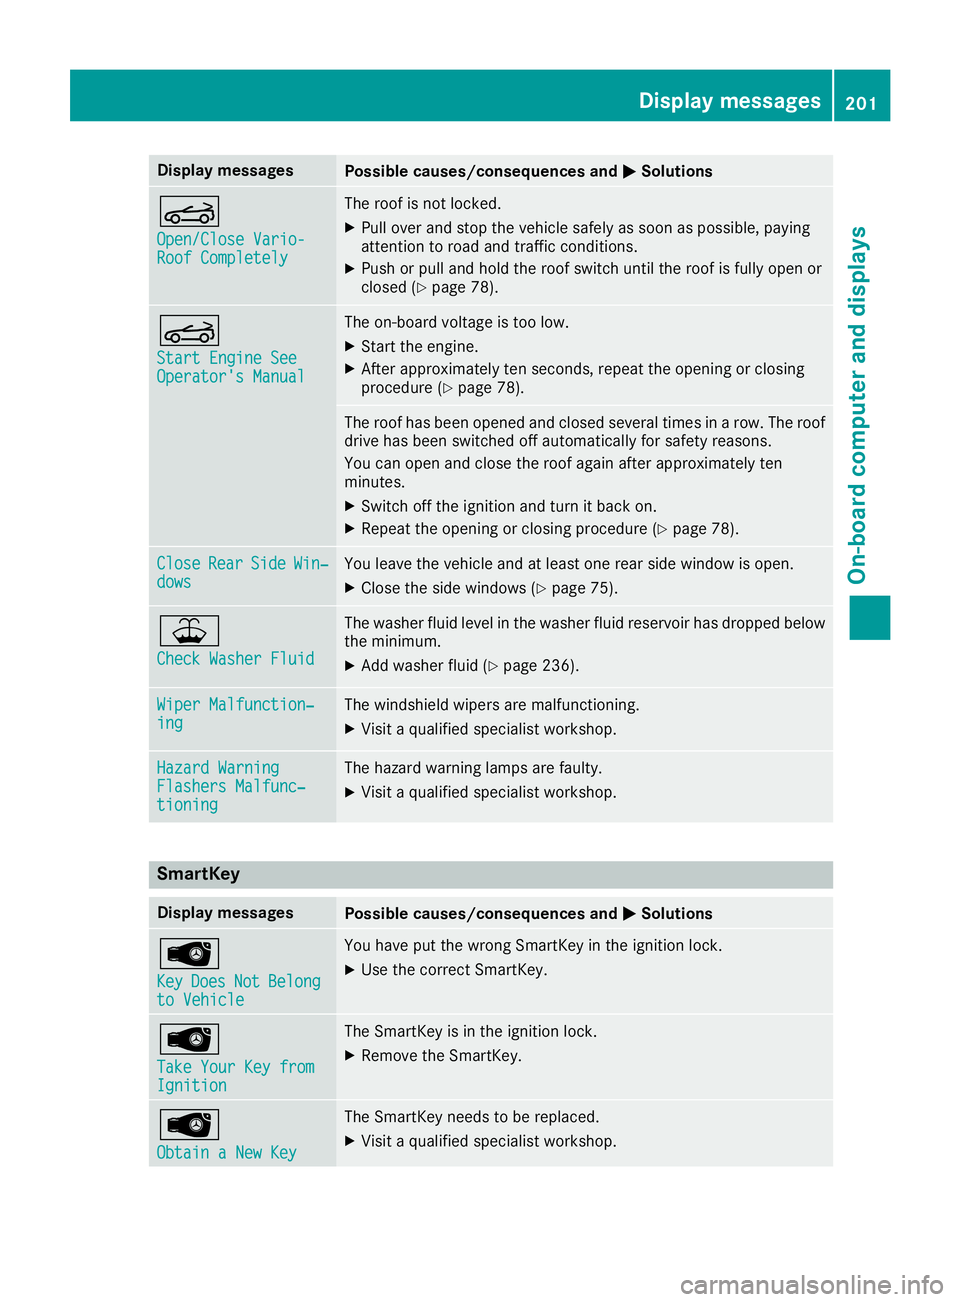
Display messagesPossible causes/consequences andMSolutions
K
Open/CloseVario-RoofCompletel y
The roofisnotlocked.
XPull ove rand stop th evehicl esafely as soo naspossible, payin g
attention to roa dand traffic conditions.
XPush or pull and hold th eroofswitch until th eroofisf ullyo pen or
closed (Ypage 78) .
K
Start Engine SeeOperator' sManual
The on-boar dvoltag eistoolow.
XStart th eengine.
XAfte rapproximately te nseconds, repeat th eopening or closin g
procedure (Ypage 78).
The roofhas been opened and closed several times in arow .The roo f
drive has been switched off automatically for safet yreasons.
You can open and close th eroofa gain after approximately te n
minutes.
XSwitc hoff th eignition and tur nitbacko n.
XRepeat th eopening or closin gprocedure (Ypage 78).
CloseRearSideWin‐dowsYou leav ethe vehicl eand at least on erear side window is open .
XClosethe side windows (Ypage 75).
¥
Check Washer Fluid
The washer flui dlevel in th ewasher flui dreservoir has dropped belo w
th em inimum .
XAddw asher flui d(Ypage 236).
Wiper Malfunction‐ingThe windshield wiper sare malfunctioning .
XVisitaqualified specialist workshop .
Hazard WarningFlashers Malfunc‐tioning
The hazard warning lamp sare faulty.
XVisit aqualified specialist workshop .
SmartKey
Display messagesPossible causes/consequences and MSolutions
Â
KeyDoesNotBelongto Vehicl e
You haveput th ewrong SmartKey in th eignition lock.
XUse th ecorrect SmartKey.
Â
TakeYourK ey fro mIgnition
The SmartKey is in th eignition lock.
XRemove th eSmartKey.
Â
Obtain aNew Key
The SmartKey needs to be replaced.
XVisit aqualified specialist workshop .
Display messages201
On-boardc omputer andd isplays
Z
Page 238 of 298
Workinginthe engine compartment poses a
risk of injury.
Where possible, let the engine cool down and touch only the componentsd escribed in the
following.
GWARNING
The cooling system is pressurized, particularly
when the motor is warm. If you open the cap,
you could be scalded if hot coolant sprays out.
There is arisk of injury.
Let the engine cool down before you open the
cap. Wear gloves and eye protection. Slowly
open the cap to relieve pressure.
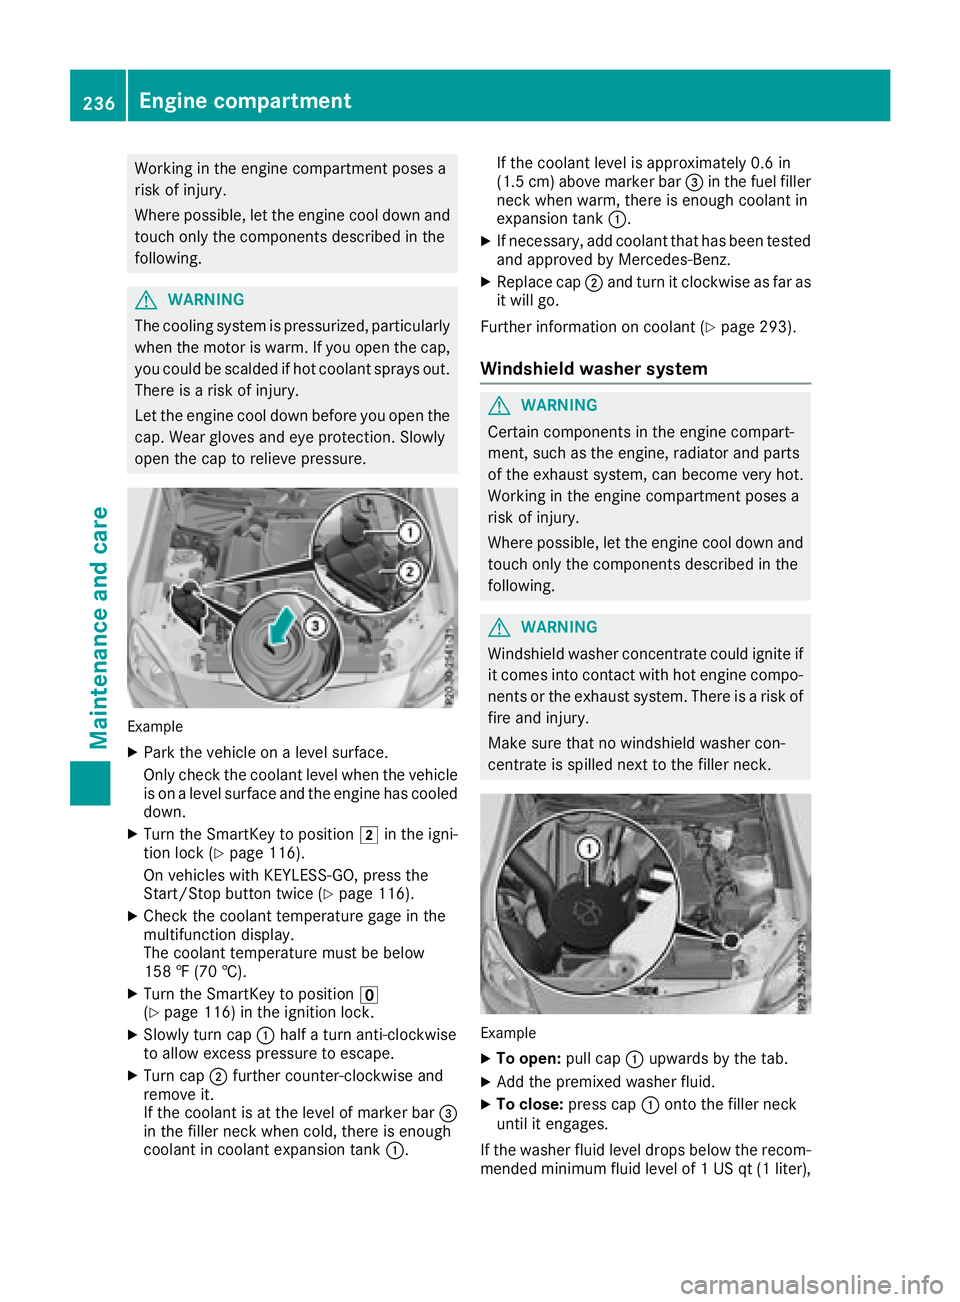
Example
XPark the vehicle on alevel surface.
Only check the coolant level when the vehicle
is on alevel surface and the engine has cooled
down.
XTurn the SmartKey to position 2in the igni-
tion lock (Ypage 116).
On vehicles with KEYLESS-GO, press the
Start/Stop button twice (
Ypage 116).
XCheck the coolant temperature gage in the
multifunction display.
The coolant temperature must be below
158 ‡(70 †).
XTurn the SmartKey to position u
(Ypage 116) in the ignition lock.
XSlowly turn cap :half aturn anti-clockwise
to allow excessp ressure to escape.
XTurn cap;further counter-clockwise and
remove it.
If the coolant is at the level of marker bar =
in the filler neck when cold, there is enough
coolant in coolant expansion tank :.If the coolant level is approximately 0.6 in
(1.5 cm
)above marker bar =in the fuel filler
neck when warm, there is enough coolant in
expansion tank :.
XIf necessary, add coolant that has been tested
and approved by Mercedes-Benz.
XReplace cap;and turn it clockwise as far as
it will go.
Further information on coolant (
Ypage 293).
Windshield washer system
GWARNING
Certain component sinthe engine compart-
ment,s uch as the engine, radiator and parts
of the exhaust system, can become very hot.
Workin ginthe engine compartment poses a
risk of injury.
Where possible, let the engine cool down and touch only the componentsd escribed in the
following.
GWARNING
Windshield washer concentrate could ignite if it comes into contact with hot engine compo-
nents or the exhaust system. There is arisk of
fire and injury.
Make sure that no windshield washer con-
centrate is spilled next to the filler neck.
Example
XTo open: pull cap:upwards by the tab.
XAdd the premixed washer fluid.
XTo close: press cap :ontothe filler neck
until it engages.
If the washer fluid level drops below the recom-
mended minimum fluid level of 1USqt(1l iter),
236Engine compartment
Maintenance and care
Page 239 of 298
amessage appearsint hemultifunction display
prompting you to add washer fluid (Ypage 201).
Further informatio nonwindshield washer fluid/
antifreeze(
Ypage 294).
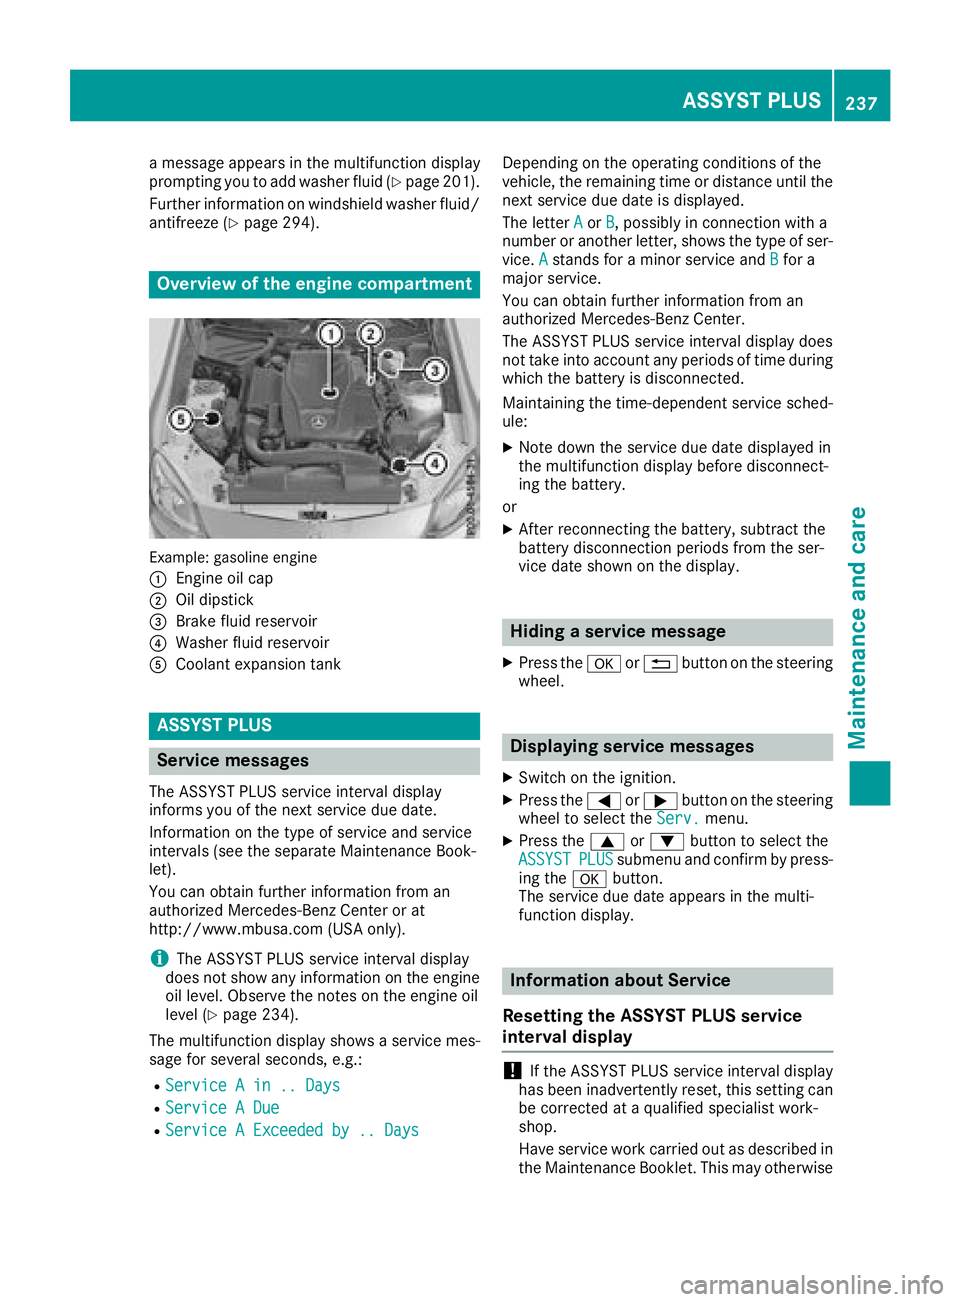
Overview of th eengine compartment
Example :gasoline engine
:
Engineo il cap
;Oil dipstick
=Brake fluid reservoir
?Washerf luid reservoir
ACoolante xpansion tank
ASSYST PLUS
Service messages
The ASSYS TPLUSs erviceinterval display
inform syou of th enexts ervic edue date.
Information on th etype of servic eand service
intervals (see th eseparate Maintenance Book-
let).
You can obtain further informatio nfroma n
authorized Mercedes-Ben zCenter or at
http://www.mbusa.com (USAo nly).
iThe ASSYS TPLUSs erviceinterval display
does no tshow any informatio nontheengine
oil level. Observ ethe note sont heengine oil
level(
Ypage 234).
The multifunction display showsas ervicemes-
sage for several seconds, e.g.:
RServiceAin..D ays
RServiceADue
RServiceAExceeded by .. Days
Dependingont heoperatin gconditionsoft he
vehicle ,the remainin gtimeord istanc euntil the
nex tservic edue dateisd isplayed.
The letter A
orB,possibly in connectio nwith a
number or another letter, showst hetype of ser-
vice. A
stands for aminor servic eand Bfor a
major service.
You can obtain further informatio nfroma n
authorized Mercedes-Ben zCenter.
The ASSYS TPLUSs erviceinterval display does
no ttak eintoa ccounta ny periods of tim eduring
whicht hebattery is disconnected.
Maintaining th etime-dependents ervicesched-
ule:
XNoted own th eservic edue dated isplayedin
th em ultifunction display before disconnect-
ing th ebattery.
or
XAfte rreconnectin gthe battery, subtrac tthe
battery disconnectio nperiods from th eser-
vic ed ates hownont hedisplay.
Hiding aservice message
XPres sthe a or% button on th esteering
wheel.
Displaying service messages
XSwitch on th eignition.
XPres sthe = or; button on th esteering
wheel to selectt heServ.menu.
XPres sthe 9 or: button to selectt he
ASSYSTPLUSsubmenu and confir mbypress-
ing the abutton.
The servic edue datea ppearsint hemulti-
function display.
Information abou tService
Resettin gthe ASSYST PLUS service
interval display
!If th eASSYSTP LUSs erviceinterval display
has been inadvertently reset,t hiss ettin gcan
be correcte dataqualified specialist work-
shop.
Hav eservic ework carried out as describe din
th eM aintenance Booklet. This may otherwise
ASSYST PLUS237
Maintenance and care
Z
Page 292 of 298
from the data shownhere. You can find the
data applicable to you rvehicleont he vehicle
identificatio nplate.
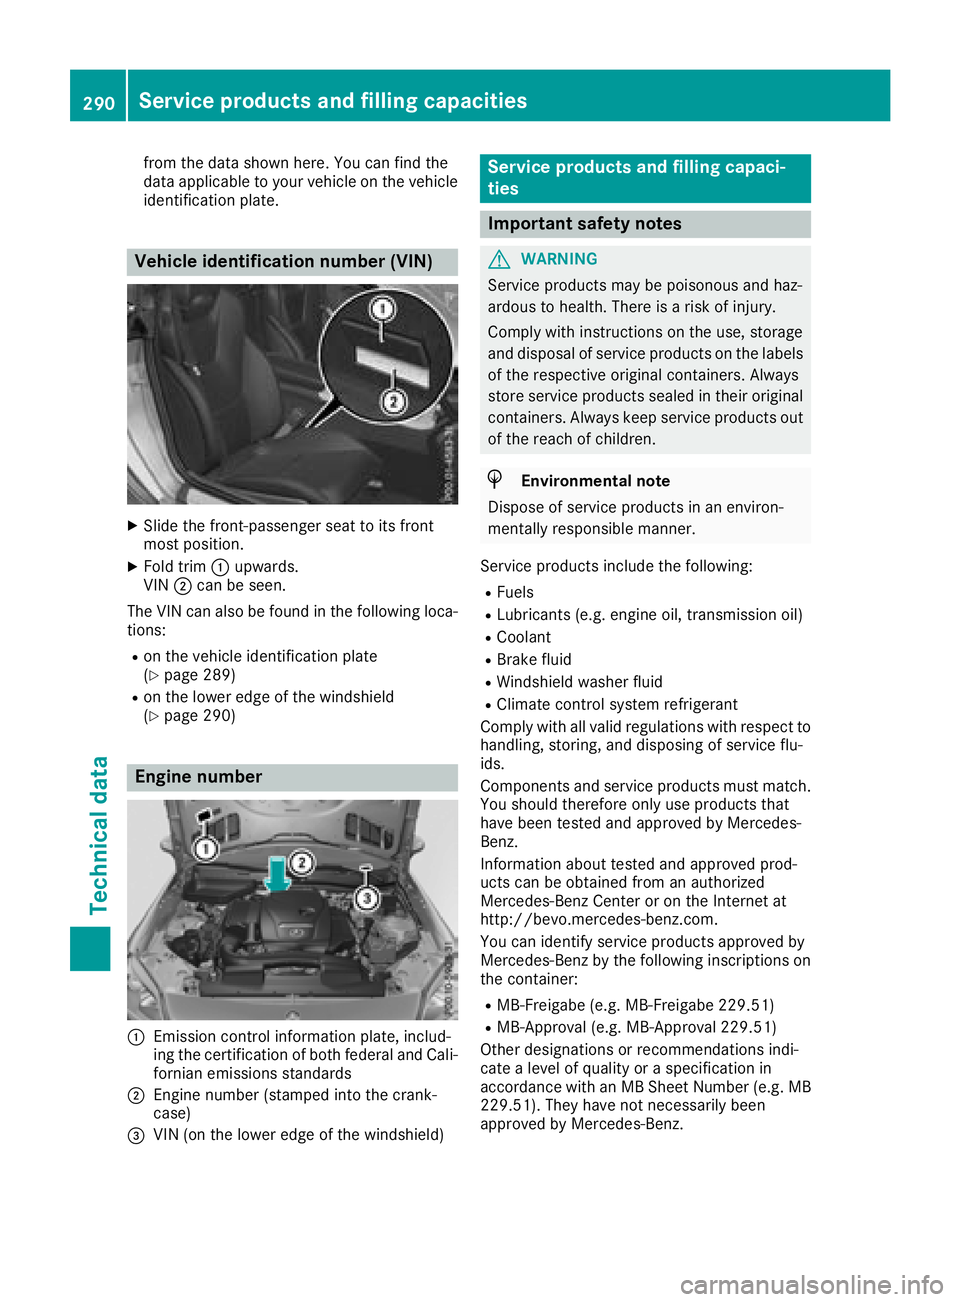
Vehicle identification number (VIN)
XSlid ethe front-passenger seattoi ts front
most position.
XFold trim :upwards.
VIN ;can be seen.
The VIN can als obefound in the following loca-
tions:
Ron the vehiclei dentificationplate
(Ypag e289)
Ron the lower edge of the windshield
(Ypag e290)
Engine number
:Emissionc ontrol information plate, includ-
ing the certification of both federala nd Cali-
forniane missions standards
;Engine numbe r(stamped into the crank-
case)
=VIN (on the lower edge of the windshield)
Service products and filling capaci-
ties
Important safety notes
GWARNING
Service products may be poisonousa nd haz-
ardous to health. There is arisk of injury.
Comply with instructions on the use ,storage
and disposal of service products on the labels
of the respective original containers. Always
store service products sealed in their original
containers. Always keep service products out
of the reach of children.
HEnvironmental note
Disposeofs ervice products in an environ-
mentall yresponsiblem anner.
Service products include the following:
RFuels
RLubricants (e.g. engine oil,t ransmission oil)
RCoolant
RBrake fluid
RWindshieldwasher fluid
RClimate control syste mrefrigerant
Comply with all vali dregulations with respect to
handling, storing, and disposing of service flu-
ids.
Components and service products must match.
You should therefore only use products that
have been tested and approved by Mercedes-
Benz.
Informatio nabout tested and approved prod-
ucts can be obtained from an authorized
Mercedes-Benz Center or on the Internet at
http://bevo.mercedes-benz.com.
You can identify service products approved by
Mercedes-Benz by the following inscriptions on
the container:
RMB-Freigabe (e.g. MB-Freigabe 229.51)
RMB-Approval( e.g. MB-Approval2 29.51)
Other designations or recommendations indi-
cate alevelofq uality or aspecificatio nin
accordance with an MB Sheet Number (e.g. MB
229.51). They have not necessarily been
approved by Mercedes-Benz.
290Service products and filling capacities
Technical data