wiper blades MERCEDES-BENZ SLC ROADSTER 2018 Owner's Manual
[x] Cancel search | Manufacturer: MERCEDES-BENZ, Model Year: 2018, Model line: SLC ROADSTER, Model: MERCEDES-BENZ SLC ROADSTER 2018Pages: 298, PDF Size: 5.26 MB
Page 23 of 298
Removingawheel.......................... 283
Storing ........................................... 281
Tightening torque ........................... 284
Wheel size/tire size ....................... 284
Win dscreen
Inserting and removing .................... 80
Preparing for installation .................. 80
see AIRGUIDE
Windows
see Sid ewindows
Windshield
Defrosting ...................................... 110
Windshiel dwasher fluid
see Windshield washers ystem
Windshiel dwasher system
Adding washerf luid ....................... 236
Important safety notes .................. 294
Windshiel dwipers
Displa ymessage ............................ 201
Problem (malfunction) ................... 103
Replacing the wipe rblade s............ 101
Switching on/off. .......................... 101
Winter driving
Important safety notes .................. 262
Slippery roads urfaces ................... 138
Snow chains .................................. 262
Winter operation
Overview ........................................ 262
Winter tires
M+S tire s....................................... 262
Wipe rblades
Cleaning ......................................... 241
Important safety notes .................. 101
Replacing ....................................... 101
Workshop
see Qualifie dspecialist workshop
Z
ZONE function
Switching on/off. .......................... 110
Index21
Page 103 of 298
XTurn housing cover:counter-clockwise and
pull it out.
XAt the bulb holder, push the bulb upwards,
disconnect it and pull it out of bulb holder ;.
XInsert the new bulb into bulb holder;at the
top, push it down and secure it in place.
XAttach housing cover :and turn it clockwise
until it engages.
Side marker lamp s(halogen head-
lamps)
Due to their location, have the bulbs in the side
marker lamp changed at aqualified specialist
workshop.
Windshield wipers
Switching the windshield wipers
on/off
!
Do not operate the windshield wipers when
the windshield is dry, as this could damage
the wiper blades. Moreover, dust that has col-
lected on the windshield can scratc hthe glass
if wiping takes place when the windshield is
dry.
If it is necessary to switch on the windshield
wipers in dry weather conditions, alwaysu se
washer fluid when operating the windshield
wipers.
!If the windshield wipers leave smears on the
windshield after the vehicle has been washed
in an automatic car wash, wax or other resi-
dues may be the reason for this. Clean the
windshield using washer fluid after washing
the vehicle in an automatic car wash.
!Intermittent wiping with rain sensor: due to
optical influences and the windshield becom-
ing dirty in dry weather conditions, the wind-
shield wipers may be activated inadvertently.
This could then damage the windshield wiper
blades or scratc hthe windshield.
For this reason, you should alwayss witch off
the windshield wipers in dry weather.
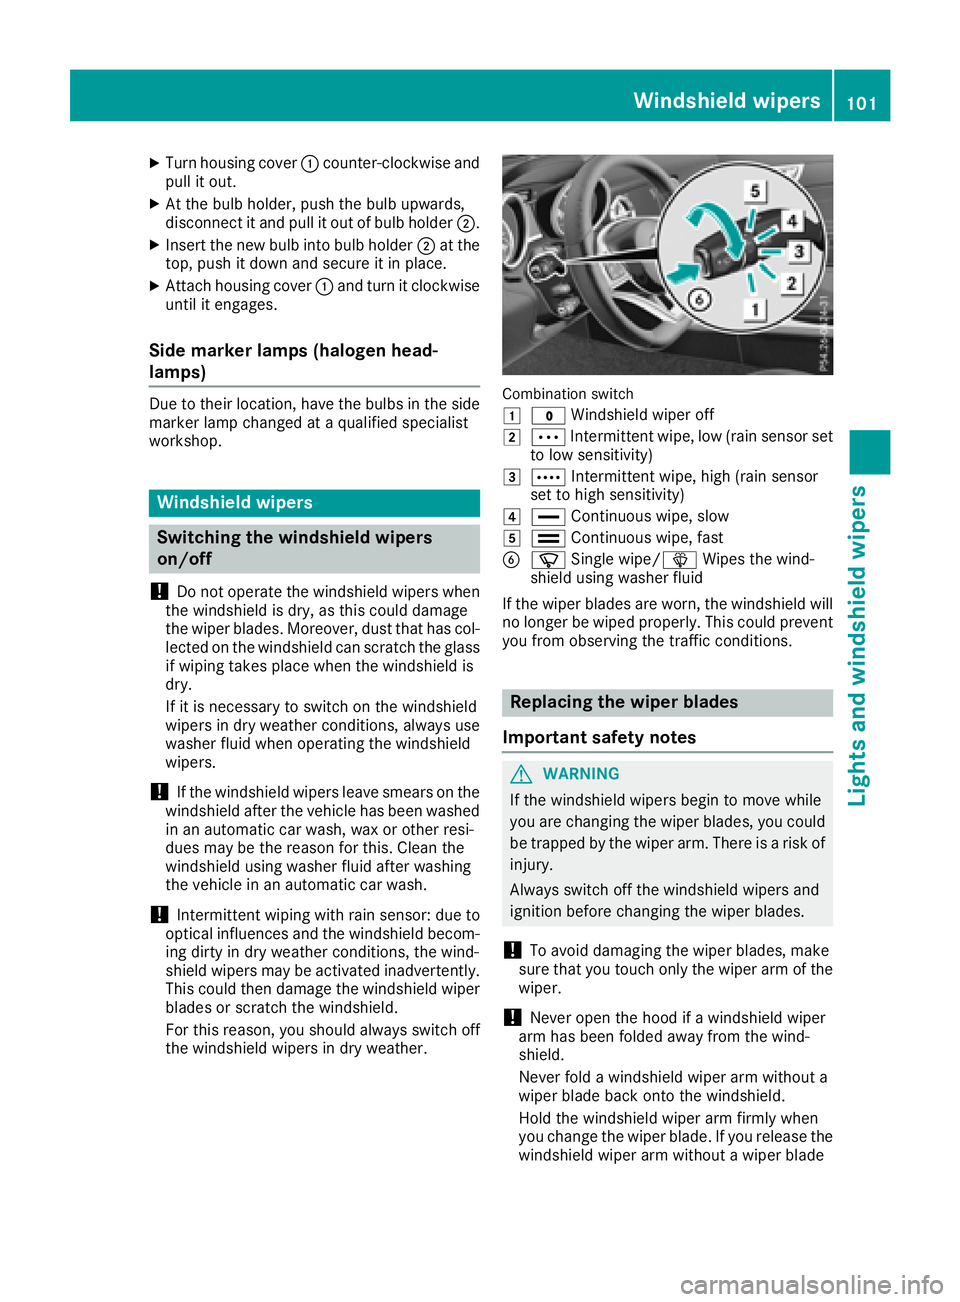
Combination switch
1
$ Windshield wiper off
2ÄIntermittent wipe, low (rain sensor set
to low sensitivity)
3Å Intermittent wipe, high (rain sensor
set to high sensitivity)
4° Continuous wipe, slow
5¯Continuous wipe, fast
BíSingle wipe/î Wipes the wind-
shield using washer fluid
If the wiper blades are worn, the windshield will
no longer be wiped properly. This could prevent
you from observing the traffic conditions.
Replacing the wiper blades
Important safety notes
GWARNING
If the windshield wipers begin to move while
you are changing the wiper blades, you could be trapped by the wiper arm. There is arisk of
injury.
Always switch off the windshield wipers and
ignition before changing the wiper blades.
!To avoid damaging the wiper blades, make
sure that you touch only the wiper arm of the
wiper.
!Never open the hood if awindshield wiper
arm has been folded away from the wind-
shield.
Never fold awindshield wiper arm without a
wiper blade back ontot he windshield.
Hold the windshield wiper arm firmly when
you change the wiper blade. If you release the
windshield wiper arm without awiper blade
Windshield wipers101
Lights and windshield wipers
Z
Page 104 of 298
and it falls onto thewindshield, th ewindshield
may be damage dbytheforce of th eimpact.
Mercedes-Ben zrecommend sthaty ou have
th ew iper blades changed at aqualified spe-
cialis tworkshop.
!Always position th ewindshield wiper arms
vertically before folding them away from the
windshield. By doings o, you will avoid dam-
age to th ehood.
Replacing th ewiper blades
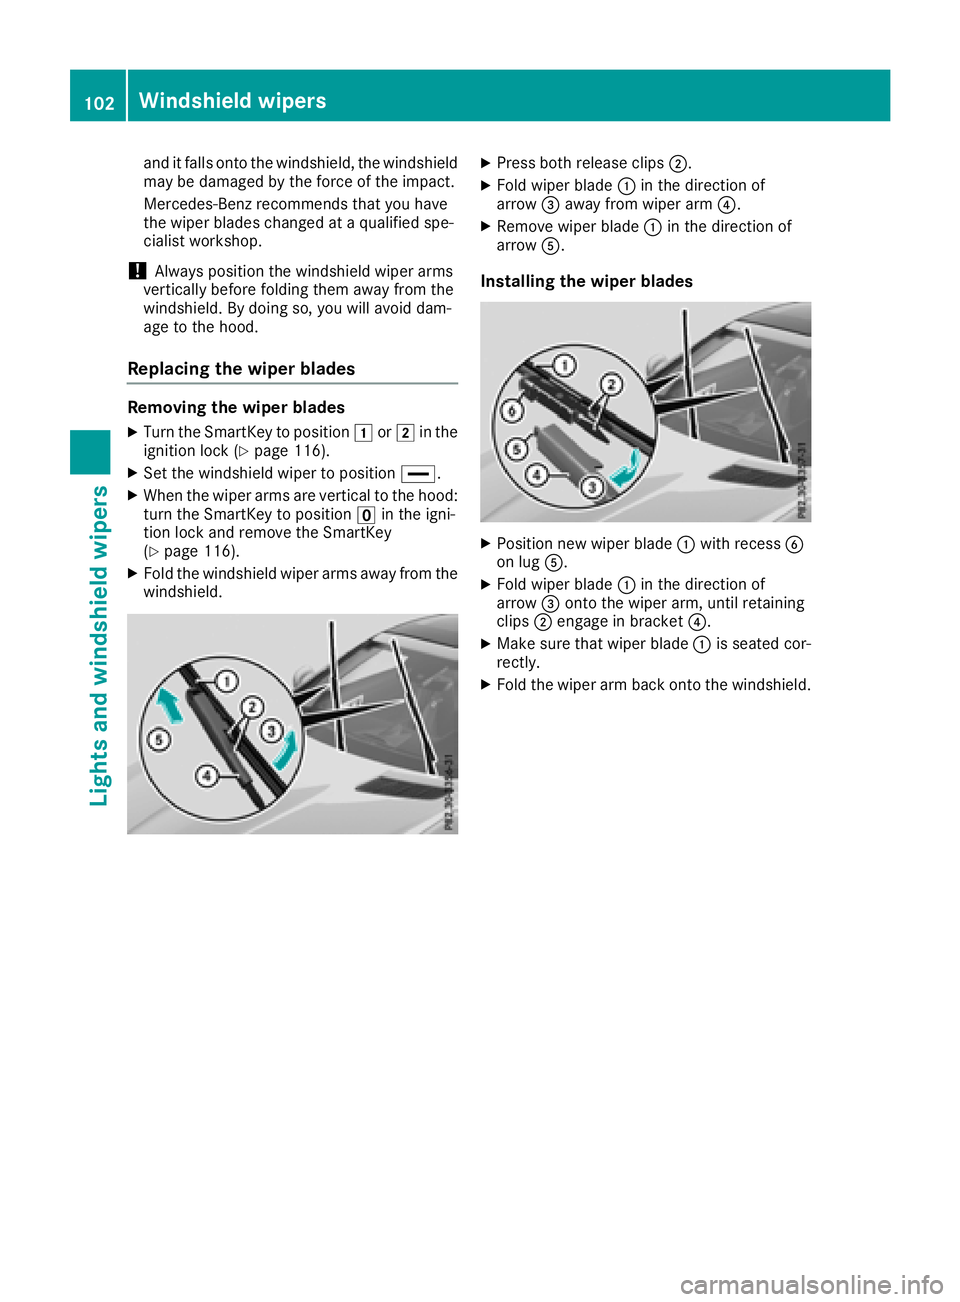
Removing th ewiper blades
XTurn th eSma rtKey to position 1or2 in the
ignition lock(Ypage 116).
XSet th ewindshield wiper to position °.
XWhen thewiper arm sare vertical to th ehood:
tur nthe SmartKey to position uin th eigni-
tio nlocka nd remove th eSmartKey
(
Ypage 116).
XFol dthe windshield wiper arm saway from the
windshield.
XPress bothr elease clips ;.
XFoldw iper blade :in th edirection of
arrow =away from wiper arm ?.
XRemovewiper blade :in th edirection of
arrow A.
Installin gthe wiper blades
XPositio nnew wiper blade :with recess B
on lug A.
XFoldw iper blade :in th edirection of
arrow =onto th ewiper arm ,until retaining
clips ;engage in bracket ?.
XMakesure that wiper blade :is seated cor-
rectly.
XFol dthe wiper arm back onto th ewindshield.
102Windshield wipers
Lightsa nd windshield wipers
Page 241 of 298
!Lock the car if you wash it in an automatic
car wash. Otherwise, the vehicle might be
damaged.
!Never clean your vehicle in aTouchless
Automatic Car Wash as these use special
cleaning agents. These cleaning agents can
damage the paintwork or plastic parts.
If you have your vehicle cleaned in ahigh-
pressure automatic car wash, small amounts
of water may enter the vehicle.
!Make sure that the automatic transmission
is in position Nwhen washing your vehicle in
at ow-through car wash. The vehicle could be
damagedift he transmission is in another
position.
!Make sure that:
Rthe side windows and the roof are com-
pletely closed
Rthe climate control blower is switched off
Rthe windshieldw iper switch is at position 0
The vehicle could otherwise be damaged.
You can clean the vehicle at an automatic car
wash from the very start.
Preferably clean the vehicle at automatic car
washes that use textile washing elements with-
out brushes. This prevents fine scratches from
forming on the paintwork and film.
If the vehicle is very dirty, pre-wash it before
cleaning it in an automatic car wash.
After using an automatic car wash, wipe off wax
from the windshielda nd the wiper blades. This
will prevent smears and reduce wiping noises
caused by residue on the windshield.
iVehicles with decorative film: select awash
program without hot wax at the automatic car
wash.
Washing by hand
In some countries, washing by hand is only
allowed at speciallye quipped washing bays.
Observe the legal requirements in each country.
XDo not use hot water and do not wash the
vehicle in direct sunlight.
XUse asoft sponge to clean.
XUse amild cleaning agent, such as acar
shampoo approved by Mercedes-Benz.
XThoroughly hose down the vehicle with agen-
tle jet of water.
XDo not point the water jet directly towards the
air inlet or the edges of decorative foils.
XUse plenty of water and rinse out the sponge
frequently.
XRinse the vehicle with clean water and dry
thoroughly with achamois.
XDo not let the cleaning agent dry on the paint-
work or the decorative foils.
Carefully remove all deposits of road salt as
soon as possible when driving in winter.
Powerw ashers
GWARNING
The water jet from acircular jet nozzle (dirt
blasters) can cause invisible exterior damage
to the tires or chassis components. Compo-
nentsd amagedint his way may fail unexpect-
edly.T here is arisk of an accident.
Do not use power washers with circular jet
nozzles to clean the vehicle. Have damaged
tires or chassis componentsr eplaced imme-
diately.
!Vehicles with decorative foil: parts of your
vehicle are covered with decorative foil. Main-
tain adistance of at least 27.5 in (70 cm)
between the foil-wrappedp arts of the vehicle
and the nozzle of the high pressure cleaner.
Information aboutt he correct distance is
available from the equipment manufacturer.
Move the power washer nozzle around when
cleaning your vehicle.
The water temperature of the high-pressure
cleaner must not exceed 140 °F (60 °C).
!Alwaysm aintainadistance of at least
11.8 in (30 cm) between the vehicle and the
power washer nozzle. Information aboutt he
correct distance is available from the equip-
ment manufacturer.
Move the power washer nozzle around when
cleaning your vehicle.
Do not aim directly at any of the following:
Rtires
Rdoor gaps, roof gaps, joints, etc.
Relectrical components
Rbattery
Rplug-type couplings
Rlights
Care239
Maintenance and care
Z
Page 243 of 298
Observe the notes in the section on the care and
treatment of matt paintwork (Ypage 240);
these notes also apply to decorative film.
To clean, use plenty of water and amild cleaning
agent without additional or abrasive products,
e.g. acar shampoo approved by Mercedes-
Benz.
XRemove bird droppings, tree resin or fuel as
soon as possible.
The decorative film may be irreparably dam-
aged.
XDry vehicles covered with film using asoft,
absorbent cloth after every wash.
Water marks could otherwise form.
Scratches, corrosive deposits, areas affected by
corrosion and damage caused by inadequate
care cannot always be completely repaired. In
such cases, visit aqualified specialist workshop.
The cleaning product Paint Cleaner, which has
been approved and recommended by
Mercedes-Benz,s hould be used when dirt has
penetrated the decorative film surface or the
decorative film has become dull.
The manufacturer can provide you with infor-
mation on special care and cleaning products.
Surfaces covered with film may appears hinier
after the decorative film has been removed.
iHave work or repairs on decorative film car-
ried out at aqualified specialist workshop.
Mercedes-Benz recommends that you use an
authorized Mercedes-Benz Center for this
purpose.
Cleaning the vehiclep arts
Cleaning the wheels
GWARNING
The water jet from acircular jet nozzle (dirt
blasters) can cause invisible exterior damage
to the tires or chassis components. Compo-
nentsd amaged in this way may fail unexpect-
edly.T here is arisk of an accident.
Do not use power washers with circular jet
nozzles to clean the vehicle. Have damaged
tires or chassis componentsr eplaced imme-
diately.
!Do not use acidic wheel cleaning products
to remove brake dust. This could damage
wheel bolts and brake components.
!Do not park your vehicle for along period of
time directly after cleaning, particularlya fter
cleaning the wheel rim with wheel cleaner.
Wheel cleaner can lead to the increased cor-
rosion of the brake discs and pads. Therefore,
drive for afew minutes after cleaning. By
heating up the brakes, the brake discs and
pads dry. The vehicle can then be parked for a
long period of time.
Cleaning the windows
GWARNING
You could become trapped by the windshield wipers if they start moving while cleaning the
windshieldorw iper blades. There is arisk of
injury.
Alwayss witch off the windshieldw ipers and
the ignition before cleaning the windshieldo r
wiper blades.
!Do not use dry cloths, abrasive products,
solvents or cleaning agents containing sol-
vents to clean the inside of the windows. Do
not touch the insides of the windows with
hard objects, e.g. an ice scraper or ring. There
is otherwise arisk of damaging the windows.
!Cleant he water drainage channels of the
windshielda nd the rear window at regular
intervals. Deposits such as leaves, petals and pollen may under certain circumstances pre-
vent water from draining away. This can lead
to corrosion damage and damage to elec-
tronic components.
XCleant he inside and outside of the windows
with adamp cloth and acleaning product that
is recommended and approved by Mercedes-
Benz.
Cleaning wiper blades
GWARNING
If the windshieldw ipers are set in motion
while you are cleaning the windshield, you can be trapped by the wiper arm. There is arisk of
injury.
Care241
Maintenance and care
Z