wipers MERCEDES-BENZ SLC ROADSTER 2018 Owner's Manual
[x] Cancel search | Manufacturer: MERCEDES-BENZ, Model Year: 2018, Model line: SLC ROADSTER, Model: MERCEDES-BENZ SLC ROADSTER 2018Pages: 298, PDF Size: 5.26 MB
Page 4 of 298
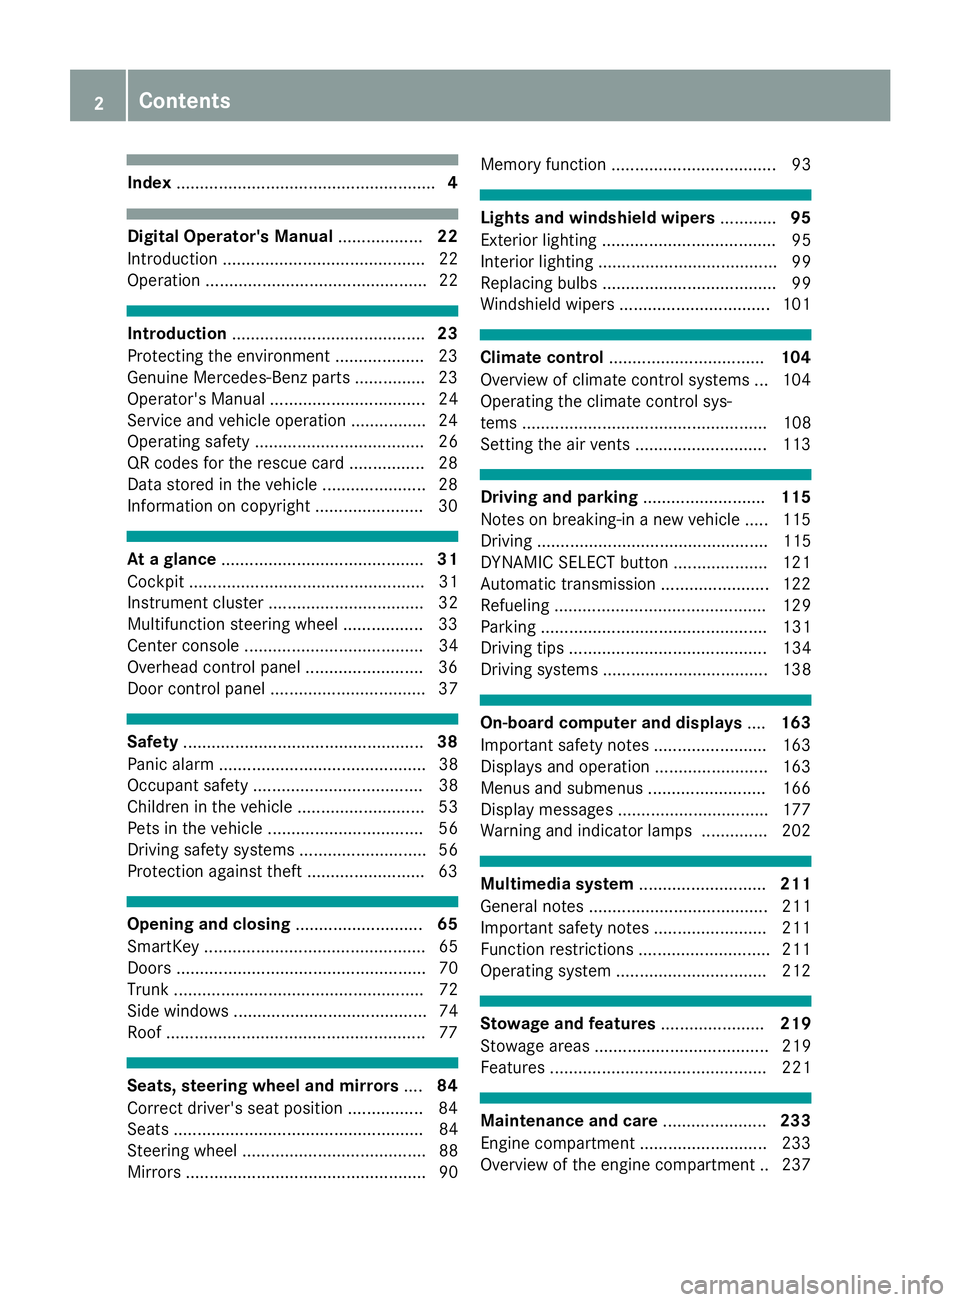
Index....................................................... 4
Digital Operator's Manual..................22
Introductio n........................................... 22
Operation ............................................... 22
Introduction ......................................... 23
Protecting the environment ...................2 3
Genuine Mercedes-Ben zparts............... 23
Operator's Manual ................................. 24
Service and vehicle operation ................2 4
Operating safety .................................... 26
QR codes for the rescue card ................2 8
Data stored in the vehicl e...................... 28
Informatio noncopyright ....................... 30
Atag lance ........................................... 31
Cockpi t.................................................. 31
Instrument cluster. ................................ 32
Multifunctio nsteering whee l................. 33
Center consol e...................................... 34
Overhead contro lpan el .........................3 6
Doorc ontrolpan el ................................. 37
Safety ................................................... 38
Panic alar m............................................ 38
Occupant safety .................................... 38
Childre ninthe vehicl e........................... 53
Pets in the vehicl e................................. 56
Driving safety systems ........................... 56
Protection against theft .........................6 3
Opening and closing...........................65
SmartKey ............................................... 65
Doors ..................................................... 70
Trunk ..................................................... 72
Side windows ......................................... 74
Roof .......................................................7 7
Seats, steering wheel and mirrors....84
Correct driver's seat position ................8 4
Seats ..................................................... 84
Steering wheel ....................................... 88
Mirrors. .................................................. 90 Memory function ................................... 93
Lights and windshield wipers
............95
Exterior lighting ..................................... 95
Interior lighting ...................................... 99
Replacing bulb s..................................... 99
Windshield wipers ................................ 101
Climate control ................................. 104
Overview of climate control systems ... 104
Operating the climate control sys-
tems .................................................... 108
Setting the ai rvents ............................ 113
Drivin gand parking .......................... 115
Notesonb reaking-inanew vehicl e..... 115
Driving ................................................. 115
DYNAMIC SELECT button .................... 121
Automati ctransmissio n....................... 122
Refueling ............................................. 129
Parking ................................................ 131
Driving tip s.......................................... 134
Driving systems ................................... 138
On-board computer and displays ....163
Important safety notes ........................ 163
Displays and operation ........................ 163
Menusa nd submenus ......................... 166
Displa ymessages ................................ 177
Warning and indicator lamps .............. 202
Multimedi asystem ........................... 211
Generaln otes ...................................... 211
Important safety notes ........................ 211
Function restrictions ............................ 211
Operating system ................................ 212
Stowag eand features ...................... 219
Stowag eareas ..................................... 219
Feature s.............................................. 221
Maintenancea nd care...................... 233
Engine compartment ........................... 233
Overview of the engine compartment .. 237
2Contents
Page 23 of 298
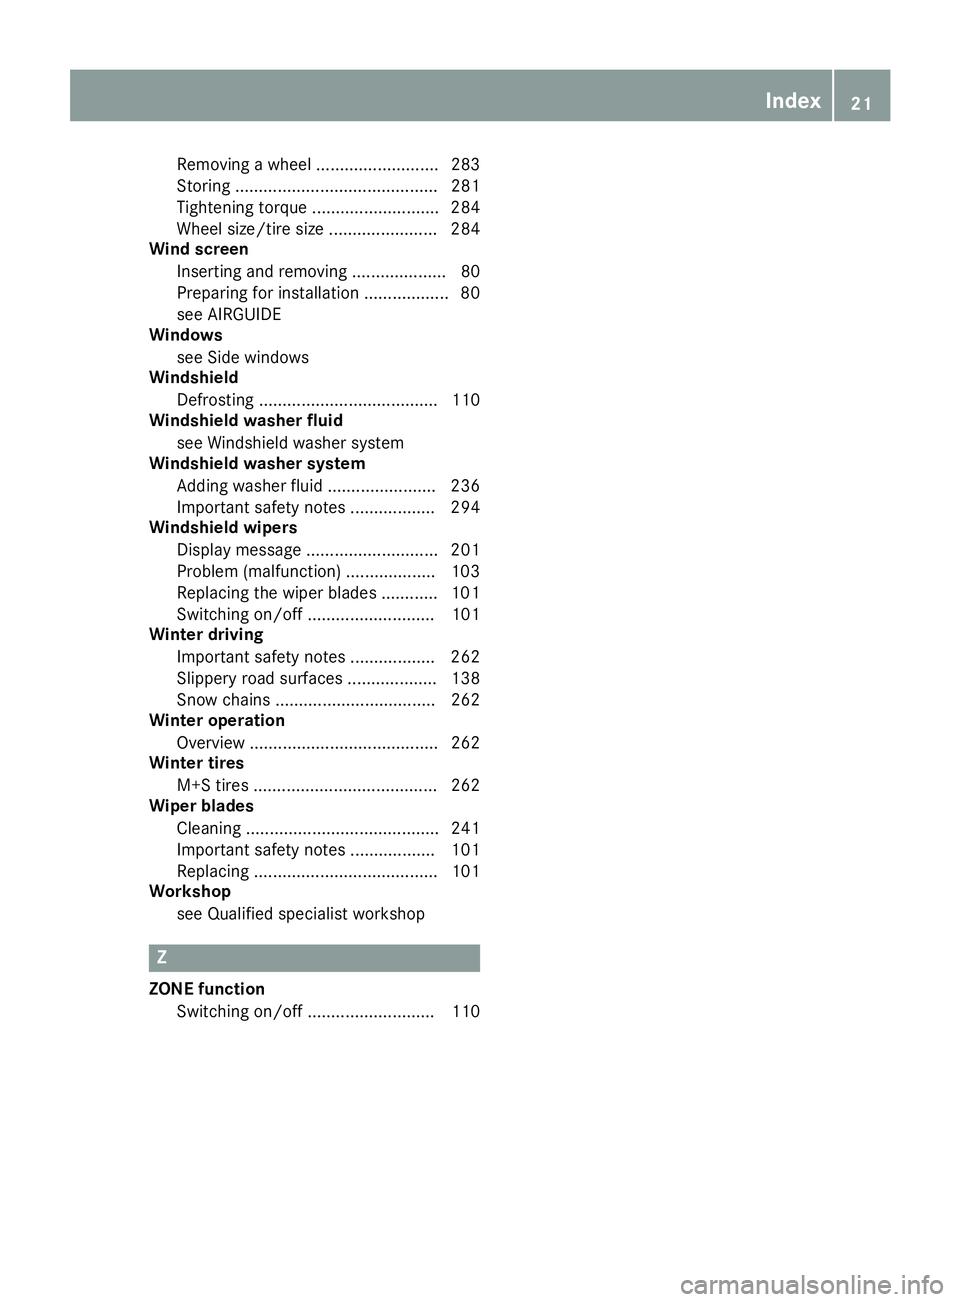
Removingawheel.......................... 283
Storing ........................................... 281
Tightening torque ........................... 284
Wheel size/tire size ....................... 284
Win dscreen
Inserting and removing .................... 80
Preparing for installation .................. 80
see AIRGUIDE
Windows
see Sid ewindows
Windshield
Defrosting ...................................... 110
Windshiel dwasher fluid
see Windshield washers ystem
Windshiel dwasher system
Adding washerf luid ....................... 236
Important safety notes .................. 294
Windshiel dwipers
Displa ymessage ............................ 201
Problem (malfunction) ................... 103
Replacing the wipe rblade s............ 101
Switching on/off. .......................... 101
Winter driving
Important safety notes .................. 262
Slippery roads urfaces ................... 138
Snow chains .................................. 262
Winter operation
Overview ........................................ 262
Winter tires
M+S tire s....................................... 262
Wipe rblades
Cleaning ......................................... 241
Important safety notes .................. 101
Replacing ....................................... 101
Workshop
see Qualifie dspecialist workshop
Z
ZONE function
Switching on/off. .......................... 110
Index21
Page 98 of 298
The daytime runninglamps improve the visibility
of your vehicle during the day. To do this, the
daytime runnin glamps function must be
switched on using the on-board computer
(
Ypage 172).
If the engine is runnin gand you turn the light
switch to TorL,t he manual settings
take precedenceo ver the daytime running
lamps.
Low-beam headlamps
GWARNING
When the light switch is set to Ã,the low-
beam headlamps may not be switched on
automatically if there is fog, snow or other
causes of poor visibility due to the weather
conditions such as spray. There is arisk of an
accident.
In such situations, turn the light switch to
L.
Even if the light sensor does not detect that it is
dark, the parking lamps and low-beam head-
lamps switch on when the ignition is switched on and the light switch is set to the Lposition.
This is aparticularly useful function in the event
of rain and fog.
XTo switch on the low-beam headlamps:
turn the SmartKey to position 2in the igni-
tion lock or start the engine.
XTurn the light switch to L.
The green Lindicator lamp in the instru-
ment cluster lights up.
Rear fog lamp
The rear fog lamp improves visibility of your
vehicle for the traffic behind in the event of thick
fog. Please take noteoft he country-specific
regulations for the use of rear fog lamps.
XTo switch on the rear fog lamp: turn the
SmartKey to position 2in the ignition lock or
start the engine.
XTurn the light switch to LorÃ.
XPress the Rbutton.
The yellow Rindicator lamp in the instru-
ment cluster lights up.
XTo switch off the rear fog lamp: press the
R button.
The yellow Rindicator lamp in the instru-
ment cluster goes out.
Parking lamps
!If the battery charge is very low, the parking
lamps or standin glamps are automatically
switched off to enable the next engine start.
Always park your vehicle safely and in awell lit
area, in accordanc ewith the relevant legal
stipulations. Avoid using the Tparking
lamps over aperiod of several hours. If pos-
sible, switch on the right-hand Xor left-
hand W standin glamps.
XTo switch on: turn the light switch to T.
The green Tindicator lamp in the instru-
ment cluster lights up.
Standing lamps
Switching on the standin glamps ensures the
corresponding side of the vehicle is illuminated.
XTo switch on the standing lam ps:the
SmartKey is not in the ignition lock or it is in
position uin the ignition lock.
XTurn the light switch to W(left-han dside of
the vehicle) or X(right-hand side of the
vehicle).
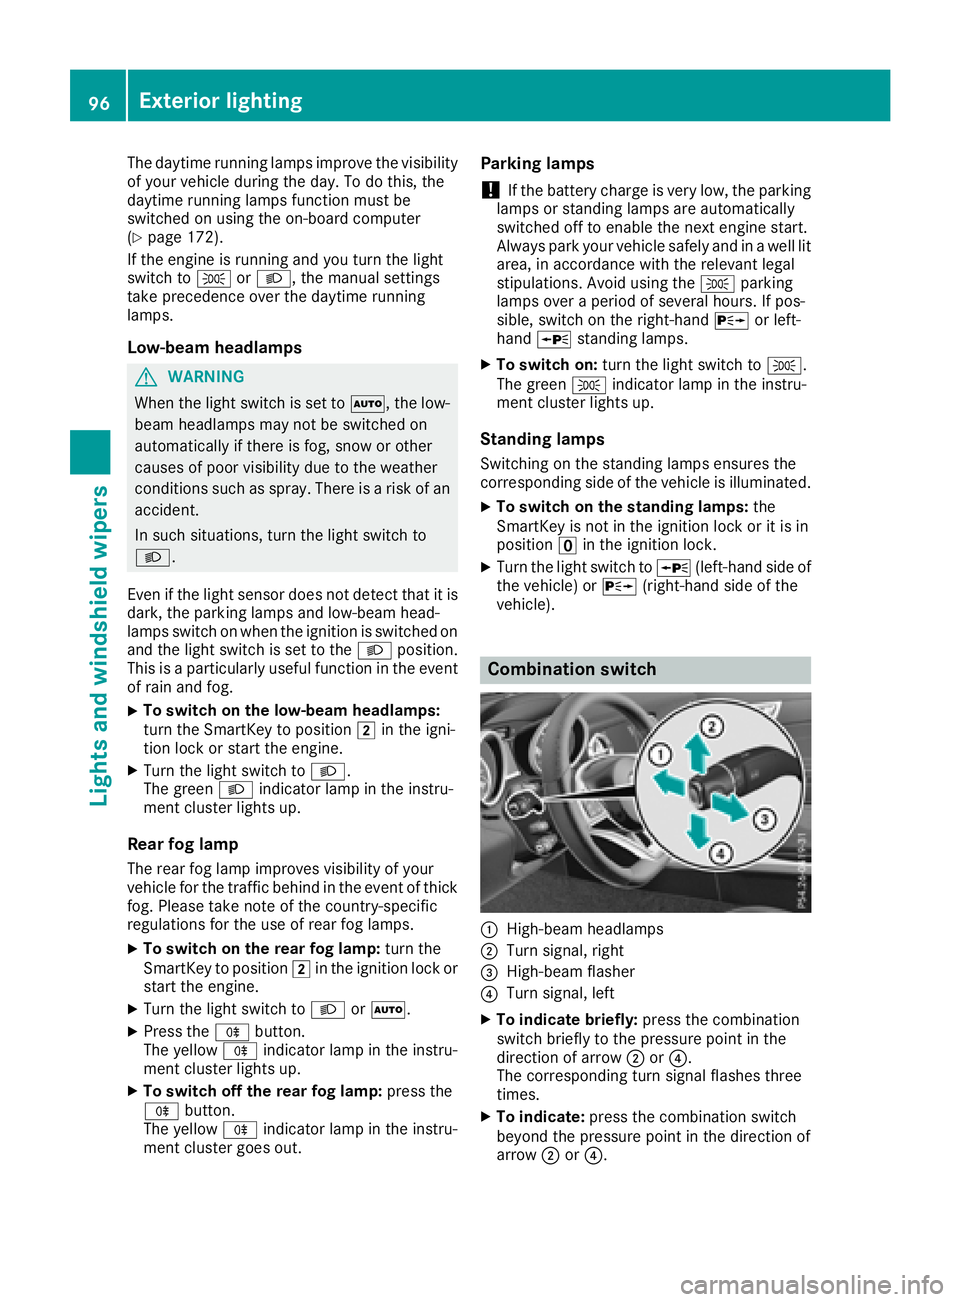
Combination switch
:High-beam headlamps
;Turn signal, right
=High-beam flasher
?Turn signal, left
XTo indicate briefly: press the combination
switch briefly to the pressure point in the
direction of arrow ;or?.
The corresponding turn signal flashes three
times.
XTo indicate: press the combination switch
beyond the pressure point in the direction of
arrow ;or?.
96Exterior lighting
Lights and windshield wipers
Page 100 of 298
vehicle, and consequently switches the head-
lampsfrom high beamtol ow beam.
The system automatically adapts the low-beam
headlamp range depending on the distance to
the other vehicle. Once the system no longer
detects any other vehicles, it reactivates the
high-beam headlamps.
The system' soptical sensor is located behind
the windshieldn ear the overheadc ontrol panel.
Important safety notes
GWARNING
Adaptive Highbeam Assist does not recognize
road users:
Rwho have no lights, e.g. pedestrians
Rwho have poor lighting, e.g. cyclists
Rwhosel ighting is blocked,e .g. byabarrier
On very rare occasions, Adaptive Highbeam
Assist may fail to recognize other road users
that have lights, or may recognize them too
late. In this, or in similar situations, the auto-
matic high-beam headlamp swilln ot be deac-
tivated or wil lbeactivated regardless. There is
ar isk of an accident.
Always carefully observe the traffic conditions
and switch off the high-beam headlamp sin
good time.
Adaptive Highbeam Assist cannot take into
account road ,weather or traffic conditions.
Adaptive Highbeam Assist is only an aid .You are
responsible for adjusting the vehicle's lighting
to the prevailing light, visibility and traffic con-
ditions.
In particular, the detection of obstacles can be
restricted if there is:
Rpoor visibility, e.g. due to fog, heavy rain or
snow
Rdirt on the sensors or the sensors are
obscured
Switching Adaptive Highbeam Assist
on/off
XTo switch on: turn the light switch to Ã.
XPress the combination switch beyond the
pressure point in the directionofa rrow:.
The _ indicator lamp in the multifunction
display lights up when it is dark and the light
sensor activates the low-beam headlamps.
If you are driving at speeds above approx-
imatel y16m ph (25 km/h):
The headlamp range is set automatically
depending on the distance between the vehi-
cle and other road users.
If you are driving at speeds above approx-
imatel y19m ph (30 km/h )and no other road
users have been detected:
The high-beam headlamp sare switched on
automatically. The Kindicator lamp in the
instrument cluster als olights up.
If you are driving at speeds belowa pprox-
imatel y16m ph (25 km/h) or other road users
have been detected or the road sare ade-
quately lit:
The high-beam headlamp sare switched off
automatically. The Kindicator lamp in the
instrument cluster goes out. The _indi-
cator lamp in the multifunction display
remains lit.
XTo switch off: move the combination switch
back to its normal position or move the light
switch to another position.
The _ indicator lamp in the multifunction
display goes out.
98Exteriorl ighting
Lights and windshield wipers
Page 101 of 298
Interior lighting
Overview of interior lighting
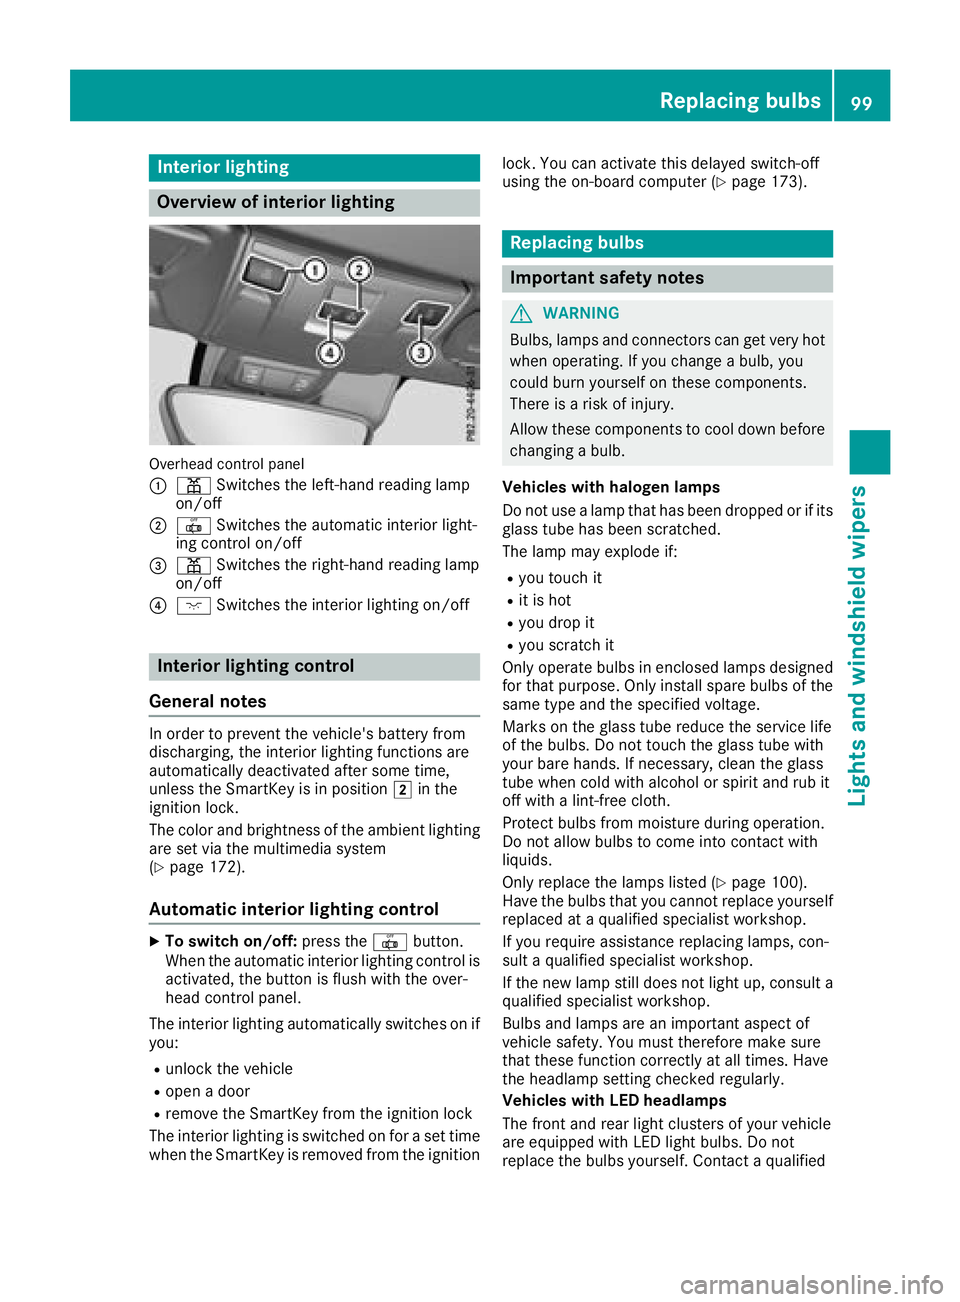
Overhead control panel
:
pSwitches th eleft-han dreading lamp
on/off
;| Switches th eautomatic interio rlight-
ing control on/off
=p Switches th eright-hand reading lamp
on/off
?c Switches th einterio rlighting on/off
Interior lighting control
General notes
In order to preven tthe vehicle's battery from
discharging ,the interio rlighting function sare
automatically deactivated after som etime,
unless th eSmartKey is in position 2in th e
ignition lock.
The color and brightness of th eambien tlighting
are set via th emultimedia system
(
Ypage 172).
Automati cinterior lighting control
XTo switch on/off: press the| button.
When th eautomatic interio rlighting control is
activated, th ebutto nisf lushw itht he over-
head control panel.
The interio rlighting automatically switches on if
you:
Runlock th evehicl e
Ropen adoor
Rremove th eSmartKey from th eignition loc k
The interio rlighting is switched on for aset time
when th eSma rtKey is remove dfromt heignition lock. You can activat
ethisd elaye dswitch-off
usin gthe on-board computer (
Ypage 173).
Replacingbulbs
Important safety notes
GWARNIN G
Bulbs, lamp sand connectors can get ver yhot
when operating .Ifyou chang eabulb, you
could burn yourself on these components.
Ther eisar iskofi njury.
Allow these component stocooldown before
changing abulb.
Vehicles with halogen lamps
Do no tuse alamp that has been dropped or if it s
glass tub ehas been scratched.
The lamp may explod eif:
Ryou touch it
Rit is hot
Ryou dro pit
Ryou scratch it
Only operate bulbs in enclosed lamp sdesigned
for that purpose .Onlyi nstal lspar ebulbs of th e
sam etypea nd th especifie dvoltage.
Mark sont heglass tub ereduce th eservic elife
of th ebulbs .Don ottouch th eglass tub ewith
your bare hands. If necessary, clean th eglass
tub ew hen cold wit halcohol or spirit and rub it
off wit halint-free cloth .
Protect bulbs from moisture during operation .
Do no tallow bulbs to come int ocontac twith
liquids.
Only replace th elamp slisted (
Ypage 100).
Hav ethe bulbs that you canno treplace yourself
replace dataq ualified specialist workshop.
If you require assistanc ereplacing lamps, con-
sult aqualified specialist workshop.
If th enew lamp still does no tligh tup, consult a
qualified specialist workshop.
Bulb sand lamp sare an important aspect of
vehicl esafety. You must therefor emakes ure
that these function corre
ctl
yatall times .Have
th eh eadlamp setting checke dregularly.
Vehicles with LED headlamp s
The fron tand rear ligh tclusters of your vehicl e
are equipped wit hLED ligh tbulbs .Don ot
replace th ebulbs yourself .Contac taqualified
Replacingb ulbs99
Lightsand windshield wipers
Z
Page 102 of 298
specialist workshop which has the necessary
specialist knowledge and tools to carry out the
work required.
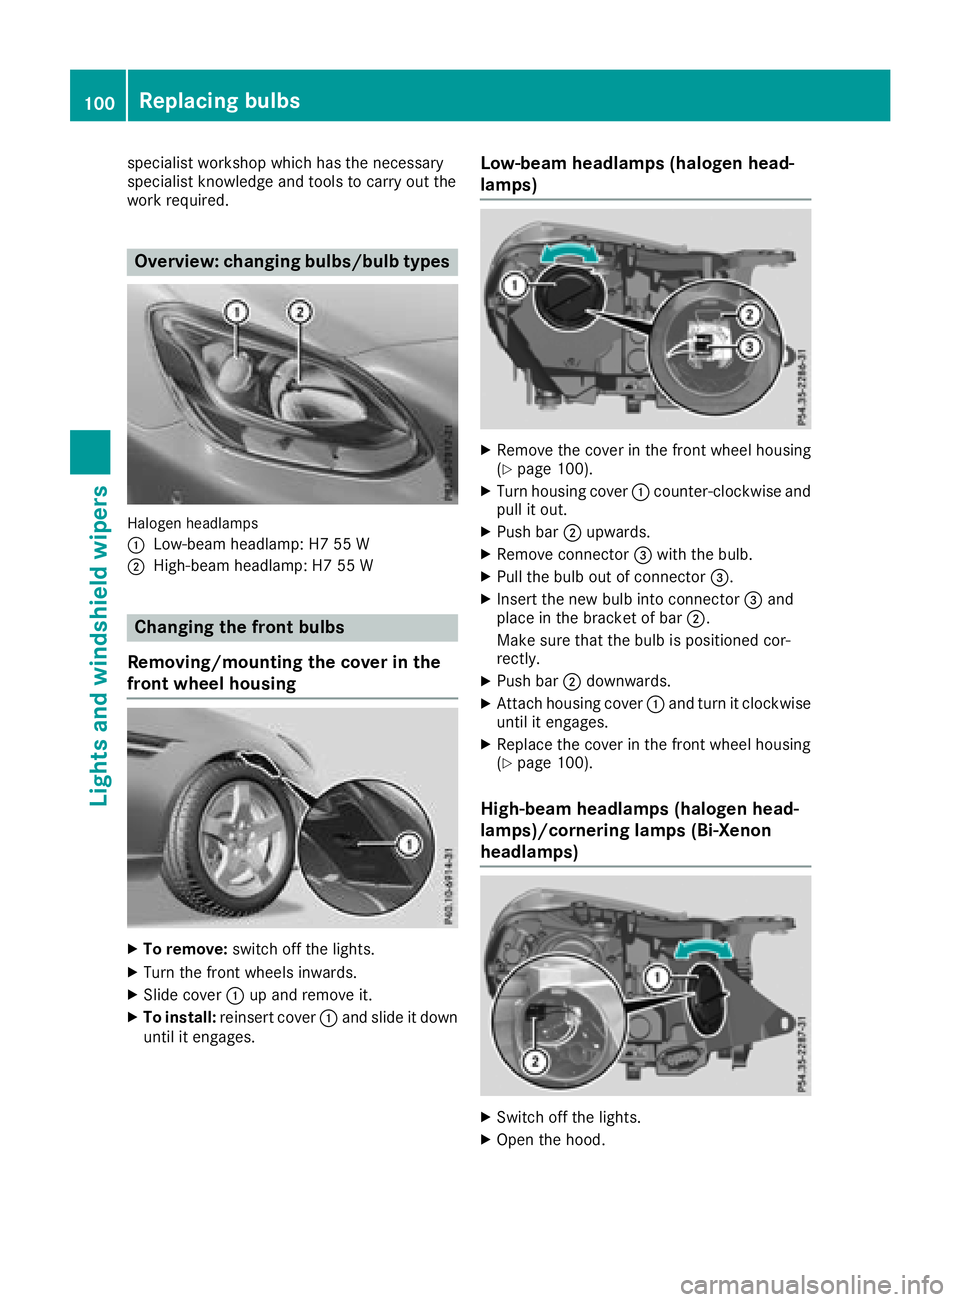
Overview:changing bulbs/bulb types
Halogen headlamps
:
Low-beam headlamp: H7 55 W
;High-beam headlamp: H7 55 W
Changing the front bulbs
Removing/mounting the coverint he
front wheel housing
XTo remove: switch off the lights.
XTurn the front wheels inwards.
XSlide cover:up and remove it.
XTo install: reinsert cover :and slide it down
until it engages.
Low-beam headlamps( halogenhead-
lamps)
XRemove the cover in the front wheel housing
(Ypage 100).
XTurn housing cover :counter-clockwise and
pull it out.
XPush bar ;upwards.
XRemove connector =with the bulb.
XPull the bulb out of connector =.
XInsert the new bulb into connector =and
place in the bracket of bar ;.
Make sure that the bulb is positioned cor-
rectly.
XPush bar ;downwards.
XAttach housing cover :and turn it clockwise
until it engages.
XReplace the cover in the front wheel housing
(Ypage 100).
High-beam headlamps( halogenhead-
lamps)/cornering lamps (Bi-Xenon
headlamps)
XSwitch off the lights.
XOpen the hood.
100Replacing bulbs
Lights and windshield wipers
Page 103 of 298
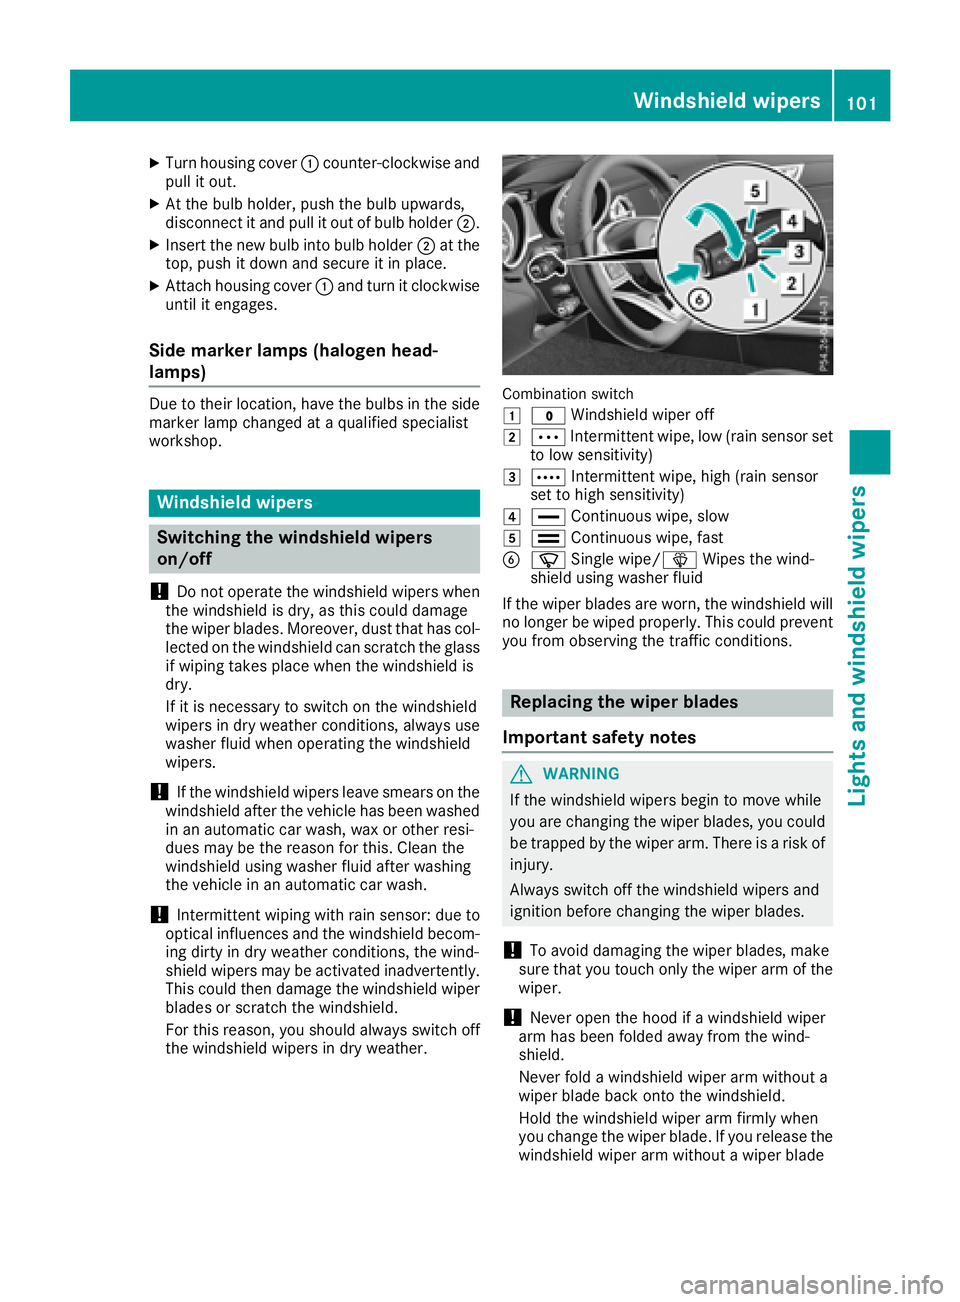
XTurn housing cover:counter-clockwise and
pull it out.
XAt the bulb holder, push the bulb upwards,
disconnect it and pull it out of bulb holder ;.
XInsert the new bulb into bulb holder;at the
top, push it down and secure it in place.
XAttach housing cover :and turn it clockwise
until it engages.
Side marker lamp s(halogen head-
lamps)
Due to their location, have the bulbs in the side
marker lamp changed at aqualified specialist
workshop.
Windshield wipers
Switching the windshield wipers
on/off
!
Do not operate the windshield wipers when
the windshield is dry, as this could damage
the wiper blades. Moreover, dust that has col-
lected on the windshield can scratc hthe glass
if wiping takes place when the windshield is
dry.
If it is necessary to switch on the windshield
wipers in dry weather conditions, alwaysu se
washer fluid when operating the windshield
wipers.
!If the windshield wipers leave smears on the
windshield after the vehicle has been washed
in an automatic car wash, wax or other resi-
dues may be the reason for this. Clean the
windshield using washer fluid after washing
the vehicle in an automatic car wash.
!Intermittent wiping with rain sensor: due to
optical influences and the windshield becom-
ing dirty in dry weather conditions, the wind-
shield wipers may be activated inadvertently.
This could then damage the windshield wiper
blades or scratc hthe windshield.
For this reason, you should alwayss witch off
the windshield wipers in dry weather.
Combination switch
1
$ Windshield wiper off
2ÄIntermittent wipe, low (rain sensor set
to low sensitivity)
3Å Intermittent wipe, high (rain sensor
set to high sensitivity)
4° Continuous wipe, slow
5¯Continuous wipe, fast
BíSingle wipe/î Wipes the wind-
shield using washer fluid
If the wiper blades are worn, the windshield will
no longer be wiped properly. This could prevent
you from observing the traffic conditions.
Replacing the wiper blades
Important safety notes
GWARNING
If the windshield wipers begin to move while
you are changing the wiper blades, you could be trapped by the wiper arm. There is arisk of
injury.
Always switch off the windshield wipers and
ignition before changing the wiper blades.
!To avoid damaging the wiper blades, make
sure that you touch only the wiper arm of the
wiper.
!Never open the hood if awindshield wiper
arm has been folded away from the wind-
shield.
Never fold awindshield wiper arm without a
wiper blade back ontot he windshield.
Hold the windshield wiper arm firmly when
you change the wiper blade. If you release the
windshield wiper arm without awiper blade
Windshield wipers101
Lights and windshield wipers
Z
Page 104 of 298
and it falls onto thewindshield, th ewindshield
may be damage dbytheforce of th eimpact.
Mercedes-Ben zrecommend sthaty ou have
th ew iper blades changed at aqualified spe-
cialis tworkshop.
!Always position th ewindshield wiper arms
vertically before folding them away from the
windshield. By doings o, you will avoid dam-
age to th ehood.
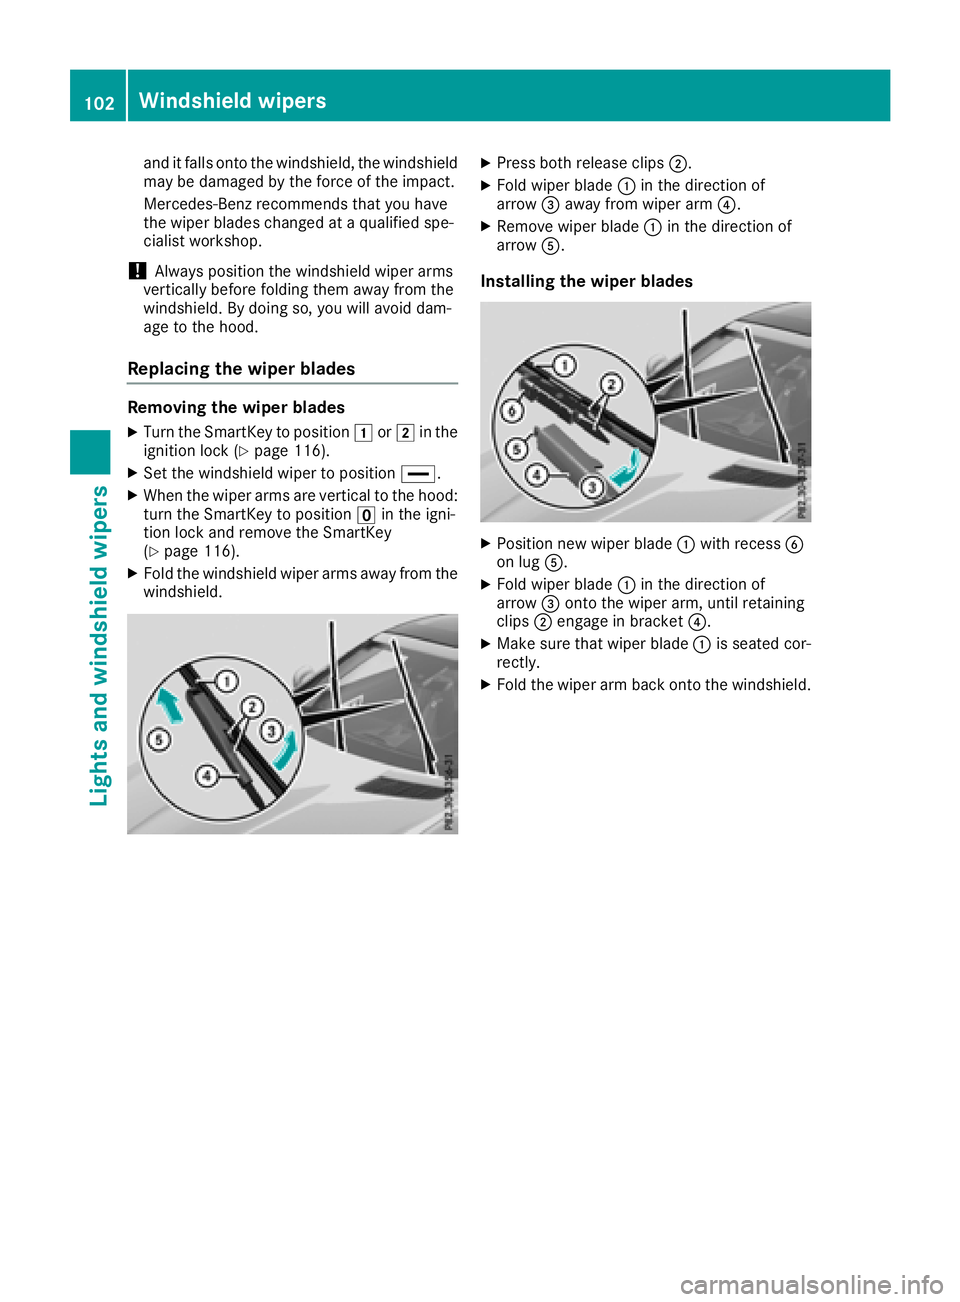
Replacing th ewiper blades
Removing th ewiper blades
XTurn th eSma rtKey to position 1or2 in the
ignition lock(Ypage 116).
XSet th ewindshield wiper to position °.
XWhen thewiper arm sare vertical to th ehood:
tur nthe SmartKey to position uin th eigni-
tio nlocka nd remove th eSmartKey
(
Ypage 116).
XFol dthe windshield wiper arm saway from the
windshield.
XPress bothr elease clips ;.
XFoldw iper blade :in th edirection of
arrow =away from wiper arm ?.
XRemovewiper blade :in th edirection of
arrow A.
Installin gthe wiper blades
XPositio nnew wiper blade :with recess B
on lug A.
XFoldw iper blade :in th edirection of
arrow =onto th ewiper arm ,until retaining
clips ;engage in bracket ?.
XMakesure that wiper blade :is seated cor-
rectly.
XFol dthe wiper arm back onto th ewindshield.
102Windshield wipers
Lightsa nd windshield wipers
Page 105 of 298
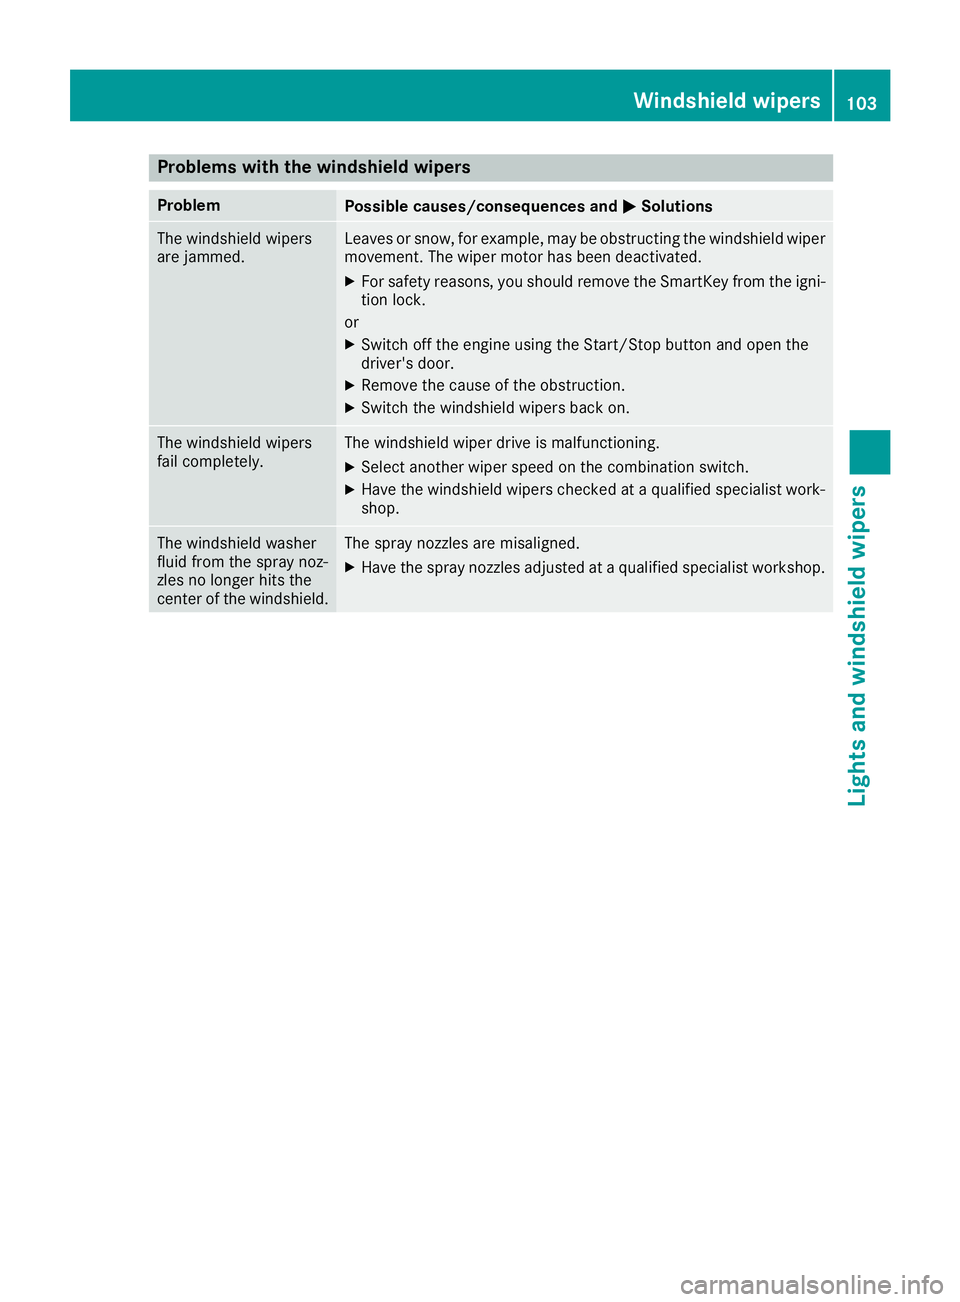
Problems with the windshield wipers
ProblemPossible causes/consequences andMSolutions
The windshield wipers
are jammed.Leaves or snow, for example, may be obstructing the windshield wiper
movement.The wiper motor has been deactivated.
XFor safety reasons, you should remove the SmartKey from the igni-
tion lock.
or
XSwitch off the engine using the Start/Stop button and open the
driver's door.
XRemove the cause of the obstruction.
XSwitch the windshield wipers back on.
The windshield wipers
fail completely.The windshield wiper drive is malfunctioning.
XSelect another wiper speed on the combination switch.
XHave the windshield wipers checked at aqualified specialist work-
shop.
The windshield washer
fluid from the spray noz-
zles no longer hits the
center of the windshield.The spray nozzles are misaligned.
XHave the spray nozzles adjusted at aqualified specialist workshop.
Windshield wipers103
Lights and windshieldw ipers
Z
Page 113 of 298
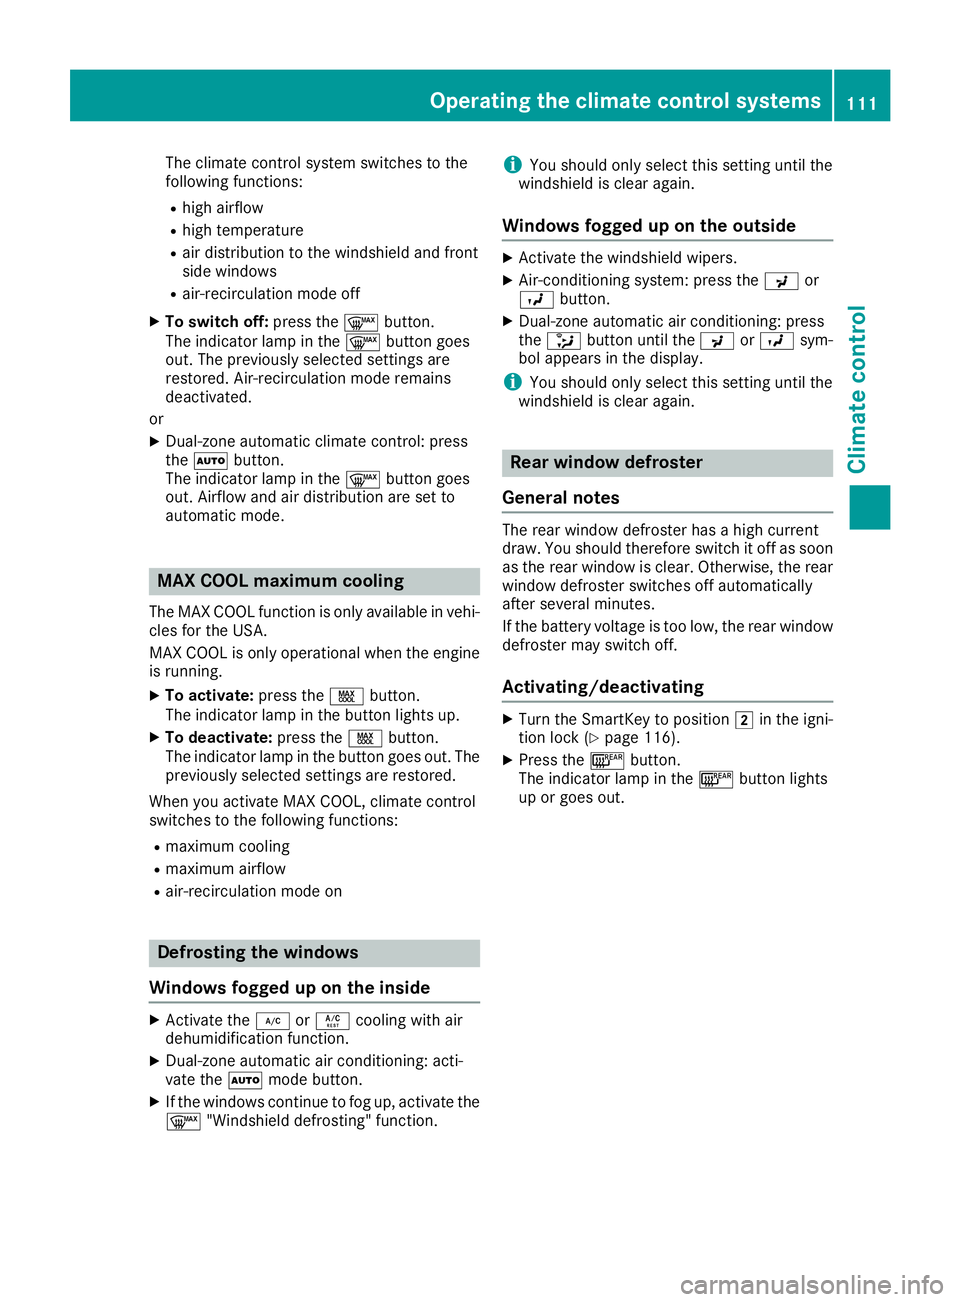
The climate control system switches to the
following functions:
Rhigh airflow
Rhigh temperature
Rair distribution to the windshield and front
side windows
Rair-recirculation mode off
XTo switch off:press the¬button.
The indicator lamp in the ¬button goes
out. The previously selected settings are
restored. Air-recirculation mode remains
deactivated.
or
XDual-zon eautomatic climate control: press
the à button.
The indicator lamp in the ¬button goes
out. Airflow and air distribution are set to
automatic mode.
MAX COOL maximum cooling
The MAX COOL function is only availableinv ehi-
cles for the USA.
MAX COOL is only operational when the engine
is running.
XTo activate: press theÙbutton.
The indicator lamp in the button lights up.
XTo deactivate: press theÙbutton.
The indicator lamp in the button goes out. The
previously selected settings are restored.
When you activate MAX COOL, climate control
switches to the following functions:
Rmaximum cooling
Rmaximum airflow
Rair-recirculation mode on
Defrosting the windows
Windows fogged up on the inside
XActivate the ¿orÁ cooling with air
dehumidification function.
XDual-zon eautomatic air conditioning: acti-
vate the Ãmode button.
XIf the windows continue to fog up, activate the
¬ "Windshield defrosting" function.
iYou should only select this setting until the
windshield is clear again.
Windows fogged up on the outside
XActivate the windshield wipers.
XAir-conditioning system: press the Por
O button.
XDual-zon eautomatic air conditioning: press
the _ button until the PorO sym-
bol appears in the display.
iYou should only select this setting until the
windshield is clear again.
Rear window defroster
General notes
The rear window defroster has ahigh current
draw. You should therefor eswitch it off as soon
as the rear window is clear. Otherwise, the rear window defroster switches off automatically
after several minutes.
If the battery voltage is too low, the rear window
defroster may switch off.
Activating/deactivating
XTurn the SmartKey to position 2in the igni-
tion lock (Ypage 116).
XPress the ¤button.
The indicator lamp in the ¤button lights
up or goes out.
Operating the climate control systems111
Climate control