MERCEDES-BENZ SLK 230 KOMPRESSOR 2002 R170 Owner's Manual
Manufacturer: MERCEDES-BENZ, Model Year: 2002, Model line: SLK 230 KOMPRESSOR, Model: MERCEDES-BENZ SLK 230 KOMPRESSOR 2002 R170Pages: 290, PDF Size: 20.03 MB
Page 251 of 290
248 Cleaning and care of the vehicle
Te ch n i c a l
data Instruments
and controlsOperation DrivingInstrument
cluster displayPractical hintsCar careIndex
Engine cleaning
Prior to cleaning the engine compartment make sure to
protect electrical components and connectors from the
intrusion of water and cleaning agents.
Corrosion protection, such as MB Anticorrosion Wax
should be applied to the engine compartment after
every engine cleaning. Before applying, all control
linkage bushings and joints should be lubricated. The
poly-V-belt and all pulleys should be protected from any
wax.Ve h i c l e w a s h i n g
Do not use hot water or wash your vehicle in direct
sunlight. Use only a mild car wash detergent, such as
Mercedes-Benz approved Car Shampoo.
Thoroughly spray the vehicle with a diffused jet of
water. Direct only a very weak spray towards the
ventilation intake. Use plenty of water and rinse the
sponge and chamois frequently.
Rinse with clear water and thoroughly wipe dry with a
chamois. Do not allow cleaning agents to dry on the
finish.
Due to the width of the vehicle, prior to running the
vehicle through an automatic car wash, fold back the
outside mirrors to prevent them from getting damaged.
In the winter, thoroughly remove all traces of road salt
as soon as possible.
When washing the underbody, do not forget to clean the
inner sides of the wheels.
Page 252 of 290
249 Cleaning and care of the vehicle
Te ch n i c a l
data Instruments
and controlsOperation DrivingInstrument
cluster displayPractical hintsCar careIndex Headlamps, taillamps, turn signal lenses
Use a mild car wash detergent, such as Mercedes-Benz
approved Car Shampoo, with plenty of water.
To prevent scratches, never apply strong force and use
only a soft, non-scratchy cloth when cleaning the lenses.
Do not attempt to wipe dirty lenses with a dry cloth or
sponge.
Window cleaning
Use a window cleaning solution on all glass surfaces. An
automotive glass cleaner is recommended.
Note:
For safety reasons, switch off wipers and remove
electronic key from steering lock before cleaning the
windshield, otherwise the wiper motor can suddenly
turn on and cause injury.Rear window cleaning
The corner flaps of the rear shelf partially cover the rear
window. This prevents the window from being fully
cleaned with the hardtop closed.
Important!
Do not manually move corner flaps of rear shelf. Doing
so will result in damage to the roof folding mechanism
that is not covered by the Mercedes-Benz Limited
Warranty.
Renewed momentary operation of hardtop switch
extends the time by another 7 minutes.
Wa r n i n g !
If a warning sounds and the indicator lamp in the
hardtop switch blinks, immediately stop cleaning
and move back from window to prevent possible
injury.The hardtop is lowered into its storage
compartment.
Page 253 of 290
250 Cleaning and care of the vehicle
Te ch n i c a l
data Instruments
and controlsOperation DrivingInstrument
cluster displayPractical hintsCar careIndex
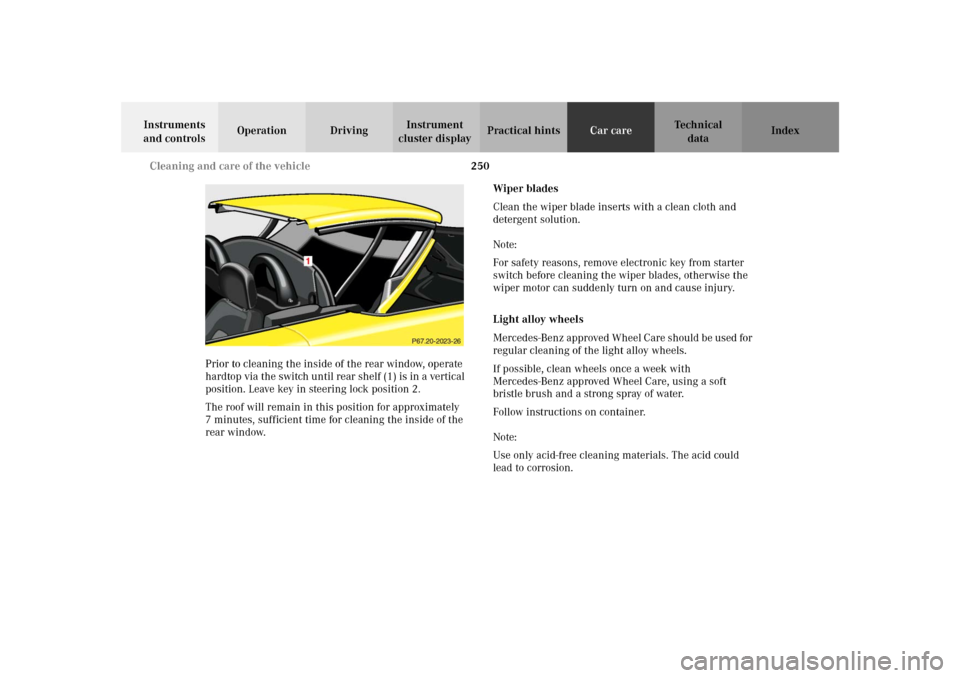
Prior to cleaning the inside of the rear window, operate
hardtop via the switch until rear shelf (1) is in a vertical
position. Leave key in steering lock position 2.
The roof will remain in this position for approximately
7 minutes, sufficient time for cleaning the inside of the
rear window.Wiper blades
Clean the wiper blade inserts with a clean cloth and
detergent solution.
Note:
For safety reasons, remove electronic key from starter
switch before cleaning the wiper blades, otherwise the
wiper motor can suddenly turn on and cause injury.
Light alloy wheels
Mercedes-Benz approved Wheel Care should be used for
regular cleaning of the light alloy wheels.
If possible, clean wheels once a week with
Mercedes-Benz approved Wheel Care, using a soft
bristle brush and a strong spray of water.
Follow instructions on container.
Note:
Use only acid-free cleaning materials. The acid could
lead to corrosion.
Page 254 of 290
251 Cleaning and care of the vehicle
Te ch n i c a l
data Instruments
and controlsOperation DrivingInstrument
cluster displayPractical hintsCar careIndex Instrument cluster
Use a gentle dishwashing detergent or mild detergent
for delicate fabrics as a washing solution. Wipe with a
cloth moistened in lukewarm solution. Do not use
scouring agents.
Steering wheel and gear selector lever
Wipe with a damp cloth and dry thoroughly or clean
with Mercedes-Benz approved Leather Care.
Cup holder
Use a gentle dishwashing detergent or mild detergent
for delicate fabrics as a washing solution. Wipe with a
cloth moistened in lukewarm solution. Do not use
scouring agents.Hard plastic trim items
Pour Mercedes-Benz approved Interior Care onto soft
lint-free cloth and apply with light pressure.
Plastic and rubber parts
Do not use oil or wax on these parts.
Use a gentle dishwashing detergent or mild detergent
for delicate fabrics as a washing solution. Wipe with a
cloth moistened in lukewarm solution. Do not use
scouring agents.
Page 255 of 290
252 Cleaning and care of the vehicle
Te ch n i c a l
data Instruments
and controlsOperation DrivingInstrument
cluster displayPractical hintsCar careIndex
Headliner and shelf behind roll bars
Clean with soft bristle brush, or use a dry-shampoo
cleaner in case of excessive dirt.
Upholstery
Using aftermarket seat covers or wearing clothing that
have the tendency to give off coloring (e.g. when wet
etc.) may cause the upholstery to become permanently
discolored. By lining the seats with a proper
intermediate cover, contact-discoloration will be
prevented.
Leather Upholstery
Wipe leather upholstery with a damp cloth and dry
thoroughly or clean with Mercedes-Benz approved
Leather Care. Exercise particular care when cleaning
perforated leather as its underside should not become
wet.
Cloth Upholstery
Clean with soft bristle brush, or use a dry-shampoo
cleaner in case of excessive dirt.Seat belts
The webbing must not be treated with chemical
cleaning agents. Use only clear, lukewarm water and
soap. Do not dry the webbing at temperatures above
176°F (80°C) or in direct sunlight.
Wa r n i n g !
Do not bleach or dye seat belts as this may severely
weaken them. In a crash they may not be able to
provide adequate protection.
Page 256 of 290
253 Contents - Technical data
Te ch n i c a l
data Instruments
and controlsOperation DrivingInstrument
cluster displayPractical hints Car care Index
Technical dataSpare parts service ........................254
Warranty coverage .........................254
Identification labels .......................255
Layout of poly-V-belt drive ............257
Technical data ................................260
Fuels, coolants,
lubricants etc. – capacities ......266Engine oils ...................................... 268
Engine oil additives ...................... 268
Air conditioner refrigerant .......... 268
Brake fluid ...................................... 268
Premium unleaded gasoline ........ 269
Fuel requirements ........................ 269
Gasoline additives ......................... 270
Coolants .......................................... 270
Consumer information ................. 272
Page 257 of 290
254 Technical data
Te ch n i c a l
data Instruments
and controlsOperation DrivingInstrument
cluster displayPractical hints Car care Index
Spare parts service
All authorized Mercedes-Benz Centers maintain a stock
of original spare parts required for maintenance and
repair work. In addition, strategically located parts
distribution centers provide quick and reliable parts
service.
More than 300 000 different spare parts, for
Mercedes-Benz models, are available.
Mercedes-Benz original spare parts are subjected to
stringent quality inspections. Each part has been
specifically developed, manufactured or selected for and
adapted to Mercedes-Benz vehicles.
Therefore, Mercedes-Benz original spare parts should
be installed.
Important!
The use of non-genuine parts and accessories not
authorized by Mercedes-Benz could damage the vehicle
which damage is not covered by the Mercedes-Benz
Limited Warranty, or compromise its durability or
safety.Warranty coverage
Your vehicle is covered under the terms of the
“warranties” printed in the Service and Warranty
Information booklet and your authorized
Mercedes-Benz Center will exchange or repair any
defective parts originally installed on the vehicle in
accordance with the terms of the following warranties:
1. New vehicle limited warranty
2. Emission system warranty
3. Emission performance warranty
4. California, Maine, Massachusetts, and Vermont
emission control systems warranty
Replacement parts and accessories are covered by the
Mercedes-Benz Spare Parts and Accessories warranties,
copies of which are available at any Mercedes-Benz
Center.
Loss of Service and Warranty Information Booklet
Should you lose your Service and Warranty Information
booklet, have your authorized Mercedes-Benz Center
arrange for a replacement. It will be mailed to you.
Page 258 of 290
255 Technical data
Te ch n i c a l
data Instruments
and controlsOperation DrivingInstrument
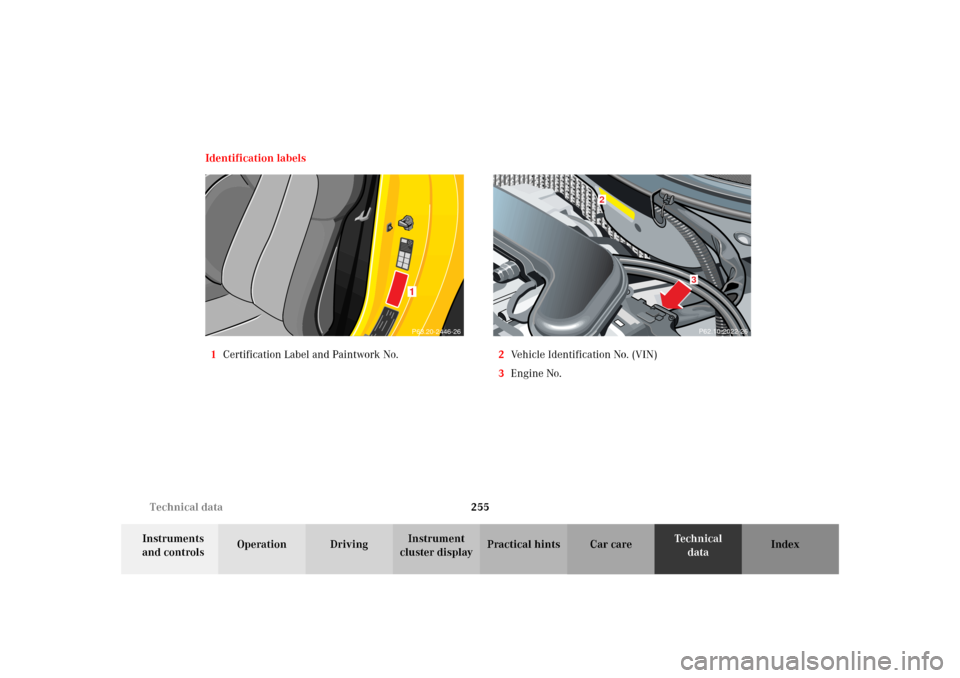
cluster displayPractical hints Car care Index Identification labels
1Certification Label and Paintwork No.2Vehicle Identification No. (VIN)
3Engine No.
1P63.20-2446-26
P62.10-2022-263
2
Page 259 of 290
256 Technical data
Te ch n i c a l
data Instruments
and controlsOperation DrivingInstrument
cluster displayPractical hints Car care Index
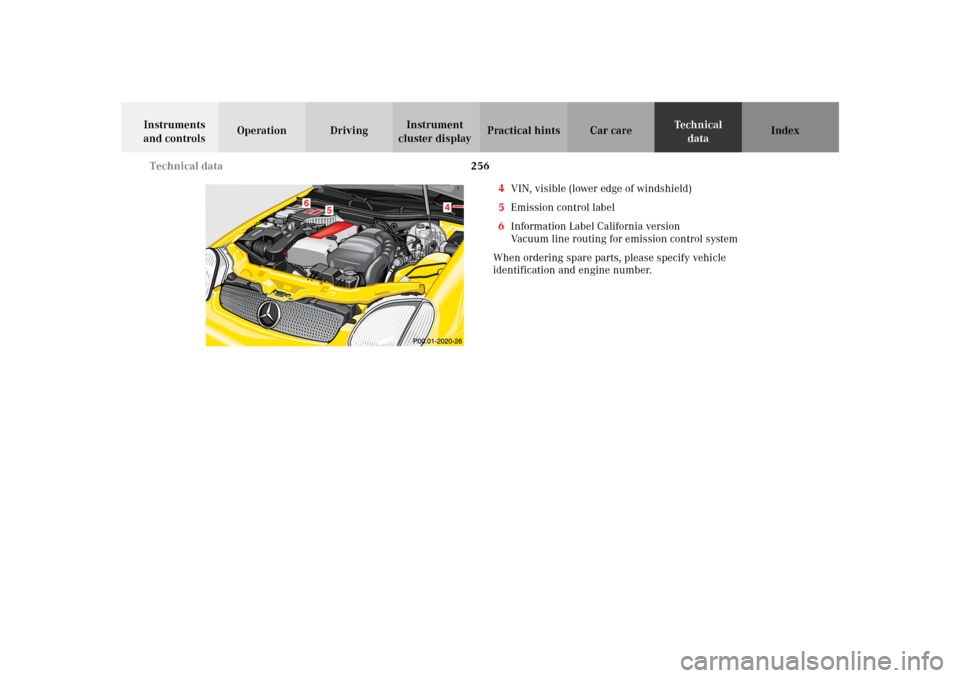
4VIN, visible (lower edge of windshield)
5Emission control label
6Information Label California version
Vacuum line routing for emission control system
When ordering spare parts, please specify vehicle
identification and engine number.
Page 260 of 290
257 Technical data
Te ch n i c a l
data Instruments
and controlsOperation DrivingInstrument
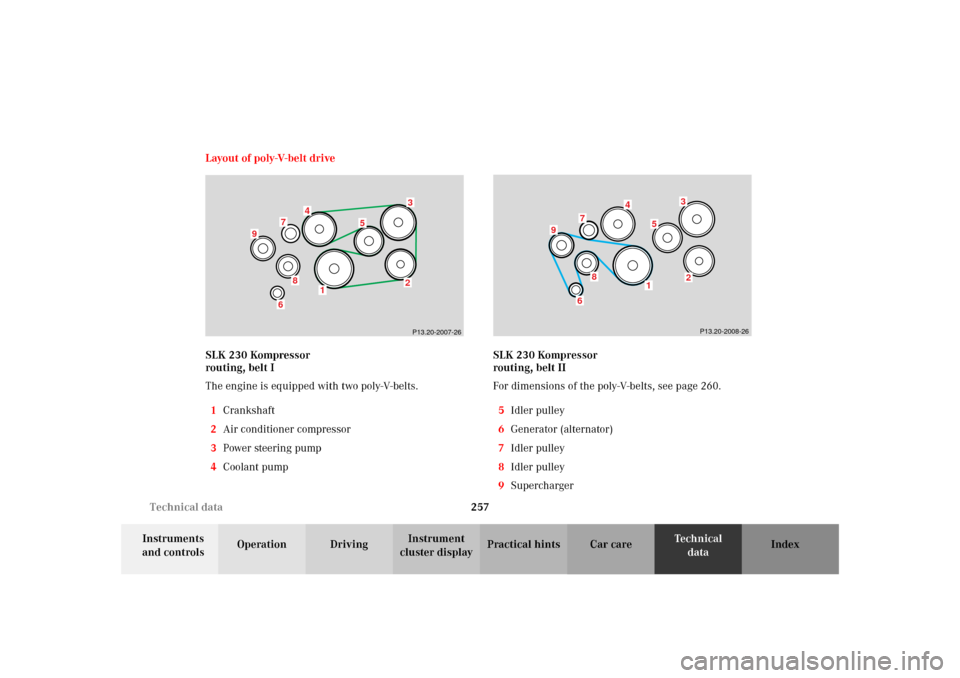
cluster displayPractical hints Car care Index Layout of poly-V-belt drive
SLK 230 Kompressor
routing, belt I
The engine is equipped with two poly-V-belts.
1Crankshaft
2Air conditioner compressor
3Power steering pump
4Coolant pumpSLK 230 Kompressor
routing, belt II
For dimensions of the poly-V-belts, see page 260.
5Idler pulley
6Generator (alternator)
7Idler pulley
8Idler pulley
9Supercharger
P13.20-2007-26
9
6
8
7
4
1
5
32
5
32
9
6
8
4
1
7
P13.20-2008-26