MERCEDES-BENZ SLK-Class 2013 R172 Owner's Manual
Manufacturer: MERCEDES-BENZ, Model Year: 2013, Model line: SLK-Class, Model: MERCEDES-BENZ SLK-Class 2013 R172Pages: 358, PDF Size: 4.61 MB
Page 151 of 358

Shift ranges
Introduction When the automatic transmission is in
position D, it is possible to restrictor
derestrict the shift range.
The set shift range appears in the
multifunction display. The automatic
transmission shifts only as far as the selected
gear.
Driving situations 0008
You can use the engine's braking
effect.
000B
The braking effec
tofthe engine can
be utilized on downhill gradients or
when driving:
R on steep mountain roads
R in mountainous terrain
R in arduous conditions 000F
The braking effect of the engine can
be utilized on extremely steep
downhill gradients and long
downhill stretches.
Restricting the shift range X
Press the selector lever to the left towards
D–.
or
X Pull the left-hand steering wheel paddle
shifter.
The automatic transmission shifts down
one gear and restricts the shift range to the
relevant gear.
i If the engine exceeds the maximum
engine speed when shifting down, the
automatic transmission protects against
engine damage by not shifting down.
i If the maximum engine speed for the shift
range is reached and you continue to
accelerate, the automatic transmission
shifts up, even if the shift range is
restricted. This is to prevent the engine
from overrevving.
Derestricting the shift range X
Briefly press the selector lever to the right
towards D+.
or
X Pull the right-hand steering wheel paddle
shifter.
The shift range is derestricted.
Clearing the shift range restriction X
Press and hold the selector lever towards
D+ until Dis shown once more in the
multifunction display.
or
X Pull and hold the right-hand steering wheel
paddle shifter until Dis shown again in the
multifunction display.
The automatic transmission shifts from the
current shift range directly to D. Automatic transmission
149Driving and parking Z
Page 152 of 358
Selecting the ideal shift range
X
Press the selector lever to the left towards
D– and hold it in position.
or
X Pull the left-hand steering wheel paddle
shifter and hold it in position.
The automatic transmission shifts to the
gear which allows optimum acceleration
and deceleration. To do this, the automatic
transmission shifts down one or more
gears. Manual drive program
Switching on the manual drive program Manual drive program
Mis different from
drive program Swith regard to spontaneity,
responsiveness and smoothness of gear
changes.
Manual drive program Mcan be selected
using the program selector button. You can
change gear using the steering wheel paddle
shifters or the selector lever in manual drive
program Mif the transmission is in position
D.T he selected gear appears in the
multifunction display.
X Press the program selector button
(Y page 147) repeatedly until Mappears in
the multifunction display.
Upshifting X
Briefly press the selector lever to the right
towards D+.
or
X Pull the right-hand steering wheel paddle
shifter (Y page 148).
The automatic transmission shifts up to the
next gear.
AMG vehicles !
In manual drive program M, the automatic
transmission does not shift up
automatically even when the engine limiting speed for the current gear is
reached. When the engine limiting speed is
reached, the fuel supply is cut to prevent
the engine from overrevving. Always make
sure that the engine speed does not reach
the red area of the tachometer. There is
otherwise a risk of engine damage.
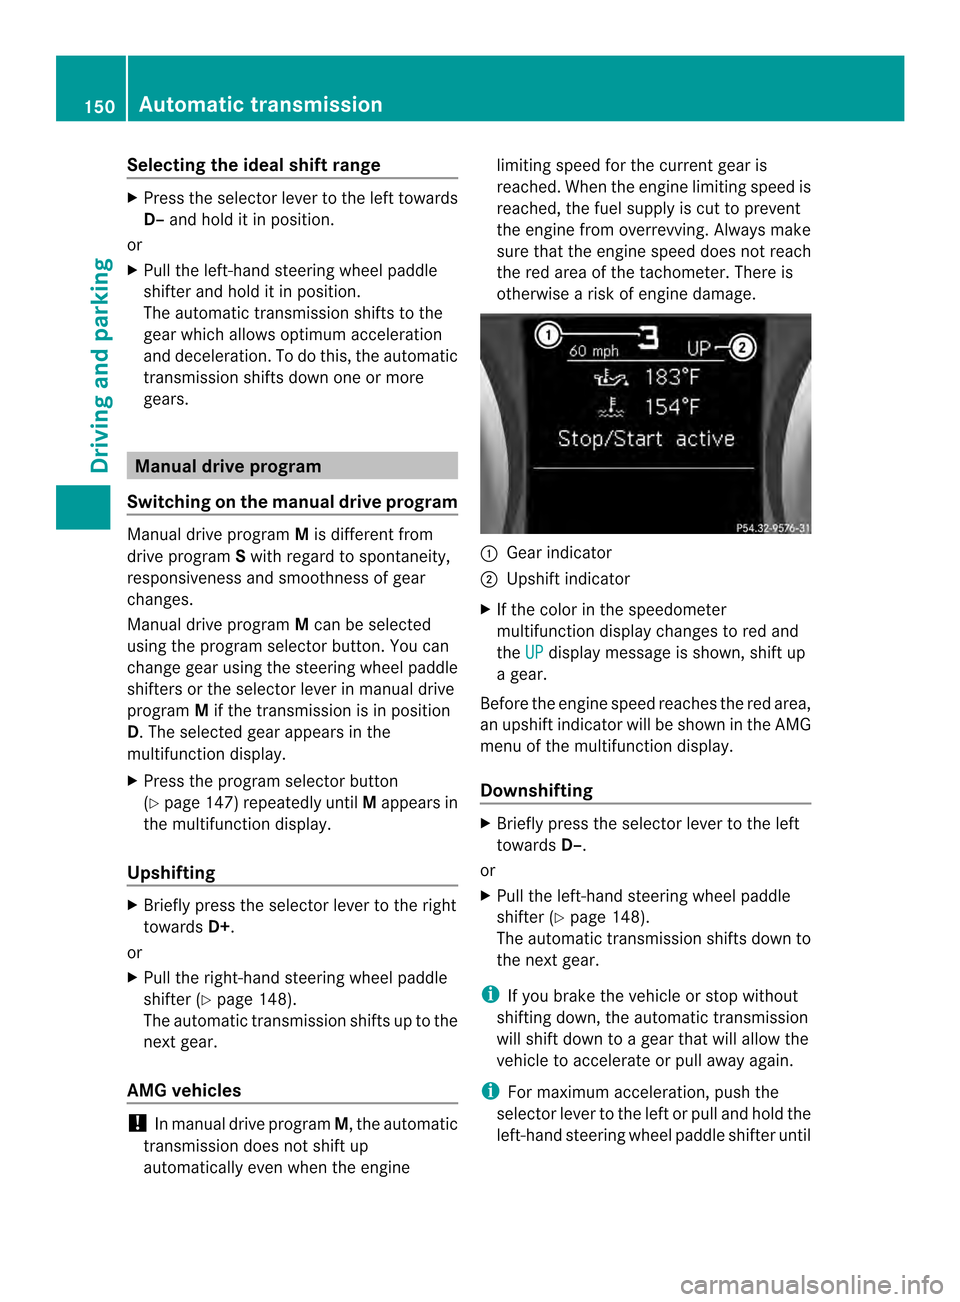
0003
Gear indicator
0004 Upshift indicator
X If the color in the speedometer
multifunction display changes to red and
the UP display message is shown, shift up
a gear.
Before the engine speed reaches the red area,
an upshift indicator will be shown in the AMG
menu of the multifunction display.
Downshifting X
Briefly press the selector lever to the left
towards D–.
or
X Pull the left-hand steering wheel paddle
shifter (Y page 148).
The automatic transmission shifts down to
the next gear.
i If you brake the vehicle or stop without
shifting down, the automatic transmission
will shift down to a gear that will allow the
vehicle to accelerate or pull away again.
i For maximum acceleration, push the
selector lever to the left or pull and hold the
left-hand steering wheel paddle shifter until 150
Automatic transmissionDriving and parking
Page 153 of 358
the transmission shifts to the optimal gear
for the current speed.
Kickdown You can also use kickdow
nfor maximum
acceleration in manual drive program M.
X Depress the accelerator pedal beyond the
pressure point.
The transmission shifts to a lower gear
depending on the engine speed.
i AMG vehicles: it is not possible to use
kickdown in manual drive program M.
Switching off the manual drive program X
Press the program selector button
(Y page 147) repeatedly until E(C in AMG
vehicles) or Sappears in the multifunction
display. Automatic transmission
151Driving and parking Z
Page 154 of 358

Problems with the transmission
Problem Possible causes/consequences and
0001 Solutions
The transmission has
problems shifting gear. The transmission is losing oil.
X
Have the transmission checked at a qualified specialist
workshop immediately. The acceleration ability
is deteriorating.
The transmission no
longer changes gear. The transmission is in emergency mode.
It is only possible to shift into
secondgear and reverse gear.
X Stop the vehicle.
X Shift the transmission to position P.
X Switch off the engine.
X Wait at least ten seconds before restarting the engine.
X Shift the transmission to position Dor R.
If D is selected, the transmission shifts into secondgear; ifRis
selected, the transmission shifts into reverse gear.
X Have the transmission checked at a qualified specialist
workshop, e.g. an authorized Mercedes-Benz Center,
immediately. Releasing the parking lock manually
! Do not use any sharp-edged objects to
remove the selector lever gaiter from the
center console. This could damage the
selector lever gaiter. X
Apply the electric parking brake.
X Press the frame of selector level gaiter 0003
together somewhat on the side edge at the
back and hold with one hand 0004.
X With the other hand, pry off the frame of
selector level gaiter 0003with a flat, blunt
object (e.g. a screwdriver wrapped in cloth) at rear edge
0024, pulling it up and out at the
same time.
X Press release button 0023down and
simultaneously move the selector lever out
of position P.
The selector lever can now be moved freely
until it is returned to position P.
In the event of an electrical malfunction, it is
possible to release the selector lever lock
manually to move it out of position P.This is
the case, for example, if you wish to tow the
vehicle away. Refueling
Important safety notes
G
WARNING
Gasoline is highly flammable and poisonous.
It burns violently and can cause serious
personal injury.
Never allow sparks, flames or smoking
materials near gasoline. 152
RefuelingDriving and parking
Page 155 of 358

Turn off the engine before refueling.
Whenever you are around gasoline, avoid
inhaling fumes and any skin or clothing
contact.
Direct skin contact with fuels and the
inhalation of fuel vapors are damaging to your
health.
G
WARNING
Overfilling of the fuel tank may create
pressure in the system which could cause a
gas discharge. This could cause the gasoline
to spray back out when removing the fuel
pump nozzle, which could cause personal
injury.
! Do not use diesel to refuel vehicles with a
gasoline engine. Even small amounts of the
wrong fuel result in damage to the fuel
system and engine.
! Do not switch on the ignition if you
accidentally refuel with the wrong fuel.
Otherwise, the fuel will enter the fuel lines.
Notify a qualified specialist workshop and
have the fuel tank and fuel lines drained
completely.
! Overfilling the fuel tank could damage the
fuel system.
! Take care not to spill any fuel on painted
surfaces. You could otherwise damage the
paintwork.
! Use a filter when refueling from a fuel can.
Otherwise, the fuel lines and/or injection
system could be blocked by particles from
the fuel can.
Further information on fuel and on fuel grades
can be found in the "Fuel" section
(Y page 348). Refueling
Opening/closing the fuel filler flap 0003
Fuel filler flap
0004 To insert the fuel filler cap
0024 Tire pressure table
0023 Fuel type to be used
The fuel filler flap is unlocked or locked
automatically when you open or close the
vehicle with the SmartKey or with KEYLESS-
GO.
The position of the fuel filler cap is displayed
0013 in the instrument cluster. The arrow
next to the filling pump indicates the side of
the vehicle.
Opening X
Switch off the engine.
X Remove the SmartKey from the ignition
lock.
X KEYLESS-GO: open the driver’s door.
This corresponds to SmartKey position 0,
"key removed".
The driver’s door can be closed again.
X Press the fuel filler flap in marked area 0003.
Fuel filler flap 0003swings up.
X Turn the fuel filler flap counter-clockwise
and remove it.
X Insert the fuel filler cap into the holder
bracket on the inside of filler flap 0004. Refueling
153Driving and parking Z
Page 156 of 358
X
Completely insert the fille rneck of the fuel
pump nozzle into the tank and refuel.
X Only fill the tank until the pump nozzle
switches off.
i Do not add any more fuel after the pump
stops filling for the first time. Otherwise,
fuel could leak out.
Closing X
Place fuel filler cap on the fuel filler neck
and turn clockwise until it engages.
X Close fuel filler flap 0003.
i Close the fuel filler flap before locking the
vehicle.
i The 0013 reserve fuel light flashes if you
are driving with the fuel filler cap open. A
message appears in the multifunction
display ( Ypage 228).
In addition, the 0011(Ypage 250) Check
Engine warning lamp may light up. 154
RefuelingDriving and parking
Page 157 of 358
Problems with fuel and the fuel tank
Problem Possible causes/consequences and
0001 Solutions
Fuel is leaking from the
vehicle. The fuel line or the fuel tank is faulty.
G WARNING
There is a risk of fire or explosion.
X Turn the SmartKey to position 0in the ignition lock and remove
it immediately (Y page 135).
X Do not restart the engine under any circumstances.
X Consult a qualified specialist workshop. The fuel filler flap
cannot be opened. The fuel filler flap is not unlocked.
or
The SmartKey battery is discharged.
X
Unlock the vehicle (Y page 71).
or
X Unlock the vehicle using the mechanical key (Y page 72).The fuel filler flap is unlocked, but the opening mechanism is
jammed.
X
Consult a qualified specialist workshop. Parking
Important safety notes
G
WARNING
If flammable materials such as leaves, grass
or twigs are exposed to prolonged contact to
parts of the exhaust system that heat up, they
could ignite. There is a risk of fire.
Park the vehicle so that no flammable
materials come into contact with parts of the
vehicle which are hot. Take particular care not
to park on dry grassland or harvested grain
fields. G
WARNING
If you switch off the ignition while driving,
safety-relevant functions are only available
with limitations, or not at all. This could affect,
for example, the power steering and the brake
boosting effect.Y ou will require considerably more effort to steer and brake. There is a risk
of an accident.
Do not switch off the ignition while driving.
G
WARNING
If you leave children unsupervised in the
vehicle, they could set it in motion by, for
example:
R releasing the parking brake
R shifting the automatic transmission out of
the parking position P
R starting the engine.
They could also operate the vehicle's
equipment. There is a risk of an accident and
injury.
When leaving the vehicle, always take the
SmartKey with you and lock the vehicle. Never
leave children unsupervised in the vehicle. Parking
155Driving and parking Z
Page 158 of 358
G
WARNING
If you leave children unsupervised in the
vehicle, they could set it in motion by, for
example:
R releasing the parking brake
R shifting the automatic transmission out of
the parking position P
R starting the engine.
They could also operate the vehicle's
equipment. There is a risk of an accident and
injury.
When leaving the vehicle, always take the
SmartKey with you and lock the vehicle. Never
leave children unsupervised in the vehicle.
! Am oving vehicle can lead to damage to
the vehicle or damage to the drive train.
To ensure that the vehicle is secured against
rolling away unintentionally:
R the electric parking brake must be applied.
R on vehicles with manual transmission,
engage first gear or reverse gear.
R on vehicles with automatic transmission,
the transmission must be in position Pand
the SmartKey must be removed from the
ignition lock.
R on steep uphill or downhill gradients, turn
the front wheels towards the curb. Switching off the engine
Important safety notes G
WARNING
The automatic transmission switches to
neutral position Nwhen you switch off the
engine. The vehicle may roll away.T here is a
risk of an accident.
After switching off the engine, always switch
to parking position P. Prevent the parked
vehicle from rolling away by applying the
parking brake. Vehicles with manual transmission X
Shift to either first gear or reverse gear R.
X Turn the SmartKey to position 0in the
ignition lock and remove it.
The immobilizer is activated.
X Apply the electric parking brake.
Vehicles with automatic transmission X
Apply the electric parking brake.
X Shift the transmission to position P.
Using the SmartKey
X Turn the SmartKey to position 0in the
ignition lock and remove it.
The immobilizer is activated.
i The key can only be removed if the
transmission is in position P.
Using KEYLESS-GO
X Press the Start/Stop button (Y page 136).
The engine stops and all the indicator
lamps in the instrumentc luster go out.
i When the driver's door is closed, this
corresponds to SmartKey position 1.W hen
the driver's door is open, it corresponds to
SmartKey position 0or "SmartKey
removed".
If you try to switch off the engine when the
transmission is not in position P, a message
appears in the multifunction display. Asignal
sounds. Electric parking brake
General notes G
WARNING
If you leave children unsupervised in the
vehicle, they could set it in motion by, for
example:
R releasing the parking brake
R shifting the automatic transmission out of
the parking position P
R starting the engine. 156
ParkingDriving and parking
Page 159 of 358
They could also operate the vehicle's
equipment. There is a risk of an accident and
injury.
When leaving the vehicle, always take the
SmartKey with you and lock the vehicle. Never
leave children unsupervised in the vehicle.
i The electric parking brake performs a
function test at regular intervals while the
engine is switched off. The sounds that can
be heard while this is occurring are normal.
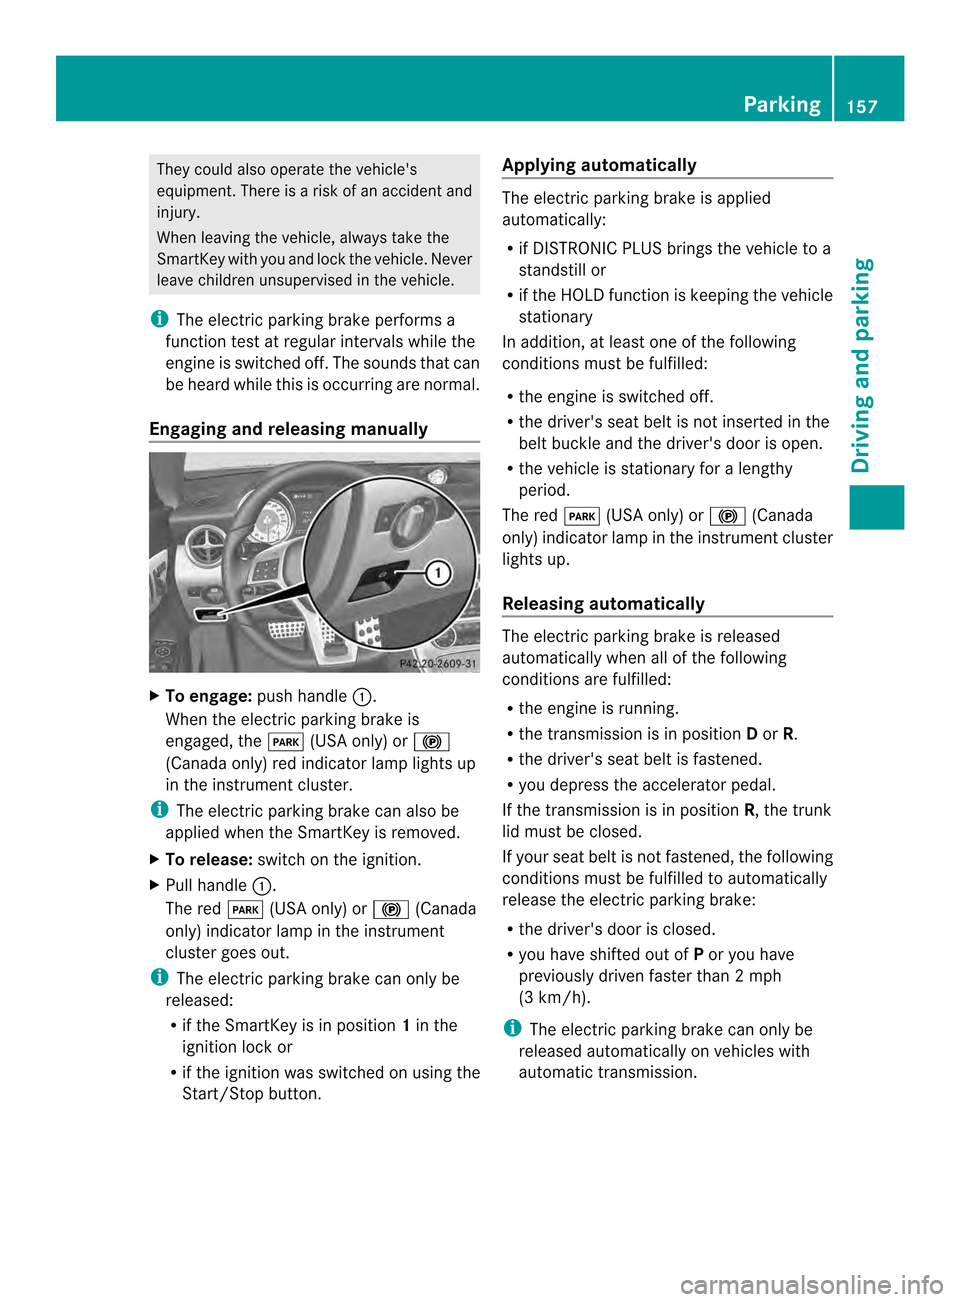
Engaging and releasing manually X
To engage: push handle 0003.
When the electric parking brake is
engaged, the 0005(USA only) or 000A
(Canada only) red indicator lamp lights up
in the instrument cluster.
i The electric parking brake can also be
applied when the SmartKey is removed.
X To release: switch on the ignition.
X Pull handle 0003.
The red 0005(USA only) or 000A(Canada
only) indicator lamp in the instrument
cluster goes out.
i The electric parking brake can only be
released:
R if the SmartKey is in position 1in the
ignition lock or
R if the ignition was switched on using the
Start/Stop button. Applying automatically The electric parking brake is applied
automatically:
R
if DISTRONIC PLUS brings the vehicle to a
standstill or
R if the HOLD function is keeping the vehicle
stationary
In addition, at least one of the following
conditions must be fulfilled:
R the engine is switched off.
R the driver's seat belt is not inserted in the
belt buckle and the driver's door is open.
R the vehicle is stationary for a lengthy
period.
The red 0005(USA only) or 000A(Canada
only) indicator lamp in the instrument cluster
lights up.
Releasing automatically The electric parking brake is released
automatically when all of the following
conditions are fulfilled:
R
the engine is running.
R the transmission is in position Dor R.
R the driver's seat belt is fastened.
R you depress the accelerator pedal.
If the transmission is in position R, the trunk
lid must be closed.
If your seat belt is not fastened, the following
conditions must be fulfilled to automatically
release the electric parking brake:
R the driver's door is closed.
R you have shifted out of Por you have
previously driven faster than 2mph
(3 km/h).
i The electric parking brake can only be
released automatically on vehicles with
automatic transmission. Parking
157Driving and parking Z
Page 160 of 358
Emergency braking
The vehicle can also be braked during an
emergency by using the electric parking
brake.
X While driving, push handle 0003of the electric
parking brake.
i The vehicle is braked for as long as the
handle of the electric parking brake is
pressed. The longer the electric parking
brake handle is depressed, th egreater the
braking force.
During braking:
R a warning tone sounds.
R the Release Parking Brake message
appears
R the red 0005(USA only) or 000A(Canada
only) indicator lamp in the instrument
cluster flashes.
When the vehicle has been braked to a
standstill, the electric parking brake is
engaged. Parking the vehicle for
along period
If you leave the vehicle parked for longer than
four weeks, the battery may be damaged by
exhaustive discharging.
X Connecting a trickle charger.
i You can obtain information about trickle
chargers from a qualified specialist
workshop.
If you leave the vehicle parked for longer than
six weeks, the vehicle may suffer damage as
a result of lack of use.
X Visit a qualified specialist workshop and
seek advice. Driving tips
General notes
Important safety notes G
WARNING
If you switch off the ignitio nwhile driving,
safety-relevant functions are only available
with limitations, or not at all. This could affect,
for example, the power steering and the brake
boosting effect.Y ou will require considerably
more effort to steer and brake. There is a risk
of an accident.
Do not switch off the ignition while driving. G
WARNING
Always remember that you must concentrate
primarily on driving the vehicle. The driver's
concentration must always be directed
primarily at road traffic. For your own safety
and that of others, we recommend that you
stop the vehicle at a safe place and in
accordance with the traffic conditions before
making or accepting a phone call.
Comply with all legal requirements if you use
the telephone while driving. Use the hands-
free system and only use the telephone when
road, weather and traffic conditions permit. In
some jurisdictions, it is forbidden for drivers
to use mobile phones while driving.
Only operate the audio system or COMAND
(Cockpit Management and Data System) in
compliance with all legal requirements and
when the road, weather and traffic conditions
permit. You may otherwise not be able to
observe the traffic conditions, endangering
yourself and others.
Remember that your vehicle covers a distance
of 44 ft (approximately 14 m)a second when
it is traveling at only 30 mph (approximately
50 km/h). 158
Driving tipsDriving and parking