oil temperature MERCEDES-BENZ SLK-Class 2015 R172 Owner's Manual
[x] Cancel search | Manufacturer: MERCEDES-BENZ, Model Year: 2015, Model line: SLK-Class, Model: MERCEDES-BENZ SLK-Class 2015 R172Pages: 358, PDF Size: 6.18 MB
Page 11 of 358
ECO start/stop function
Automatic engine start .................. 146
Automatic engine switch-off .......... 144
Deactivating/activating ................ .147
General information ....................... 144
Important safety notes .................. 143
Introduction ................................... 143
Electronic Stability Program
see ESP ®
(Electronic Stability Program)
Emergency
Automatic measures after an acci-
dent ................................................. 57
Emergency release
Driver's door ................................... .80
Trunk ............................................... 83
Vehicle ............................................. 80
Emergency spare wheel
General notes ................................ 341
Important safety notes .................. 341
Removing ....................................... 341
Stowing .......................................... 342
Technical data ...............................3 44
Emergency Tensioning Devices
Activation ......................................... 54
Emissions control
Service and warranty information .... 22
Engine
Check Engine warning lamp ........... 251
Display message ............................ 228
ECO start/stop function ................ 143
Engine number ............................... 347
Irregular running ............................ 149
Jump-starting ................................. 301
Starting problems .......................... 149
Starting the engine with the
SmartKey ....................................... 142
Starting with KEYLESS-GO ............. 142
Switching off .................................. 162
Tow-starting (vehicle) ..................... 306
Engine electronics
Problem (malfunction) ................... 149
Engine oil
Adding .......................................... .280
Additives ........................................ 350
Checking the oil level ..................... 279
Checking the oil level using the
dipstick .......................................... 279 Display message ............................ 230
Filling capacity ............................... 350
Notes about oil grades ................... 349
Notes on oil level/consumption .... 279
Temperature (on-board com-
puter) ............................................. 208
Viscosity ........................................ 350
ESP ®
(Electronic Stability Pro-
gram) AMG menu (on-board computer) ... 209
Characteristics ................................. 64
Deactivating/activating (AMG
vehicles) .......................................... 65
Deactivating/activating (notes;
except AMG vehicles) ..................... .64
Display message ............................ 213
ETS .................................................. 63
Function/note s................................ 63
General notes .................................. 63
Important safety information ........... 64
Warning lamp ................................. 247
ETS (Electronic Traction System) ....... 63
Exhaust check ................................... 165
Exhaust pipe (cleaning instruc-
tions) .................................................. 287
Exterior lighting Setting options .............................. 108
see Lights
Exterior mirrors
Adjusting ....................................... 103
Dipping (automatic) ....................... 104
Folding in/out (automatically )....... 104
Folding in/out (electrically) ........... 104
Folding in when locking (on-board
computer) ...................................... 208
Out of position (troubleshooting) ... 104
Storing settings (memory func-
tion) ............................................... 106
Storing the parking position .......... 105
Eyeglasses compartment ................. 257 F
Filler cap see Fuel filler flap
Filling capacities (Technical data) ... 347
Flat tire MOExtended tire s.......................... 293 Index
9
Page 15 of 358
N
Navigation Menu (on-board computer) ............ 199
NECK-PRO head restraints
Important safety note s.................... 56
Operation ......................................... 56
Resetting after being triggered ........ 56
Notes on breaking-in a new vehi-
cle ....................................................... 138 O
Occupant Classification System
(OCS) Conditions ....................................... 49
Faults ............................................... 53
Operation ......................................... 49
System self-test ............................... 51
Occupant safety
Automatic measures after an acci-
dent ................................................. 57
Children in the vehicle ..................... 57
Important safety notes .................... 41
Pets in the vehicle ........................... 60
PRE-SAFE ®
(anticipatory occu-
pant protection) ............................... 56
OCS
Conditions ....................................... 49
Faults ............................................... 53
Operation ......................................... 49
System self-test ............................... 51
Odometer ........................................... 197
Oil see Engine oil
On-board computer
AMG menu ..................................... 208
Assistance menu ........................... 203
Audio menu ................................... 200
Convenience submenu .................. 207
Displaying a service message ........ 283
Display messages .......................... 212
DISTRONIC PLUS ........................... 177
Factory settings submenu ............. 208
Important safety notes .................. 194
Instrument cluster submenu .......... 204
Lighting submenu .......................... 205
Menu overview .............................. 197 Message memory .......................... 212
Navigation menu ............................ 199
Operation ....................................... 195
RACETIMER ................................... 209
Service menu ................................. 204
Settings menu ............................... 204
Standard display ............................ 197
Telephone menu ............................ 201
Trip menu ...................................... 197
Vehicle submenu ........................... 207
Video DVD operation ..................... 201
Operating safety
Declaration of conformity ................ 25
Important safety notes .................... 24
Operating system
see On-board computer
Operator's Manual
Vehicle equipment ........................... 22
Outside temperature display ........... 195
Overhead control panel ...................... 36 P
Paint code number ............................ 346
Paintwork (cleaning instructions) ... 285
Panic alarm .......................................... 40
Parking Important safety notes .................. 161
Parking brake ................................ 162
Position of exterior mirror, front-
passenger sid e............................... 105
see PARKTRONIC
Parking aid
Parking Guidance ........................... 185
see Exterior mirrors
see PARKTRONIC
Parking assistance
see PARKTRONIC
Parking brake
Display message ............................ 215
Electric parking brake .................... 162
Warning lamp ................................. 250
Parking Guidance
Display message ............................ 233
Important safety notes .................. 185
Parking lamps
Switching on/of f........................... 110 Index
13
Page 19 of 358
Technical data
Capacities ...................................... 347
Emergency spare wheel ................. 344
Information .................................... 346
Tires/wheels ................................. 337
Vehicle data ................................... 353
TELEAID
Call priority .................................... 265
Downloading destinations
(COMAND) ..................................... 266
Downloading routes ....................... 269
Emergency call .............................. 263
General notes ................................ 261
Geo fencing ................................... 269
Locating a stolen vehicle ............... 268
MB info call button ....................... .265
Remote vehicle locking .................. 267
Roadside Assistance button .......... 264
Search & Send ............................... 266
Self-test ......................................... 262
Speed alert ................................... .269
System .......................................... 262
Triggering the vehicle alarm ........... 270
Vehicle remote malfunction diag-
nosis .............................................. 268
Vehicle remote unlocking .............. 267
Telephone
Accepting a call ............................ .202
Display message ............................ 241
Menu (on-board computer) ............ 201
Number from the phone book ....... .202
Redialing ........................................ 202
Rejecting/ending a call ................. 202
Temperature
Coolant .......................................... 194
Coolant (on-board computer) ......... 208
Engine oil (on-board computer) ...... 208
Outside temperature ..................... .195
Setting (climate control) ................ 129
Time
see separate operating instructions
Timing (RACETIMER) ......................... 209
TIREFIT kit .......................................... 294
Tire pressure Calling up (on-board computer) ..... 318
Checking manually ........................ 317
Display message ............................ 236 Important safety notes .................. 318
Maximum ....................................... 316
Notes ............................................. 315
Not reached (TIREFIT) .................... 295
Reached (TIREFIT) .......................... 296
Recommended ............................... 314
Tire pressure loss warning sys-
tem
General notes ................................ 317
Important safety notes .................. 317
Restarting ...................................... 318
Tire pressure monitor
Radio type approval for the tire
pressure monitor ........................... 321
Tire pressure monitoring system
Checking the tire pressure elec-
tronically ........................................ 320
Function/notes ............................ .318
General notes ................................ 318
Important safety notes .................. 319
Restarting ...................................... 321
Warning lamp ................................. 254
Warning message .......................... 320
Tires
Aspect ratio (definition) ................. 331
Average weight of the vehicle
occupants (definition) .................... 330
Bar (definition) ............................... 330
Changing a wheel .......................... 332
Characteristics .............................. 329
Checking ........................................ 311
Curb weight (definition) ................. 331
Definition of terms ......................... 329
Direction of rotatio n...................... 332
Display message ............................ 236
Distribution of the vehicle occu-
pants (definition) ............................ 332
DOT, Tire Identification Number
(TIN) ............................................... 329
DOT (Department of Transporta-
tion) (definition) ............................. 330
GAWR (Gross Axle Weight Rating)
(definition) ..................................... 330
GVW (Gross Vehicle Weight) (def-
inition) ........................................... 330
GVWR (Gross Vehicle Weight Rat-
ing) (definition) .............................. 330
Important safety notes .................. 310 Index
17
Page 141 of 358
Driving
Important safety notes
G
WARNING
Objects in the driver's footwell can restrict the pedal travel or obstruct a depressed pedal.
The operating and road safety of the vehicle is
jeopardized. There is a risk of an accident.
Make sure that all objects in the vehicle are
stowed correctly, and that they cannot enter
the driver's footwell. Install the floormats
securely and as specified in order to ensure
sufficient clearance for the pedals. Do not use loose floormats and do not place floormats on
top of one another. G
WARNING
Unsuitable footwear can hinder correct usage of the pedals, e.g.:
R shoes with thick soles
R shoes with high heels
R slippers
There is a risk of an accident.
Wear suitable footwear to ensure correct
usage of the pedals. G
WARNING
If you switch off the ignition while driving,
safety-relevant functions are only available
with limitations, or not at all. This could affect, for example, the power steering and the brake
boosting effect. You will require considerably
more effort to steer and brake. There is a risk of an accident.
Do not switch off the ignition while driving. G
WARNING
If the parking brake has not been fully
released when driving, the parking brake can:
R overheat and cause a fire
R lose its hold function.
There is a risk of fire and an accident. Release
the parking brake fully before driving off. !
Warm up the engine quickly. Do not use
the engine's full performance until it has
reached operating temperature.
Only shift the automatic transmission to
the desired drive position when the vehicle
is stationary.
Where possible, avoid spinning the drive
wheels when pulling away on slippery
roads. You could otherwise damage the
drive train.
! AMG vehicles:
at low engine oil temper-
atures below 68 ‡ (+20 †), the maximum
engine speed is restricted in order to pro-
tect the engine. To protect the engine and
maintain smooth engine operation, avoid
driving at full throttle when the engine is
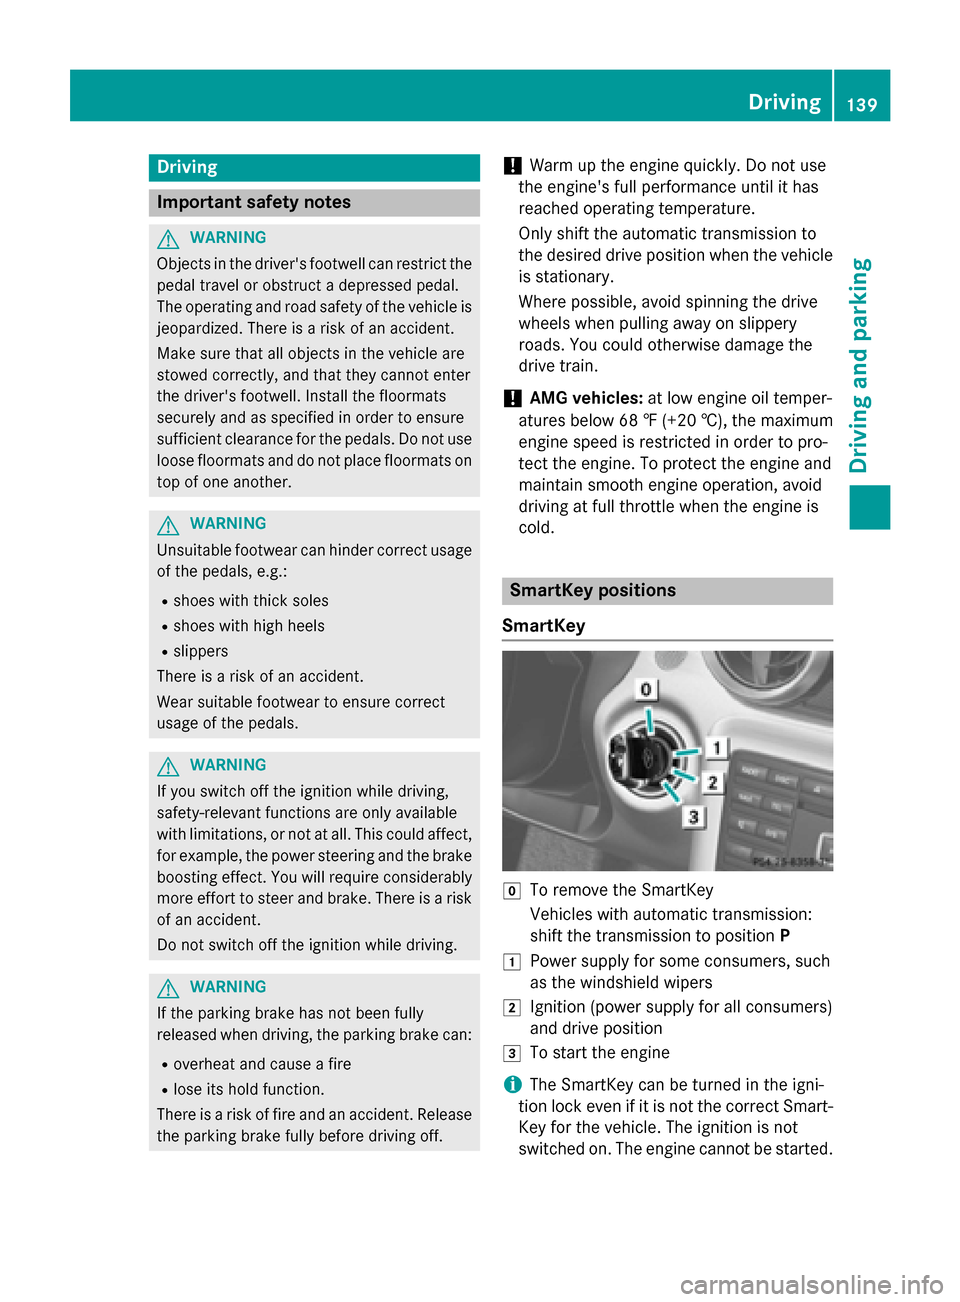
cold. SmartKey positions
SmartKey 005A
To remove the SmartKey
Vehicles with automatic transmission:
shift the transmission to position P
0047 Power supply for some consumers, such
as the windshield wipers
0048 Ignition (power supply for all consumers)
and drive position
0049 To start the engine
i The SmartKey can be turned in the igni-
tion lock even if it is not the correct Smart- Key for the vehicle. The ignition is not
switched on. The engine cannot be started. Driving
139Driving and pa rking Z
Page 210 of 358
Further information on the EASY-ENTRY/EXIT
feature (Y page 101).
Switching the belt adjustment on/off
X Press the 0059or0065 button on the steer-
ing wheel to select the Sett
Sett menu.
X Press the 0064or0063 button to select the
Convenience
Convenience submenu.
X Press 0076to confirm.
X Press the 0064or0063 button to select the
Belt Adjustment
Belt Adjustment function.
When the Belt Adjustment
Belt Adjustment function is
activated, the vehicle seat belt is displayed in orange in the multifunction display.
X Press the 0076button to save the setting.
For further information on belt adjustment,
see (Y page 45).
Switching the fold-in mirrors when lock-
ing feature on/off
This function is only available on vehicles with
the memory function (Y page 106).
This function is only available in Canada.
When you activate the Auto.
Auto. Mirror Mirror Fold‐
Fold‐
ing
ing function, the exterior mirrors are folded
in when the vehicle is locked.
If you unlock the vehicle and then open a
door, the exterior mirrors fold out again.
If you have switched on the Auto. Mirror
Auto. Mirror
Folding
Folding function and you fold in the exterior
mirrors using the button on the door
(Y page 104), they will not fold out automat-
ically. The exterior mirrors can then only be
folded out using the button on the door.
X Press the 0059or0065 button on the steer-
ing wheel to select the Sett
Sett menu.
X Press the 0064or0063 button to select the
Convenience
Convenience submenu.
X Press 0076to confirm.
X Press the 0064or0063 button to select the
Auto. Mirror Folding Auto. Mirror Folding function.
If the Auto. Mirror Folding
Auto. Mirror Folding function is
activated, the vehicle's exterior mirror is displayed in orange in the multifunction
display.
X Press the 0076button to save the setting.
Restoring the factory settings X
Press the 0059or0065 button on the steer-
ing wheel to select the Sett. Sett.menu.
X Press the 0064or0063 button to select the
Factory Setting Factory Setting submenu.
X Press 0076to confirm.
The Reset All Settings? Reset All Settings? message
appears.
X Press the 0064or0063 button to select No
No
or Yes
Yes.
X Press the 0076button to confirm the selec-
tion.
If you have selected Yes Yes, the multifunction
display shows a confirmation message.
For safety reasons, the Daytime Running
Daytime Running
Lights
Lights function in the Light
Lightsubmenu is only
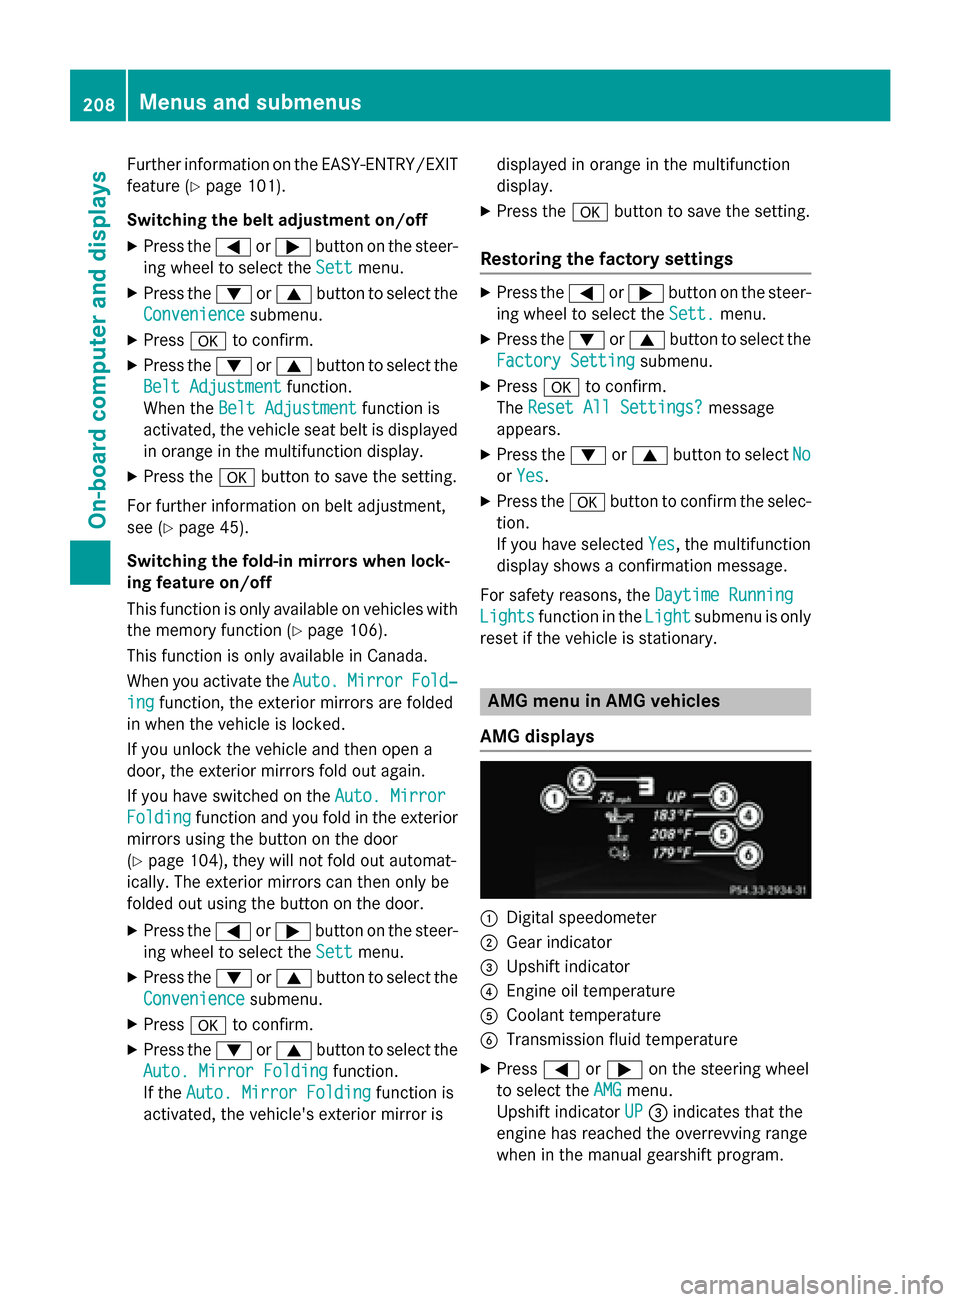
reset if the vehicle is stationary. AMG menu in AMG vehicles
AMG displays 0043
Digital speedometer
0044 Gear indicator
0087 Upshift indicator
0085 Engine oil temperature
0083 Coolant temperature
0084 Transmission fluid temperature
X Press 0059or0065 on the steering wheel
to select the AMG AMGmenu.
Upshift indicator UP UP0087 indicates that the
engine has reached the overrevving range
when in the manual gearshift program. 208
Menus and submenusOn-board computer and displays
Page 211 of 358
Upshift indicator
UP
UP0087 fades out other
messages until you have shifted up.
If the engine oil temperature is below
160 ‡(71 †), oil temperature 0085is shown
in blue. Avoid driving at full engine output
during this time.
If the transmission fluid temperature is
below 122 ‡(50 †), oil temperature 0084is
shown in blue. Avoid driving at full engine
output during this time.
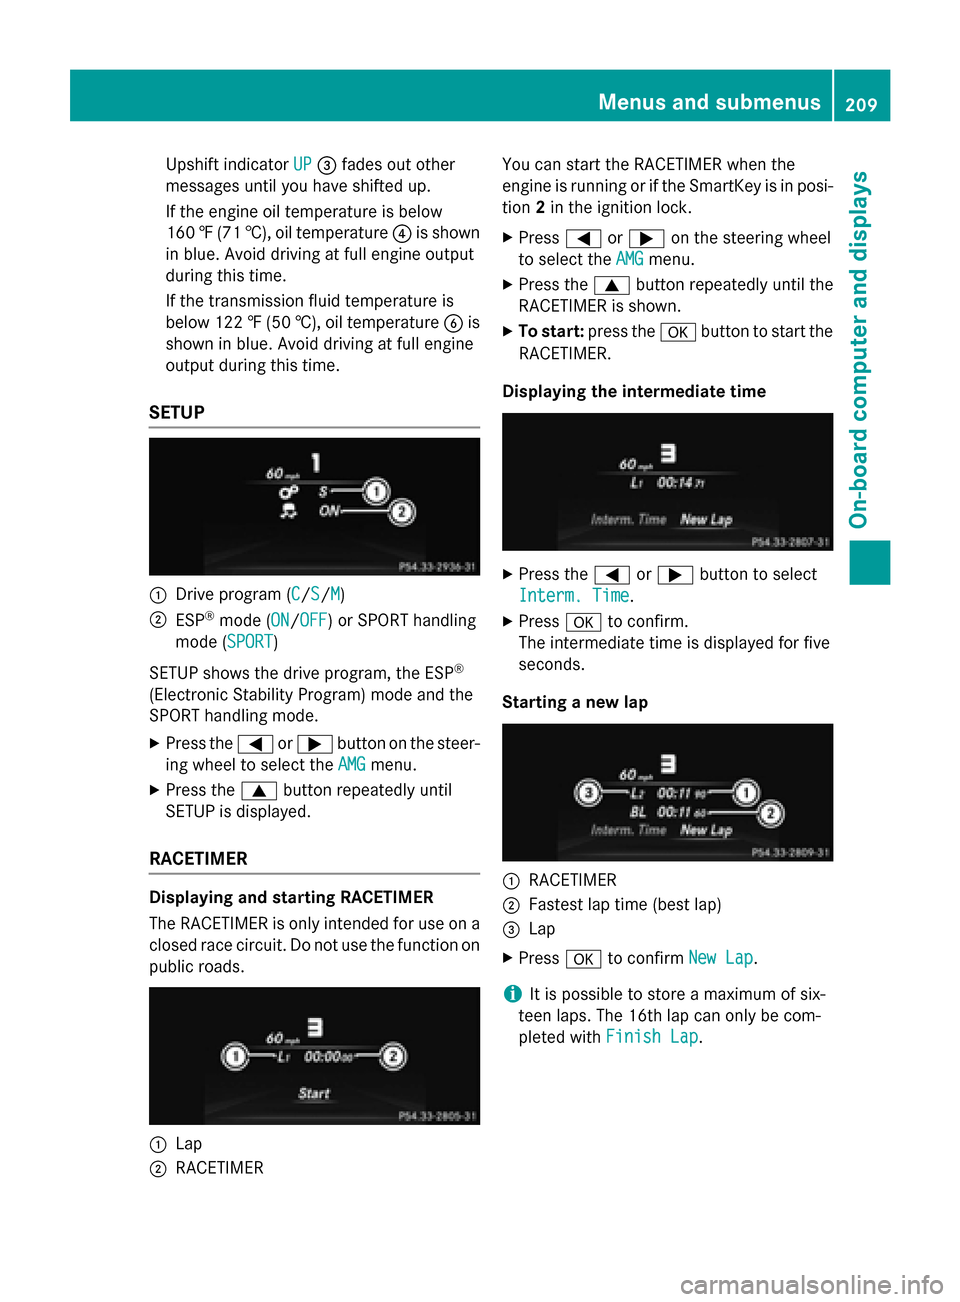
SETUP 0043
Drive program (C C/SS/MM)
0044 ESP ®
mode (ON ON/OFFOFF) or SPORT handling
mode (SPORT SPORT)
SETUP shows the drive program, the ESP ®
(Electronic Stability Program) mode and the
SPORT handling mode.
X Press the 0059or0065 button on the steer-
ing wheel to select the AMG
AMG menu.
X Press the 0063button repeatedly until
SETUP is displayed.
RACETIMER Displaying and starting RACETIMER
The RACETIMER is only intended for use on a
closed race circuit. Do not use the function on
public roads. 0043
Lap
0044 RACETIMER You can start the RACETIMER when the
engine is running or if the SmartKey is in posi-
tion 2in the ignition lock.
X Press 0059or0065 on the steering wheel
to select the AMG
AMG menu.
X Press the 0063button repeatedly until the
RACETIMER is shown.
X To start: press the 0076button to start the
RACETIMER.
Displaying the intermediate time X
Press the 0059or0065 button to select
Interm. Time Interm. Time.
X Press 0076to confirm.
The intermediate time is displayed for five
seconds.
Starting a new lap 0043
RACETIMER
0044 Fastest lap time (best lap)
0087 Lap
X Press 0076to confirm New Lap New Lap.
i It is possible to store a maximum of six-
teen laps. The 16th lap can only be com-
pleted with Finish Lap Finish Lap. Menus and submenus
209On-board computer and displays Z
Page 281 of 358
X
Make sure that the windshield wipers are
turned off.
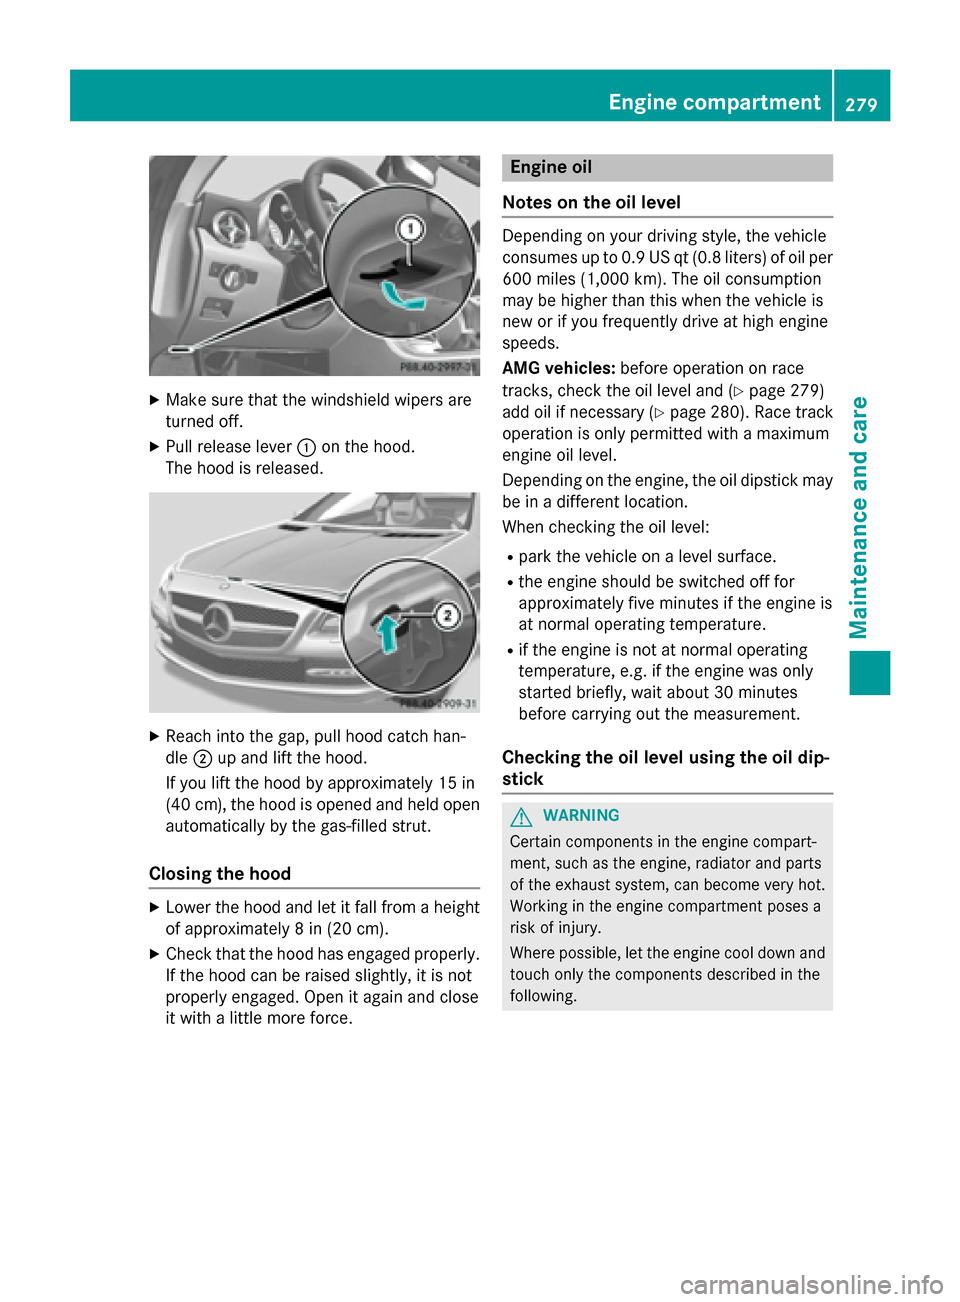
X Pull release lever 0043on the hood.
The hood is released. X
Reach into the gap, pull hood catch han-
dle 0044up and lift the hood.
If you lift the hood by approximately 15 in
(40 cm), the hood is opened and held open automatically by the gas-filled strut.
Closing the hood X
Lower the hood and let it fall from a height
of approximately 8 in (20 cm).
X Check that the hood has engaged properly.
If the hood can be raised slightly, it is not
properly engaged. Open it again and close
it with a little more force. Engine oil
Notes on the oil level Depending on your driving style, the vehicle
consumes up to 0.9 US qt (0.8 liters) of oil per
600 miles (1,000 km). The oil consumption
may be higher than this when the vehicle is
new or if you frequently drive at high engine
speeds.
AMG vehicles: before operation on race
tracks, check the oil level and (Y page 279)
add oil if necessary (Y page 280). Race track
operation is only permitted with a maximum
engine oil level.
Depending on the engine, the oil dipstick may be in a different location.
When checking the oil level:
R park the vehicle on a level surface.
R the engine should be switched off for
approximately five minutes if the engine is
at normal operating temperature.
R if the engine is not at normal operating
temperature, e.g. if the engine was only
started briefly, wait about 30 minutes
before carrying out the measurement.
Checking the oil level using the oil dip-
stick G
WARNING
Certain components in the engine compart-
ment, such as the engine, radiator and parts
of the exhaust system, can become very hot.
Working in the engine compartment poses a
risk of injury.
Where possible, let the engine cool down and touch only the components described in the
following. Engine compartment
279Maintenance and care Z
Page 283 of 358
X
Replace cap 0043on the filler neck and turn
clockwise.
Ensure that the cap locks into place
securely.
X Check the oil level again with the oil dip-
stick (Y page 279).
Further information on engine oil
(Y page 349). Checking and adding other service
products
Checking coolant level G
WARNING
Certain components in the engine compart-
ment, such as the engine, radiator and parts
of the exhaust system, can become very hot.
Working in the engine compartment poses a
risk of injury.
Where possible, let the engine cool down and touch only the components described in the
following. G
WARNING
The engine cooling system is pressurized, par- ticularly when the engine is warm. When
opening the cap, you could be scalded by hotcoolant spraying out. There is a risk of injury.
Let the engine cool down before opening the
cap. Wear eye and hand protection when
opening the cap. Open the cap slowly half a
turn to allow pressure to escape. Example X
Park the vehicle on a level surface.
Only check the coolant level when the vehi- cle is on a level surface and the engine has
cooled down.
X Turn the SmartKey to position 2in the igni-
tion lock (Y page 139).
On vehicles with KEYLESS-GO, press the
Start/Stop button twice (Y page 140).
X Check the coolant temperature gauge in
the multifunction display.
The coolant temperature must be below
158 ‡ (70 †).
X Turn the SmartKey to position
0(Y page 139) in the ignition lock.
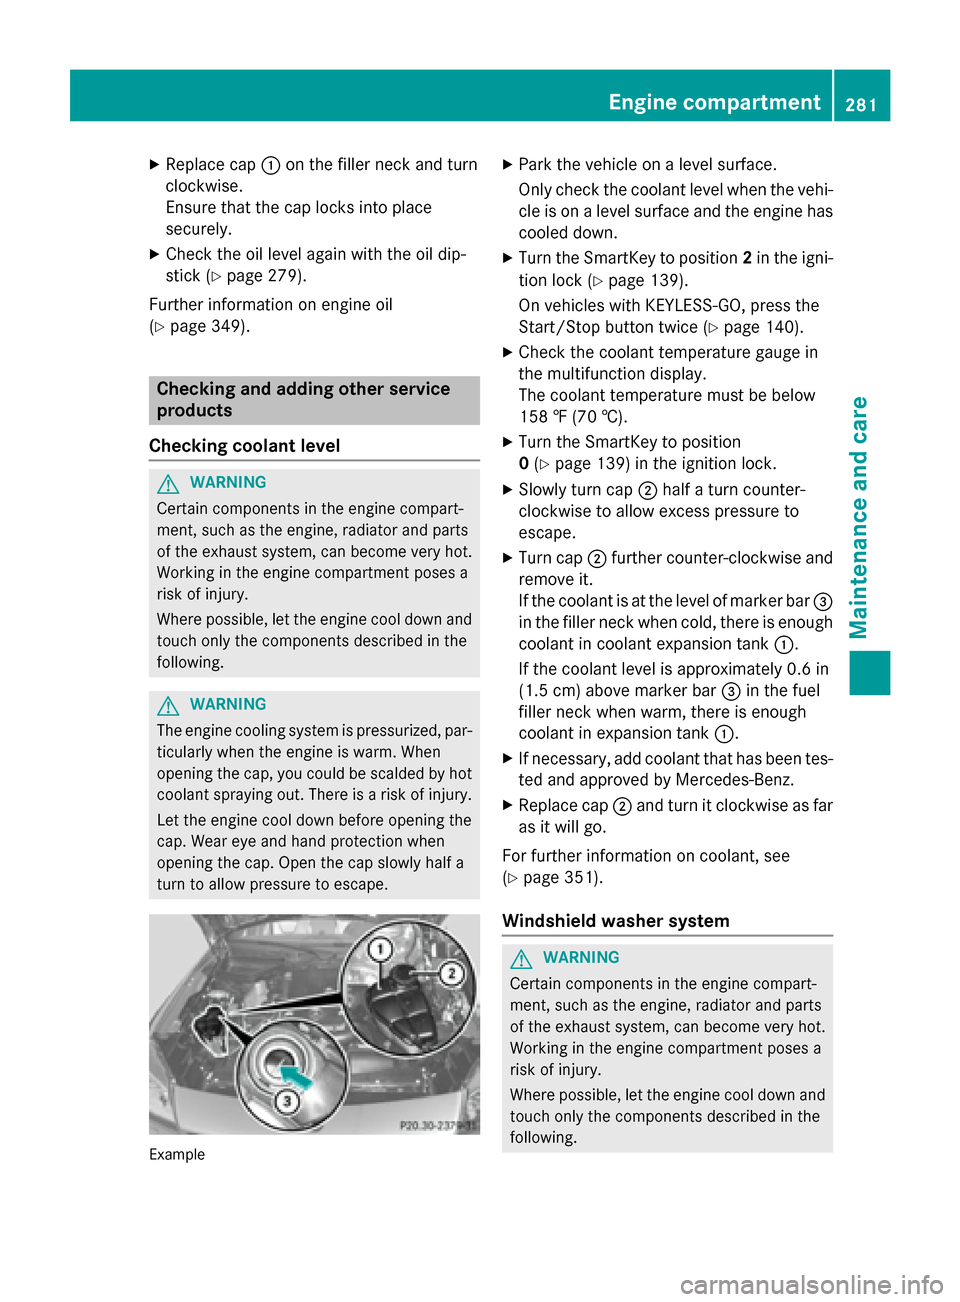
X Slowly turn cap 0044half a turn counter-
clockwise to allow excess pressure to
escape.
X Turn cap 0044further counter-clockwise and
remove it.
If the coolant is at the level of marker bar 0087
in the filler neck when cold, there is enough coolant in coolant expansion tank 0043.
If the coolant level is approximately 0.6 in
(1.5 cm) above marker bar 0087in the fuel
filler neck when warm, there is enough
coolant in expansion tank 0043.
X If necessary, add coolant that has been tes-
ted and approved by Mercedes-Benz.
X Replace cap 0044and turn it clockwise as far
as it will go.
For further information on coolant, see
(Y page 351).
Windshield washer system G
WARNING
Certain components in the engine compart-
ment, such as the engine, radiator and parts
of the exhaust system, can become very hot.
Working in the engine compartment poses a
risk of injury.
Where possible, let the engine cool down and touch only the components described in the
following. Engine compartment
281Maintenance and care Z
Page 291 of 358
X
Wipe the wooden trim and trim pieces with
a damp, lint-free cloth, e.g. a microfiber
cloth.
X Heavy soiling: use car care and cleaning
products recommended and approved by
Mercedes-Benz.
Cleaning the seat covers General notes
! Do not use microfiber cloths to clean gen-
uine leather, artificial leather or DINAMICA
covers. If used often, these can damage the cover.
i Note that regular care is essential to
ensure that the appearance and comfort of the covers is retained over time.
Genuine leather seat covers
! To retain the natural appearance of the
leather, observe the following cleaning
instructions:
R Clean genuine leather covers carefully
with a damp cloth and then wipe the cov- ers down with a dry cloth.
R Make sure that the leather does not
become soaked. It may otherwise
become rough and cracked.
R Only use leather care agents that have
been tested and approved by Mercedes-
Benz. You can obtain these from a quali- fied specialist workshop.
Leather is a natural product.
It exhibits natural surface characteristics, for
example:
R differences in the texture
R marks caused by growth and injury
R slight nuances of color
These are characteristics of leather and not
material defects. Seat covers of other materials
! Observe the following when cleaning:
R Clean artificial leather covers with a cloth
moistened with a solution containing 1% detergent (e.g. dish washing liquid).
R Clean cloth covers with a microfiber
cloth moistened with a solution contain-
ing 1% detergent (e.g. dish washing liq-
uid). Rub carefully and always wipe entire
seat sections to avoid leaving visible
lines. Leave the seat to dry afterwards.
Cleaning results depend on the type of
dirt and how long it has been there.
R Clean Alcantara® covers with a damp
cloth. Make sure that you wipe entire
seat sections to avoid leaving visible
lines.
Cleaning the seat belts G
WARNING
Seat belts can become severely weakened if
bleached or dyed. This could cause the seat
belts to tear or fail, for instance, in the event of an accident. This poses an increased risk of
injury or fatal injury.
Never bleach or dye the seat belts.
! Do not clean the seat belts using chemical
cleaning agents. Do not dry the seat belts
by heating at temperatures above 176 ‡
(80 †) or in direct sunlight.
X Use clean, lukewarm water and soap solu-
tion.
Cleaning the headliner and carpets X
Headliner: if it is very dirty, use a soft brush
or dry shampoo.
X Carpets: use the carpet and textile clean-
ing agents recommended and approved by
Mercedes-Benz. Care
289Maintenance and care Z
Page 352 of 358
Model Engine
model MB
Approval SLK 250
271 229.5
SLK 350
276 229.5
SLK 55 AMG
152 229.5
Use only SAE 0W-40 or SAE 5W-40 engine oils
for AMG vehicles.
i MB approval is indicated on the oil con-
tainers.
Filling capacities The following values refer to an oil change
including the oil filter. Model Capacity
SLK 250
5.8 US qt (5.5
l) SLK 350
6.9 US qt (6.5
l) SLK 55 AMG
With external oil
cooler: 10.0 US qt (9.5l) Ad
ditives !
Do not use any additives in the engine oil.
This could damage the engine.
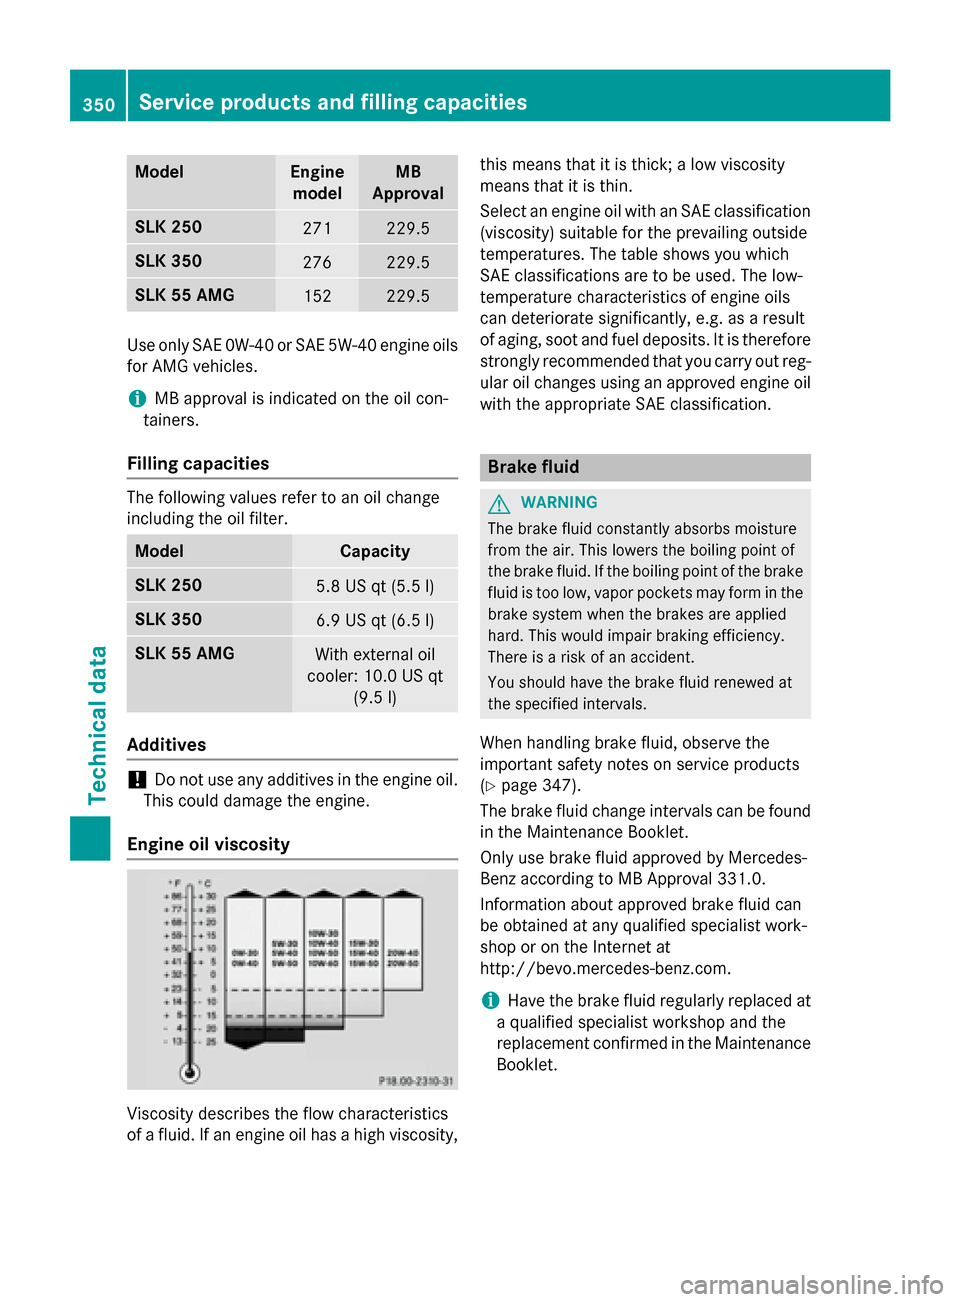
Engine oil viscosity Viscosity describes the flow characteristics
of a fluid. If an engine oil has a high viscosity, this means that it is thick; a low viscosity
means that it is thin.
Select an engine oil with an SAE classification (viscosity) suitable for the prevailing outside
temperatures. The table shows you which
SAE classifications are to be used. The low-
temperature characteristics of engine oils
can deteriorate significantly, e.g. as a result
of aging, soot and fuel deposits. It is therefore
strongly recommended that you carry out reg- ular oil changes using an approved engine oil
with the appropriate SAE classification. Brake fluid
G
WARNING
The brake fluid constantly absorbs moisture
from the air. This lowers the boiling point of
the brake fluid. If the boiling point of the brake fluid is too low, vapor pockets may form in the brake system when the brakes are applied
hard. This would impair braking efficiency.
There is a risk of an accident.
You should have the brake fluid renewed at
the specified intervals.
When handling brake fluid, observe the
important safety notes on service products
(Y page 347).
The brake fluid change intervals can be found
in the Maintenance Booklet.
Only use brake fluid approved by Mercedes-
Benz according to MB Approval 331.0.
Information about approved brake fluid can
be obtained at any qualified specialist work-
shop or on the Internet at
http://bevo.mercedes-benz.com.
i Have the brake fluid regularly replaced at
a qualified specialist workshop and the
replacement confirmed in the Maintenance Booklet. 350
Service products and filling capacitiesTechnical data