stop start MERCEDES-BENZ SLK-Class 2016 R172 User Guide
[x] Cancel search | Manufacturer: MERCEDES-BENZ, Model Year: 2016, Model line: SLK-Class, Model: MERCEDES-BENZ SLK-Class 2016 R172Pages: 358, PDF Size: 7.24 MB
Page 60 of 358
the child restraint system manufacturer's
installation instructions
Rbe sure to observe the instructions and
safety notes on the "Occupant Classifica-
tion System (OCS)" (
Ypage 49)
GWARNING
If you leave children unsupervised in the vehi-
cle, they could set it in motion by, for example:
Rrelease the parking brake.
Rshift the automatic transmission out of the
parking position P.
Rstart the engine.
In addition, they may operate vehicle equip-
ment and become trapped. There is a risk of
an accident and injury.
When leaving the vehicle, always take the
SmartKey with you and lock the vehicle. Never
leave children unsupervised in the vehicle.
GWARNING
If persons, particularly children are subjected to prolonged exposure to extreme heat or
cold, there is a risk of injury, possibly even
fatal. Never leave children unattended in the
vehicle.
GWARNING
If the child restraint system is subjected to
direct sunlight, parts may get very hot. Chil-
dren may burn themselves on these parts,
particularly on the metal parts of the child
restraint system. There is a risk of injury.
If you leave the vehicle, taking the child with
you, always ensure that the child restraint
system is not exposed to direct sunlight. Pro- tect it with a blanket, for example. If the child
restraint system has been exposed to direct
sunlight, let it cool down before securing the
child in it. Never leave children unattended in
the vehicle.
Always ensure that all vehicle occupants have
their seat belts fastened correctly and are sit- ting properly. Particular attention must be
paid to children. Observe the safety notes on the seat belt
(
Ypage 42) and the notes on correct use of
seat belts (
Ypage 43).
A booster seat may be necessary to achieve
proper seat belt positioning for children over
41 lbs (18 kg) until they reach a height where a three-point seat belt can be properly fas-
tened without a booster seat.
Special seat belt retractor
GWARNING
If the seat belt is released while driving, the
child restraint system will no longer be
secured properly. The special seat belt retrac- tor is disabled and the inertia real draws in a
portion of the seat belt. The seat belt cannot
be immediately refastened. There is an
increased risk of injury, possibly even fatal.
Stop the vehicle immediately, paying atten-
tion to road and traffic conditions. Reactivate
the special seat belt retractor and secure the
child restraint system properly.
The seat belt on the front passenger's side is
equipped with a special seat belt retractor.
When activated, the special seat belt retrac-
tor ensures that the seat belt cannot slacken
once the child seat is secured.
Installing a child restraint system:
XMake sure you observe the child restraint
system manufacturer's installation instruc-
tions.
XPull the seat belt smoothly out of the belt
loop.
XEngage seat belt tongue in belt buckle.
Activating the special seat belt retractor:
XPull the seat belt out fully and let the inertia
reel retract it again.
While the seat belt is retracting, you should
he ar a ra
tcheting sound. The special seat
belt retractor is enabled.
XPush the child restraint system down so
that the seat belt is tight and does not
loosen.
58Children in the vehicle
Safety
Page 65 of 358
If COLLISION PREVENTION ASSIST PLUS is
deactivated, theæsymbol appears in the
assistance graphics display.
Distance warning function
General information
iObserve the "Important safety notes" sec-
tion for driving safety systems (
Ypage 61).
The distance warning function can help you to
minimize the risk of a front-end collision with
a vehicle ahead or reduce the effects of such
a collision.
With the help of the radar sensor system, the distance warning function can detect obsta-
cles that are in the path of your vehicle for an
extended period of time.
If the distance warning function detects that
there is a risk of a collision, you will be warned
visually and acoustically.
Starting at a speed of approximately 4 mph
(7 km/h), the distance warning function
warns you if you rapidly approach a vehicle infront. An intermittent warning tone will then
sound, and the ·distance warning lamp
will light up in the instrument cluster.
Up to a speed of approximately 44 mph
(70 km/h), the distance warning function can
also react to stationary obstacles, such as
stopped or parked vehicles.
Important safety notes
GWARNING
The distance warning function does not react:
Rto people or animals
Rto oncoming vehicles
Rto crossing traffic
Rwhen cornering
Thus, the distance warning function cannot
provide a warning in all critical situations.
There is a risk of an accident.
Always pay careful attention to the traffic sit-
uation and be ready to brake.
GWARNING
The distance warning function cannot always
clearly identify objects and complex traffic
situations.
In such cases, the distance warning function
may:
Rgive an unnecessary warning
Rnot give a warning
There is a risk of an accident.
Always pay careful attention to the traffic sit-
uation and do not rely solely on the distance
warning function.
Detection of hazardous situations can be par-
ticularly impaired by:
Rthere is dirt on the sensors or anything else covering the sensors
Rthere is snow or heavy rain
Rthere is interference by other radar sources
Rthere are strong radar reflections, for
example in parking garages
Ra narrow vehicle traveling in front, e.g. a
motorbike
Ra vehicle traveling in front on a different line
Rnew vehicles or after a service on the COL-
LISION PREVENTION ASSIST PLUS system
Observe the important safety notes in the
"Breaking-in notes" section (
Ypage 138).
Following damage to the front end of the vehi-
cle, have the configuration and operation of
the radar sensor checked at a qualified spe-
cialist workshop. This also applies to colli-
sions at low speeds where there is no visible
damage to the front of the vehicle.
XBrake immediately in order to increase the distance from the vehicle in front.
or
XTake evasive action, provided it is safe to do
so.
Due to the nature of the system, particularly
complicated but non-critical driving condi-
tions may also cause the system to display a warning.
Driving safety systems63
Safety
Z
Page 66 of 358
Function
Starting at a speed of around 4 mph(7 km/h),
the distance warning function warns you if
you rapidly approach a vehicle in front. An
intermittent warning tone will then sound,
and the ·distance warning lamp will light
up in the instrument cluster.
XBrake immediately in order to increase the distance from the vehicle in front.
or
XTake evasive action, provided it is safe to do
so.
Due to the nature of the system, particularly
complicated but non-critical driving condi-
tions may also cause the system to display a warning.
With the help of the radar sensor system, the
distance warning function can detect obsta-
cles that are in the path of your vehicle for an
extended period of time.
Up to a speed of around 44 mph (70 km/h),
the distance warning function can also react
to stationary obstacles, such as stopped or
parked vehicles.
Autonomous braking function
If the driver does not react to the distance
warning signal in a critical situation, COLLI-
SION PREVENTION ASSIST PLUS can assist
with the autonomous braking function.
The autonomous braking function:
Rgives the driver more time to react to criti-
cal driving situations
Rcan help the driver to avoid an accident or
Rreduces the effects of an accident
If the autonomous braking function requires a
particularly high braking force, preventative
passenger protection measures (PRE-SAFE
®)
are activated simultaneously. Vehicles without DISTRONIC PLUS:
the
autonomous braking function is available in
the following speed ranges:
R4 - 65 mph (7 - 105 km/h) for moving
objects
R4 - 31 mph (7 - 50 km/h) for stationary
objects
Vehicles with DISTRONIC PLUS: the auton-
omous braking function is available in the fol- lowing speed ranges:
R4 - 124 mph (7 - 200 km/h) for moving
objects
R4 - 31 mph (7 - 50 km/h) for stationary
objects
Due to the nature of the system, complicated but non-critical driving conditions may also
cause the Autonomous Braking function to
intervene.
Adaptive Brake Assist
General information
iObserve the "Important safety notes" sec-
tion (
Ypage 61).
With the help of adaptive Brake Assist, the
distance warning signal can detect obstacles
that are in the path of your vehicle for an
extended period of time.
If adaptive Brake Assist detects a risk of col-
lision with the vehicle in front, it calculates
the braking force necessary to avoid a colli-
sion. If you apply the brakes forcefully, adap-
tive Brake Assist will automatically increase
the braking force to a level suitable for the
traffic conditions.
Adaptive Brake Assist provides braking assis-
tance in hazardous situations at speeds
above 4 mph (7 km/h). It uses radar sensor
technology to assess the traffic situation.
Up to a speed of approximately 155 mph
(250 km/h), Adaptive Brake Assist is capable
of reacting to moving objects that have
already been detected as such at least once
over the period of observation.
64Driving safet ysystem s
Safety
Page 68 of 358
pulling away on wet or slippery roads. ESP®
can also stabilize the vehicle during braking.
ETS (Electronic Traction System)
iObserve the "Important safety notes" sec-
tion (
Ypage 61).
ETS traction control is part of ESP
®.
ETS brakes the drive wheels individually if
they spin. This enables you to pull away and
accelerate on slippery surfaces, for example
if the road surface is slippery on one side. In
addition, more drive torque is transferred to
the wheel or wheels with traction.
ETS remains active when you deactivate
ESP
®.
iMercedes-AMG vehicles: your vehicle
may be equipped with 20-inch tires on the
rear axle. After changing to 19 inch wheels,
ETS may intervene noticeably earlier during
the first few kilometers. After approx-
imately 10 km ETS will function as usual
again. Information on the dimensions and
types of wheels and tires for your vehicle
can be found in the "Wheel/tire combina-
tions" section (
Ypage 335).
Important safety notes
GWARNING
If ESP
®is malfunctioning, ESP®is unable to
stabilize the vehicle. Additionally, further driv-
ing safety systems are deactivated. This
increases the risk of skidding and an accident.
Drive on carefully. Have ESP
®checked at a
qualified specialist workshop.
When towing the vehicle with the rear axle
raised, observe the notes on ESP®
(Ypage 303).
ESP
®is only deactivated if the åwarning
lamp is lit continuously.
If the ÷ warning lamp and the åwarn-
ing lamp are lit continuously, ESP
®not avail-
able due to a malfunction. Observe the information on warning lamps
(
Ypage 245) and display messages which
may be shown in the instrument cluster
(
Ypage 212).
iOnly use wheels with the recommended
tire sizes. Only then will ESP®function
properly.
Characteristics of ESP®
General information
If the ÷ ESP
®warning lamp goes out
before beginning the journey, ESP®is auto-
matically active.
If ESP
®intervenes, the ÷ESP®warning
lamp flashes in the instrument cluster.
If ESP
®intervenes:
XDo not deactivate ESP®under any circum-
stances.
XOnly depress the accelerator pedal as far as
necessary when pulling away.
XAdapt your driving style to suit the prevail-
ing road and weather conditions.
ECO start/stop function
The ECO start/stop function switches the
engine off automatically when the vehicle
stops moving. The engine starts automati-
cally when the driver wants to pull away again.
ESP
®remains in its previously selected sta-
tus. Example: if ESP®was deactivated before
the engine was switched off, ESP®remains
deactivated when the engine is switched on
again.
Deactivating/activating ESP®(except
Mercedes ‑AMG vehicles)
Important safety notes
iObserve the "Important safety notes" sec-
tion (
Ypage 61).
66Driving safety systems
Safety
Page 72 of 358
XTo arm:lock the vehicle with the SmartKey
or KEYLESS-GO.
Indicator lamp :flashes. The alarm sys-
tem is armed after approximately
15 seconds.
XTo deactivate: unlock the vehicle with the
SmartKey or KEYLESS-GO.
A visual and audible alarm is triggered if the
alarm system is armed and you open:
Ra door
Rthe vehicle with the mechanical key
Rthe trunk lid
Rthe hood
Rthe glove box
Rthe stowage space under the armrest
XTo turn the alarm off with the SmartKey:
press the %or& button on the
SmartKey.
The alarm is switched off.
or
XInsert the SmartKey into the ignition lock.
The alarm is switched off.
XTo stop the alarm using KEYLESS-GO:
grasp the outside door handle. The Smart-
Key must be outside the vehicle.
The alarm is switched off.
or
XPress the Start/Stop button on the dash-
board. The SmartKey must be inside the
vehicle.
The alarm is switched off.
The alarm is not switched off, even if you
close the open door that triggered it, for
example.
iIf the alarm continues for more than
30 seconds, the mbrace emergency call
system automatically notifies the Cus-
tomer Assistance Center. This is done
either by text message or data connection.
The emergency call sy stem s
ends the mes-
sage or data provided that:
Ryou have subscribed to the mbrace ser-
vice.
Rthe mbrace service has been activated
properly.
Rthe necessary mobile phone network is
available.
70Protection against theft
Safety
Page 76 of 358
Changing the settings of the locking
system
You can change the settings of the locking
system. This means only the driver's door, the
lockable stowage compartments in the vehi-
cle interior and the fuel filler flap are unlocked
when the vehicle is unlocked. This is useful if
you frequently travel on your own.
XTo change the setting: press and hold
down the %and& buttons simulta-
neously for about six seconds until the bat- tery indicator lamp flashes twice
(
Ypage 75).
iIf the setting of the locking system is
changed within the signal range of the vehi-
cle, pressing the &or% button:
Rlocks or
Runlocks the vehicle
The SmartKey now functions as follows:
XTo unlock: press the%button once.
XTo unlock centrally: press the%but-
ton twice.
XTo lock centrally: press the&button.
The KEYLESS-GO function is changed as fol-
lows:
XTo unlock the driver's door: touch the
inner surface of the door handle on the
driver's door.
XTo unlock centrally: touch the inner sur-
face of the front-passenger door handle.
XTo lock centrally: touch the outer sensor
surface on one of the door handles.
XTo restore the factory settings: press
and hold down the %and& buttons
simultaneously for appro ximat
ely six sec-
onds until the battery check lamp flashes
twice (
Ypage 75).
Mechanical key
General notes
If the vehicle can no longer be locked or
unlocked with the SmartKey, use the
mechanical key.
If you use the mechanical key to unlock and
open the driver's door or the trunk lid, the
anti-theft alarm system will be triggered
(
Ypage 69).
There are several ways to turn off the alarm:
XTo deactivate the alarm with the key:
press the %or& button on the key.
or
XInsert the SmartKey into the ignition lock.
or
XTo deactivate the alarm with KEYLESS-
GO: press the Start/Stop button in the igni-
tion lock. The SmartKey must be in the
vehicle.
or
XLock or unlock the vehicle using KEYLESS-
GO. The SmartKey must be outside the
vehicle.
If you unlock the vehicle using the mechanical
key, the fuel filler flap will not be unlocked
automatically.
XTo unlock the fuel filler flap: insert the
SmartKey into the ignition lock.
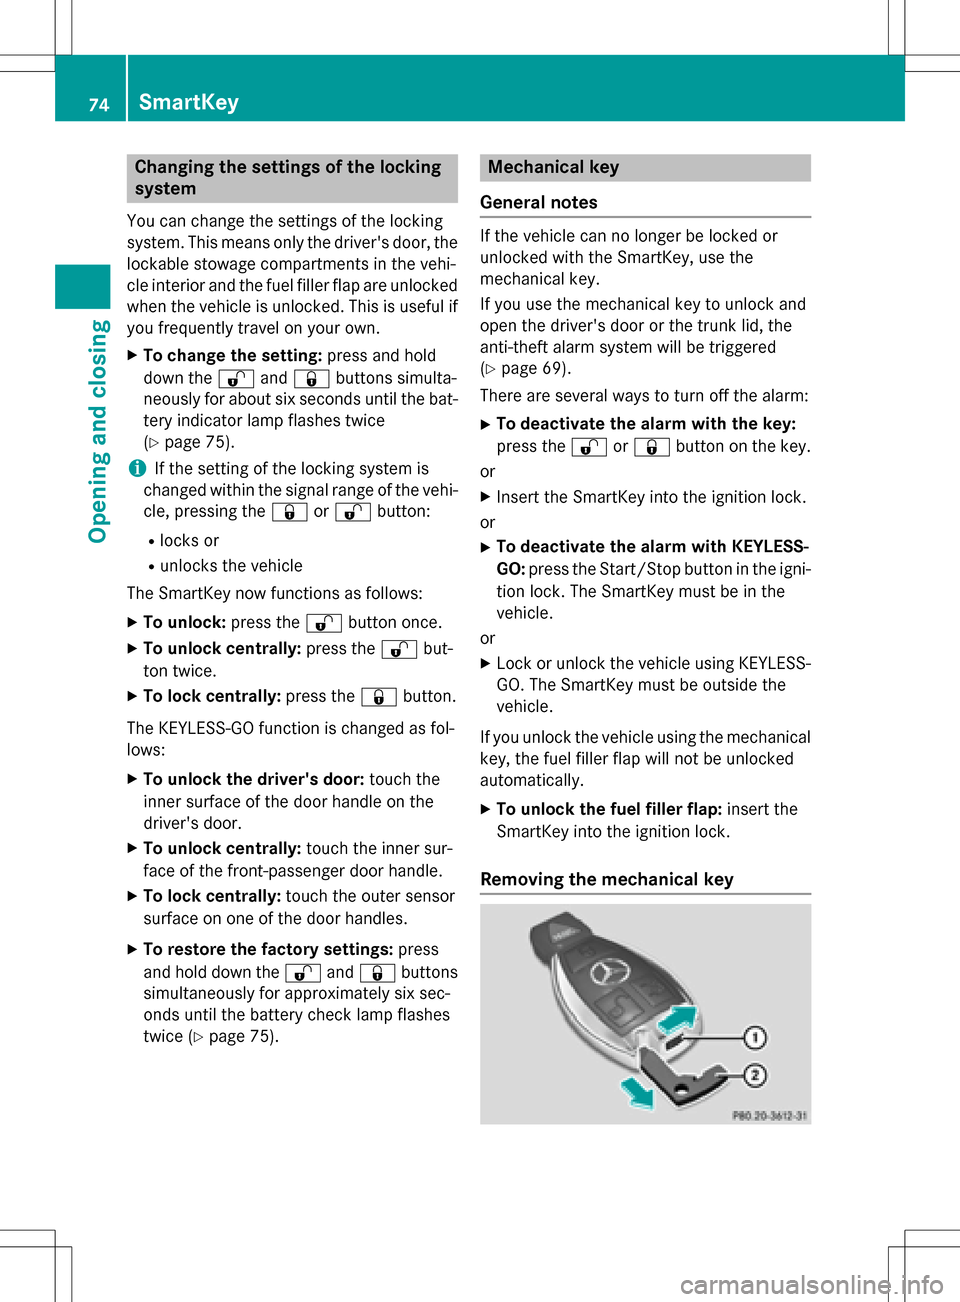
Removing the mechanical key
74SmartKey
Opening and closing
Page 104 of 358

occupants – particularly children – could
become trapped. There is a risk of injury.
While the EASY-ENTRY/EXIT feature is mak-
ing adjustments, make sure that no one has
any body parts in the sweep of the steering
wheel.
If somebody becomes trapped:
Rpress one of the memory function position
buttons, or
Rmove the switch for steering wheel adjust-
ment in the opposite direction to that in
which the steering wheel is moving.
The adjustment process is stopped.
GWARNING
When the EASY-ENTRY/EXIT feature adjusts
the steering wheel and the driver's seat, you
and other vehicle occupants – particularly
children – could become trapped. There is a
risk of injury.
While the EASY-ENTRY/EXIT feature is mak-
ing adjustments, make sure that no one has
any body parts in the sweep of the seat and
the steering wheel.
If somebody becomes trapped:
Rpress one of the memory function position
buttons, or
Rpress one of the memory function memory
buttons, or
Rmove the switch for steering wheel adjust-
ment in the opposite direction to that in
which the steering wheel is moving
The adjustment process is stopped.
GWARNING
If you use openings in the bodywork or
detachable parts as steps, you could:
Rslip and/or fall
Rdamage the vehicle and cause yourself to
fall.
There is a risk of injury.
Always use secure climbing aids, e.g. a suita-
ble ladder.
The EASY-ENTRY/EXIT feature makes getting
in and out of your vehicle easier.
You can activate and deactivate the EASY-
ENTRY/EXIT feature in the on-board com-
puter (
Ypage 206).
Position of the steering wheel when the
EASY-ENTRY/EXIT feature is active
The steering wheel swings upwards when
you:
Rremove the SmartKey from the ignition lock
Ropen the driver's door with KEYLESS-GO in position 1
Ropen the driver's door and the SmartKey is
in position 0or 1in the ignition lock
iThe steering wheel only moves upwards if
it has not already reached the upper end
stop.
Position of the steering wheel for driv-
ing
The steering wheel is moved to the last selec-
ted position when:
Rthe driver's door is closed
Ryou insert the SmartKey into the ignition
lock
or
Ryou press the Start/Stop button once on
vehicles with KEYLESS-GO
When you close the driver's door with the
ignition switched on, the steering wheel is
also automatically moved to the previously
set position.
The last position of the steering wheel is
stored when you switch off the ignition or
when you store the setting with the memory
function (
Ypage 106).
Crash-responsive EASY-EXIT feature
If the crash-responsive EASY-EXIT feature is
triggered in an accident, the steering column
will move upwards when the driver's door is
opened. This occurs irrespective of the posi-
102Steering wheel
Seats, steering wheel and mirrors
Page 122 of 358
Problems with the windshield wipers
ProblemPossible causes/consequences andMSolutions
The windshield wipers
are jammed.Leaves or snow, for example, may be obstructing the windshield
wiper movement. The wiper motor has been deactivated.
XFor safety reasons, you should remove the SmartKey from the
ignition lock.
or
XSwitch off the engine using the Start/Stop button and open the driver's door.
XRemove the cause of the obstruction.
XSwitch the windshield wipers back on.
The windshield wipers
fail completely.The windshield wiper drive is malfunctioning.
XSelect another wiper speed on the combination switch.
XHave the windshield wipers checked at a qualified specialist
workshop.
The windshield washer
fluid from the spray
nozzles no longer hits
the center of the wind-
shield.The spray nozzles are misaligned.
XHave the spray nozzles adjusted at a qualified specialist work-
shop.
120Windshield wipers
Lights and windshield wipers
Page 126 of 358
=Sets the air distribution (Ypage 130)
?Defrosts the windshield (Ypage 131)
ASwitches cooling with air dehumidification on/off (Ypage 127)
BSwitches air-recirculation mode on/off (Ypage 133)
CSets the airflow (Ypage 130)
DSwitches the rear window defroster on/off (Ypage 132)
Notes on using the air-conditioning
system
Air-conditioning system
Below, you can find a number of notes and
recommendations to help you use the air-
conditioning system optimally.
RSwitch on cooling with air dehumidification
using the ¿button. The indicator lamp
in the ¿button lights up.
RSet the temperature to 72 ‡ (22 †).
RRecommendation for air distribution in
winter: set theOand¯ settings.
Recommendation for air distribution in
summer: set thePsetting.
ROnly use the "Windshield defrosting" func-
tion briefly until the windshield is clear
again.
ROnly use air-recirculation mode briefly, e.g.
if there are unpleasant outside odors or
when in a tunnel. The windows could oth-
erwise fog up, since no fresh air is drawn
into the vehicle in air-recirculation mode.
ECO start/stop function
During automatic engine switch-off, the cli-
mate control system only operates at a
reduced capacity. If you require full climate
control capacity, the ECO start/stop function can be deactivated by pressing the ECO but-
ton (
Ypage 145).
124Overview of climate control systems
Climate control
Page 129 of 358
heat function can only be activated or deac-tivated with the ignition switched off.
ECO start/stop function
During automatic engine switch-off, the cli-
mate control only operates at a reduced capa-
city. If you require full climate control capa-
city, the ECO start/stop function can be
deactivated by pressing the ECO button
(
Ypage 145).
Operating the climate control sys-
tems
Activating/deactivating climate con-
trol
General notes
When the climate control is switched off, the
air supply and air circulation are also
switched off. The windows could fog up.
Therefore, switch off climate control only
briefly
iActivate climate control primarily using
the à button (
Ypage 129).
Air-conditioning system
XTurn the SmartKey to position 2in the igni-
tion lock (
Ypage 139).
XTo switch on: turn airflow control C
clockwise to the desired position (except
position 0) (
Ypage 123).
XTo switch off: turn airflow control C
counter-clockwise to position 0
(
Ypage 123).
Dual-zone automatic climate control
XTurn the SmartKey to position 2in the igni-
tion lock (
Ypage 139).
XTo switch on: press theÃbutton.
The indicator lamp in the Ãbutton lights
up. Airflow and air distribution are set to
automatic mode.
or
XPress the ^button.
The indicator lamp in the ^button goes
out. The previously selected settings are
restored.
XTo switch off: press the^button.
The indicator lamp in the ^button lights
up.
Switching cooling with air dehumidi-
fication on/off
General notes
If you deactivate the "Cooling with air-dehu-
midification" function, the air inside the vehi- cle will not be cooled. The air inside the vehi-
cle will also not be dehumidified. The win-
dows can fog up more quickly. Therefore,
deactivate the cooling with air-dehumidifica-
tion function only briefly.
The "Cooling with air dehumidification" func-
tion is only available when the engine is run-
ning. The air inside the vehicle is cooled and
dehumidified according to the temperature
selected.
Condensation may drip from the underside of
the vehicle when it is in cooling mode. This is
normal and not a sign that there is a malfunc-
tion.
Operating the climate control systems127
Climate control