clock MERCEDES-BENZ SLK-Class 2016 R172 Owner's Manual
[x] Cancel search | Manufacturer: MERCEDES-BENZ, Model Year: 2016, Model line: SLK-Class, Model: MERCEDES-BENZ SLK-Class 2016 R172Pages: 358, PDF Size: 7.24 MB
Page 82 of 358
You could therefore lock yourself out if:
Rthe vehicle is being pushed.
Rthe vehicle is being towed.
Rthe vehicle is on a roller dynamometer.
You can also switch the automatic locking
function on and off using the on-board com-
puter (
Ypage 206).
Unlocking the driver's door (mechan-
ical key)
If the vehicle can no longer be unlocked with
the SmartKey, use the mechanical key.
If you use the mechanical key to unlock and
open the driver's door, the anti-theft alarm
system will be triggered (
Ypage 69).
XTake the mechanical key out of the Smart-
Key (
Ypage 74).
XInsert the mechanical key into the lock of
the driver's door as far as it will go.
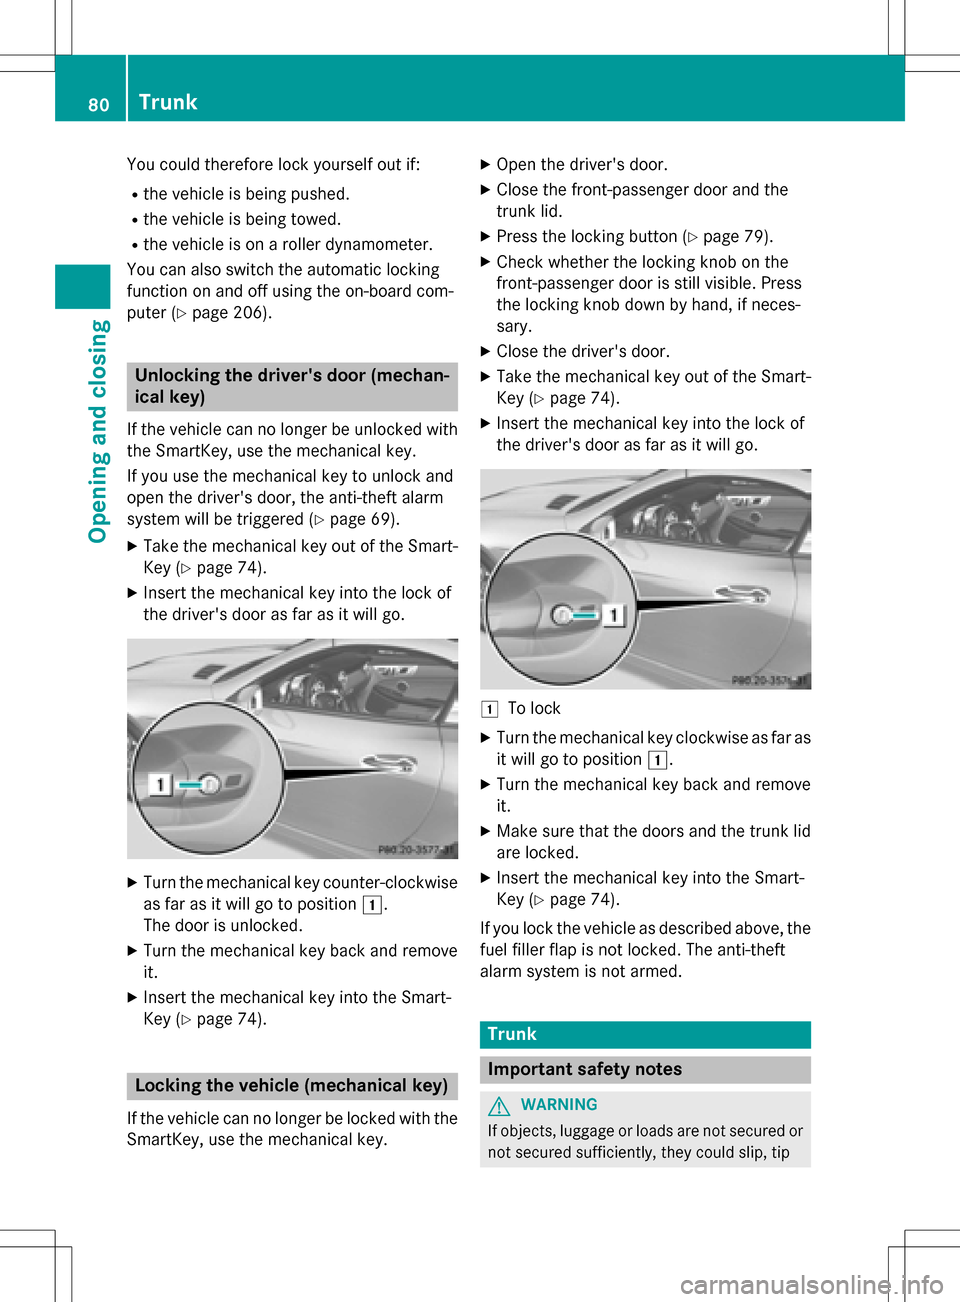
XTurn the mechanical key counter-clockwise
as far as it will go to position 1.
The door is unlocked.
XTurn the mechanical key back and remove
it.
XInsert the mechanical key into the Smart-
Key (
Ypage 74).
Locking the vehicle (mechanical key)
If the vehicle can no longer be locked with the
SmartKey, use the mechanical key.
XOpen the driver's door.
XClose the front-passenger door and the
trunk lid.
XPress the locking button (Ypage 79).
XCheck whether the locking knob on the
front-passenger door is still visible. Press
the locking knob down by hand, if neces-
sary.
XClose the driver's door.
XTake the mechanical key out of the Smart-
Key (
Ypage 74).
XInsert the mechanical key into the lock of
the driver's door as far as it will go.
1To lock
XTurn the mechanical key clockwise as far as
it will go to position 1.
XTurn the mechanical key back and remove
it.
XMake sure that the doors and the trunk lid
are locked.
XInsert the mechanical key into the Smart-
Key (
Ypage 74).
If you lock the vehicle as described above, the
fuel filler flap is not locked. The anti-theft
alarm system is not armed.
Trunk
Important safety notes
GWARNING
If objects, luggage or loads are not secured or
not secured sufficiently, they could slip, tip
80Trunk
Opening and closing
Page 84 of 358
Vehicles with the trunk lid remote closing fea-
ture: the trunk lid can be also be opened
automatically using the SmartKey.
XPress and hold theFbutton on the key
until the trunk lid opens.
Locking the trunk separately
You can lock the trunk separately. If you then
unlock the vehicle centrally, the trunk
remains locked and cannot be opened.
XClose the trunk lid.
XTake the mechanical key out of the Smart-
Key (
Ypage 74).
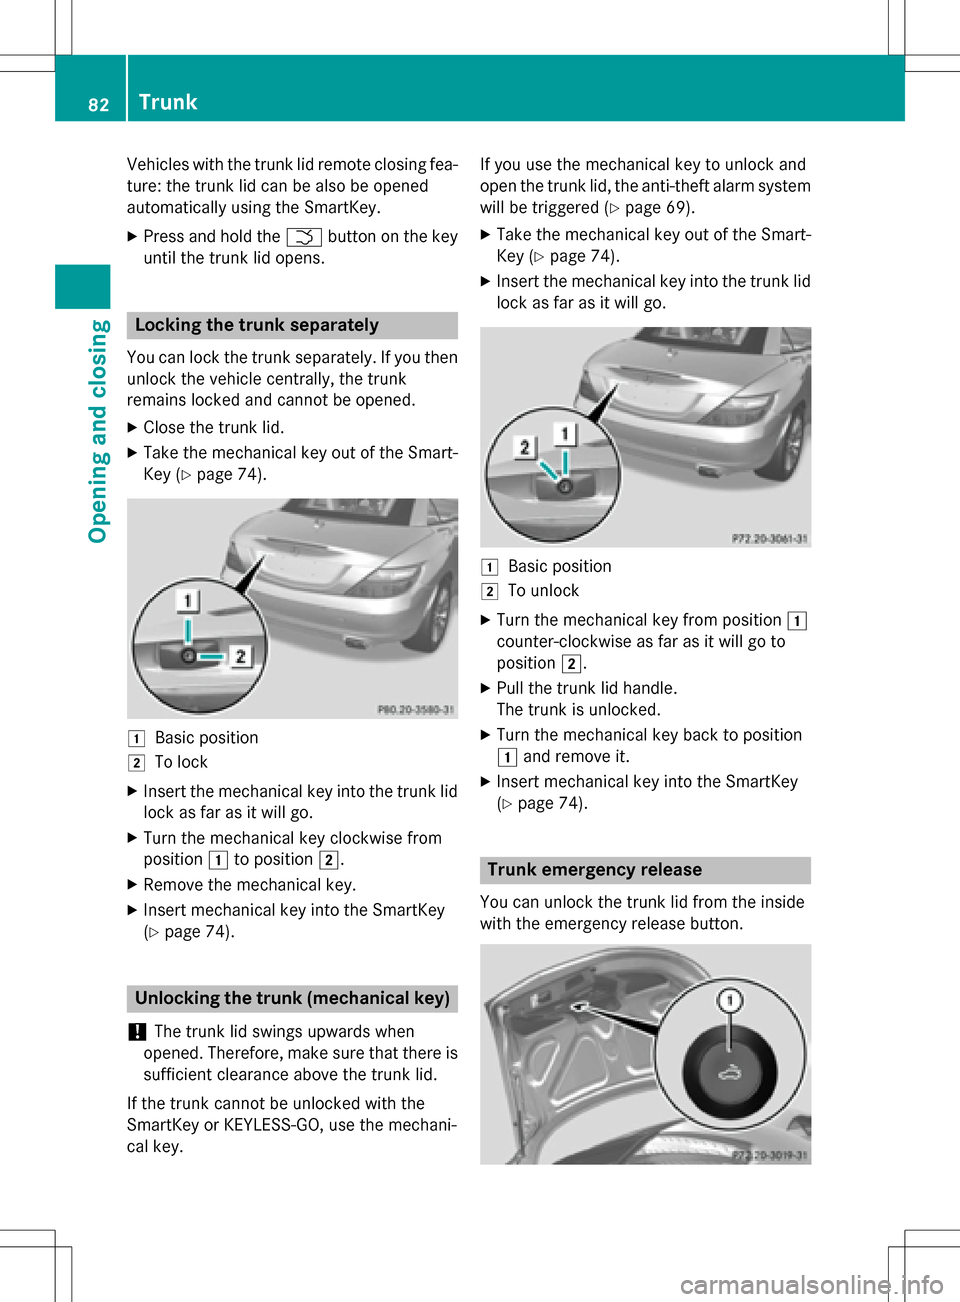
1Basic position
2To lock
XInsert the mechanical key into the trunk lid
lock as far as it will go.
XTurn the mechanical key clockwise from
position 1to position 2.
XRemove the mechanical key.
XInsert mechanical key into the SmartKey
(
Ypage 74).
Unlocking the trunk (mechanical key)
!
The trunk lid swings upwards when
opened. Therefore, make sure that there is
sufficient clearance above the trunk lid.
If the trunk cannot be unlocked with the
SmartKey or KEYLESS-GO, use the mechani-
cal key. If you use the mechanical key to unlock and
open the trunk lid, the anti-theft alarm system
will be triggered (
Ypage 69).
XTake the mechanical key out of the Smart-
Key (
Ypage 74).
XInsert the mechanical key into the trunk lid
lock as far as it will go.
1Basic position
2To unlock
XTurn the mechanical key from position 1
counter-clockwise as far as it will go to
position 2.
XPull the trunk lid handle.
The trunk is unlocked.
XTurn the mechanical key back to position
1and remove it.
XInsert mechanical key into the SmartKey
(
Ypage 74).
Trunk emergency release
You can unlock the trunk lid from the inside
with the emergency release button.
82Trunk
Opening and closing
Page 118 of 358
Low-beam headlamps (halogen head-
lamps)
XRemove the cover in the front wheel hous-
ing (
Ypage 115).
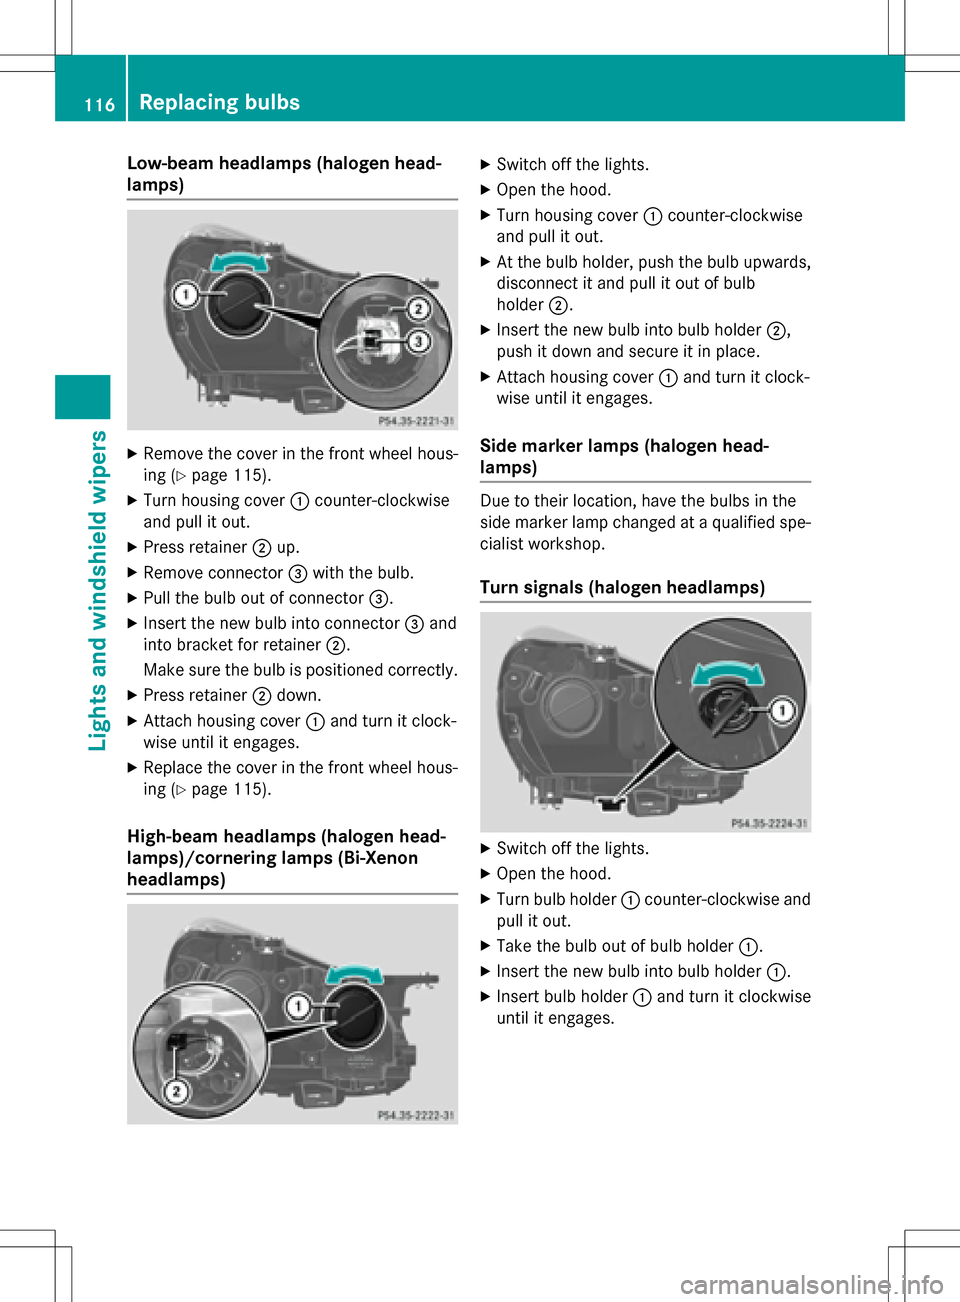
XTurn housing cover:counter-clockwise
and pull it out.
XPress retainer ;up.
XRemove connector =with the bulb.
XPull the bulb out of connector =.
XInsert the new bulb into connector =and
into bracket for retainer ;.
Make sure the bulb is positioned correctly.
XPress retainer ;down.
XAttach housing cover :and turn it clock-
wise until it engages.
XReplace the cover in the front wheel hous-
ing (
Ypage 115).
High-beam headlamps (halogen head-
lamps)/cornering lamps (Bi-Xenon
headlamps)
XSwitch off the lights.
XOpen the hood.
XTurn housing cover :counter-clockwise
and pull it out.
XAt the bulb holder, push the bulb upwards,
disconnect it and pull it out of bulb
holder ;.
XInsert the new bulb into bulb holder ;,
push it down and secure it in place.
XAttach housing cover :and turn it clock-
wise until it engages.
Side marker lamps (halogen head-
lamps)
Due to their location, have the bulbs in the
side marker lamp changed at a qualified spe-
cialist workshop.
Turn signals (halogen headlamps)
XSwitch off the lights.
XOpen the hood.
XTurn bulb holder :counter-clockwise and
pull it out.
XTake the bulb out of bulb holder :.
XInsert the new bulb into bulb holder :.
XInsert bulb holder:and turn it clockwise
until it engages.
116Replacing bulbs
Lights and windshield wipers
Page 129 of 358
heat function can only be activated or deac-tivated with the ignition switched off.
ECO start/stop function
During automatic engine switch-off, the cli-
mate control only operates at a reduced capa-
city. If you require full climate control capa-
city, the ECO start/stop function can be
deactivated by pressing the ECO button
(
Ypage 145).
Operating the climate control sys-
tems
Activating/deactivating climate con-
trol
General notes
When the climate control is switched off, the
air supply and air circulation are also
switched off. The windows could fog up.
Therefore, switch off climate control only
briefly
iActivate climate control primarily using
the à button (
Ypage 129).
Air-conditioning system
XTurn the SmartKey to position 2in the igni-
tion lock (
Ypage 139).
XTo switch on: turn airflow control C
clockwise to the desired position (except
position 0) (
Ypage 123).
XTo switch off: turn airflow control C
counter-clockwise to position 0
(
Ypage 123).
Dual-zone automatic climate control
XTurn the SmartKey to position 2in the igni-
tion lock (
Ypage 139).
XTo switch on: press theÃbutton.
The indicator lamp in the Ãbutton lights
up. Airflow and air distribution are set to
automatic mode.
or
XPress the ^button.
The indicator lamp in the ^button goes
out. The previously selected settings are
restored.
XTo switch off: press the^button.
The indicator lamp in the ^button lights
up.
Switching cooling with air dehumidi-
fication on/off
General notes
If you deactivate the "Cooling with air-dehu-
midification" function, the air inside the vehi- cle will not be cooled. The air inside the vehi-
cle will also not be dehumidified. The win-
dows can fog up more quickly. Therefore,
deactivate the cooling with air-dehumidifica-
tion function only briefly.
The "Cooling with air dehumidification" func-
tion is only available when the engine is run-
ning. The air inside the vehicle is cooled and
dehumidified according to the temperature
selected.
Condensation may drip from the underside of
the vehicle when it is in cooling mode. This is
normal and not a sign that there is a malfunc-
tion.
Operating the climate control systems127
Climate control
Page 131 of 358
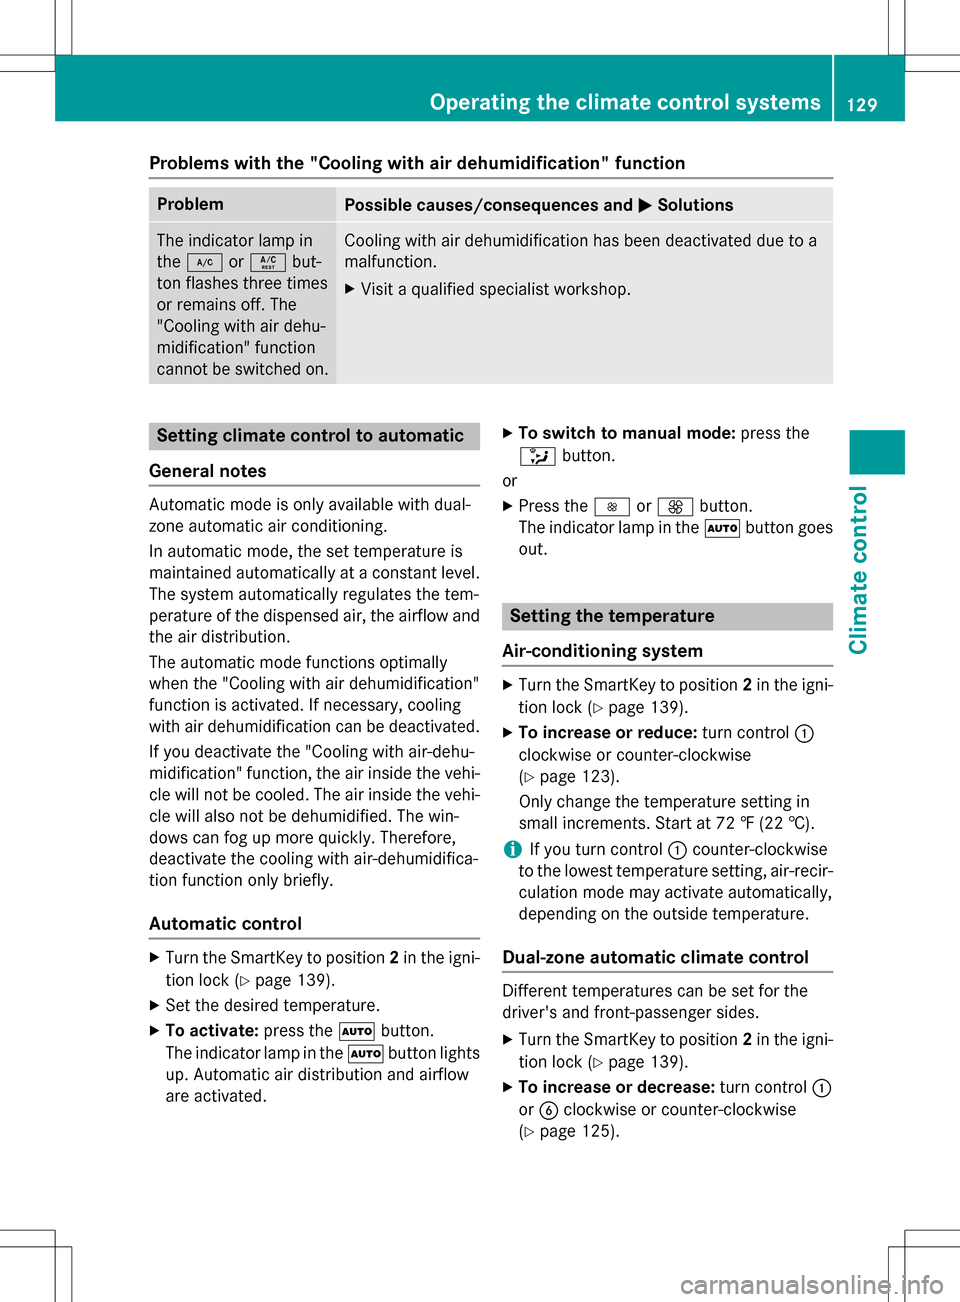
Problems with the "Cooling with air dehumidification" function
ProblemPossible causes/consequences andMSolutions
The indicator lamp in
the¿ orÁ but-
ton flashes three times
or remains off. The
"Cooling with air dehu-
midification" function
cannot be switched on.Cooling with air dehumidification has been deactivated due to a
malfunction.
XVisit a qualified specialist workshop.
Setting climate control to automatic
General notes
Automatic mode is only available with dual-
zone automatic air conditioning.
In automatic mode, the set temperature is
maintained automatically at a constant level.
The system automatically regulates the tem-
perature of the dispensed air, the airflow and
the air distribution.
The automatic mode functions optimally
when the "Cooling with air dehumidification"
function is activated. If necessary, cooling
with air dehumidification can be deactivated.
If you deactivate the "Cooling with air-dehu-
midification" function, the air inside the vehi-
cle will not be cooled. The air inside the vehi-
cle will also not be dehumidified. The win-
dows can fog up more quickly. Therefore,
deactivate the cooling with air-dehumidifica-
tion function only briefly.
Automatic control
XTurn the SmartKey to position 2in the igni-
tion lock (
Ypage 139).
XSet the desired temperature.
XTo activate: press theÃbutton.
The indicator lamp in the Ãbutton lights
up. Automatic air distribution and airflow
are activated.
XTo switch to manual mode: press the
_ button.
or
XPress the IorK button.
The indicator lamp in the Ãbutton goes
out.
Setting the temperature
Air-conditioning system
XTurn the SmartKey to position 2in the igni-
tion lock (
Ypage 139).
XTo increase or reduce: turn control:
clockwise or counter-clockwise
(
Ypage 123).
Only change the temperature setting in
small increments. Start at 72 ‡ (22 †).
iIf you turn control :counter-clockwise
to the lowest temperature setting, air-recir-
culation mode may activate automatically,
depending on the outside temperature.
Dual-zone automatic climate control
Different temperatures can be set for the
driver's and front-passenger sides.
XTurn the SmartKey to position 2in the igni-
tion lock (
Ypage 139).
XTo increase or decrease: turn control:
or B clockwise or counter-clockwise
(
Ypage 125).
Operating the climate control systems129
Climate control
Page 132 of 358
Only change the temperature setting in
small increments. Start at 72 ‡ (22 †).
iIf you turn controls:and Bcounter-
clockwise to the lowest temperature set-
ting, air-recirculation mode may activate
automatically, depending on the outside
temperature.
Setting the air distribution
Air-conditioning system
XTurn the SmartKey to position 2in the igni-
tion lock (
Ypage 139).
XPress one or more of the P,O,¯
buttons.
The corresponding indicator lamp lights up
briefly.
The following air distribution settings can be
selected:
¯ Directs air through the defroster vents
O Directs air through the footwell air
vents
P Directs air through the center and side
air vents
iYou can also activate several air distribu-
tion settings simultaneously. To do this,
press multiple air distribution buttons. The
air is then directed through various vents.
Dual-zone automatic climate control
XTurn the SmartKey to position 2in the igni-
tion lock (
Ypage 139).
XPress the _button repeatedly until the
desired symbol appears in the display.
The following air distribution settings can be
selected:
P Directs air through the center and side
air vents
O Directs air through the footwell air
vents
S Directs air through the center, side and
footwell vents ¯
Directs air through the defroster vents
b Directs the airflow through the
defroster, center and side air vents
(Canada only)
a Directs air through the defroster and
footwell vents
_ Directs the airflow through the
defroster vents, the center and side air
vents as well as the footwell air vents
(Canada only)
iRegardless of the air distribution setting,
airflow is always directed through the side
air vents. You can only close the side air
vents, by fully closing the adjuster on the
side air vents (
Ypage 135).
Setting the airflow
Air-conditioning system
XTurn the SmartKey to position 2in the igni-
tion lock (
Ypage 139).
XTo increase or reduce: turn controlC
clockwise or counter-clockwise
(
Ypage 123).
Dual-zone automatic climate control
XTurn the SmartKey to position 2in the igni-
tion lock (
Ypage 139).
XTo increase or reduce: press theKor
I button.
Switching the ZONE function on/off
This function is only available with dual-zone
automatic climate control on vehicles for
Canada.
XTo switch on: press theábutton.
The indicator lamp in the ábutton lights
up. The temperature setting for the driver's
130Operating the climate control systems
Climate control
Page 136 of 358
Activatingordeactivating
XTurn th eSmartKey to position 0in th eigni-
tion loc kor remove it (
Ypage 139).
XTo activate:press th eÌ orÁ but-
ton.
The indicator lamp in th eÌ orÁ
butto nlights up.
iThe blowe rwill run at alow spee dregard-
less of th eairflow setting .
iIf you activateth eresidual heat function
at high temperatures ,only th eventilation
will be activated. The blowe rrun sat
medium speed.
XTo deacti vate:press th eÌ orÁ
button.
The indicator lamp in th eÌ orÁ
butto ngoes out .
Residual heat is deactivated automatically:
Rafter approximately 30 minute s
Rwhen theignition is switched on
Rif th ebattery voltag edrops
Setting the air vents
Import ant safety notes
GWARNIN G
Ver yhot or ver ycold air can flo wfrom th eair
vents .This could result in burn sor frostbit ein
th eimmediat evicinity of th eair vents .There
is aris kof injury.
Mak esur ethat all vehicl eoccupant salways
maintai n asufficien tdistanc eto th eair out -
lets. If necessary, redirect th eairflow to
another area of th evehicl einterior.
GWARNIN G
When AIRSCARF is switched on ,ver yhot air
can flo wfrom th events in th ehead restraints .
This could result in burn sin th eimmediat e
vicinity of th eair vents .There is aris kof injury.
Reduc eth eheater output before it become s
to ohot .
In order to en surethedirect flo wof fresh air
throug hth eair vents int oth evehicl einterior,
pleas eobserv eth efollowin gnote s:
Rkeep th eair inlet grille on th ehoo dand in
th eengin ecompartmen ton th efront-
passenger side free of blockages, suchas
ice ,snow or leaves.
Rnever cover th eair vents or air intake grilles
in th evehicl einterior.
iYou can mov eth eadjusters for th eair
vents verticall yor horizontally to setthe
direction of th eairflow.
iFo roptimal climat econtrol in th evehicle,
open th eair vents completely and set th e
adj usters to th ecentral position .
Setting the center air vents
XTo open thecenter air vents: turnth e
adj uster in on eof center air vents :coun-
ter-clockwise.
XTo close th ecenter air vents: turnth e
adjuster in on eof center air vents :clock -
wise until it engages.
134Setting the air vents
Climate control
Page 161 of 358
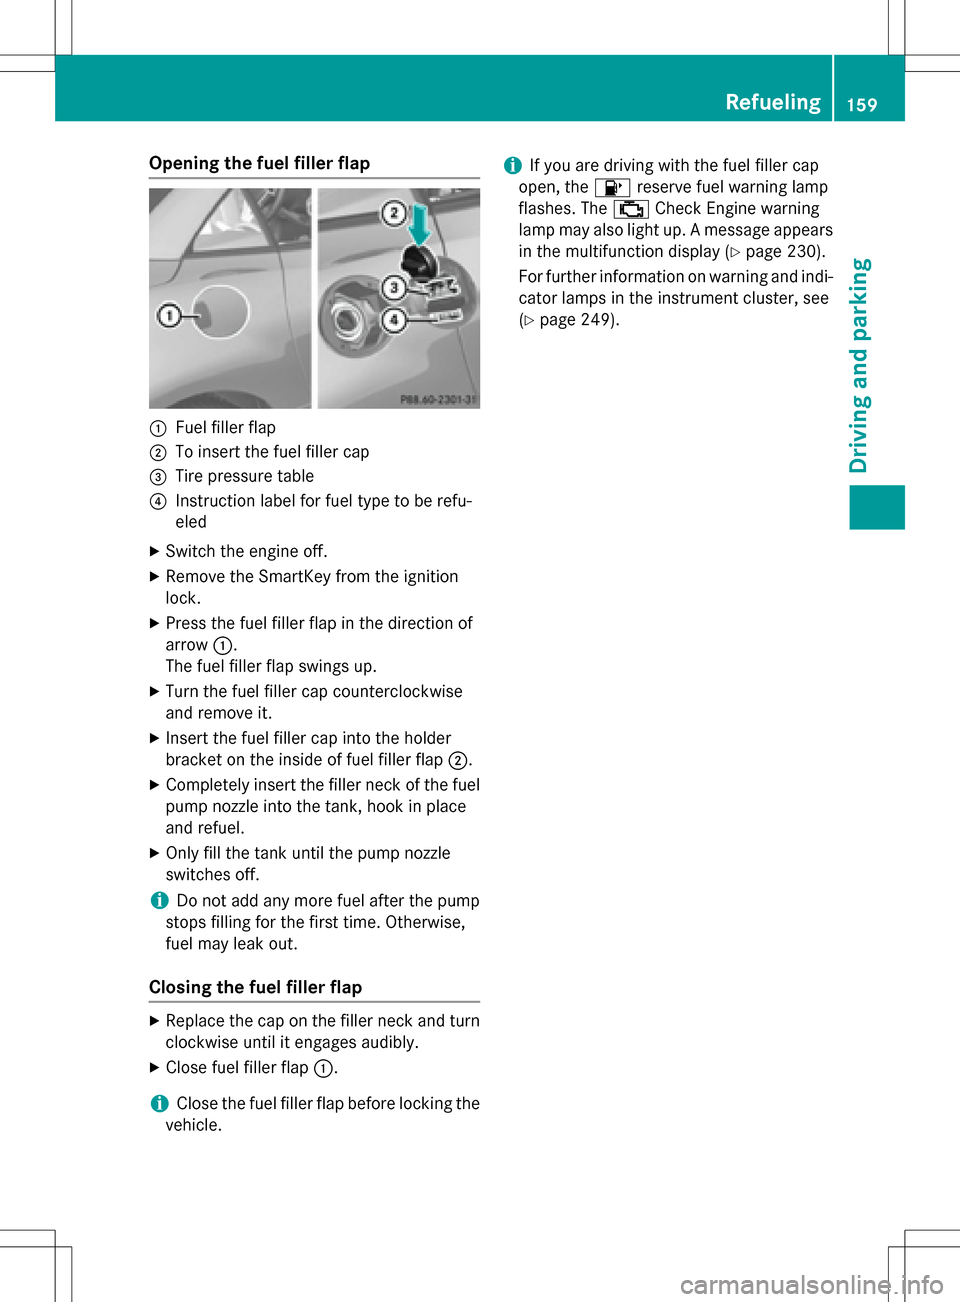
Opening the fuel filler flap
:Fuel filler flap
;To insert the fuel filler cap
=Tire pressure table
?Instruction label for fuel type to be refu-
eled
XSwitch the engine off.
XRemove the SmartKey from the ignition
lock.
XPress the fuel filler flap in the direction of
arrow:.
The fuel filler flap swings up.
XTurn the fuel filler cap counterclockwise
and remove it.
XInsert the fuel filler cap into the holder
bracket on the inside of fuel filler flap ;.
XCompletely insert the filler neck of the fuel
pump nozzle into the tank, hook in place
and refuel.
XOnly fill the tank until the pump nozzle
switches off.
iDo not add any more fuel after the pump
stops filling for the first time. Otherwise,
fuel may leak out.
Closing the fuel filler flap
XReplace the cap on the filler neck and turn
clockwise until it engages audibly.
XClose fuel filler flap :.
iClose the fuel filler flap before locking the
vehicle.
iIf you are driving with the fuel filler cap
open, the 8reserve fuel warning lamp
flashes. The ;Check Engine warning
lamp may also light up. A message appears
in the multifunction display (
Ypage 230).
For further information on warning and indi- cator lamps in the instrument cluster, see
(
Ypage 249).
Refueling159
Driving and parking
Z
Page 196 of 358
Useful information
i
This Operator's Manual describes all
models and all standard and optional equip-
ment of your vehicle available at the time of
publication of the Operator's Manual.
Country-specific differences are possible.
Please note that your vehicle may not be
equipped with all features described. This
also applies to safety-related systems and
functions.
iRead the information on qualified special-
ist workshops (
Ypage 25).
Important safety notes
GWARNING
If you operate information systems and com-
munication equipment integrated in the vehi-
cle while driving, you will be distracted from
traffic conditions. You could also lose control
of the vehicle. There is a risk of an accident.
Only operate the equipment when the traffic
situation permits. If you are not sure that this
is possible, park the vehicle paying attention
to traffic conditions and operate the equip-
ment when the vehicle is stationary.
You must observe the legal requirements for
the country in which you are currently driving
when operating the on-board computer.
GWARNING
If the instrument cluster has failed or mal-
functioned, you may not recognize function
restrictions in systems relevant to safety. The
operating safety of your vehicle may be
impaired. There is a risk of an accident.
Drive on carefully. Have the vehicle checked
at a qualified specialist workshop immedi-
ately.
The on-board computer only shows messages
or warnings from certain systems in the mul-
tifunction display. You should therefore make sure your vehicle is operating safely at all
times.
If the operating safety of your vehicle is
impaired, pull over as soon as it is safe to do
so. Contact a qualified specialist workshop.
For an overview, see the instrument panel
illustration (
Ypage 31).
Displays and operation
Instrument cluster lighting
The lighting in the instrument cluster, in the
displays and the controls in the vehicle inte-
rior can be adjusted using the brightness con-
trol knob.
The brightness control knob is located on the bottom left of the instrument cluster
(
Ypage 31).
XTurn the brightness control knob clockwise
or counter-clockwise.
If you turn the light switch to Ã,Tor
L, the brightness is dependent upon
the brightness of the ambient light.
iThe light sensor in the instrument cluster
automatically controls the brightness of
the multifunction display.
In daylight, the displays in the instrument
cluster are not illuminated.
Speedometer with segments
The speedometer is divided into segments
only on vehicles with DISTRONIC PLUS.
The segments in the speedometer indicate
which speed range is available.
RDISTRONIC PLUS activated (Ypage 170):
One or two segments in the set speed
range light up.
RDISTRONIC PLUS detects a vehicle in front
that is driving at a slower speed than the
stored speed:
194Displays and operation
On-board computer and displays
Page 280 of 358
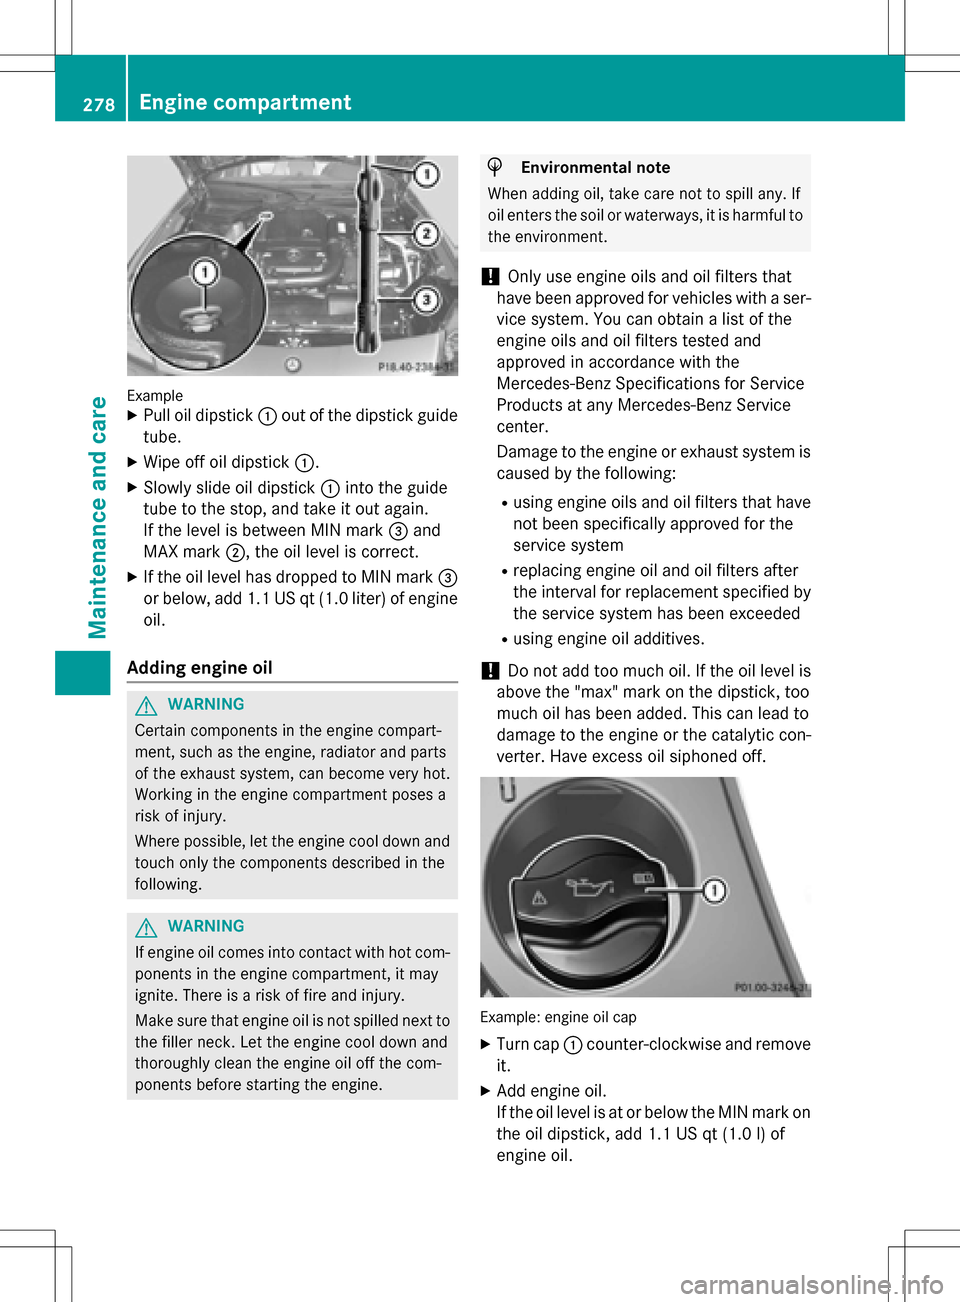
ExampleXPull oil dipstick:out of the dipstick guide
tube.
XWipe off oil dipstick :.
XSlowly slide oil dipstick :into the guide
tube to the stop, and take it out again.
If the level is between MIN mark =and
MAX mark ;, the oil level is correct.
XIf the oil level has dropped to MIN mark =
or below, add 1.1 US qt (1.0 liter) of engine
oil.
Adding engine oil
GWARNING
Certain components in the engine compart-
ment, such as the engine, radiator and parts
of the exhaust system, can become very hot.
Working in the engine compartment poses a
risk of injury.
Where possible, let the engine cool down and touch only the components described in the
following.
GWARNING
If engine oil comes into contact with hot com- ponents in the engine compartment, it may
ignite. There is a risk of fire and injury.
Make sure that engine oil is not spilled next to
the filler neck. Let the engine cool down and
thoroughly clean the engine oil off the com-
ponents before starting the engine.
HEnvironmental note
When adding oil, take care not to spill any. If
oil enters the soil or waterways, it is harmful to
the environment.
!Only use engine oils and oil filters that
have been approved for vehicles with a ser-
vice system. You can obtain a list of the
engine oils and oil filters tested and
approved in accordance with the
Mercedes-Benz Specifications for Service
Products at any Mercedes-Benz Service
center.
Damage to the engine or exhaust system is
caused by the following:
Rusing engine oils and oil filters that have
not been specifically approved for the
service system
Rreplacing engine oil and oil filters after
the interval for replacement specified by the service system has been exceeded
Rusing engine oil additives.
!Do not add too much oil. If the oil level is
above the "max" mark on the dipstick, too
much oil has been added. This can lead to
damage to the engine or the catalytic con-
verter. Have excess oil siphoned off.
Example: engine oil cap
XTurn cap :counter-clockwise and remove
it.
XAdd engine oil.
If the oil level is at or below the MIN mark on
the oil dipstick, add 1.1 US qt (1.0 l)of
engine oil.
278Engine compartment
Maintenance and care