MERCEDES-BENZ SLK-CLASS ROADSTER 2016 Owners Manual
Manufacturer: MERCEDES-BENZ, Model Year: 2016, Model line: SLK-CLASS ROADSTER, Model: MERCEDES-BENZ SLK-CLASS ROADSTER 2016Pages: 358, PDF Size: 7.24 MB
Page 341 of 358
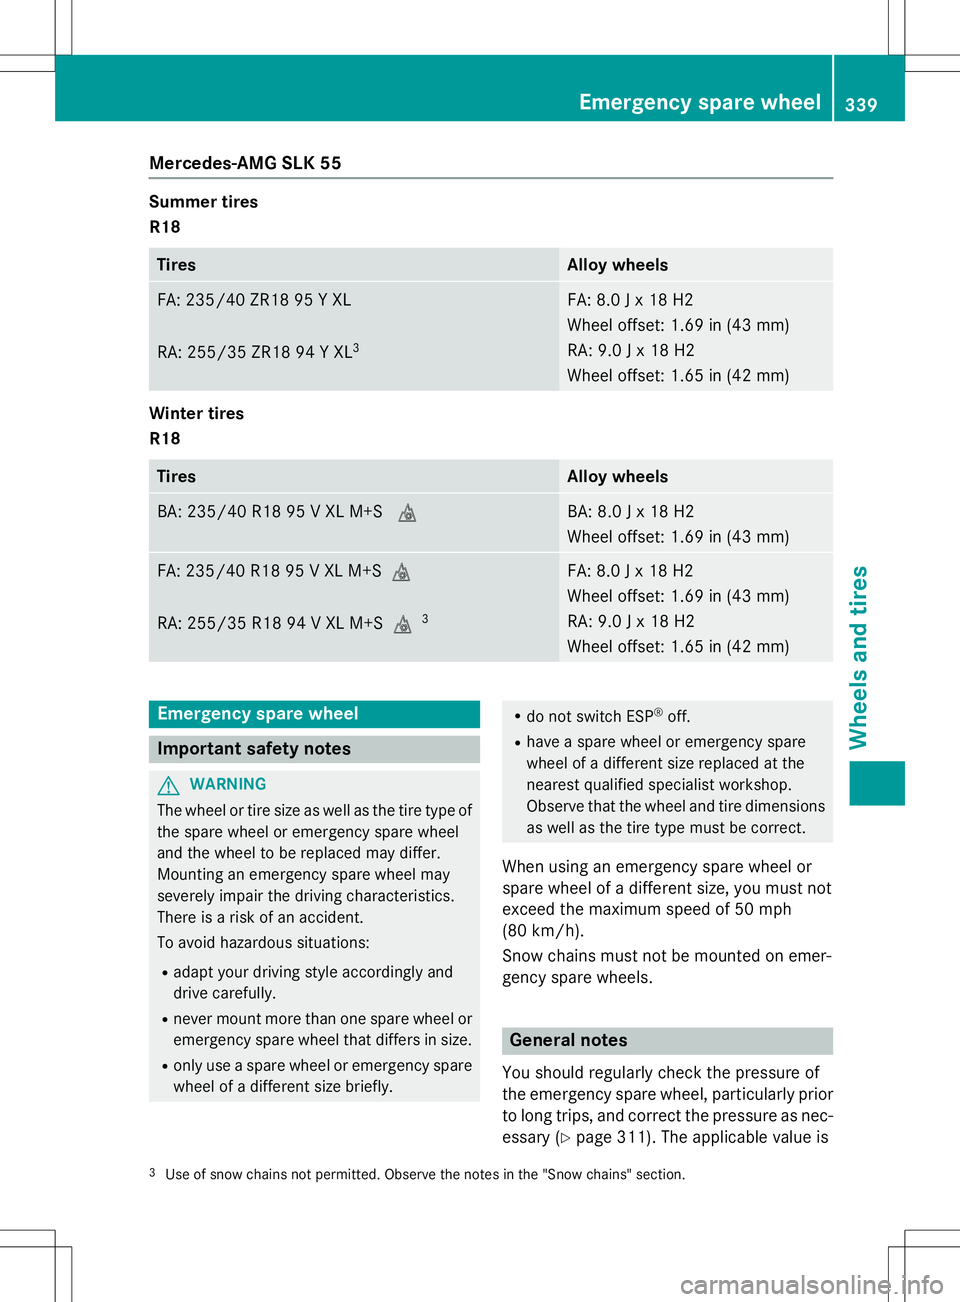
Mercedes-AMG SLK 55
Summer tires
R18
TiresAlloy wheels
FA: 235/40 ZR18 95 Y XL
RA: 255/35 ZR18 94 Y XL
3
FA: 8.0 J x 18 H2
Wheel offset: 1.69 in (43 mm)
RA: 9.0 J x 18 H2
Wheel offset: 1.65 in (42 mm)
Winter tires
R18
TiresAlloy wheels
BA: 235/40 R18 95 V XL M+SiBA: 8.0 J x 18 H2
Wheel offset: 1.69 in (43 mm)
FA: 235/40 R18 95 V XL M+Si
RA: 255/35 R18 94 V XL M+Si
3
FA: 8.0 J x 18 H2
Wheel offset: 1.69 in (43 mm)
RA: 9.0 J x 18 H2
Wheel offset: 1.65 in (42 mm)
Emergency spare wheel
Important safety notes
GWARNING
The wheel or tire size as well as the tire type of the spare wheel or emergency spare wheel
and the wheel to be replaced may differ.
Mounting an emergency spare wheel may
severely impair the driving characteristics.
There is a risk of an accident.
To avoid hazardous situations:
Radapt your driving style accordingly and
drive carefully.
Rnever mount more than one spare wheel or
emergency spare wheel that differs in size.
Ronly use a spare wheel or emergency spare
wheel of a different size briefly.
Rdo not switch ESP®off.
Rhave a spare wheel or emergency spare
wheel of a different size replaced at the
nearest qualified specialist workshop.
Observe that the wheel and tire dimensions
as well as the tire type must be correct.
When using an emergency spare wheel or
spare wheel of a different size, you must not
exceed the maximum speed of 50 mph
(80 km/h).
Snow chains must not be mounted on emer-
gency spare wheels.
General notes
You should regularly check the pressure of
the emergency spare wheel, particularly prior
to long trips, and correct the pressure as nec-
essary (
Ypage 311). The applicable value is
3Use of snow chains not permitted. Observe the notes in the "Snow chains" section.
Emergency spare wheel339
Wheels and tires
Z
Page 342 of 358
found on the wheel or under "Technical data"
(
Ypage 342).
An emergency spare wheel may also be
mounted against the direction of rotation.
Observe the time restriction on use as well as
the speed limitation specified on the emer-
gency spare wheel.
Replace the tires after six years at the latest,
regardless of wear. This also applies to the
emergency spare wheel.
iWhen you are driving with the collapsible
spare wheel mounted, the tire pressure
loss warning system or the tire pressure
monitor cannot function reliably. Only
restart the tire pressure loss warning sys-
tem or tire pressure monitor when the
defective wheel has been replaced with a
new wheel.
Vehicles with tire pressure monitor:
after mounting an emergency spare wheel,
the system may still display the tire pres-
sure of the removed wheel for a few
minutes. The value displayed for the moun-
ted emergency spare wheel is not the same
as the current tire pressure of the emer-
gency spare wheel.
Removing the emergency spare wheel
(Example)
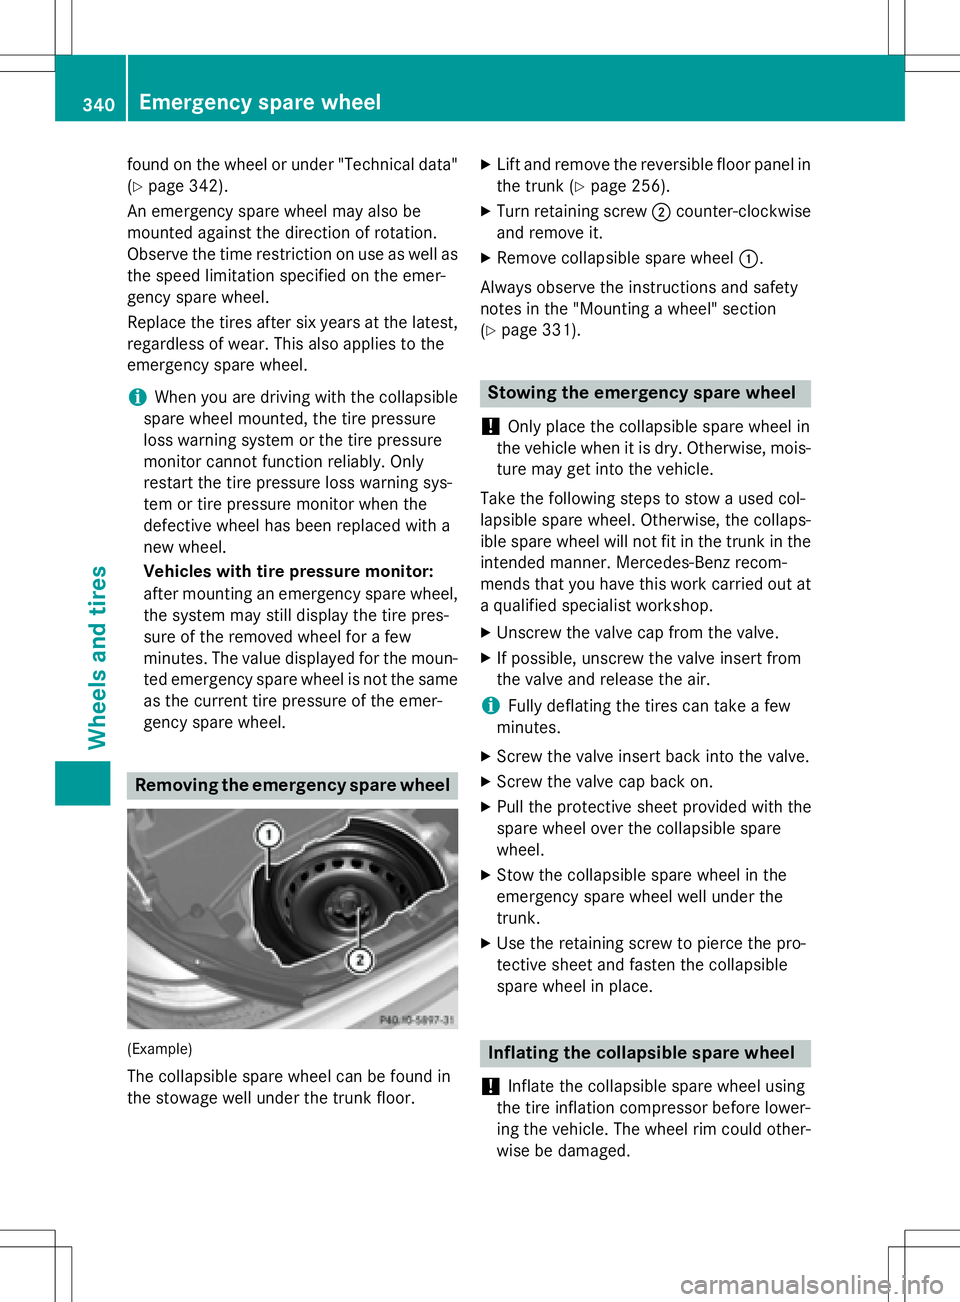
The collapsible spare wheel can be found in
the stowage well under the trunk floor.
XLift and remove the reversible floor panel in
the trunk (
Ypage 256).
XTurn retaining screw ;counter-clockwise
and remove it.
XRemove collapsible spare wheel :.
Always observe the instructions and safety
notes in the "Mounting a wheel" section
(
Ypage 331).
Stowing the emergency spare wheel
!
Only place the collapsible spare wheel in
the vehicle when it is dry. Otherwise, mois-
ture may get into the vehicle.
Take the following steps to stow a used col-
lapsible spare wheel. Otherwise, the collaps-
ible spare wheel will not fit in the trunk in the
intended manner. Mercedes-Benz recom-
mends that you have this work carried out at
a qualified specialist workshop.
XUnscrew the valve cap from the valve.
XIf possible, unscrew the valve insert from
the valve and release the air.
iFully deflating the tires can take a few
minutes.
XScrew the valve insert back into the valve.
XScrew the valve cap back on.
XPull the protective sheet provided with the
spare wheel over the collapsible spare
wheel.
XStow the collapsible spare wheel in the
emergency spare wheel well under the
trunk.
XUse the retaining screw to pierce the pro-
tective sheet and fasten the collapsible
spare wheel in place.
Inflating the collapsible spare wheel
!
Inflate the collapsible spare wheel using
the tire inflation compressor before lower-
ing the vehicle. The wheel rim could other-
wise be damaged.
340Emergency spare wheel
Wheels and tires
Page 343 of 358
!Do not operate the tire inflation compres-
sor for longer than ten minutes at a time
without a break. It may otherwise overheat.
The tire inflation compressor can be oper-
ated again once it has cooled down.
XMount the collapsible spare wheel as
described (
Ypage 331).
The collapsible spare wheel must be moun-
ted before it is inflated.
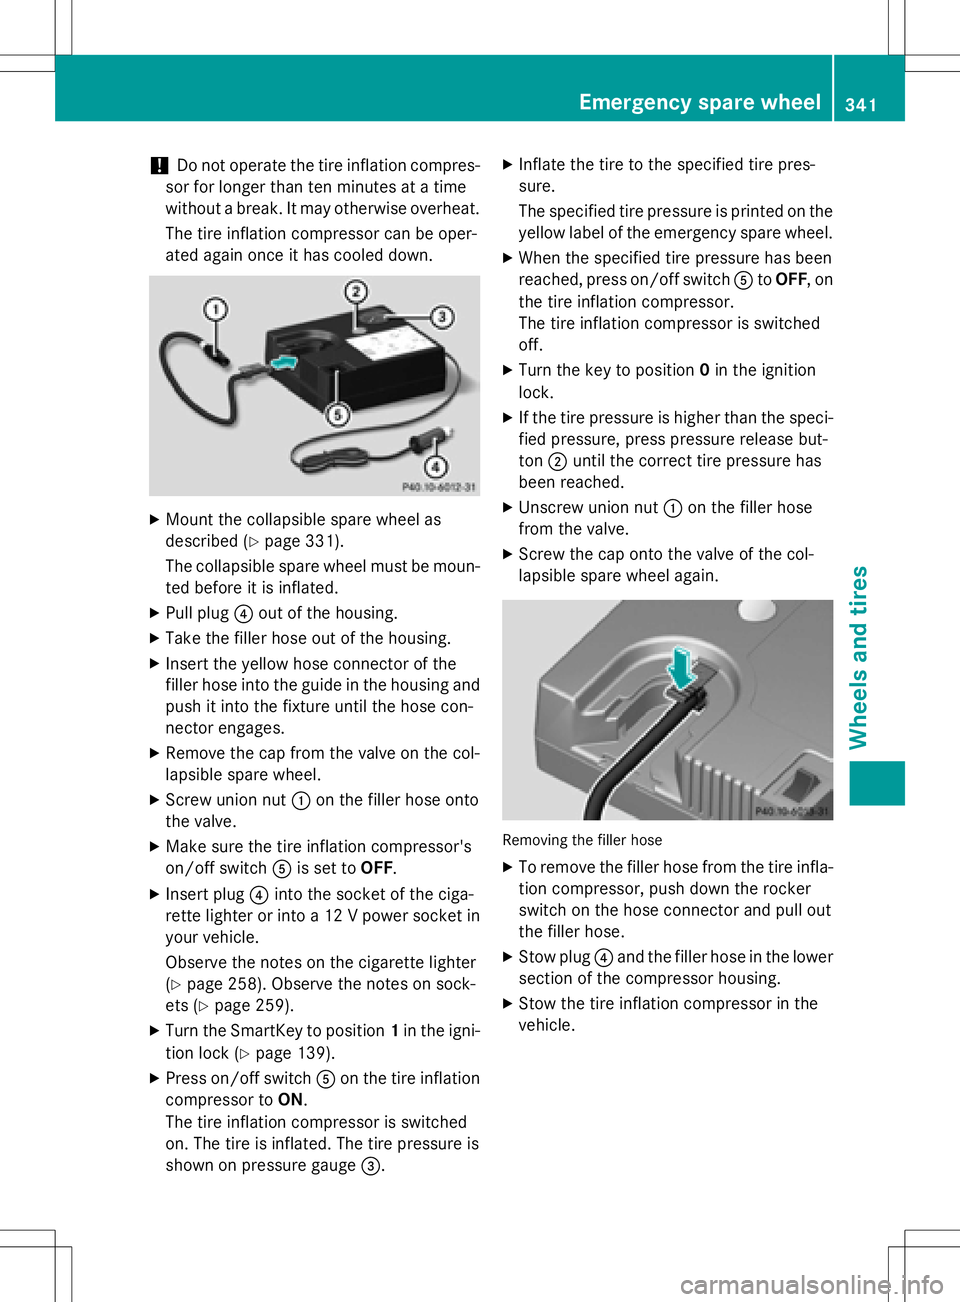
XPull plug ?out of the housing.
XTake the filler hose out of the housing.
XInsert the yellow hose connector of the
filler hose into the guide in the housing and
push it into the fixture until the hose con-
nector engages.
XRemove the cap from the valve on the col-
lapsible spare wheel.
XScrew union nut :on the filler hose onto
the valve.
XMake sure the tire inflation compressor's
on/off switch Ais set to OFF.
XInsert plug ?into the socket of the ciga-
rette lighter or into a 12 V power socket in
your vehicle.
Observe the notes on the cigarette lighter
(
Ypage 258). Observe the notes on sock-
ets (
Ypage 259).
XTurn the SmartKey to position 1in the igni-
tion lock (
Ypage 139).
XPress on/off switch Aon the tire inflation
compressor to ON.
The tire inflation compressor is switched
on. The tire is inflated. The tire pressure is
shown on pressure gauge =.
XInflate the tire to the specified tire pres-
sure.
The specified tire pressure is printed on the
yellow label of the emergency spare wheel.
XWhen the specified tire pressure has been
reached, press on/off switch AtoOFF , on
the tire inflation compressor.
The tire inflation compressor is switched
off.
XTurn the key to position 0in the ignition
lock.
XIf the tire pressure is higher than the speci- fied pressure, press pressure release but-
ton ;until the correct tire pressure has
been reached.
XUnscrew union nut :on the filler hose
from the valve.
XScrew the cap onto the valve of the col-
lapsible spare wheel again.
Removing the filler hose
XTo remove the filler hose from the tire infla-
tion compressor, push down the rocker
switch on the hose connector and pull out
the filler hose.
XStow plug ?and the filler hose in the lower
section of the compressor housing.
XStow the tire inflation compressor in the
vehicle.
Emergency spare wheel341
Wheels and tires
Z
Page 344 of 358
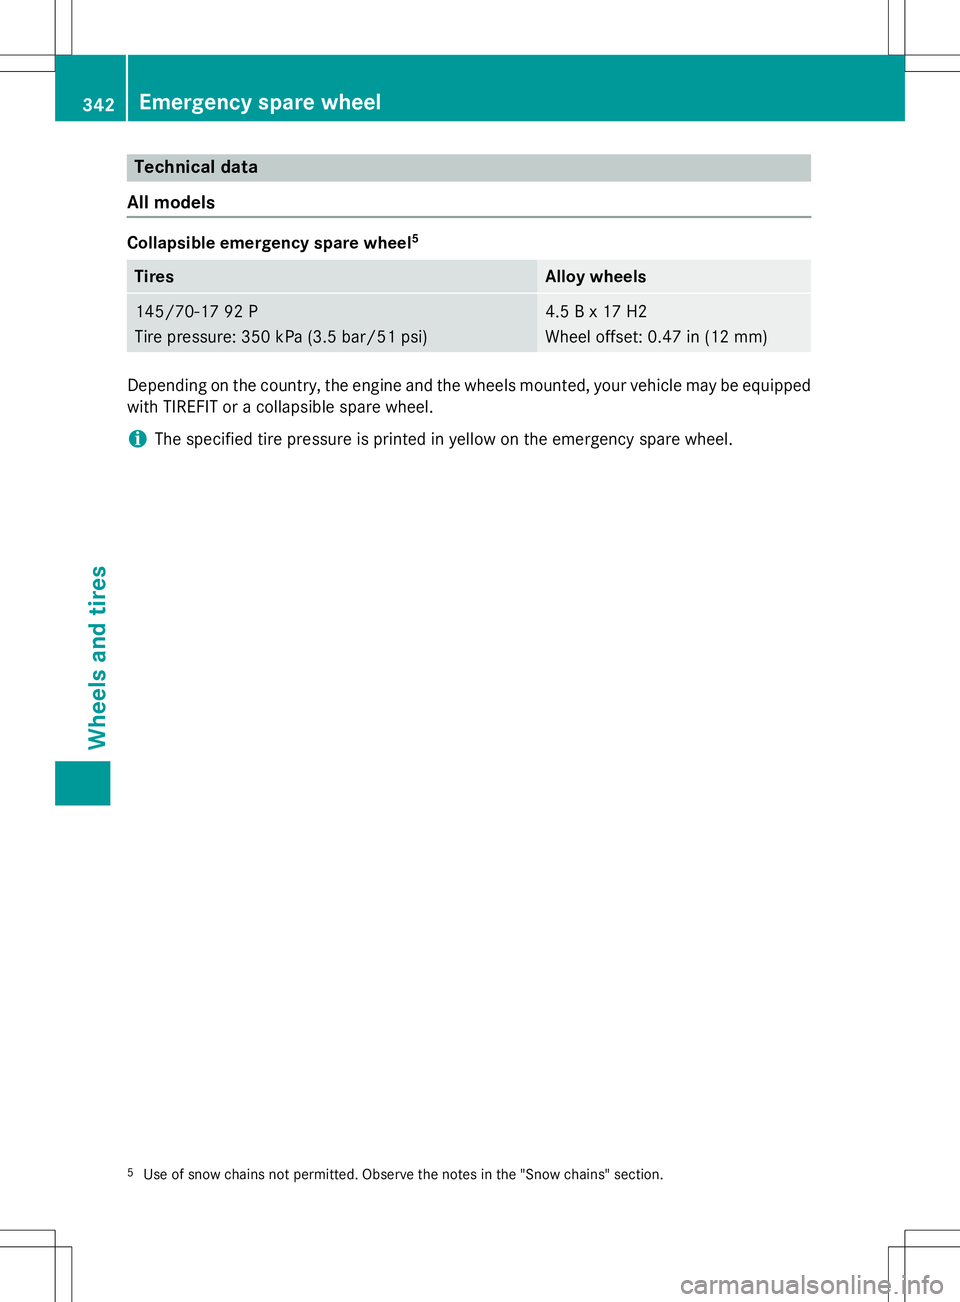
Technical data
All models
Collapsible emergency spare wheel5
TiresAlloy wheels
145/70-17 92 P
Tire pressure: 350 kPa (3.5 bar/51 psi)4.5 B x 17 H2
Wheel offset: 0.47 in (12 mm)
Depending on the country, the engine and the wheels mounted, your vehicle may be equipped
with TIREFIT or a collapsible spare wheel.
iThe specified tire pressure is printed in yellow on the emergency spare wheel.
5Use of snow chains not permitted. Observe the notes in the "Snow chains" section.
342Emergency spare wheel
Wheels an d tires
Page 345 of 358
Useful information............................344
Information regarding technical
data .................................................... 344
Vehicle electronics ...........................344
Identification plates .........................345
Service products and filling capaci-
ties ..................................................... 347
Vehicle data ....................................... 352
343
Technical data
Page 346 of 358
Useful information
i
This Operator's Manual describes all
models and all standard and optional equip-
ment of your vehicle available at the time of
publication of the Operator's Manual.
Country-specific differences are possible.
Please note that your vehicle may not be
equipped with all features described. This
also applies to safety-related systems and
functions.
iRead the information on qualified special-
ist workshops (
Ypage 25).
Information regarding technical data
i
The data stated here specifically refers to
a vehicle with standard equipment. Consult an authorized Mercedes-Benz Center for
the data for all vehicle variants and trim
levels.
Vehicle electronics
Tampering with the engine electron-
ics
!
Only have work carried out on the engine
electronics and its associated parts, such
as control units, sensors, actuating com-
ponents and connector leads, at a qualified
specialist workshop. Vehicle components
may otherwise wear more quickly and the
vehicle's operating permit may be invalida-
ted.
Retrofitting two-way radios and
mobile phones (RF transmitters)
GWARNING
The electromagnetic radiation from modified
or incorrectly retrofitted RF-transmitters can
interfere with the vehicle electronics. This can compromise the operational safety of the
vehicle. There is a risk of an accident.
You should have all work to electrical and
electronic equipment carried out at a qualified
specialist workshop.
GWARNING
The electromagnetic radiation from incor-
rectly operated RF transmitters can interfere
with the vehicle electronics, for example:
Rif the RF transmitter is not connected with
an exterior antenna
Rthe exterior antenna has been installed
incorrectly or is not a low-reflection type
This can compromise the operational safety
of the vehicle. There is a risk of an accident.
Have the low-reflection exterior antenna
mounted at a qualified specialist workshop.
When operating RF transmitters in the vehi-
cle, always connect them with the low-reflec-
tion exterior antenna.
!The operating permit may be invalidated if
the instructions for installation and use of
RF transmitters are not observed.
In particular, the following conditions must
be complied with:
Ronly approved wavebands may be used.
Rcompliance with the maximum permissi-
ble output in these wavebands is
required.
Ronly approved antenna positions may be used.
Excessive levels of electromagnetic radiation
may cause damage to your health and the
health of others. Using an exterior antenna
takes into account current scientific discus-
sions relating to the possible health hazards
that may result from electromagnetic fields.
The following antenna positions may be used if RF transmitters have been properly instal-
led:
344Vehicle electronics
Technical data
Page 347 of 358
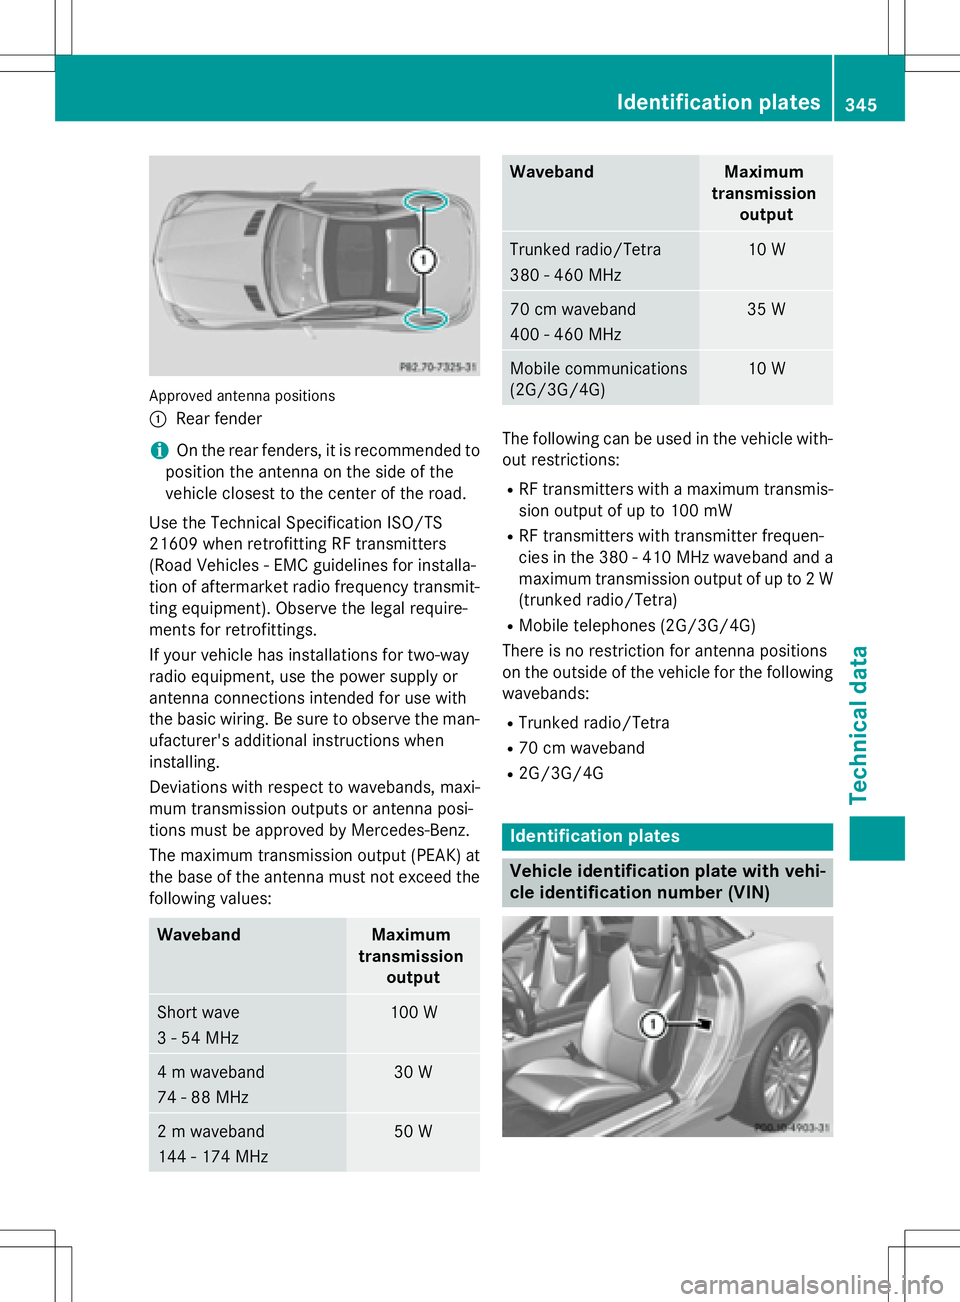
Approved antenna positions
:
Rear fender
iOn the rear fenders, it is recommended to
position the antenna on the side of the
vehicle closest to the center of the road.
Use the Technical Specification ISO/TS
21609 when retrofitting RF transmitters
(Road Vehicles - EMC guidelines for installa-
tion of aftermarket radio frequency transmit-
ting equipment). Observe the legal require-
ments for retrofittings.
If your vehicle has installations for two-way
radio equipment, use the power supply or
antenna connections intended for use with
the basic wiring. Be sure to observe the man- ufacturer's additional instructions when
installing.
Deviations with respect to wavebands, maxi-
mum transmission outputs or antenna posi-
tions must be approved by Mercedes-Benz.
The maximum transmission output (PEAK) at
the base of the antenna must not exceed the
following values:
WavebandMaximum
transmission output
Short wave
3 - 54 MHz100 W
4 m waveband
74 - 88 MHz30 W
2 m waveband
144 - 174 MHz50 W
WavebandMaximum
transmission output
Trunked radio/Tetra
380 - 460 MHz10 W
70 cm waveband
400 - 460 MHz35 W
Mobile communications
(2G/3G/4G)10 W
The following can be used in the vehicle with-
out restrictions:
RRF transmitters with a maximum transmis-
sion output of up to 100 mW
RRF transmitters with transmitter frequen-
cies in the 380 - 410 MHz waveband and a
maximum transmission output of up to 2 W
(trunked radio/Tetra)
RMobile telephones (2G/3G/4G)
There is no restriction for antenna positions
on the outside of the vehicle for the following
wavebands:
RTrunked radio/Tetra
R70 cm waveband
R2G/3G/4G
Identification plates
Vehicle identification plate with vehi-
cle identification number (VIN)
Identification plates345
Technical data
Z
Page 348 of 358
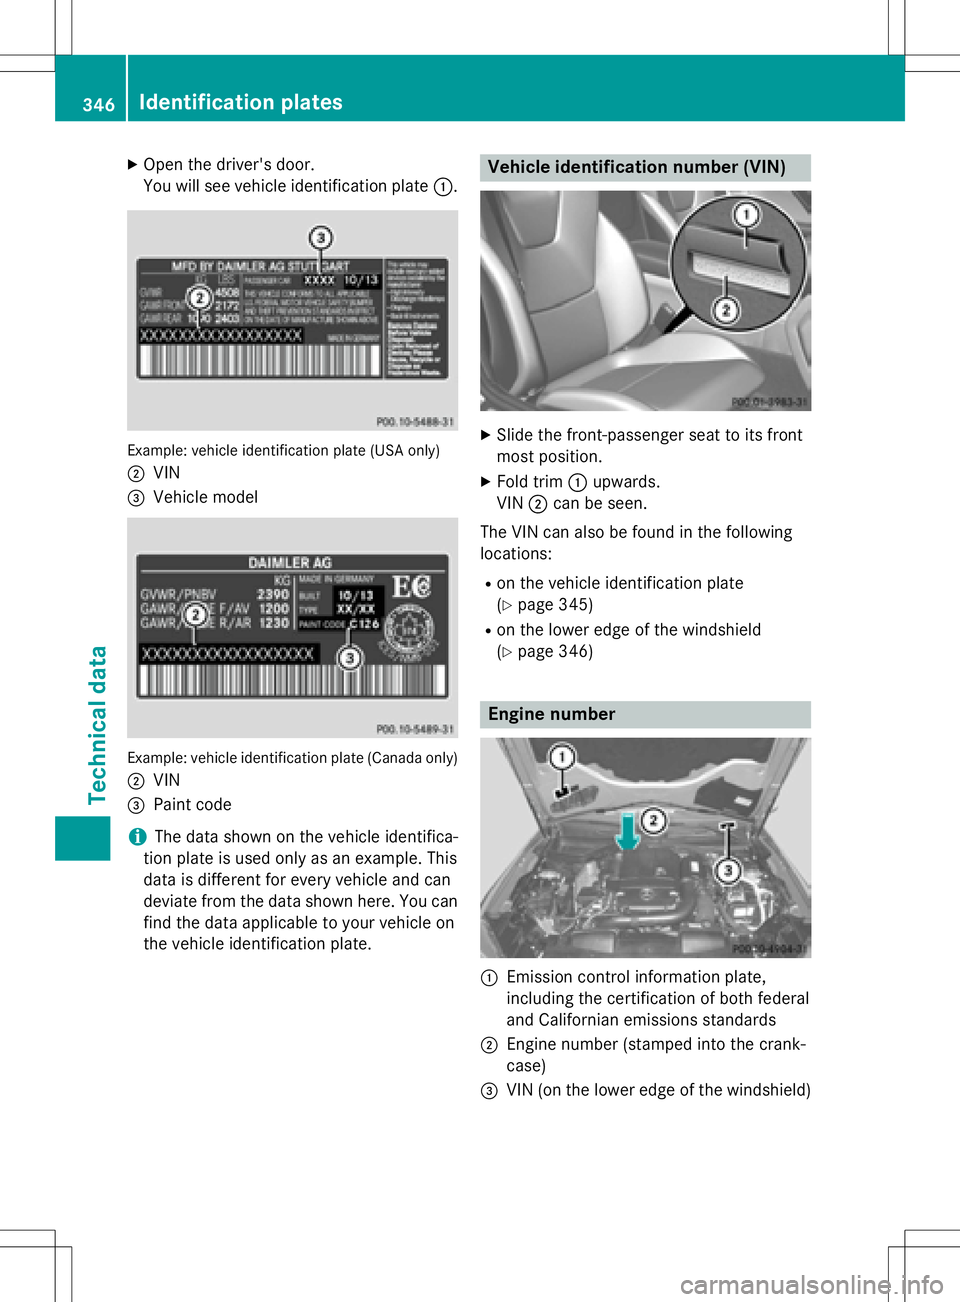
XOpen the driver's door.
You will see vehicle identification plate:.
Example: vehicle identification plate (USA only)
;
VIN
=Vehicle model
Example: vehicle identification plate (Canada only)
;
VIN
=Paint code
iThe data shown on the vehicle identifica-
tion plate is used only as an example. This
data is different for every vehicle and can
deviate from the data shown here. You can
find the data applicable to your vehicle on
the vehicle identification plate.
Vehicle identification number (VIN)
XSlide the front-passenger seat to its front
most position.
XFold trim :upwards.
VIN ;can be seen.
The VIN can also be found in the following
locations:
Ron the vehicle identification plate
(
Ypage 345)
Ron the lower edge of the windshield
(
Ypage 346)
Engine number
:Emission control information plate,
including the certification of both federal
and Californian emissions standards
;Engine number (stamped into the crank-
case)
=VIN (on the lower edge of the windshield)
346Identification plates
Technical data
Page 349 of 358
Service products and filling capaci-
ties
Important safety notes
GWARNING
Service products may be poisonous and haz-
ardous to health. There is a risk of injury.
Comply with instructions on the use, storage
and disposal of service products on the labels
of the respective original containers. Always
store service products sealed in their original
containers. Always keep service products out
of the reach of children.
HEnvironmental note
Dispose of service products in an environ-
mentally responsible manner.
Service products include the following:
RFuels
RLubricants (e.g. engine oil, transmission oil)
RCoolant
RBrake fluid
RWindshield washer fluid
RClimate control system refrigerant
Comply with all valid regulations with respect
to handling, storing, and disposing of service
fluids.
Components and service products must be
matched. You should therefore only use prod-
ucts that have been tested and approved by
Mercedes-Benz.
Information about tested and approved prod-
ucts can be obtained from an authorized
Mercedes-Benz Center or on the Internet at
http://bevo.mercedes-benz.com.
You can recognize service products approved
by Mercedes-Benz by the following inscrip-
tion on the containers:
RMB-Freigabe (e.g. MB-Freigabe 229.51)
RMB-Approval (e.g. MB-Approval 229.51)
Other designations or recommendations indi-
cate a level of quality or a specification in
accordance with an MB Sheet Number (e.g. MB 229.51). They have not necessarily been
approved by Mercedes-Benz.
Fuel
Important safety notes
GWARNING
Fuel is highly flammable. If you handle fuel
incorrectly, there is a risk of fire and explo-
sion.
You must avoid fire, open flames, creating
sparks and smoking. Switch off the engine
and, if applicable, the auxiliary heating before refueling.
GWARNING
Fuel is poisonous and hazardous to health.
There is a risk of injury.
You must make sure that fuel does not come into contact with your skin, eyes or clothing
and that it is not swallowed. Do not inhale fuel
vapors. Keep fuel away from children.
If you or others come into contact with fuel,
observe the following:
RWash away fuel from skin immediately
using soap and water.
RIf fuel comes into contact with your eyes,
immediately rinse them thoroughly with
clean water. Seek medical assistance with-
out delay.
RIf fuel is swallowed, seek medical assis-
tance without delay. Do not induce vomit-
ing.
RImmediately change out of clothing which
has come into contact with fuel.
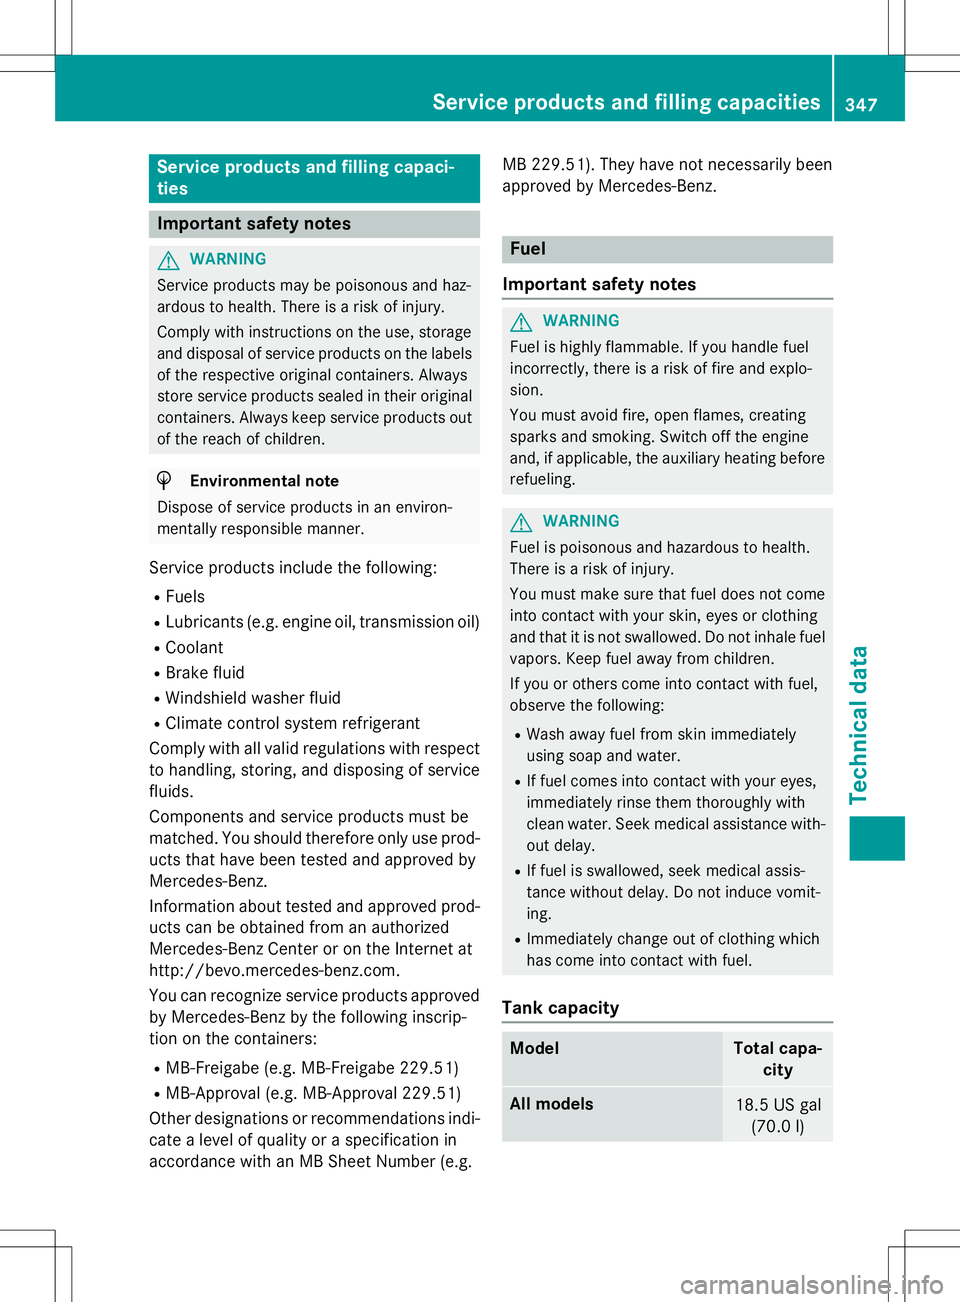
Tank capacity
ModelTotal capa- city
All models18.5 US gal(70.0 l)
Service products and filling capacities347
Technical data
Z
Page 350 of 358
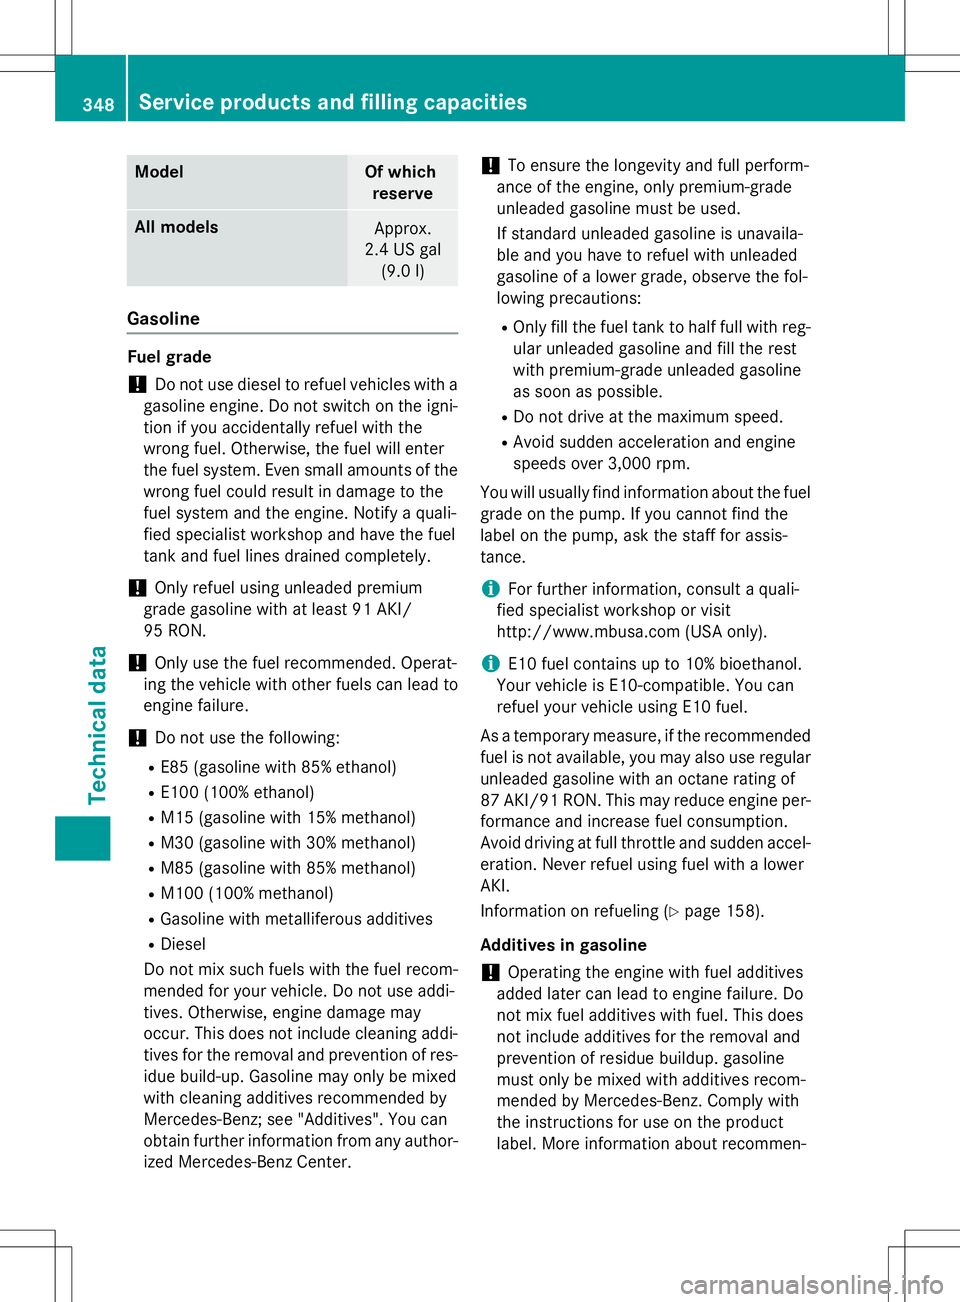
ModelOf whichreserve
All modelsApprox.
2.4 US gal (9.0 l)
Gasoline
Fuel grade
!Do not use diesel to refuel vehicles with a
gasoline engine. Do not switch on the igni-
tion if you accidentally refuel with the
wrong fuel. Otherwise, the fuel will enter
the fuel system. Even small amounts of the
wrong fuel could result in damage to the
fuel system and the engine. Notify a quali-
fied specialist workshop and have the fuel
tank and fuel lines drained completely.
!Only refuel using unleaded premium
grade gasoline with at least 91 AKI/
95 RON.
!Only use the fuel recommended. Operat-
ing the vehicle with other fuels can lead to
engine failure.
!Do not use the following:
RE85 (gasoline with 85% ethanol)
RE100 (100% ethanol)
RM15 (gasoline with 15% methanol)
RM30 (gasoline with 30% methanol)
RM85 (gasoline with 85% methanol)
RM100 (100% methanol)
RGasoline with metalliferous additives
RDiesel
Do not mix such fuels with the fuel recom-
mended for your vehicle. Do not use addi-
tives. Otherwise, engine damage may
occur. This does not include cleaning addi-
tives for the removal and prevention of res- idue build-up. Gasoline may only be mixed
with cleaning additives recommended by
Mercedes-Benz; see "Additives". You can
obtain further information from any author-
ized Mercedes-Benz Center.
!To ensure the longevity and full perform-
ance of the engine, only premium-grade
unleaded gasoline must be used.
If standard unleaded gasoline is unavaila-
ble and you have to refuel with unleaded
gasoline of a lower grade, observe the fol-
lowing precautions:
ROnly fill the fuel tank to half full with reg-
ular unleade d ga
soline and fill the rest
with premium-grade unleaded gasoline
as soon as possible.
RDo not drive at the maximum speed.
RAvoid sudden acceleration and engine
speeds over 3,000 rpm.
You will usually find information about the fuel
grade on the pump. If you cannot find the
label on the pump, ask the staff for assis-
tance.
iFor further information, consult a quali-
fied specialist workshop or visit
http://www.mbusa.com (USA only).
iE10 fuel contains up to 10% bioethanol.
Your vehicle is E10-compatible. You can
refuel your vehicle using E10 fuel.
As a temporary measure, if the recommended
fuel is not available, you may also use regular
unleaded gasoline with an octane rating of
87 AKI/91 RON. This may reduce engine per-
formance and increase fuel consumption.
Avoid driving at full throttle and sudden accel- eration. Never refuel using fuel with a lower
AKI.
Information on refueling (
Ypage 158).
Additives in gasoline
!Operating the engine with fuel additives
added later can lead to engine failure. Do
not mix fuel additives with fuel. This does
not include additives for the removal and
prevention of residue buildup. gasoline
must only be mixed with additives recom-
mended by Mercedes-Benz. Comply with
the instructions for use on the product
label. More information about recommen-
348Service products and filling capacities
Technical data