steering wheel MERCEDES-BENZ SLK ROADSTER 2008 User Guide
[x] Cancel search | Manufacturer: MERCEDES-BENZ, Model Year: 2008, Model line: SLK ROADSTER, Model: MERCEDES-BENZ SLK ROADSTER 2008Pages: 273, PDF Size: 4.42 MB
Page 58 of 273
55
Opening and closing
...........................56
Key positions ...................................... .59
Seats .................................................... 59
Steering wheel .................................... 63
Mirrors ................................................. 65
Memory functions* .............................68
Seat belts ............................................ .69
Lights ................................................... 73
Windscreen wipers .............................78
Side windows ...................................... 79Driving and parking
............................81
Transmission ....................................... 84
Instrument cluster ..............................90
On-board computer .............................91
Driving systems ................................ 109
Air conditioning ................................. 118
Opening/closing the roof .................132
Loading and stowing ........................136
Features ............................................. 140 Controls
171_AKB; 3; 4, en-GB
vpfaff7,
2007-11-13T10:50:25+01:00 - Seite 55
Page 66 of 273
Steering wheel
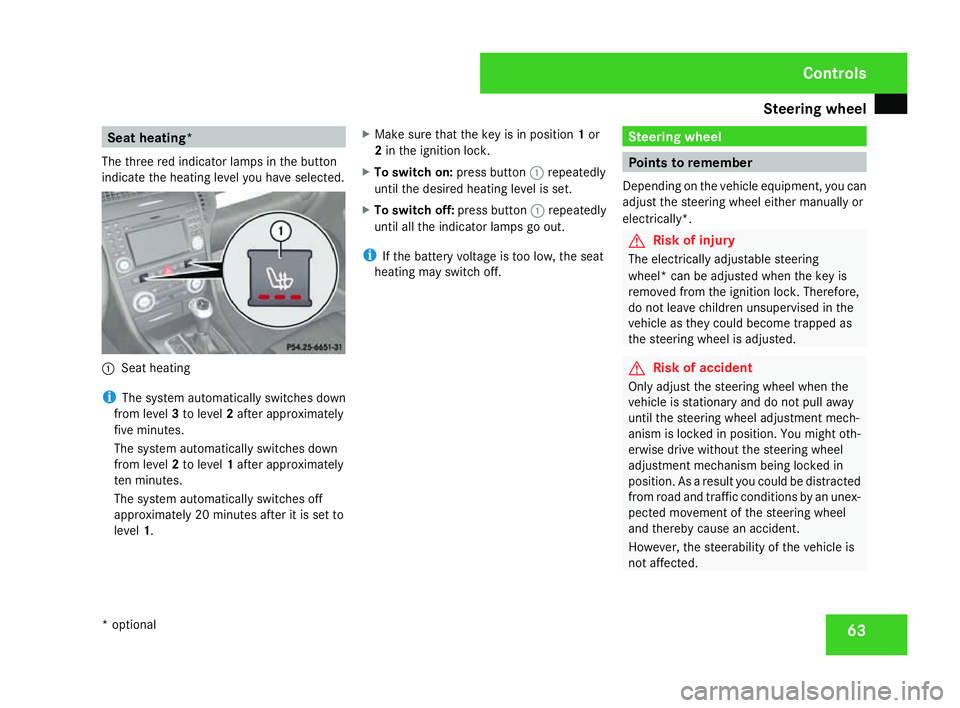
63Seat heating*
The three red indicator lamps in the button
indicate the heating level you have selected. 1
Seat heating
i The system automatically switches down
from level 3to level 2after approximately
five minutes.
The system automatically switches down
from level 2to level 1after approximately
ten minutes.
The system automatically switches off
approximately 20 minutes after it is set to
level 1. X
Make sure that the key is in position 1or
2 in the ignition lock .
X To switch on: press button1repeatedly
until the desired heating level is set.
X To switch off: press button1repeatedly
until all the indicator lamps go out.
i If the battery voltage is too low, the sea t
heating may switch off. Steering wheel
Points to remember
Depending on the vehicle equipment, you can
adjust the steering wheel either manually or
electrically*. G
Risk of injury
The electrically adjustable steering
wheel* can be adjusted when the key is
removed from the ignition lock. Therefore,
do not leave children unsupervised in the
vehicle as they could become trapped as
the steering wheel is adjusted . G
Risk of acciden
t
Only adjust the steering wheel when the
vehicle is stationary and do not pull away
until the steering wheel adjustment mech-
anism is locked in position. You might oth-
erwise drive without the steering whee l
adjustment mechanism being locked in
position. As a result you could be distracted
from road and traffic conditions by an unex -
pected movement of the steering wheel
and thereby cause an accident.
However, the steerability of the vehicle is
not affected. Controls
* optional
171_AKB; 3; 4, en-GB
vpfaff7,
2007-11-13T10:50:25+01:00 - Seite 63
Page 67 of 273

Steering wheel
64
When you adjust the steering wheel, make
sure that:
R
the steering wheel can be reached with
your arms slightly bent
R you can move your legs freely
R you can see all the displays in the instru-
ment cluster clearly Adjusting the steering wheel man-
ually
1
Release handle
2 Steering column height
3 Steering column fore-and-aft adjustment X
Pull handle 1out completely.
The steering column is unlocked.
X Set the desired steering wheel position.
X Push handle 1in completely until it
engages fully.
The steering wheel is locked in position . Adjusting the steering wheel electri-
cally*
1
Steering column height
2 Steering column fore-and-aft adjustment
X Press the lever in the direction of arrow
1 or2 until the steering wheel has
moved into the desired position.
You can find more information under :R
Easy-entry/exit feature (Y page 65)
R Storing settings (Y page 68) Steering wheel heating*
1
To switch on the steering-wheel heating
2 To switch off the steering-wheel heating
3 Indicator lamp
X To switch on or off: make sure that the
key is in position 2in the ignition lock .
X Turn the lever in the direction of arrow 1
or 2 .
Indicator lamp 3comes on or goes out.
i The steering-wheel heating does not
switch off automatically. Controls
* optional
171_AKB; 3; 4, en-GB
vpfaff7,
2007-11-13T10:50:25+01:00 - Seite 64
Page 68 of 273
Mirrors
65Easy-entry/exit feature*
The easy-entry/exit feature makes getting in
and out of your vehicle easier.
The steering wheel swings upwards whe n
you:
R remove the key from the ignition lock
R open the driver's door when the key is in
the ignition lock or in position 1.
The steering wheel is moved automatically to
the position previously set when the key is
inserted into the ignition lock with the driver's
door closed. G
Risk of injury
Make sure that nobody can become trap -
ped when you activate the easy-entry/exit
feature.
If there is a risk of becoming trapped, stop
the adjustment procedure. To halt the pro-
cedure:
R press the steering-column adjustment
switc h
R press one of the memory function posi-
tion buttons
The steering column stops moving immedi-
ately. Never leave children unsupervised in the
vehicle. They could open the driver's door
and thereby unintentionally activate the
easy-entry feature and become trapped.
The most recent position of the steering
wheel is stored when you switch off the igni-
tion or when you store a memory position
( Y page 68).
You can activate and deactivate the easy-
entry/exit feature via the on-board computer
( Y page 106). Mirrors
Rear-view mirror
X Adjust the rear-view mirror by hand so yo u
have a good overview of the traffic condi-
tions.
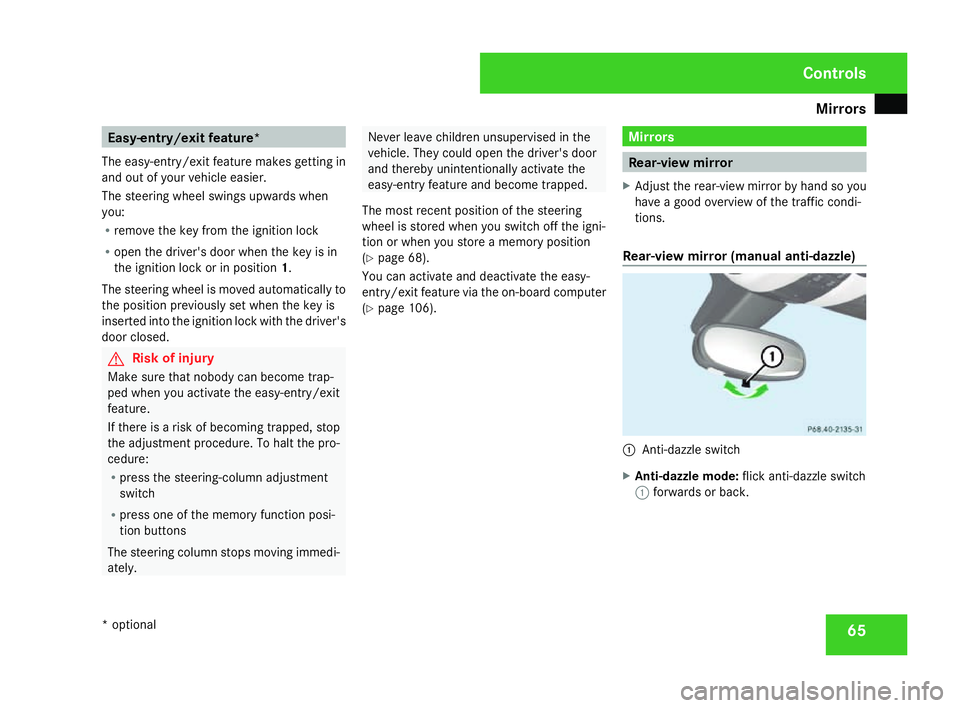
Rear-view mirror (manual anti-dazzle) 1
Anti-dazzle switch
X Anti-dazzle mode: flick anti-dazzle switch
1 forwards or back. Controls
* optional
171_AKB; 3; 4, en-GB
vpfaff7,
2007-11-13T10:50:25+01:00 - Seite 65
Page 71 of 273
Memory functions*
68 Memory functions*
Storing settings
You can store up to three different settings
using the memory button.
The following settings are stored as a single
memory preset :
R Seat and backrest position
R Driver's side: steering-wheel positio n
R Driver's side: position of the exterior mir-
rors on the driver's and front-passenge r
sides G
Risk of injury
The memory function can also be used
when the key has been removed. For this
reason, children should never be left unsu-
pervised in the vehicle. They could other-
wise become trapped when moving the
seat or the steering wheel .G
Risk of accident
Only activate the memory function on the
driver’s side when the vehicle is stationary.
You could otherwise be distracted from the
traffic conditions by the steering wheel and
seat moving of their own accord, and as a
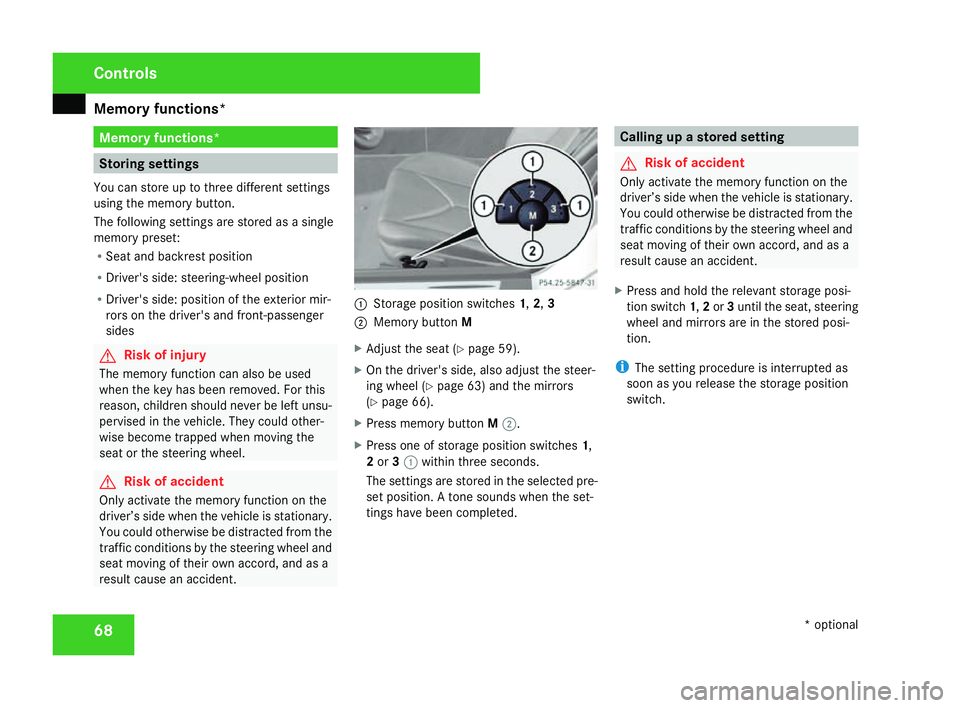
result cause an accident. 1
Storage position switches 1,2 ,3
2 Memory button M
X Adjust the seat (Y page 59).
X On the driver's side, also adjust the steer-
ing wheel (Y page 63) and the mirrors
( Y page 66).
X Press memory button M2 .
X Press one of storage position switches 1,
2 or 31 within three seconds.
The settings are stored in the selected pre-
set position. A tone sounds when the set-
tings have been completed. Calling up a stored setting
G
Risk of acciden
t
Only activate the memory function on the
driver’s side when the vehicle is stationary .
You could otherwise be distracted from the
traffic conditions by the steering wheel and
seat moving of their own accord, and as a
result cause an accident.
X Press and hold the relevant storage posi-
tion switch 1,2 or 3until the seat, steerin g
wheel and mirrors are in the stored posi-
tion .
i The setting procedure is interrupted as
soon as you release the storage position
switch. Controls
* optional
171_AKB; 3; 4, en-GB
vpfaff7,
2007-11-13T10:50:25+01:00 - Seite 68
Page 74 of 273
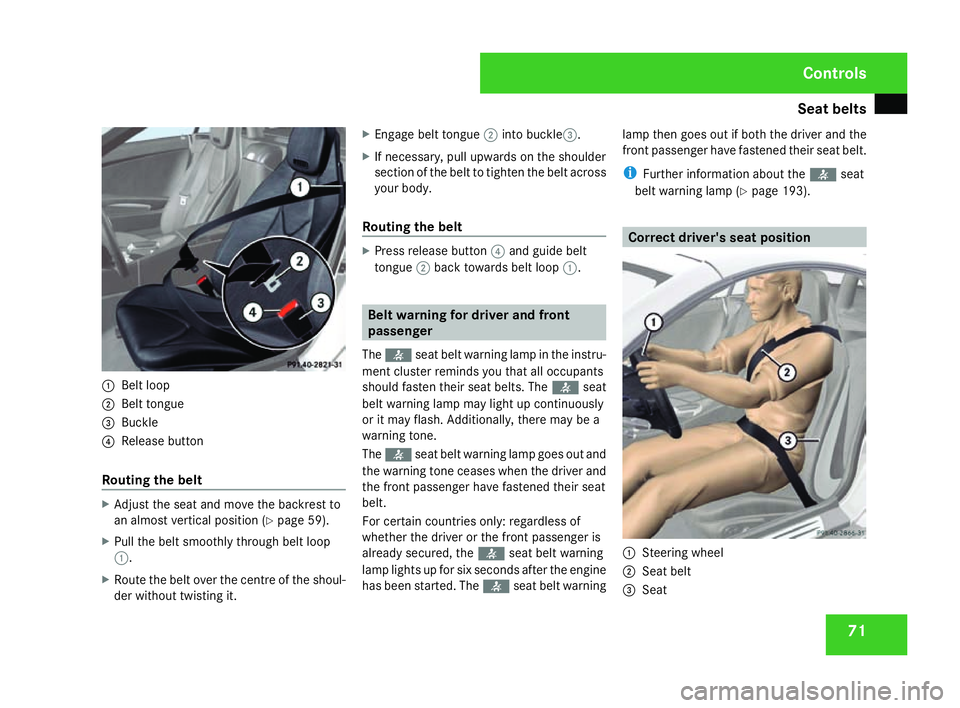
Seat belts
711
Belt loo p
2 Belt tongu e
3 Buckl e
4 Release butto n
Routing the belt X
Adjust the seat and move the backrest to
an almost vertical position (Y page 59).
X Pull the belt smoothly through belt loop
1 .
X Route the belt over the centre of the shoul-
der without twisting it . X
Engage belt tongue 2into buckle3 .
X If necessary, pull upwards on the shoulder
section of the belt to tighten the belt across
your body.
Routing the belt X
Press release button 4and guide belt
tongue 2back towards belt loop 1. Belt warning for driver and fron
t
passenge r
The < seat belt warning lamp in the instru-
ment cluster reminds you that all occupants
should fasten their seat belts. The
or it may flash. Additionally, there may be a
warning tone.
The < seat belt warning lamp goes out and
the warning tone ceases when the driver and
the front passenger have fastened their seat
belt.
For certain countries only: regardless of
whether the driver or the front passenger is
already secured, the
has been started. The
i
Further information about the
1
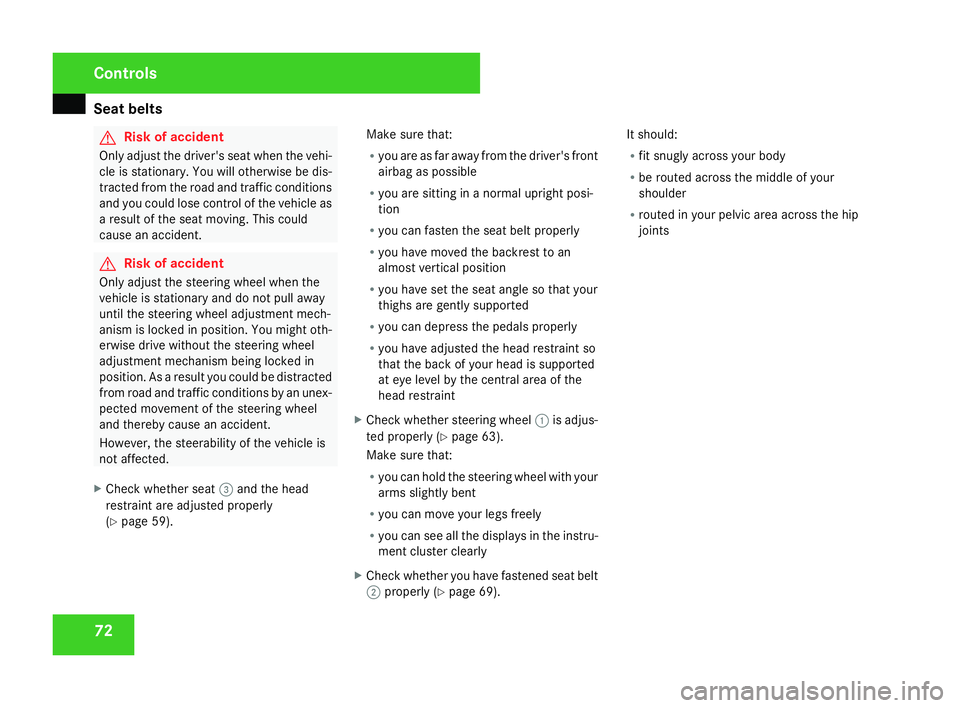
Steering wheel
2 Seat belt
3 Sea t Cont
rols
171_AKB; 3; 4, en-GB
vpfaff7,
2007-11-13T10:50:25+01:00 - Seite 71
Page 75 of 273
Seat belts
72 G
Risk of accident
Only adjust the driver's seat when the vehi-
cle is stationary. You will otherwise be dis-
tracted from the road and traffic conditions
and you could lose control of the vehicle as
a result of the seat moving. This could
cause an accident. G
Risk of accident
Only adjust the steering wheel when the
vehicle is stationary and do not pull away
until the steering wheel adjustment mech -
anism is locked in position. You might oth-
erwise drive without the steering wheel
adjustment mechanism being locked in
position. As a result you could be distracte d
from road and traffic conditions by an unex-
pected movement of the steering wheel
and thereby cause an accident.
However, the steerability of the vehicle is
not affected .
X Check whether seat 3and the head
restraint are adjusted properl y
( Y page 59). Make sure that
:
R you are as far away from the driver's fron t
airbag as possible
R you are sitting in a normal upright posi-
tion
R you can fasten the seat belt properly
R you have moved the backrest to an
almost vertical position
R you have set the seat angle so that your
thighs are gently supporte d
R you can depress the pedals properly
R you have adjusted the head restraint so
that the back of your head is supporte d
at eye level by the central area of th e
head restraint
X Check whether steering wheel 1is adjus-
ted properly (Y page 63).
Make sure that :
R you can hold the steering wheel with your
arms slightly ben t
R you can move your legs freely
R you can see all the displays in the instru-
ment cluster clearly
X Check whether you have fastened seat belt
2 properly (Y page 69). It should:
R
fit snugly across your body
R be routed across the middle of your
shoulder
R routed in your pelvic area across the hip
joints Controls
171_AKB; 3; 4, en-GB
vpfaff7,
2007-11-13T10:50:25+01:00 - Seite 72
Page 79 of 273
Light
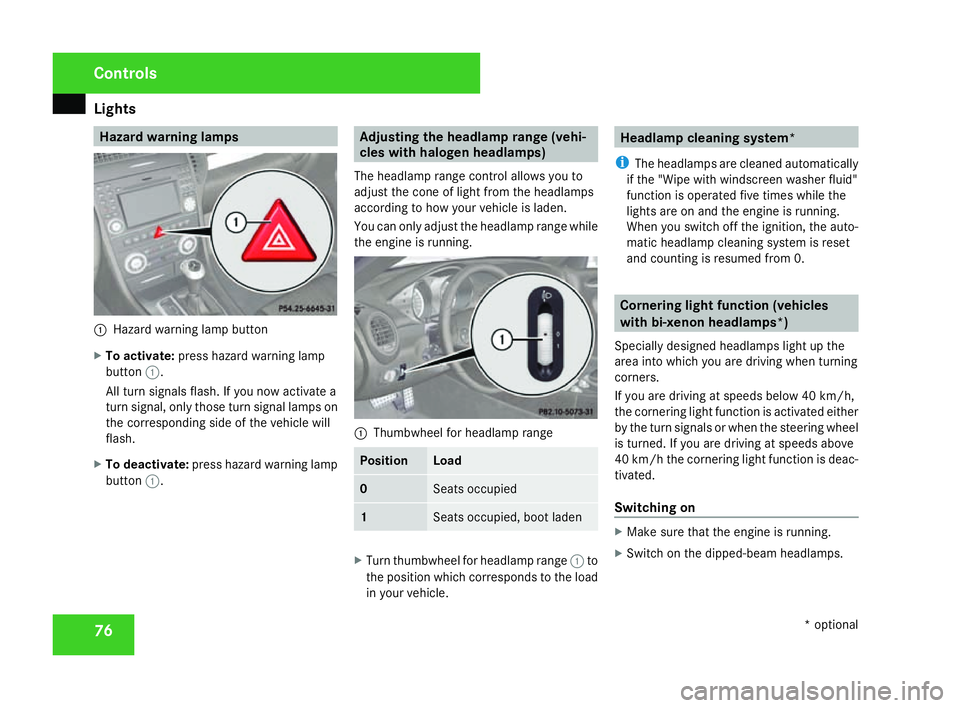
s 76 Hazard warning lamps
1
Hazard warning lamp button
X To activate :press hazard warning lamp
button 1.
All turn signals flash. If you now activate a
turn signal, only those turn signal lamps on
the corresponding side of the vehicle will
flash.
X To deactivate :press hazard warning lamp
button 1. Adjusting the headlamp range (vehi-
cles with halogen headlamps)
The headlamp range control allows you to
adjust the cone of light from the headlamps
according to how your vehicle is laden.
You can only adjust the headlamp range while
the engine is running. 1
Thumbwheel for headlamp range Position Load
0 Seats occupied
1 Seats occupied, boot lade
n X
Turn thumbwheel for headlamp range 1to
the position which corresponds to the load
in your vehicle. Headlamp cleaning system*
i The headlamps are cleaned automatically
if the "Wipe with windscreen washer fluid"
function is operated five times while the
lights are on and the engine is running.
When you switch off the ignition, the auto-
matic headlamp cleaning system is reset
and counting is resumed from 0. Cornering light function (vehicles
with bi-xenon headlamps*)
Specially designed headlamps light up the
area into which you are driving when turning
corners.
If you are driving at speeds below 40 km/h,
the cornering light function is activated either
by the turn signals or when the steering wheel
is turned. If you are driving at speeds above
40 km/h the cornering light function is deac-
tivated.
Switching on X
Make sure that the engine is running.
X Switch on the dipped-beam headlamps. Control
s
* optional
171_AKB; 3; 4, en-GB
vpfaff7,
2007-11-13T10:50:25+01:00 - Seite 76
Page 80 of 273
Light
s 77
X
Switch off the fog lights .
X Switch on the turn signal .
The cornering light on the same side as the
turn signal comes on, even if you turn the
steering wheel in the opposite direction
after indicating.
or
X Turn the steering wheel in the desired
direction .
When in a forwards gear: the cornering
lamp on the inside of the bend comes on.
When in reverse gear: the cornering light on
the outside of the bend comes on.
Switching off X
Switch off the turn signal .
i The cornering light is activated until you
turn the steering wheel back to the straight -
ahead position and the turn signal switches
off. The cornering light may remain lit for a
short time, but no more than three minutes.
It then goes out, even if the turn signal is
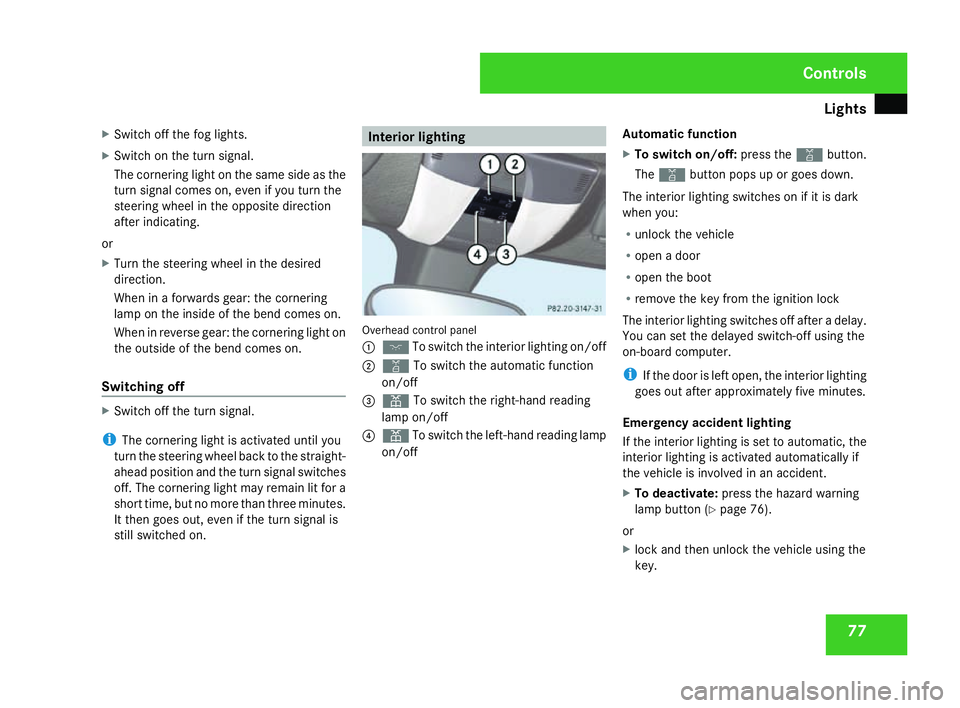
still switched on. Interior lighting
Overhead control panel
1
ð To switch the interior lighting on/of f
2 ¡ To switch the automatic function
on/of f
3 X To switch the right-hand reading
lamp on/of f
4 X To switch the left-hand reading lamp
on/of f Automatic function
X
To switch on/off: press the¡button.
The ¡ button pops up or goes down.
The interior lighting switches on if it is dark
when you:
R unlock the vehicl e
R open a door
R open the boot
R remove the key from the ignition lock
The interior lighting switches off after a delay.
You can set the delayed switch-off using the
on-board computer .
i If the door is left open, the interior lighting
goes out after approximately five minutes.
Emergency accident lighting
If the interior lighting is set to automatic, the
interior lighting is activated automatically if
the vehicle is involved in an accident.
X To deactivate: press the hazard warning
lamp button (Y page 76).
or
X lock and then unlock the vehicle using the
key. Controls
171_AKB; 3; 4, en-GB
vpfaff7,
2007-11-13T10:50:25+01:00 - Seite 77
Page 87 of 273
Transmission
84
X
To apply :pull handbrake 2up firmly.
The 3 indicator lamp in the instrumen t
cluster lights up if the engine is running.
i On steep slopes, turn the front wheels
towards the kerb. Stopping the engine
G
Risk of accident
If the engine is not running, there is no
power assistance for the steering and
brakes. Steering and braking then take s
much more effort.
As a result, you might lose control of the
vehicle, cause an accident and injure your-
self and others.
Do not switch off the engine while driving.
Vehicles with manual transmissio nX
Shift to either first or reverse gear.
X Turn the key to position 0(Y page 59) in
the ignition lock and remove it.
The immobiliser is activated. Vehicles with automatic transmission* X
Move the selector lever to P.
X Turn the key to position 0(Y page 59) in
the ignition lock and remove it.
The immobiliser is activated. Transmission
Introduction to the transmission
G
Risk of accident
The movement of the pedals must not be
impaired in any way. Do not keep any
objects in the driver's footwell. Make sure
that floormats or carpets are correctly
secured and that there is sufficient clear-
ance for the pedals. G
Risk of accident
Do not change down for additional engine
braking on a slippery road surface. Thi s
could cause the drive wheels to lose thei r
grip and the vehicle could skid. This could
cause you to lose control of your vehicle
and cause an accident .Cont
rols
* optional
171_AKB; 3; 4, en-GB
vpfaff7,
2007-11-13T10:50:25+01:00 - Seite 84