steering wheel MERCEDES-BENZ SLK ROADSTER 2008 Owner's Manual
[x] Cancel search | Manufacturer: MERCEDES-BENZ, Model Year: 2008, Model line: SLK ROADSTER, Model: MERCEDES-BENZ SLK ROADSTER 2008Pages: 273, PDF Size: 4.42 MB
Page 91 of 273
Transmission
88 Steering wheel gearshift paddles
*
and manual gearshift program*
i The full range of functions of the steerin g
wheel shift paddles and the manual gear-
shift program are only available once oper -
ating temperature is reached.
Steering wheel gearshift paddles It is possible to shift gear using either th
e
steering wheel gearshift paddles or the selec-
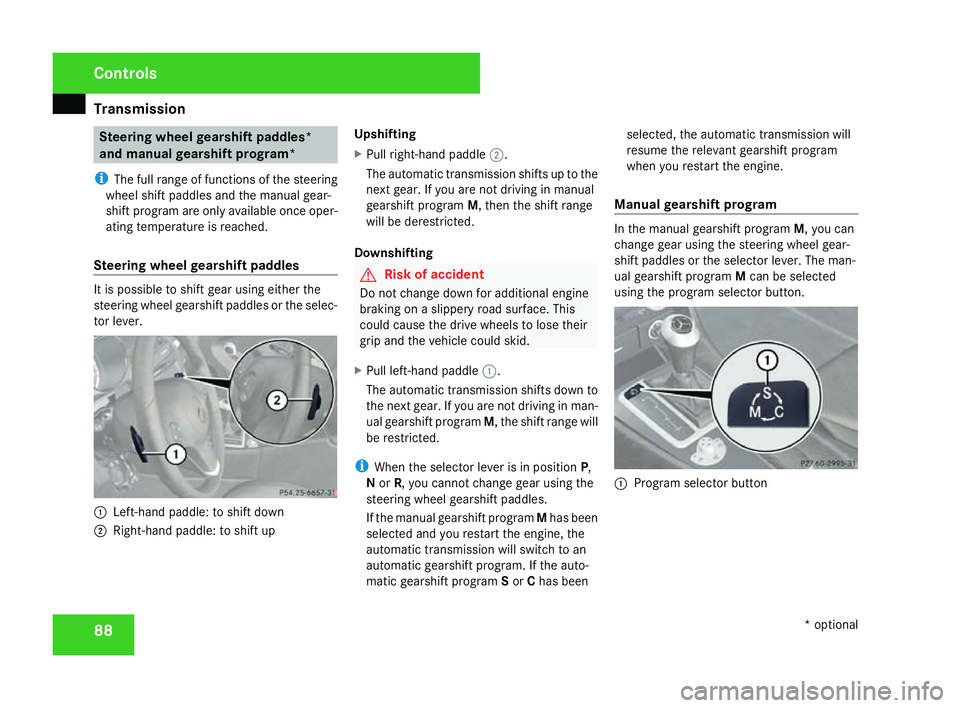
tor lever. 1
Left-hand paddle: to shift down
2 Right-hand paddle: to shift up Upshifting
X
Pull right-hand paddle 2.
The automatic transmission shifts up to the
next gear. If you are not driving in manual
gearshift program M, then the shift range
will be derestricted.
Downshifting G
Risk of accident
Do not change down for additional engine
braking on a slippery road surface. Thi s
could cause the drive wheels to lose thei r
grip and the vehicle could skid.
X Pull left-hand paddle 1.
The automatic transmission shifts down to
the next gear. If you are not driving in man-
ual gearshift program M, the shift range will
be restricted.
i When the selector lever is in position P,
N or R, you cannot change gear using the
steering wheel gearshift paddles.
If the manual gearshift program Mhas been
selected and you restart the engine, the
automatic transmission will switch to an
automatic gearshift program. If the auto-
matic gearshift program Sor Chas been selected, the automatic transmission will
resume the relevant gearshift program
when you restart the engine.
Manual gearshift program In the manual gearshift program
M, you can
change gear using the steering wheel gear-
shift paddles or the selector lever. The man-
ual gearshift program Mcan be selected
using the program selector button. 1
Program selector button Controls
* optional
171_AKB; 3; 4, en-GB
vpfaff7
, 2007-11-13T10:50:25+01:00 - Seite 88
Page 92 of 273
Transmission
89S
Spor t For all normal driving con-
ditions
C
Comfort For comfort mod
e M
Manual For manual gearshifting
X
To activate :press program selector but-
ton 1repeatedly until Mappears in th e
display.
If the selector lever is in position D, you can
shift up or down through the gears. The gear
currently selected and engaged is shown in
the display.
X To deactivate :press program selector
button 1repeatedly until Sor Cappear s
in the display.
Upshifting
X Briefly press the selector lever to the right
towards D+
or
X Pull the right-hand paddle on the steerin g
wheel (Y page 88).
The automatic transmission shifts up to the
next gear. Vehicles with AMG engines
!
In manual gearshift program M, the auto-
matic transmission does not shift up auto-
matically even when the limiting speed for
the current gear is reached. When the lim-
iting speed is reached, the fuel supply is cut
to prevent the engine from overrevving.
You must make sure that the engine speed
does not reach the red area of the rev coun -
ter. There is otherwise a risk of engine
damage .
X Shift up a gear when the ^upshift symbol
appears in the display instead of M.
Downshifting G
Risk of accident
Do not change down for additional engine
braking on a slippery road surface. Thi s
could cause the drive wheels to lose thei r
grip and the vehicle could skid.
X Briefly press the selector lever to the left
towards D-
or X
Pull the left-hand paddle on the steerin g
wheel (Y page 88).
The automatic transmission shifts down to
the next gear.
i For maximum acceleration, pull the left-
hand gearshift paddle until the transmis-
sion selects the optimum gear depending
on the speed.
Kickdown
i It is not possible to use kickdown in the
manual gearshift program Mon vehicles
with AMG engines.
You can also use kickdown for maximum
acceleration in manual gearshift program M.
X Depress the accelerator pedal beyond the
pressure point.
The transmission shifts to a lower gear
depending on the engine speed.
i It is not possible to shift gears using the
steering wheel gearshift paddles during
kickdown. Controls
171_AKB; 3; 4, en-GB
vpfaff7,
2007-11-13T10:50:25+01:00 - Seite 89
Page 94 of 273
On-board computer
91Outside temperature displa
yG
Risk of accident
The road surface may be icy, especially in
wooded areas or on bridges, even if tem-
peratures are just above freezing point. The
vehicle could skid if you fail to adapt your
driving style. You should therefore always
adapt your driving style and speed to suit
the weather conditions .
There is a short delay before a change in out-
side temperature is displayed. On-board computer
Points to remember
The on-board computer is activated as soon
as you turn the key to position 1in the ignition
lock. You can use the on-board computer to
call up information relating to your vehicle
and to make and/or adjust settings.
You can call up the next service due date,
select the display language for the instrumen t
cluster and set other functions. G
Risk of accident
Only use the on-board computer when roa d
and traffic conditions permit. You would
otherwise be distracted and unable to con-
centrate properly on driving, and could
cause an accident.
The on-board computer shows information in
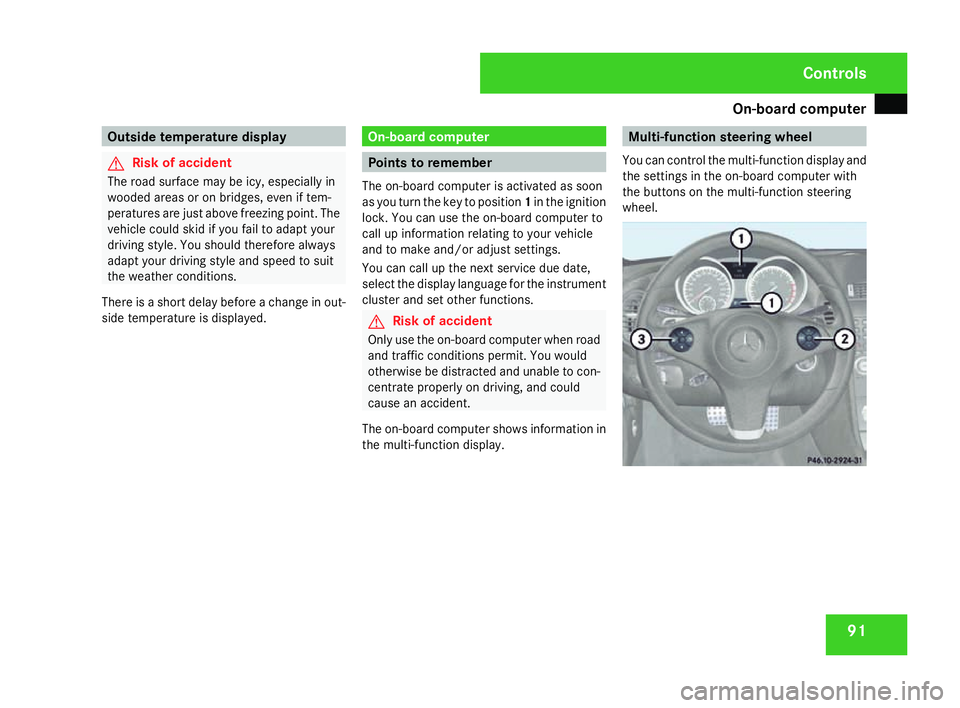
the multi-function display. Multi-function steering wheel
You can control the multi-function display and
the settings in the on-board computer wit h
the buttons on the multi-function steering
wheel. Controls
171_AKB; 3; 4, en-G
B
vpfaff7, 2007-11-13T10:50:25+01:00 - Seite 91
Page 109 of 273

On-board computer
106
lock centrally from a speed of about
15 km/h upwards.
i
For more information on automatic lock-
ing, see (Y page 57).
X Press the èor· button to select the
Settings menu.
X Press the jbutton to call up the selec-
tion of submenus.
X Press the æorç button to select the
Vehicl esubmenu.
X Press the jbutton to select Automatic
door lockin g.
X Press the æorç button to switc h
the Automatic door lockin gfeature on
or off.
X Press the j,è orÿ button to
select a different display.
Activating or deactivating the easy-
entry/exit feature* i
For more information on the easy-entry/
exit feature, see (Y page 65). G
Risk of injury
When the easy-entry/exit feature is active,
the steering wheel moves. There is a risk of
occupants becoming trapped. Before acti -
vating the easy-entry/exit feature, make
sure that nobody can become trapped.
Do not leave children unsupervised in the
vehicle, even if they are secured in a child
restraint system. The children could open
the driver's door and thereby unintention-
ally activate the easy-entry/exit feature
and become trapped.
X Press the èor· button to select the
Settings menu.
X Press the jbutton to call up the selec-
tion of submenus.
X Press æorç to select the Conve-
nience submenu.
X Press the jbutton to select the EASY-
ENTRY system .
X Press the æorç button to activate
or deactivate the EASY-ENTRY system .
X Press the j,è orÿ button to
select a different display. Activating or deactivating the fold-in
mirrors when locking* function The
Fold in mirrors when lockin gfunc-
tion allows you to determine whether the
exterior mirrors should fold in when you lock
the vehicle. When you open a door or switch
on the ignition, the exterior mirrors fold out
again.
If you have switched the function on and you
fold in the exterior mirrors using the button
on the centre console (Y page 66), they will
not fold out automatically. The exterior mir-
rors can then only be folded out using the
button on the centre console.
X Press the èor· button to select the
Settings menu.
X Press the jbutton to call up the selec-
tion of submenus.
X Press the æorç button to select the
Convenience submenu.
X Press the jbutton to select Fold in
mirrors when lockin g. Cont
rols
* optional
171_AKB; 3; 4, en-GB
vpfaff7,
2007-11-13T10:50:25+01:00 - Seite 106
Page 145 of 273
Features
142 relating to the possible health risk posed by
electromagnetic fields.
i In order to ensure optimum signal quality
for mobile phones and to minimise mutual
interference between the vehicle electron -
ics and mobile phones, Mercedes-Benz rec -
ommends the use of an approved exterior
aerial. An exterior aerial conducts the elec-
tromagnetic fields generated by a wireless
device to the exterior of the vehicle; the
field strength within the vehicle interior is
lower than in a vehicle that does not have
an exterior aerial.
i There are various mobile phone bracket s
that may be fitted to your vehicle; in some
cases these are country-specific. You can
obtain these mobile phone brackets from a
qualified specialist workshop, e.g. a
Mercedes-Benz Service Centre. The func-
tions and services available when you use
the phone depend on your mobile phone
model and service provider.
The mobile phone bracket is in the armrest.
X Open the telephone compartment
(Y page 138). Inserting the mobile phone into the
mobile phone bracket If the mobile phone is inserted into the mobile
phone bracket, you can only speak to the per-
son you are calling using the hands-free sys-
tem.
! Do not attempt to remove the mobile
phone and the telephone bracket together.
You could otherwise damage the mobile
phone bracket.
X Remove the cover of the aerial plug from
the back of the mobile phone and keep it in
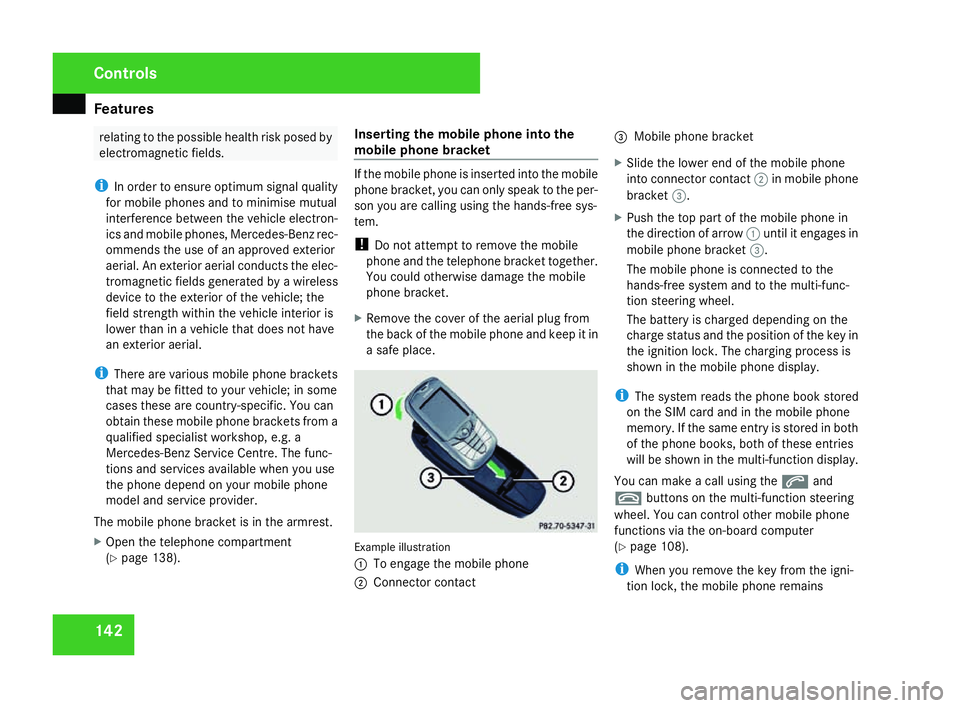
a safe place. Example illustration
1 To engage the mobile phone
2 Connector contact 3
Mobile phone bracket
X Slide the lower end of the mobile phone
into connector contact 2in mobile phon e
bracket 3.
X Push the top part of the mobile phone in
the direction of arrow 1until it engages in
mobile phone bracket 3.
The mobile phone is connected to the
hands-free system and to the multi-func-
tion steering wheel.
The battery is charged depending on the
charge status and the position of the key in
the ignition lock. The charging process is
shown in the mobile phone display .
i The system reads the phone book stored
on the SIM card and in the mobile phone
memory. If the same entry is stored in both
of the phone books, both of these entries
will be shown in the multi-function display .
You can make a call using the sand
t buttons on the multi-function steering
wheel. You can control other mobile phone
functions via the on-board computer
( Y page 108).
i When you remove the key from the igni-
tion lock, the mobile phone remains Controls
171_AKB; 3; 4, en-GB
vpfaff7
, 2007-11-13T10:50:25+01:00 - Seite 142
Page 155 of 273
Engine compartment
152
Via the on-board computer*
X
Make sure that the key is in position 2in
the ignition lock (Y page 59).
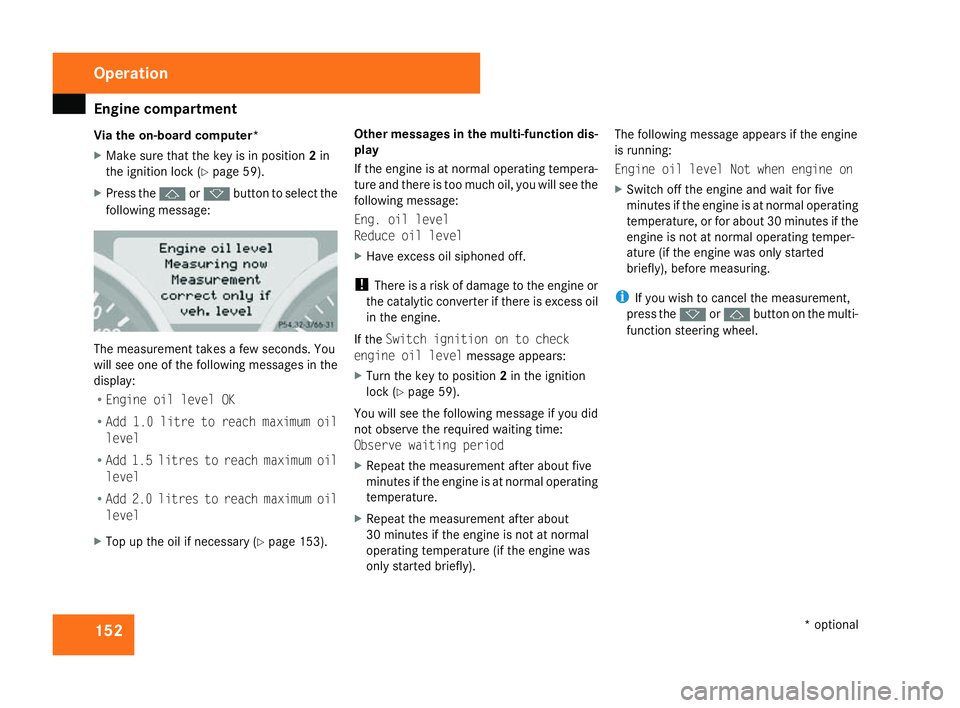
X Press the jork button to select the
following message: The measurement takes a few seconds. You
will see one of the following messages in the
display:
R Engine oil level OK
R Add 1.0 litre to reach maximum oil
level
R Add 1.5 litres to reach maximum oil
level
R Add 2.0 litres to reach maximum oil
level
X Top up the oil if necessary (Y page 153). Other messages in the multi-function dis-
play
If the engine is at normal operating tempera-
ture and there is too much oil, you will see the
following message:
Eng. oil level
Reduce oil level
X
Have excess oil siphoned off.
! There is a risk of damage to the engine or
the catalytic converter if there is excess oil
in the engine.
If the Switch ignition on to chec k
engine oil level message appears:
X Turn the key to position 2in the ignition
lock (Y page 59).
You will see the following message if you did
not observe the required waiting time:
Observe waiting period
X Repeat the measurement after about fiv e
minutes if the engine is at normal operating
temperature.
X Repeat the measurement after about
30 minutes if the engine is not at normal
operating temperature (if the engine was
only started briefly). The following message appears if the engin
e
is running:
Engine oil level Not when engine on
X Switch off the engine and wait for fiv e
minutes if the engine is at normal operating
temperature, or for about 30 minutes if the
engine is not at normal operating temper-
ature (if the engine was only started
briefly), before measuring.
i If you wish to cancel the measurement,
press the korj button on the multi-
function steering wheel. Operation
* optional
171_AKB; 3; 4, en-GB
vpfaff7
, 2007-11-13T10:50:25+01:00 - Seite 152
Page 160 of 273
Tyres and wheels
15
7
cate that the wheels or tyres are damaged.
If you suspect that a tyre is defective,
reduce your speed and stop the vehicle as
soon as possible to check the wheels and
tyres for damage. Hidden tyre damag e
could also be causing the unusual handling
characteristics. If you find no signs of dam-
age, have the wheels and tyres inspected
at a specialist workshop, for example at a
Mercedes-Benz Service Centre.
R When parking your vehicle, make sure that
the tyres do not get deformed by the kerb
or other obstacles. If it is necessary to drive
over kerbs, speed humps or similar, try to
do so slowly and at an obtuse angle. Oth-
erwise, the tyres, particularly the sidewalls,
could get damaged. Direction of rotation
Direction of rotation Tyres with a specified direction of rotation
have additional benefits, e.g. if there is a risk
of aquaplaning. You will only gain these ben-
efits if the correct direction of rotation is
observed.
An arrow on the sidewall of the tyre indicates
its correct direction of rotation.
i You may fit a spare tyre *against th e
direction of rotation. Tyre tread
G
Risk of accident
Bear in mind that:
R tyre grip decreases rapidly on wet roads
when the tread depth is less than 3 mm.
You should thus replace tyres that have
insufficient tread.
R winter tyres should be replaced when th e
tread depth is 4 mm or less because oth - erwise they no longer provide adequate
grip.
R the tread on a tyre may not wear evenly .
You should thus regularly check the tread
depth and the condition of the tread
across the entire width of all tyres. If nec -
essary, turn the steering wheel so that
you can see the tyre tread more easily.
You could otherwise lose control of the
vehicle and cause an accident due to the
reduced grip of the tyres on the road. Tyre pressures
G
Risk of accident
Tyre pressure that is either too high or too
low has a negative effect on the vehicle’ s
active safety, which could lead you to caus e
an accident. You should therefore regularly
check the pressure of all your tyres (includ -
ing the spare tyre*), particularly prior to
long trips, and correct the pressure as nec -
essary.
To test tyre pressure, use a suitable pressure
gauge. The outer appearance of a tyre does
not permit any reliable conclusion about the
tyre pressure. Operation
* optional
171_AKB; 3; 4, en-GB
vpfaff7
, 2007-11-13T10:50:25+01:00 - Seite 157 Z
Page 161 of 273
Tyres and wheels
15
8
If the vehicle is to be heavily laden or driven
at high speeds, the tyre pressure must be
adapted according to the specifications given
in the fuel filler flap
(Y page 148).
Use the highest specified tyre pressure for
the spare wheel* . G
Risk of accident
Should the tyre pressure drop repeatedly:
R Check the tyre for foreign bodies.
R Check whether the wheel is losing air or
the valve is leaking .
Tyre pressure that is too low has a negative
effect on the vehicle’s active safety, which
could lead to your causing an accident .
Tyre pressure changes by approximately
0.1 bar for every 10 °C change in ambient
temperature.
If you measure the tyre pressure in enclosed
spaces where the temperature differs from
the outside temperature, you will have to cor-
rect the measured value accordingly.
When the vehicle is driven, the tyre tempera-
ture, and with it the tyre pressure, will
increase depending on the road speed and
the load on the tyres.
Therefore, you should only correct tyre pres-
sures when the tyres are cold. The pressure of warm tyres should only be
corrected if it is too low for the current oper-
ating conditions.
You will find a table of tyre pressures for var-
ious operating conditions on the inside of
your vehicle's fuel filler flap.
Driving with tyre pressure that is too high or
too low can:
R shorten the service life of the tyres
R cause increased tyre damag e
R have a negative effect on handling charac-
teristics (e.g. by causing aquaplaning)
i The tyre pressure values given for low
loads are minimum values which offer you
good ride comfort characteristics.
You can, however, also use the values given
for higher loads. These are permissible and
will not adversely affect the running of the
vehicle.
Also check the tyre pressure of the spare
wheel*. H
Environmental not
e
Check the tyre pressure regularly, and at
least every 14 days. Tyre pressure loss warning system*
G
Risk of accident
The tyre pressure loss warning system doe s
not warn you of an incorrectly set tyre pres-
sure. The table on the inside of the fuel fille r
flap will help you decide whether the tyre
pressures should be corrected.
The tyre pressure loss warning system does
not replace the need to regularly check
your vehicle's tyre pressures, since an even
loss of pressure on several tyres at the
same time cannot be detected by the tyre
pressure loss warning system.
The tyre pressure loss warning system is
not able to warn you of a sudden loss of
pressure, e.g. if the tyre is penetrated by a
foreign object.
In the event of a sudden loss of pressure,
bring the vehicle to a halt by braking care-
fully. Do not make any sudden steering
movements when doing so.
While the vehicle is in motion, the tyre pres-
sure loss warning system monitors the set
tyre pressure using the rotational speed of
the wheels. This enables the system to detect
significant pressure loss in a tyre. If the spee d
of rotation of a wheel changes as a result of
a loss of pressure, a corresponding warning Operation
* optional
171_AKB; 3; 4, en-GB
vpfaff7,
2007-11-13T10:50:25+01:00 - Seite 158
Page 164 of 273
Winter driving
161
the vehicle, affix an appropriate warning sign
in the driver's field of vision. This can be
obtained at a qualified specialist workshop,
e.g. from a Mercedes-Benz Service Centre.
In such circumstances, you should also
restrict the maximum speed of the vehicle
using permanent Speedtronic 24
to the maxi-
mum permissible speed for winter tyres
( Y page 114). G
Risk of accident
If you fit the spare wheel* when driving with
winter tyres, bear in mind that driving sta-
bility will be impaired owing to unstable
cornering characteristics caused by the dif-
ferent tyres. You should therefore adap t
your driving style and drive carefully.
Have the spare wheel* replaced at th e
nearest qualified specialist workshop
which has the necessary specialist knowl-
edge and tools to carry out the work
required. Mercedes-Benz recommends
that you use a Mercedes-Benz Service
Centre for this purpose. In particular, work
relevant to safety or on safety-related sys-
tems must be carried out at a qualified
specialist workshop . Snow chains
For safety reasons, Mercedes-Benz recom-
mends that you only use snow chains which
have been specially approved for your vehicle
by Mercedes-Benz or are of a correspondin g
standard of quality.
! Information about the use of snow chain-
compatible AMG winter tyres is applicable
for AMG tyres. Use of snow chains is only
permissible with these tyres.
If you intend to fit snow chains, please bear
the following points in mind:
R Snow chains cannot be fitted to all wheel /
tyre combinations.
R Snow chains must not be fitted to emer-
gency spare wheels, e.g. a collapsibl e
emergency spare wheel.
R Fit snow chains to both rear wheels. Com-
ply with the manufacturer's installation
instructions.
! If snow chains are fitted to the front
wheels, they may come into contact with
the bodywork and axle components whe n
the vehicle is in motion and damage the
tyre or the vehicle. Do not exceed the maximum permissibl
e
speed of 50 km/h.
i You may wish to deactivate ES P®
when
pulling away with snow chains fitted
( Y page 51). This way you can allow the
wheels to spin in a controlled manner, ach-
ieving an increased driving force (cutting
action). Winter driving
G
Risk of accident
Do not shift down for additional engine
braking on a slippery road surface. Thi s
could cause the drive wheels to lose thei r
grip and the vehicle could skid.
You should drive particularly carefully on slip-
pery road surfaces. Avoid sudden accelera-
tion, steering and braking manoeuvres.
If the vehicle threatens to skid or cannot be
stopped when moving at low speed:
24 Only available for certain countries. Operation
171_AKB; 3; 4, en-GB
vpfaff7,
2007-11-13T10:50:25+01:00 - Seite 161 Z
Page 165 of 273
Driving
tips 16
2
X
Vehicles with manual transmission: engage
neutral.
X Vehicles with automatic transmission*:
shift the selector lever to N.
X Try to bring the vehicle under control using
corrective steering. Driving tips
Rolling with the engine switched off
G
Risk of accident
Never switch the engine off while the vehi-
cle is in motion.
There is no power assistance for the steer-
ing and the service brake when the engine
is not running.
You will require considerably more effort to
steer and brake and you could therefore
lose control of the vehicle and cause an
accident. Brakin
g G
Risk of accident
Do not change down for additional engine
braking on a slippery road surface. Thi s
could cause the drive wheels to lose thei r
grip and the vehicle could skid. G
Risk of accident
Make sure that other road users are not
endangered by your braking. Downhill gradients On long and steep downhill gradients, espe-
cially if the vehicle is laden, you must shift to
a lower gear in good time or, on vehicles with
automatic transmission*, select shift rang e
1 ,2 or 3.
i This also applies if you have activated
cruise control or Speedtronic.
This uses the braking effect of the engine and
you will not have to brake to such an exten t
to maintain the same speed. This relieves the
load on the brake system and prevents the
brakes from overheating and wearing too
quickly. If you need additional braking ,
depress the brake pedal repeatedly rather
than continuously.
Heavy and light loads If the brakes have been subjected to a heavy
load, do not stop the vehicle immediately, but
drive on for a short while. This allows the air-
flow to cool the brakes more quickly. G
Risk of accident
Never depress the brake pedal continu -
ously while the vehicle is in motion, e.g.
never cause the brakes to rub by applying Operation
* optional
171_AKB; 3; 4, en-GB
vpfaff7,
2007-11-13T10:50:25+01:00 - Seite 162