change wheel MERCEDES-BENZ SLK ROADSTER 2008 Owner's Manual
[x] Cancel search | Manufacturer: MERCEDES-BENZ, Model Year: 2008, Model line: SLK ROADSTER, Model: MERCEDES-BENZ SLK ROADSTER 2008Pages: 273, PDF Size: 4.42 MB
Page 223 of 273

Flat tyre
220
X
Affix part 1of the sticker within the driv-
er's field of vision.
X Affix part 2of the sticker near the valve
on the wheel with the defective tyre. G
Risk of injury
TIREFIT must not come into contact with
your skin, eyes or clothing .
R If TIREFIT comes into contact with your
eyes or skin, immediately rinse thor -
oughly with clean water.
R Change out of clothing which has come
into contact with TIREFIT immediately.
R If an allergic reaction occurs, consult a
doctor immediately.
Keep TIREFIT away from children .
R If TIREFIT is swallowed, immediately
rinse your mouth out thoroughly with
water and drink plenty of water.
R Do not induce vomiting. Consult a doctor
immediately.
R Do not inhale TIREFIT fumes .
i If TIREFIT leaks out, allow it to dry. It can
then be removed like a layer of film. If you get TIREFIT on your clothing, have it
cleaned as soon as possible with perchloro
-
ethylene. G
Risk of injury
Comply with the manufacturer's safety
instructions shown on the sticker on the
electric air pump.
i Your vehicle may be equipped with one of
two different air pumps. Version 1 can be
identified by the flap, behind which the
hose with the pressure gauge and cable are
located; version 2 has a pressure gauge
integrated in the electric air pump. Version
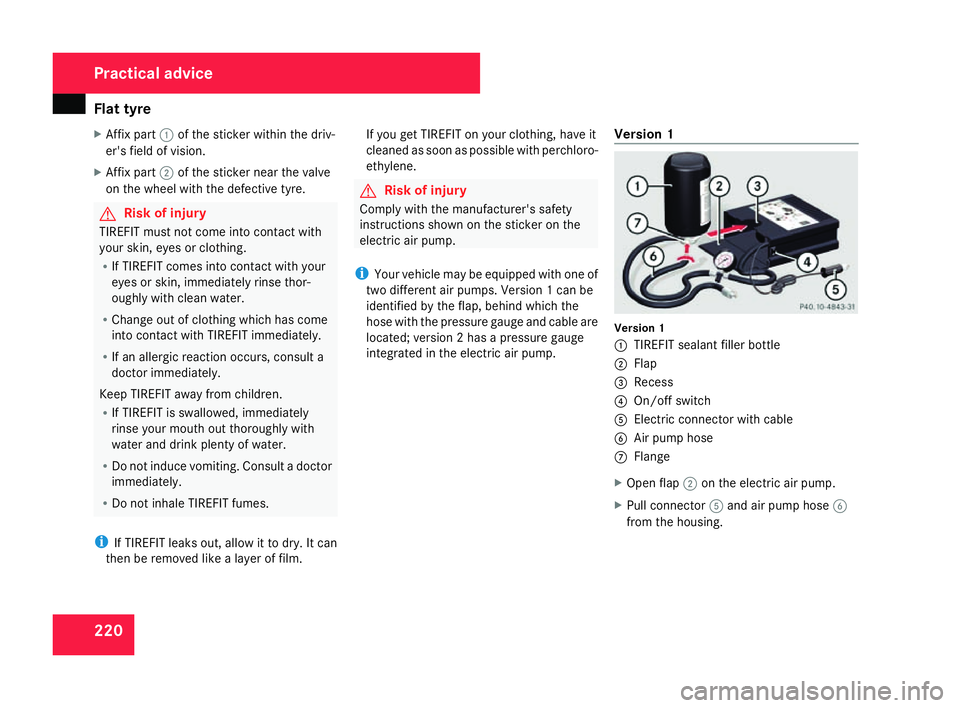
1 Version
1
1 TIREFIT sealant filler bottle
2 Flap
3 Recess
4 On/off switch
5 Electric connector with cable
6 Air pump hos e
7 Flange
X Open flap 2on the electric air pump.
X Pull connector 5and air pump hose 6
from the housing. Practical advic
e
171_AKB; 3; 4, en-GB
vpfaff7,
2007-11-13T10:50:25+01:00 - Seite 220
Page 228 of 273

Flat tyre
225Changing a wheel and fitting the spar
e
wheel * G
Risk of accident
The wheel dimensions and tyre size of the
emergency spare wheel* may differ from
those of the standard wheels.
Your vehicle's handling characteristics will
change when driving with a collapsibl e
emergency spare wheel*. Adapt your style
of driving accordingly.
The collapsible emergency spare wheel*
must only be used for a short time. Do not
exceed the maximum speed of 80 km/h
and do not deactivate ES P®
.
Never drive the vehicle with more than one
collapsible emergency spare wheel* fitted.G
Risk of accident
Have the collapsible emergency spare
wheel* replaced as soon as possible at a
qualified specialist workshop which has the
necessary specialist knowledge and tools
to carry out the work required. Mercedes-
Benz recommends that you use a
Mercedes-Benz Service Centre for this pur-
pose. In particular, work relevant to safety or on safety-related systems must be car-
ried out at a qualified specialist workshop.
Preparing the vehicle X
Prepare the vehicle as described
(Y page 218).
X Place the wheels in the straight-ahead posi-
tion.
X Take the following from the stowage well
beneath the boot floor:
R
the collapsible emergency spare wheel*
R the vehicle tool kit
R the wheel chock
R the jack
R the air pump
X Secure the vehicle to prevent it from rolling
away .
On level ground :place chocks or similar
under the front and rear of the wheel that
is diagonally opposite the wheel you wish
to change.
X On downhill gradients: place chocks or
similar under both wheels of the other axle. Raising the vehicle
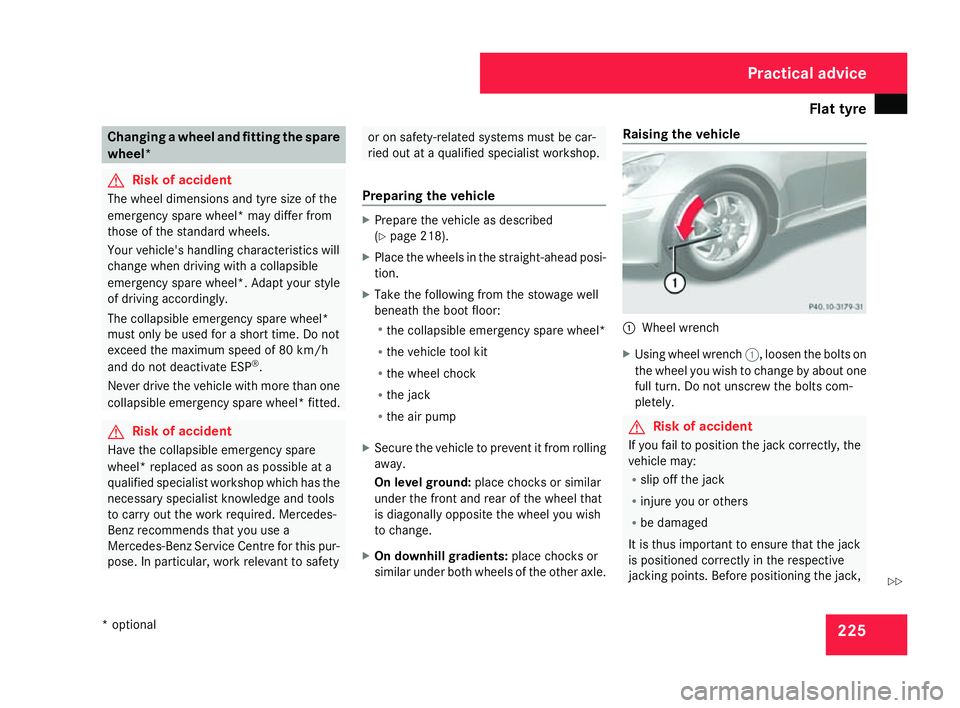
1
Wheel wrenc h
X Using wheel wrench 1, loosen the bolts on
the wheel you wish to change by about one
full turn. Do not unscrew the bolts com -
pletely. G
Risk of accident
If you fail to position the jack correctly, the
vehicle may :
R slip off the jack
R injure you or others
R be damaged
It is thus important to ensure that the jack
is positioned correctly in the respective
jacking points. Before positioning the jack , Practical advice
* optional
171_AKB; 3; 4, en-GB
vpfaff7,
2007-11-13T10:50:25+01:00 - Seite 225 Z
Page 232 of 273

Flat tyre
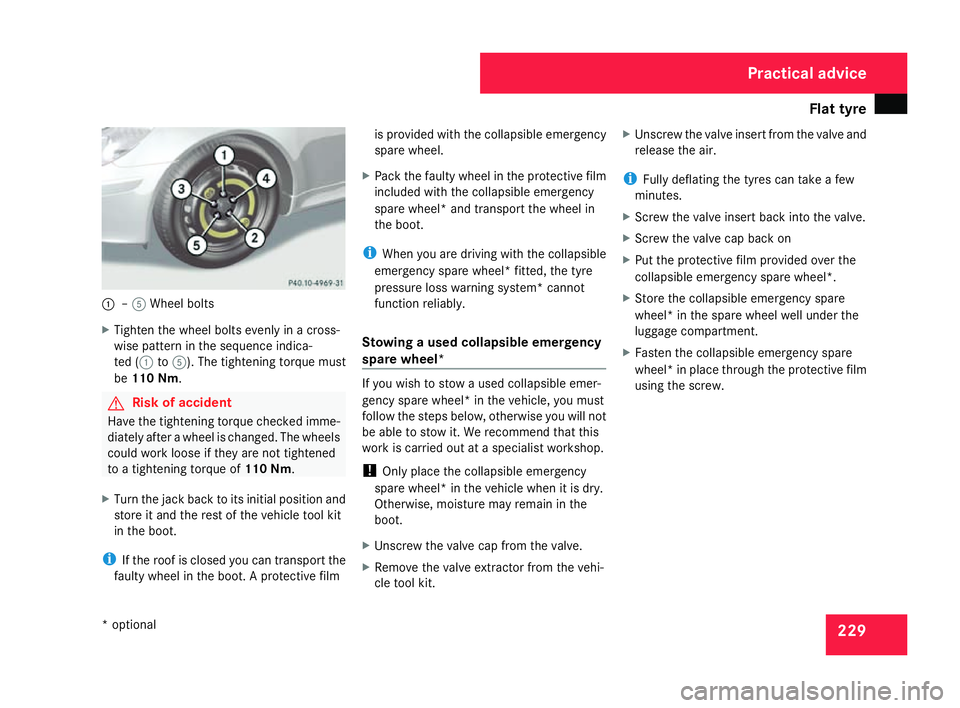
2291
–5 Wheel bolts
X Tighten the wheel bolts evenly in a cross-
wise pattern in the sequence indica-
ted (1 to5 ). The tightening torque must
be 110 Nm. G
Risk of acciden
t
Have the tightening torque checked imme-
diately after a wheel is changed. The wheels
could work loose if they are not tightened
to a tightening torque of 110 Nm.
X Turn the jack back to its initial position and
store it and the rest of the vehicle tool kit
in the boot.
i If the roof is closed you can transport the
faulty wheel in the boot. A protective film is provided with the collapsible emergency
spare wheel.
X Pack the faulty wheel in the protective film
included with the collapsible emergency
spare wheel* and transport the wheel in
the boot .
i When you are driving with the collapsible
emergency spare wheel* fitted, the tyre
pressure loss warning system* cannot
function reliably.
Stowing a used collapsible emergency
spare wheel* If you wish to stow a used collapsible emer-
gency spare wheel* in the vehicle, you must
follow the steps below, otherwise you will not
be able to stow it. We recommend that this
work is carried out at a specialist workshop.
!
Only place the collapsible emergency
spare wheel* in the vehicle when it is dry.
Otherwise, moisture may remain in the
boot.
X Unscrew the valve cap from the valve .
X Remove the valve extractor from the vehi -
cle tool kit. X
Unscrew the valve insert from the valve and
release the air.
i Fully deflating the tyres can take a few
minutes.
X Screw the valve insert back into the valve .
X Screw the valve cap back on
X Put the protective film provided over the
collapsible emergency spare wheel*.
X Store the collapsible emergency spar e
wheel* in the spare wheel well under the
luggage compartment.
X Fasten the collapsible emergency spar e
wheel* in place through the protective film
using the screw. Practical advice
* optional
171_AKB; 3; 4, en-GB
vpfaff7,
2007-11-13T10:50:25+01:00 - Seite 229