ECO mode MERCEDES-BENZ SLK ROADSTER 2008 Owners Manual
[x] Cancel search | Manufacturer: MERCEDES-BENZ, Model Year: 2008, Model line: SLK ROADSTER, Model: MERCEDES-BENZ SLK ROADSTER 2008Pages: 273, PDF Size: 4.42 MB
Page 6 of 273
31, 2, 3 ...
7G–TRONIC . . . . . . . . . . . . . . . . . . . . . .86 A
ABS (Anti-lock Braking System ). . . . .50
Display message . . . . . . . . . . . . . .176
Warning lamp . . . . . . . . . . . . . . . . .193
Acceleratio n
Technical data . . . . . . . . . . . . . . . .245
Accident
Notes . . . . . . . . . . . . . . . . . . . . . . .199
Active Service Syste m
see ASSYST PLUS
Airbag
Activation . . . . . . . . . . . . . . . . . . . . .39
Control unit . . . . . . . . . . . . . . . . . . .39
Driver's . . . . . . . . . . . . . . . . . . . . . . .42
Front . . . . . . . . . . . . . . . . . . . . . . . .42
Front passenger . . . . . . . . . . . . . . . .42
Head/thorax airbags . . . . . . . . . . . .43
PASSENGER AIRBAG OFF warning
lamp . . . . . . . . . . . . . . . . . . . . . . .191
System . . . . . . . . . . . . . . . . . . . . . . .41
Air conditioning
2-zone Thermatic . . . . . . . . . . . . . .122
Activating/deactivating air-recir-
culation mode . . . . . . . . . . . . . . . .131
Activating/deactivating auxiliary
heating/ventilatio n.. . . . . . . . . ..132 Air-recirculation mode with con-
venience opening/closing feature
.131
Controlling automatically . . . . . . . .127
Cooling with air dehumidification . .126
Demisting the windscreen . . . . . . .130
Heatmatic . . . . . . . . . . . . . . . . . . .120
Malfunction indicator lamp . . . . . .191
Misted up windows . . . . . . . . . . . .130
Rear window heating . . . . . . . . . . .130
Setting the air distribution . . . . . . .129
Setting the airflow . . . . . . . . . . . . .129
Setting the air vents . . . . . . . . . . . .128
Setting the temperature . . . . . . . . .127
Thermotronic . . . . . . . . . . . . . . . . .124
see Climate control
Air-conditionin g
Activating/deactivating . . . . . . . . .126
AIRSCARF neck-level heatin g. . . . . . .62
Antifreeze concentratio n. . . . . . . . .260
Anti-lock braking syste m
see ABS
Anti-theft alarm system
see ATA
Anti-theft systems . . . . . . . . . . . . . . ..52
Ashtra y. . . . . . . . . . . . . . . . . . . . . . . .140
ASSYST PLU S. . . . . . . . . . . . . . . . . . .165
ATA (anti-theft alarm system) . . . . ..52
Switching off the alarm . . . . . . . . . .53
Audible warning signa l. . . . . . . . . . .197 AUTO lights
Display message . . . . . . . . . . . . . .183
Automatic car wash . . . . . . . . . . . ..166
Automatic transmission Changing gear yoursel f.. . . . . . . . .86
Display in the speedomete r.. . . . ..85
Display message . . . . . . . . . . . . . .177
Driving tips . . . . . . . . . . . . . . . . . . . .87
Emergency running mod e.. . . . . .203
Malfunction . . . . . . . . . . . . . . . . . .203
One-touch gearshifting . . . . . . . . . . .86
Program selector button . . . . . . . . .87
Releasing the parking lock man -
ually . . . . . . . . . . . . . . . . . . . . . . . .212
Selector lever positions . . . . . . . . . .85
Shift ranges . . . . . . . . . . . . . . . . . . .86
Axle load, maximum permissibl e
. . . . . . . . . . . . . . . . . . . . . . . . . .253, 254 B
BAS (Brake Assist) . . . . . . . . . . . . . . ..50
Battery Changing (key) . . . . . . . . . . . . . . . .212
Charging . . . . . . . . . . . . . . . . . . . . .232
Checking (key ).. . . . . . . . . . . . . . .212
Check lamp (key ).. . . . . . . . . . . . .212
Disconnecting . . . . . . . . . . . . . . . .231
Display message . . . . . . . . . . . . . .180
Maintenance (vehicle ).. . . . . . . ..230
Reconnecting . . . . . . . . . . . . . . . . .232 Index
171_AKB; 3; 4, en-GB
vpfaff7,
2007-11-13T10:50:25+01:00 - Seite
3
Page 68 of 273
Mirrors
65Easy-entry/exit feature*
The easy-entry/exit feature makes getting in
and out of your vehicle easier.
The steering wheel swings upwards whe n
you:
R remove the key from the ignition lock
R open the driver's door when the key is in
the ignition lock or in position 1.
The steering wheel is moved automatically to
the position previously set when the key is
inserted into the ignition lock with the driver's
door closed. G
Risk of injury
Make sure that nobody can become trap -
ped when you activate the easy-entry/exit
feature.
If there is a risk of becoming trapped, stop
the adjustment procedure. To halt the pro-
cedure:
R press the steering-column adjustment
switc h
R press one of the memory function posi-
tion buttons
The steering column stops moving immedi-
ately. Never leave children unsupervised in the
vehicle. They could open the driver's door
and thereby unintentionally activate the
easy-entry feature and become trapped.
The most recent position of the steering
wheel is stored when you switch off the igni-
tion or when you store a memory position
( Y page 68).
You can activate and deactivate the easy-
entry/exit feature via the on-board computer
( Y page 106). Mirrors
Rear-view mirror
X Adjust the rear-view mirror by hand so yo u
have a good overview of the traffic condi-
tions.
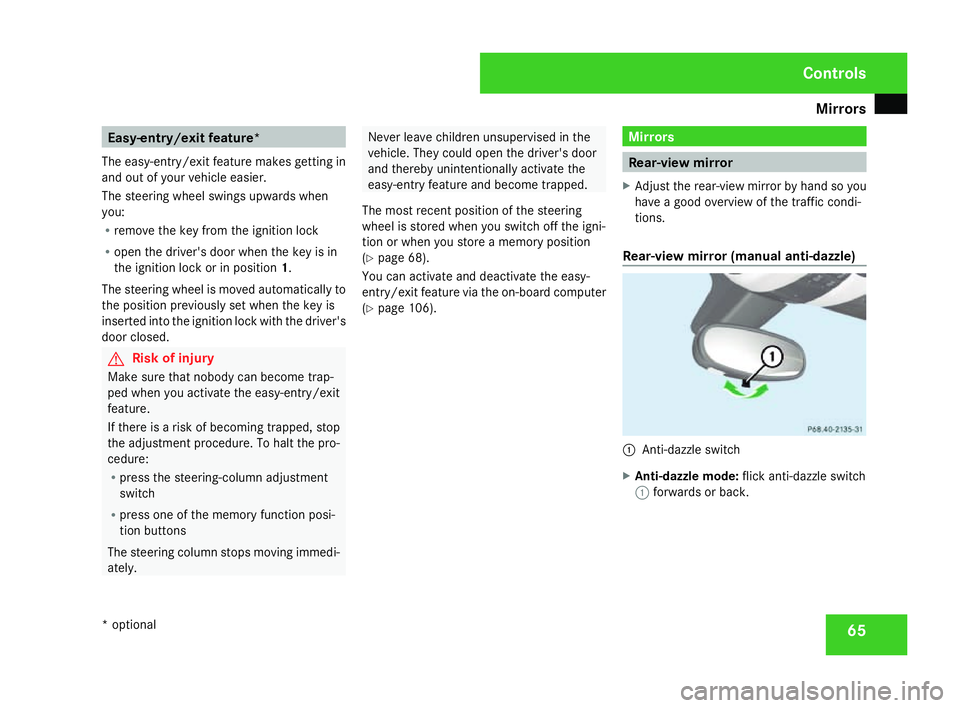
Rear-view mirror (manual anti-dazzle) 1
Anti-dazzle switch
X Anti-dazzle mode: flick anti-dazzle switch
1 forwards or back. Controls
* optional
171_AKB; 3; 4, en-GB
vpfaff7,
2007-11-13T10:50:25+01:00 - Seite 65
Page 70 of 273
Mirrors
67
R
The exterior mirrors fold in automatically as
soon as you lock the vehicle from the out-
side.
R The exterior mirrors fold out again auto-
matically as soon as you unlock the vehicle
and then open the driver's or front-
passenger door.
i If you have activated this function and fold
in the exterior mirrors using button 1, they
will not be folded out automatically. You
can then only fold out the exterior mirrors
using button 1. Automatic anti-dazzle mirrors
*
The rear-view mirror and the exterior mirror
on the driver's side automatically go into anti-
dazzle mode if the ignition is switched on and
incident light from headlamps strikes the sen-
sor in the rear-view mirror.
The mirrors do not go into anti-dazzle mode if
reverse gear is engaged and the interior light-
ing is switched on. G
Risk of accident
If incident light from the headlamps of othe r
vehicles is prevented from striking the sen-
sor in the rear-view mirror, for instance if the draught stop is fitted, the mirrors' auto-
matic anti-dazzle function will not operate.
Incident light could then dazzle you. This
may prevent you from observing the traffic
conditions, thereby causing an accident. In
this case, adjust the rear-view mirror man-
ually. Parking aid*
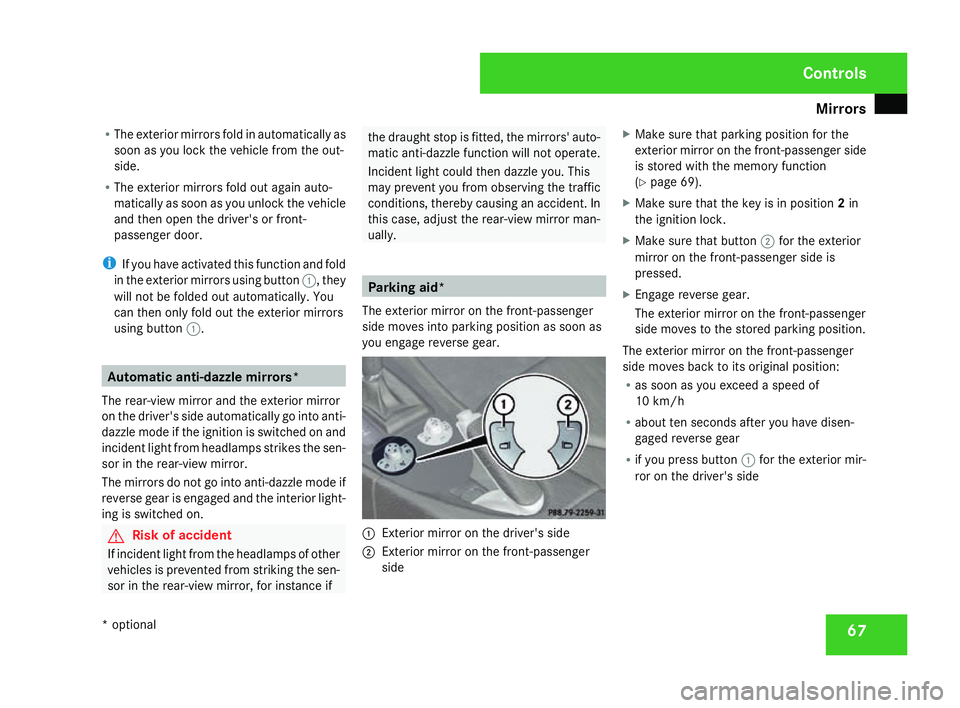
The exterior mirror on the front-passenger
side moves into parking position as soon as
you engage reverse gear. 1
Exterior mirror on the driver's side
2 Exterior mirror on the front-passenge r
side X
Make sure that parking position for the
exterior mirror on the front-passenger side
is stored with the memory function
(Y page 69).
X Make sure that the key is in position 2in
the ignition lock .
X Make sure that button 2for the exterior
mirror on the front-passenger side is
pressed.
X Engage reverse gear .
The exterior mirror on the front-passenger
side moves to the stored parking position.
The exterior mirror on the front-passenger
side moves back to its original position:
R as soon as you exceed a speed of
10 km/h
R about ten seconds after you have disen -
gaged reverse gear
R if you press button 1for the exterior mir-
ror on the driver's sid e Controls
* optional
171_AKB; 3; 4, en-GB
vpfaff7,
2007-11-13T10:50:25+01:00 - Seite 67
Page 76 of 273
Light
s 73Lights
Light switch
For reasons of safety, Mercedes-Benz recom-
mends that you drive with the lights switched
on even during the daytime. In some coun -
tries, daytime use of headlamps varies due to
legal requirements and self-imposed obliga -
tions. In these countries, dipped-beam head -
lamps are switched on when the ignition is
switched on.
i If you drive in countries in which traffic
drives on the opposite side of the road to
the country where the vehicle is registered ,
oncoming traffic may be dazzled by the
asymmetrical dipped-beam headlamps.
Have the headlamps changed to symmet-
rical dipped beam when driving in these
countries. You can obtain information
about this from any Mercedes-Benz Servic e
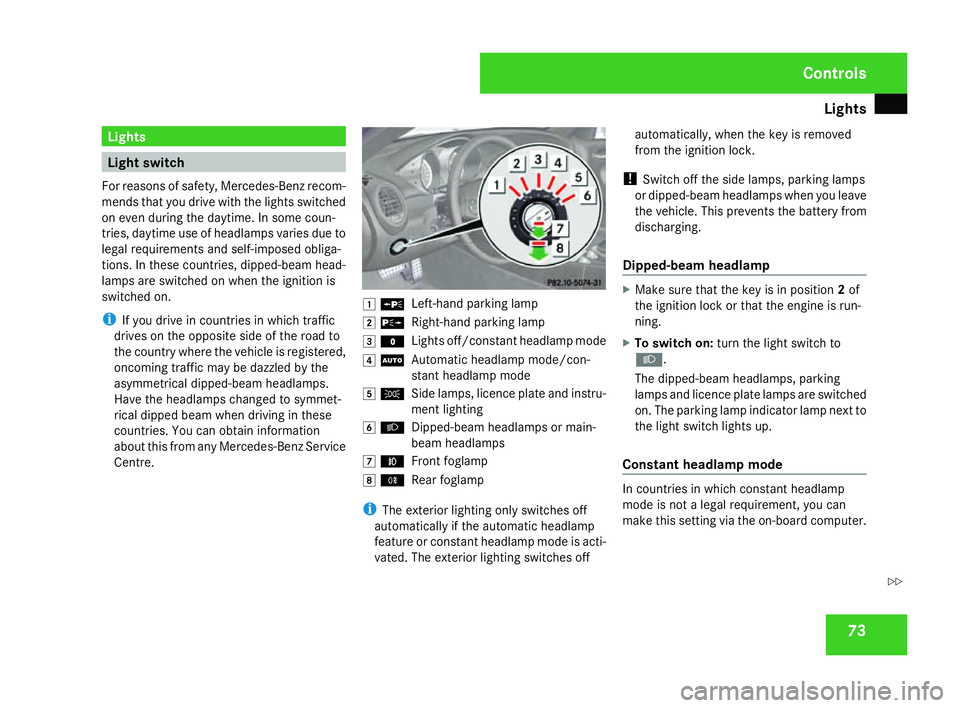
Centre. $
a
Left-hand parking lamp
% g
Right-hand parking lamp
& M
Lights off/constant headlamp mode
( U
Automatic headlamp mode/con-
stant headlamp mod e
) C
Side lamps, licence plate and instru-
ment lighting
* B
Dipped-beam headlamps or main-
beam headlamps
, ¥
Front foglamp
. †
Rear foglamp
i The exterior lighting only switches off
automatically if the automatic headlamp
feature or constant headlamp mode is acti-
vated. The exterior lighting switches off automatically, when the key is removed
from the ignition lock.
! Switch off the side lamps, parking lamps
or dipped-beam headlamps when you leave
the vehicle. This prevents the battery from
discharging.
Dipped-beam headlam p X
Make sure that the key is in position 2of
the ignition lock or that the engine is run-
ning.
X To switch on :turn the light switch to
B .
The dipped-beam headlamps, parking
lamps and licence plate lamps are switched
on. The parking lamp indicator lamp next to
the light switch lights up.
Constant headlamp mode In countries in which constant headlamp
mode is not a legal requirement, you can
make this setting via the on-board computer
. Cont
rols
171_AKB; 3; 4, en-GB
vpfaff7,
2007-11-13T10:50:25+01:00 - Seite 73 Z
Page 77 of 273
Light
s 74
X
Make sure that constant headlamp mode
has been set with the on-board computer
(Y page 101). 8
X To switch on :turn the light switch to
M orU .
The dipped-beam headlamps, side lamps
and licence plate lighting are switched on
when the engine is running.
i When you turn the light switch to any
position other than MorU , the cor -
responding light goes on.
Automatic headlamp mode The side lamps, dipped-beam headlamps and
licence plate lighting are switched on or off
automatically, depending on the brightness of
the ambient light. G
Risk of accident
If the light switch is set to U, the head-
lamps may temporarily switch off due to
exposure to light, or the lights may not
come on automatically if it is foggy. This
could endanger you and others. Therefore,
turn the light switch to Bin the dark or
in fog. The automatic headlamp feature is only an
aid. The driver is responsible for the vehicle
lighting at all times.
G
Risk of accident
When it is dark or foggy, turn the light
switch quickly from UtoB . You
could otherwise cause an accident if the
headlamps were to switch off temporarily.
X To switch on :turn the light switch to
U .
The side lamps are switched on and off
automatically when the key is in position
1 in the ignition lock .
The dipped-beam headlamps, side lamps
and licence plate lighting are switched on
automatically when the engine is running.
When the parking lamp or dipped-beam
headlamps are switched on, the indicator
lamp next to the light switch lights up.
Front foglamps/rear foglamp G
Risk of accident
If you suspect that driving conditions will be
foggy, turn the light switch to Bbefore you start your journey. Otherwise, your
vehicle may not be visible and you could
therefore endanger yourself and others.
G
Risk of accident
When it is dark or foggy, turn the light
switch quickly from UtoB . You
could otherwise cause an accident if the
headlamps were to switch off temporarily.
i When the light switch is set to Uyou
cannot switch on the front or rear fog-
lamps.
X Make sure that the key is in position 2in
the ignition lock .
X To switch on the front foglamps: turn the
light switch to the BorC position .
X Pull the light switch out to the first stop.
The ¥ green indicator lamp next to the
light switch lights up.
X To switch on the rear foglamp: turn the
light switch to the Bposition .
X Pull the light switch out to the second stop.
The † yellow indicator lamp next to th e
light switch lights up.
8 This is not possible in countries where constant headlamp mode is required by law. Controls
171_AKB; 3; 4, en-GB
vpfaff7,
2007-11-13T10:50:25+01:00 - Seite 74
Page 104 of 273
On-board computer
101
X
Press the èor· button repeatedly
until either the original menu or the Mes-
sage memory menu appears.
If the Message memory menu does not
appear, there are no display messages.
If there are messages, the following mes-
sage may appear in the multi-function dis-
play, for example: 2 messages.
X Press the jork button to call up a
display message.
You can scroll through the display mes-
sages in sequence. The possible display
messages are explained in the "Practical
advice" section (Y page 174). Settings menu
In the Settings menu, you can use the To
reset: Press reset button for 3 sec-
onds function to restore most settings to the
factory settings. There are also submenus in
which you can make individual settings for
your vehicle.
i Menu overview: see (Y page 94).
Use the buttons on the multi-function steer -
ing wheel. Resetting to factory settings For safety reasons, not all functions are reset
:
permanent Speedtronic can only be set in the
Vehicl esubmenu. The Headlamp mode
function in the Lightingsubmenu is only
reset if the vehicle is stationary.
X Press èor· to select the Set-
tings menu.
X Press and hold reset button Jon the left
of the instrument cluster for approximately
three seconds.
A prompt appears in the multi-function dis-
play asking you to press the reset button
again to confirm.
X Press reset button Jagain .
The functions of most submenus are
restored to the factory settings.
or
X If you want to retain the settings, do not
press reset buttonJ a second time.
You will see the Settingsmenu again after
approximately 5 seconds.
X Press the èor· button to select a
different menu. Submenus in the Settings menu X
Press èor· to select the Set-
tings menu.
X Press the jbutton to call up the selec-
tion of submenus.
A submenu appears. There are several sub-
menus. X
Press the æorç button to select a
submenu.
The selected submenu is highlighted.
X Press the jbutton to select a function
within a submenu.
X Press the æorç button to chang e
the setting .
The changed setting is stored.
X Press the èorÿ button to select a
different display.
The following tables show the settings you
can make in the individual submenus. You will Controls
171_AKB; 3; 4, en-GB
vpfaff7,
2007-11-13T10:50:25+01:00 - Seite 101 Z
Page 105 of 273
On-board computer
102
find additional information on the pages
shown. Instrument cluster submenu
R
Unit of measurement for distance
(Y page 102 )
R Language (Y page 102 )
R Status line display (Y page 103 ) Time/date submen
u13 R
Time and date (Y page 103 ) Lighting submenu
R
Constant headlamp mode (Y page 104 )
R Surround lighting (Y page 104 )
R Exterior lighting delayed switch-off
(Y page 105 )
R Interior lighting delayed switch-off
(Y page 105 ) Vehicle submen
u R
Permanent Speedtronic (Y page 114 )
R Automatic locking feature (Y page 105 ) Convenience submenu*
R
Easy-entry/exit feature * (Y page 106 )
R Fold in the exterior mirrors when locking
the vehicle* (Y page 106 ) Selecting the unit of measurement for
distance
The selected unit of measurement for dis-
tance applies to:
R the analogue speedometer (only vehicles
with speedometers in km/h )
R the digital speedometer (not for vehicles
for the United Kingdom with speedometers
in mph )
R the total distance recorder and the tri p
meter
R the trip compute r R
cruise control
R Speedtroni c
Vehicles for the United Kingdom: the ana-
logue speedometer and the digital speedom-
eter always show different units.
X Press the èor· button to select the
Settings menu.
X Press the jbutton to call up the selec-
tion of submenus.
X Press the æorç button to select the
Instr. cluste rsubmenu.
X Press the jbutton to select Display
unit Speed-/odometer.
X Press æorç to select km(kilome-
tres) or milesas the unit of measurement
for distance.
X Press the j,è orÿ button to
select a different display.
Selecting the language X
Press the èor· button to select the
Settings menu.
X Press the jbutton to call up the selec-
tion of submenus.
13 This function is not available on vehicles with Audio 50 APS*, Audio 55 APS* or COMAND APS*. Controls
* optional
171_AKB; 3; 4, en-GB
vpfaff7,
2007-11-13T10:50:25+01:00 - Seite 102
Page 107 of 273
On-board computer
104
Setting the tim
e
X Use the jbutton to select Clock,
hours Press R to confir m(or Clock ,
minutes Press R to confirm).
X Press the æorç button to set a
value.
X Press the reset button Jon the left of the
instrument cluster.
The set time is stored.
Setting the date
X Press the jbutton to select Set date
Day (orSet date Month orSet date
Year).
X Press the æorç button to set the
values.
X Press the j,è orÿ button to
select a different display.
Setting constant headlamp mode If you have selected constant headlamp mode
and the light switch is set to the
Mor
U position, the side lamps, dipped-beam
headlamps and licence plate lighting switc h
on automatically when the engine is running. Turning the light switch to a different position
switches on the corresponding lights.
In countries in which constant headlamp
mode is a legal requirement,
Constantis the
factory setting.
X Press the èor· button to select the
Settings menu.
X Press the jbutton to call up the selec-
tion of submenus.
X Press the æorç button to select the
Lighting submenu.
X Press the jbutton to select Headlamp
mode.
X Press the æorç button to set the
switch-on mode for the headlamps to Man-
ual orConstant (constant headlamp
mode).
X Press the j,è orÿ button to
select a different display. Switching the surround lighting on or
off If the surround lighting is switched on, the
following lights will be switched on automat-
ically in the dark after you have unlocked the
vehicle using the key:
R the side lamps
R the tail lamps
R the licence plate lighting
R the front foglamps
The surround lighting switches off automati-
cally if you open the driver's door or after 40
seconds.
X Press the èor· button to select the
Settings menu.
X Press the jbutton to call up the selec-
tion of submenus.
X Press the æorç button to select the
Lighting submenu.
X Press the jbutton to select the Sur-
round lighting function. Cont
rols
171_AKB; 3; 4, en-GB
vpfaff7,
2007-11-13T10:50:25+01:00 - Seite 104
Page 124 of 273

Air conditionin
g 121Function Recommendation/Notes
3 Sets the air distribution (
Y page 129 ) 4 Sets the temperature, right i
Set the temperature to 22 †. (
Y page 127 ) 5 ¯
Switches the rear window heating on/of f i
At very low temperatures, the rear window heating is
only switched on once the vehicle interior has warme d
up. (
Y page 130 ) 6 y
Activates/deactivates the demisting function for
the windscree n i
Only use the "demisting" function until the wind-
screen is clear again. (
Y page 130 ) 7 T
Activates/deactivates the auxiliary heating/venti-
latio n i
You can use the residual heat to heat or ventilate the
vehicle interior after you have switched off the ignition. (
Y page 132 ) 8 ,
Activates/deactivates air-recirculation mod e i
Only use this operating mode for a short time, e.g. in
a tunnel. Otherwise, the windows can mist up due to
lack of fresh air. (
Y page 131 ) Cont
rols
171_AKB; 3; 4, en-GB
vpfaff7,
2007-11-13T10:50:25+01:00 - Seite 121
Page 126 of 273
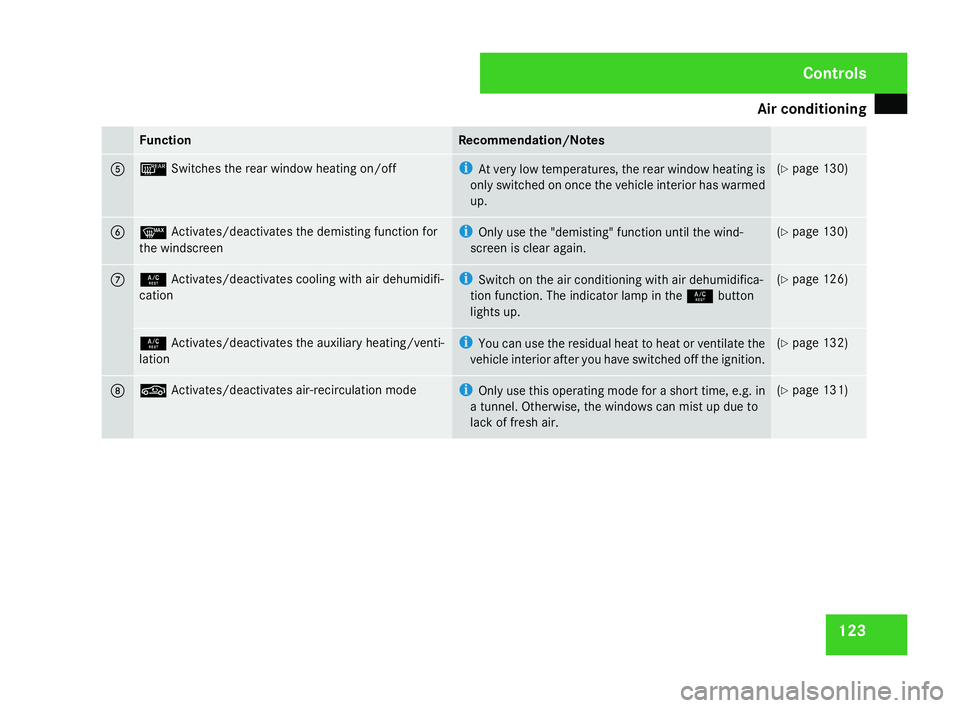
Air conditionin
g 123Function Recommendation/Notes
5 ¯
Switches the rear window heating on/of f i
At very low temperatures, the rear window heating is
only switched on once the vehicle interior has warme d
up. (
Y page 130 ) 6 y
Activates/deactivates the demisting function for
the windscree n i
Only use the "demisting" function until the wind-
screen is clear again. (
Y page 130 ) 7 9
Activates/deactivates cooling with air dehumidifi -
cation i
Switch on the air conditioning with air dehumidifica-
tion function. The indicator lamp in the 9button
lights up. (
Y page 126 ) 9
Activates/deactivates the auxiliary heating/venti-
latio n i
You can use the residual heat to heat or ventilate the
vehicle interior after you have switched off the ignition. (
Y page 132 ) 8 ,
Activates/deactivates air-recirculation mod e i
Only use this operating mode for a short time, e.g. in
a tunnel. Otherwise, the windows can mist up due to
lack of fresh air. (
Y page 131 ) Cont
rols
171_AKB; 3; 4, en-GB
vpfaff7,
2007-11-13T10:50:25+01:00 - Seite 123