bolt pattern MERCEDES-BENZ SLK ROADSTER 2008 Owners Manual
[x] Cancel search | Manufacturer: MERCEDES-BENZ, Model Year: 2008, Model line: SLK ROADSTER, Model: MERCEDES-BENZ SLK ROADSTER 2008Pages: 273, PDF Size: 4.42 MB
Page 163 of 273

Winter driving
160 Interchanging the wheels
G
Risk of accident
Interchange the front and rear wheels only
if they have the same dimensions: for exam-
ple size, offset, etc.
After every wheel interchange/change,
have the tightening torque checked at a
qualified specialist workshop that has the
necessary specialist knowledge and tools
to carry out the work required. Mercedes-
Benz recommends that you use a
Mercedes-Benz Service Centre for this pur-
pose. In particular, work relevant to safety
or on safety-related systems must be car-
ried out at a qualified specialist workshop.
The wheels could work loose if they are not
tightened to a torque of 110 Nm.
For safety reasons, Mercedes-Benz recom -
mends that you only use wheel bolts of the
correct size which have been approved for
Mercedes-Benz vehicles.
The wheels may be interchanged every 5,000
km to 10,000 km depending on the degree of
tyre wear, provided that the vehicle has the
same size front and rear tyres. Do not reverse
the direction of tyre rotation.
The wear patterns on the front and rear tyres
differ depending on the operating conditions. Interchange the wheels before a clear wear
pattern has formed on the tyres. The fron
t
tyres typically wear more on the shoulders
and the rear tyres in the centre.
Clean the contact surfaces of the wheel and
the brake disc thoroughly every time a whee l
is changed. Check the tyre pressure and, if
necessary, restart the tyre pressure loss
warning system*. Winter driving
Introduction to winter operation
Have your vehicle winterproofed at a qualified
specialist workshop, e.g. at a Mercedes-Ben z
Service Centre, at the onset of winter. Winter tyres
Use winter tyres at temperatures below +7 °
C and on snow or ice-covered roads. Only
then can the effect of the ABS and ES P®
driv-
ing systems be ensured in winter too.
Use winter tyres of the same make and tread
on all wheels to maintain safe handling char-
acteristics. G
Risk of accident
You must replace winter tyres with a trea d
depth of less than 4 mm immediately. They
are no longer suitable for winter use, in par-
ticular because they do not provide suffi-
cient grip. This could cause you to lose
control of your vehicle and cause an acci-
dent .
Always observe the maximum permitted
speed specified for the winter tyres you have
fitted. If you fit winter tyres which have a
lower maximum permitted speed than that of Operation
* optional
171_AKB; 3; 4, en-GB
vpfaff7,
2007-11-13T10:50:25+01:00 - Seite 160
Page 232 of 273

Flat tyre
2291
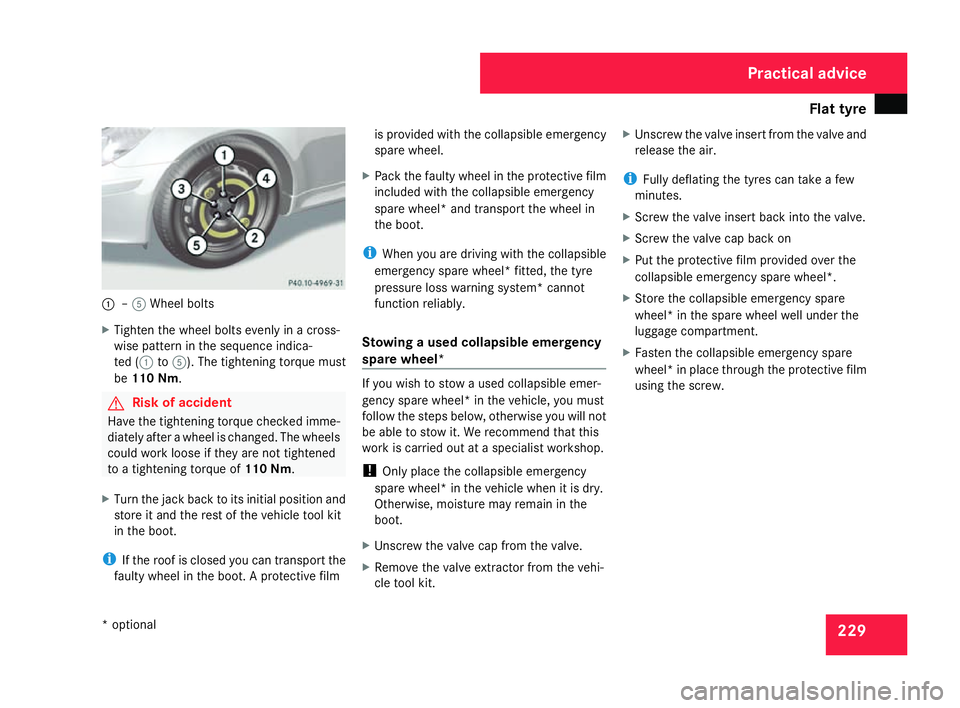
–5 Wheel bolts
X Tighten the wheel bolts evenly in a cross-
wise pattern in the sequence indica-
ted (1 to5 ). The tightening torque must
be 110 Nm. G
Risk of acciden
t
Have the tightening torque checked imme-
diately after a wheel is changed. The wheels
could work loose if they are not tightened
to a tightening torque of 110 Nm.
X Turn the jack back to its initial position and
store it and the rest of the vehicle tool kit
in the boot.
i If the roof is closed you can transport the
faulty wheel in the boot. A protective film is provided with the collapsible emergency
spare wheel.
X Pack the faulty wheel in the protective film
included with the collapsible emergency
spare wheel* and transport the wheel in
the boot .
i When you are driving with the collapsible
emergency spare wheel* fitted, the tyre
pressure loss warning system* cannot
function reliably.
Stowing a used collapsible emergency
spare wheel* If you wish to stow a used collapsible emer-
gency spare wheel* in the vehicle, you must
follow the steps below, otherwise you will not
be able to stow it. We recommend that this
work is carried out at a specialist workshop.
!
Only place the collapsible emergency
spare wheel* in the vehicle when it is dry.
Otherwise, moisture may remain in the
boot.
X Unscrew the valve cap from the valve .
X Remove the valve extractor from the vehi -
cle tool kit. X
Unscrew the valve insert from the valve and
release the air.
i Fully deflating the tyres can take a few
minutes.
X Screw the valve insert back into the valve .
X Screw the valve cap back on
X Put the protective film provided over the
collapsible emergency spare wheel*.
X Store the collapsible emergency spar e
wheel* in the spare wheel well under the
luggage compartment.
X Fasten the collapsible emergency spar e
wheel* in place through the protective film
using the screw. Practical advice
* optional
171_AKB; 3; 4, en-GB
vpfaff7,
2007-11-13T10:50:25+01:00 - Seite 229