remote control MERCEDES-BENZ SLK ROADSTER 2008 Owners Manual
[x] Cancel search | Manufacturer: MERCEDES-BENZ, Model Year: 2008, Model line: SLK ROADSTER, Model: MERCEDES-BENZ SLK ROADSTER 2008Pages: 273, PDF Size: 4.42 MB
Page 9 of 273
6
Emergency running mod
e
Automatic transmission . . . . . . . . .203
Emergency unlocking
Boot . . . . . . . . . . . . . . . . . . . . . . . .211
Vehicle . . . . . . . . . . . . . . . . . . . . . .210
Engine
Display message . . . . . . . . . . . . . .187
Running irregularl y.. . . . . . . . . . . .201
Starting problems . . . . . . . . . . . . .201
Starting with the key . . . . . . . . . . . .81
Technical data . . . . . . . . . . . . . . . .244
Engine diagnostic warning lamp . ..1 95
Engine electronics . . . . . . . . . . . . . ..241
Malfunction . . . . . . . . . . . . . . . . . .201
Engine number . . . . . . . . . . . . . . . . . .243
Engine oil . . . . . . . . . . . . . . . . . . . . . .258
Checking the oil level (dipstick) . . .153
Checking the oil level (on-board
computer) . . . . . . . . . . . . . . . . . . .152
Consumption . . . . . . . . . . . . . . . . .151
Display message . . . . . . . . . . . . . . . . . . .152, 186, 187
Filler neck . . . . . . . . . . . . . . . . . . .153
Temperature display (on-board
computer) . . . . . . . . . . . . . . . . . . . .96
Topping up . . . . . . . . . . . . . . . . . . .153
ESP ®
(Electronic Stability Program) .51
Activating/deactivating . . . . . . . . . .51
Display message . . . . . . . . . .176, 177
Warning lamp . . . . . . . . . . . . . .51, 194 Exterior lighting
Delayed switch-off (on-board
computer) . . . . . . . . . . . . . . . . . . .105
Exterior mirror parking position
Storing . . . . . . . . . . . . . . . . . . . .67, 69
Exterior mirrors
Adjusting . . . . . . . . . . . . . . . . . . . . .66
Anti-dazzle mode (automatic) . . . . .67
Folding in/out (automatically ).. . . .66
Folding in/out (electrically) . . . . . . .66
Folding in when locking (on-board
computer) . . . . . . . . . . . . . . . . . . .106
Malfunction . . . . . . . . . . . . . . . . . .206
Parking position . . . . . . . . . . . . .67, 69
Resetting . . . . . . . . . . . . . . . . . . . . .66
Storing settings . . . . . . . . . . . . . . . .68
Exterior view
Overview . . . . . . . . . . . . . . . . . . . . .18 F
Fire extinguishe r. . . . . . . . . . . . . . . .174
First-aid kit . . . . . . . . . . . . . . . . . . . . .174
Flat tyre Preparing the vehicle . . . . . . . . . . .218
TIREFIT kit . . . . . . . . . . . . . . . . . . .219
Floormat . . . . . . . . . . . . . . . . . . . . . . .146
Foglamps Display message . . . . . . . . . . . . . .185
Fording . . . . . . . . . . . . . . . . . . . . . . . .164 Frequencies
Garage door opene r.. . . . . . . . . . .262
Telephone . . . . . . . . . . . . . . . . . . .242
Front airbag . . . . . . . . . . . . . . . . . . . . .42
Front-passenger airbag . . . . . . . . . . ..42
Fuel . . . . . . . . . . . . . . . . . . . . . . . . . . .255
Loss . . . . . . . . . . . . . . . . . . . . . . . .200
Petrol . . . . . . . . . . . . . . . . . . . . . . .149
Fuel consumptio n. . . . . . . . . . .256, 257
Fuel filler flap Opening/closing . . . . . . . . . . . . . .148
Fuel lin e
Malfunction . . . . . . . . . . . . . . . . . .200
Fuel tank
Malfunction . . . . . . . . . . . . . . . . . .200
Fuse allocation chart . . . . . . . . . . ..237
Fuse box Boot . . . . . . . . . . . . . . . . . . . . . . . .238
Dashboard . . . . . . . . . . . . . . . . . . .238
Engine compartment . . . . . . . . . . .238
Fuse s. . . . . . . . . . . . . . . . . . . . . . . . . .237 G
Garage door Opening/closing (with the remote
control) . . . . . . . . . . . . . . . . . . . . .145
Garage door opener . . . . . . . . . . . . ..144
Clearing the memory . . . . . . . . . . .146 Index
171_AKB; 3; 4, en-GB
vpfaff7,
2007-11-13T10:50:25+01:00 - Seite
6
Page 10 of 273
7
Frequencies . . . . . . . . . . . . . . . . .
.262
Programming the remote control . .144
Gear indicator (on-board computer) .96
Gearshift program Manua l.. . . . . . . . . . . . . . . . . . . . . .88
Genuine Mercedes-Benz parts . . . ..240
Glove compartment . . . . . . . . . . . . ..138
Golf bag Storage location . . . . . . . . . . . . . . .138
Gross vehicle weight, maximum
permissible . . . . . . . . . . . . . . . . . . . . .253 H
Handbrake Display message . . . . . . . . . . . . . .181
Head/thorax airbags . . . . . . . . . . . . ..43
Headlamp Misting up . . . . . . . . . . . . . . . . . . .205
Headlamp mode (automatic ). . . . . . .74
Headlamps Cleaning . . . . . . . . . . . . . . . . . . . . .168
Cleaning system . . . . . . . . . . . . . . . .76
Headlamps delayed switch-off
see Exterior lighting delayed switch-off
Head restraint
Adjusting (front) . . . . . . . . . . . . .60, 61
Heatin g
see Air conditioning
High-pressure cleaners . . . . . . . . . ..167 HomeLink
®
see Garage door opener I
Immobiliser . . . . . . . . . . . . . . . . . . . . .52
Indicator and warning lam p
Brakes (red) . . . . . . . . . . . . . . . . . .194
Engine diagnostic . . . . . . . . . . . . . .195
ESP ®
. . . . . . . . . . . . . . . . . . . .51, 194
PASSENGER AIRBAG OFF . . . .46, 191
Reserve fuel . . . . . . . . . . . . . . . . . .197
Seat belt . . . . . . . . . . . . . . . . . . . . .195
SRS . . . . . . . . . . . . . . . . . . . . .39, 194
Indicator and warning lamps . . . . ..193
Indicator lamp see Indicator and warning lamp
Instrument cluster . . . . . . . . . . . . . ..90
Overview . . . . . . . . . . . . . . . . . . . . .24
Selecting the language (on-board
computer) . . . . . . . . . . . . . . . . . . .102
Instrument lighting . . . . . . . . . . . . . ..90
Interior lightin g. . . . . . . . . . . . . . . . . .77
Automatic contro l.. . . . . . . . . . . . .77
Delayed switch-off (on-boar d
computer) . . . . . . . . . . . . . . . . . . .105
Emergency lighting . . . . . . . . . . . . . .77
Manual control . . . . . . . . . . . . . . . . .78
Reading lamp . . . . . . . . . . . . . . . . . .78
Interior motion sensor . . . . . . . . . . ..54 Intermittent wipe
Windscreen wiper s.. . . . . . . . . . . . .79 J
Jack Operation . . . . . . . . . . . . . . . . . . . .225
Storage location . . . . . . . . . . . . . . .172
Jump-starting . . . . . . . . . . . . . . . . . . .233
Jump leads . . . . . . . . . . . . . . . . . . .233 K
Key . . . . . . . . . . . . . . . . . . . . . . . . . . . .56
Changing the battery . . . . . . . . . . .212
Checking the battery . . . . . . . . . . .212
Closing the roof . . . . . . . . . . . . . . .134
Display message . . . . . . . . . .184, 187
Factory setting . . . . . . . . . . . . . .56, 57
Loss . . . . . . . . . . . . . . . . . . . . . . . .207
Malfunction . . . . . . . . . . . . . . . . . .207
Modifying the programming . . . . . . .56
Opening the roof . . . . . . . . . . . . . .134
Key position s
Key . . . . . . . . . . . . . . . . . . . . . . . . . .59
Kickdown . . . . . . . . . . . . . . . . . . . .87, 89 Index
171_AKB; 3; 4, en-GB
vpfaff7,
2007-11-13T10:50:25+01:00 - Seite
7
Page 13 of 273
10
Rear window heating
Malfunction indicator lamp . . . . . .191
Refuelling . . . . . . . . . . . . . . . . . . . . . .148
Remote control Garage door opene r.. . . . . . . . . . .144
Programming (garage door
opener) . . . . . . . . . . . . . . . . . . . . . .144
Replacing the wiper blade s. . . . . . .217
Reserve Display message . . . . . . . . . . . . . .187
Reserve fuel . . . . . . . . . . . . . . . . . . . .255
Display message . . . . . . . . . . . . . .187
Fuel tank . . . . . . . . . . . . . . . . . . . .255
Warning lamp . . . . . . . . . . . . . . . . .197
Reset button . . . . . . . . . . . . . . . . .25, 27
Restraint syste m. . . . . . . . . . . . . . . .178
Airbags . . . . . . . . . . . . . . . . . . . . . . .41
Restraint systems
For childre n.. . . . . . . . . . . . . . . . . .44
Rev counte r. . . . . . . . . . . . . . . . . . . . .90
Reverse gear Engaging (automatic transmission) .85
Engaging (manual transmission) . . .85
Reversing lamp
Display messag e.. . . . . . . . . . . . .185
Roof . . . . . . . . . . . . . . . . . . . . . . . . . . .132
Closing (key ).. . . . . . . . . . . . . . . .134
Closing (switch) . . . . . . . . . . . . . . .133
Display message . . . . . . . . . . . . . .188
Opening (key ).. . . . . . . . . . . . . . . .134 Opening (switch) . . . . . . . . . . . . .
.133
Relocking . . . . . . . . . . . . . . . . . . . .134
Roof load, maximum . . . . . . . ..253, 254
Roof rack . . . . . . . . . . . . . . . . . . . . . .136
Roof switch . . . . . . . . . . . . . . . . . . . .133
Run-on time (mobile phone ). . . . . . .143 S
Seat Adjusting . . . . . . . . . . . . . . . . . .60, 61
Correct driver's seat position . . . . . .71
Storing settings . . . . . . . . . . . . . . . .68
Seat belt
Fastening. . . . . . . . . . . . . . . . . . . . .69
Warning lamp . . . . . . . . . . . . . .71, 195
Seat heatin g. . . . . . . . . . . . . . . . . . . . .63
Seat ventilation Malfunction indicator lamp . . . . . .190
Selector lever
Positions . . . . . . . . . . . . . . . . . . . . .85
Service
Display message . . . . . . . . . . . . . .165
Service display
see ASSYST PLUS
Service indicator
see ASSYST PLUS
Service products . . . . . . . . . . . . . . . .255
Brake fluid . . . . . . . . . . . . . . . . . . .260 Coolant . . . . . . . . . . . . . . . . . . . .
.259
Windscreen washer fluid . . . . . . . .260
Settings
Calling up a stored setting . . . . . . . .68
Factory (key ).. . . . . . . . . . . . . .56, 57
Factory (on-board computer) . . . . .101
Setting the unit (on-board computer)
Speedometer . . . . . . . . . . . . . . . . .102
Shift range s
Automatic transmission . . . . . . . . . .86
Display in the speedomete r.. . . . ..85
Side window
Fault . . . . . . . . . . . . . . . . . . . . . . . .206
Opening/closing . . . . . . . . . . . . . . .79
Resettin g.. . . . . . . . . . . . . . . . . . . .81
Side windows
Cleaning . . . . . . . . . . . . . . . . . . . . .168
Snow chains . . . . . . . . . . . . . . . . . . . .161
Socket . . . . . . . . . . . . . . . . . . . . . . . . .141
Soft top see Roo f
Spare wheel
Fitting . . . . . . . . . . . . . . . . . . . . . . .225
Storage location . . . . . . . . . . . . . . .172
Technical data . . . . . . . . . . . . . . . .252
Spee d
Technical data . . . . . . . . . . . . . . . .245
Speed limiter
Speedtronic . . . . . . . . . . . . . . . . . .112 Index
171_AKB; 3; 4, en-GB
vpfaff7,
2007-11-13T10:50:25+01:00 - Seite 10
Page 59 of 273
Opening and closing
56 Opening and closing
Key
The vehicle's equipment includes two keys
with remote control. Each key contains an
emergency key element .
The key is configured at the factory to cen-
trally lock and unlock the following:
R the doors
R the boot li d
R the fuel filler flap
R the glove compartment
R the stowage compartment in the centr e
console G
Risk of accident
Never leave children unsupervised in the
vehicle. They could open a door from the
inside, even if it has been locked, or star t
the vehicle if the key is left in it. They could
endanger themselves and others. Yo u
should therefore take the key with you
when leaving the vehicle, even if you are
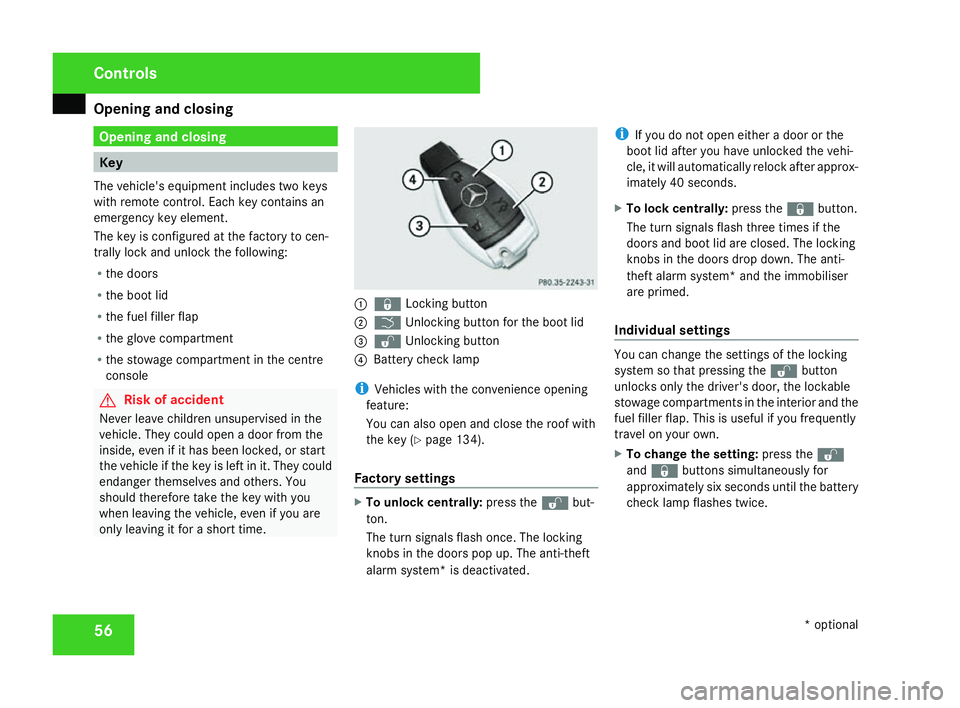
only leaving it for a short time. 1
j Locking button
2 i Unlocking button for the boot lid
3 k Unlocking button
4 Battery check lamp
i Vehicles with the convenience opening
feature:
You can also open and close the roof with
the key (Y page 134).
Factory settings X
To unlock centrally :press the kbut-
ton .
The turn signals flash once. The lockin g
knobs in the doors pop up. The anti-theft
alarm system* is deactivated .i
If you do not open either a door or the
boot lid after you have unlocked the vehi-
cle, it will automatically relock after approx-
imately 40 seconds.
X To lock centrally :press the jbutton.
The turn signals flash three times if the
doors and boot lid are closed. The locking
knobs in the doors drop down. The anti-
theft alarm system* and the immobiliser
are primed.
Individual settings You can change the settings of the locking
system so that pressing the
kbutton
unlocks only the driver's door, the lockable
stowage compartments in the interior and the
fuel filler flap. This is useful if you frequently
travel on your own.
X To change the setting: press thek
and j buttons simultaneously for
approximately six seconds until the battery
check lamp flashes twice. Controls
* optional
171_AKB; 3; 4, en-GB
vpfaff7,
2007-11-13T10:50:25+01:00 - Seite 56
Page 147 of 273
Features
144
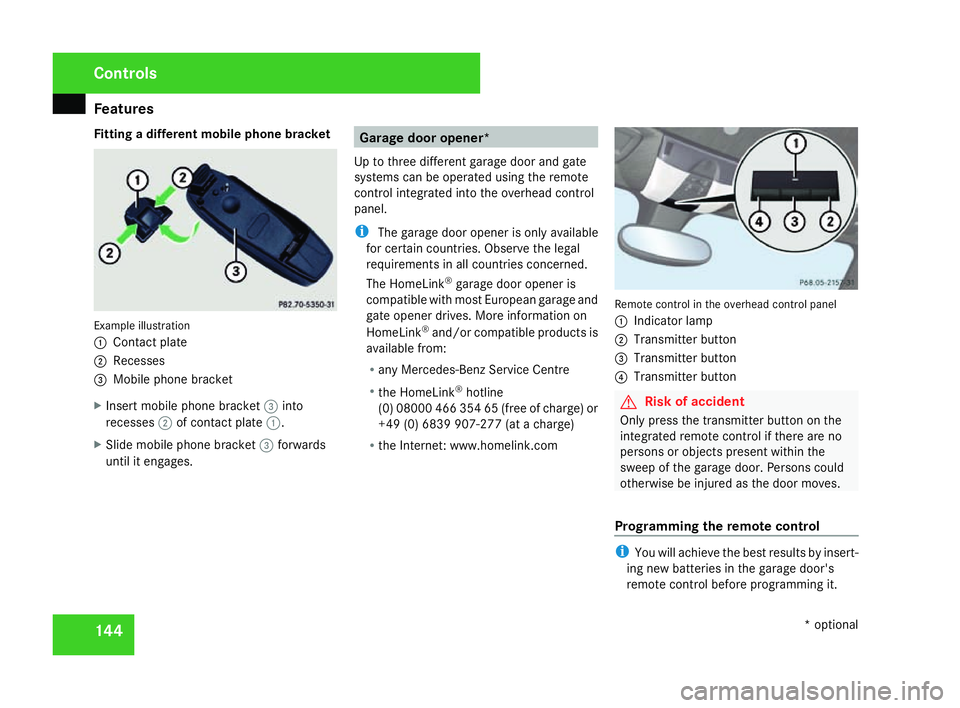
Fitting a different mobile phone bracket
Example illustration
1
Contact plate
2 Recesses
3 Mobile phone bracket
X Insert mobile phone bracket 3into
recesses 2of contact plate 1.
X Slide mobile phone bracket 3forward s
until it engages. Garage door opener
*
Up to three different garage door and gate
systems can be operated using the remote
control integrated into the overhead control
panel .
i The garage door opener is only available
for certain countries. Observe the legal
requirements in all countries concerned.
The HomeLink ®
garage door opener is
compatible with most European garage and
gate opener drives. More information on
HomeLink ®
and/or compatible products is
available from:
R any Mercedes-Benz Service Centre
R the HomeLink ®
hotline
(0) 08000 466 354 65 (free of charge) or
+49 (0) 6839 907-277 (at a charge)
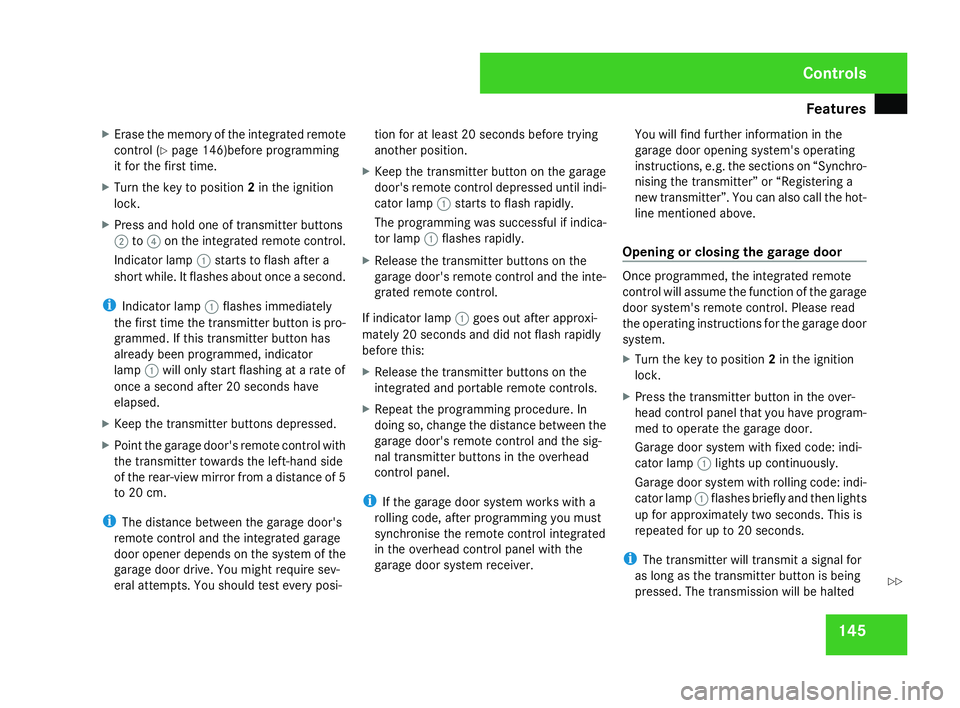
R the Internet: www.homelink.co m Remote control in the overhead control panel
1
Indicator lamp
2 Transmitter button
3 Transmitter button
4 Transmitter button G
Risk of acciden
t
Only press the transmitter button on the
integrated remote control if there are no
persons or objects present within the
sweep of the garage door. Persons could
otherwise be injured as the door moves.
Programming the remote control i
You will achieve the best results by insert -
ing new batteries in the garage door's
remote control before programming it. Controls
* optional
171_AKB; 3; 4, en-GB
vpfaff7,
2007-11-13T10:50:25+01:00 - Seite 144
Page 148 of 273
Features
145
X
Erase the memory of the integrated remote
control (Y page 146)before programming
it for the first time.
X Turn the key to position 2in the ignition
lock .
X Press and hold one of transmitter button s
2 to4 on the integrated remote control.
Indicator lamp 1starts to flash after a
short while. It flashes about once a second.
i Indicator lamp 1flashes immediately
the first time the transmitter button is pro-
grammed. If this transmitter button has
already been programmed, indicator
lamp 1will only start flashing at a rate of
once a second after 20 seconds have
elapsed .
X Keep the transmitter buttons depressed.
X Point the garage door's remote control with
the transmitter towards the left-hand side
of the rear-view mirror from a distance of 5
to 20 cm.
i The distance between the garage door's
remote control and the integrated garage
door opener depends on the system of the
garage door drive. You might require sev-
eral attempts. You should test every posi- tion for at least 20 seconds before trying
another position.
X Keep the transmitter button on the garage
door's remote control depressed until indi-
cator lamp 1starts to flash rapidly.
The programming was successful if indica-
tor lamp 1flashes rapidly .
X Release the transmitter buttons on th e
garage door's remote control and the inte-
grated remote control.
If indicator lamp 1goes out after approxi-
mately 20 seconds and did not flash rapidly
before this:
X Release the transmitter buttons on th e
integrated and portable remote controls.
X Repeat the programming procedure. In
doing so, change the distance between th e
garage door's remote control and the sig-
nal transmitter buttons in the overhead
control panel.
i If the garage door system works with a
rolling code, after programming you must
synchronise the remote control integrated
in the overhead control panel with the
garage door system receiver. You will find further information in the
garage door opening system's operating
instructions, e.g. the sections on “Synchro-
nising the transmitter” or “Registering
a
new transmitter”. You can also call the hot-
line mentioned above .
Opening or closing the garage door Once programmed, the integrated remot
e
control will assume the function of the garag e
door system's remote control. Please read
the operating instructions for the garage door
system.
X Turn the key to position 2in the ignition
lock .
X Press the transmitter button in the over-
head control panel that you have program-
med to operate the garage door.
Garage door system with fixed code: indi-
cator lamp 1lights up continuously.
Garage door system with rolling code: indi-
cator lamp 1flashes briefly and then lights
up for approximately two seconds. This is
repeated for up to 20 seconds.
i The transmitter will transmit a signal for
as long as the transmitter button is being
pressed. The transmission will be halted Controls
171_AKB; 3; 4, en-GB
vpfaff7,
2007-11-13T10:50:25+01:00 - Seite 145 Z
Page 149 of 273
Features
146after a maximum of 20 seconds and indi-
cator lamp
1will flash. Press the trans -
mitter button again if necessary .
Clearing the remote control memory X
Turn the key to position 2in the ignition
lock .
X Press and hold transmitter buttons 2and
4 for approximately 20 seconds until indi -
cator lamp 1flashes rapidly .
The memory is cleared.
i You should clear the remote control mem-
ory before selling the vehicle. Floormat* on the driver's side
G
Risk of accident
Make sure that there is sufficient clearance
around the pedals when floormats are
used, and that the floormats are properly
secured .
The floormats must be secured at all times
using retainers and studs.
Before you drive off, make sure that the
floormats are secure and rectify if neces- sary. A floormat which is not properly
secured can slip and thereby interfere with
the movement of the pedals.
Do not place floormats on top of one
another
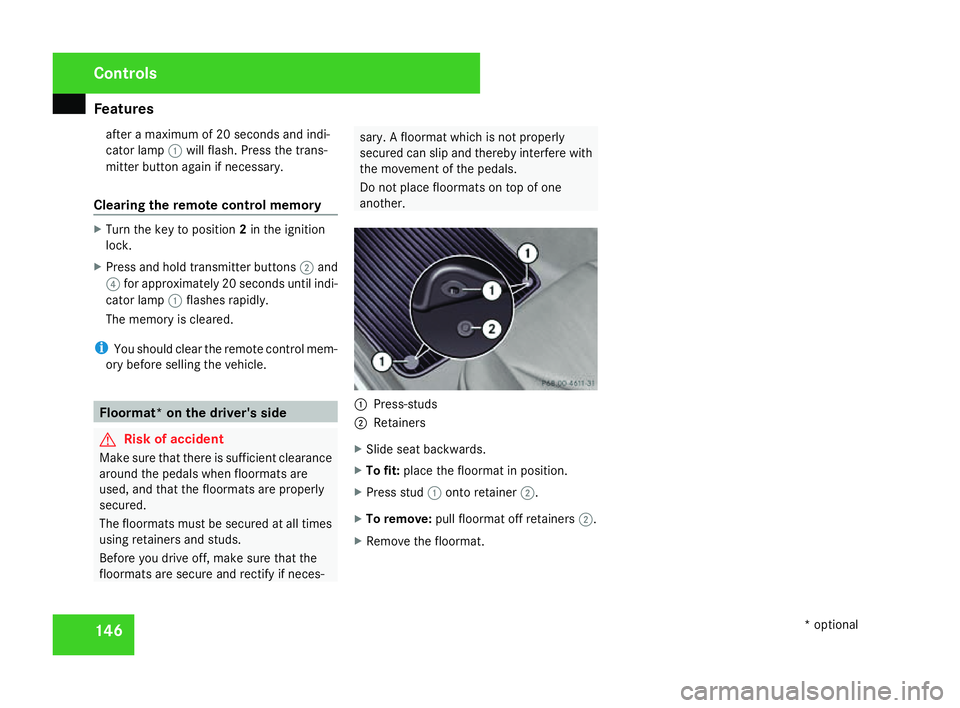
. 1
Press-studs
2 Retainers
X Slide seat backwards .
X To fit: place the floormat in position.
X Press stud 1onto retainer 2.
X To remove :pull floormat off retainers 2.
X Remove the floormat. Cont
rols
* optional
171_AKB; 3; 4, en-GB
vpfaff7,
2007-11-13T10:50:25+01:00 - Seite 146