MERCEDES-BENZ SLK ROADSTER 2012 Owners Manual
Manufacturer: MERCEDES-BENZ, Model Year: 2012, Model line: SLK ROADSTER, Model: MERCEDES-BENZ SLK ROADSTER 2012Pages: 321, PDF Size: 6.9 MB
Page 261 of 321
!
Do not allow cosmetics, insect repellent
or sunscreen to come in contact with the
plastic trim. This maintains the high-quality
look of the surfaces.
X Wipe the plastic trim with a damp, lint-free
cloth, e.g. a microfibre cloth.
X Heavy soiling: use car care and cleaning
products recommended and approved by
Mercedes-Benz.
The surface may change colour tempora-
rily. Wait until the surface is dry again.
Cleaning the steering wheel and gear or
selector lever X
Thoroughly wipe with a damp cloth or use
leather care agents that have been recom-
mended and approved by Mercedes-Benz.
Cleaning wooden trim and trim ele-
ments X
Wipe the wooden trim and trim pieces with
a damp, lint-free cloth, e.g. a microfibre
cloth.
X Heavy soiling: use car care and cleaning
products recommended and approved by
Mercedes-Benz.
! Do not use solvent-based cleaning agents
such as tar remover, wheel cleaners, pol-
ishes or waxes. There is otherwise a risk of
damaging the surface.
Cleaning the seat covers !
Do not use microfibre cloths to clean gen-
uine leather, artificial leather or
Alcantara® covers. If used often, these can
damage the cover.
! Observe the following when cleaning:
R clean genuine leather covers carefully
with a damp cloth and then wipe the cov-
ers down with a dry cloth. Make sure that
the leather does not become soaked. It
may otherwise become rough and
cracked. Only use leather care agents that have been tested and approved by
Mercedes-Benz.Y
ou can obtain these
from a qualified specialist workshop.
R clean artificial leather covers with a cloth
moistened with a solution containing 1%
detergent (e.g. washing-up liquid).
R clean cloth covers with a microfibre cloth
moistened with a solution containing 1%
detergent (e.g. washing-up liquid). Rub
carefully and always wipe entire seat sec-
tions to avoid leaving visible lines. Leave
the seat to dry afterwards. Cleaning
results depend on the type of dirt and
how long it has been there.
R clean Alcantara® covers with a damp
cloth. Make sure that you wipe entire
seat sections to avoid leaving visible
lines.
i Note that regular care is essential to
make sure that the appearance and com-
fort of the covers are retained over time.
Cleaning the seat belts X
Use clean, lukewarm water and soap solu-
tion.
! Do not clean the seat belts using chemical
cleaning agents. Do not dry the seat belts
at temperatures above 80 † or in direct
sunlight.
Cleaning the roof lining and carpets X
Roof lining: use a soft brush or a cleaning
agent recommended and approved by
Mercedes-Benz to remove heavy soiling.
X Carpets: use the carpet and textile clean-
ing agents recommended and approved by
Mercedes-Benz. 258
CareMaintenance and care
Page 262 of 321
Useful information
............................260
Where will I find...? ...........................260
Flat tyre ............................................. 263
Battery ............................................... 273
Jump-starting .................................... 277
Towing and tow-starting ..................278
Electrical fuses ................................. 281 259Breakdown assistance
Page 263 of 321
Useful information
i This Owner's Manual describes all models
and all standard and optional equipment
available to your vehicle at the time of pub-
lication of the Owner's Manual. Country-
specific deviations are possible. Please
note that your vehicle may not be equipped
with all features described. This also
applies to safety-relevan tsystems and
functions.
i Please read the information on qualified
specialist workshops (Y page 22).Where will I find...?
Warning triangle
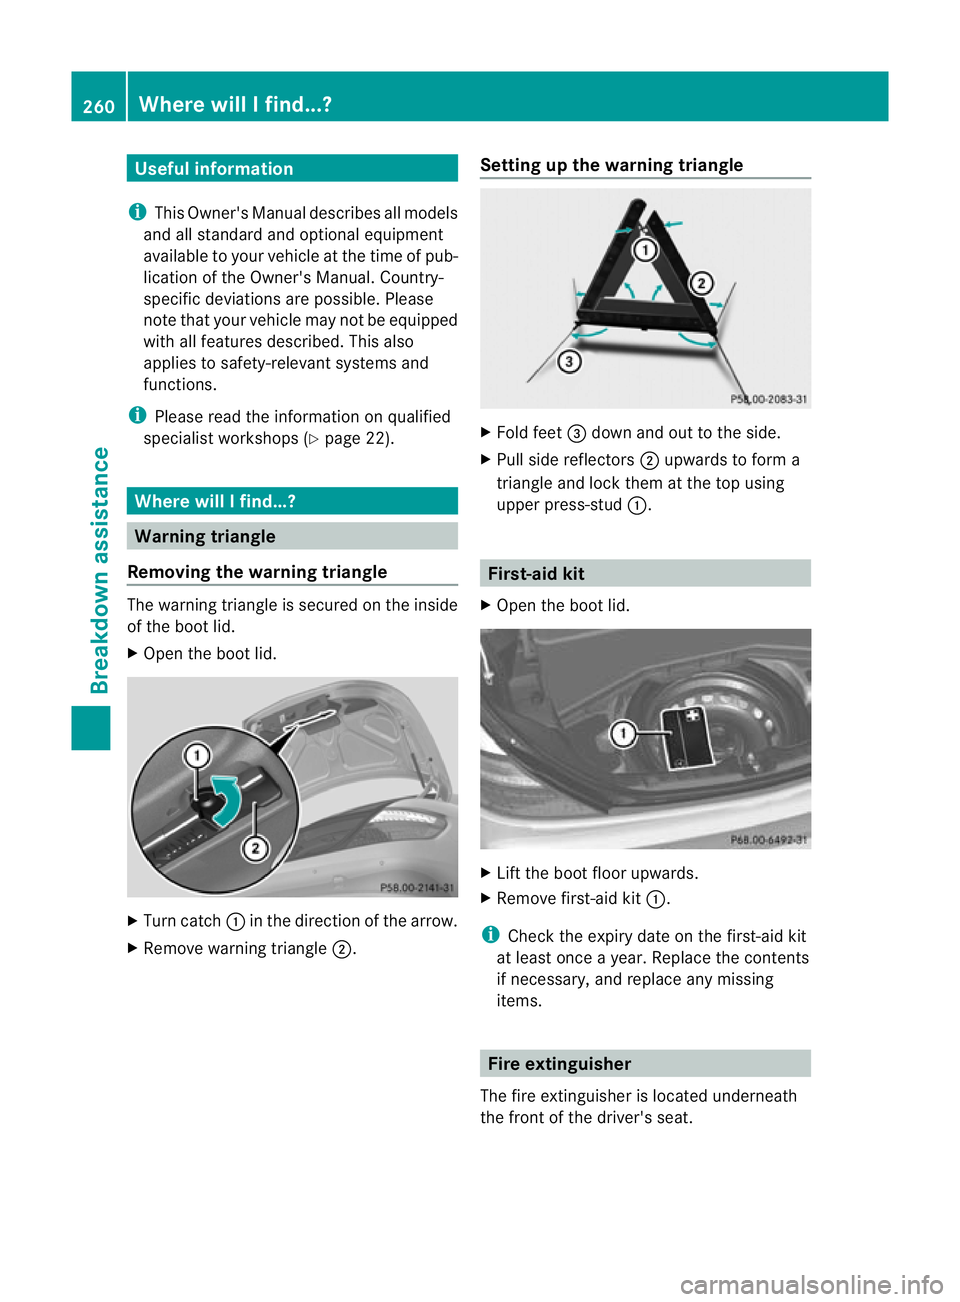
Removing the warning triangle The warning triangle is secured on the inside
of the boo tlid.
X Open the boot lid. X
Turn catch :in the direction of the arrow.
X Remove warning triangle ;.Setting up the warning triangle X
Fold feet =down and out to the side.
X Pull side reflectors ;upwards to form a
triangle and lock the matthe top using
upper press-stud :. First-aid kit
X Open the boot lid. X
Lift the boot floor upwards.
X Remove first-aid kit :.
i Check the expiry date on the first-aid kit
at least once a year. Replace the contents
if necessary, and replace any missing
items. Fire extinguisher
The fire extinguisher is located underneath
the front of the driver's seat. 260
Where will I find...?Breakdown assistance
Page 264 of 321
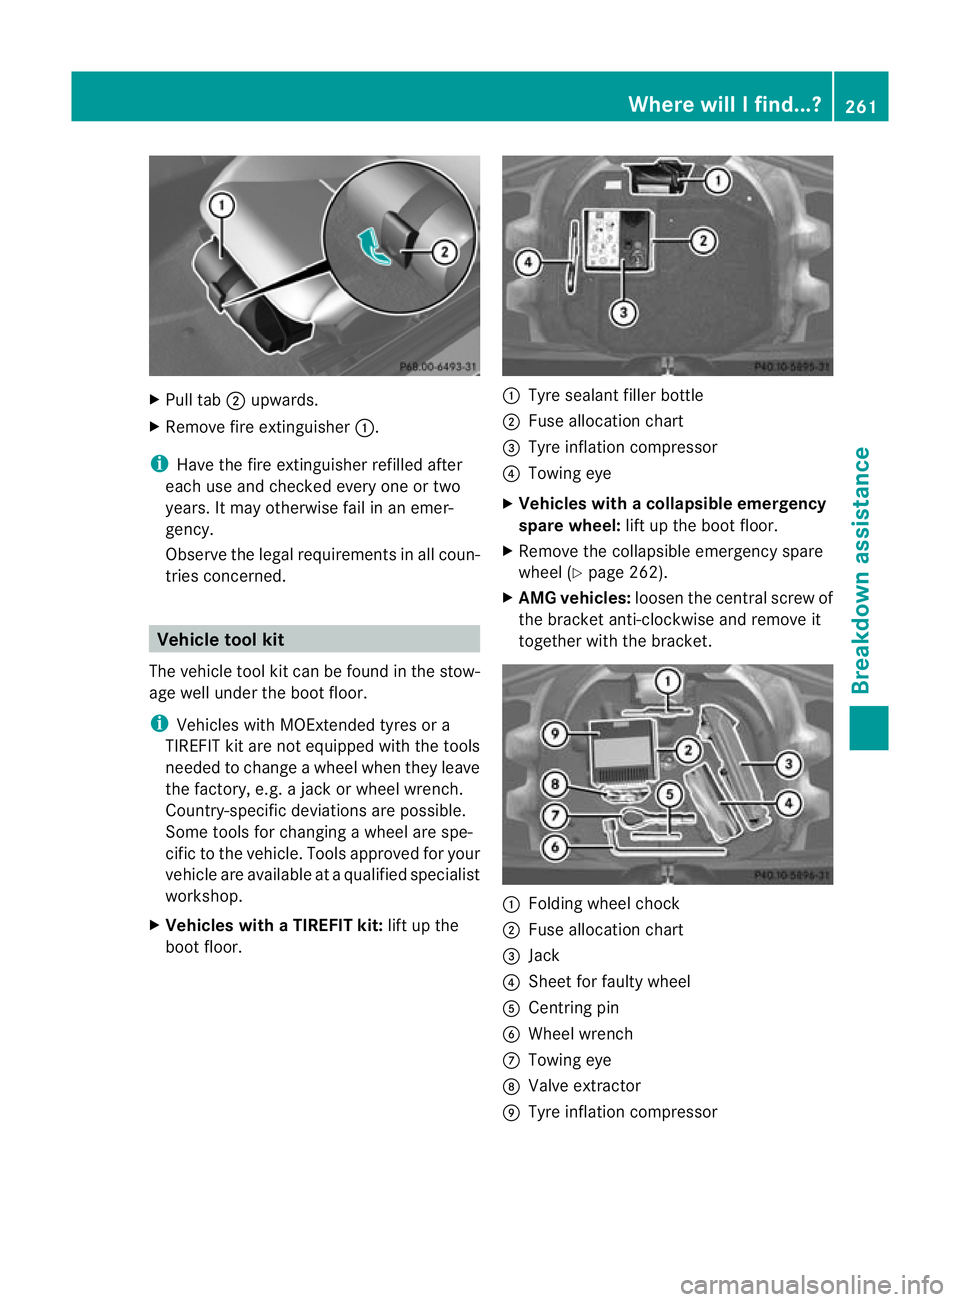
X
Pull tab ;upwards.
X Remove fire extinguisher :.
i Have the fire extinguisher refilled after
each use and checked every one or two
years. It may otherwise fail in an emer-
gency.
Observe the legal requirement sinall coun-
tries concerned. Vehicle tool kit
The vehicle tool kit can be found in the stow-
age well under the boot floor.
i Vehicles with MOExtended tyres or a
TIREFIT kit are not equipped with the tools
needed to change a wheel when they leave
the factory, e.g. a jack or wheel wrench.
Country-specific deviations are possible.
Some tools for changing awheel are spe-
cific to the vehicle. Tools approved for your
vehicle are available at a qualified specialist
workshop.
X Vehicles with a TIREFIT kit: lift up the
boot floor. :
Tyre sealant filler bottle
; Fuse allocation chart
= Tyre inflation compressor
? Towing eye
X Vehicles with acollapsible emergency
spare wheel: lift up the boot floor.
X Remove the collapsible emergency spare
wheel (Y page 262).
X AMG vehicles: loosenthe central screw of
the bracket anti-clockwise and remove it
together with the bracket. :
Folding wheel chock
; Fuse allocation chart
= Jack
? Sheet for faulty wheel
A Centring pin
B Wheel wrench
C Towing eye
D Valve extractor
E Tyre inflation compressor Where will I find...?
261Breakdown assistance
Page 265 of 321
Collapsible emergency spare wheel
Removing the collapsible emergency
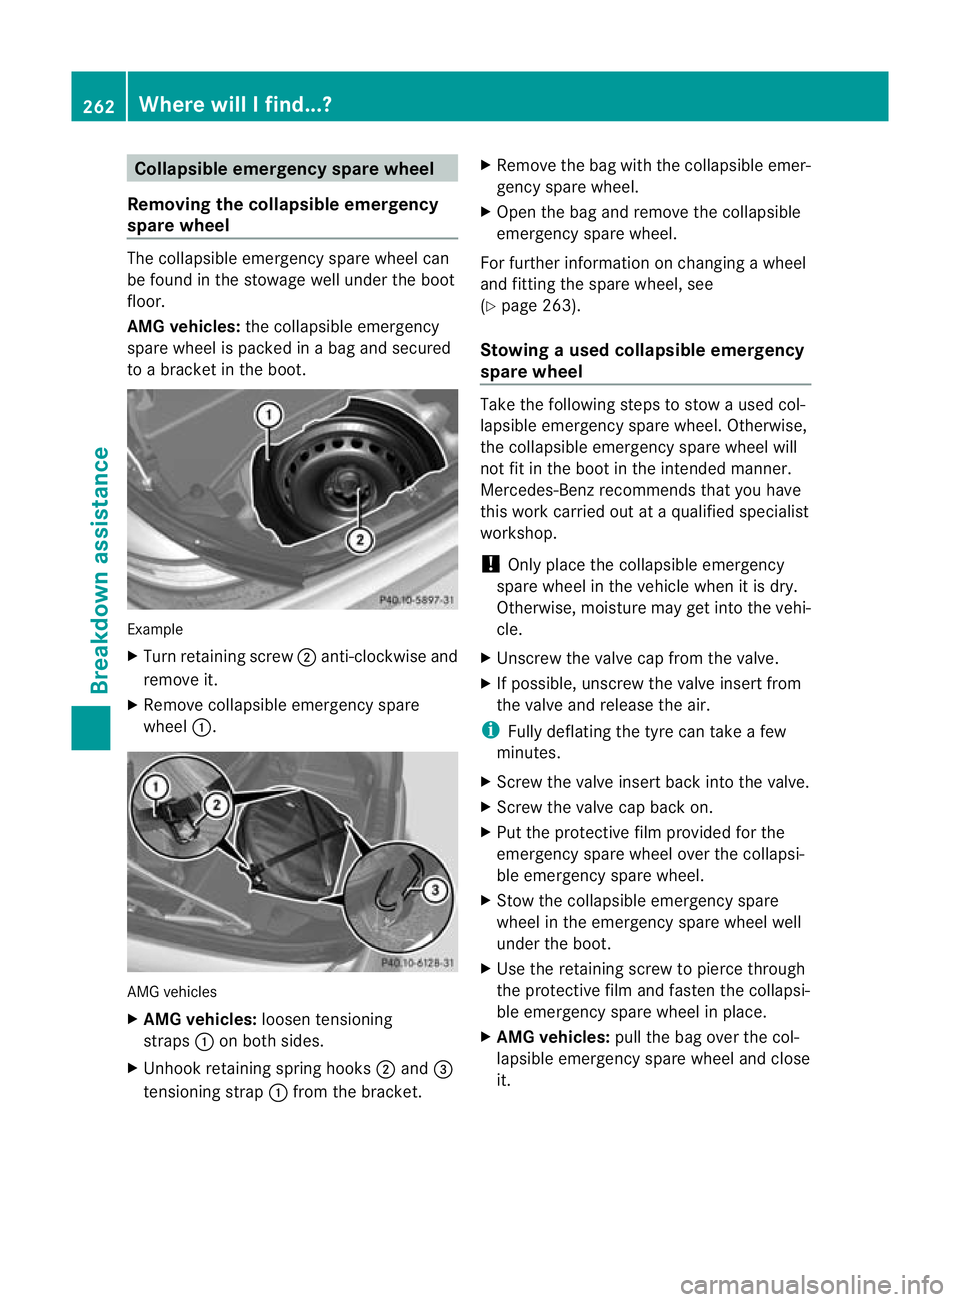
spare wheel The collapsible emergency spare wheel can
be found in the stowage well unde rthe boot
floor.
AMG vehicles: the collapsible emergency
spare wheel is packed in a bag and secured
to a bracket in the boot. Example
X
Turn retaining screw ;anti-clockwise and
remove it.
X Remove collapsible emergency spare
wheel :. AMG vehicles
X
AMG vehicles: loosen tensioning
straps :on both sides.
X Unhook retaining spring hooks ;and =
tensioning strap :from the bracket. X
Remove the bag with the collapsible emer-
gency spare wheel.
X Open the bag and remove the collapsible
emergency spare wheel.
For further information on changing a wheel
and fitting the spare wheel, see
(Y page 263).
Stowing aused collapsible emergency
spare wheel Take the following steps to stow a used col-
lapsible emergency spare wheel. Otherwise,
the collapsible emergency spare wheel will
not fit in the boot in the intended manner.
Mercedes-Benz recommends that you have
this work carried out at a qualified specialist
workshop.
!
Only place the collapsible emergency
spare wheel in the vehicle when it is dry.
Otherwise, moisture may get into the vehi-
cle.
X Unscrew the valve cap from the valve.
X If possible, unscrew the valve insert from
the valve and release the air.
i Fully deflating the tyre can take a few
minutes.
X Screw the valve insert back into the valve.
X Screw the valve cap back on.
X Put the protective film provided for the
emergency spare wheel over the collapsi-
ble emergency spare wheel.
X Stow the collapsible emergency spare
wheel in the emergency spare wheel well
under the boot.
X Use the retaining screw to pierce through
the protective film and fasten the collapsi-
ble emergency spare wheel in place.
X AMG vehicles: pull the bag over the col-
lapsible emergency spare wheel and close
it. 262
Where will I find...?Breakdown assistance
Page 266 of 321
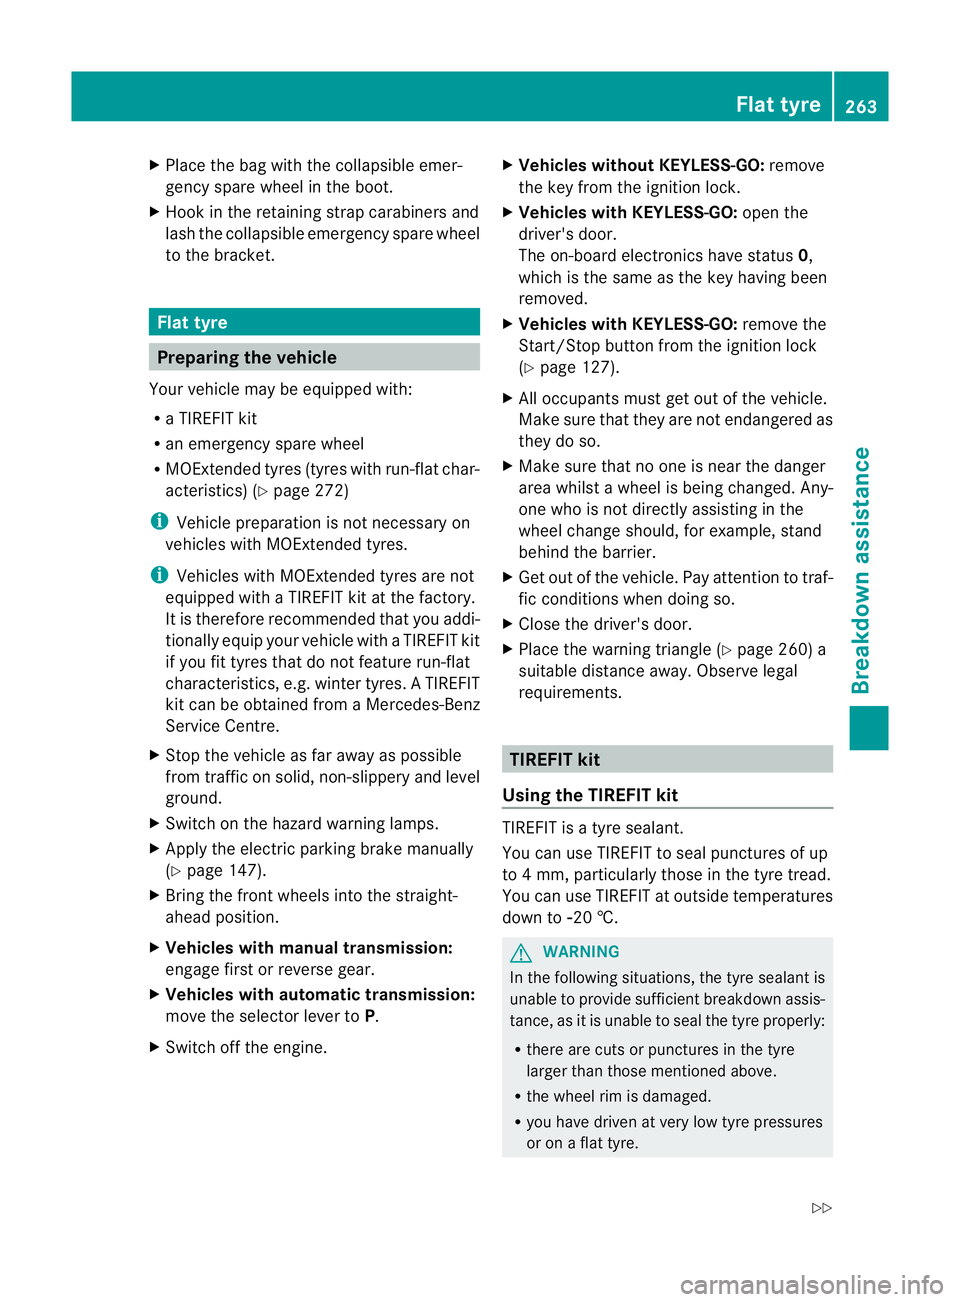
X
Place the bag with the collapsible emer-
gency spare wheel in the boot.
X Hook in the retaining strap carabiners and
lash the collapsible emergenc yspare wheel
to the bracket. Flat tyre
Preparing the vehicle
Your vehicle may be equipped with:
R a TIREFIT kit
R an emergency spare wheel
R MOExtended tyres (tyres with run-flat char-
acteristics) (Y page 272)
i Vehicle preparation is not necessary on
vehicles with MOExtended tyres.
i Vehicles with MOExtended tyres are not
equipped with a TIREFIT kit at the factory.
It is therefore recommended that you addi-
tionally equip your vehicle with a TIREFIT kit
if you fit tyres that do not feature run-flat
characteristics, e.g. winter tyres. A TIREFIT
kit can be obtained from a Mercedes-Benz
Service Centre.
X Stop the vehicle as far away as possible
from traffic on solid, non-slippery and level
ground.
X Switch on the hazard warning lamps.
X Apply the electric parkin gbrake manually
(Y page 147).
X Bring the front wheels into the straight-
ahead position.
X Vehicles with manual transmission:
engage first or reverse gear.
X Vehicles with automatic transmission:
move the selector leve rtoP.
X Switch off the engine. X
Vehicles without KEYLESS-GO: remove
the key from the ignition lock.
X Vehicles with KEYLESS-GO: open the
driver's door.
The on-board electronics have status 0,
which is the same as the key having been
removed.
X Vehicles with KEYLESS-GO: remove the
Start/Stop button from the ignition lock
(Y page 127).
X All occupants must get out of the vehicle.
Make sure that they are not endangered as
they do so.
X Make sure that no one is near the danger
area whilst a wheel is being changed. Any-
one who is not directly assisting in the
wheel change should, for example, stand
behind the barrier.
X Get out of the vehicle. Pay attention to traf-
fic conditions when doing so.
X Close the driver's door.
X Place the warning triangle (Y page 260) a
suitable distance away.O bserve legal
requirements. TIREFIT kit
Using the TIREFIT kit TIREFIT is a tyre sealant.
You can use TIREFIT to seal punctures of up
to 4 mm, particularly those in the tyre tread.
You can use TIREFIT at outside temperatures
down to
Ò20 †. G
WARNING
In the following situations, the tyre sealant is
unable to provide sufficient breakdown assis-
tance, as it is unable to seal the tyre properly:
R there are cuts or punctures in the tyre
larger than those mentioned above.
R the wheel rim is damaged.
R you have driven at very low tyre pressures
or on a flat tyre. Flat tyre
263Breakdown assistance
Z
Page 267 of 321
There is a risk of accident.
Do not drive any further. Contact a qualified
specialist workshop.
X Do not remove any foreign objects which
have penetrated the tyre, e.g. screws or
nails.
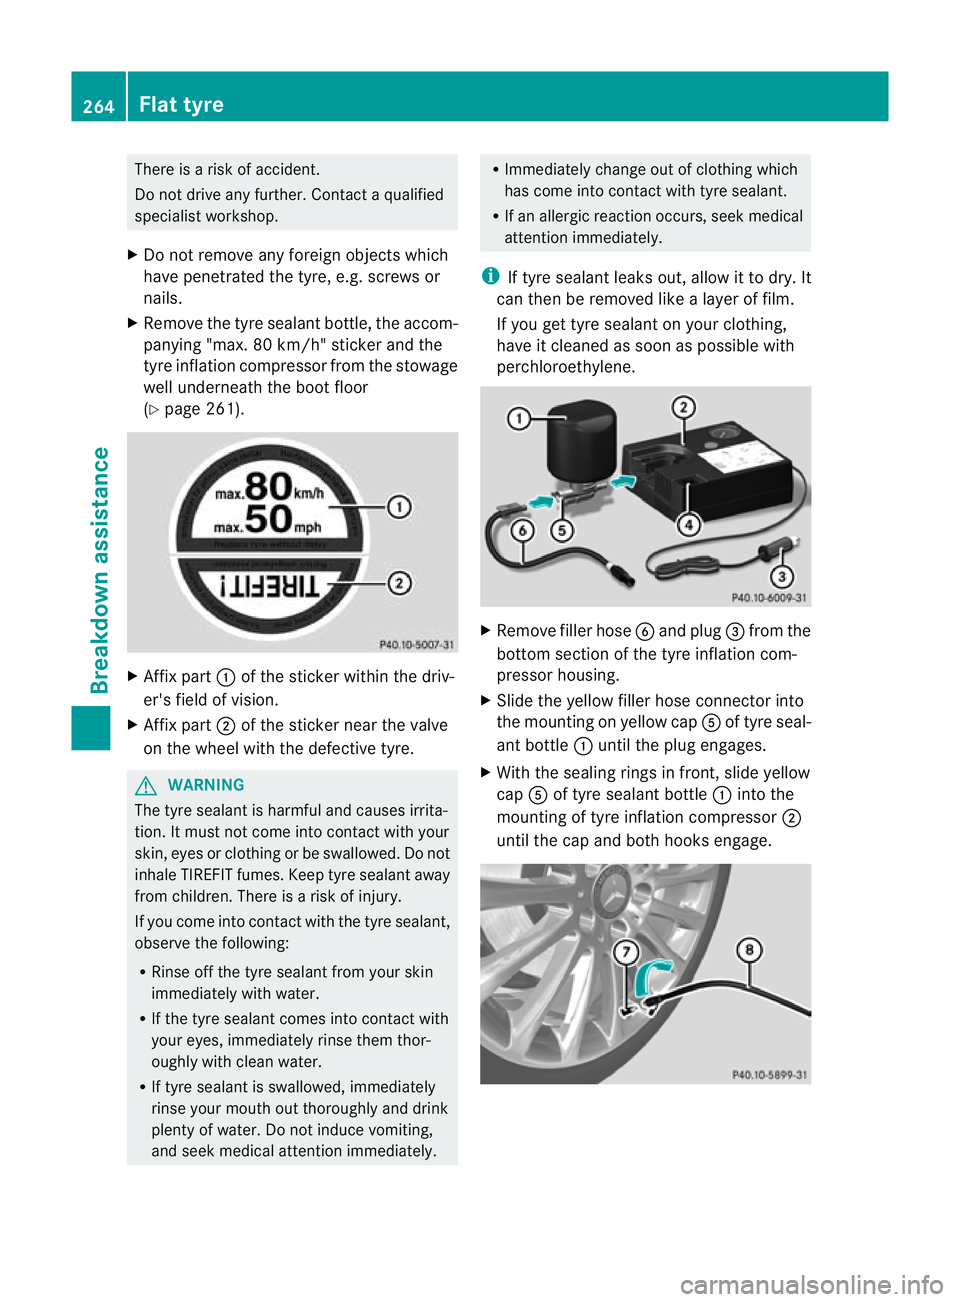
X Remove the tyre sealant bottle, the accom-
panying "max. 80 km/h" sticker and the
tyre inflation compressor from the stowage
well underneath the boot floor
(Y page 261). X
Affix part :of the sticker within the driv-
er's field of vision.
X Affix part ;of the sticker near the valve
on the wheel with the defective tyre. G
WARNING
The tyre sealant is harmful and causes irrita-
tion. It must not come into contact with your
skin, eyes or clothing or be swallowed. Do not
inhale TIREFIT fumes. Keep tyre sealant away
from children. There is a risk of injury.
If you come into contact with the tyre sealant,
observe the following:
R Rinse off the tyre sealant from your skin
immediately with water.
R If the tyre sealant comes into contact with
your eyes, immediately rinse them thor-
oughly with clean water.
R If tyre sealant is swallowed, immediately
rinse your mouth out thoroughly and drink
plenty of water. Do not induce vomiting,
and seek medical attention immediately. R
Immediately change out of clothing which
has come into contact with tyre sealant.
R If an allergic reaction occurs, seek medical
attention immediately.
i If tyre sealant leaks out, allow it to dry. It
can then be removed like a layer of film.
If you get tyre sealant on your clothing,
have it cleaned as soon as possible with
perchloroethylene. X
Remove filler hose Band plug =from the
bottom section of the tyre inflation com-
pressor housing.
X Slide the yellow filler hose connector into
the mounting on yellow cap Aof tyre seal-
ant bottle :until the plug engages.
X With the sealing rings in front, slide yellow
cap Aof tyre sealant bottle :into the
mounting of tyre inflation compressor ;
until the cap and both hooks engage. 264
Flat tyreBreakdown assistance
Page 268 of 321
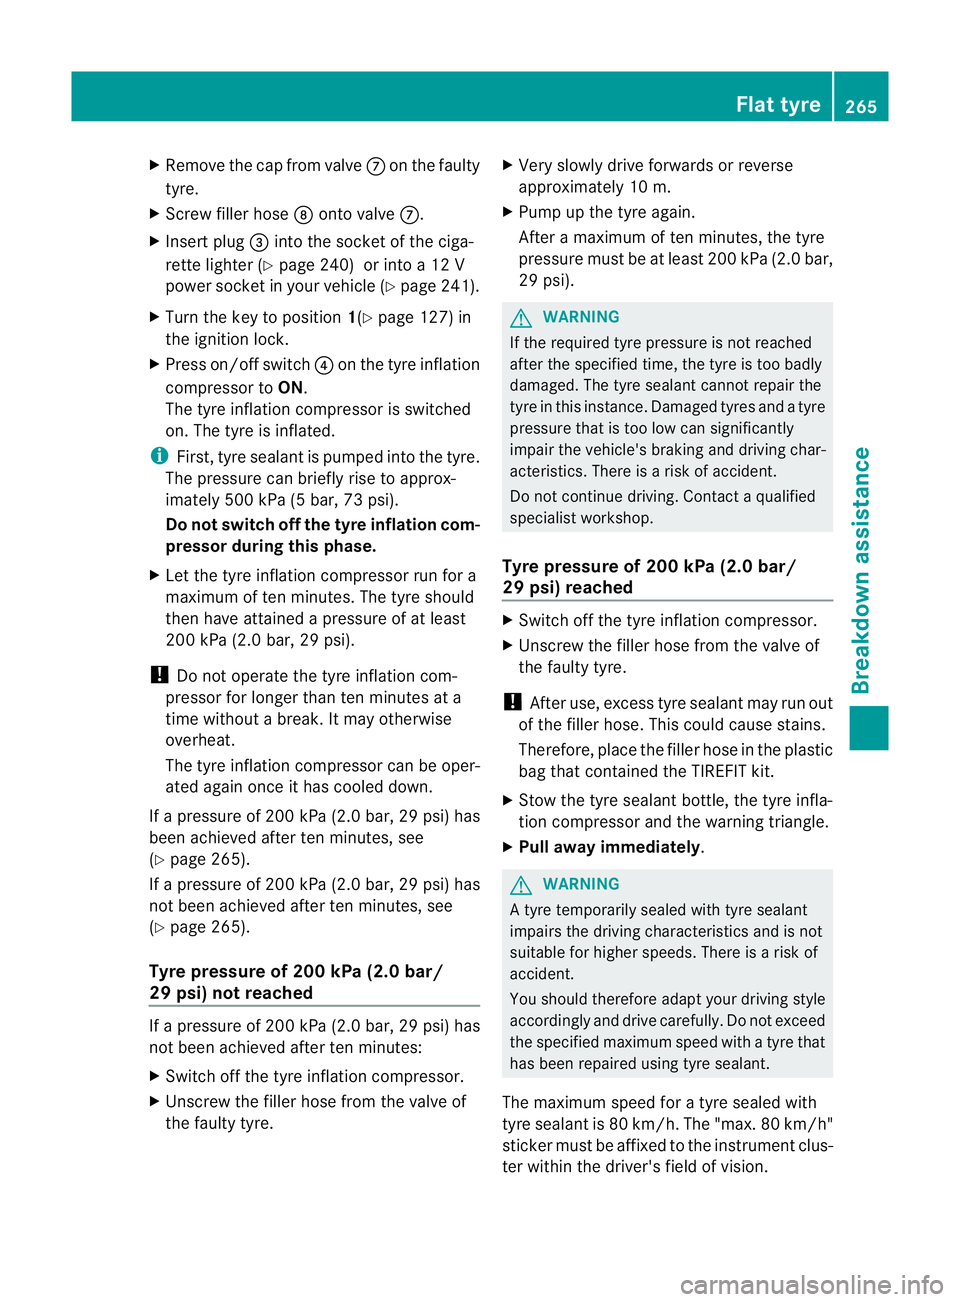
X
Remove the cap from valve Con the faulty
tyre.
X Screw filler hose Donto valve C.
X Inser tplug =into the socket of the ciga-
rette lighter (Y page 240) or into a 12 V
power socket in your vehicle (Y page 241).
X Turn the key to position 1(Ypage 127) in
the ignition lock.
X Press on/off switch ?on the tyre inflation
compressor to ON.
The tyre inflation compressor is switched
on. The tyre is inflated.
i First, tyre sealant is pumped into the tyre.
The pressure can briefly rise to approx-
imately 500 kPa (5 bar, 73 psi).
Do not switch off the tyre inflation com-
pressor during this phase.
X Let the tyre inflation compressor run for a
maximum of ten minutes. The tyre should
the nhave attained a pressure of at least
200 kPa (2.0 bar, 29 psi).
! Do not operate the tyre inflation com-
pressor for longer than ten minutes at a
time without a break .Itmay otherwise
overheat.
The tyre inflation compressor can be oper-
ated again once it has cooled down.
If a pressure of 200 kP a(2 .0 ba r,29 psi) has
bee nachieved afte rten minutes, see
(Y page 265).
If a pressure of 200 kPa (2.0 ba r,29 psi) has
not bee nachieved afte rten minutes, see
(Y page 265).
Tyre pressure of 200 kPa (2.0 bar/
29 psi) not reached If a pressure of 200 kPa
(2.0 ba r,29 psi) has
not been achieved after ten minutes:
X Switch off the tyre inflation compressor.
X Unscrew the filler hose from the valve of
the faulty tyre. X
Very slowly drive forwards or reverse
approximately 10 m.
X Pump up the tyre again.
After a maximum of ten minutes, the tyre
pressure must be at least 200 kPa (2.0 bar,
29 psi). G
WARNING
If the required tyre pressure is not reached
after the specified time, the tyre is too badly
damaged. The tyre sealant cannot repair the
tyre in this instance. Damaged tyres and a tyre
pressure that is too low can significantly
impair the vehicle's braking and driving char-
acteristics. There is a risk of accident.
Do not continue driving. Contact a qualified
specialist workshop.
Tyre pressure of 200 kPa (2.0 bar/
29 psi) reached X
Switch off the tyre inflation compressor.
X Unscrew the filler hose from the valve of
the faulty tyre.
! After use, excess tyre sealant may run out
of the filler hose .This could cause stains.
Therefore, place the filler hose in the plastic
bag that contained the TIREFIT kit.
X Stow the tyre sealant bottle, the tyre infla-
tion compressor and the warning triangle.
X Pull away immediately. G
WARNING
At yre temporarily sealed with tyre sealant
impairs the driving characteristics and is not
suitable for higher speeds .There is a risk of
accident.
You should therefore adapt your driving style
accordingly and drive carefully. Do not exceed
the specified maximum speed with a tyre that
has been repaired using tyre sealant.
The maximum speed for a tyre sealed with
tyre sealant is 80 km/h. The "max. 80 km/h"
sticker must be affixed to the instrumentc lus-
ter within the driver's field of vision. Flat tyre
265Breakdown assistance Z
Page 269 of 321
X
Stop after driving for approximately ten
minutes and check the tyre pressure with
the tyre inflation compressor.
The tyre pressure mus tnow be at least
130 kPa (1.3 bar, 19 psi). G
WARNING
If the required tyre pressure is not reached
after driving for a short period, the tyre is too
badly damaged. The tyre sealant cannot
repair the tyre in this instance. Damaged tyres
and a tyre pressure that is too low can signif-
icantly impair the vehicle's braking and driv-
ing characteristics. There is a risk of accident.
Do not continue driving. Contact a qualified
specialist workshop.
i In your vehicle, you will find a sticker with
the Mercedes-Benz Service24h telephone
number, e.g. on the B-pillar on the driver's
side.
X Correct the tyre pressure if it is still at least
130 kPa (1.3 bar, 19 psi) (for the values,
see the fuel filler flap).
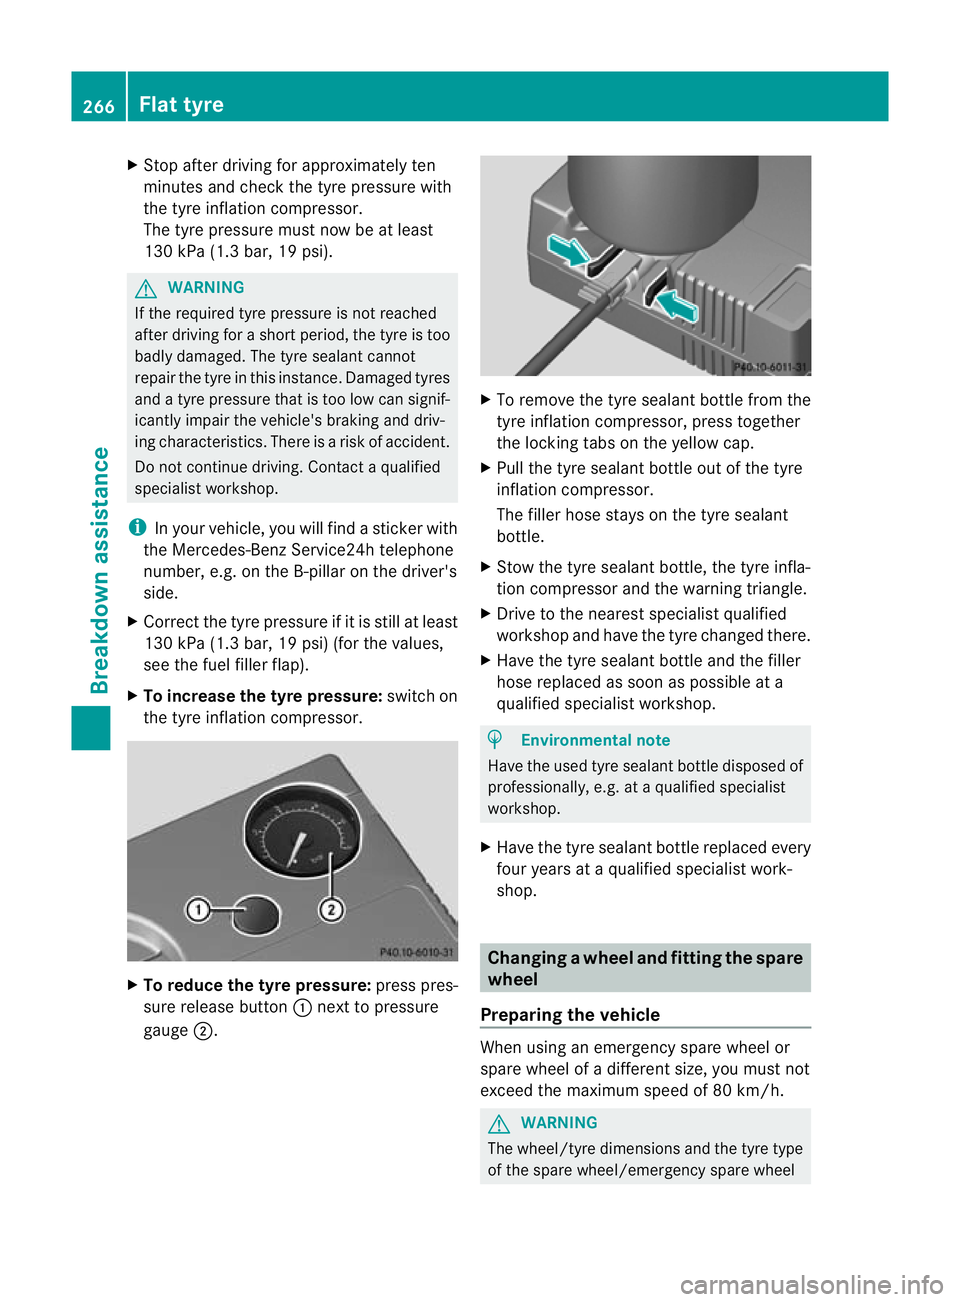
X To increase the tyre pressure: switch on
the tyre inflation compressor. X
To reduce the tyre pressure: press pres-
sure release button :next to pressure
gauge ;. X
To remove the tyre sealant bottle from the
tyre inflation compressor ,press together
the locking tabs on the yellow cap.
X Pull the tyre sealant bottle out of the tyre
inflation compressor.
The filler hose stays on the tyre sealant
bottle.
X Stow the tyre sealant bottle, the tyre infla-
tion compresso rand the warning triangle.
X Drive to the neares tspecialist qualified
workshop and have the tyre changed there.
X Have the tyre sealant bottle and the filler
hose replaced as soon as possible at a
qualified specialist workshop. H
Environmental note
Have the used tyre sealant bottle disposed of
professionally, e.g. at aqualified specialist
workshop.
X Have the tyre sealan tbottle replaced every
four years at a qualified specialist work-
shop. Changing
awheel and fitting the spare
wheel
Preparing the vehicle When using an emergency spare wheel or
spare wheel of a different size, you must not
exceed the maximum speed of 80 km/h.
G
WARNING
The wheel/tyre dimensions and the tyre type
of the spare wheel/emergency spare wheel 266
Flat tyreBreakdown assistance
Page 270 of 321
and the wheel to be replaced may differ. Fit-
ting a spare wheel/emergency spare wheel
may severely impair the driving characteris-
tics. There is a risk of accident.
To prevent hazardous situations:
R Adap tyour driving style accordingly and
drive carefully.
R Never fit more than one spare wheel/emer-
gency spare wheel if the dimesions are dif-
ferent to those of the wheel being replaced.
R Only use a spare wheel/emergency spare
wheel briefly if the dimesions are different
to those of the wheel being replaced.
R Do not switch off ESP ®
.
R Have the spare wheel/emergency spare
wheel in question replaced at the nearest
qualified specialist workshop. Make sure
that the wheel/tyre dimensions and tyre
type are correct.
i Vehicles without an emergency spare
wheel/spare wheel are not equipped with
wheel-changing tools at the factory. For
more information on which tools are
required to perform a wheel change on your
vehicle, e.g. wheel chock, wheel wrench or
centring pin, consult a Mercedes-Benz
Service Centre.
X Prepare the vehicle as described
(Y page 263).
X Remove the following items (depending on
the vehicle's equipment) from the stowage
well under the boot floor:
R the emergency spare wheel
R the wheel wrench
R the folding wheel chock
R the jack
R the centring pin
R the tyre inflation compressor
X Secure the vehicle to prevent it from rolling
away. Securing the vehicle to prevent it from
rolling away If your vehicle is equipped with a wheel chock,
it can be found in the vehicle tool kit
(Y
page 261).
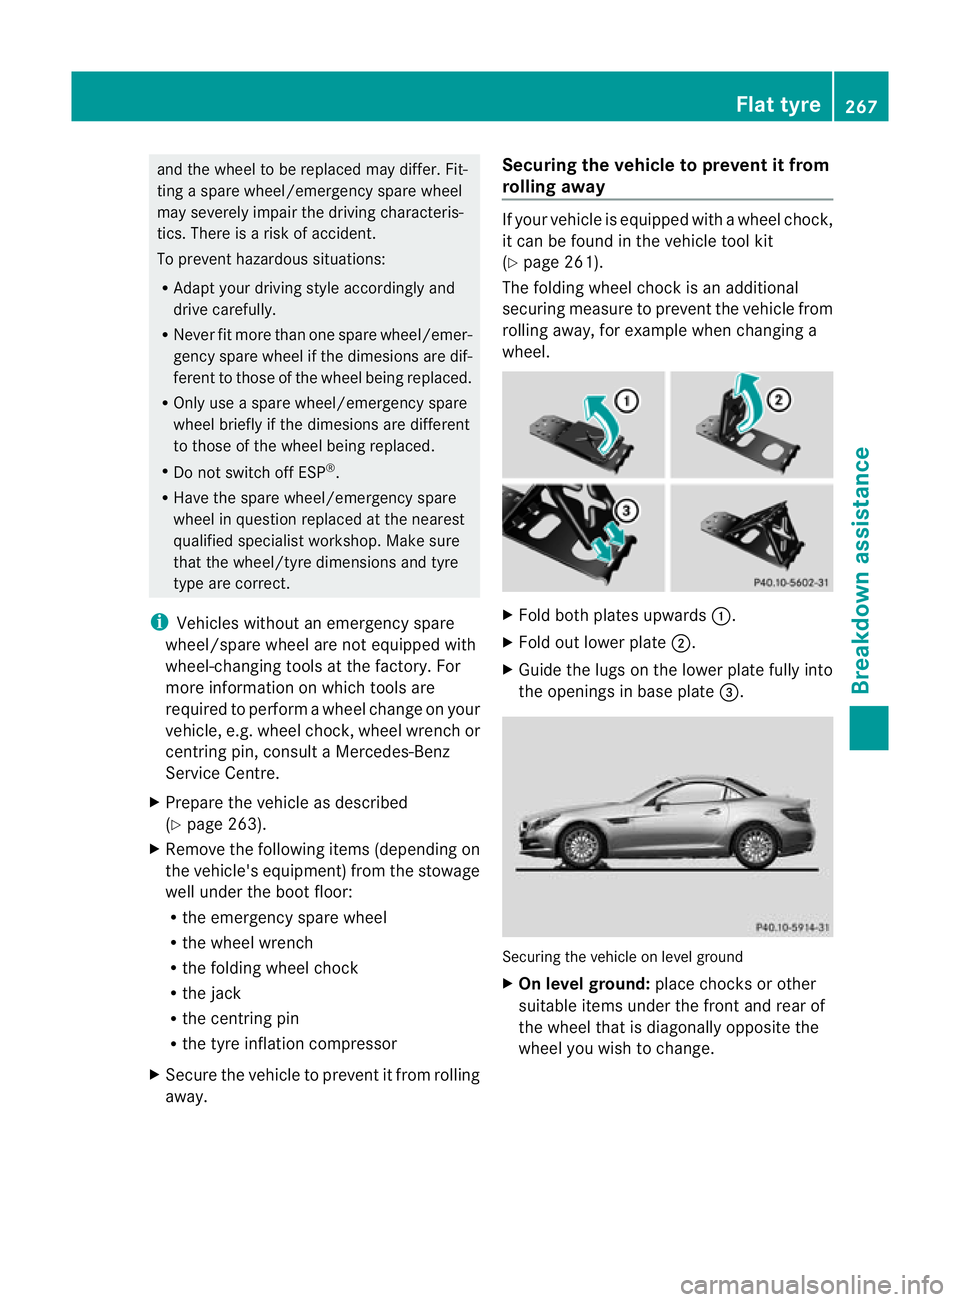
The folding wheel chock is an additional
securing measure to prevent the vehicle from
rolling away, for example when changing a
wheel. X
Fold both plates upwards :.
X Fold out lower plate ;.
X Guide the lugs on the lower plate fully into
the openings in base plate =. Securing the vehicle on level ground
X
On level ground: place chocks or other
suitable items under the front and rear of
the wheel that is diagonally opposite the
wheel you wish to change. Flat tyre
267Breakdown assistance Z