warning MERCEDES-BENZ SLK ROADSTER 2012 Service Manual
[x] Cancel search | Manufacturer: MERCEDES-BENZ, Model Year: 2012, Model line: SLK ROADSTER, Model: MERCEDES-BENZ SLK ROADSTER 2012Pages: 321, PDF Size: 6.9 MB
Page 62 of 321
the instrument cluste
rdoes not flash. In such
situations, ESP ®
will not stabilise the vehicle. X
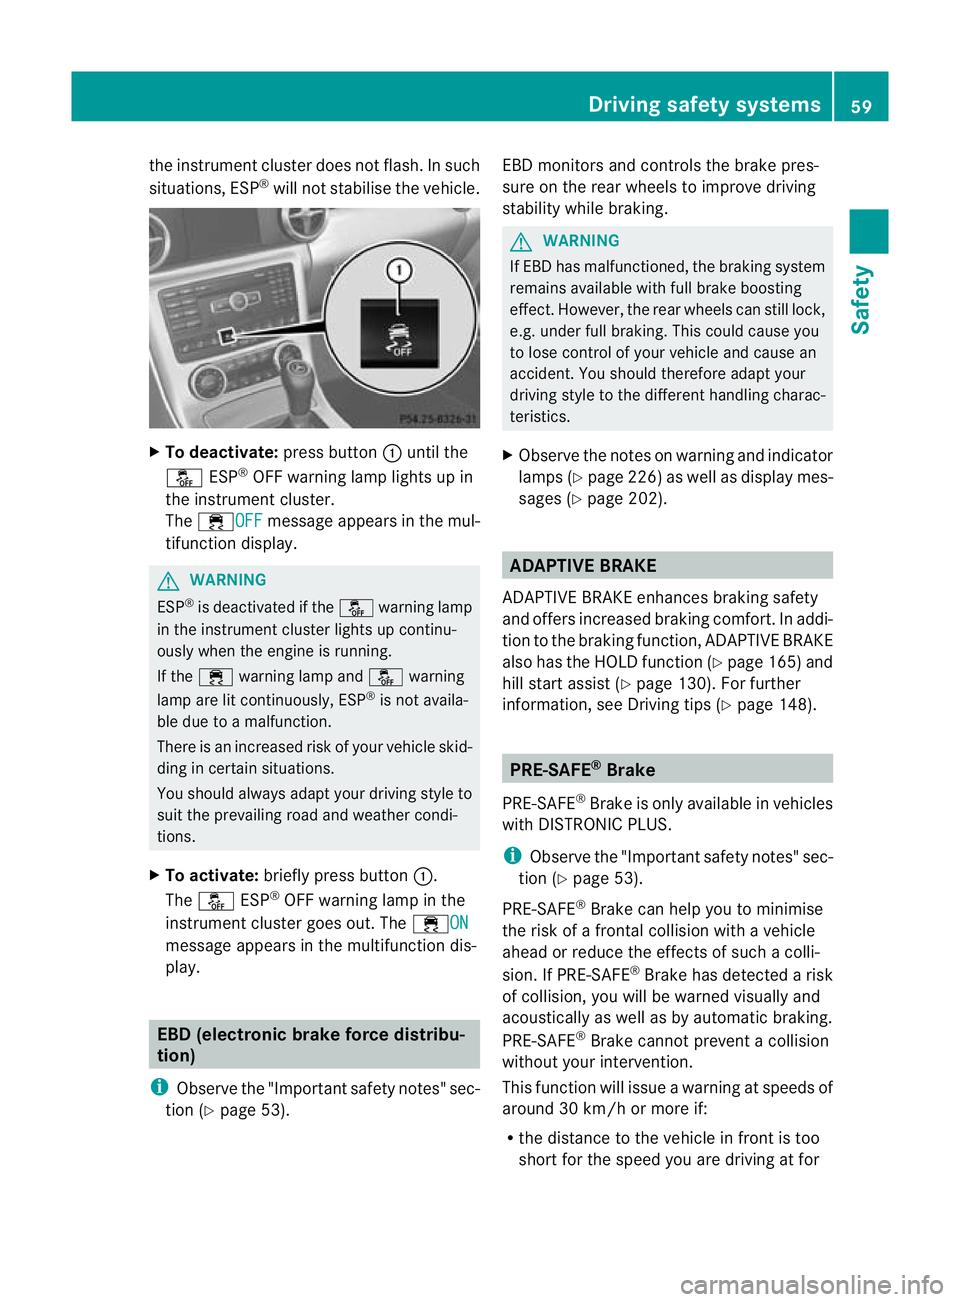
To deactivate: press button:until the
å ESP®
OFF warning lamp lights up in
the instrument cluster.
The ÷OFF message appears in the mul-
tifunction display. G
WARNING
ESP ®
is deactivated if the åwarning lamp
in the instrument cluster lights up continu-
ously when the engine is running.
If the ÷ warning lamp and åwarning
lamp are lit continuously, ESP ®
is not availa-
ble due to a malfunction.
There is an increased risk of your vehicle skid-
ding in certain situations.
You should always adapt your driving style to
suit the prevailing road and weather condi-
tions.
X To activate: briefly press button :.
The å ESP®
OFF warning lamp in the
instrument cluster goes out. The ÷ONmessage appears in the multifunction dis-
play.
EBD (electronic brake force distribu-
tion)
i Observe the "Important safety notes" sec-
tion (Y page 53). EBD monitors and controls the brake pres-
sure on the rear wheels to improve driving
stability while braking. G
WARNING
If EBD has malfunctioned, the braking system
remains available with full brake boosting
effect .However, the rear wheels can still lock,
e.g. under full braking. This could cause you
to lose control of your vehicle and cause an
accident .You should therefore adapt your
driving style to the different handling charac-
teristics.
X Observe the notes on warning and indicator
lamps (Y page 226) as well as display mes-
sages (Y page 202). ADAPTIVE BRAKE
ADAPTIVE BRAKE enhances braking safety
and offers increased braking comfort. In addi-
tion to the braking function, ADAPTIVE BRAKE
also has the HOLD function (Y page 165) and
hill start assist (Y page 130). For further
information, see Driving tips (Y page 148). PRE-SAFE
®
Brake
PRE-SAFE ®
Brake is only available in vehicles
with DISTRONIC PLUS.
i Observe the "Important safety notes" sec-
tion (Y page 53).
PRE-SAFE ®
Brake can help you to minimise
the risk of a frontal collision with a vehicle
ahead or reduce the effect sofsuch a colli-
sion. If PRE-SAFE ®
Brake has detected a risk
of collision, you will be warned visually and
acoustically as well as by automatic braking.
PRE-SAFE ®
Brake cannot prevent a collision
without your intervention.
This function will issue a warning at speeds of
around 30 km/h or more if:
R the distance to the vehicle in front is too
short for the speed you are driving at for Driving safety systems
59Safety Z
Page 63 of 321
several seconds. The
·distance warn-
ing lamp then lights up in the instrument
cluster.
R you are rapidly approaching the vehicle in
front. An intermittent warning tone will
then sound and the ·distance warning
lamp will light up in the instrument cluster.
X Brake immediately in order to increase the
distance from the vehicle in front.
or
X Take evasive action provided it is safe to do
so.
If the driver and passengers have fastened
their seat belts, PRE-SAFE ®
Brake can also
can also perform the following at speeds of
above approximately 30 km/h:
R brake the vehicle automatically from a
speed of up to approximately 200 km/h
R trigger preventative passenger protection
measures (PRE-SAFE ®
) (Y page 43)
Due to the nature of the system, particularly
complicated driving conditions may cause
unnecessary warnings or the unnecessary
intervention of PRE-SAFE ®
Brake. To end this,
you can either depress the accelerator pedal
further, activate kickdown or release the
brake pedal.
The braking action of PRE-SAFE ®
Brake is
ended automatically if:
R you drive slower than approximately
15 km/h.
R you manoeuvre to avoid the obstacle.
R there is no longer any danger of a rear-end
collision.
R there is no longer an obstacle detected in
front of your vehicle.
With the help of the radar sensor system,
PRE-SAFE ®
Brake can detect obstacles that
are in front of your vehicle for an extended
period of time.
At speeds up to approximately 70 km/h, PRE-
SAFE ®
Brake can also detect stationary
obstacles, for example, stopped or parked
vehicles. If you approach an obstacle and PRE-SAFE
®
Brake detects a risk of a collision, the system
will initially alert you both visually and acous-
tically. If you do not brake or take evasive
action, the system will warn you by automat-
ically braking the vehicle gently. If there is an
increased risk of collision, preventative
passenger protection measures (PRE-SAFE ®
)
are activated (Y page 43). If the risk of colli-
sion remains and you do not brake, take eva-
sive action or accelerate significantly, the
vehicle may perform automatic emergency
braking. Automatic emergency braking is not
performed until immediately prior to an acci-
dent that can no longer be avoided. G
WARNING
Even if PRE-SAFE ®
Brake slows the vehicle
before an imminent rear-end collision, the
system cannot avert a collision without the
intervention of the driver. There is a risk of an
accident. Brake according to the situation or
take evasive action. Delayed intervention by
the driver can lead to an accident. G
WARNING
PRE-SAFE ®
Brake cannot always clearly iden-
tify objects and complex traffic conditions.
In these cases, PRE-SAFE ®
Brake may:
R give an unnecessary warning and then
brake the vehicle
R not give a warning or intervene
There is a risk of an accident. Always pay par-
ticular attention to the traffic situation and be
ready to brake, especially if PRE-SAFE ®
Brake
warns you. Terminate the intervention in a
non-critical driving situation.
In particular, the detection of obstacles can
be impaired if there is:
R dirt on the sensors or anything else cover-
ing the sensors
R snow or heavy rain
R interference by other radar sources
R the possibility of strong radar reflections,
for example, in multi-storey car parks 60
Driving safety systemsSafety
Page 64 of 321
R
a narrow vehicle travelling in front, e.g. a
motorbike
R a vehicle travelling in front on a different
line G
WARNING
PRE-SAFE ®
Brake does not react:
R to people or animals
R to oncoming vehicles
R to crossing traffic
R when cornering
As a result, PRE-SAFE ®
Brake may not give
warnings or intervene in critical situations.
There is a ris kofanaccident. Always pay
careful attention to the traffi csituation and be
ready to brake.
In order to maintain the appropriate distance
to the vehicle in front and thus prevent a col-
lision, you must apply the brakes yourself.
X To activate/deactivate: activate or deac-
tivate PRE-SAFE ®
Brake in the on-board
computer (Y page 189).
The Ä symbol appears in the multifunc-
tion display as long as the HOL Dfunction
is not activated (Y page 165).
On vehicles with parking guidance, the
Ä symbol is displayed when Pis
engaged or you are driving faste rthan
35 km/h.
Vehicles with COMAND and navigation sys-
tem: the radar sensor system is switched off
automatically in the vicinity of radio telescope
facilities (Y page 312).
Vehicles without COMAND and a navigation
system and vehicles for Australia: the radar
sensor system and on-board computer must
be switched off in the vicinity of radio tele-
scope facilities (Y page 194).
For PRE-SAFE ®
Brake to assist you when driv-
ing, the radar sensor system must be
switched on (Y page 194) and be opera-
tional.
Following damage to the front end of the vehi-
cle, have the configuration and operation of the radar sensors checked at a qualified spe-
cialist workshop. This also applies to colli-
sions at slow speeds where there is no visible
damage to the front of the vehicle. Anti-theft systems
Immobiliser
The immobiliser prevents your vehicle from
being started without the correct key.
X To activate with the key: remove the key
from the ignition lock.
X To activate with KEYLESS-GO: switch the
ignition off and open the driver's door.
X To deactivate: switch on the ignition.
i The immobiliser is always deactivated
when you start the engine. ATA (Anti-Theft Alarm system)
Av isual and audible alarm is triggered if the
alarm system is primed and you open:
R a door
R the vehicle with the emergency key ele-
ment
R the boot lid
R the bonnet
R the glove compartment
R the stowage space under the armrest
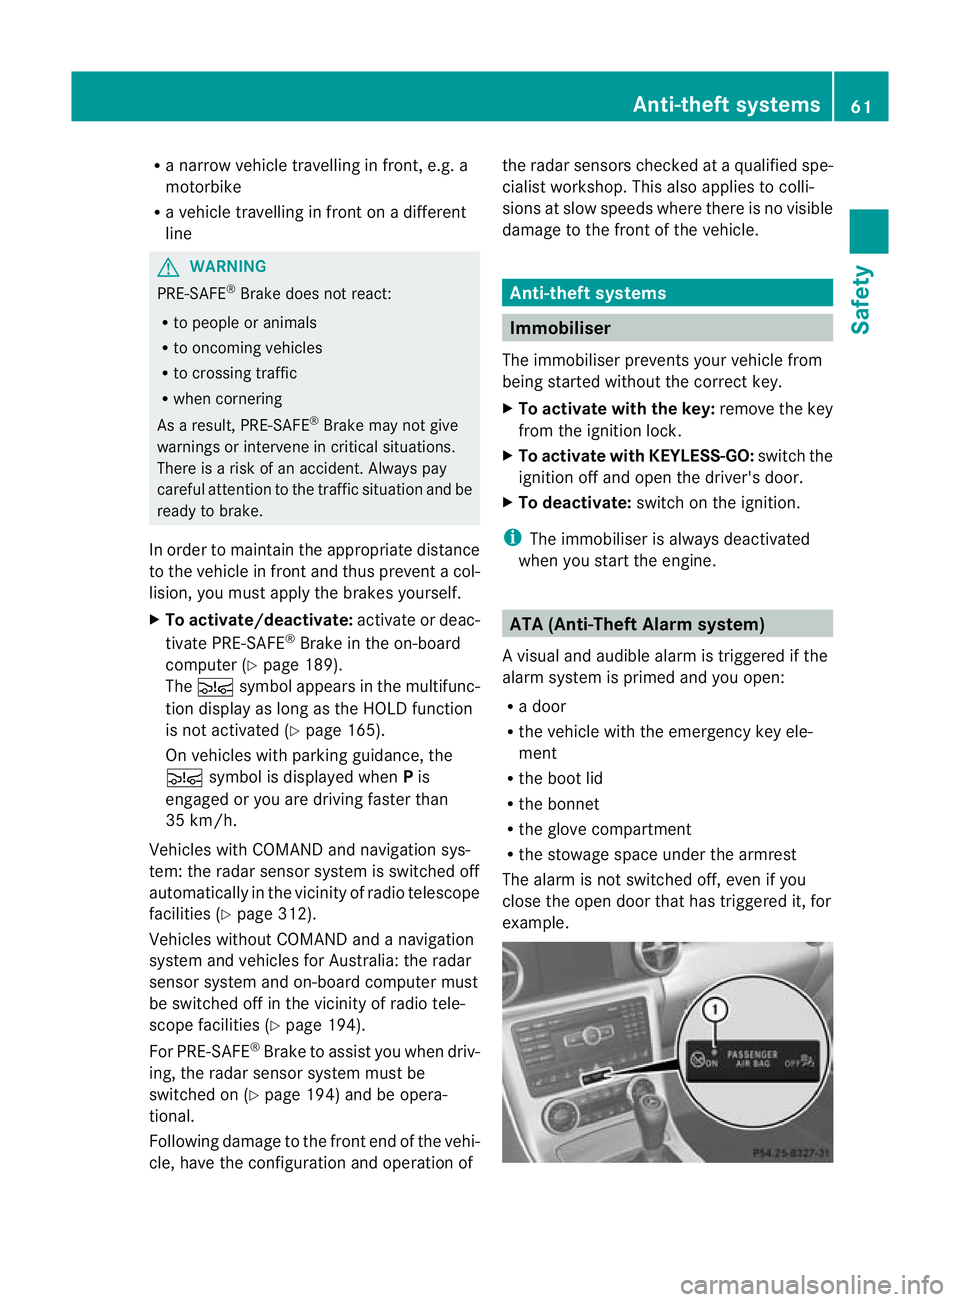
The alarm is not switched off, even if you
close the open door that has triggered it, for
example. Anti-theft systems
61Safety Z
Page 69 of 321
Useful information
i This Owner's Manual describes all models
and all standard and optional equipment
available to your vehicle at the time of pub-
lication of the Owner's Manual. Country-
specific deviations are possible. Please
note that your vehicle may not be equipped
with all features described. This also
applies to safety-relevan tsystems and
functions.
i Please read the information on qualified
specialist workshops (Y page 22).Key
Key functions
The key centrally locks/unlocks:
R the doors
R the boo tlid
R the glove compartment
R the stowage compartment in the centre
console
R the fuel filler flap G
WARNING
Only for the United Kingdom: if the vehicle
has been locked with the key, the double lock
function is activated as standard. It is the nnot
possible to open the doors from inside the
vehicle.
Therefore, do not leave any people behind in
the vehicle, particularly children, elderly peo-
ple or people in need of special assistance if
the vehicle has been locked with the key. As
a result, they may not be able to free them-
selves in the event of an emergency. As a
result, they could be seriously or even fatally
injured by prolonged exposure to extremely
high or low temperatures, for example. In this
case, rescuing people from outside the vehi-
cle is difficult.
Deactivate the interior motion sensor before
you lock the vehicle with the key. The doors can then be opened from the inside after the
vehicle has been locked from the outside with
the key. G
WARNING
If children are left unsupervised in the vehicle,
they could:
R open a door from inside the vehicle at any
time, even if it has been locked
R start the vehicle using akey which has been
left in the vehicle
R release the electric parking brake
They could thereby endanger themselves and
others. Never leave children unsupervised in
the vehicle. Always take the key with you
when leaving the vehicle, even if you are only
leaving it for a short time. G
WARNING
If a key ring is too heavy or too large, the
weight acting on the key could cause it to turn
in the ignition lock or catch on the steering
wheel. This could cause the engine to be
switched off suddenly. You may lose control
of the vehicle and cause an accident. Do not
attach any heavy or large key rings to the key
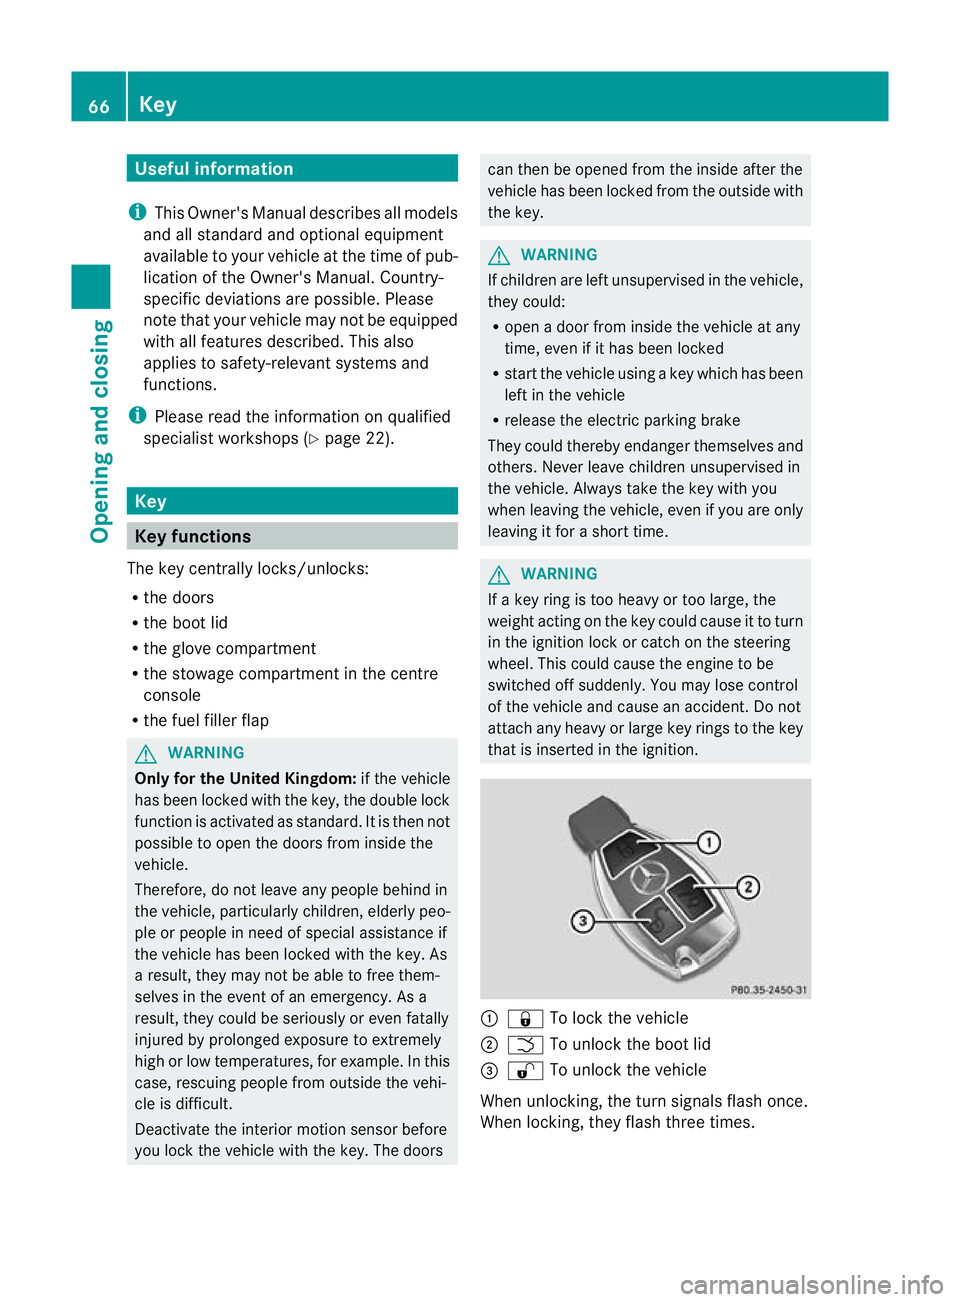
that is inserted in the ignition. :
& To lock the vehicle
; F To unlock the boot lid
= % To unlock the vehicle
When unlocking, the turn signals flash once.
When locking, they flash three times. 66
KeyOpening and closing
Page 71 of 321
i
If the setting of the locking system is
changed within the signal range of the vehi-
cle, pressing the &or% button locks
or unlocks the vehicle.
The key now functions as follows:
X To unlock the driver's door: press the
% button once.
X To unlockc entrally:press the %but-
ton twice.
X To lock centrally: press the&button.
The KEYLESS-GO function is changed as fol-
lows:
X To unlock the driver's door: touch the
inner surface of the door handle on the
driver's door.
X To unlock centrally: touch the inner sur-
face of the front-passenger door handle.
X To lock centrally: touch the outersensor
surface on one of the door handles. Restoring factor
ysettings
X Press the %and& buttons simulta-
neously for approximately six seconds until
the battery check lamp flashes twice. Emergency key element
General notes If the vehicle can no longer be locked or
unlocked with the key, use the emergency
key element.
If you use the emergency key element to
unlock and open the driver's door or the boot
lid, the anti-thef talarm system will be trig-
gered (Y page 61).
There are several ways to tur noff the alarm:
X To turn the alarm off with the key: press
the % or& button on the key.
or
X Insert the key into the ignition lock.
or X
To deactivate the alarm with KEYLESS-
GO: press the Start/Stop button in the igni-
tion lock. The key must be in the vehicle.
or
X Lock or unlock the vehicle using KEYLESS-
GO. The key must be outside the vehicle.
If you unlock the vehicle using the emergency
key element, the fuel filler flap will not be
unlocked automatically.
X To unlock the fuel filler flap: insert the
key in the ignition lock.
Removing the emergency key element X
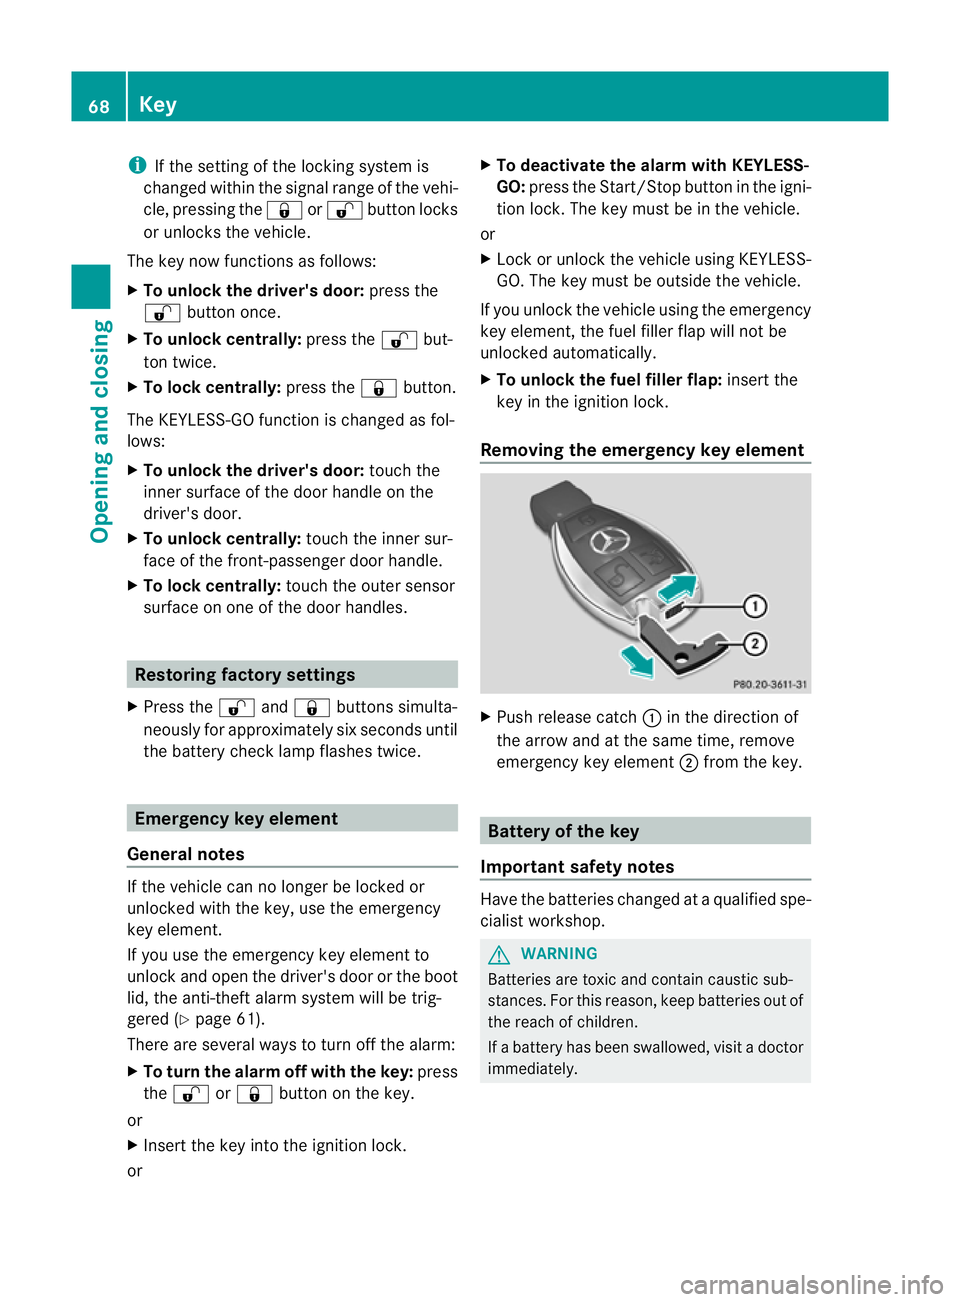
Push release catch :in the direction of
the arrow and at the same time, remove
emergency key element ;from the key. Battery of the key
Important safety notes Have the batteries changed at a qualified spe-
cialist workshop. G
WARNING
Batteries are toxic and contain caustic sub-
stances. For this reason, keep batteries out of
the reach of children.
If a battery has been swallowed, visi tadoctor
immediately. 68
KeyOpening and closing
Page 74 of 321
Problem Possible causes/consequences and
M Solutions
The engine cannot be
started using the key. The on-board voltage is too low.
X
Switch off non-essential consumers, e.g. seat heating or interior
lighting, and try to start the engine again.
If this does not work:
X Check the starter battery and charge it if necessary
(Y page 273).
or
X Jump-start the vehicle (Y page 277).
or
X Consult a qualified specialist workshop. The engine cannot be
started using KEYLESS-
GO. The key is in the
vehicle. Ad
oor is open. Therefore, the key cannot be detected as easily.
X Close the door and try to start the vehicle again. There is interference from a powerful source of radio waves.
X
Start your vehicle with the key in the ignition lock. Doors
Important safety notes
G
WARNING
Only for the United Kingdom: if the vehicle
has been locked with the key, the double lock
function is activated as standard. It is then not
possible to open the doors from inside the
vehicle.
Therefore, do not leave any people behind in
the vehicle, particularly children, elderly peo-
ple or people in need of special assistance if
the vehicle has been locked with the key. As
a result, they may not be able to free them-
selves in the event of an emergency. As a
result, they could be seriously or even fatally
injured by prolonged exposure to extremely
high or low temperatures, for example. In this
case, rescuing people from outside the vehi-
cle is difficult.
Deactivate the interior motion sensor before
you lock the vehicle with the key. The doors
can then be opened from the inside after the
vehicle has been locked from the outside with
the key. G
WARNING
If children are left unsupervised in the vehicle,
they could:
R open a door from inside the vehicle at any
time, even if it has been locked
R start the vehicle using akey which has been
left in the vehicle
R release the electric parking brake
They could thereby endanger themselves and
others. Never leave children unsupervised in
the vehicle. Always take the key with you
when leaving the vehicle, even if you are only
leaving it for a short time. Unlocking and opening the doors
from the inside
For all countries except the United King-
dom: you can open a door from inside the
vehicle even if it has been locked.
Only for the United Kingdom: if the vehicle
has been locked with the key, the double lock
function is activated as standard. It is then
not possible to open the doors from inside the Doors
71Opening and closing Z
Page 77 of 321
G
WARNING
Exhaust fumes could enter the vehicle interior
if the engine is running and the boot lid is
open. This could poison you.T herefore, you
should make sure that the boot lid is always
closed when the engine is running.
! The boot lid swings upwards when
opened. Therefore, make sure that there is
sufficient clearance above the boot lid.
i You will find details on the boot lid open-
ing dimensions in the Technical data sec-
tion (Y page 311).
The boot lid can be:
R opened and closed manually from outside
R opened automatically from outside
R unlocked with the emergency key element Opening/closing manually
Opening You can only unlock the boot lid when the
vehicle is stationary and the roof is fully
opened or closed.
X
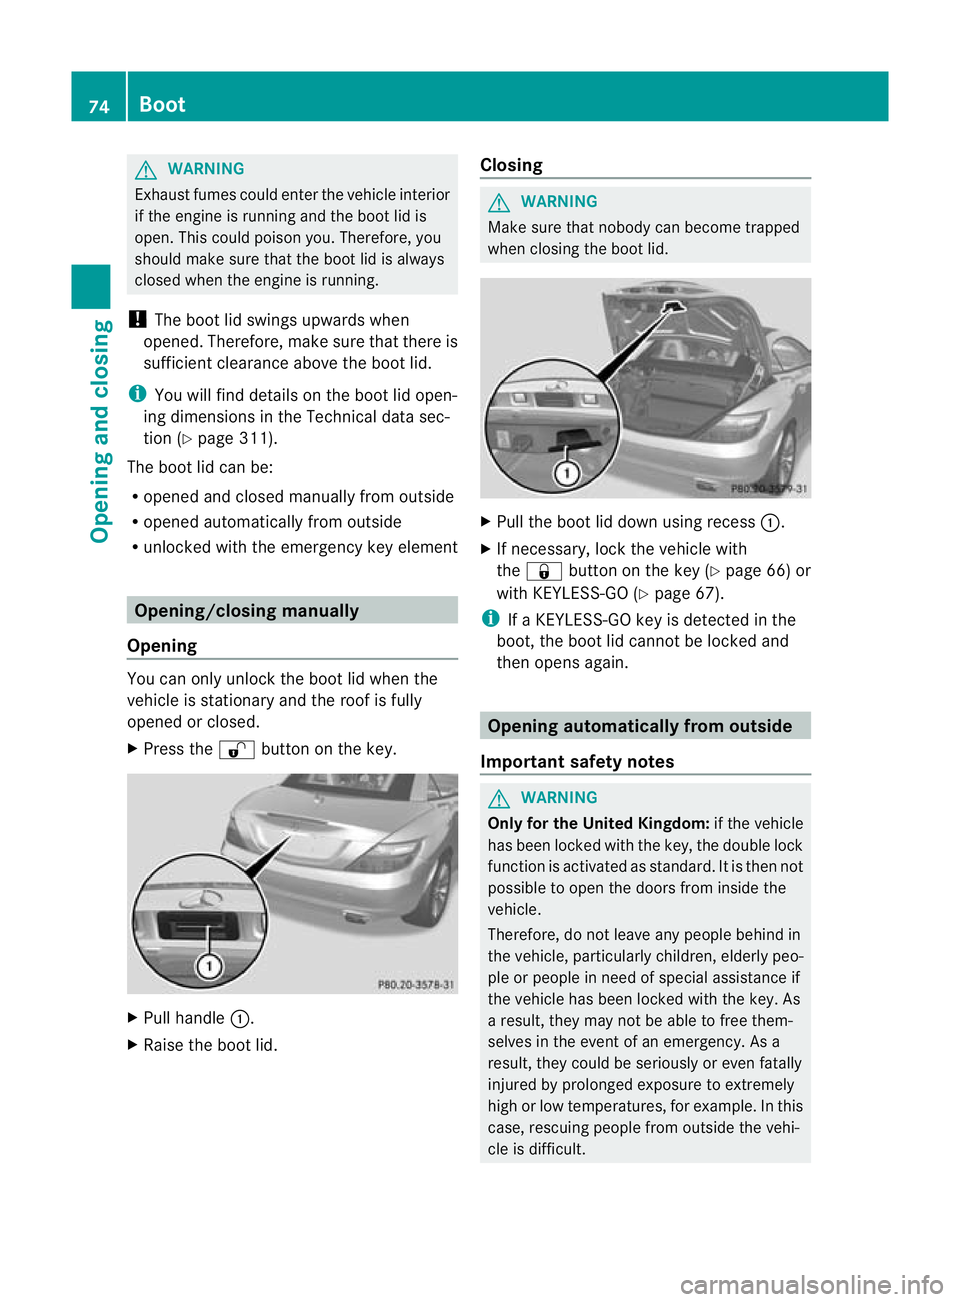
Press the %button on the key. X
Pull handle :.
X Raise the boot lid. Closing G
WARNING
Make sure that nobody can become trapped
when closing the boot lid. X
Pull the boot lid down using recess :.
X If necessary, lock the vehicle with
the & button on the key (Y page 66) or
with KEYLESS-GO (Y page 67).
i If a KEYLESS-GO key is detected in the
boot, the boot lid cannot be locked and
then opens again. Opening automatically from outside
Important safety notes G
WARNING
Only for the United Kingdom: if the vehicle
has been locked with the key, the double lock
function is activated as standard. It is then not
possible to open the doors from inside the
vehicle.
Therefore, do not leave any people behind in
the vehicle, particularly children, elderly peo-
ple or people in need of special assistance if
the vehicle has been locked with the key. As
a result, they may not be able to free them-
selves in the event of an emergency. As a
result, they could be seriously or even fatally
injured by prolonged exposure to extremely
high or low temperatures, for example. In this
case, rescuing people from outside the vehi-
cle is difficult. 74
BootOpening and closing
Page 78 of 321
Deactivate the interior motion sensor before
you lock the vehicle with the key .The doors
can then be opened from the inside after the
vehicle has been locked from the outside with
the key.
! The boot lid swings upwards when
opened. Therefore, make sure that there is
sufficient clearance above the boot lid.
i You will find details on the boot lid open-
ing dimensions in the Technical data sec-
tion (Y page 311).
Opening You can open the boot lid automatically using
the key or the handle in the boot lid.
X
Press and hold the Fbutton on the key
until the boot lid opens.
or
X If the boot is unlocked, pull on the boot lid
handle and let it go again immediately. Unlocking the boot (emergency key
element)
! The boot lid swings upwards when
opened. Therefore, make sure that there is
sufficient clearance above the boot lid.
If the boot cannot be unlocked with the key
or KEYLESS-GO, use the emergency key ele-
ment.
If you use the emergency key element to
unlock and open the boot lid, the anti-theft
alarm system will be triggered (Y page 61).
X Take the emergency key element out of the
key (Y page 68).
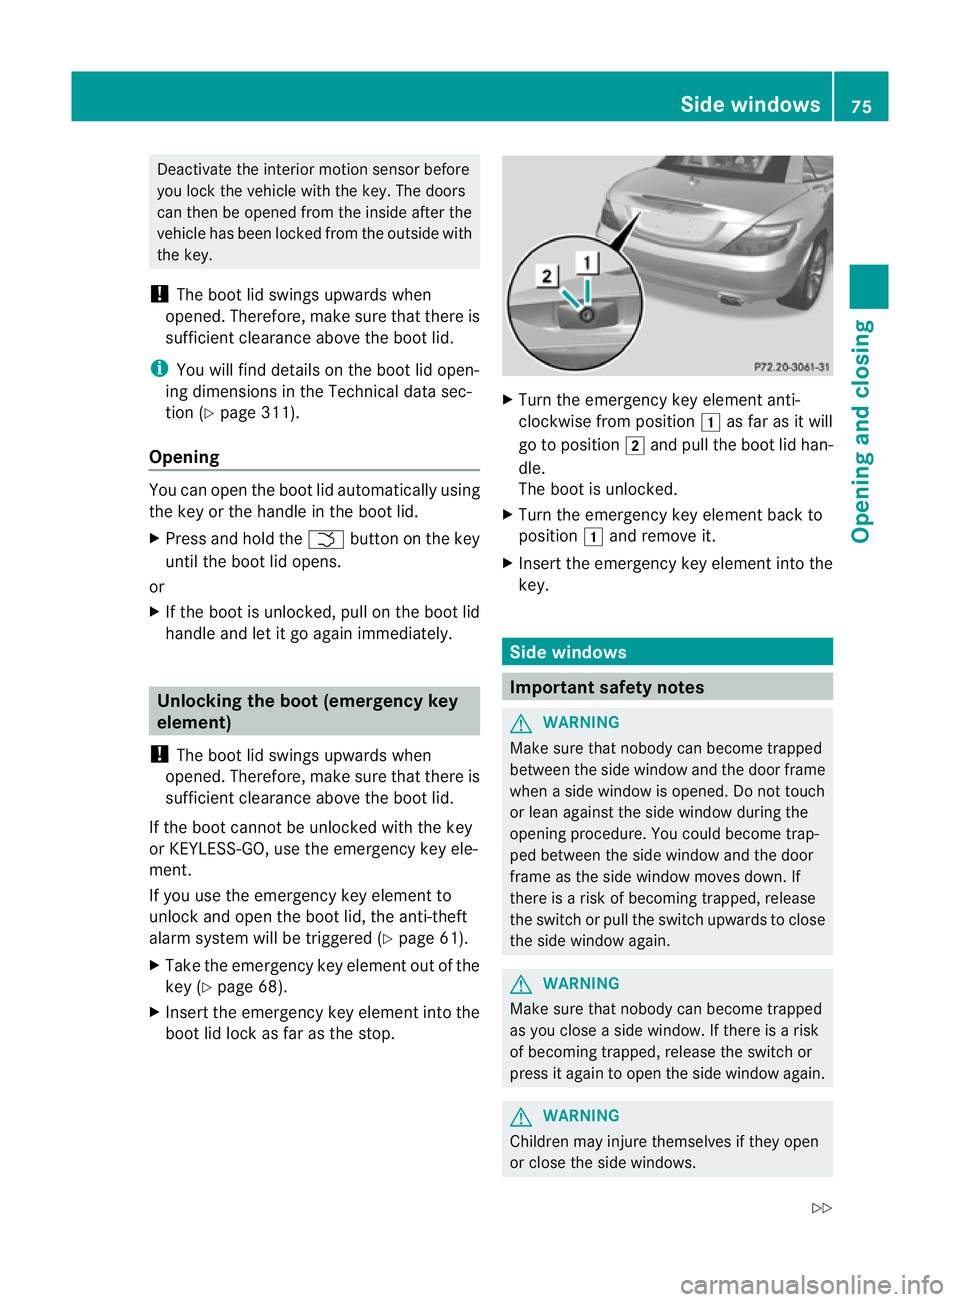
X Insert the emergency key element into the
boot lid lock as far as the stop. X
Turn the emergency key element anti-
clockwise from position 1as far as it will
go to position 2and pull the boot lid han-
dle.
The boot is unlocked.
X Turn the emergency key element back to
position 1and remove it.
X Insert the emergency key element into the
key. Side windows
Important safety notes
G
WARNING
Make sure that nobody can become trapped
between the side window and the door frame
when a side window is opened. Do not touch
or lean against the side window during the
opening procedure. You could become trap-
ped between the side window and the door
frame as the side window moves down. If
there is a risk of becoming trapped, release
the switch or pull the switch upwards to close
the side window again. G
WARNING
Make sure that nobody can become trapped
as you close a side window. If there is a risk
of becoming trapped, release the switch or
press it again to open the side window again. G
WARNING
Children may injure themselves if they open
or close the side windows. Side windows
75Opening and closing
Z
Page 79 of 321
Never leave children unsupervised in the vehi-
cle. Always take the key with you when leaving
the vehicle, even if you are only leaving it for
a short time.
G
WARNING
Do not leave children unsupervised in the
vehicle, even if they are secured in a child
restraint system. The children could:
R be seriously or even fatally injured on parts
of the vehicle
R be seriously or even fatally injured by pro-
longed exposure to extremely high or
extremely low temperatures
If children open a door, they could:
R seriously or even fatally injure other people
R get out of the vehicle and injure them-
selves, or be seriously or even fatally
injured by a passing vehicle Opening and closing the side win-
dows in the front
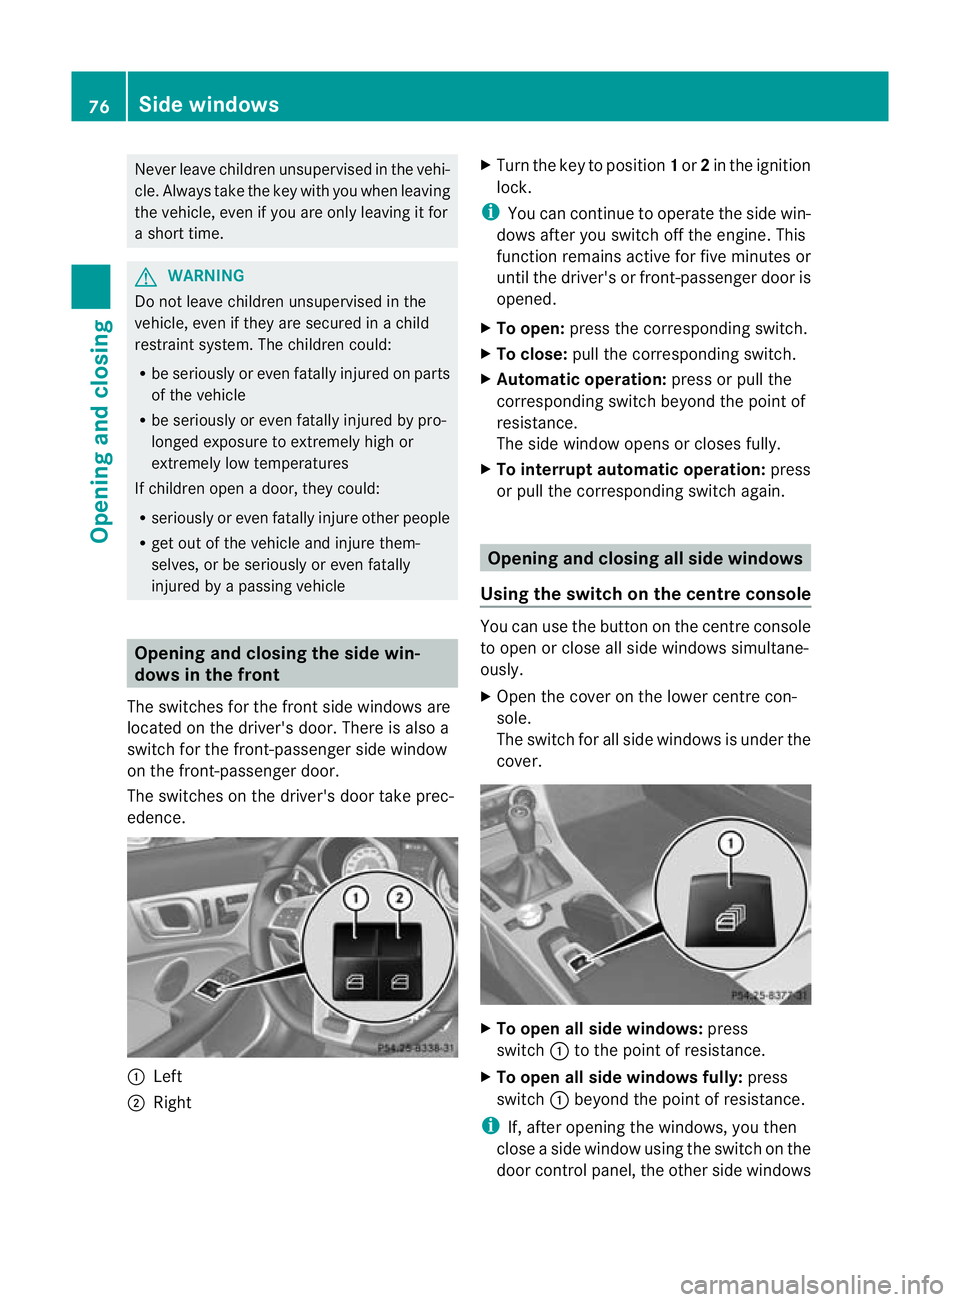
The switches for the front side windows are
located on the driver's door. There is also a
switch for the front-passenger side window
on the front-passenger door.
The switches on the driver's door take prec-
edence. :
Left
; Right X
Turn the key to position 1or 2in the ignition
lock.
i You can continue to operate the side win-
dows after you switch off the engine. This
function remains active for five minutes or
until the driver's or front-passenger door is
opened.
X To open: press the corresponding switch.
X To close: pull the corresponding switch.
X Automatic operation: press or pull the
corresponding switch beyond the point of
resistance.
The side window opens or closes fully.
X To interrupt automatic operation: press
or pull the corresponding switch again. Opening and closing all side windows
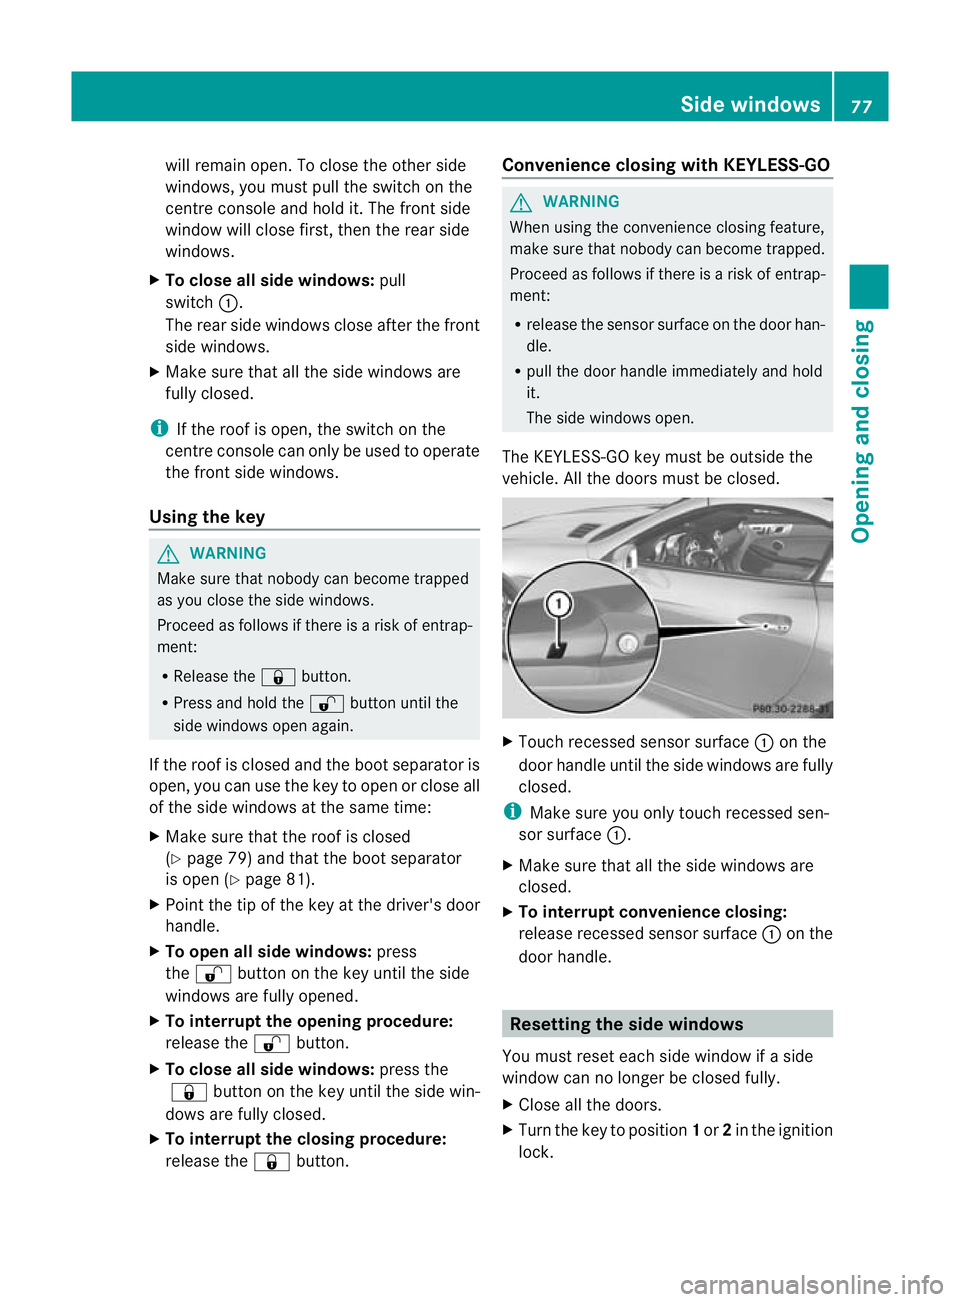
Using the switch on the centre console You can use the button on the centre console
to open or close all side windows simultane-
ously.
X Open the cover on the lower centre con-
sole.
The switch for all side windows is under the
cover. X
To open all side windows: press
switch :to the point of resistance.
X To open all side windows fully: press
switch :beyond the point of resistance.
i If, after opening the windows, you then
close a side window using the switch on the
door control panel, the other side windows 76
Side windowsOpening and closing
Page 80 of 321
will remain open
.To close the other side
windows, you must pull the switch on the
centre console and hold it. The front side
window will close first, then the rear side
windows.
X To close all side windows: pull
switch :.
The rear side windows close after the front
side windows.
X Make sure that all the side windows are
fully closed.
i If the roof is open, the switch on the
centre console can only be used to operate
the front side windows.
Using the key G
WARNING
Make sure that nobody can become trapped
as you close the side windows.
Proceed as follows if there is a risk of entrap-
ment:
R Release the &button.
R Press and hold the %button until the
side windows open again.
If the roof is closed and the boot separator is
open, you can use the key to open or close all
of the side windows at the same time:
X Make sure that the roof is closed
(Y page 79) and that the boot separator
is open (Y page 81).
X Point the tip of the key at the driver's door
handle.
X To open all side windows: press
the % button on the key until the side
windows are fully opened.
X To interrupt the opening procedure:
release the %button.
X To close all side windows: press the
& button on the key until the side win-
dows are fully closed.
X To interrupt the closing procedure:
release the &button. Convenience closing with KEYLESS-GO G
WARNING
When using the convenience closing feature,
make sure that nobody can become trapped.
Proceed as follows if there is a risk of entrap-
ment:
R release the sensor surface on the door han-
dle.
R pull the door handle immediately and hold
it.
The side windows open.
The KEYLESS-GO key must be outside the
vehicle. All the doors must be closed. X
Touch recessed sensor surface :on the
door handle until the side windows are fully
closed.
i Make sure you only touch recessed sen-
sor surface :.
X Make sure that all the side windows are
closed.
X To interrupt convenience closing:
release recessed sensor surface :on the
door handle. Resetting the side windows
You must reset each side window if a side
window can no longer be closed fully.
X Close all the doors.
X Turn the key to position 1or 2in the ignition
lock. Side windows
77Opening and closing Z