warning light MERCEDES-BENZ SLK ROADSTER 2012 Service Manual
[x] Cancel search | Manufacturer: MERCEDES-BENZ, Model Year: 2012, Model line: SLK ROADSTER, Model: MERCEDES-BENZ SLK ROADSTER 2012Pages: 321, PDF Size: 6.9 MB
Page 153 of 321
or brake discs, depends on the individual driv-
ing style and operating conditions.
For this reason, it is impossible to state a
mileage that will be valid under all circum-
stances. An aggressive driving style will lead
to high wear. You can obtain further informa-
tion about this from your Mercedes-Benz
Service Centre. Tyre traction
G
WARNING
Whereas the vehicle can be fully controlled at
a certain speed on dry roads, you must reduce
your speed on wet or icy roads to achieve the
same road safety. You could otherwise cause
an accident.
Pay particular attention to the road conditions
at temperatures around freezing point.
If ice has formed on the road surface (e.g.
from fog), a thin film of water rapidly forms on
the ice when you brake, considerably reduc-
ing tyre traction. Drive with particular care in
such weather conditions. Driving on wet roads
Aquaplaning If water has accumulated to a certain depth
on the road surface, there is a danger of aqua-
planing occurring, even if:
R
you are driving at low speeds.
R the tyres have adequate tread depth.
For this reason, do not drive in tyre ruts, and
brake carefully. Driving on flooded roads If you have to drive on stretches of road on
which water has collected, please bear in
mind that:
R
the maximum permissible still water depth
is 12 cm.
R you should drive no faster than at walking
pace.
! Bear in mind that vehicles travelling in
front or in the opposite direction create
waves. This may cause the maximum per-
missible water depth to be exceeded.
These notes must be observed under all
circumstances. You could otherwise dam-
age the engine, the electronics or the trans-
mission. Winter driving
Important safety notes G
WARNING
If the vehicle becomes trapped in snow,
ensure that snow is kept away from the
exhaust pipe and from around the vehicle as
long as the engine is running. Otherwise, poi-
sonous carbon monoxide (CO) may enter the
vehicle, resulting in loss of consciousness and
even death.
To assure sufficient fresh air ventilation, open
a window slightly on the side of the vehicle
not facing the wind.
Have your vehicle winterproofed at a qualified
specialist workshop at the onset of winter.
Observe the notes in the "Winter operation"
section (Y page 288).
Driving with summer tyres Observe the notes in the "Winter operation"
section (Y
page 288). 150
Driving tipsDriving and parking
Page 156 of 321
Setting
aspeed X
Press the cruise control lever up :for a
highe rspeed or down ?for a lower speed.
X Keep the cruise control lever pressed until
the desired speed is reached.
X Release the cruise control lever.
The new speed is stored.
X Setting in 1-km/h increments: press the
cruise control lever briefly up :or
down ?to the pressure point.
The last stored speed increases or decrea-
ses in 1 km/h increments.
X Setting in 10-km/h increments: press
the cruise control lever briefly up :or
down ?beyond the pressure point.
The last stored speed increases or decrea-
ses in 10 km/h increments.
i Cruise control is not deactivated if you
depress the accelerator pedal. For exam-
ple, if you accelerate briefly to overtake,
cruise control adjusts the vehicle's speed
to the last speed stored after you have fin-
ished overtaking.
Deactivating cruise control There are several ways to deactivate cruise
control:
X Briefly press the cruise control lever for-
wards B.
or
X Brake
or
X Briefly press the cruise control lever in the
direction of arrow A.
Variable SPEEDTRONIC is selected. LIM
indicator lamp ;in the cruise contro llever
lights up.
Cruise control is automatically deactivated if:
R you engage the electric parking brake.
R you are driving at less than 30 km/h.
R ESP ®
intervenes or if you deactivate ESP ®
. R
you shift into neutral in a vehicle with man-
ual transmission while driving or depress
the clutch pedal for longer than six sec-
onds.
R on vehicles with manual transmission, you
shift to a gear that is too high, and as a
result the engine speed is too low.
R on vehicles with automatic transmission,
you shift into position Nwhile driving.
If cruise control is deactivated, you will hear
a warning tone. You will see the Cruise control off message in the multifunction
display for approximately five seconds.
i The last speed stored is cleared when you
switch off the engine. SPEEDTRONIC
Important safety notes SPEEDTRONIC brakes automatically so that
you do not exceed the set speed. On long and
steep downhill gradients, especially if the
vehicle is laden, you must shift to a lower gear
in good time or select shift range
1,2or 3in
vehicles with automatic transmission .By
doing so, you will make use of the braking
effec tofthe engine, which relieves the load
on the brake system and prevents the brakes
from overheating and wearing too quickly. If
you need additional braking, depress the
brake pedal repeatedly rather than continu-
ously. G
WARNING
Never depress the brake pedal continuously
while the vehicle is in motion, e.g. never cause
the brakes to rub by applying constant slight
pedal pressure. This causes the brake system
to overheat, increases the braking distance
and can lead to the brakes failing completely. G
WARNING
Do not change down for additional engine
braking on a slippery road surface. This could Driving systems
153Driving and parking
Z
Page 157 of 321
cause the drive wheels to los
etheir grip and
the vehicle could skid.
You can set a variable or permanent limit
speed:
R variable for speed limits, e.g. in built-up
areas
R permanent for long-term speed restric-
tions, e.g. when driving with winter tyres
fitted (Y page 156) G
WARNING
SPEEDTRONIC is only an aid designed to
assist driving. You are responsible for the
vehicle's speed and for braking in good time.
i The speed indicated in the speedometer
may differ slightly from the limit speed
stored.
Variable SPEEDTRONIC General notes
With the cruise control lever, you can operate
cruise control or DISTRONIC PLUS and vari-
able SPEEDTRONIC.
The LIM indicator lamp on the cruise control
lever indicates which system you have selec-
ted:
R LIM indicator lamp off: cruise control or
DISTRONIC PLUS is selected.
R LIM indicator lamp on: variable SPEED-
TRONIC is selected.
You can use the cruise control lever to limit
the speed to any speed above 30 km/h while
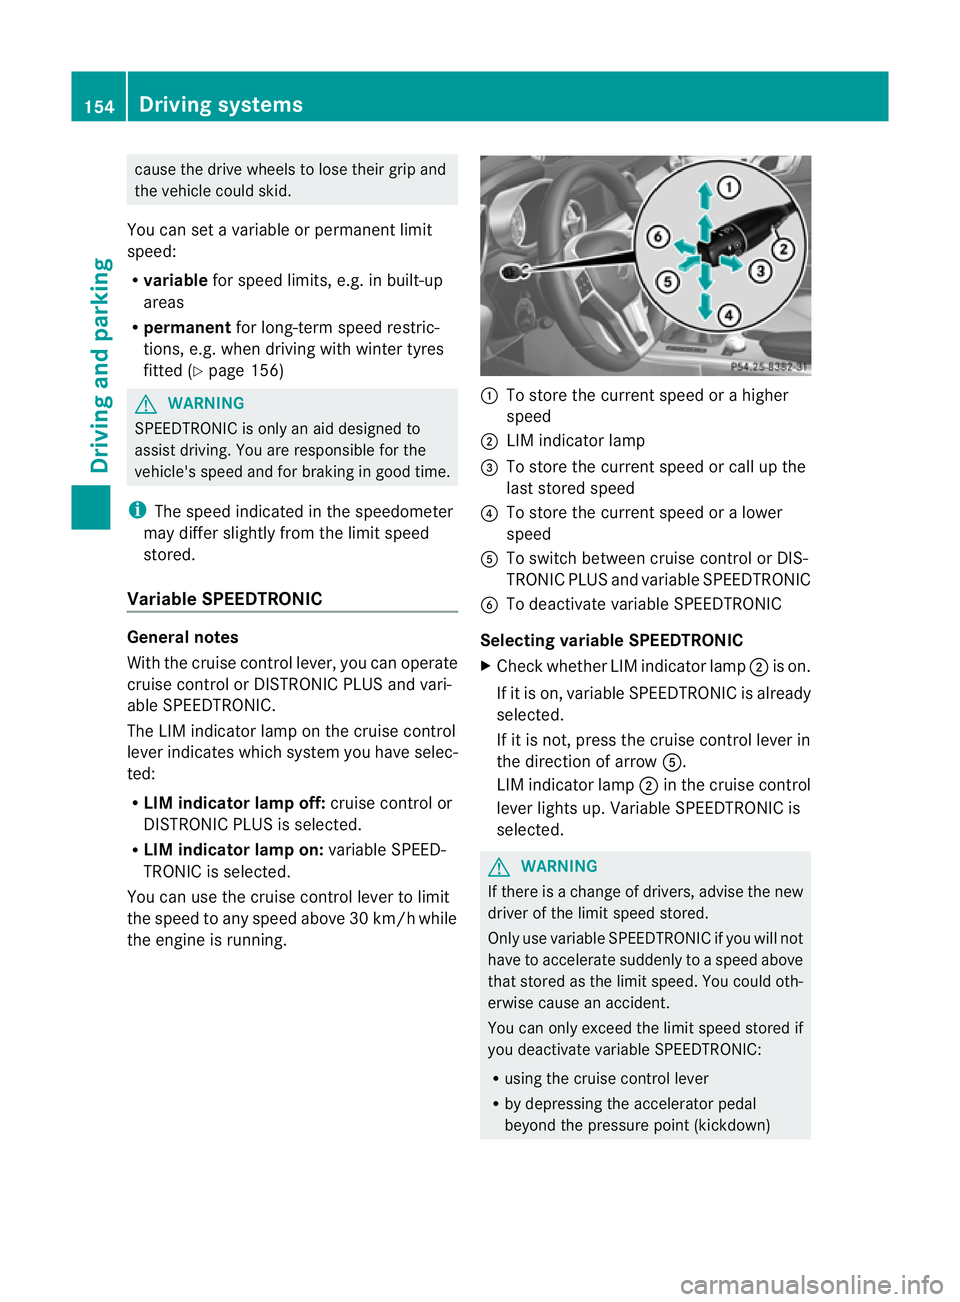
the engine is running. :
To store the current speed or a higher
speed
; LIM indicator lamp
= To store the current speed or call up the
last stored speed
? To store the current speed or a lower
speed
A To switch between cruise control or DIS-
TRONIC PLUS and variable SPEEDTRONIC
B To deactivate variable SPEEDTRONIC
Selecting variable SPEEDTRONIC
X Check whether LIM indicator lamp ;is on.
If it is on, variable SPEEDTRONIC is already
selected.
If it is not, press the cruise control lever in
the direction of arrow A.
LIM indicator lamp ;in the cruise control
lever lights up. Variable SPEEDTRONIC is
selected. G
WARNING
If there is a change of drivers, advise the new
driver of the limit speed stored.
Only use variable SPEEDTRONIC if you will not
have to accelerate suddenly to a speed above
that stored as the limit speed. You could oth-
erwise cause an accident.
You can only exceed the limit speed stored if
you deactivate variable SPEEDTRONIC:
R using the cruise control lever
R by depressing the accelerator pedal
beyond the pressure point (kickdown) 154
Driving systemsDriving and parking
Page 158 of 321
It is not possible to deactivate variable
SPEEDTRONIC by braking.
Storing the current speed
You can use the cruise control lever to limit
the speed to any speed above 30 km/h while
the engine is running.
X Briefly press the cruise control lever to the
pressure point up :or down ?.
The current speed is stored. For five sec-
onds, the multifunction display shows the
stored speed, e.g. Limit 100 km/h .
Vehicles with cruise control: the stored
speed is permanently displayed in the sta-
tus indicator, e.g. LIM 100 km/h .
Vehicles with DISTRONIC PLUS: the seg-
ments from the start of the scale up to the
stored speed lightu p in the speedometer.
Storing the current speed or calling up the
last stored speed G
WARNING
Only select a stored speed if you know what
that speed is and whether it is suitable for the
current driving and traffic situation. Other-
wise, sudden braking could endanger you or
others.
X Briefly pull the cruise control lever towards
you =.
Making adjustments in 1 km/h incre-
ments
X Briefly press the cruise control lever to the
pressure point, up :for a higher speed or
down ?for a lower speed.
or
X Keep the cruise control lever pressed to the
pressure point until the desired speed is
set. Press the cruise control lever up :for
a higher speed or down ?for a lower
speed. Making adjustments in 10 km/h incre-
ments
X
Briefly press the cruise control lever
beyond the pressure point, up :for a
higher speed or down ?for a lower speed.
or
X Keep the cruise control lever pressed
beyond the pressure point until the desired
speed is set. Press the cruise control lever
up : for a higher speed or down ?for a
lower speed.
Deactivating variable SPEEDTRONIC
There are several ways to deactivate variable
SPEEDTRONIC:
X Briefly press the cruise control lever for-
wards B.
or
X Briefly press the cruise control lever in the
direction of arrow A.
LIM indicator lamp ;in the cruise control
lever goes out. Variable SPEEDTRONIC is
deactivated.
Cruise control or DISTRONIC PLUS is selec-
ted.
Variable SPEEDTRONIC is automatically
deactivated if:
R you depress the accelerator pedal beyond
the pressure point (kickdown), but only if
your curren tspeed does not differ by more
than 20 km/h from the stored speed. You
will hear a warning tone if this is the case.
R on vehicles with manual transmission, if
you shift to a higher gear and as a result,
the engine speed is too low. G
WARNING
It is not possible to deactivate variable Speed-
tronic by braking.
i The last speed stored is cleared when you
switch off the engine. Driving systems
155Driving and parking Z
Page 160 of 321
Otherwise, you may fail to recognise dangers
in time, cause an accident and injure yourself
and others.
The radar sensor system is automatically
deactivated near radio telescope facilities
(Y page 312).
If you want DISTRONIC PLUS to assist you,
the radar sensor system must be activated
(Y page 194) and operational.
If there is no vehicle in front, DISTRONIC
PLUS operates in the same way as cruise
control in the speed range between
30 km/h and 200 km/h. If avehicle is driving
in front of you, DISTRONIC operates in the
speed range between 0km/h and
200 km/h.
Do not use DISTRONIC PLUS on roads with
steep gradients. G
WARNING
DISTRONIC PLUS brakes yourv ehicle up to a
maximum of 4 m/s 2
depending on its speed.
This corresponds to approximately 40% of
your vehicle's maximum braking power. You
must also apply the brakes yourself if this
braking power is not sufficient.
If DISTRONIC PLUS detects a risk of collision
with avehicle in front, an intermittent warning
tone sounds. In addition, the ·distance
warning lamp in the instrument cluster lights
up. Brake to avoid a collision.
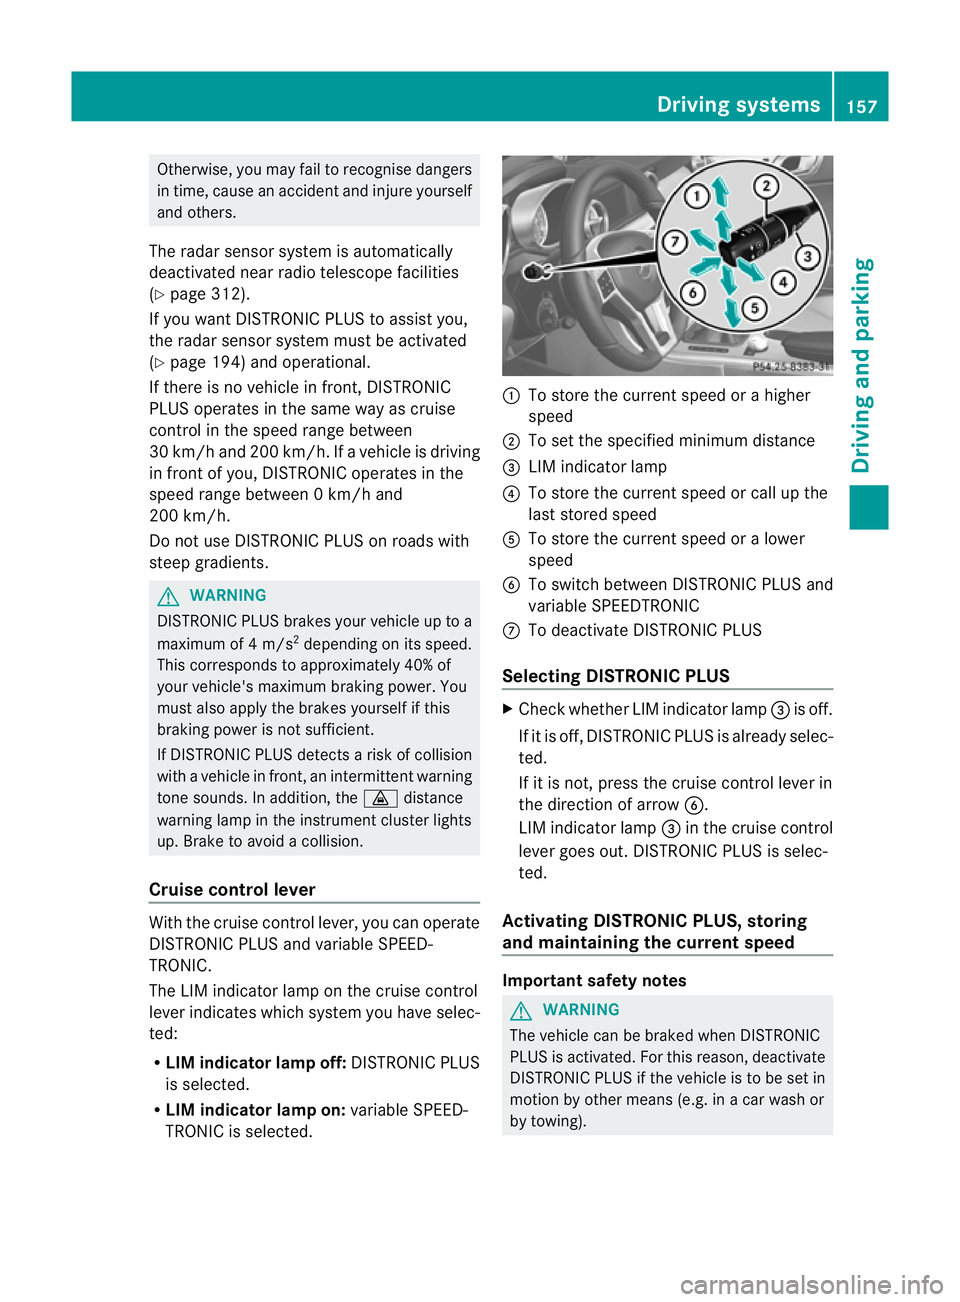
Cruise control lever With the cruise control lever, you can operate
DISTRONIC PLUS and variable SPEED-
TRONIC.
The LIM indicator lamp on the cruise control
lever indicates which system you have selec-
ted:
R LIM indicator lamp off: DISTRONIC PLUS
is selected.
R LIM indicator lamp on: variable SPEED-
TRONIC is selected. :
To store the curren tspeed or a higher
speed
; To set the specified minimum distance
= LIM indicator lamp
? To store the curren tspeed or call up the
last stored speed
A To store the curren tspeed or a lower
speed
B To switch between DISTRONIC PLUS and
variable SPEEDTRONIC
C To deactivate DISTRONIC PLUS
Selecting DISTRONIC PLUS X
Check whether LIM indicator lamp =is off.
If it is off, DISTRONIC PLUS is already selec-
ted.
If it is not, press the cruise control lever in
the direction of arrow B.
LIM indicator lamp =in the cruise control
lever goes out. DISTRONIC PLUS is selec-
ted.
Activating DISTRONIC PLUS, storing
and maintaining the current speed Important safety notes
G
WARNING
The vehicle can be braked when DISTRONIC
PLUS is activated. For this reason, deactivate
DISTRONIC PLUS if the vehicle is to be set in
motion by other means (e.g. in a car wash or
by towing). Driving systems
157Driving and parking Z
Page 166 of 321
Deactivating DISTRONIC PLUS
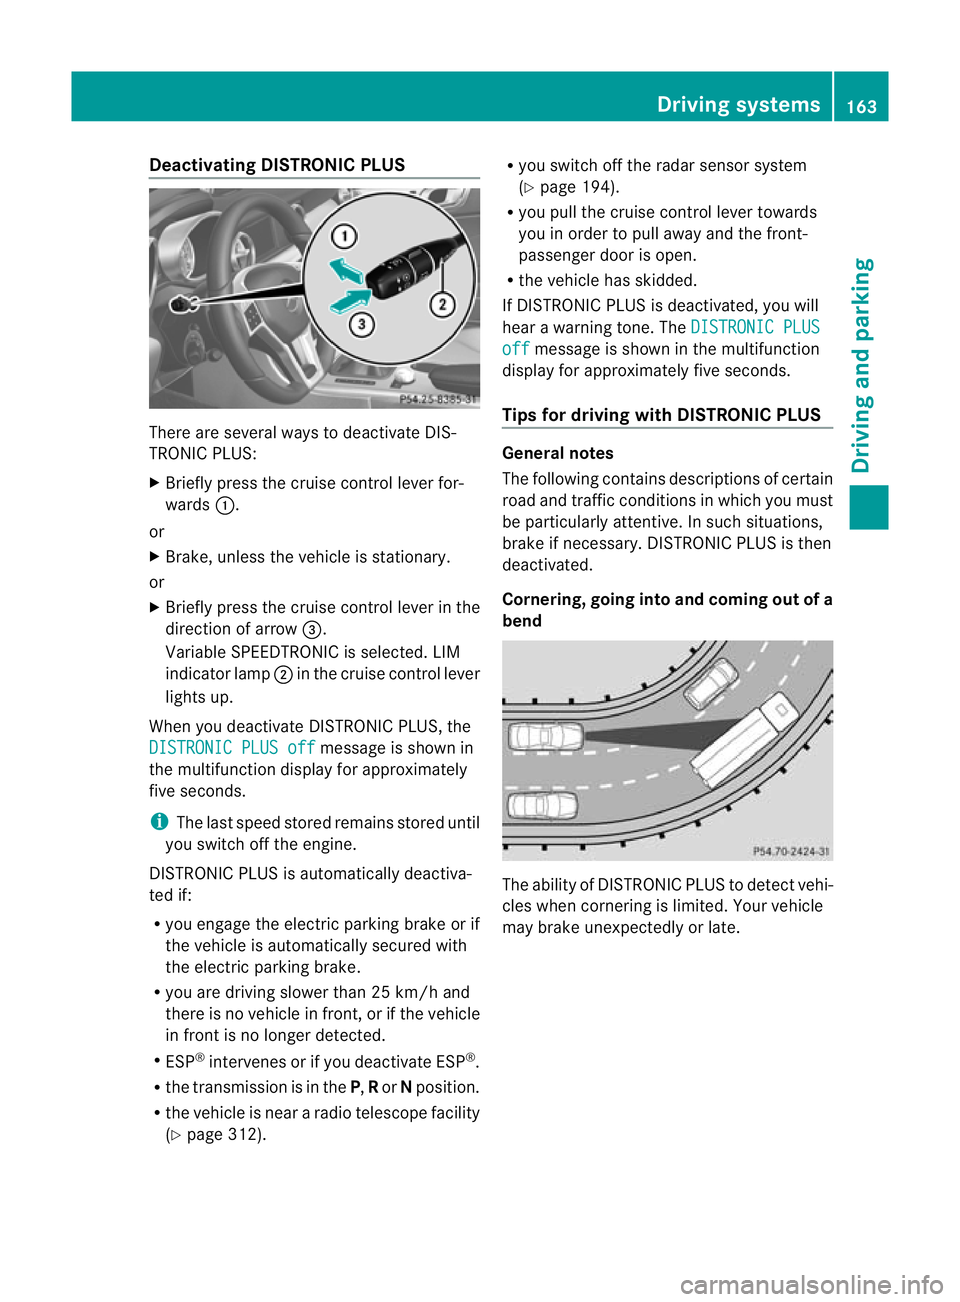
There are several ways to deactivate DIS-
TRONIC PLUS:
X Briefly press the cruise control lever for-
wards :.
or
X Brake, unless the vehicle is stationary.
or
X Briefly press the cruise control lever in the
direction of arrow =.
Variable SPEEDTRONIC is selected. LIM
indicator lamp ;in the cruise contro llever
lights up.
When you deactivate DISTRONIC PLUS, the
DISTRONIC PLUS off message is shown in
the multifunction display for approximately
five seconds.
i The last speed stored remains stored until
you switch off the engine.
DISTRONIC PLUS is automatically deactiva-
ted if:
R you engage the electric parking brake or if
the vehicle is automatically secured with
the electric parking brake.
R you are driving slower than 25 km/h and
there is no vehicle in front, or if the vehicle
in front is no longer detected.
R ESP ®
intervenes or if you deactivate ESP ®
.
R the transmission is in the P,Ror Nposition.
R the vehicle is near a radio telescope facility
(Y page 312). R
you switch off the radar sensor system
(Y page 194).
R you pull the cruise control lever towards
you in order to pull away and the front-
passenger door is open.
R the vehicle has skidded.
If DISTRONIC PLUS is deactivated, you will
hear a warning tone. The DISTRONIC PLUS off message is shown in the multifunction
display for approximately five seconds.
Tips for driving with DISTRONIC PLUS General notes
The following contains descriptions of certain
road and traffic conditions in which you must
be particularly attentive. In such situations,
brake if necessary. DISTRONIC PLUS is then
deactivated.
Cornering, going into and coming out of a
bend
The ability of DISTRONIC PLUS to detec
tvehi-
cles when cornering is limited. Your vehicle
may brake unexpectedly or late. Driving systems
163Driving and parking Z
Page 171 of 321
Fron
tsensors Centre approximately 10
0cm Corners approximately 60 cm
Rea
rsensors Centre approximately 12
0cm Corners approximately 80 cm
!
When parking, pay particula rattention to
objects above or below the sensors, such
as flower pots or trailer drawbars. PARK-
TRONIC does not detect such objects when
they are in the immediate vicinity of the
vehicle. You could damage the vehicle or
the objects.
The sensors may not detect snow and
objects which absorb ultrasonic sources.
Ultrasonic sources, such as an automatic
car wash, a lorry's compressed-air brakes
or a pneumati cdrill, coul dcause PARK-
TRONIC to malfunction.
PARKTRONIC may no tfunction correctly on
uneven terrain.
Minimum distance Centre approximately 20 cm
Corners approximately 15 cm
If there is an obstacle within this range, the
relevan
twarning displays light up and a warn-
ing tone sounds. If th edistance falls below
the minimum, the distanc emay no longer be
shown.
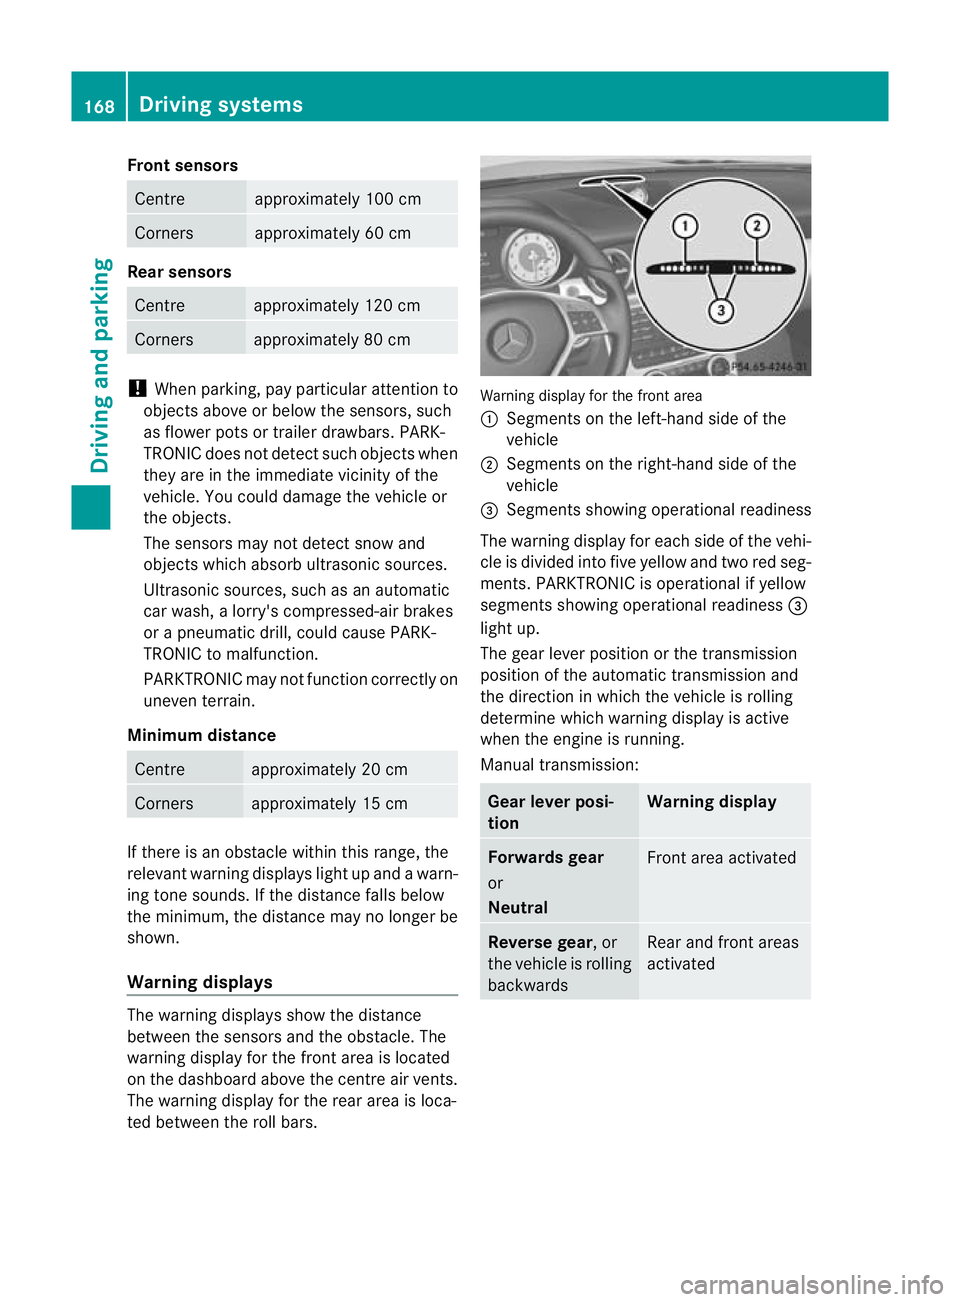
Warning displays The warning displays show the distance
between the sensors and th eobstacle. The
warning display for the fron tarea is located
on the dashboard above the centre air vents.
The warning display for the rear area is loca-
ted between the roll bars. Warning display for the front area
:
Segments on the left-hand side of the
vehicle
; Segments on the right-hand side of the
vehicle
= Segments showing operational readiness
The warning display for each side of the vehi-
cle is divided into five yellow and two red seg-
ments. PARKTRONIC is operational if yellow
segments showing operational readiness =
light up.
The gearl ever position or the transmission
position of the automatic transmission and
the direction in which the vehicle is rolling
determine which warning display is active
when the engine is running.
Manual transmission: Gear lever posi-
tion Warning display
Forwards gear
or
Neutral
Front area activated
Reverse gear
, or
the vehicle is rolling
backwards Rear and front areas
activated168
Driving systemsDriving and parking
Page 172 of 321
Automatic transmission:
Transmission
position Warning display
D
Front area activated
R,
Nor the vehicle
is rolling back-
wards Rear and front areas
activated
P
No areas activated
One or more segments light up as the vehicle
approaches an obstacle, depending on the
vehicle's distance fro
mthe obstacle.
From the:
R sixth segment onwards, you will hear an
intermittent warning tone for approx-
imately two seconds.
R seventh segment onwards, you will hear a
warning tone for approximately two sec-
onds. This indicates that you have now
reached the minimum distance.
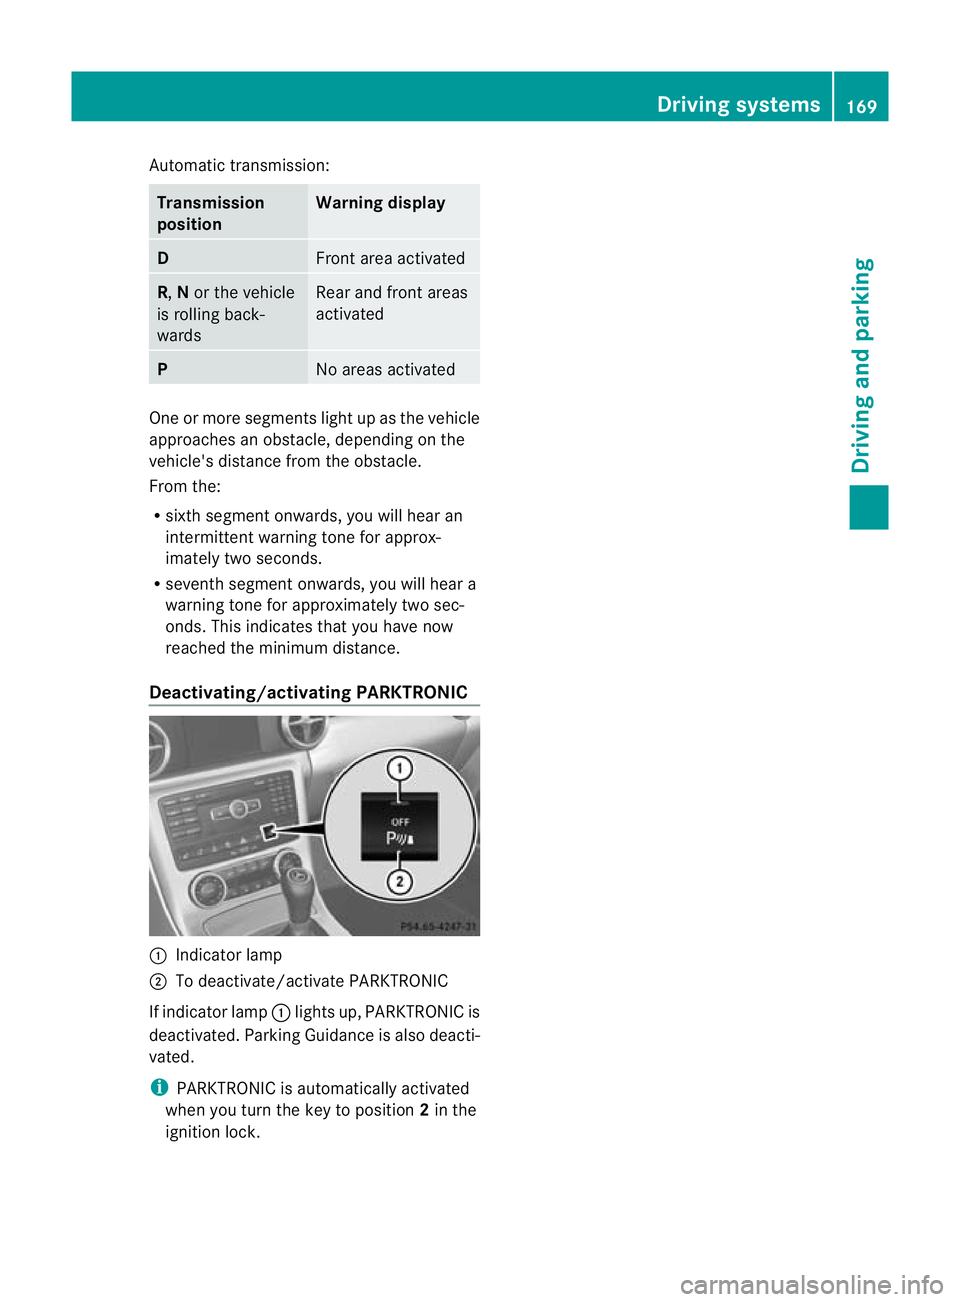
Deactivating/activating PARKTRONIC :
Indicator lamp
; To deactivate/activate PARKTRONIC
If indicator lamp :lights up, PARKTRONIC is
deactivated. Parking Guidance is also deacti-
vated.
i PARKTRONIC is automatically activated
when you turn the key to position 2in the
ignition lock. Driving systems
169Driving and parking Z
Page 173 of 321
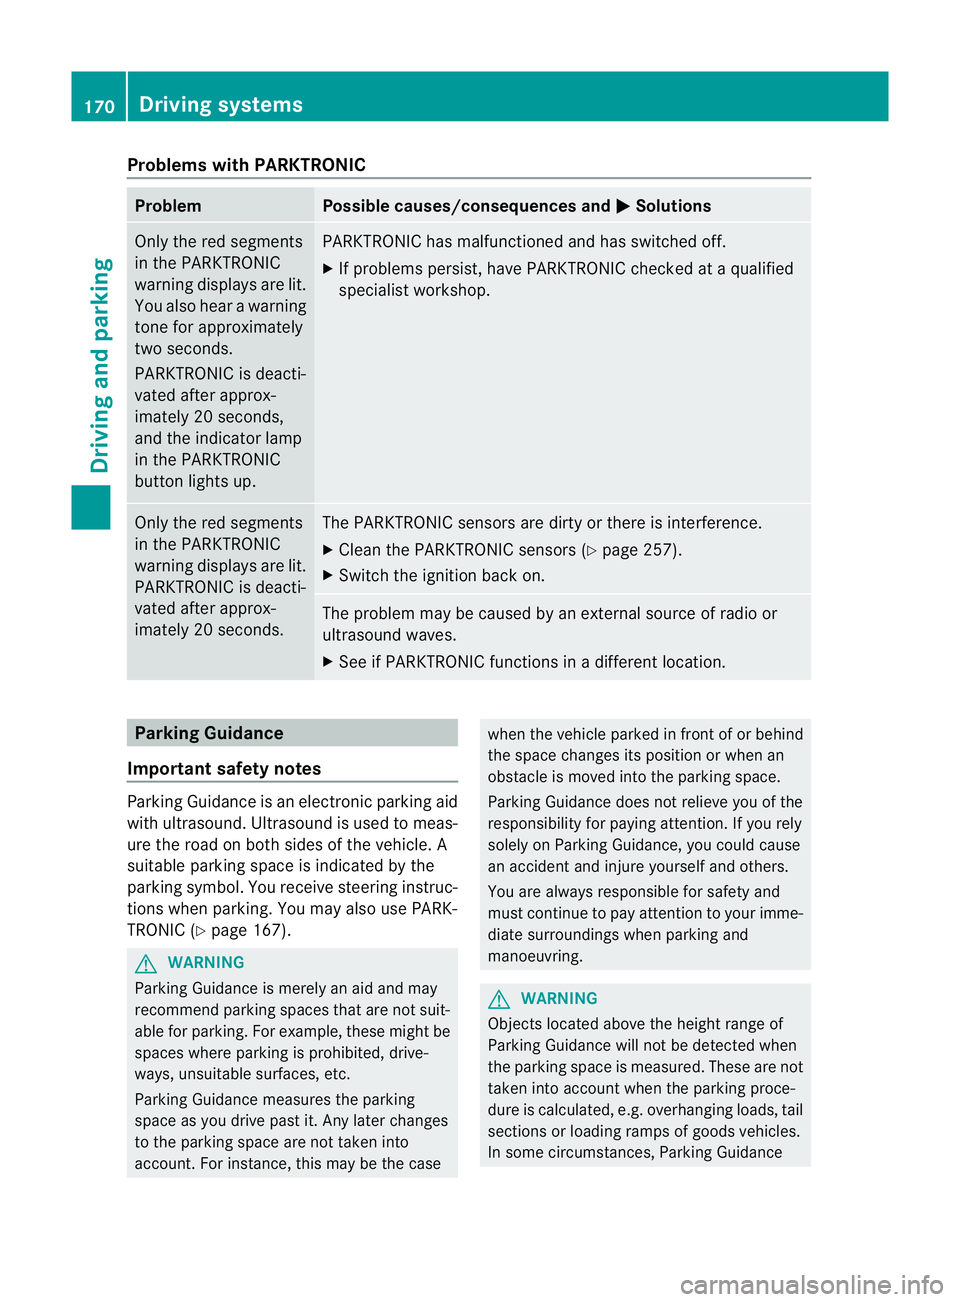
Problems with PARKTRONIC
Problem Possible causes/consequences and
M Solutions
Only the red segments
in the PARKTRONIC
warning displays are lit.
You also hear a warning
tone for approximately
two seconds.
PARKTRONIC is deacti-
vated after approx-
imately 20 seconds,
and the indicator lamp
in the PARKTRONIC
button lights up. PARKTRONIC has malfunctioned and has switched off.
X
If problems persist, have PARKTRONIC checked at a qualified
specialist workshop. Only the red segments
in the PARKTRONIC
warning displays are lit.
PARKTRONIC is deacti-
vated after approx-
imately 20 seconds. The PARKTRONIC sensors are dirty or there is interference.
X
Cleant he PARKTRONIC sensors (Y page 257).
X Switch the ignition back on. The problem may be caused by an external source of radio or
ultrasound waves.
X
See if PARKTRONIC functions in a different location. Parking Guidance
Important safety notes Parking Guidance is an electronic parking aid
with ultrasound. Ultrasound is used to meas-
ure the road on both sides of the vehicle. A
suitable parking space is indicated by the
parking symbol. You receive steering instruc-
tions when parking. You may also use PARK-
TRONIC (Y
page 167). G
WARNING
Parking Guidance is merely an aid and may
recommend parking spaces that are not suit-
able for parking. For example, these might be
spaces where parking is prohibited, drive-
ways, unsuitable surfaces, etc.
Parking Guidance measures the parking
space as you drive past it. Any later changes
to the parking space are not taken into
account. For instance, this may be the case when the vehicle parked in front of or behind
the space changes its position or when an
obstacle is moved into the parking space.
Parking Guidance does not relieve you of the
responsibility for paying attention. If you rely
solely on Parking Guidance, you could cause
an accident and injure yourself and others.
You are always responsible for safety and
must continue to pay attention to your imme-
diate surroundings when parking and
manoeuvring. G
WARNING
Objects located above the height range of
Parking Guidance will not be detected when
the parking space is measured. These are not
taken into account when the parking proce-
dure is calculated, e.g. overhanging loads, tail
sections or loading ramps of goods vehicles.
In some circumstances, Parking Guidance 170
Driving systemsDriving and parking
Page 181 of 321
Useful information
i This Owner's Manual describes all models
and all standard and optional equipment
available to your vehicle at the time of pub-
lication of the Owner's Manual. Country-
specific deviations are possible. Please
note that your vehicle may not be equipped
with all features described. This also
applies to safety-relevan tsystems and
functions.
i Please read the information on qualified
specialist workshops (Y page 22).Important safety notes
You will find an illustration of the instrument
cluster in the "At a glance" section
(Y page 28). G
WARNING
Only use the on-board computer when road
and traffic conditions permit .You would oth-
erwise be distracted and unable to concen-
trate properly on driving, and could cause an
accident. G
WARNING
No messages will be displayed if either the
instrument cluster or the multifunction dis-
play is inoperative.
As a result, you will not be able to see infor-
mation about your driving conditions, such as
speed, outside temperature, warning and indi-
cator lamps, display messages or system fail-
ures. Driving characteristics may be impaired.
Adjust your driving style and vehicle speed
accordingly.
Contact a qualified specialist workshop
immediately. G
WARNING
The on-board computer only records and dis-
plays malfunctions and warnings from certain
systems. For this reason, you should always make sure that your vehicle is safe to use. You
could otherwise cause an accident by driving
an unsafe vehicle.
G
WARNING
The operating safety of your vehicle could be
impaired if maintenance work is carried out
incorrectly. This could cause you to lose con-
trol of your vehicle and cause an accident.
Moreover, the safety systems may no longer
be able to protect you or others as they are
designed to do.
Always have service work carried out at a
qualified specialist workshop. Displays and operation
Instrument cluster lighting
The brightness control knob is located on the
bottom left of the instrument cluster
(Y page 28).
X Turn the brightness control knob clockwise
or anti-clockwise.
Instrument cluster: if the light switch is set
to Ã, TorL, brightness control
takes ambient light conditions into account.
i The light sensor in the instrument cluster
automatically controls the brightness of
the multifunction display.
In daylight, the displays in the instrument
cluster are not illuminated.
Displays and switches in the vehicle
interior: if the light switch is set to Ã,
brightness control takes ambient light condi-
tions into account .Ifthe light switch is set to
T orL, brightness control does not
take ambient light conditions into account. Coolant temperature gauge
The coolant temperature gauge is in the
instrumentc lusteront he right-hand side. 178
Displays and operationOn-board computer and displays