fuel type MERCEDES-BENZ SLK ROADSTER 2012 Owners Manual
[x] Cancel search | Manufacturer: MERCEDES-BENZ, Model Year: 2012, Model line: SLK ROADSTER, Model: MERCEDES-BENZ SLK ROADSTER 2012Pages: 321, PDF Size: 6.9 MB
Page 20 of 321

Summer opening
see Convenience opening feature
Summer tyres .................................... 288
Sun visor ............................................ 240
Supplement Restraint System see SRS (Supplemental Restraint
System)
Surround lighting (on-board com-
puter) ................................................. .192
Switching off the alarm (ATA) ............61 T
Tail lamps Display message ............................ 209
see Lights
Tank
see Fuel tank
Technical data
Notes ............................................. 300
Tyres/wheels ................................. 295
Vehicle data ................................... 310
Telephone
Accepting acall............................. 188
Display message ............................ 221
Menu (on-board computer) ............187
Number from the phone book ....... .188
Redialling ....................................... 188
Rejecting/ending acall................. 188
Telephone compartment ................237
Temperature
Coolant .......................................... 178
Coolant (on-board computer) ......... 195
Engine oil (on-board computer) ...... 195
Outside temperature ..................... .179
Setting (climate control) ................118
TEMPOMAT
Function/notes ............................. 151
Theft-deterrent system
ATA (Anti-Theft Alarm system) .........61
Immobiliser ...................................... 61
Time
see Separate Owner' smanual
Timing (RACETIMER) .........................196
TIREFIT kit .......................................... 263
Total distance recorder ....................183
Tow-away protection ..........................62Towing
Important safety notes ..................278
With the rear axle raised ................280
Towing away
Fitting the towing eye. ...................279
Removing the towing eye. ..............280
With both axles on the ground .......280
Tow-starting
Emergency engine starting ............281
Fitting the towing eye. ...................279
Important safety notes ..................278
Removing the towing eye. ..............280
Transmission
see Automatic transmission
see Manual transmission
Transporting the vehicle ..................281
Trim pieces (cleaning instructions) .258
Trip computer (on-board com-
puter) ................................................. .183
Trip meter Calling up ....................................... 183
Resetting (on-board computer) ......184
Trip odometer
see Trip meter
Turn signals
Changing bulbs (front) ...................108
Switching on/off ........................... 103
Two-way radio
Frequencies ................................... 301
Installatio n..................................... 301
Transmission output (maximum) .... 301
Type identification plate
see Vehicle identification plate
Tyre pressure
Calling up (on-board computer) .....292
Display message ............................ 217
Not reached (TIREFIT) ....................265
Pressure loss warning ....................291
Reached (TIREFIT) ..........................265
Recommended ............................... 289
Tyre pressure monitor
Function/notes ............................. 292
Restarting ...................................... 293
Warning lamp ................................. 233
Tyres
Checking ........................................ 287
Direction of rotatio n...................... 295 Index
17
Page 146 of 321

Switch off the engine before refuelling.
G
WARNING
Avoid contact with fuels.
It is hazardous to your health if your skin
comes into direct contact with fuels or you
breathe in fuel vapours. G
WARNING
Do not use petrol to refuel a diesel tank. Never
mix diesel with petrol .Doing so could damage
the fuel system and the engine. The vehicle
could also catch fire.
! Do not use petrol to refuel vehicles with a
diesel engine. Do not use diesel to refuel
vehicles with a petrol engine. Even small
amounts of the wrong fuel result in damage
to the fuel system and the engine.
! Do not switch on the ignition if you acci-
dentally refuel with the wrong fuel. Other-
wise, the fuel will enter the fuel lines. Notify
a qualified specialist workshop and have
the fuel tank and fuel lines drained com-
pletely.
! Overfilling the fuel tank could damage the
fuel system.
! Take care not to spill any fuel on painted
surfaces. You could otherwise damage the
paintwork.
! Use a filter when adding fuel from a fuel
can. The fuel lines and/or the diesel injec-
tion system could otherwise be blocked by
particles from the fuel can.
Further information on fuel and on fuel grades
can be found in the "Fuel" section
(Y page 303). Refuelling
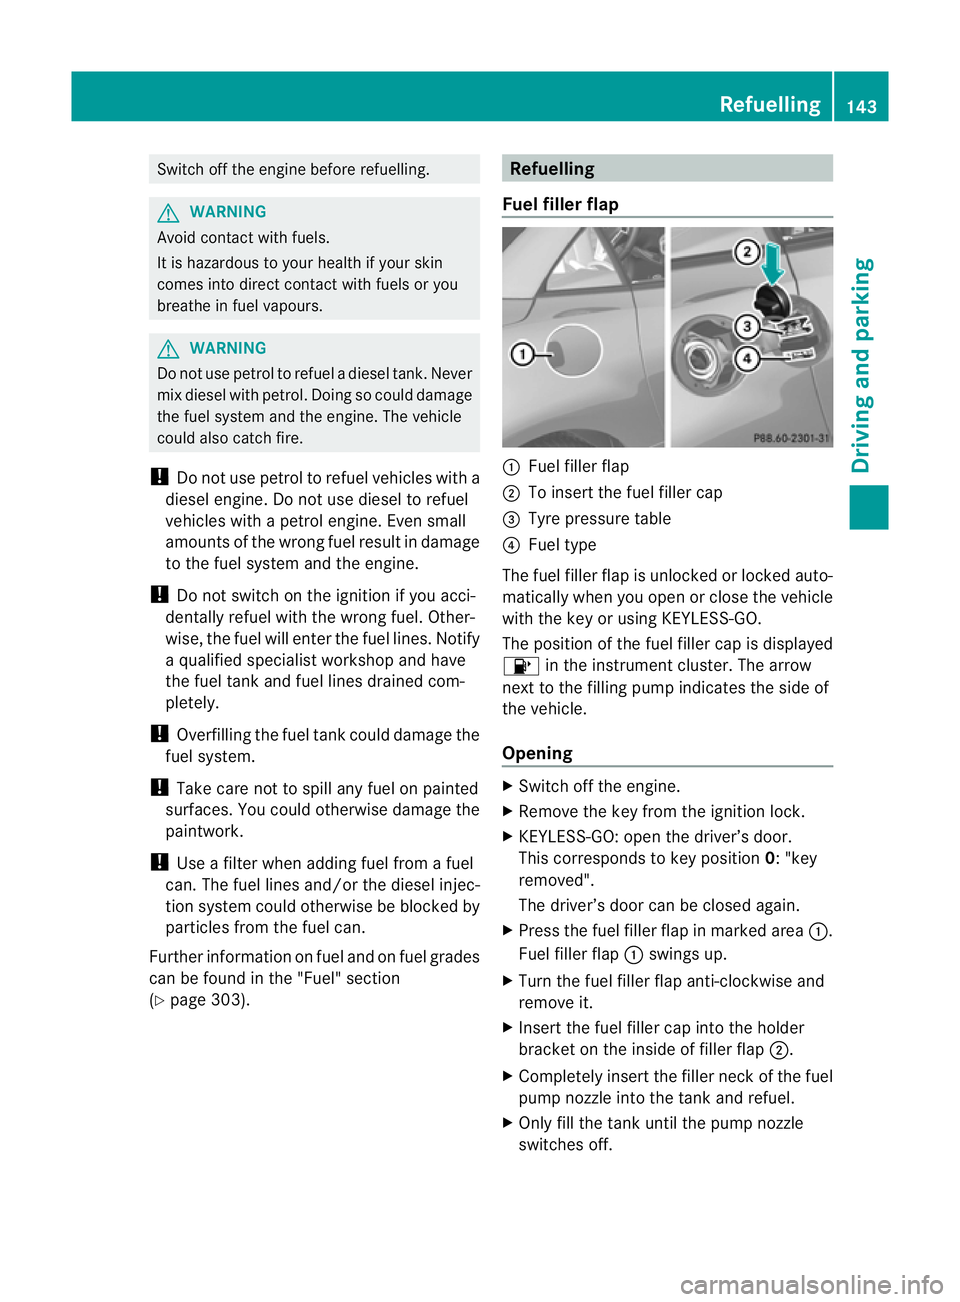
Fuel filler flap :
Fuel filler flap
; To insert the fuel filler cap
= Tyre pressure table
? Fuel type
The fuel filler flap is unlocked or locked auto-
matically when you open or close the vehicle
with the key or using KEYLESS-GO.
The position of the fuel filler cap is displayed
8 in the instrument cluster. The arrow
next to the filling pump indicates the side of
the vehicle.
Opening X
Switch off the engine.
X Remove the key from the ignition lock.
X KEYLESS-GO: open the driver’s door.
This corresponds to key position 0: "key
removed".
The driver’s door can be closed again.
X Press the fuel filler flap in marked area :.
Fuel filler flap :swings up.
X Turn the fuel filler flap anti-clockwise and
remove it.
X Insert the fuel filler cap into the holder
bracket on the inside of filler flap ;.
X Completely insert the filler neck of the fuel
pump nozzle into the tank and refuel.
X Only fill the tank until the pump nozzle
switches off. Refuelling
143Driving and parking Z
Page 269 of 321

X
Stop after driving for approximately ten
minutes and check the tyre pressure with
the tyre inflation compressor.
The tyre pressure mus tnow be at least
130 kPa (1.3 bar, 19 psi). G
WARNING
If the required tyre pressure is not reached
after driving for a short period, the tyre is too
badly damaged. The tyre sealant cannot
repair the tyre in this instance. Damaged tyres
and a tyre pressure that is too low can signif-
icantly impair the vehicle's braking and driv-
ing characteristics. There is a risk of accident.
Do not continue driving. Contact a qualified
specialist workshop.
i In your vehicle, you will find a sticker with
the Mercedes-Benz Service24h telephone
number, e.g. on the B-pillar on the driver's
side.
X Correct the tyre pressure if it is still at least
130 kPa (1.3 bar, 19 psi) (for the values,
see the fuel filler flap).
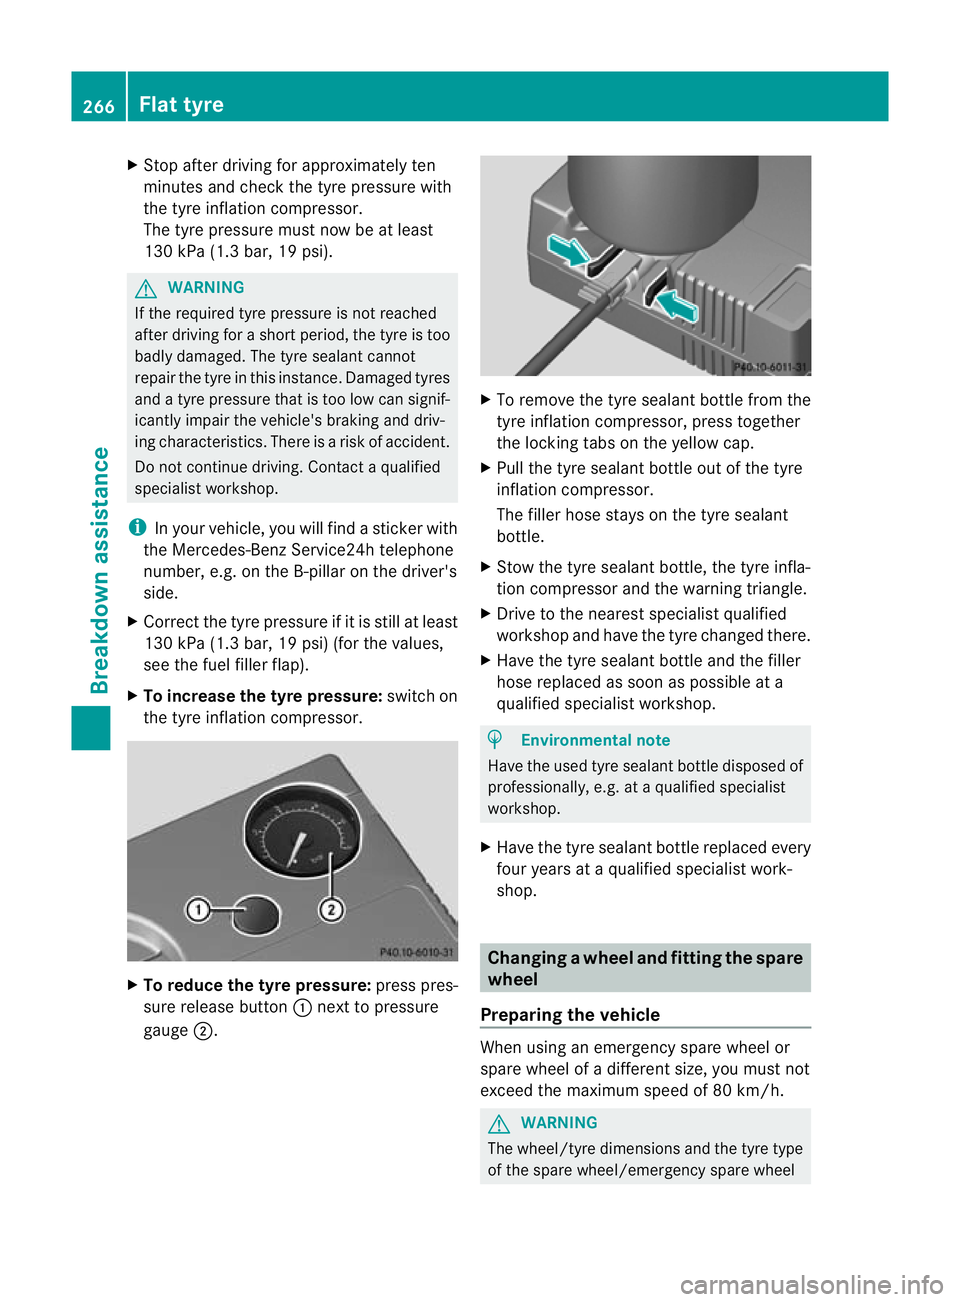
X To increase the tyre pressure: switch on
the tyre inflation compressor. X
To reduce the tyre pressure: press pres-
sure release button :next to pressure
gauge ;. X
To remove the tyre sealant bottle from the
tyre inflation compressor ,press together
the locking tabs on the yellow cap.
X Pull the tyre sealant bottle out of the tyre
inflation compressor.
The filler hose stays on the tyre sealant
bottle.
X Stow the tyre sealant bottle, the tyre infla-
tion compresso rand the warning triangle.
X Drive to the neares tspecialist qualified
workshop and have the tyre changed there.
X Have the tyre sealant bottle and the filler
hose replaced as soon as possible at a
qualified specialist workshop. H
Environmental note
Have the used tyre sealant bottle disposed of
professionally, e.g. at aqualified specialist
workshop.
X Have the tyre sealan tbottle replaced every
four years at a qualified specialist work-
shop. Changing
awheel and fitting the spare
wheel
Preparing the vehicle When using an emergency spare wheel or
spare wheel of a different size, you must not
exceed the maximum speed of 80 km/h.
G
WARNING
The wheel/tyre dimensions and the tyre type
of the spare wheel/emergency spare wheel 266
Flat tyreBreakdown assistance
Page 289 of 321

Useful information
i This Owner's Manual describes all models
and all standard and optional equipment
available to your vehicle at the time of pub-
lication of the Owner's Manual. Country-
specific deviations are possible. Please
note that your vehicle may not be equipped
with all features described. This also
applies to safety-relevan tsystems and
functions.
i Please read the information on qualified
specialist workshops (Y page 22).Important safety notes
G
WARNING
If wheels and tyres of the wrong size are used,
the wheel brakes or suspensio ncomponents
may be damaged. There is arisk of accident.
Always replace wheels and tyres with those
that fulfil the specifications of the original part
(designation, manufacturer, model). G
WARNING
Af lat tyre severely impairs the driving, steer-
ing and braking characteristics of the vehicle.
There is a risk of accident.
Tyres without run-flat characteristics:
R do not drive with aflat tyre.
R immediately replace the flat tyre with your
emergency spare wheel or spare wheel, or
consult a qualified specialist workshop.
Tyres with run-flat characteristics:
R pay attention to the information and warn-
ing notices on MOExtended tyres (tyres
with run-flat characteristics).
Accessories that are not approved for your
vehicle by Mercedes-Ben zorare not being
used correctly can impair the operating
safety. Before purchasing and using non-approved
accessories, visit a qualified specialist work-
shop and enquire about:
R suitability
R legal stipulations
R factory recommendations
Information on the dimensions and types of
wheels and tyres for yourv ehicle can be
found in the "Wheel/tyre combinations" sec-
tion (Y page 295).
Information on air pressure for the tyres on
your vehicle can be found:
R on the tyre pressure label on the fuel filler
flap
R in the "Tyre pressure" section
Modification work on the brake system and
wheels is not permitted, nor is the use of
spacer plates or brake dust shields. This inva-
lidates the general operating permit for the
vehicle.
Pay special attention to the country-specific
requirements for tyre approval. These
requirements can stipulate aspecific tyre
type for your vehicle. Furthermore, the use of
certain tyre types in certain regions and areas
of operation can be highly beneficial. You can
find further information regarding tyres at
specialist tyre retailers, at qualified specialist
workshops or at every Mercedes-Benz
Service Centre.
i Further information on wheels and tyres
can be obtained at any qualified specialist
workshop. Operation
Notes on driving
R While driving, pay attention to vibrations,
noises and unusual handling characteris-
tics, e.g. pulling to one side. This may indi-
cate that the wheels or tyres are damaged.
If you suspect that a tyre is defective,
reduce your speed immediately. Stop the
vehicle as soon as possible to chec kthe 286
OperationWheels and tyres