tire pressure MERCEDES-BENZ SLK ROADSTER 2012 Owners Manual
[x] Cancel search | Manufacturer: MERCEDES-BENZ, Model Year: 2012, Model line: SLK ROADSTER, Model: MERCEDES-BENZ SLK ROADSTER 2012Pages: 321, PDF Size: 6.9 MB
Page 20 of 321
Summer opening
see Convenience opening feature
Summer tyres .................................... 288
Sun visor ............................................ 240
Supplement Restraint System see SRS (Supplemental Restraint
System)
Surround lighting (on-board com-
puter) ................................................. .192
Switching off the alarm (ATA) ............61 T
Tail lamps Display message ............................ 209
see Lights
Tank
see Fuel tank
Technical data
Notes ............................................. 300
Tyres/wheels ................................. 295
Vehicle data ................................... 310
Telephone
Accepting acall............................. 188
Display message ............................ 221
Menu (on-board computer) ............187
Number from the phone book ....... .188
Redialling ....................................... 188
Rejecting/ending acall................. 188
Telephone compartment ................237
Temperature
Coolant .......................................... 178
Coolant (on-board computer) ......... 195
Engine oil (on-board computer) ...... 195
Outside temperature ..................... .179
Setting (climate control) ................118
TEMPOMAT
Function/notes ............................. 151
Theft-deterrent system
ATA (Anti-Theft Alarm system) .........61
Immobiliser ...................................... 61
Time
see Separate Owner' smanual
Timing (RACETIMER) .........................196
TIREFIT kit .......................................... 263
Total distance recorder ....................183
Tow-away protection ..........................62Towing
Important safety notes ..................278
With the rear axle raised ................280
Towing away
Fitting the towing eye. ...................279
Removing the towing eye. ..............280
With both axles on the ground .......280
Tow-starting
Emergency engine starting ............281
Fitting the towing eye. ...................279
Important safety notes ..................278
Removing the towing eye. ..............280
Transmission
see Automatic transmission
see Manual transmission
Transporting the vehicle ..................281
Trim pieces (cleaning instructions) .258
Trip computer (on-board com-
puter) ................................................. .183
Trip meter Calling up ....................................... 183
Resetting (on-board computer) ......184
Trip odometer
see Trip meter
Turn signals
Changing bulbs (front) ...................108
Switching on/off ........................... 103
Two-way radio
Frequencies ................................... 301
Installatio n..................................... 301
Transmission output (maximum) .... 301
Type identification plate
see Vehicle identification plate
Tyre pressure
Calling up (on-board computer) .....292
Display message ............................ 217
Not reached (TIREFIT) ....................265
Pressure loss warning ....................291
Reached (TIREFIT) ..........................265
Recommended ............................... 289
Tyre pressure monitor
Function/notes ............................. 292
Restarting ...................................... 293
Warning lamp ................................. 233
Tyres
Checking ........................................ 287
Direction of rotatio n...................... 295 Index
17
Page 266 of 321
X
Place the bag with the collapsible emer-
gency spare wheel in the boot.
X Hook in the retaining strap carabiners and
lash the collapsible emergenc yspare wheel
to the bracket. Flat tyre
Preparing the vehicle
Your vehicle may be equipped with:
R a TIREFIT kit
R an emergency spare wheel
R MOExtended tyres (tyres with run-flat char-
acteristics) (Y page 272)
i Vehicle preparation is not necessary on
vehicles with MOExtended tyres.
i Vehicles with MOExtended tyres are not
equipped with a TIREFIT kit at the factory.
It is therefore recommended that you addi-
tionally equip your vehicle with a TIREFIT kit
if you fit tyres that do not feature run-flat
characteristics, e.g. winter tyres. A TIREFIT
kit can be obtained from a Mercedes-Benz
Service Centre.
X Stop the vehicle as far away as possible
from traffic on solid, non-slippery and level
ground.
X Switch on the hazard warning lamps.
X Apply the electric parkin gbrake manually
(Y page 147).
X Bring the front wheels into the straight-
ahead position.
X Vehicles with manual transmission:
engage first or reverse gear.
X Vehicles with automatic transmission:
move the selector leve rtoP.
X Switch off the engine. X
Vehicles without KEYLESS-GO: remove
the key from the ignition lock.
X Vehicles with KEYLESS-GO: open the
driver's door.
The on-board electronics have status 0,
which is the same as the key having been
removed.
X Vehicles with KEYLESS-GO: remove the
Start/Stop button from the ignition lock
(Y page 127).
X All occupants must get out of the vehicle.
Make sure that they are not endangered as
they do so.
X Make sure that no one is near the danger
area whilst a wheel is being changed. Any-
one who is not directly assisting in the
wheel change should, for example, stand
behind the barrier.
X Get out of the vehicle. Pay attention to traf-
fic conditions when doing so.
X Close the driver's door.
X Place the warning triangle (Y page 260) a
suitable distance away.O bserve legal
requirements. TIREFIT kit
Using the TIREFIT kit TIREFIT is a tyre sealant.
You can use TIREFIT to seal punctures of up
to 4 mm, particularly those in the tyre tread.
You can use TIREFIT at outside temperatures
down to
Ò20 †. G
WARNING
In the following situations, the tyre sealant is
unable to provide sufficient breakdown assis-
tance, as it is unable to seal the tyre properly:
R there are cuts or punctures in the tyre
larger than those mentioned above.
R the wheel rim is damaged.
R you have driven at very low tyre pressures
or on a flat tyre. Flat tyre
263Breakdown assistance
Z
Page 268 of 321
X
Remove the cap from valve Con the faulty
tyre.
X Screw filler hose Donto valve C.
X Inser tplug =into the socket of the ciga-
rette lighter (Y page 240) or into a 12 V
power socket in your vehicle (Y page 241).
X Turn the key to position 1(Ypage 127) in
the ignition lock.
X Press on/off switch ?on the tyre inflation
compressor to ON.
The tyre inflation compressor is switched
on. The tyre is inflated.
i First, tyre sealant is pumped into the tyre.
The pressure can briefly rise to approx-
imately 500 kPa (5 bar, 73 psi).
Do not switch off the tyre inflation com-
pressor during this phase.
X Let the tyre inflation compressor run for a
maximum of ten minutes. The tyre should
the nhave attained a pressure of at least
200 kPa (2.0 bar, 29 psi).
! Do not operate the tyre inflation com-
pressor for longer than ten minutes at a
time without a break .Itmay otherwise
overheat.
The tyre inflation compressor can be oper-
ated again once it has cooled down.
If a pressure of 200 kP a(2 .0 ba r,29 psi) has
bee nachieved afte rten minutes, see
(Y page 265).
If a pressure of 200 kPa (2.0 ba r,29 psi) has
not bee nachieved afte rten minutes, see
(Y page 265).
Tyre pressure of 200 kPa (2.0 bar/
29 psi) not reached If a pressure of 200 kPa
(2.0 ba r,29 psi) has
not been achieved after ten minutes:
X Switch off the tyre inflation compressor.
X Unscrew the filler hose from the valve of
the faulty tyre. X
Very slowly drive forwards or reverse
approximately 10 m.
X Pump up the tyre again.
After a maximum of ten minutes, the tyre
pressure must be at least 200 kPa (2.0 bar,
29 psi). G
WARNING
If the required tyre pressure is not reached
after the specified time, the tyre is too badly
damaged. The tyre sealant cannot repair the
tyre in this instance. Damaged tyres and a tyre
pressure that is too low can significantly
impair the vehicle's braking and driving char-
acteristics. There is a risk of accident.
Do not continue driving. Contact a qualified
specialist workshop.
Tyre pressure of 200 kPa (2.0 bar/
29 psi) reached X
Switch off the tyre inflation compressor.
X Unscrew the filler hose from the valve of
the faulty tyre.
! After use, excess tyre sealant may run out
of the filler hose .This could cause stains.
Therefore, place the filler hose in the plastic
bag that contained the TIREFIT kit.
X Stow the tyre sealant bottle, the tyre infla-
tion compressor and the warning triangle.
X Pull away immediately. G
WARNING
At yre temporarily sealed with tyre sealant
impairs the driving characteristics and is not
suitable for higher speeds .There is a risk of
accident.
You should therefore adapt your driving style
accordingly and drive carefully. Do not exceed
the specified maximum speed with a tyre that
has been repaired using tyre sealant.
The maximum speed for a tyre sealed with
tyre sealant is 80 km/h. The "max. 80 km/h"
sticker must be affixed to the instrumentc lus-
ter within the driver's field of vision. Flat tyre
265Breakdown assistance Z
Page 290 of 321
wheels and tyres for damage. Hidde
ntyre
damage could also be causing the unusual
handling characteristics. If you find no
signs of damage, have the tyres and wheels
checked at a qualified specialist workshop.
R Whe nparking your vehicle ,make sure that
the tyres do no tget deformed by the kerb
or other obstacles. If it is necessary to drive
over kerbs, speed humps or similar eleva-
tions, try to do so slowly and at an obtuse
angle. Otherwise, the tyres, particularly the
sidewalls, can get damaged. Notes on regularly inspecting wheels
and tyres G
WARNING
Damaged tyres can cause tyre inflation pres-
sure loss. As a result, you could lose control
of your vehicle. There is a risk of accident.
Check the tyres regularly for signs of damage
and replace any damaged tyres immediately.
R Regularly chec kthe wheels and tyres of
your vehicle for damage (e.g. cuts, punctu-
res, tears, bulges on tyres and deformation,
cracks or severe corrosion on wheels), at
least every 14days, as well as after driving
off-road or on rough roads. Damaged
wheels can cause a loss of tyre pressure.
R Regularly check the tyre tread depth and
the condition of the tread across the whole
width of the tyre (Y page 287). If neces-
sary, turn the front wheels to full lock in
order to inspect the inner side of the tyre
surface.
R All wheels must have a valve cap to protect
the valve against dirt and moisture. Do not
fit anything onto the valve (such as tyre
pressure monitoring systems) other than
the standard valve cap or other valve caps
approved by Mercedes-Ben zfor your vehi-
cle.
R Regularly check the pressure of all the tyres
including the emergency spare wheel or the
spare wheel, particularly prior to long trips, and correc
tthe pressure as necessary
(Y page 289). Tyre tread
G
WARNING
Insufficient tyre tread will reduce tyre trac-
tion. The tyre is no longer able to dissipate
water. This means that on wet road surfaces,
the risk of aquaplaning increases, in particular
where speed is not adapted to suit the driving
conditions. There is a risk of accident.
If the tyre pressure is too high or too low, tyres
may exhibit different levels of wear at differ-
ent locations on the tyre tread. Thus, you
should regularly check the tread depth and
the condition of the tread across the entire
width of all tyres.
Minimum tyre tread depth for:
R summer tyres: 3 mm
R M+S tyres: 4 mm
For safety reasons, replace the tyres before
the legally prescribed limit for the minimum
tyre tread depth is reached.. Notes on selecting, fitting and replac-
ing tyres
R Only fit tyres and wheels of the same type
and make.
R Only fit tyres of the correct size onto the
wheels.
R After fittingn ew tyres, run them in at mod-
erate speeds for the first 100 km, as they
only reach their full performance after this
distance.
R Do not drive with tyres which have too little
tread depth, as this significantly reduces
the traction on wet roads (aquaplaning).
R Replace the tyres after six years at the lat-
est, regardless of wear. This also applies to
the emergency spare wheel/spare wheel. Operation
287Wheels and tyres Z
Page 291 of 321
The service life of tyres depends on various
factors, including the following:
R
driving style
R tyre pressure
R mileage MOExtended tyres (tyres with run-flat
characteristics)
MOExtended tyres (tyres with run-flat char-
acteristics) allow you to continue driving the
vehicle even if one or more tyres lose all air
pressure.
MOExtended tyres may only be used in con-
junction with an activated tyre pressure loss
warning system or with an activated tyre pres-
sure monitor and on wheels specifically tes-
ted by Mercedes-Benz.
i Vehicles with MOExtended tyres are not
equipped with a TIREFIT kit at the factory.
It is therefore recommended that you addi-
tionally equip your vehicle with the TIREFIT
kit if you fit tyres that do not feature run-
flat characteristics, e.g. winter tyres. A
TIREFIT kit can be obtained from a qualified
specialist workshop.
Notes on driving with MOExtended tyres in
the event of a flat tyre can be found in the
"Breakdown assistance" section
(Y page 272). Winter operation
Points to remember
Have your vehicle winterproofed at a qualified
specialist workshop at the onset of winter.
Observe the notes in the "Changing a wheel"
section (Y page 294). Driving with summer tyres
At temperatures below +7 †, summer tyres
lose elasticity and therefore traction and
braking power; change the tyres on your vehi- cle to M+S tyres. Using summer tyres at very
cold temperatures could cause tears to form,
thereby damaging the tyres permanently.
Mercedes-Benz cannot accept responsibility
for this type of damage.
M+S tyres
At temperatures below +7 †, use winter tyres
or all-season tyres. Both types of tyre are
identified by the M+S marking.
Only winter tyres bearing the isnowflake
symbol in addition to the M+S marking pro-
vide the best possible grip in wintry road con-
ditions. Only these tyres will allow driving
safety systems such as ABS and ESP ®
to
function optimally in winter. These tyres have
been developed specifically for driving in
snow.
Use M+S tyres of the same make and tread
on all wheels to maintain safe handling char-
acteristics. G
WARNING
M+S tyres with a tyre tread depth of less than
4mma re not suitable for use in winter as they
do not provide sufficient traction. There is a
risk of accident.
M+S tyres with a tread depth of less than
4 mm must be replaced.
Always observe the maximu mpermissible
speed specified for the M+S tyres you have
fitted.
If you fit M+S tyres that have a lower maxi-
mum permissible speed than that of the vehi-
cle, affix an appropriate warning sign in the
driver's field of vision. This can be obtained in
a qualified specialist workshop.
Under these circumstances, you should also
restrict the maximum speed of the vehicle
using permanent SPEEDTRONIC so that it
does not exceed the maximum permissible
speed for the M+S tyres (Y page 156).288
Winter operationWheels and tyres
Page 301 of 321
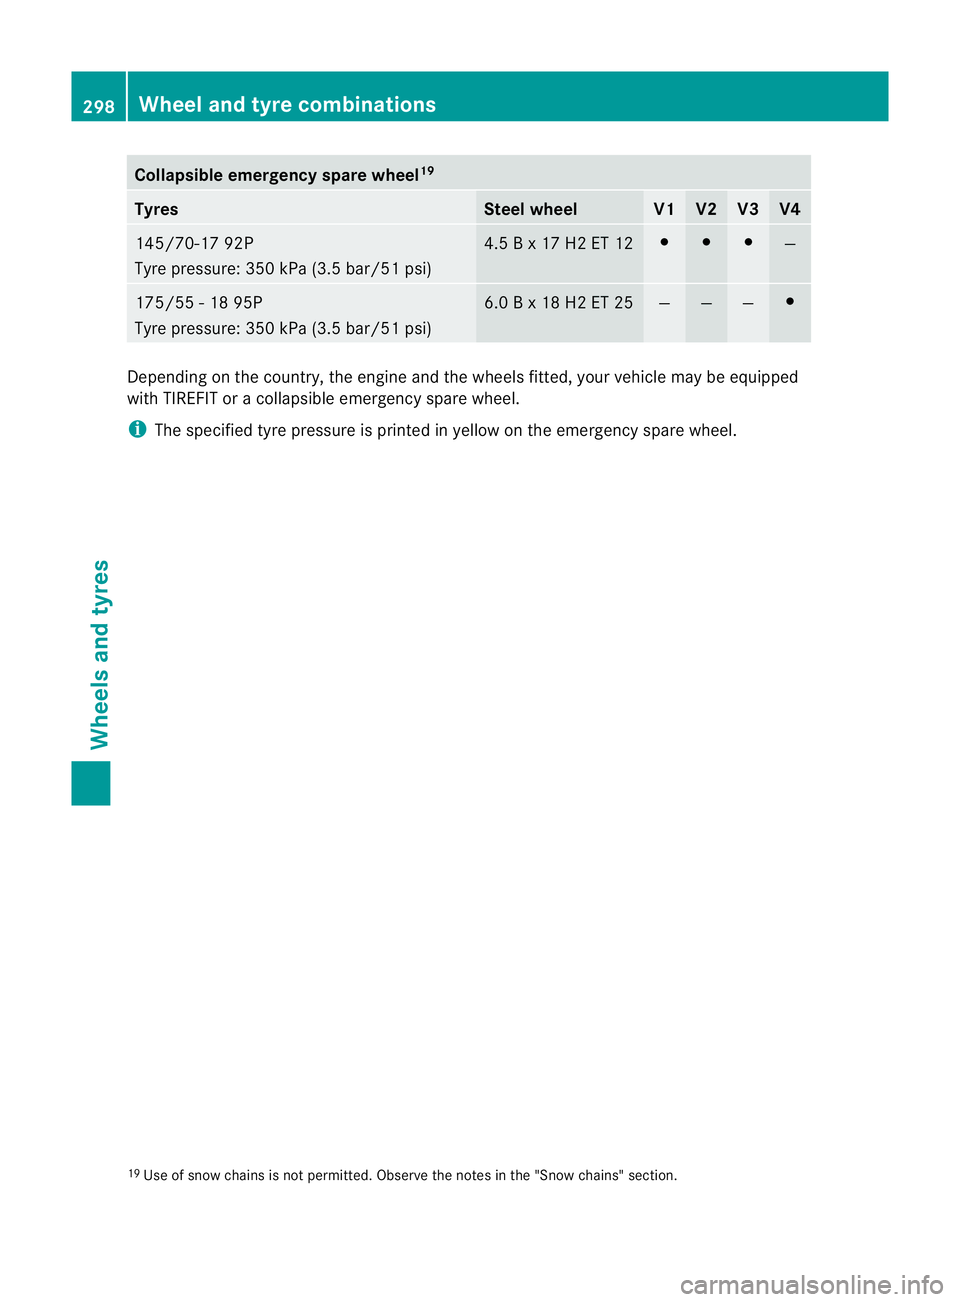
Collapsible emergency spare wheel
19Tyres Steel wheel V1 V2 V3 V4
145/70-17 92P
Tyre pressure: 350 kPa (3.5 bar/51 psi) 4.5 B x 17 H2 ET 12 # # #
—
175/55 - 18 95P
Tyre pressure: 350 kPa (3.5 bar/51 psi) 6.0 B x 18 H2 ET 25 — — — #
Depending on the country, the engine and the wheels fitted, your vehicle may be equipped
with TIREFIT or a collapsible emergency spare wheel.
i The specified tyre pressure is printed in yellow on th eemergency spare wheel.
19 Use of snow chains is not permitted. Observe the notes in the "Snow chains" section. 298
Wheel and tyre combinationsWheels and tyres