steering wheel MERCEDES-BENZ SLK230 2000 R170 Owner's Guide
[x] Cancel search | Manufacturer: MERCEDES-BENZ, Model Year: 2000, Model line: SLK230, Model: MERCEDES-BENZ SLK230 2000 R170Pages: 273
Page 210 of 273
207 Tires, wheels
Te ch n ica l
data Instruments
and controlsOperation DrivingInstrument
cluster displayPractical hintsCar care Index Inflating the collapsible spare tire
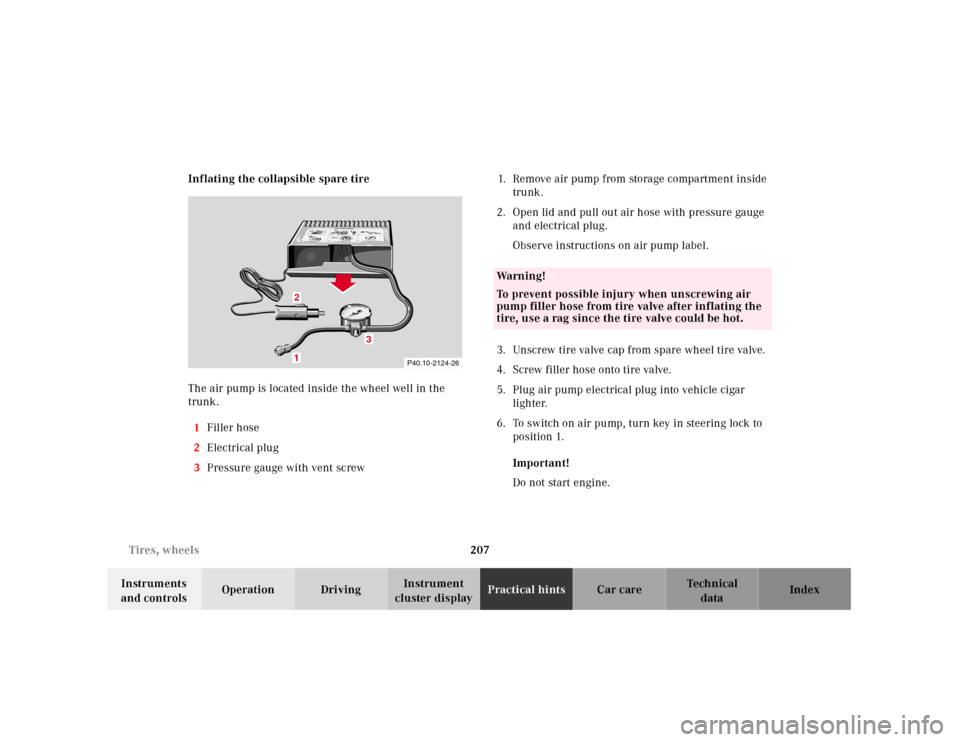
The air pump is located inside the wheel well in the
trunk.
1Filler hose
2Electrical plug
3Pressure gauge with vent screw1.Remove air pump from storage compartment inside
trunk.
2.Open lid and pull out air hose with pressure gauge
and electrical plug.
Observe instructions on air pump label.
3.Unscrew tire valve cap from spare wheel tire valve.
4.Screw filler hose onto tire valve.
5.Plug air pump electrical plug into vehicle cigar
lighter.
6.To switch on air pump, turn key in steering lock to
position 1.
Important!
Do not start engine.
P40.10-2124-26
1
0
45 6max. 6 min
A 170 584 01 38 AIR COMPRESSOR 23
Mercedes-Benz
2
3
2 1
1
2,5 bar
36 psi1
0 23
4
5
620PSI
BAR40
60
80
LUFTPRESSER12
12
3
Wa r n i n g !
To prevent possible injury when unscrewing air
pump filler hose from tire valve after inflating the
tire, use a rag since the tire valve could be hot.
Page 211 of 273
208 Tires, wheels
Te ch n ica l
data Instruments
and controlsOperation DrivingInstrument
cluster displayPractical hintsCar care Index
7.Operate air pump (approximately 5 minutes) until
pressure gauge displays 36 psi (2.5 bar).
8.To switch off air pump, turn key in steering lock to
position 0.
9.Unscrew filler hose from tire. Reinstall tire valve
cap.
Note:
Excessive tire air pressure should be released using the
vent screw.Storing spare wheel in wheel well
Deflate spare tire:
1.Unscrew valve stem removal tool, which is a part of
the valve cap, from tire valve.
2.Using the valve stem removal tool, open tire valve
slightly by turning the tire valve insert
counterclockwise to release air pressure.
3.When the tire air pressure has been released,
remove tire valve insert (protect it from dirt and
sand) using the previously removed tire valve cap.
4.Once all air is out of the tire, and the tire has
collapsed to its original shape, reinstall the tire
valve insert and valve cap.
Place spare wheel in wheel well and secure it with air
pump holder. Turn pump holder clockwise to its stop.
Page 218 of 273
215 Towing the vehicle
Te ch n ica l
data Instruments
and controlsOperation DrivingInstrument
cluster displayPractical hintsCar care Index Sport Package
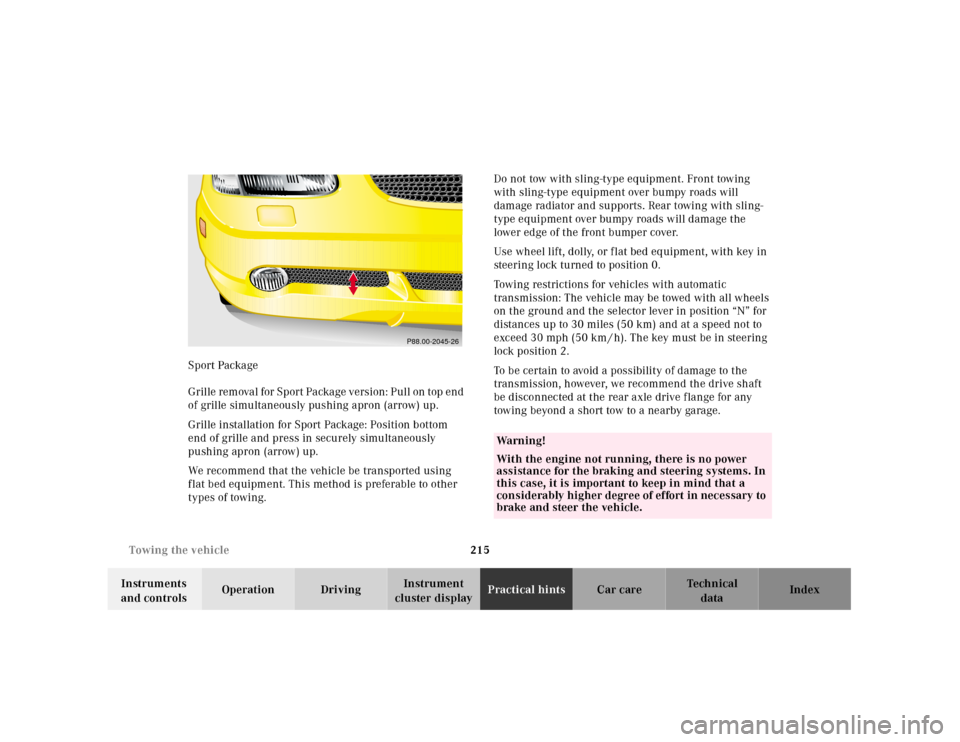
G r il l e re m ova l f or S p or t Pa cka g e v e rs i on : P u l l on t op e n d
of grille simultaneously pushing apron (arrow) up.
Grille installation for Sport Package: Position bottom
end of grille and press in securely simultaneously
pushing apron (arrow) up.
We recommend that the vehicle be transported using
f lat bed equipment. This method is preferable to other
types of towing.Do not tow with sling-type equipment. Front towing
with sling-type equipment over bumpy roads will
damage radiator and supports. Rear towing with sling-
type equipment over bumpy roads will damage the
lower edge of the front bumper cover.
Use wheel lift, dolly, or f lat bed equipment, with key in
steering lock turned to position 0.
Towing restrictions for vehicles with automatic
transmission: The vehicle may be towed with all wheels
on the ground and the selector lever in position “N” for
distances up to 30 miles (50 km) and at a speed not to
exceed 30 mph (50 km / h). The key must be in steering
lock position 2.
To be certain to avoid a possibility of damage to the
transmission, however, we recommend the drive shaft
be disconnected at the rear axle drive f lange for any
towing beyond a short tow to a nearby garage.
P88.00-2045-26
Wa r n i n g !
With the engine not running, there is no power
assistance for the braking and steering systems. In
this case, it is important to keep in mind that a
considerably higher degree of effort in necessary to
brake and steer the vehicle.
Page 219 of 273
216 Towing the vehicle
Te ch n ica l
data Instruments
and controlsOperation DrivingInstrument
cluster displayPractical hintsCar care Index
Important!
When towing the vehicle, please, note the following:
With the automatic central locking activated and the
key in steering lock position 2, the vehicle doors lock if
the left front wheel as well as the right rear wheel are
turning at vehicle speeds of approximately 9 mph
(15 km / h) or more.
To prevent the vehicle door locks from locking,
deactivate the automatic central locking.Note:
To signal turns while being towed with hazard warning
f lash er in u se, turn key in steering l ock to position 2 a nd
activate combination switch for left or right turn signal
in usual manner – only the selected turn signal will
operate. Upon canceling the turn signal, the hazard
warning flasher will operate again.
Caution!
If the vehicle is towed with the front axle raised, the
engine must be shut off (key in steering lock position 0
or 1). Otherwise, the ESP will immediately be engaged
and will apply the rear wheel brakes. Switch off the
tow-away alarm as well as the ESP, see page 37 and 170.
Page 236 of 273
233 Contents - Vehicle care
Te ch n ica l
data Instruments
and controlsOperation DrivingInstrument
cluster displayPractical hintsCar careIndex
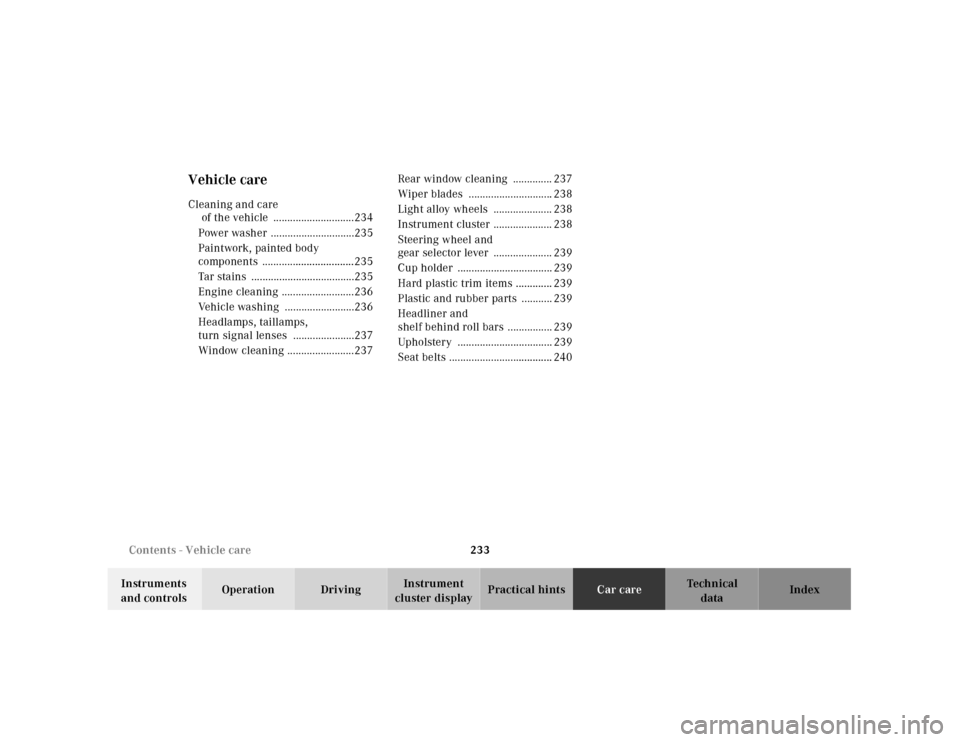
Vehicle careCleaning and care
of the vehicle .............................234
Power washer ..............................235
Paintwork, painted body
components .................................235
Tar stains .....................................235
Engine cleaning ..........................236
Vehicle washing .........................236
Headlamps, taillamps,
turn signal lenses ......................237
Window cleaning ........................237Rear window cleaning .............. 237
Wiper blades .............................. 238
Light alloy wheels ..................... 238
Instrument cluster ..................... 238
Steering wheel and
gear selector lever ..................... 239
Cup holder .................................. 239
Hard plastic trim items ............. 239
Plastic and rubber parts ........... 239
Headliner and
shelf behind roll bars ................ 239
Upholstery .................................. 239
Seat belts ..................................... 240
Page 241 of 273
238 Cleaning and care of the vehicle
Te ch n ica l
data Instruments
and controlsOperation DrivingInstrument
cluster displayPractical hintsCar careIndex
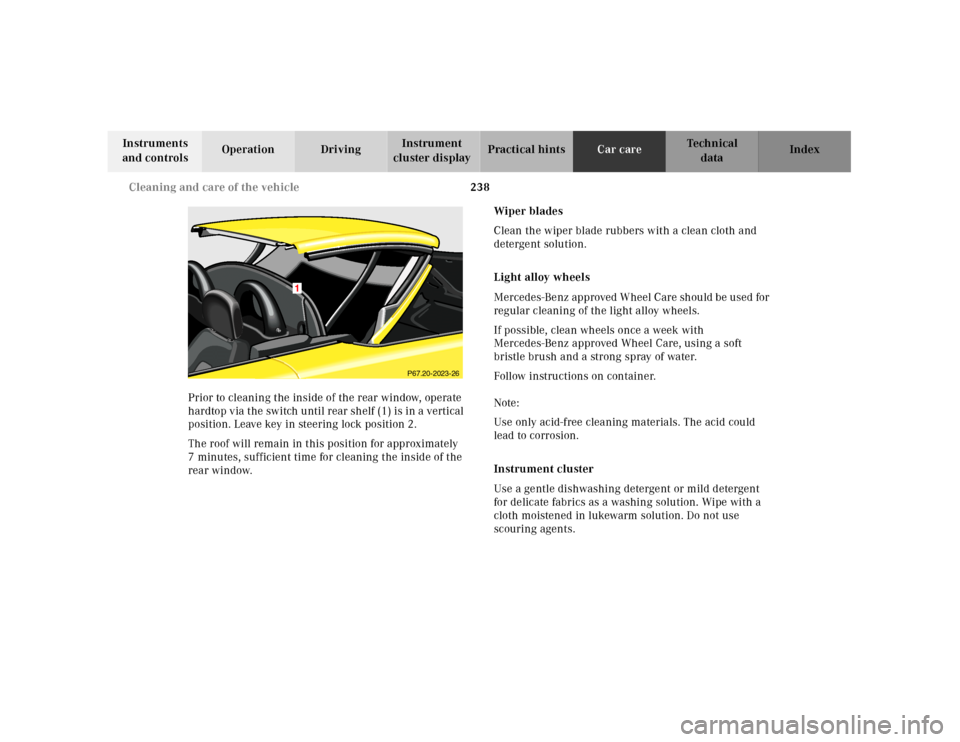
Prior to cleaning the inside of the rear window, operate
hardtop via the switch until rear shelf (1) is in a vertical
position. Leave key in steering lock position 2.
The roof will remain in this position for approximately
7 minutes, sufficient time for cleaning the inside of the
rear window.Wiper blades
Clean the wiper blade rubbers with a clean cloth and
detergent solution.
Light alloy wheels
Mercedes-Benz approved Wheel Care should be used for
regular cleaning of the light alloy wheels.
If possible, clean wheels once a week with
Mercedes-Benz approved Wheel Care, using a soft
bristle brush and a strong spray of water.
Follow instructions on container.
Note:
Use only acid-free cleaning materials. The acid could
lead to corrosion.
Instrument cluster
Use a gentle dishwashing detergent or mild detergent
for delicate fabrics as a washing solution. Wipe with a
cloth moistened in lukewarm solution. Do not use
scouring agents.
Page 242 of 273
239 Cleaning and care of the vehicle
Te ch n ica l
data Instruments
and controlsOperation DrivingInstrument
cluster displayPractical hintsCar careIndex Steering wheel and gear selector lever
Wipe with a damp cloth and dry thoroughly or clean
with Mercedes-Benz approved Leather Care.
Cup holder
Use a gentle dishwashing detergent or mild detergent
for delicate fabrics as a washing solution. Wipe with a
cloth moistened in lukewarm solution. Do not use
scouring agents.
Hard plastic trim items
Pour Mercedes-Benz approved Interior Care onto soft
lint-free cloth and apply with light pressure.
Plastic and rubber parts
Do not use oil or wax on these parts.
Headliner and shelf behind roll bars
Clean with soft bristle brush, or use a dry-shampoo
cleaner in case of excessive dirt.Upholstery
Using aftermarket seat covers or wearing clothing that
have the tendency to give off coloring (e.g. when wet
etc.) may cause the upholstery to become permanently
discolored. By lining the seats with a proper
intermediate cover, contact-discoloration will be
prevented.
Leather Upholstery
Wipe leather upholstery with a damp cloth and dry
thoroughly or clean with Mercedes-Benz approved
Leather Care. Exercise particular care when cleaning
perforated leather as its underside should not become
wet.
Cloth Upholstery
Clean with soft bristle brush, or use a dry-shampoo
cleaner in case of excessive dirt.
Page 255 of 273
252 Fuels, coolants, lubricants etc. - capacities
Te ch n ica l
data Instruments
and controlsOperation DrivingInstrument
cluster displayPractical hints Car care Index
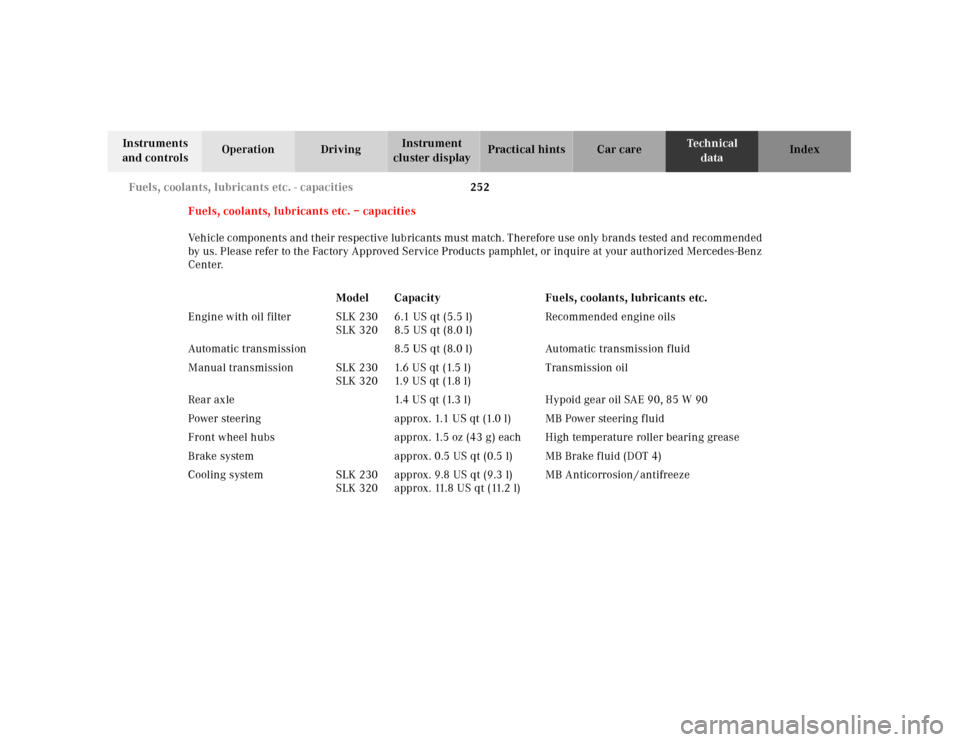
Fuels, coolants, lubricants etc. – capacities
Veh icle c omponents and t heir respec tive lub rica nts mu st ma tch . T herefore u se only brands tested and rec omm end ed
by us. Please refer to the Factory Approved Service Products pamphlet, or inquire at your authorized Mercedes-Benz
Center.
Model Capacity Fuels, coolants, lubricants etc.
Engine with oil filter SLK 230
SLK 3206.1 US qt (5.5 l)
8.5 US qt (8.0 l)Recommended engine oils
Automatic transmission 8.5 US qt (8.0 l) Automatic transmission fluid
Manual transmission SLK 230
SLK 3201.6 US qt (1.5 l)
1.9 US qt (1.8 l)Transmission oil
Rear axle 1.4 US qt (1.3 l) Hypoid gear oil SAE 90, 85 W 90
Power steering approx. 1.1 US qt (1.0 l) MB Power steering fluid
Front wheel hubs approx. 1.5 oz (43 g) each High temperature roller bearing grease
Brake system approx. 0.5 US qt (0.5 l) MB Brake f luid (DOT 4)
Cooling system SLK 230
SLK 320approx. 9.8 US qt (9.3 l)
a p p r ox . 11.8 U S q t ( 11.2 l )MB Anticorrosion / antifreeze
Page 270 of 273
267 Index
Te ch n ica l
data Instruments
and controlsOperation DrivingInstrument
cluster displayPractical hints Car careIndex SRS (Supplemental restraint system) ........................... 51
Indicator lamp ........................................................... 180
SRS malfunction ......................................................... 54
Start lock-out .................................................................... 24
Malfunction lamp ...................................................... 185
Starting and turning off the engine ............................ 142
Steering column, telescopic
Adjusting ...................................................................... 63
Warning lamp ............................................................ 182
Steering lock ................................................................... 140
Storage compartments ...................................................113
Armrest ........................................................................113
Center console ............................................................113
Glove box .....................................................................112
Trunk floor ................................................................. 196
Stowing things in the vehicle ...................................... 188
Sun visors ........................................................................ 111
Supplemental restraint system (SRS) ........................... 51
Indicator lamp ........................................................... 180
SRS malfunction ......................................................... 54
Synchronizing remote control .....................................225
TTachometer ........................................................................ 74
Technical data ................................................................ 248
Electrical system .......................................................251
Main Dimensions ...................................................... 251
Rims – Tires .............................................................. 249
Weights ....................................................................... 251
Tele Aid ............................................................................ 130
Emergency calls ........................................................ 131
Information ................................................................ 134
Initiating an emergency call manually .................. 132
Roadside Assistance ................................................. 133
Telephones and two-way radio .....................................128
Telescoping steering column
Adjusting ......................................................................63
Warning lamp ............................................................ 182
The first 1 000 miles (1 500 km) ................................129
Tires
Consumer information ............................................ 258
Driving instructions ................................................. 157
Rims and tires .......................................................... 249
Rotating wheels ......................................................... 199
Tire inflation pressure ............................................ 209
Tire replacement ....................................................... 198
Tire speed rating ....................................................... 159