instrument cluster MERCEDES-BENZ SLK250 2012 R172 Owner's Guide
[x] Cancel search | Manufacturer: MERCEDES-BENZ, Model Year: 2012, Model line: SLK250, Model: MERCEDES-BENZ SLK250 2012 R172Pages: 334, PDF Size: 4.26 MB
Page 136 of 334
X
Release the brake pedal.
X Slowly release the clutch pedal and gently
depress the accelerato rpedal.
! Change gear in good time and avoid
spinning the wheels. You could otherwise
damage the vehicle.
i The vehicle locks centrally once you have
pulled away. The locking knobs in the doors
drop down.
You can open the doors from the inside at
any time.
You can also deactivate the automatic
locking feature (Y page 193).
Automatic transmission G
WARNING
It is dangerous to shift the automatic
transmission out of parkin gposition Por
neutral position Nif the engine speed is
higher than idle speed. If your foot is not firmly
on the brake pedal, the vehicle could
accelerate quickly forward or in reverse. You
could lose control of the vehicle and hit
someone or something. Only shift into gear
when the engine is idling normally and when
your right foot is firmly on the brake pedal.
i It is only possible to shift the transmission
from position Pto the desired position if
you depress the brake pedal. Only then is
the selector lever lock released.
X Depress the brake pedal and keep it
depressed.
X Shift the transmission to position Dor R.
X Release the brake pedal.
X Carefully depress the accelerator pedal.
The electric parking brake (Y page 150) is
automatically released.
The red 0005(USA only) or 000A(Canada
only) indicator lamp in the instrument
cluster goes out. i
The vehicle locks centrally once you have
pulled away.T he locking knobs in the doors
drop down.
You can open the doors from the inside at
any time.
You can also deactivate the automatic
locking feature .
i Upshifts take place at higher engine
speeds after a cold start. This helps the
catalytic converter to reach its operating
temperature more quickly.
Hill starta ssist Hill start assist helps you when pulling away
forwards or in reverse on an uphill gradient.
It holds the vehicle for a short time after you
have removed your foot from the brake pedal.
This gives you enough time to move your foot
from the brake pedal to the accelerator pedal
and to depress it before the vehicle begins to
roll.
G
WARNING
Never leave the vehicle when it is held by hill
start assist. After approximately one second,
hill start assist will no longer brake your
vehicle and it could roll away.
X Take your foot off the brake pedal.
i Once you have taken your foot off the
brake pedal, the vehicle is held for around
one second.
X Pull away.
Hill start assist will not function if:
R you are pulling away on a level road or on
a downhill gradient.
R on vehicles with automatic transmission,
the transmission is in position N.
R the electric parking brake is applied.
R ESP ®
is malfunctioning. 134
DrivingDriving and parking
Page 142 of 334
multifunction display of the instrument
cluster.
Automatic transmission
Important safety notes
G
WARNING
It is dangerous to shift the automatic
transmission out of parking position Por
neutral position Nif the engine speed is
highe rthan idle speed. If your foot is not firmly
on the brake pedal, the vehicle could
accelerate quickly forward or in reverse. You
could lose control of the vehicle and hit
someone or something. Only shift into gear
when the engine is idling normally and when
your right foot is firmly on the brake pedal. G
WARNING
Keep in mind that turning off the engine alone
only will shift the automatic transmission into
neutral position Nautomatically.
Always shift the automatic transmission into
park position Pbefore turning off the engine.
Otherwise the vehicle could roll away which
could result in an accident and/or serious
personal injury. Selector lever
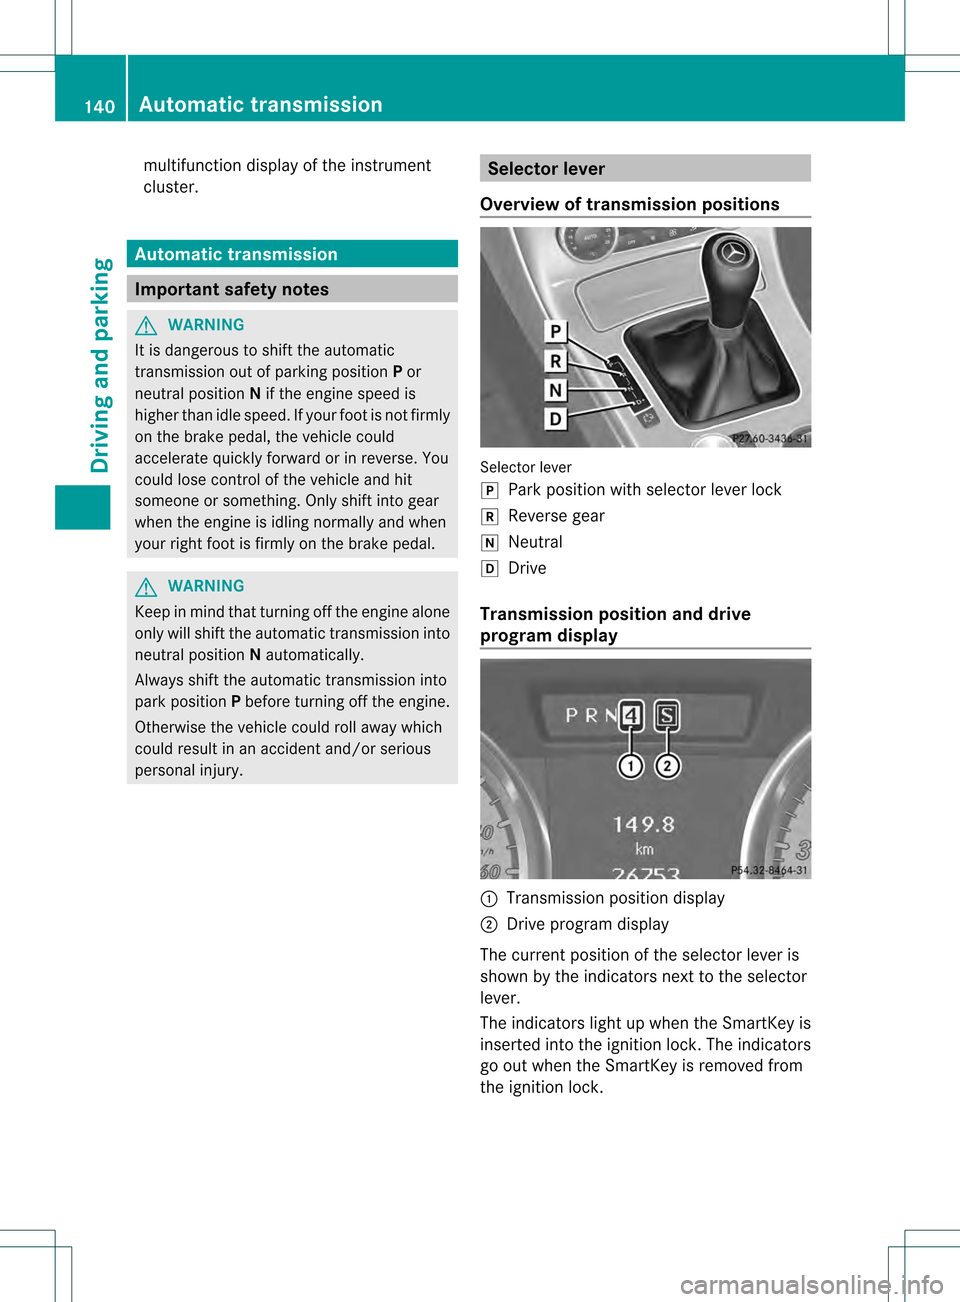
Overview of transmission positions Selector lever
0013
Park position with selector lever lock
0010 Reverse gear
0011 Neutral
0012 Drive
Transmission position and drive
program display 0002
Transmission position display
0003 Drive program display
The current position of the selector lever is
shown by the indicators next to the selector
lever.
The indicators light up when the SmartKey is
inserted into the ignition lock. The indicators
go out when the SmartKey is removed from
the ignition lock. 140
Automatic transmissionDriving and parking
Page 150 of 334
X
Completely insert the fille rneck of the fuel
pump nozzle into the tank and refuel.
X Only fill the tank until the pump nozzle
switches off.
i Do not add any more fuel after the pump
stops filling for the first time. Otherwise,
fuel may leak out.
Closing X
Replace the cap on the filler necka nd turn
clockwise until it engages audibly.
X Close fuel fille rflap 0002.
i If you drive with the fuel filler cap open,
reserve fuel warning lamp 0010flashes .In
addition, the 000ECheck Engine warning
lamp may light up. Amessage appears in
the multifunction display (Y page 219).
For further information on warning and
indicator lamps in the instrument cluster,
see (Y page 234). 148
RefuelingDriving and parking
Page 152 of 334
Switching off the engine
Important safety notes G
WARNING
Do not turn off the engine before the vehicle
has come to a complete stop. With the engine
not running, there is no power assistance for
the brake and steering systems. In this case,
it is important to keep in mind that a
considerably higher degree of effort is
necessary to brake and steer the vehicle.
Vehicles with manual transmission X
Shift to either first gear or reverse gear R.
X Turn the SmartKey to position 0in the
ignition lock and remove it.
The immobilizer is activated.
X Apply the electric parking brake.
Vehicles with automatic transmission X
Apply the electric parking brake.
X Shift the transmission to position P.
Using the SmartKey
X Turn the SmartKey to position 0in the
ignition lock and remove it.
The immobilizer is activated.
i The SmartKey can only be removed if the
transmission is in position P.
Using KEYLESS-GO
X Press the Start/Stop button (Y page 131).
The engine stops and all the indicator
lamps in the instrumen tcluster go out.
i When the driver's door is closed, this
corresponds to SmartKey position 1.When
the driver's door is open, it corresponds to
SmartKey position 0or "SmartKey
removed".
If you attempt to switch off the engine while
the selector lever is in a position other than
P, a message appears in the multifunction
display and you hear a tone. Electric parking brake
General information i
The electric parking brake performs a
function test at regular intervals while the
engine is switched off. The sounds that can
be heard while this is occurring are normal. G
WARNING
When leaving the vehicle, always remove the
SmartKey from the starter switch, take it with
you, and lock the vehicle. Do not leave
children unattended in the vehicle, or with
access to an unlocked vehicle. Children could
release the parking brake and/or shift the
automatic transmission out of park position
P, either of which could result in an accident
and/or serious personal injury. Applying/releasing manually
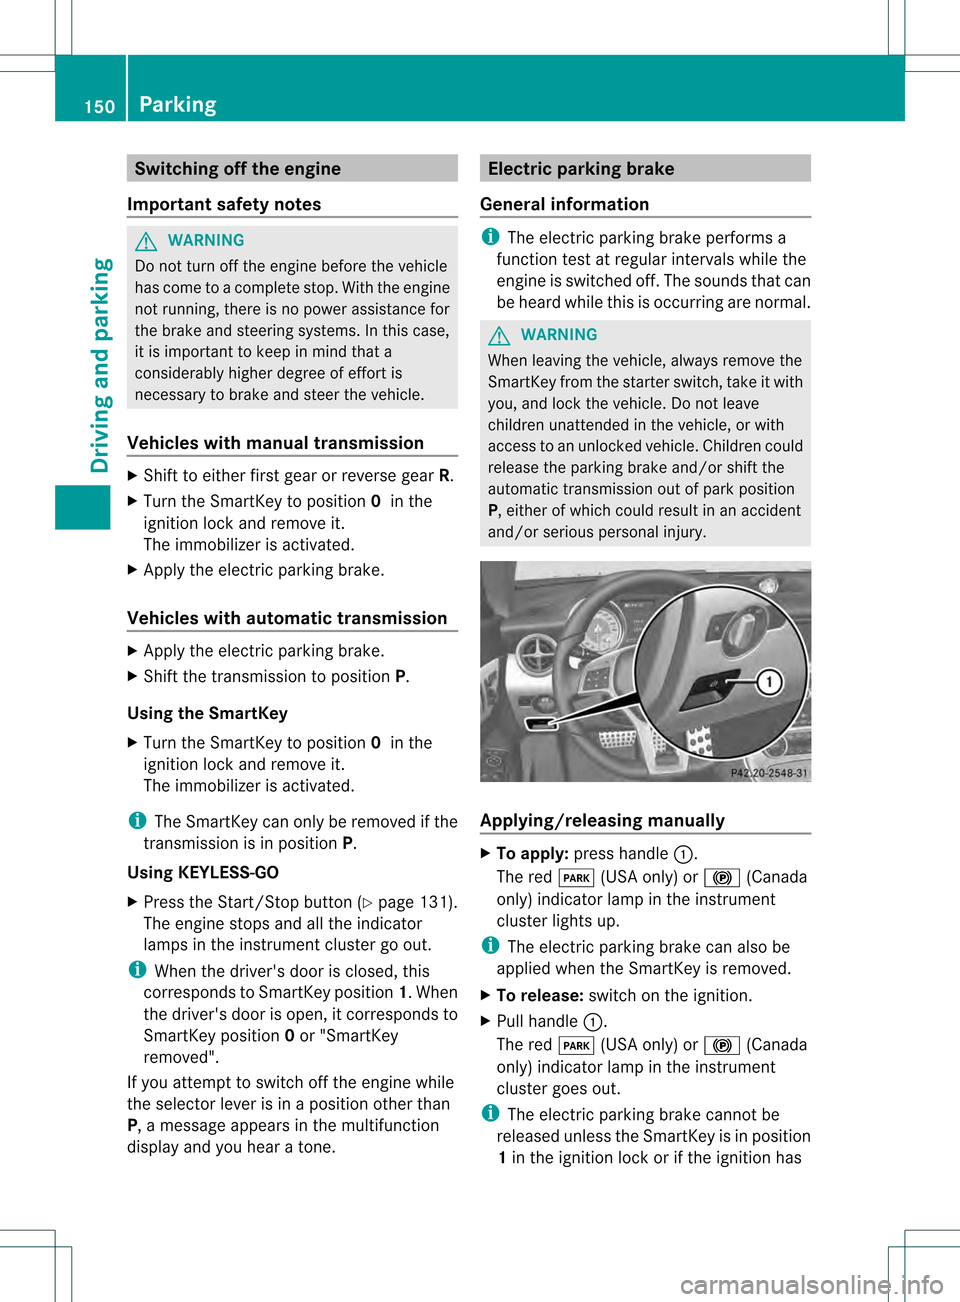
X
To apply: press handle 0002.
The red 0005(USA only) or 000A(Canada
only) indicator lamp in the instrument
cluster lights up.
i The electric parking brake can also be
applied when the SmartKey is removed.
X To release: switch on the ignition.
X Pull handle 0002.
The red 0005(USA only) or 000A(Canada
only) indicator lamp in the instrument
cluster goes out.
i The electric parking brake cannot be
released unless the SmartKey is in position
1 in the ignition lock or if the ignition has 150
ParkingDriving and parking
Page 153 of 334
been switched on using the Start/Stop
button.
Applying automatically Your vehicle's electric parking brake is
applied automatically if DISTRONIC PLUS
(vehicles with automatic transmission only)
or the HOLD function stops your vehicle or is
keeping your vehicle stationary. In addition,
at least one of the following conditions must
be fulfilled:
R the engine is switched off.
R the driver's door is open and the seat belt
is not fastened.
R the vehicle is stationary for a lengthy
period.
The red 0005(USA only) or 000A(Canada
only) indicator lamp in the instrument cluster
lights up.
Releasing automatically i
The electric parking brake can only be
released automatically on vehicles with
automatic transmission.
Your vehicle's electric parking brake is
automatically released if all of the following
conditions are met:
R the engine is running.
R the transmission is in position Dor R.
R the seat belt has been fastened.
R you depress the accelerator pedal.
If the transmission is in position R, the trunk
lid must be closed.
If your seat belt is not fastened, the following
conditions must be fulfilled to automatically
release the electric parkin gbrake:
R the driver's door is closed.
R you have shifted out of position Por you
have previously drive nfaster than 2mph
(3km/h). Emergency braking The vehicle can also be braked during an
emergency by using the electric parking
brake.
X
While driving, push handle 0002of the electric
parking brake (Y page 150).
i The vehicle is braked as long as you keep
the handle of the electric parking brake
pressed. The longer the electric parking
brake handle is depressed, the greater the
braking force.
During braking:
R a warning tone sounds.
R the Please Release Parking Brake message appears.
R the red 0005(USA only) or 000A(Canada
only) indicator lamp in the instrument
cluster flashes.
When the vehicle has been braked to a
standstill, the electric parking brake is
engaged. Parking the vehicle for
along period
If you leave the vehicle parked for longer than
four weeks, the battery may be damaged by
exhaustive discharge.
X Connect a trickle charger.
i You can obtain information about trickle
chargers from a qualified specialist
workshop.
If you leave the vehicle parked for longer than
six weeks, the vehicle may suffer damage as
a result of lack of use.
X Visit a qualified specialist workshop and
seek advice. Parking
151Driving and parking Z
Page 156 of 334
Limited braking performance on salt-
treated roads
G
WARNING
The layer of salt on th ebrake discs and the
brake pads/linings may caus eadelay in the
braking effect, resulting in a significantly
longer braking distance, which could lead to
an accident.
To avoid this danger, you should:
R occasionally brake carefully, without
putting other road users at risk, when you
are driving on salted roads. This helps to
remove any salt that may have started to
build up on the brake discs and the brake
pads/linings.
R maintain a greater distanc eto the vehicle
ahead and drive with particular care.
R carefully apply the brakes at the end of a
trip and immediately after commencing a
new trip, so that salt residues are removed
from the brake discs.
Servicing the brakes !
If the red brake warning lamp lights up in
the instrument cluster and you hear a
warning tone while the engine is running,
the brake fluid level may be too low.
Observe additional warning messages in
the multifunction display.
The brake fluid level may be too low due to
brake pad wear or leaking brake lines.
Have the brake system checked
immediately. This work should be carried
out at a qualified specialist workshop.
All checks and maintenance work on the
brake system must be carried out at a
qualified specialist workshop. Consult a
qualified specialist workshop to arrange this.
Have brake pads installed and brake fluid
replaced at a qualified specialist workshop. G
WARNING
If brake pads or brake fluid other than those
recommended are used, the braking properties of the vehicle can be degraded to
an extentt
hat safe braking is substantially
impaired. This could result in an accident.
! As the ESP ®
system operates
automatically, the engine and the ignition
must be switched off (SmartKey in position
0 or 1in the ignition lock) if the electric
parking brake is being tested on a brake
dynamometer (maximum 10 seconds).
Braking triggered automatically by ESP ®
may seriously damage the brake system.
If the brake system has only been subject to
moderate loads, you should test the
functionality of your brakes at regular
intervals. To do so, press firmly on the brake
pedal when driving at a high speed. This
improves the grip of the brake pads. G
WARNING
Make sure that you do not endanger other
road users when you apply the brakes.
You can find a description of Brake Assist
(BAS) on (Y page 57).
High-performance brake system for
AMG vehicles The high-performance brake system is
installed only on the SLK 55 AMG.
G
WARNING
New vehicle brake pads and discs, and
replacement brake pads and discs may take
several hundred miles of driving until they
provide optimum braking efficiency. Until that
time, you may need to use increased brake
pedal pressure while braking. Please be aware
of this and adjust your driving and braking
accordingly during this break-in period.
Excessive high-demand braking will cause
correspondingly high brake wear. Please be
attentive to the brake warning lamp in the
instrument cluster and brake condition
messages in the multifunction display.
Especially for high performance driving, it is 154
Driving tipsDriving and parking
Page 162 of 334
too late. This could cause an accident in which
you and/or others could be injured.
G
WARNING
The "Resume" functio nshould only be
operated if the driver is fully aware of the
previously set speed and wishes to resume
this particular preset speed. G
WARNING
Your undivided attention to street and traffic
conditions is necessary at all times whether
DISTRONIC PLUS is active or not.
The use of DISTRONIC PLUS can be
dangerous on winding roads or in heavy traffic
because conditions do not allow safe driving
at a constant speed.
DISTRONIC PLUS does not react to stationary
objects on the road (for example, a vehicle
stopped in traffic or an abandoned vehicle).
DISTRONIC PLUS likewise does not react to
oncoming vehicles.
Deactivate DISTRONIC PLUS:
R when changing to the right lane, if the
vehicles in the left lane are driving slower
R when driving into a filter lane or an
expressway exit
R in complex driving situations, for example
in construction sites on an expressway
In these situations DISTRONIC PLUS will
maintain the set speed if it is not deactivated.
DISTRONIC PLUS is intended only for
maintaining a set speed and a set distance
from the objects moving in front of the
vehicle. G
WARNING
An intermittent warning sounds and the
distance warning lamp 000Cin the instrument
cluster is illuminated if the DISTRONIC PLUS
system calculates that the distance to the
vehicle ahead and your vehicle's current
speed indicate that the DISTRONIC PLUS will
not be capable of slowing the vehicle
sufficiently to maintain the preset following distance, which creates a danger of a
collision.
Immediately brake the vehicle to increase
your distance to the preceding vehicle. The
warning sound is intended as a final caution
in which you should intercede with your own
braking inputs to avoid a potentially
dangerous situation. Do not wait for the
operation of the warning signal to intercede
with your own braking. This will result in
potentially dangerous emergency braking
which will not always result in an impact being
avoided.
Tailgating increases the risk of an accident.
G
WARNING
DISTRONIC PLUS brakes your vehicle with a
maximum deceleration of 13 ft/s 2
(4 m/s 2
).
This corresponds to approximately 40% of
your vehicle's maximum braking force.
To avoid a collision, you must apply the brakes
yourself. DISTRONIC PLUS brakes the vehicle
just enough to restore the preset speed or the
preset distance to the vehicle in front. G
WARNING
If you do not receive visual or acoustic
warning signals during a critical traffic
situation, DISTRONIC PLUS has either not
recognized the collision risk, has been
deactivated or is malfunctioning.
Remember, whether or not DISTRONIC PLUS
is operating, it is ultimately always the drivers
responsibility to apply the brakes in order to
control the vehicle and avoid a collision. 160
Driving systemsDriving and parking
Page 177 of 334
parking spaces on both sides of the vehicle.
When driving at speeds below 19 mph
(30km/h), you will see parking symbol 0003as
a status indicator in the instrument cluster.
When a parking space has been detected, an
arrow towards the right 0023or the left 0002also
appears. Parking Guidance only displays
parking spaces on the front-passenger side
as standard. Parking spaces on the driver's
side are displayed as soon as the turn signal
on the driver's side is activated. To park on
the driver's side, you must leave the driver's
side turn signal switched on until you have
engaged reverse gear.
Parking Guidance will only detec tparking
spaces:
R that are parallel to the direction of travel
R that are at least 5 ft (1.5 m) wide
R that are at least 4.3 ft (1.3 m) longer than
your vehicle
Ap arking space is displayed while you are
driving past it, and until you are
approximately 50 ft (15 m) away from it.
Parking G
WARNING
The Parking Guidance is only an aid and may
no td etec tall obstacles. The Parking
Guidance does not relieve you of the
responsibility to pay attention. You are always
responsible for safety and must continue to
pay attention to your immediate surroundings
when parking and maneuvering. Otherwise,
you could endanger yourself and others.
X Stop the vehicle when the parking space
symbol shows the desired parking space in
the instrument cluster.
X Vehicles with manual transmission :shift to
reverse gear. Vehicles with automatic transmission: shift
into position
R.
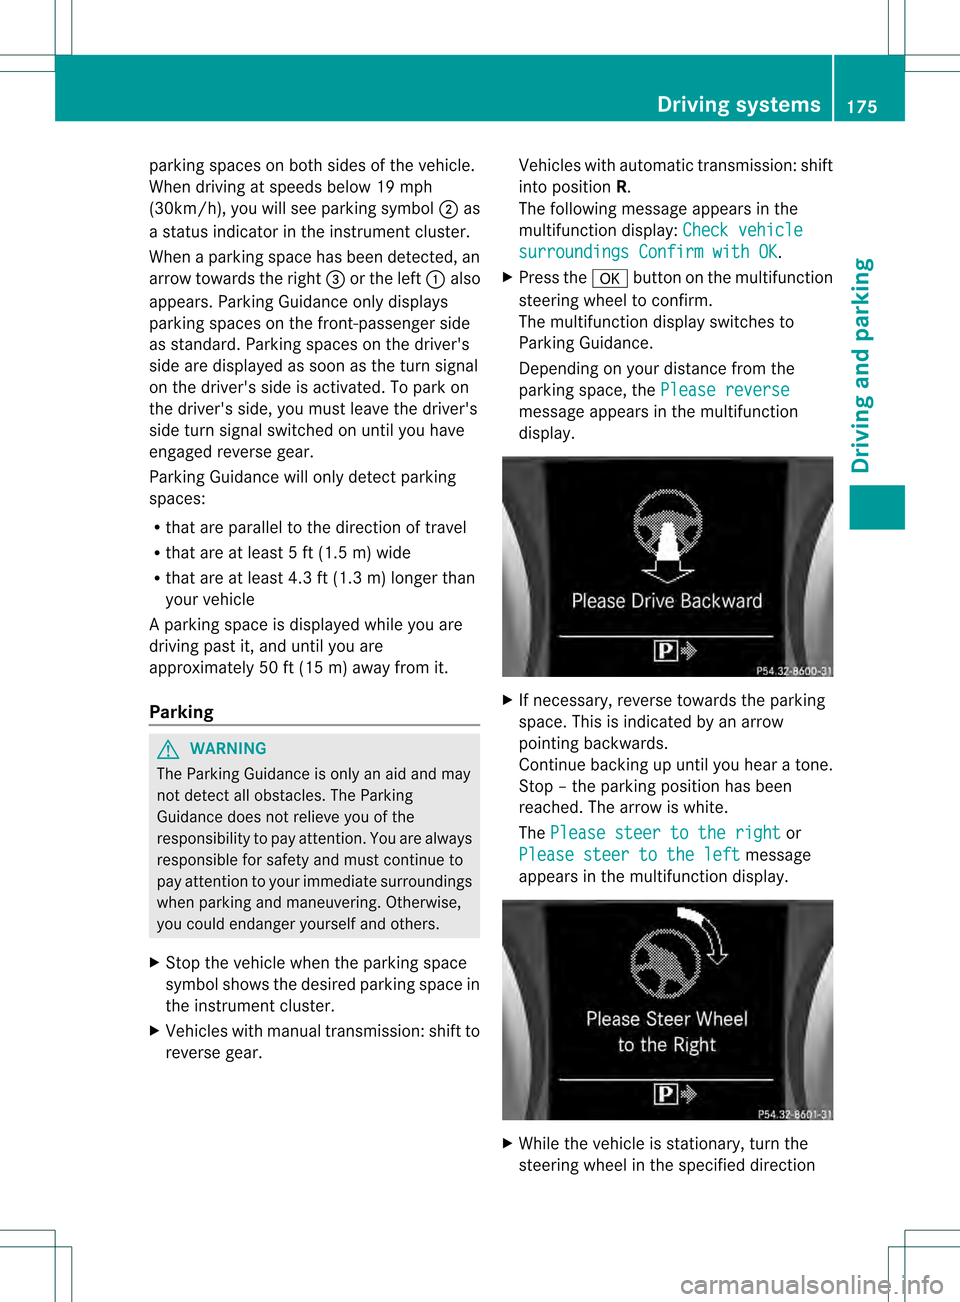
The following message appears in the
multifunction display: Check vehicle surroundings Confirm with OK .
X Press the 000Cbutton on the multifunction
steering wheel to confirm.
The multifunction display switches to
Parking Guidance.
Depending on your distance from the
parking space, the Please reverse message appears in the multifunction
display. X
If necessary, reverse towards the parking
space. This is indicated by an arrow
pointing backwards.
Continue backing up until you hear a tone.
Stop –the parking position has been
reached. The arrow is white.
The Please steer to the right or
Please steer to the left message
appears in the multifunction display. X
While the vehicle is stationary, turn the
steering wheel in the specified direction Driving systems
175Driving and parking Z
Page 181 of 334
Useful information
............................180
Important safety notes ....................180
Displays and operation ....................180
Menus and submenus ......................184
Display messages ............................. 199
Warning and indicator lamps in the
instrument cluster ............................228 179On-board computer and displays
Page 182 of 334
Useful information
i This Operator's Manual describes all
models and all standard and optional
equipment of your vehicle available at the
time of publication of the Operator's
Manual. Country-specific differences are
possible. Please note that your vehicle may
not be equipped with all features
described. This also applies to safety-
related systems and functions.
i Please read the information on qualified
specialist workshops (Y page 23).Important safety notes
You will find an illustration of the instrument
cluster in the "At a glance" section
(Y page 27). G
WARNING
The driver's concentration must always be
directed primarily at road traffic.
For your safety and the safety of others,
selecting features through the multifunction
steering wheel should only be done by the
driver when traffic and road conditions permit
it to be done safely.
Bear in mind that at a speed of only 30 mph
(approximately 50 km/h), the vehicle covers
a distance of 44 feet (approximately 14 m) per
second. G
WARNING
No messages will be displayed if either the
instrument cluster or the multifunction
display is inoperative.
As a result, you will not be able to see
information about your driving conditions,
such as
R speed
R outside temperature
R warning/indicato rlamps R
malfunction/warning messages
R failure of any systems
Driving characteristics may be impaired.
If you must continue to drive, do so with added
caution .Contactana uthorized Mercedes-
Ben zCenter as soon as possible. G
WARNING
Malfunction and warning messages are only
indicated for certain systems and are
intentionally not very detailed. The
malfunction and warning messages are
simply a reminder with respect to the
operation of certain systems. They do not
replace the owner's and/or driver's
responsibility to maintain the vehicle's
operating safety. Have all required
maintenance and safety checks performed on
the vehicle. Bring the vehicle to an authorized
Mercedes-Benz Center to address the
malfunction and warning messages. Displays and operation
Instrument lighting
The brightness control knob is located on the
bottom left of the instrument cluster
(Y page 27).
X Turn the brightness control knob clockwise
or counter-clockwise.
Instrument cluster: if the light switch is set
to 0005, 0011or0009, brightness control
takes ambient light into account.
i The light sensor in the instrument cluster
automatically controls the brightness of
the multifunction display.
In daylight, the displays in the instrument
cluster are not illuminated.
Displays and switches in the vehicle
interior: if the light switch is set to 0005,
brightness control takes ambient light into
account. If the light switch is set to 0011or
0009, brightness control does not take
ambient light into account. 180
Displays and operationOn-board computer and displays