battery MERCEDES-BENZ SLK300 2010 R171 User Guide
[x] Cancel search | Manufacturer: MERCEDES-BENZ, Model Year: 2010, Model line: SLK300, Model: MERCEDES-BENZ SLK300 2010 R171Pages: 312, PDF Size: 5.75 MB
Page 64 of 312
driving, refer to “Lamps in instrument cluster”
(Y page 256).
If the SmartKey is left in starter switch
position 0 for an extended period of time, it
can
no longer be turned in the starter switch.
In this case, the steering is locked. To unlock,
remove SmartKey from the starter switch and
reinsert.
The steering is locked when the SmartKey is
removed from the starter switch.
X Always remove the SmartKey from the
starter switch when the engine is not in
operation.
This
will help to prevent accelerated vehicle
battery discharge or a completely
discharged vehicle battery.
If the SmartKey cannot be turned in the
starter
switch, the vehicle battery may not be
sufficiently charged.
X Check the vehicle battery and charge it if
necessary ( Y page 283).
or
X Get a jump start (Y page 283). Seats
Safety notes
G
Warning!
In order to avoid possible loss of vehicle
control
the following must be done before the
vehicle is put into motion:
R seat adjustment
R head restraint adjustment
R steering wheel adjustment
R rear view mirror adjustment
R fastening of seat belts G
Warning!
Do not adjust the driver’s seat while driving.
Adjusting the seat while driving could cause
the driver to lose control of the vehicle. Never ride in a moving vehicle with the seat
backrest
in an excessively reclined position as
this can be dangerous. You could slide under
the seat belt in a collision. If you slide under
it, the seat belt would apply force at the
abdomen or neck. That could cause serious
or fatal injuries. The seat backrest and seat
belts provide the best restraint when the
wearer is in a position that is as upright as
possible and seat belts are properly
positioned on the body. G
Warning!
Your seat must be adjusted so that you can
correctly fasten your seat belt.
Observe the following points:
R Adjust
the seat backrest until your arms are
slightly angled when holding the steering
wheel.
R Adjust the seat to a comfortable seating
position that still allows you to reach the
accelerator/brake pedal safely. The
position should be as far back as possible
with the driver still able to operate the
controls properly.
R Adjust the head restraint so that it is as
close to the head as possible. The center of
the head restraint must support the back of
the head at eye level.
R Never place hands under the seat or near
any moving parts while a seat is being
adjusted.
Failure to do so could result in an accident
and/or serious personal injury. G
Warning!
Children 12 years old and under must be
seated and properly secured in an
appropriately sized infant restraint, toddler
restraint, or booster seat recommended for
the
size and weight of the child. For additional
information, see section “Children in the
vehicle”.
A child’s risk of serious or fatal injuries is
significantly increased if the child restraints 62
Seats
Controls in detail
171_AKB; 3; 60, en-US
d2ureepe,
Version: 2.11.8.1 2009-05-11T16:00:23+02:00 - Seite 62
Page 73 of 312
Relevant information can be obtained at
any authorized Mercedes-Benz Center.
i Vehicles equipped with active Bi-Xenon
headlamps:
The active Bi-Xenon headlamps increase
usable illumination over conventional
headlamps because they follow the
curvature of the road ahead. The beams of
the active Bi-Xenon headlamps shift to
either side according to the vehicle’s
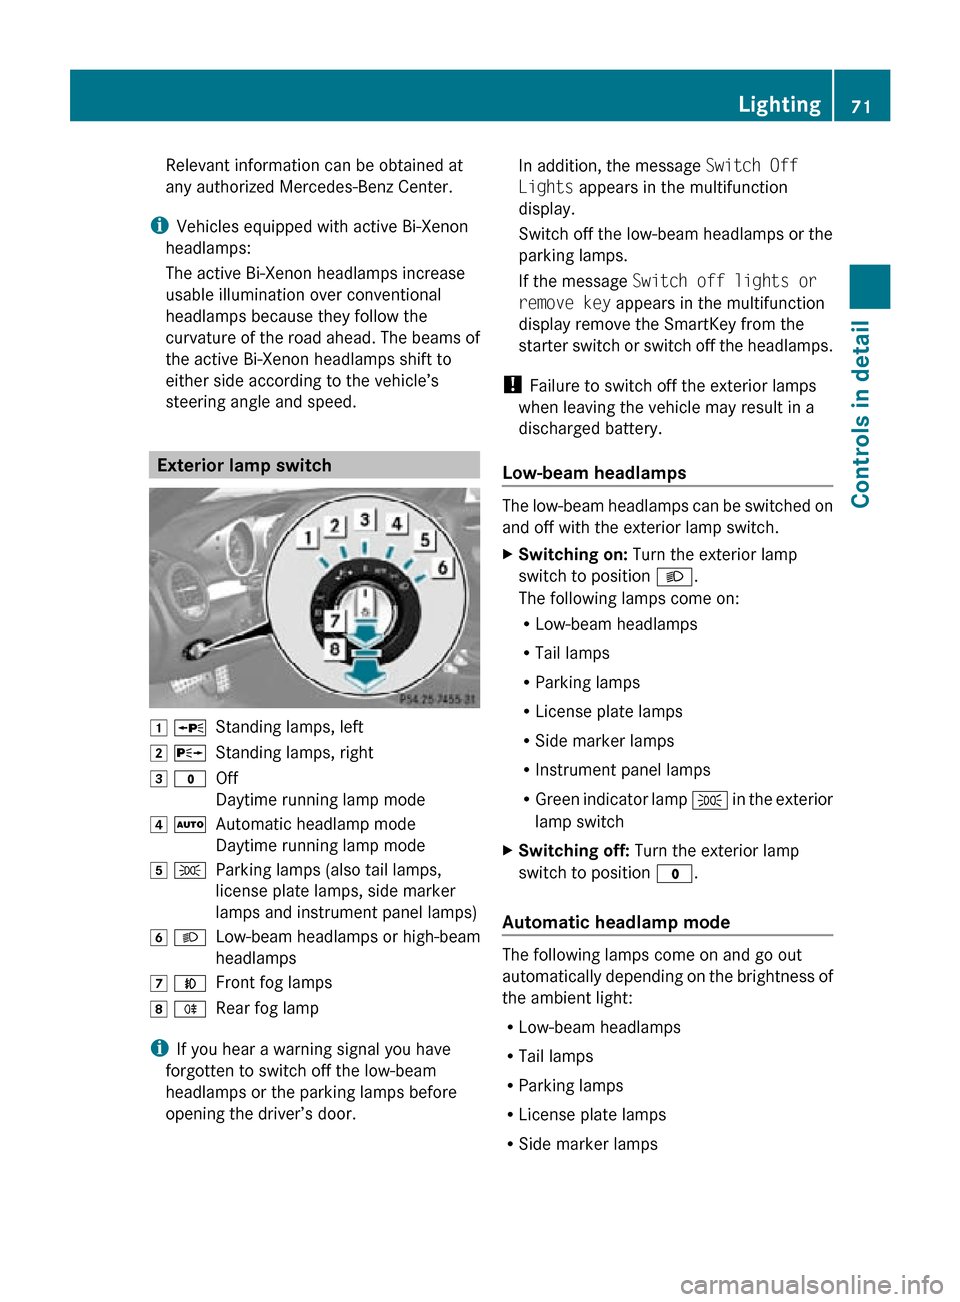
steering angle and speed. Exterior lamp switch
1 W
Standing lamps, left
2 X Standing lamps, right
3 $ Off
Daytime running lamp mode
4 Ã Automatic headlamp mode
Daytime running lamp mode
5 T Parking lamps (also tail lamps,
license plate lamps, side marker
lamps and instrument panel lamps)
6 L Low-beam headlamps or high-beam
headlamps
7 N Front fog lamps
8 R Rear fog lamp
i If you hear a warning signal you have
forgotten to switch off the low-beam
headlamps or the parking lamps before
opening the driver’s door. In addition, the message
Switch Off
Lights appears in the multifunction
display.
Switch off the low-beam headlamps or the
parking lamps.
If the message Switch off lights or
remove key appears in the multifunction
display remove the SmartKey from the
starter switch or switch off the headlamps.
! Failure to switch off the exterior lamps
when leaving the vehicle may result in a
discharged battery.
Low-beam headlamps The low-beam headlamps can be switched on
and off with the exterior lamp switch.
X
Switching on: Turn the exterior lamp
switch to position L.
The following lamps come on:
R Low-beam headlamps
R Tail lamps
R Parking lamps
R License plate lamps
R Side marker lamps
R Instrument panel lamps
R Green indicator lamp T in the exterior
lamp switch
X Switching off: Turn the exterior lamp
switch to position $.
Automatic headlamp mode The following lamps come on and go out
automatically depending on the brightness of
the ambient light:
R
Low-beam headlamps
R Tail lamps
R Parking lamps
R License plate lamps
R Side marker lamps Lighting
71Controls in detail
171_AKB; 3; 60, en-US
d2ureepe, Version: 2.11.8.1 2009-05-11T16:00:23+02:00 - Seite 71 Z
Page 78 of 312
Shut-off must be switched on
(Y page 107))
R open a door
The interior lighting goes out after a short
time.
i If a door remains open, the interior lamps
go out automatically after approximately
5 minutes when the SmartKey is removed
or in starter switch position 0.
X Deactivating: Press switch q.
Manual control !
An interior lamp switched on manually
does not go out automatically.
Leaving an interior lamp switched on for an
extended period of time with the engine
turned off could result in a discharged
battery.
X Switching interior lighting on/off: Press
switch c.
i The footwell lighting is switched on and
off simultaneously with the manual control.
The standard reading lamps are located to the
left and right of the overhead control panel.
Reading lamps as part of the interior lighting
package are located on the lower edge of the
interior rear view mirror.
X Switching reading lamps on/off: Press
respective switch p.
Emergency lighting The interior lighting comes on automatically
if the vehicle is involved in an accident.
Switching off:
X
Press switch q.
or
X Press hazard warning flasher switch
(Y page 74). Wipers
Notes
! Do not operate the wipers when the
windshield is dry. Dust that accumulates on
a windshield might scratch the glass and/
or damage the wiper blades when wiping
occurs on a dry windshield. If it is necessary
to operate the wipers in dry weather
conditions, always operate the wipers with
washer fluid. Windshield wipers
X Observe notes on page (Y page 76).
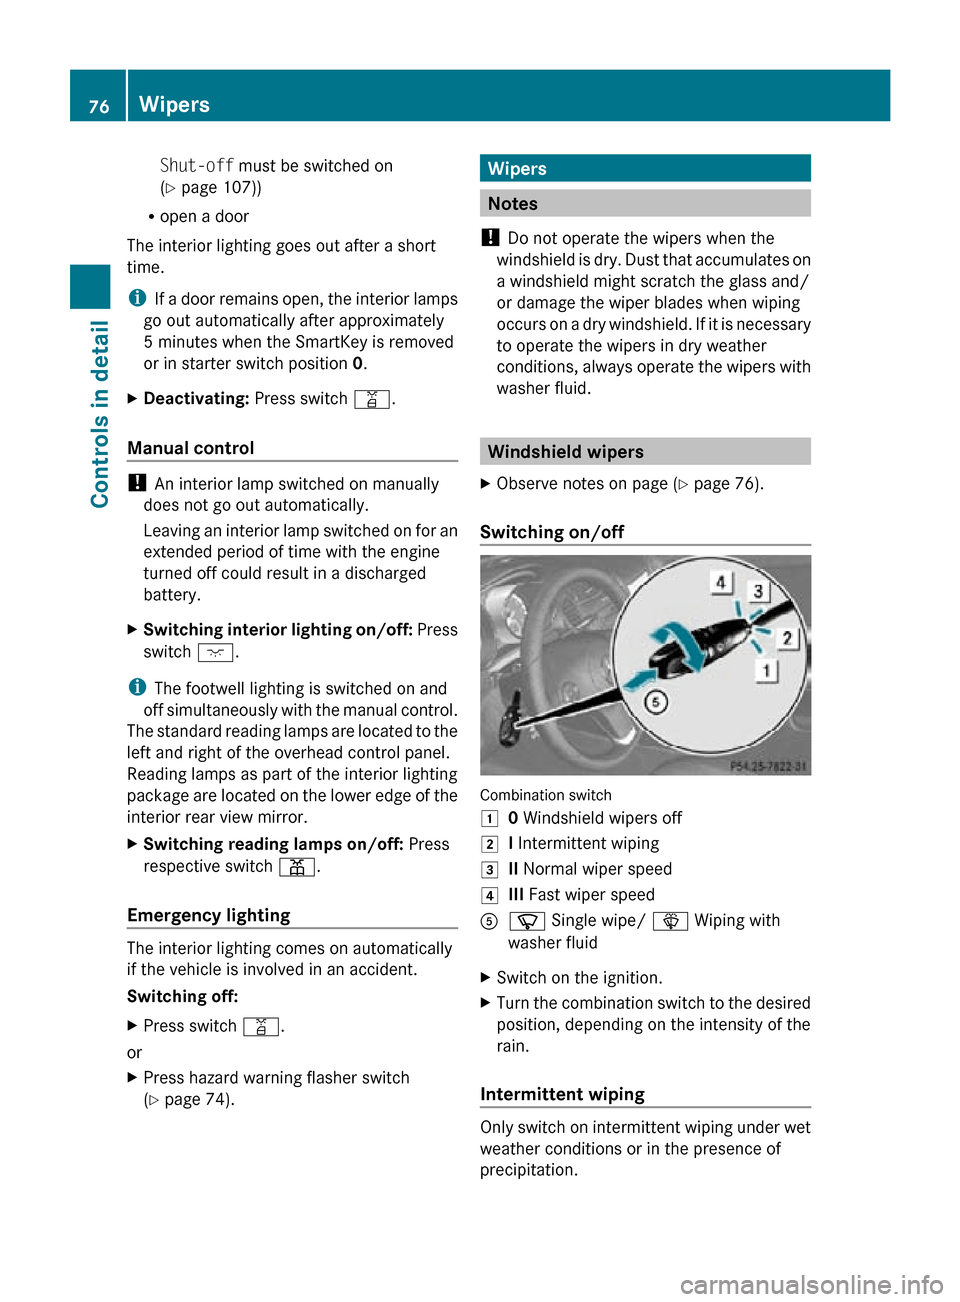
Switching on/off Combination switch
1
0 Windshield wipers off
2 I Intermittent wiping
3 II Normal wiper speed
4 III Fast wiper speed
A í Single wipe/ î Wiping with
washer fluid
X Switch on the ignition.
X Turn the combination switch to the desired
position, depending on the intensity of the
rain.
Intermittent wiping Only switch on intermittent wiping under wet
weather conditions or in the presence of
precipitation.76
WipersControls in detail
171_AKB; 3; 60, en-US
d2ureepe,
Version: 2.11.8.1 2009-05-11T16:00:23+02:00 - Seite 76
Page 81 of 312
Closing when a door window is blocked
G
Warning!
Make sure that nobody can become trapped
and be seriously or even fatally injured when
closing a door window with greater force or
without automatic reversal function.
If the upward movement of a door window is
blocked during the closing procedure, the
door window will stop and open slightly.
X Immediately after the door window has
stopped because it was blocked, pull and
hold
the respective switch upward until the
door window is fully closed.
The door window closes with greater force.
If the door window is blocked again and opens
slightly:
X Immediately after the door window was
blocked, pull and hold the respective
switch
upward until the door window is fully
closed.
The door window closes without automatic
reversal function. G
Warning!
Pulling and holding the switch to close the
door window immediately after it had been
blocked
two times will cause the door window
to close without any reversal function for as
long as you hold the switch.
Opening and closing the rear side
windows when the hardtop is closed X
Opening: Open the door window.
X Press switch : or ; again.
The corresponding rear side window will
open completely.
X Closing: Close the door window.
X Pull and hold switch : or ;.
The
corresponding rear side window moves
upward until you release the switch. Synchronizing power windows
The windows must be synchronized after the
battery has been disconnected or if the
windows cannot be fully closed (express
operation).
Each window must be synchronized
separately.
X Close all doors.
X Switch on the ignition.
X Pull and hold switch : or ; (Y page 78)
until the respective window is closed.
The window opens again slightly.
X Pull and hold the respective switch once
more immediately until the window is
closed completely.
X Hold the respective switch for
approximately 1 second.
The window is synchronized. Driving and parking
Safety notes
G
Warning!
Make sure absolutely no objects are
obstructing the pedals’ range of movement.
Keep the driver’s footwell clear of all
obstacles. If there are any floormats or
carpets
in the footwell, make sure the pedals
still have sufficient clearance.
During sudden driving or braking maneuvers
the objects could get caught between or
under the pedals. You could then no longer
brake or accelerate. This could lead to
accidents and injury. G
Warning!
With the engine not running, there is no power
assistance for the brake and steering
systems. In this case, it is important to keep
in mind that a considerably higher degree of
effort is necessary to brake and steer the
vehicle. Adapt your driving accordingly. Driving and parking
79
Controls in detail
171_AKB; 3; 60, en-US
d2ureepe, Version: 2.11.8.1 2009-05-11T16:00:23+02:00 - Seite 79 Z
Page 82 of 312
Starting the engine
G
Warning!
Inhalation of exhaust gas is hazardous to your
health. All exhaust gas contains carbon
monoxide (CO), and inhaling it can cause
unconsciousness and possible death.
Do not run the engine in confined areas (such
as a garage) which are not properly ventilated.
If you think that exhaust gas fumes are
entering the vehicle while driving, have the
cause determined and corrected
immediately. If you must drive under these
conditions, drive only with at least one
window fully open at all times.
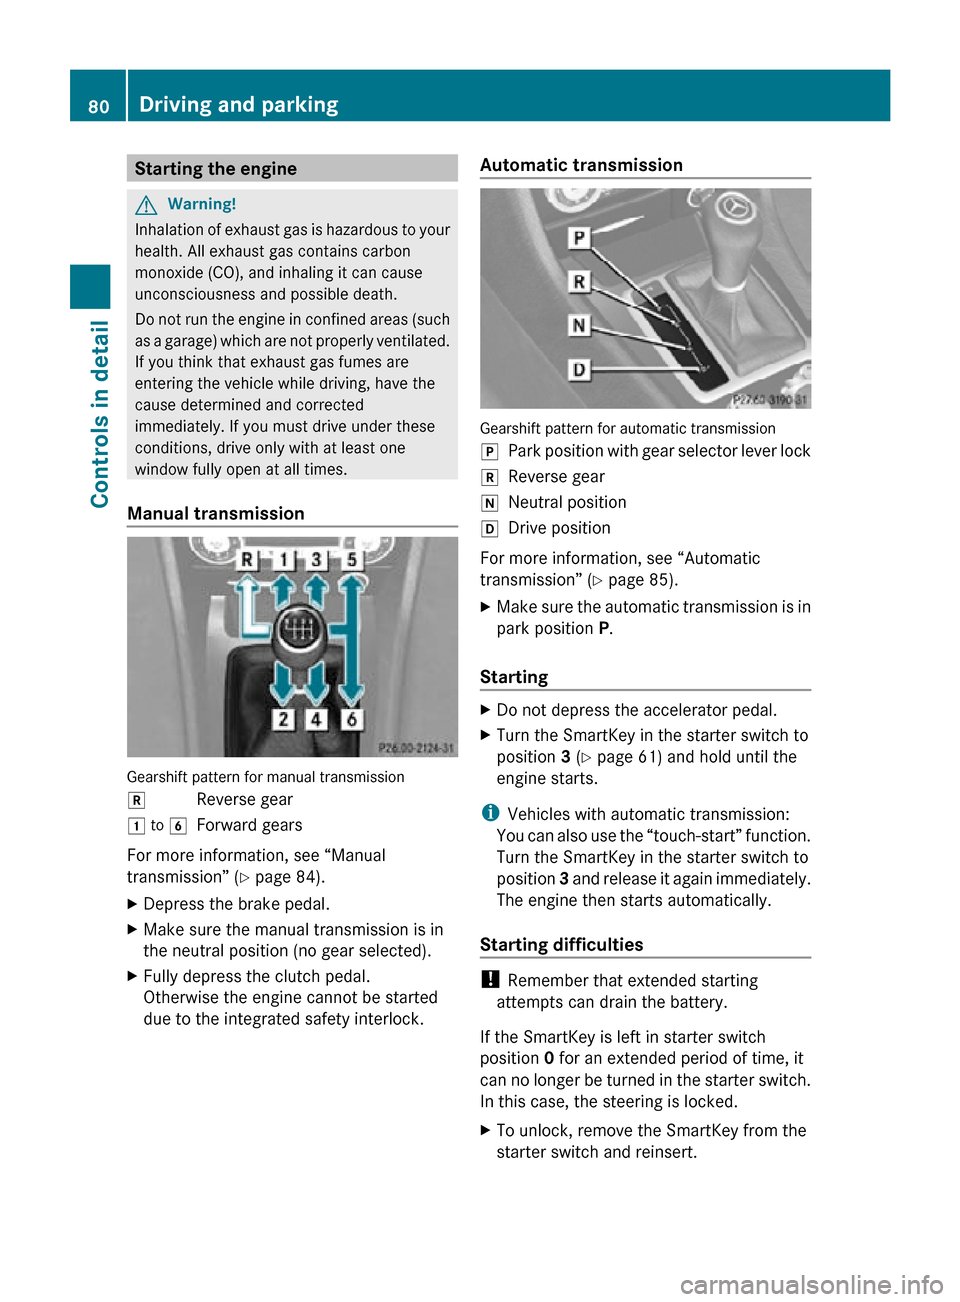
Manual transmission Gearshift pattern for manual transmission
k
Reverse gear
1 to 6 Forward gears
For more information, see “Manual
transmission” (Y page 84).
X Depress the brake pedal.
X Make sure the manual transmission is in
the neutral position (no gear selected).
X Fully depress the clutch pedal.
Otherwise the engine cannot be started
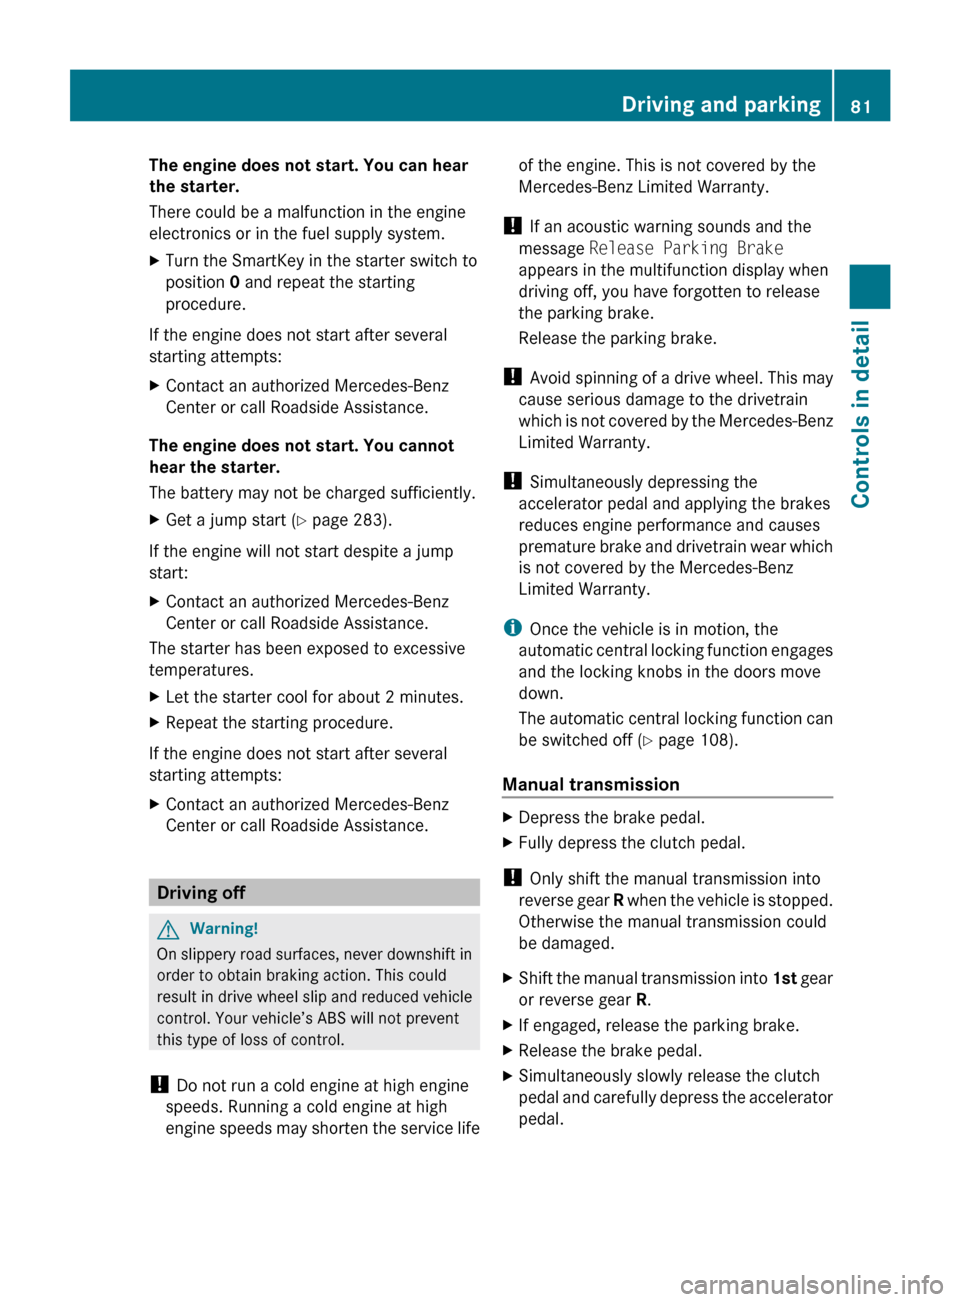
due to the integrated safety interlock. Automatic transmission Gearshift pattern for automatic transmission
j
Park position with gear selector lever lock
k Reverse gear
i Neutral position
h Drive position
For more information, see “Automatic
transmission” (Y page 85).
X Make sure the automatic transmission is in
park position P.
Starting X
Do not depress the accelerator pedal.
X Turn the SmartKey in the starter switch to
position 3 (Y page 61) and hold until the
engine starts.
i Vehicles with automatic transmission:
You can also use the “touch-start” function.
Turn the SmartKey in the starter switch to
position 3 and release it again immediately.
The engine then starts automatically.
Starting difficulties !
Remember that extended starting
attempts can drain the battery.
If the SmartKey is left in starter switch
position 0 for an extended period of time, it
can no longer be turned in the starter switch.
In this case, the steering is locked.
X To unlock, remove the SmartKey from the
starter switch and reinsert. 80
Driving and parkingControls in detail
171_AKB; 3; 60, en-US
d2ureepe,
Version: 2.11.8.1 2009-05-11T16:00:23+02:00 - Seite 80
Page 83 of 312
The engine does not start. You can hear
the starter.
There could be a malfunction in the engine
electronics or in the fuel supply system.
X
Turn the SmartKey in the starter switch to
position 0 and repeat the starting
procedure.
If the engine does not start after several
starting attempts:
X Contact an authorized Mercedes-Benz
Center or call Roadside Assistance.
The engine does not start. You cannot
hear the starter.
The battery may not be charged sufficiently.
X Get a jump start (Y page 283).
If the engine will not start despite a jump
start:
X Contact an authorized Mercedes-Benz
Center or call Roadside Assistance.
The starter has been exposed to excessive
temperatures.
X Let the starter cool for about 2 minutes.
X Repeat the starting procedure.
If the engine does not start after several
starting attempts:
X Contact an authorized Mercedes-Benz
Center or call Roadside Assistance. Driving off
G
Warning!
On slippery road surfaces, never downshift in
order to obtain braking action. This could
result
in drive wheel slip and reduced vehicle
control. Your vehicle’s ABS will not prevent
this type of loss of control.
! Do not run a cold engine at high engine
speeds. Running a cold engine at high
engine speeds may shorten the service life of the engine. This is not covered by the
Mercedes-Benz Limited Warranty.
! If an acoustic warning sounds and the
message Release Parking Brake
appears in the multifunction display when
driving off, you have forgotten to release
the parking brake.
Release the parking brake.
! Avoid
spinning of a drive wheel. This may
cause serious damage to the drivetrain
which is not covered by the Mercedes-Benz
Limited Warranty.
! Simultaneously depressing the
accelerator pedal and applying the brakes
reduces engine performance and causes
premature brake and drivetrain wear which
is not covered by the Mercedes-Benz
Limited Warranty.
i Once the vehicle is in motion, the
automatic central locking function engages
and the locking knobs in the doors move
down.
The automatic central locking function can
be switched off ( Y page 108).
Manual transmission X
Depress the brake pedal.
X Fully depress the clutch pedal.
! Only shift the manual transmission into
reverse
gear R when the vehicle is stopped.
Otherwise the manual transmission could
be damaged.
X Shift the manual transmission into 1st
gear
or reverse gear R.
X If engaged, release the parking brake.
X Release the brake pedal.
X Simultaneously slowly release the clutch
pedal
and carefully depress the accelerator
pedal. Driving and parking
81
Controls in detail
171_AKB; 3; 60, en-US
d2ureepe, Version: 2.11.8.1 2009-05-11T16:00:23+02:00 - Seite 81 Z
Page 172 of 312

X
Activating: Switch off the ignition.
X Press button Á 13
/Ì 14
.
The indicator lamp in the button comes on.
X Deactivating: Press button Á 13
/
Ì 14
.
The indicator lamp in the button goes out.
The residual heat is deactivated
automatically:
R when the ignition is switched on
R after approximately 30 minutes
R if the battery voltage drops
R if the coolant temperature is too low Rear window defroster
G
Warning!
Any accumulation of snow and ice should be
removed
from the rear window before driving.
Visibility could otherwise be impaired,
endangering you and others.
The rear window defroster uses a large
amount of power. To keep the battery drain
to a minimum, switch off the defroster as
soon as the rear window is clear. The
defroster is switched off automatically after
some time of operation depending on the
outside temperature.
X Switch on the ignition.
X Switching on: Press button ¤ on the
respective climate control panel.
The
indicator lamp in the button comes on.
! The rear window defroster cannot be
switched on when the retractable hardtop
is open. The indicator lamp will start
flashing if the hardtop is open.
R Close the retractable hardtop.
The rear window defroster can then be
switched on. X
Switching off: Press button ¤ again.
The rear window defroster switches off when
the battery voltage is too low. The indicator
lamp in button ¤ flashes. Too many
electrical consumers may be operating
simultaneously.
X Switch off consumers that are currently not
needed if required. Retractable hardtop
Safety notes
For safety reasons, the retractable hardtop
can only be opened and closed when the
vehicle is standing still. G
Observe Safety notes, see page 45. G
Warning!
To prevent possible accidents, only drive the
vehicle with the retractable hardtop either
completely
closed and locked, or fully lowered
into its storage compartment.
If the retractable hardtop does not completely
open or close, the roof hydraulics will lose
pressure and the retractable hardtop is
lowered
R after approximately 7 minutes when the
ignition is switched on
R after approximately 15 seconds when the
ignition is switched off
Shortly before the retractable hardtop is
lowered, a warning will sound. In the
multifunction display you will see K and
the message Retractable Roof Lowering .
Properly lock the retractable hardtop before
continuing to drive. Otherwise, the unlocked
hardtop could open while the vehicle is in
motion and cause you to lose control of the
vehicle. You or others could be injured as a
result.
13 Vehicles with climate control
14 Vehicles with automatic climate control 170
Retractable hardtop
Controls in detail
171_AKB; 3; 60, en-US
d2ureepe,
Version: 2.11.8.1 2009-05-11T16:00:23+02:00 - Seite 170
Page 179 of 312
X
Lift up vanity mirror cover B.
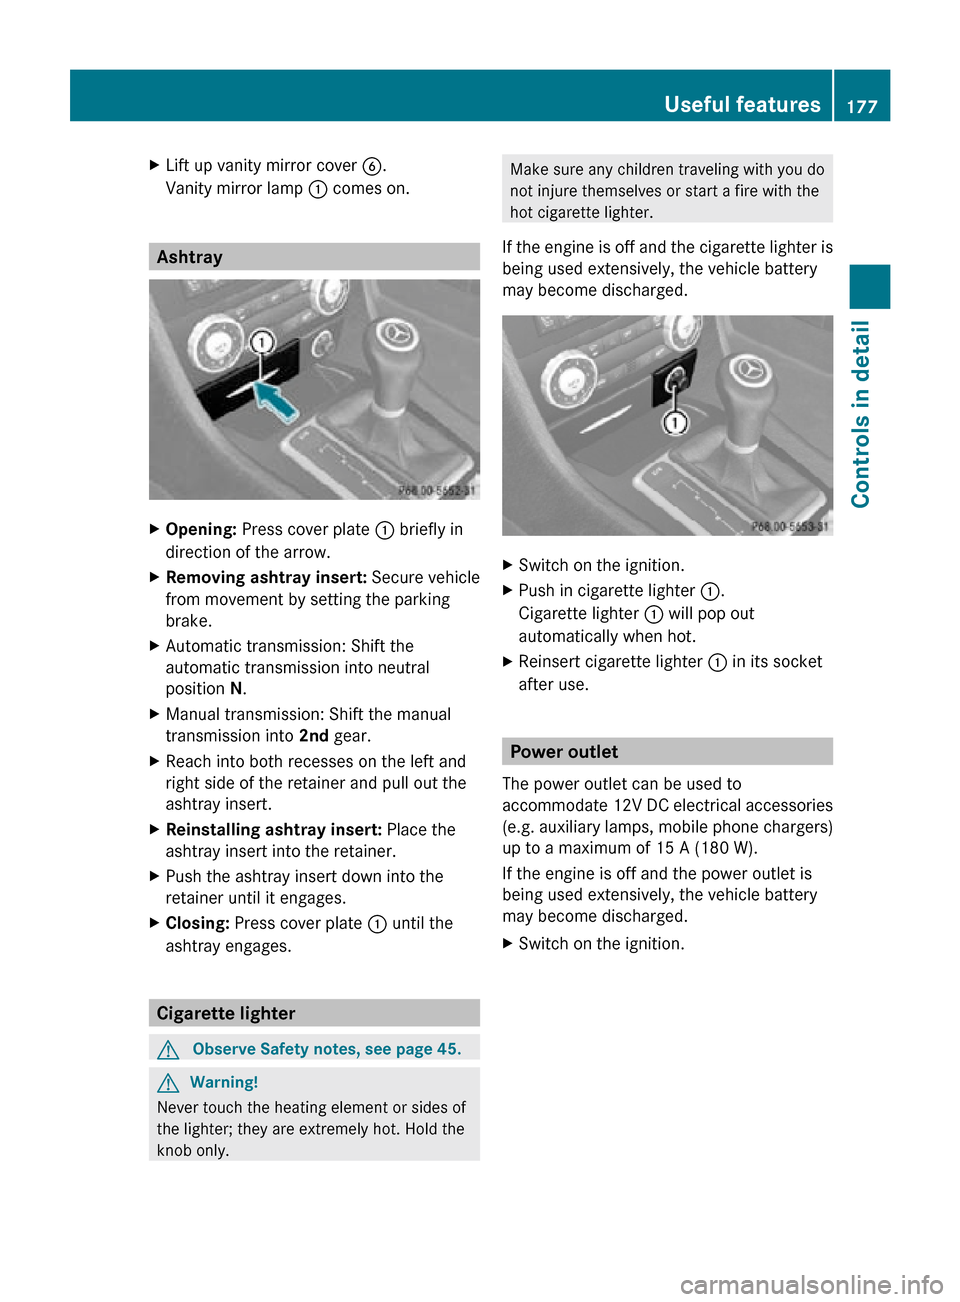
Vanity mirror lamp : comes on. Ashtray
X
Opening: Press cover plate : briefly in
direction of the arrow.
X Removing ashtray insert: Secure vehicle
from movement by setting the parking
brake.
X Automatic transmission: Shift the
automatic transmission into neutral
position N.
X Manual transmission: Shift the manual
transmission into 2nd gear.
X Reach into both recesses on the left and
right side of the retainer and pull out the
ashtray insert.
X Reinstalling ashtray insert: Place the
ashtray insert into the retainer.
X Push the ashtray insert down into the
retainer until it engages.
X Closing: Press cover plate : until the
ashtray engages. Cigarette lighter
G
Observe Safety notes, see page 45. G
Warning!
Never touch the heating element or sides of
the lighter; they are extremely hot. Hold the
knob only. Make sure any children traveling with you do
not injure themselves or start a fire with the
hot cigarette lighter.
If the engine is off and the cigarette lighter is
being used extensively, the vehicle battery
may become discharged. X
Switch on the ignition.
X Push in cigarette lighter :.
Cigarette lighter : will pop out
automatically when hot.
X Reinsert cigarette lighter : in its socket
after use. Power outlet
The power outlet can be used to
accommodate 12V DC electrical accessories
(e.g. auxiliary lamps, mobile phone chargers)
up to a maximum of 15 A (180 W).
If the engine is off and the power outlet is
being used extensively, the vehicle battery
may become discharged.
X Switch on the ignition. Useful features
177Controls in detail
171_AKB; 3; 60, en-US
d2ureepe, Version: 2.11.8.1 2009-05-11T16:00:23+02:00 - Seite 177 Z
Page 180 of 312
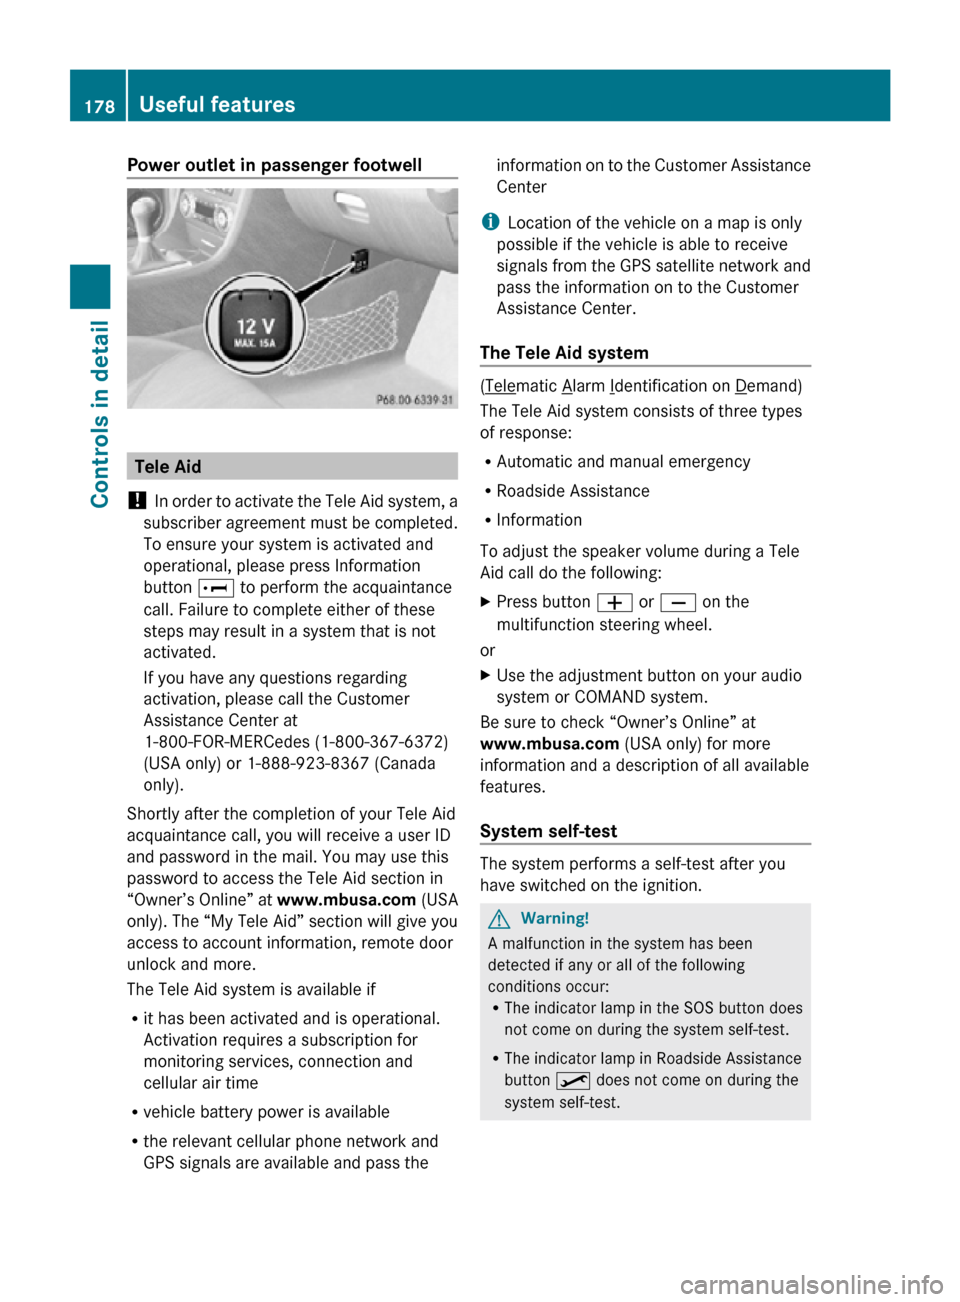
Power outlet in passenger footwell
Tele Aid
! In order to activate the Tele Aid system, a
subscriber agreement must be completed.
To ensure your system is activated and
operational, please press Information
button E to perform the acquaintance
call. Failure to complete either of these
steps may result in a system that is not
activated.
If you have any questions regarding
activation, please call the Customer
Assistance Center at
1-800-FOR-MERCedes (1-800-367-6372)
(USA only) or 1-888-923-8367 (Canada
only).
Shortly after the completion of your Tele Aid
acquaintance call, you will receive a user ID
and password in the mail. You may use this
password to access the Tele Aid section in
“Owner’s Online” at www.mbusa.com (USA
only). The “My Tele Aid” section will give you
access to account information, remote door
unlock and more.
The Tele Aid system is available if
R it has been activated and is operational.
Activation requires a subscription for
monitoring services, connection and
cellular air time
R vehicle battery power is available
R the relevant cellular phone network and
GPS signals are available and pass the information on to the Customer Assistance
Center
i Location of the vehicle on a map is only
possible if the vehicle is able to receive
signals from the GPS satellite network and
pass the information on to the Customer
Assistance Center.
The Tele Aid system ( Telematic Alarm Identification on Demand)
The Tele Aid system consists of three types
of response:
R Automatic and manual emergency
R Roadside Assistance
R Information
To adjust the speaker volume during a Tele
Aid call do the following:
X Press button W or X on the
multifunction steering wheel.
or
X Use the adjustment button on your audio
system or COMAND system.
Be sure to check “Owner’s Online” at
www.mbusa.com (USA only) for more
information and a description of all available
features.
System self-test The system performs a self-test after you
have switched on the ignition.
G
Warning!
A malfunction in the system has been
detected if any or all of the following
conditions occur:
R The indicator lamp in the SOS button does
not come on during the system self-test.
R The indicator lamp in Roadside Assistance
button º does not come on during the
system self-test. 178
Useful featuresControls in detail
171_AKB; 3; 60, en-US
d2ureepe,
Version: 2.11.8.1 2009-05-11T16:00:23+02:00 - Seite 178
Page 188 of 312
X
Switch on the ignition.
X Press and hold the desired signal
transmitter button ( ;, = or ?). Do not
release the button.
Indicator lamp : will begin to flash after
20 seconds.
X Without releasing the signal transmitter
button,
proceed with programming starting
with step 3.
Operation of integrated remote control X
Switch on the ignition.
X Select and press the appropriate
integrated signal transmitter button ( ;,
=
or ?) to activate the remote controlled
device.
The integrated remote control transmitter
continues to send the signal as long as the
button is pressed – up to 20 seconds.
Erasing the integrated remote control
memory i
If
you sell your vehicle, erase the codes of
all three channels.
X Switch on the ignition.
X Simultaneously press and hold outer signal
transmitter buttons ; and ?, for
approximately 20 seconds, until indicator
lamp : flashes rapidly. Do not hold for
longer than 30 seconds.
The
codes of all three channels are erased.
Programming tips If you are having difficulty programming the
integrated remote control, here are some
helpful tips:
R
Check the frequency of hand-held remote
control A
(typically located on the reverse
side of the remote). The integrated remote control is compatible with radio-frequency
devices operating between 280-390 MHz
.
R Put a new battery in hand-held remote
control A. This will increase the likelihood
of the hand-held remote control sending a
stronger and more accurate signal to the
integrated remote control.
R While performing step 3, hold hand-held
remote control A at different lengths and
angles from the signal transmitter button
(;, = or ?) you are programming.
Attempt varying angles at the distance of 2
to 12 inches (5 to 30 cm) away or the same
angle at varying distances.
R If another hand-held remote control is
available for the same device, try the
programming steps again using that other
hand-held remote control. Make sure new
batteries are in the hand-held remote
control before beginning the procedure.
R Straighten the antenna wire from the
garage door opener assembly. This may
help improve transmitting and/or receiving
signals.
i Certain types of garage door openers are
incompatible with the integrated remote
control. If you should experience further
difficulties with programming the
integrated remote control, contact an
authorized Mercedes-Benz Center, or call
the Mercedes-Benz Customer Assistance
Center (USA only) at
1-800-FOR-MERCedes, or the HomeLink ®
Hotline (USA only) at 1-800-355-3515, or
the Customer Service (Canada only) at
1-800-387-0100. 186
Useful features
Controls in detail
171_AKB; 3; 60, en-US
d2ureepe,
Version: 2.11.8.1 2009-05-11T16:00:23+02:00 - Seite 186