change wheel MERCEDES-BENZ SLK350 2010 R171 Owner's Manual
[x] Cancel search | Manufacturer: MERCEDES-BENZ, Model Year: 2010, Model line: SLK350, Model: MERCEDES-BENZ SLK350 2010 R171Pages: 312, PDF Size: 5.75 MB
Page 18 of 312
Indicator lamps ................................
26
Messages in the multifunction
display
........................................... 255U
Uniform Tire Quality Grading
Standards .................................. 210, 219
Units Selecting speedometer display
mode ............................................. 104
Unleaded gasoline, premium ........... 303
Unlocking the vehicle
Manually
........................................ 264
SmartKey ......................................... 56
Upholstery, cleaning .........................231
USB devices (media interface) .........139
Useful features .................................. 176V
Valet locking ........................................ 61
Vehicle
Battery ........................................... 282
Care ............................................... 227
Control system ................................ 93
Identification Number (VIN) ........... 292
Locking/unlocking
........................... 56
Lowering (wheel change) ...............281
Modifications and alterations,
Operating safety .............................. 20
Towing ........................................... 285
Unlocking/locking manually .......... 264
Vehicle dimensions
see Vehicle specification
Vehicle Identification Number
(VIN) ................................................... 292
Vehicle jack see Jack
Vehicle lighting .................................... 70
Vehicle loading
Load limit ....................................... 206
Terminology ................................... 217
Vehicle maximum load on the tire ... 219
Vehicle specification
SLK 300 ......................................... 294
SLK 350 ......................................... 295
SLK 55 AMG .................................. 296Vehicle status message memory ....
101
Vehicle tool kit .................................. 234
Vehicle washing see Vehicle care
Vehicle weights
see Vehicle specification W
Warning sounds Driver’s or passenger’s seat belt
.....42
Parking brake ................................ 244
Seat belt telltale ............................ 259
Warranty coverage ............................ 292
Washer and headlamp cleaning
system ................................................ 306
Washer fluid
Messages in the multifunction
display ........................................... 247
Mixing ratio .................................... 306
Refilling .......................................... 196
Washing the vehicle .......................... 227
Wear pattern (tires) ..........................212
Weights (vehicle) see Vehicle specification
Wheel
Changing ....................................... 273
Removing ....................................... 278
Spare ............................................. 273
Tightening torque ........................... 281
Wheels, sizes ..................................... 297
Wheels, Tires and .............................. 197
Windows see Power windows
Windows, cleaning ............................229
Wind screen ....................................... 173
Windshield Cleaning wiper blades .................... 229
Defogging ...................................... 169
Washer fluid ................................... 306
Wipers ............................................. 76
Windshield wipers
Replacing wiper blades .................. 271
Winter driving
Instructions .................................... 220
Snow chains .................................. 220
Tires ............................................... 219
Winter tires ................................ 219, 297 16
Index 171_AKB; 3; 60, en-US
d2ureepe,
Version: 2.11.8.1 2009-05-11T16:00:23+02:00 - Seite 16
Page 37 of 312
installed or supplied by an authorized
Mercedes-Benz Center.
R Air bags and pyrotechnic Emergency
Tensioning Devices (ETDs) contain
perchlorate material, which may require
special handling and regard for the
environment. Check with your local
government’s disposal guidelines.
California residents, see
www.dtsc.ca.gov/HazardousWaste/
Perchlorate/index.cfm.
R Air bags and ETDs are designed to function
on a one-time-only basis. An air bag or ETD
that has deployed must be replaced.
R Do not pass seat belts over sharp edges.
They could tear.
R Do not make any modification that could
change the effectiveness of the seat belts.
R Do not bleach or dye seat belts as this may
severely weaken them. In a crash they may
not be able to provide adequate protection.
R No modifications of any kind may be made
to any components or wiring of the SRS.
R Do no change or remove any component or
part of the SRS.
R Do not install additional trim material, seat
covers, badges, etc. over the steering
wheel hub, passenger front air bag cover,
outboard sides of the seat backrests, door
trim panels, or door frame trims.
R Do not install additional electrical/
electronic equipment on or near SRS
components and wiring.
R Keep area between air bags and occupants
free of objects (e.g. packages, purses,
umbrellas, etc.).
R Air bag system components will be hot after
an air bag has inflated. Do not touch them.
R Never place your feet on the instrument
panel, dashboard, or on the seat. Always
keep both feet on the floor in front of the
seat. R
Improper repair work on the SRS creates a
risk of rendering the SRS inoperative or
causing unintended air bag deployment.
Work on the SRS must therefore only be
performed by qualified technicians.
Contact an authorized Mercedes-Benz
Center.
R For your protection and the protection of
others, when scrapping the air bag unit or
ETD, our safety instructions must be
followed. These instructions are available
from any authorized Mercedes-Benz
Center.
R Given the considerable deployment speed,
required inflation volume, and the material
of the air bags, there is the possibility of
abrasions or other, potentially more serious
injuries resulting from air bag deployment.
If you sell your vehicle, we strongly
recommend that you inform the subsequent
owner that the vehicle is equipped with SRS.
Also refer them to the applicable section in
the Operator’s Manual.
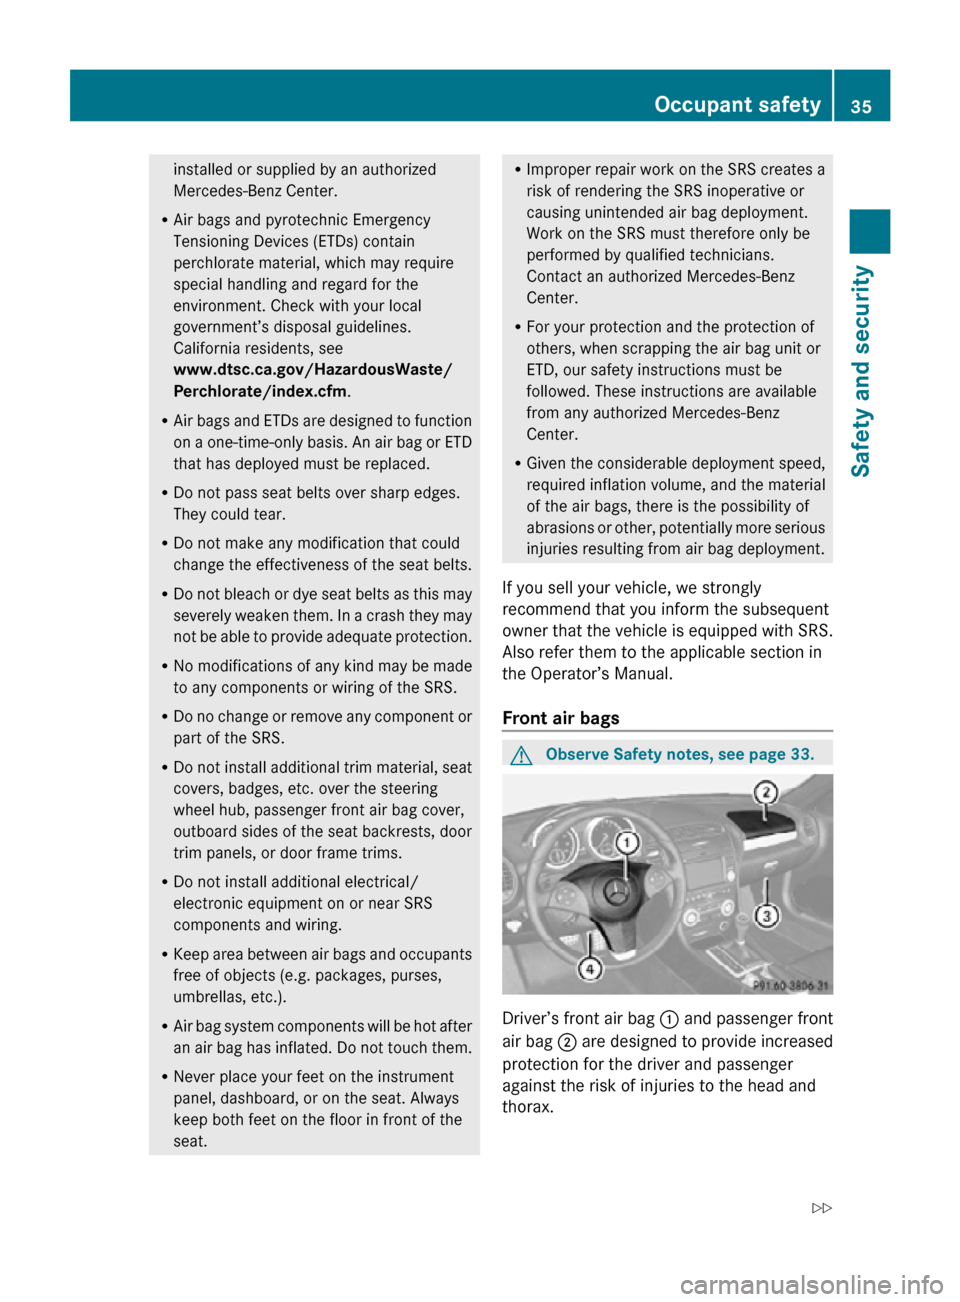
Front air bags G
Observe Safety notes, see page 33. Driver’s front air bag
: and passenger front
air bag ; are designed to provide increased
protection for the driver and passenger
against the risk of injuries to the head and
thorax. Occupant safety
35Safety and security
171_AKB; 3; 60, en-US
d2ureepe, Version: 2.11.8.1 2009-05-11T16:00:23+02:00 - Seite 35 Z
Page 47 of 312
Children in the vehicle
Safety notes If an infant or child is traveling with you in the
vehicle:
X
Secure the child using an infant or child
restraint
appropriate to the age and size of
the child.
X Make sure the infant or child is properly
secured at all times while the vehicle is in
motion. G
Warning!
When leaving the vehicle, always remove the
SmartKey from the starter switch. Always
take the SmartKey with you and lock the
vehicle. Do not leave children unattended in
the
vehicle, even if they are secured in a child
restraint system, or with access to an
unlocked vehicle. A child’s unsupervised
access to a vehicle could result in an accident
and/or serious personal injury. The children
could
R injure themselves on parts of the vehicle
R be seriously or fatally injured through
excessive exposure to extreme heat or cold
R injure themselves or cause an accident with
vehicle equipment that can be operated
even if the SmartKey is removed from the
starter switch or removed from the vehicle,
such as seat adjustment, steering wheel
adjustment, or the memory function
If children open a door, they could injure other
persons or get out of the vehicle and injure
themselves or be injured by following traffic.
Do not expose the child restraint system to
direct sunlight. The child restraint system’s
metal parts, for example, could become very
hot, and the child could be burned by these
parts. G
Warning!
Do not carry heavy or hard objects in the
passenger compartment unless they are
firmly secured in place. Unsecured or improperly positioned cargo
increases a child’s risk of injury in the event
of
R
strong braking maneuvers
R sudden changes of direction
R an accident
Infant and child restraint systems G
Observe Safety notes, see page 45.
We recommend all infants and children be
properly restrained at all times while the
vehicle is in motion.
The passenger lap/shoulder belt has a
special seat belt retractor for secure
fastening of child restraints.
To fasten a child restraint, follow the child
restraint manufacturer’s instructions for
mounting.
To activate the special seat belt retractor:
X Pull the shoulder belt out completely and
let it retract.
During seat belt retraction, a ratcheting
sound can be heard to indicate that the
special seat belt retractor is activated.
The seat belt is now locked.
X Push down on child restraint to take up any
slack.
To deactivate the special seat belt retractor:
X Release the seat belt buckle and let the
seat belt retract completely.
The
seat belt can then again be used in the
usual manner. G
Warning!
Never release the seat belt buckle while the
vehicle
is in motion, since the special seat belt
retractor will be deactivated.
The use of infant or child restraints is required
by law in all 50 states, the District of
Columbia, the U.S. territories and all
Canadian provinces. Occupant safety
45
Safety and security
171_AKB; 3; 60, en-US
d2ureepe, Version: 2.11.8.1 2009-05-11T16:00:23+02:00 - Seite 45 Z
Page 91 of 312
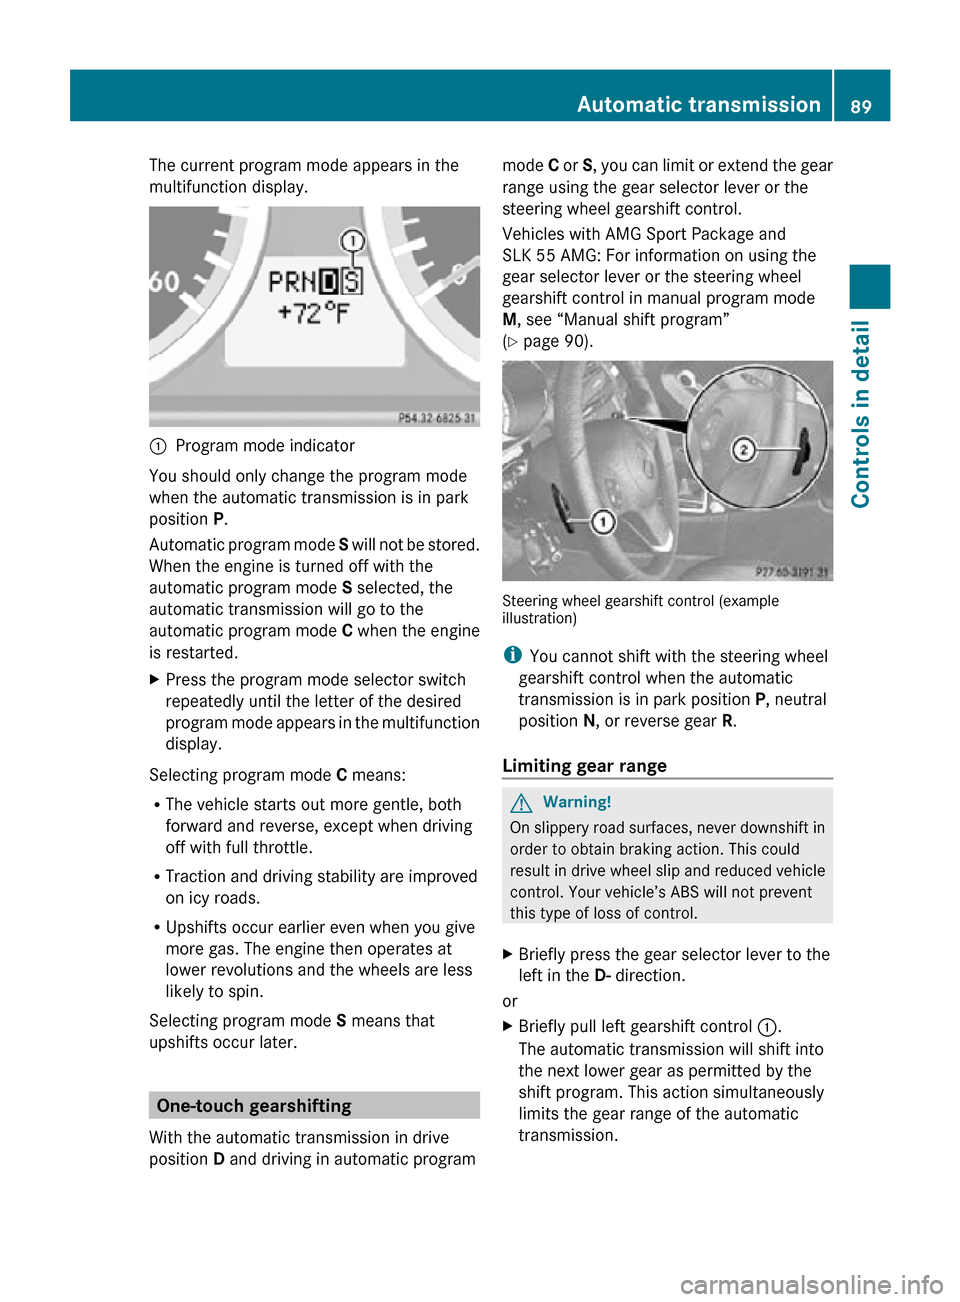
The current program mode appears in the
multifunction display.
:
Program mode indicator
You should only change the program mode
when the automatic transmission is in park
position P.
Automatic program mode S will not be stored.
When the engine is turned off with the
automatic program mode S selected, the
automatic transmission will go to the
automatic program mode C when the engine
is restarted.
X Press the program mode selector switch
repeatedly until the letter of the desired
program mode appears in the multifunction
display.
Selecting program mode C means:
R The vehicle starts out more gentle, both
forward and reverse, except when driving
off with full throttle.
R Traction and driving stability are improved
on icy roads.
R Upshifts occur earlier even when you give
more gas. The engine then operates at
lower revolutions and the wheels are less
likely to spin.
Selecting program mode S means that
upshifts occur later. One-touch gearshifting
With the automatic transmission in drive
position D and driving in automatic program mode
C or S, you can limit or extend the gear
range using the gear selector lever or the
steering wheel gearshift control.
Vehicles with AMG Sport Package and
SLK 55 AMG: For information on using the
gear selector lever or the steering wheel
gearshift control in manual program mode
M, see “Manual shift program”
(Y page 90). Steering wheel gearshift control (example
illustration)
i
You cannot shift with the steering wheel
gearshift control when the automatic
transmission is in park position P, neutral
position N, or reverse gear R.
Limiting gear range G
Warning!
On slippery road surfaces, never downshift in
order to obtain braking action. This could
result in drive wheel slip and reduced vehicle
control. Your vehicle’s ABS will not prevent
this type of loss of control.
X Briefly press the gear selector lever to the
left in the D- direction.
or
X Briefly pull left gearshift control :.
The automatic transmission will shift into
the next lower gear as permitted by the
shift program. This action simultaneously
limits the gear range of the automatic
transmission. Automatic transmission
89Controls in detail
171_AKB; 3; 60, en-US
d2ureepe, Version: 2.11.8.1 2009-05-11T16:00:23+02:00 - Seite 89 Z
Page 92 of 312
i
To avoid overrevving the engine when
downshifting, the automatic transmission
will not shift into a lower gear if the engine’s
maximum speed would be exceeded.
Extending gear range X
Briefly press the gear selector lever to the
right in the D+ direction.
or
X Briefly pull right gearshift control ;.
The automatic transmission will shift into
the next higher gear as permitted by the
shift program. This action simultaneously
extends the gear range of the automatic
transmission.
i If you press on the accelerator pedal
when the engine has reached the
revolution limit of the current gear range,
the automatic transmission will upshift
beyond any gear range limit selected.
Canceling gear range limit X
Press and hold the gear selector lever to
the right in the D+ direction until D
reappears in the multifunction display.
or
X Pull and hold right gearshift control ; until
D reappears in the multifunction display.
The automatic transmission will shift from
the current gear range directly into drive
position D.
Shifting into optimal gear range X
Press and hold the gear selector lever to
the left in the D- direction.
or
X Pull and hold left gearshift control :.
The automatic transmission will select the
gear range suited for optimal acceleration
and deceleration automatically. This will
involve shifting down one or more gears. Manual shift program
The manual shift program is available on
vehicles with AMG Sport Package and on
SLK 55 AMG only.
Manual program mode M differs with regard
to spontaneity, response time, and shifting
smoothness from automatic program mode
S.
In manual program mode M, system-
controlled automatic gearshifting is switched
off. You need to change the gears by manually
upshifting or downshifting using the gear
selector lever or the steering wheel gearshift
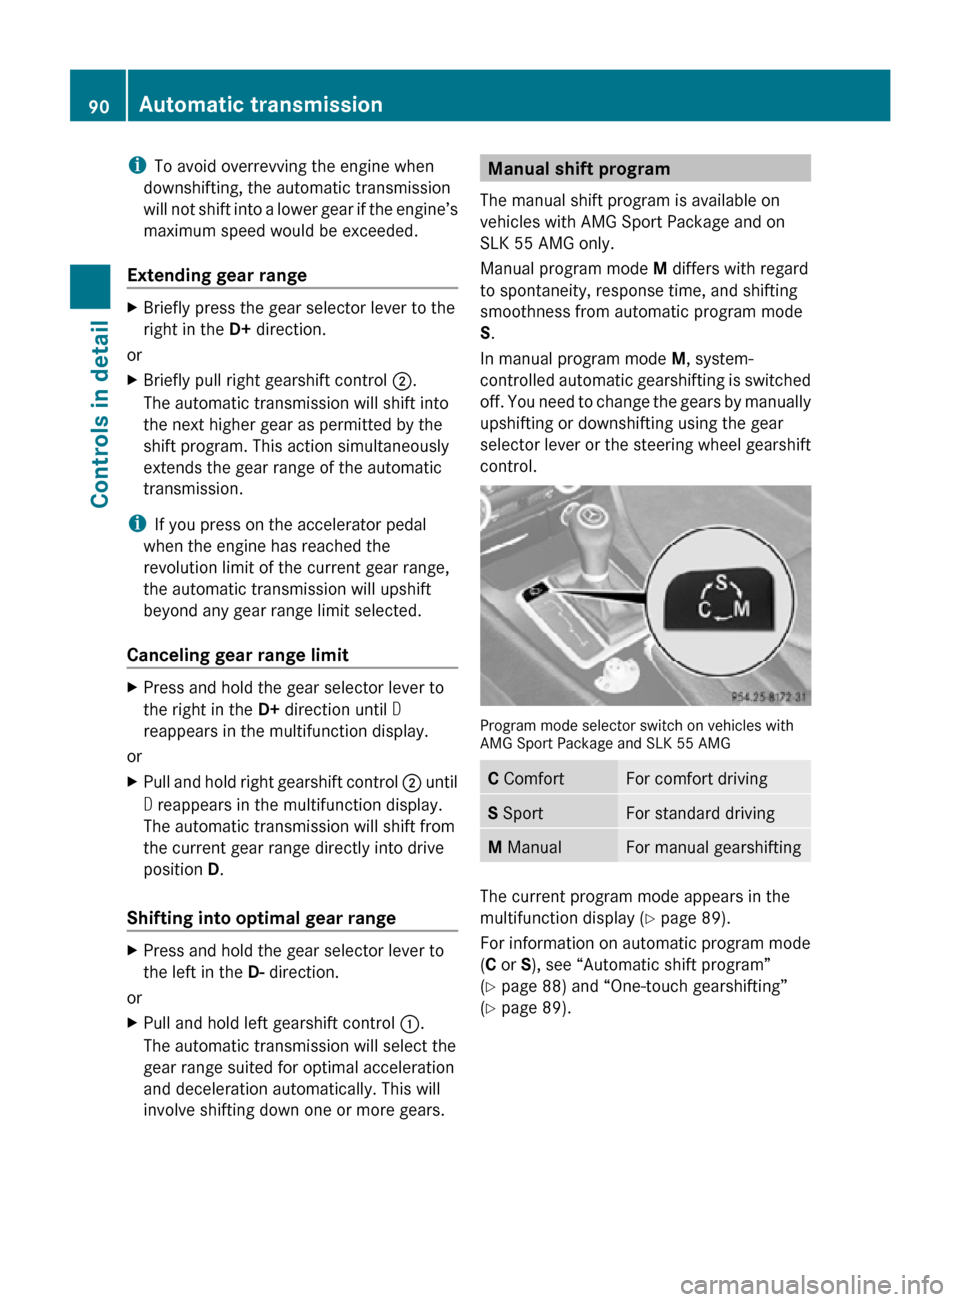
control. Program mode selector switch on vehicles with
AMG Sport Package and SLK 55 AMG
C Comfort For comfort driving
S Sport For standard driving
M Manual For manual gearshifting
The current program mode appears in the
multifunction display (
Y page 89).
For information on automatic program mode
(C or S), see “Automatic shift program”
(Y page 88) and “One-touch gearshifting”
(Y page 89). 90
Automatic transmissionControls in detail
171_AKB; 3; 60, en-US
d2ureepe,
Version: 2.11.8.1 2009-05-11T16:00:23+02:00 - Seite 90
Page 93 of 312
Activating manual shift program
X
Press the program mode selector switch
repeatedly until M appears in the
multifunction display.
The automatic transmission switches to
manual program mode M. Automatic
shifting is switched off. The gear range is
not limited.
You can change the gears manually with drive
position D selected. You can upshift or
downshift through the gears in succession.
i Manual program mode M will not be
stored. When the engine is turned off with
manual program mode M selected, the
automatic transmission will go to
automatic program mode C when the
engine is restarted.
Upshifting !
In manual program mode M, the
automatic transmission will not upshift,
even if the engine has reached its
overrevving range. Shift up into the next
gear before the engine has reached its
overrevving range. Make absolutely certain
that the engine speed does not reach the
red marking on the tachometer. Otherwise
the engine could be damaged which is not
covered by the Mercedes-Benz Limited
Warranty.
X Briefly press the gear selector lever to the
right in the D+ direction.
or
X Briefly pull right gearshift control ;
(Y page 89).
The automatic transmission shifts into the
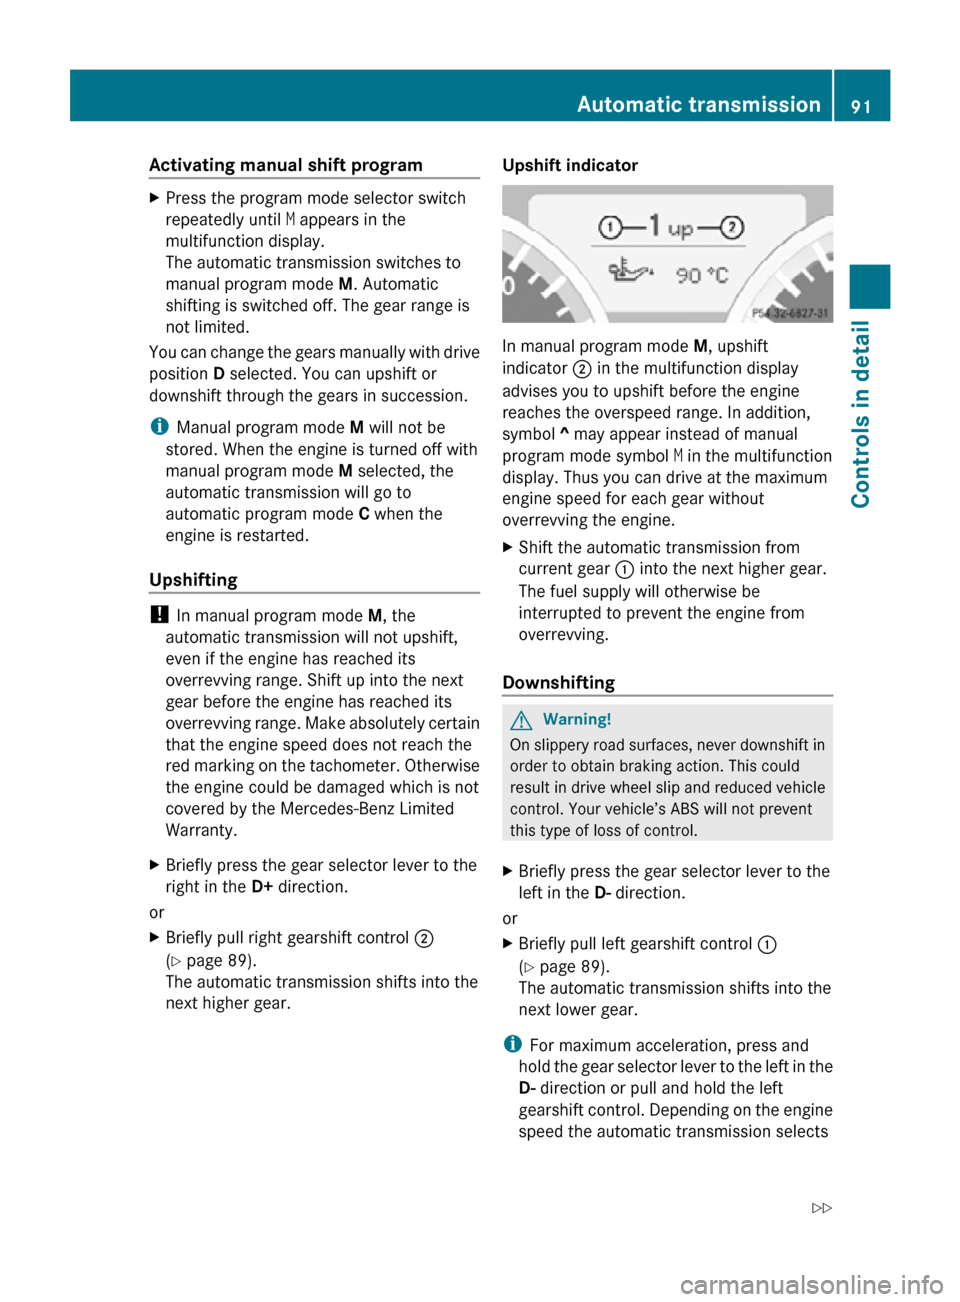
next higher gear. Upshift indicator In manual program mode
M, upshift
indicator ; in the multifunction display
advises you to upshift before the engine
reaches the overspeed range. In addition,
symbol ^ may appear instead of manual
program mode symbol M in the multifunction
display. Thus you can drive at the maximum
engine speed for each gear without
overrevving the engine.
X Shift the automatic transmission from
current gear : into the next higher gear.
The fuel supply will otherwise be
interrupted to prevent the engine from
overrevving.
Downshifting G
Warning!
On slippery road surfaces, never downshift in
order to obtain braking action. This could
result in drive wheel slip and reduced vehicle
control. Your vehicle’s ABS will not prevent
this type of loss of control.
X Briefly press the gear selector lever to the
left in the D- direction.
or
X Briefly pull left gearshift control :
(Y page 89).
The automatic transmission shifts into the
next lower gear.
i For maximum acceleration, press and
hold the gear selector lever to the left in the
D- direction or pull and hold the left
gearshift control. Depending on the engine
speed the automatic transmission selects Automatic transmission
91Controls in detail
171_AKB; 3; 60, en-US
d2ureepe, Version: 2.11.8.1 2009-05-11T16:00:23+02:00 - Seite 91 Z
Page 95 of 312
Activating the instrument cluster
The instrument cluster is activated when you
R open the driver’s door
R switch on the ignition
R press reset button .
R switch on the exterior lamps
i Opening the driver’s door or pressing the
reset button . without switching on the
ignition or the exterior lamps activates the
instrument cluster illumination only for
30 seconds. Adjusting the instrument cluster
illumination
X To brighten illumination: Press knob :
briefly.
X To dim illumination: Press knob ;
briefly.
The illumination brightness for the instrument
cluster changes each time you press
knob :
or ;. Several settings are possible.
i The instrument cluster illumination is
dimmed or brightened automatically to suit
ambient light conditions.
You can only adjust the brightness of the
instrument cluster illumination when it is
dark outside.
i With the exterior lighting switched on, the
brightness of the switches in the center
console will also be adjusted when using
knob : or ;. Resetting trip odometer
X Make sure you are viewing the standard
display
(Y page 96) in the multifunction
display.
X Press and hold reset button .
until the trip
odometer is reset. Tachometer
The red marking on the tachometer
(Y
page 26) denotes excessive engine speed.
! Avoid driving at excessive engine speeds,
as it may result in serious engine damage
that is not covered by the Mercedes-Benz
Limited Warranty.
To help protect the engine, the fuel supply is
interrupted if the engine is operated within
the red marking. Clock
In vehicles with the audio system, the clock
can be set via the control system
(Y page 105).
For setting the time with the COMAND
system, see separate COMAND system
operating instructions. Control system
Introduction
The
control system is activated as soon as the
starter switch is in position 1.
The control system enables you to call up
information about your vehicle and to change
vehicle settings.
For example, you can use the control system
to find out when your vehicle is next due for
maintenance service, to set the language for
messages in the instrument cluster display,
and much more. G
Warning!
A driver’s attention to the road and traffic
conditions must always be his/her primary
focus when driving.
For your safety and the safety of others,
selecting features through the multifunction
steering wheel should only be done by the
driver
when traffic and road conditions permit
it to be done safely. Control system
93
Controls in detail
171_AKB; 3; 60, en-US
d2ureepe, Version: 2.11.8.1 2009-05-11T16:00:23+02:00 - Seite 93 Z
Page 114 of 312
Audio system
Audio and telephone operation
These instructions are intended to help you
become familiar with your Mercedes-Benz
audio system. They contain useful tips and a
detailed description of the user functions. G
Warning!
In order to avoid distraction which could lead
to an accident, the driver should enter system
settings with the vehicle at a standstill and
operate the system only when road and traffic
conditions permit. Always pay full attention to
traffic conditions first before operating
system controls while driving.
Bear in mind that at a speed of just 30 mph
(approximately 50 km/h), your vehicle is
covering a distance of 44 feet (approximately
14 m) every second. Operating safety
G
Warning!
Any alterations made to electronic
components can cause malfunctions.
The radio, amplifier, CD changer, satellite
radio, and telephone are interconnected.
When one of the components is not
operational or has not been removed/
replaced properly, the function of other
components may be impaired.
This condition might seriously impair the
operating safety of your vehicle. We recommend that you have any service
work
on electronic components carried out at
an authorized Mercedes-Benz Center. Audio system components
With the audio system you can operate the
following main functions:
R Audio function with the radio, Satellite
radio,
disc (CD audio or MP3 mode), Audio
AUX and external audio devices
R the mobile phone with the phone book
R various system settings
In addition, the audio system can also be
operated with the multifunction steering
wheel (Y page 94).
In these instructions, the keypad (right side
of audio control unit) and the function buttons
are referred to as “buttons”.
Audio control unit With the audio control unit you can
R
switch the audio system on/off
R adjust the volume
R select the operating modes
R enter telephone numbers and accept,
reject, initiate and end telephone calls
R load and eject CDs 112
Audio system
Controls in detail
171_AKB; 3; 60, en-US
d2ureepe,
Version: 2.11.8.1 2009-05-11T16:00:23+02:00 - Seite 112
Page 120 of 312
X
Adjusting: Turn rotary control :.
The volume will increase or decrease
depending on the direction turned.
Adjusting volume for telephone calls
In hands-free mode, you can adjust the
volume of a telephone call while the call is
currently active.
During a telephone call:
X Turn rotary control :.
The volume will increase or decrease
depending on the direction turned.
i The volume of the audio system or a
telephone call can also be adjusted by
pressing the button W or X on the
multifunction steering wheel ( Y page 94).
Sound X
Switching on/off: Press button 8 on
the audio control unit (Y page 113).
The sound of the current audio source is
switched on or off.
i When the sound is switched off, the
symbol 8 appears in the status line.
If you change the audio source, or alter the
volume, the sound is automatically
switched on again.
In CD and MP3 mode, button 8
switches the pause function on or off.
Selecting sound settings You can select different bass and treble
settings for each individual audio source. The
particular
Sound menu can be opened from
the basic menu for the desired operating
mode, or by pressing the button J on the
audio control unit.
Example:
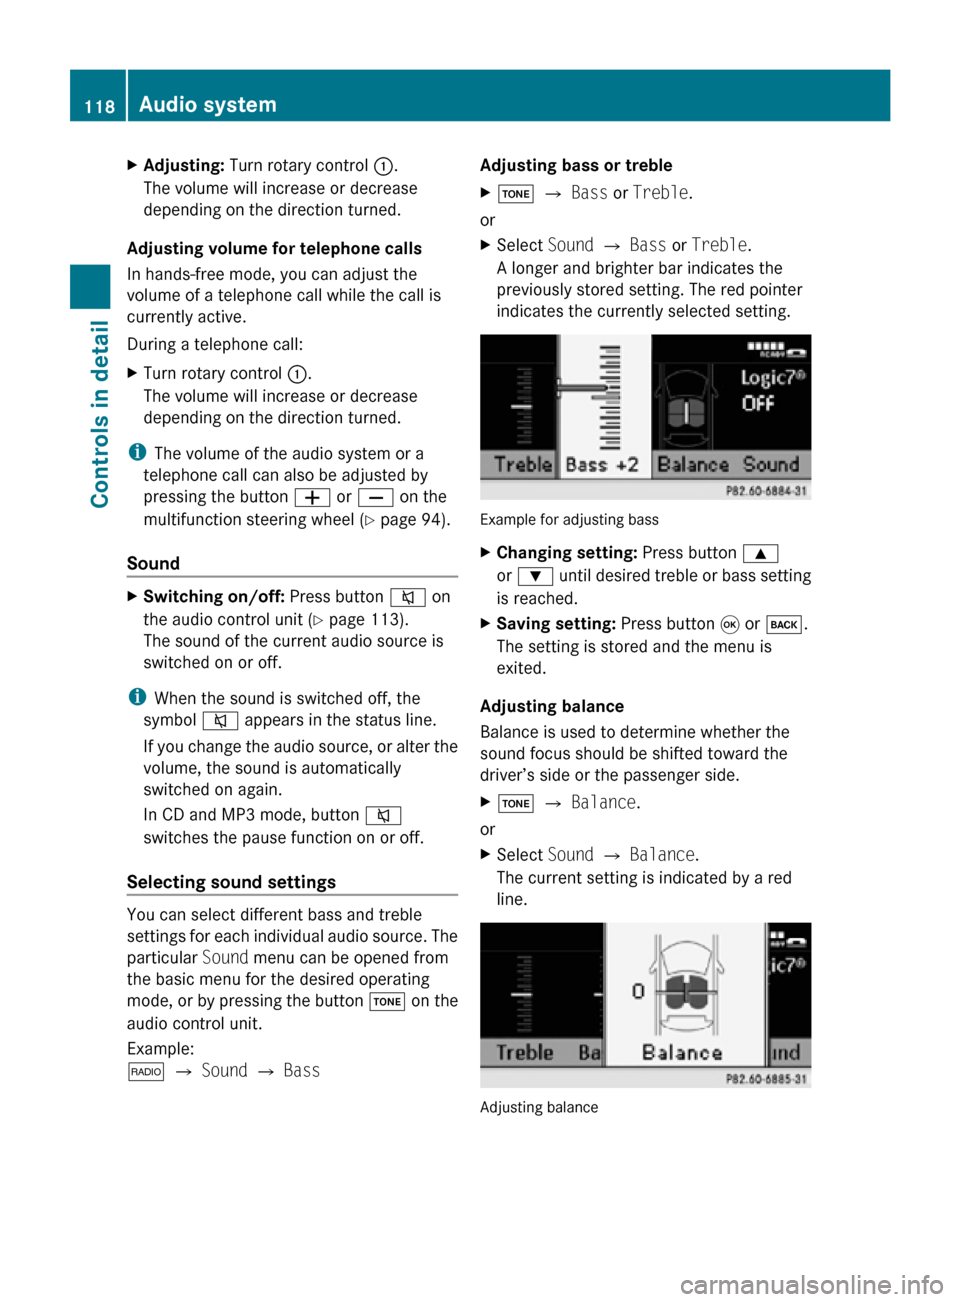
$ Q Sound Q Bass Adjusting bass or treble
X
J Q Bass or Treble.
or
X Select Sound Q Bass or Treble.
A longer and brighter bar indicates the
previously stored setting. The red pointer
indicates the currently selected setting. Example for adjusting bass
X
Changing setting: Press button 9
or : until desired treble or bass setting
is reached.
X Saving setting: Press button 9 or k.
The setting is stored and the menu is
exited.
Adjusting balance
Balance is used to determine whether the
sound focus should be shifted toward the
driver’s side or the passenger side.
X J Q Balance.
or
X Select Sound Q Balance.
The current setting is indicated by a red
line. Adjusting balance118
Audio systemControls in detail
171_AKB; 3; 60, en-US
d2ureepe,
Version: 2.11.8.1 2009-05-11T16:00:23+02:00 - Seite 118
Page 160 of 312
X
Selecting a call: Press button 9
or : until the desired entry is
highlighted.
X Initiating call: Press button 9 or 6.
Aborting dial or ending a call X
% Q ¢ and press button 9.
or
X Press button ~ on the audio control unit
or on the multifunction steering wheel.
Rejecting or accepting calls You will be notified of an incoming call by the
ringing tone and a message on the display.
i
Depending on the mobile phone you are
using, the audio system’s ringing tone may
differ from the one you have set on your
mobile phone. You may hear
R the ringing tone set on the mobile phone
R the audio system’s preset ringing tone
R the audio system’s preset ringing tone
and the ringing tone set on the mobile
phone
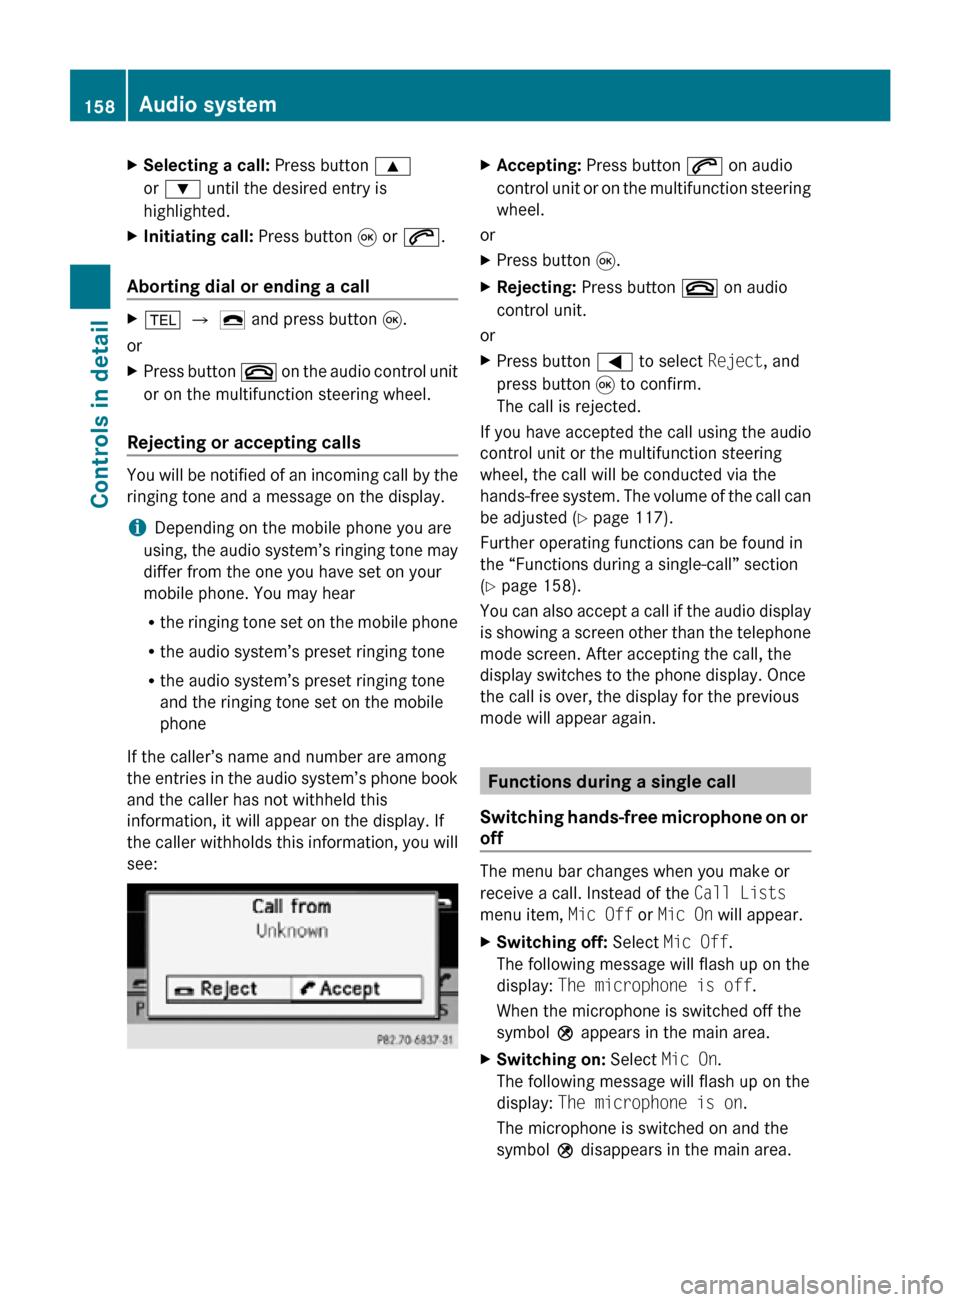
If the caller’s name and number are among
the entries in the audio system’s phone book
and the caller has not withheld this
information, it will appear on the display. If
the caller withholds this information, you will
see: X
Accepting: Press button 6 on audio
control unit or on the multifunction steering
wheel.
or
X Press button 9.
X Rejecting: Press button ~ on audio
control unit.
or
X Press button = to select Reject, and
press button 9 to confirm.
The call is rejected.
If you have accepted the call using the audio
control unit or the multifunction steering
wheel, the call will be conducted via the
hands-free system. The volume of the call can
be adjusted ( Y page 117).
Further operating functions can be found in
the “Functions during a single-call” section
(Y page 158).
You can also accept a call if the audio display
is showing a screen other than the telephone
mode screen. After accepting the call, the
display switches to the phone display. Once
the call is over, the display for the previous
mode will appear again. Functions during a single call
Switching hands-free microphone on or
off The menu bar changes when you make or
receive a call. Instead of the Call Lists
menu item, Mic Off or Mic On will appear.
X
Switching off: Select Mic Off.
The following message will flash up on the
display: The microphone is off.
When the microphone is switched off the
symbol Q appears in the main area.
X Switching on: Select Mic On.
The following message will flash up on the
display: The microphone is on.
The microphone is switched on and the
symbol Q disappears in the main area. 158
Audio systemControls in detail
171_AKB; 3; 60, en-US
d2ureepe,
Version: 2.11.8.1 2009-05-11T16:00:23+02:00 - Seite 158