reset MERCEDES-BENZ SLS AMG 2011 Owners Manual
[x] Cancel search | Manufacturer: MERCEDES-BENZ, Model Year: 2011, Model line: SLS AMG, Model: MERCEDES-BENZ SLS AMG 2011Pages: 436, PDF Size: 17.73 MB
Page 9 of 436
stopping or pausing playback ........186
voice control with ..................224, 229
Center console
Lower part ....................................... 39
Upper part ....................................... 38
Central locking
Automatic ...................................... 239
Locking/unlocking from inside ......239
SmartKey ....................................... 236
Central locking/unlocking switch ... 239
Ceramic brake system ...................... 350
Certification label .............................. 420
Channel selection (satellite radio) ..... 83
voice commands for ......................223
Chapter selection (DVD)
main video ..................................... 203
Character entry ................................... 86
Children in the vehicle Air bags ........................................... 45
Indicator lamp, passenger front
air bag off ........................................ 49
Infant and child restraint systems .... 58
OCS (Occupant Classification
System) ........................................... 49
Safety notes ..................................... 57
Tether anchorage points ..................59
Top tether ........................................ 59
Child safety
see Children in the vehicle
Chrome-plated exhaust tip,
cleaning .............................................. 360
Cigarette lighter ................................ 307
City center, selecting as
destination ................................. 119, 214
City of destination, selecting ........... 115
Clear button ......................................... 79
Climate control system .................... 298
Air conditioning ............................. 300
Air conditioning refrigerant ............426
Air distribution ............................... 302
Air recirculation mode ...................303
Air vents ........................................ 301
Air volume ..................................... 302
Automatic mode ............................ 300
Deactivating system ......................299
Front defroster .............................. 302
Maximum cooling MAX COOL ........303Temperature .................................. 300
Using driver-side settings for
passenger side ............................... 303
Cockpit ................................................. 33
Cold tire inflation pressure .............. 345
Collapsible wheel chock ................... 363
Color video settings main video ..................................... 203
COMAND
control unit ...................................... 75
Reset ............................................... 99
System settings ............................... 92
COMAND, about
basic functions ................................ 89
operation of ..................................... 85
switching on/off .............................. 89
COMAND components ........................ 73
COMAND controller ............................. 77
COMAND Control System ................... 72
Combination switch .......................... 251
Commands for voice control ............ 225
for address book ...................219, 227
for CD, DVD, MP3 ..................224, 229
for navigation ........................ 212, 226
for phone operation .......................226
for radio and satellite radio .... 221, 228
general commands ........................225
Contacts
see Address book
Contrast setting
main video ..................................... 203
Control system .................................. 272
Multifunction display .....................273
Multifunction steering wheel .........272
Resetting to factory settings ..........282
Submenus in the Settings menu ....283
Control system menus ...................... 275
AMG ............................................... 287
Audio ............................................. 279
Navi ............................................... 277
Service ........................................... 281
Settings ......................................... 282
Telephone ...................................... 280
Trip ................................................ 275
Control system submenus
Convenience .................................. 286
Instrument cluster .........................283Index7BA 197 USA, CA Edition A 2011; 1; 27, en-UShereepeVersion: 3.0.3.52010-03-24T15:31:10+01:00 - Seite 7
Page 50 of 436
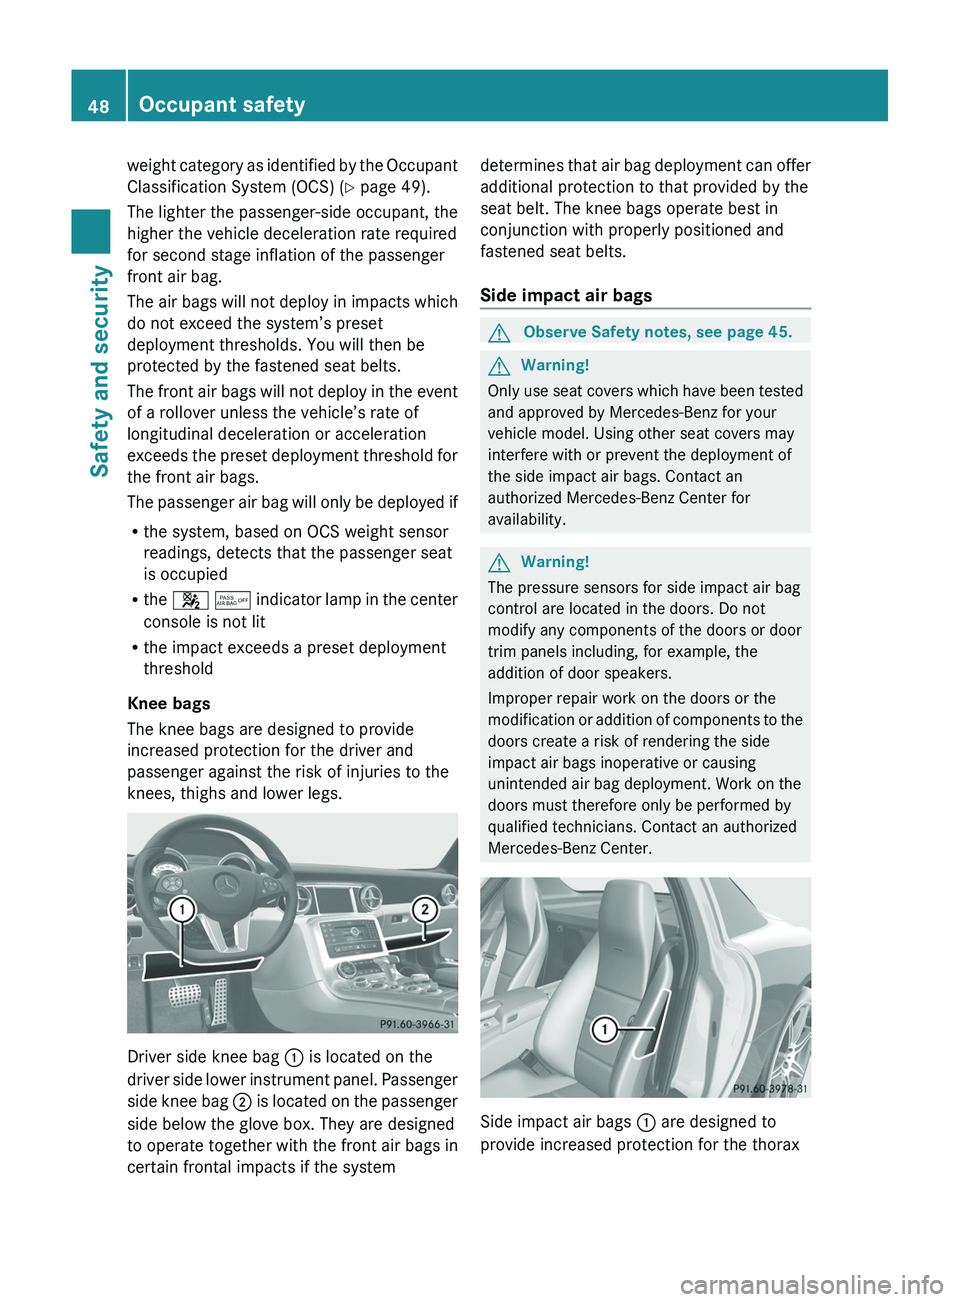
weight category as identified by the Occupant
Classification System (OCS) (Y page 49).
The lighter the passenger-side occupant, the
higher the vehicle deceleration rate required
for second stage inflation of the passenger
front air bag.
The air bags will not deploy in impacts which
do not exceed the system’s preset
deployment thresholds. You will then be
protected by the fastened seat belts.
The front air bags will not deploy in the event
of a rollover unless the vehicle’s rate of
longitudinal deceleration or acceleration
exceeds the preset deployment threshold for
the front air bags.
The passenger air bag will only be deployed if
Rthe system, based on OCS weight sensor
readings, detects that the passenger seat
is occupied
Rthe \000 \000
Page 51 of 436
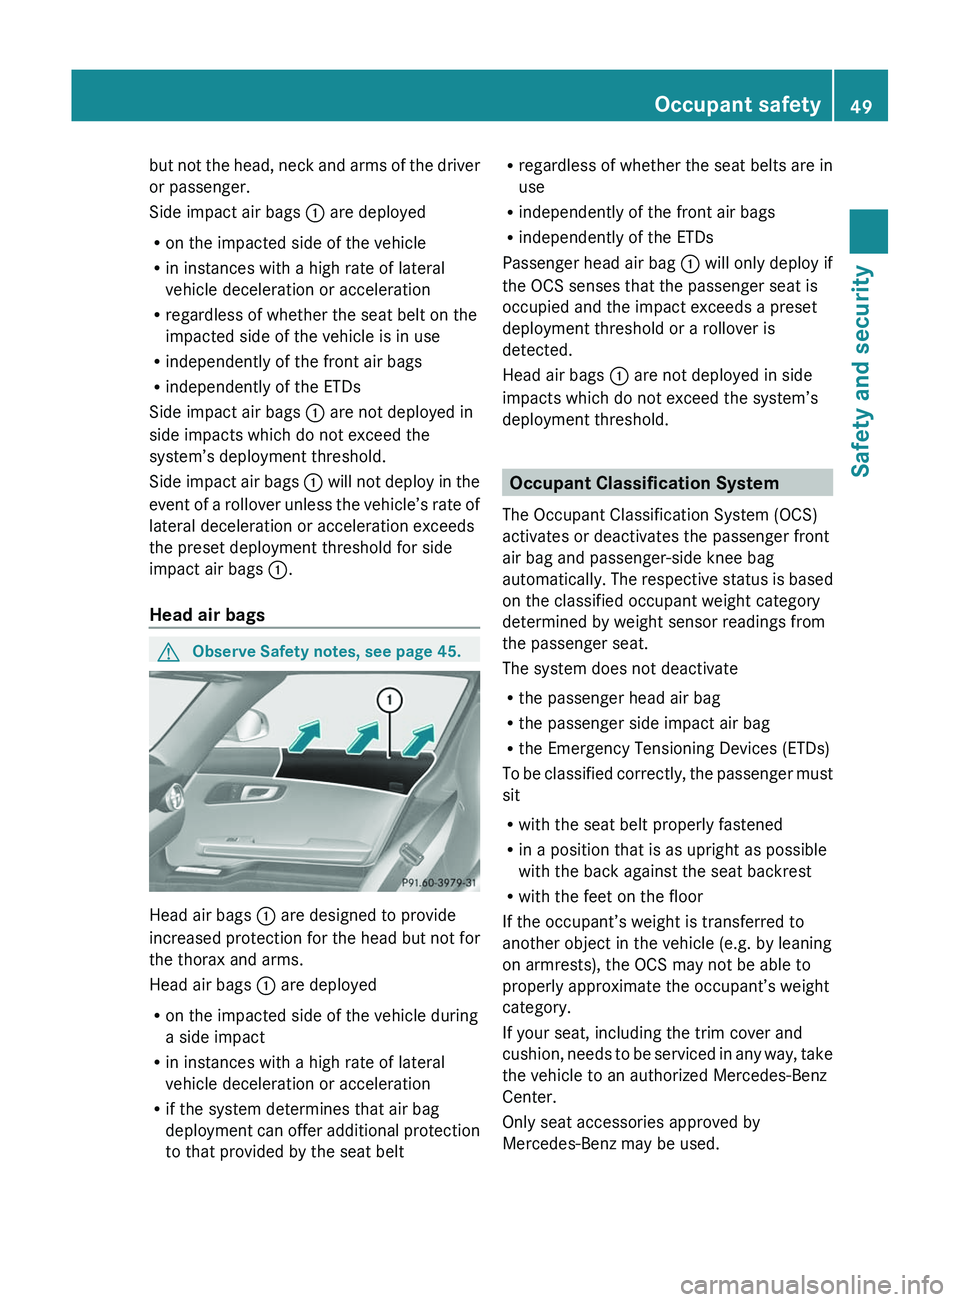
but not the head, neck and arms of the driver
or passenger.
Side impact air bags \000F are deployed
Ron the impacted side of the vehicle
Rin instances with a high rate of lateral
vehicle deceleration or acceleration
Rregardless of whether the seat belt on the
impacted side of the vehicle is in use
Rindependently of the front air bags
Rindependently of the ETDs
Side impact air bags \000F are not deployed in
side impacts which do not exceed the
system’s deployment threshold.
Side impact air bags \000F will not deploy in the
event of a rollover unless the vehicle’s rate of
lateral deceleration or acceleration exceeds
the preset deployment threshold for side
impact air bags \000F.
Head air bags
GObserve Safety notes, see page 45.
Head air bags \000F are designed to provide
increased protection for the head but not for
the thorax and arms.
Head air bags \000F are deployed
Ron the impacted side of the vehicle during
a side impact
Rin instances with a high rate of lateral
vehicle deceleration or acceleration
Rif the system determines that air bag
deployment can offer additional protection
to that provided by the seat belt
Rregardless of whether the seat belts are in
use
Rindependently of the front air bags
Rindependently of the ETDs
Passenger head air bag \000F will only deploy if
the OCS senses that the passenger seat is
occupied and the impact exceeds a preset
deployment threshold or a rollover is
detected.
Head air bags \000F are not deployed in side
impacts which do not exceed the system’s
deployment threshold.
Occupant Classification System
The Occupant Classification System (OCS)
activates or deactivates the passenger front
air bag and passenger-side knee bag
automatically. The respective status is based
on the classified occupant weight category
determined by weight sensor readings from
the passenger seat.
The system does not deactivate
Rthe passenger head air bag
Rthe passenger side impact air bag
Rthe Emergency Tensioning Devices (ETDs)
To be classified correctly, the passenger must
sit
Rwith the seat belt properly fastened
Rin a position that is as upright as possible
with the back against the seat backrest
Rwith the feet on the floor
If the occupant’s weight is transferred to
another object in the vehicle (e.g. by leaning
on armrests), the OCS may not be able to
properly approximate the occupant’s weight
category.
If your seat, including the trim cover and
cushion, needs to be serviced in any way, take
the vehicle to an authorized Mercedes-Benz
Center.
Only seat accessories approved by
Mercedes-Benz may be used.
Occupant safety49Safety and securityBA 197 USA, CA Edition A 2011; 1; 27, en-UShereepeVersion: 3.0.3.52010-03-24T15:31:10+01:00 - Seite 49Z
Page 52 of 436
Both the driver and the passenger should
always use the 007F 0080 indicator lamp as
an indication of whether or not the passenger
is properly positioned.GWarning!
If the 007F 0080 indicator lamp illuminates
when an adult or someone larger than a small
individual is in the passenger seat, have the
passenger reposition himself or herself in the
seat until the 007F 0080 indicator lamp goes
out.
In the event of a collision, the air bag control
unit will not allow passenger front air bag
deployment when the OCS has classified the
passenger seat occupant as weighting as
much as or less than a typical 12-month-old
child in a standard child restraint or if the
passenger seat is classified as being empty.
When the OCS senses that the passenger seat
occupant is classified as being up to or less
than the weight of a typical 12-month-old
child in a standard child restraint, the 007F
0080 indicator lamp will illuminate when the
engine is started and remain illuminated,
indicating that the passenger front air bag is
deactivated.
When the OCS senses that the passenger seat
is classified as being empty, the 007F 0080
indicator lamp will illuminate when the engine
is started and remain illuminated, indicating
that the passenger front air bag is
deactivated.
When the OCS senses that the passenger seat
occupant is classified as being heavier than
the weight of a typical 12-month-old child
seated in a standard child restraint or as being
a small individual (such as a young teenager
or a small adult), the 007F 0080 indicator
lamp will illuminate for approximately 6
seconds when the engine is started and then,
depending on occupant weight sensor
readings from the seat, remain illuminated or
go out. With the 007F 0080 indicator lamp
illuminated, the passenger front air bag is
deactivated. With the 007F 0080 indicator
lamp out, the passenger front air bag is
activated.
When the OCS senses that the passenger seat
occupant is classified as an adult or someone
larger than a small individual, the 007F 0080
indicator lamp will illuminate for
approximately 6 seconds when the engine is
started and then goes out, indicating that the
passenger front air bag is activated.
If the 007F 0080 indicator lamp is illuminated,
the passenger front air bag is deactivated and
will not be deployed.
If the 007F 0080 indicator lamp is not
illuminated, the passenger front air bag is
activated and will be deployed
R in the event of certain frontal impacts
R if impact exceeds a preset deployment
threshold
R independently of other air bags in the
vehicle
If the passenger front air bag is deployed, the
rate of inflation will be influenced by
R the rate of relevant vehicle deceleration as
assessed by the air bag control unit
R the passenger’s weight category as
identified by the OCS
For more information on air bag display
messages in the multifunction display, see
( Y page 365).GWarning!
Children 12 years old and under must be
seated and properly secured in an appropriate
infant restraint, toddler restraint, or booster
seat recommended for the size and weight of
the child.
The infant or child restraint must be properly
secured with the vehicle’s seat belt fully in
accordance with the child seat
manufacturer’s instructions.
Occupants, especially children, should always
sit as upright as possible, wear the seat belt
properly and use an appropriately sized infant
restraint, toddler restraint, or booster seat
50Occupant safetySafety and security
BA 197 USA, CA Edition A 2011; 1; 27, en-UShereepeVersion: 3.0.3.52010-03-24T15:31:10+01:00 - Seite 50
Page 55 of 436
the interior of the vehicle or be ejected from
it. You can be seriously injured or killed.
In the same crash, the possibility of injury or
death is lessened if you are properly wearing
your seat belt. The air bags can only protect
as intended if the occupants are properly
wearing their seat belts.GWarning!
Never ride in a moving vehicle with the seat
backrest in an excessively reclined position as
this can be dangerous. You could slide under
the seat belt in a collision. If you slide under
it, the seat belt would apply force at the
abdomen or neck. That could cause serious
or even fatal injuries. The seat backrest and
seat belt provide the best restraint when the
wearer is in a position that is as upright as
possible and the seat belt is properly
positioned on the body.
GWarning!
Never let more people ride in the vehicle than
there are seat belts available. Make sure
everyone riding in the vehicle is correctly
restrained with a separate seat belt. Never
use a seat belt for more than one person at a
time.
GWarning!
Damaged seat belts or seat belts that have
been subjected to stress in an accident must
be replaced. Also, the seat belt anchoring
points must be checked.
Only use seat belts which have been approved
by Mercedes-Benz.
Do not make any modifications to the seat
belts. This can lead to unintended activation
of the ETDs or to their failure to activate when
necessary.
Do not bleach or dye seat belts as this may
severely weaken them. In a crash they may
not be able to provide adequate protection.
Have all work carried out only by qualified
technicians. Contact an authorized
Mercedes-Benz Center.
Proper use of seat beltsGWarning!
USE SEAT BELTS PROPERLY
R Seat belts can only protect when used
properly. Never wear seat belts in any other
way than as described in this section, as
that could result in serious injuries in case
of an accident.
R Each occupant should wear their seat belt
at all times, because seat belts help reduce
the likelihood of and potential severity of
injuries in accidents, including rollovers.
The integrated restraint system includes
SRS (driver front air bag, knee bags,
passenger front air bag, side impact air
bags, head air bags), Emergency
Tensioning Devices (ETDs) and seat belt
force limiters.
The system is designed to enhance the
protection offered to properly belted
occupants in certain frontal (front air bags,
knee bags and ETDs) and side (side impact
air bags, head air bags and ETDs) impacts
which exceed preset deployment
thresholds.
R Never wear the shoulder belt under your
arm, against your neck or off your shoulder.
In a frontal crash, your body would move
too far forward. That would increase the
chance of head and neck injuries. The seat
belt would also apply too much force to the
ribs or abdomen, which could severely
injure internal organs such as your liver or
spleen.
Adjust the seat belt so that the shoulder
section is located as close as possible to
the middle of the shoulder. It should not
touch the neck. Never pass the shoulder
portion of the seat belt under your arm.
R Position the lap belt as low as possible on
your hips and not across the abdomen. If
the lap belt is positioned across your
abdomen, it could cause serious injuries in
a crash.
Occupant safety53Safety and securityBA 197 USA, CA Edition A 2011; 1; 27, en-UShereepeVersion: 3.0.3.52010-03-24T15:31:10+01:00 - Seite 53Z
Page 57 of 436
special seat belt retractors, see “Infant and
child restraint systems” ( Y page 58).
To release the seat belt with seat belt release
button 0088, see ( Y page 55).
Releasing the seat beltsXPress seat belt release button 0088
( Y page 54).
Allow the retractor to completely rewind
the seat belt by guiding latch plate 0047
( Y page 54).
!
Make sure the seat belt retracts
completely. Otherwise the seat belt and/or
latch plate could get caught or pinched in
the door or in the seat mechanism. This can
damage the seat belt and impair its
effectiveness, and/or cause damage to the
door and/or door trim panel. Such damage
is not covered by the Mercedes-Benz
Limited Warranty.
Damaged seat belts must be replaced.
Contact an authorized Mercedes-Benz
Center.
Enhanced seat belt reminder system
When the engine is started, the seat belt
telltale 0082 will always illuminate for
6 seconds to remind you and your passenger
to fasten your seat belts.
If the driver’s seat belt is not fastened when
the engine is started, an additional warning
chime will sound. The warning chime goes out
after approximately 6 seconds or once the
driver’s seat belt is fastened.
If after these 6 seconds the driver’s or the
passenger’s seat belt (with the passenger
seat occupied) is not fastened with both
doors closed,
R the seat belt telltale 0082 remains
illuminated for as long as either the driver’s
or passenger’s seat belt is not fastened.
R and if the vehicle speed once exceeds
15 mph (25 km/h), the seat belt telltale
0082 starts flashing and a warning chime
sounds with increasing intensity for a
maximum of 60 seconds or until the
driver’s and passenger’s seat belt are
fastened.
If you and/or your passenger release the
seat belt during driving, the seat belt
telltale 0082 starts flashing and the
warning chime sounds as described before.
If the driver’s or the passenger’s seat belt
remains unfastened after 60 seconds, the
warning chime stops sounding, the seat
belt telltale 0082 stops flashing but
continues to be illuminated.
After a vehicle standstill, the warning chime
is reactivated and the seat belt telltale
0082 is flashing again if the vehicle speed
once exceeds 15 mph (25 km/h).
The seat belt telltale 0082 will only go out if
both the driver’s and the passenger’s seat
belt (with the passenger seat occupied) are
fastened, or the vehicle is standing still and a
door is opened.
For more information, see “Practical hints”
( Y page 35).
Emergency Tensioning Device (ETD),
seat belt force limiter
The seat belts are equipped with ETDs and
seat belt force limiters.
The ETDs are designed to activate in the
following cases:
R in frontal or rear-end impacts exceeding
the system’s preset deployment threshold
R in side impacts exceeding the system’s
preset deployment threshold on the far
side of the impact
R in certain vehicle rollovers
R if the restraint systems are operational and
functioning correctly, see “SRS indicator
lamp” ( Y page 44)
The ETDs will only activate if the seat belts are
fastened (latch plate properly inserted into
buckle).
In an impact, the ETDs remove slack from the
seat belts in such a way that the seat belts fit
Occupant safety55Safety and securityBA 197 USA, CA Edition A 2011; 1; 27, en-UShereepeVersion: 3.0.3.52010-03-24T15:31:10+01:00 - Seite 55Z
Page 85 of 436
appears, for example, with relatively large
special destinations.
RNew Route...: the system is calculating a
new route, for example because you have
deviated from the previous route. Route
guidance is subsequently resumed.
RCalculating Route: a route is being
calculated, after which route guidance will
start.
ROff Map: the vehicle is outside the range
of the digital map. The vehicle is in an off-
map position.
ROff Mapped Road: the vehicle is on a road
which is not in the digital map, or is away
from the road, for example in a car park.
RNo Route: no route to the selected
destination could be calculated.
Audio Menu
Use the functions in the Audio menu to
operate the audio equipment. If no audio
equipment is switched on, the multifunction
display shows the message Audio Off.
XTo adjust the volume: Press the \000Z or
\000[ button.
Selecting a Radio Station/Channel
XSwitch on COMAND and select FM/AM
Radio (Y page 169) or SatRadio
(Y page 174).
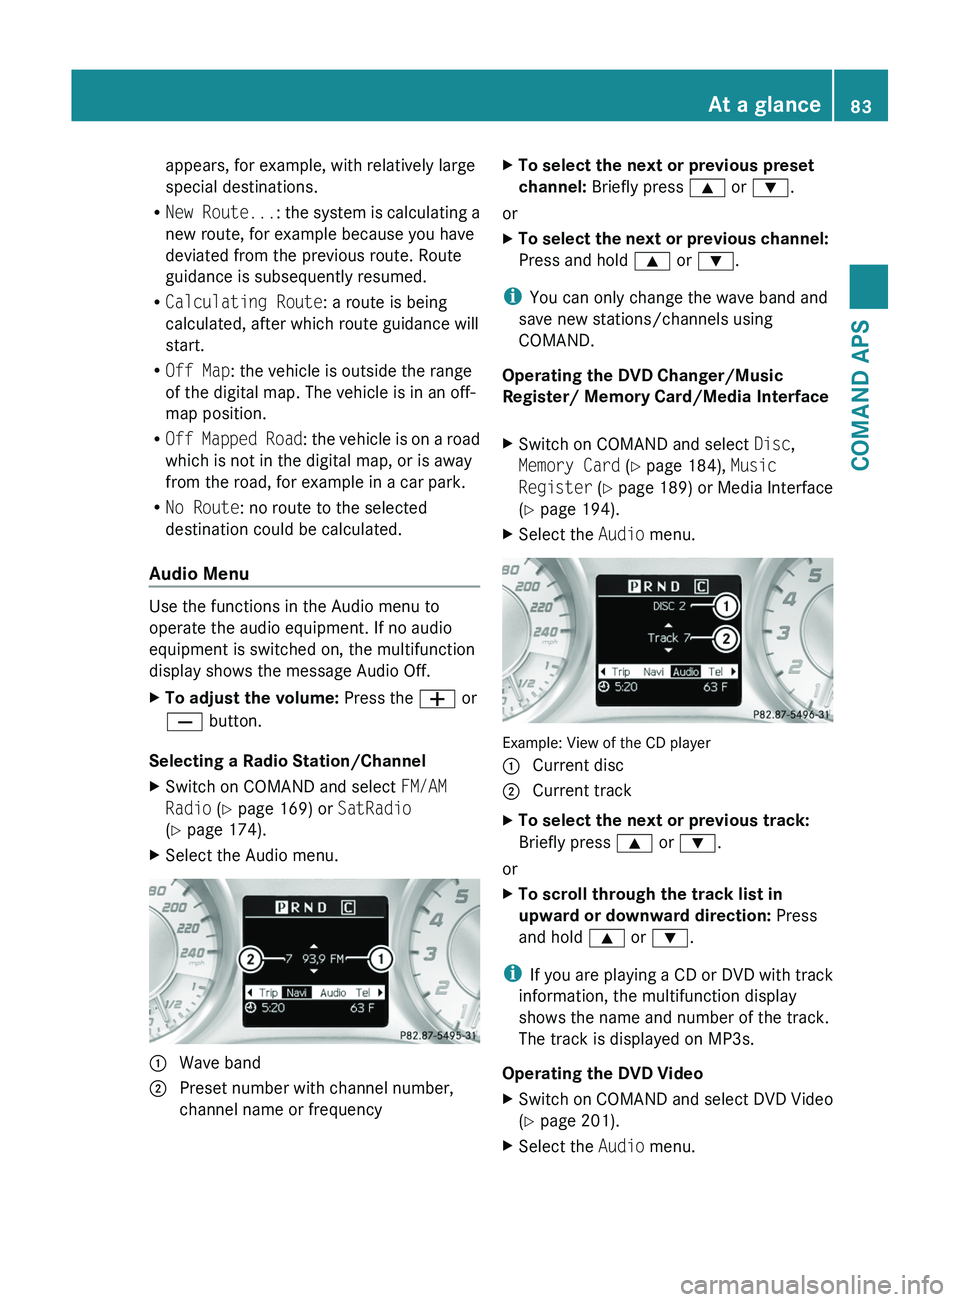
XSelect the Audio menu.1 Wave band2 Preset number with channel number,
channel name or frequency
XTo select the next or previous preset
channel: Briefly press \000< or \000=.
or
XTo select the next or previous channel:
Press and hold \000< or \000=.
iYou can only change the wave band and
save new stations/channels using
COMAND.
Operating the DVD Changer/Music
Register/ Memory Card/Media Interface
XSwitch on COMAND and select Disc,
Memory Card (Y page 184), Music
Register (Y page 189) or Media Interface
(Y page 194).
XSelect the Audio menu.
Example: View of the CD player
1 Current disc2 Current trackXTo select the next or previous track:
Briefly press \000< or \000=.
or
XTo scroll through the track list in
upward or downward direction: Press
and hold \000< or \000=.
iIf you are playing a CD or DVD with track
information, the multifunction display
shows the name and number of the track.
The track is displayed on MP3s.
Operating the DVD Video
XSwitch on COMAND and select DVD Video
(Y page 201).
XSelect the Audio menu.At a glance83COMAND APSBA 197 USA, CA Edition A 2011; 1; 27, en-UShereepeVersion: 3.0.3.52010-03-24T15:31:10+01:00 - Seite 83Z
Page 90 of 436
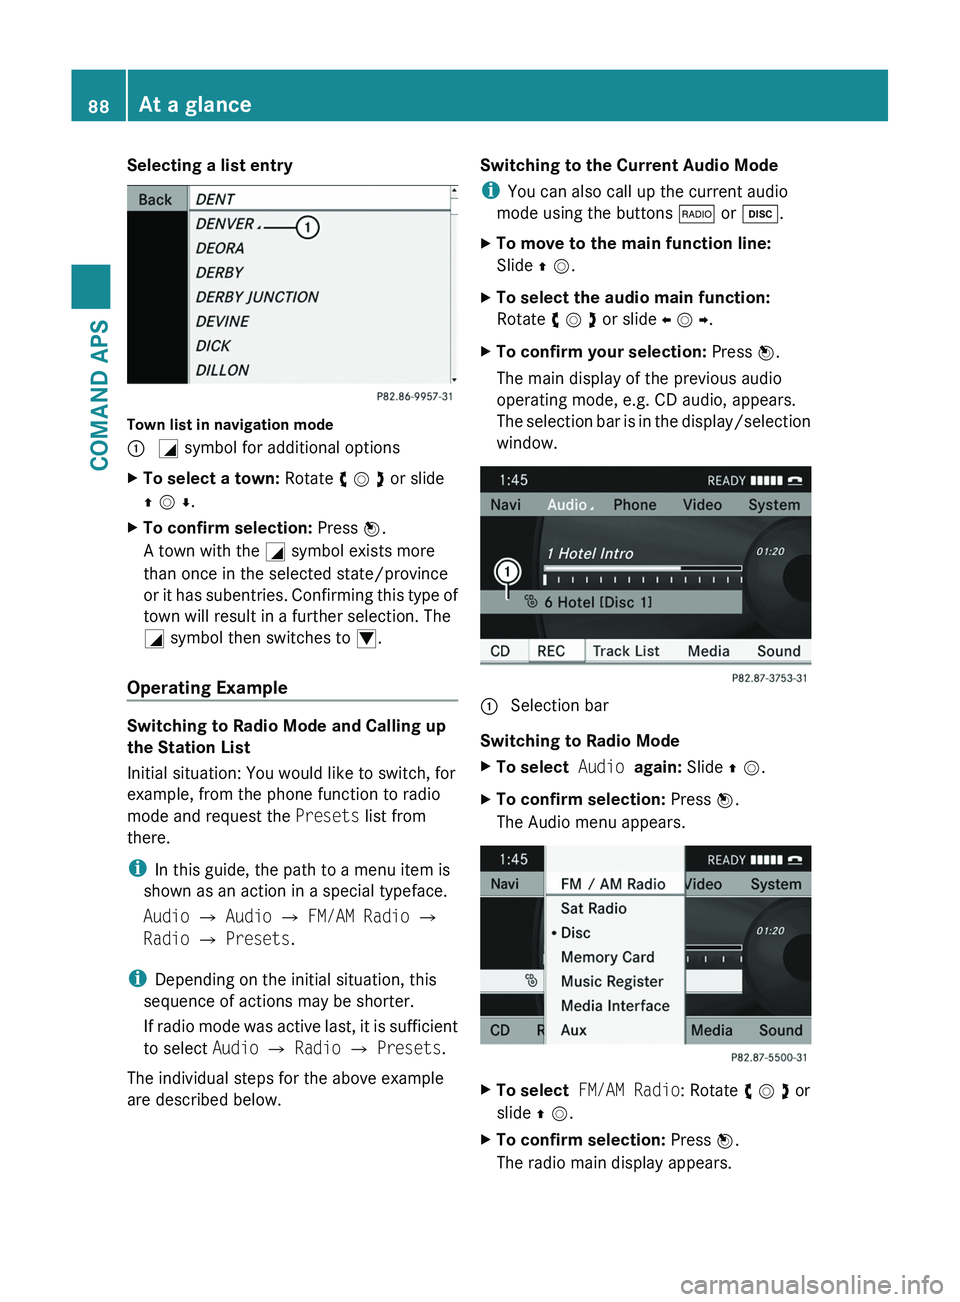
Selecting a list entry
Town list in navigation mode
\000F \000L symbol for additional optionsXTo select a town: Rotate y m z or slide
q m r.
XTo confirm selection: Press n.
A town with the \000L symbol exists more
than once in the selected state/province
or it has subentries. Confirming this type of
town will result in a further selection. The
\000L symbol then switches to \000N.
Operating Example
Switching to Radio Mode and Calling up
the Station List
Initial situation: You would like to switch, for
example, from the phone function to radio
mode and request the Presets list from
there.
iIn this guide, the path to a menu item is
shown as an action in a special typeface.
Audio £ Audio £ FM/AM Radio £
Radio £ Presets.
iDepending on the initial situation, this
sequence of actions may be shorter.
If radio mode was active last, it is sufficient
to select Audio £ Radio £ Presets.
The individual steps for the above example
are described below.
Switching to the Current Audio Mode
iYou can also call up the current audio
mode using the buttons \000* or \000:.
XTo move to the main function line:
Slide q m.
XTo select the audio main function:
Rotate y m z or slide o m p.
XTo confirm your selection: Press n.
The main display of the previous audio
operating mode, e.g. CD audio, appears.
The selection bar is in the display/selection
window.
1 Selection bar
Switching to Radio Mode
XTo select Audio again: Slide q m.XTo confirm selection: Press n.
The Audio menu appears.
XTo select FM/AM Radio: Rotate y m z or
slide q m.
XTo confirm selection: Press n.
The radio main display appears.
88At a glanceCOMAND APS
BA 197 USA, CA Edition A 2011; 1; 27, en-UShereepeVersion: 3.0.3.52010-03-24T15:31:10+01:00 - Seite 88
Page 95 of 436
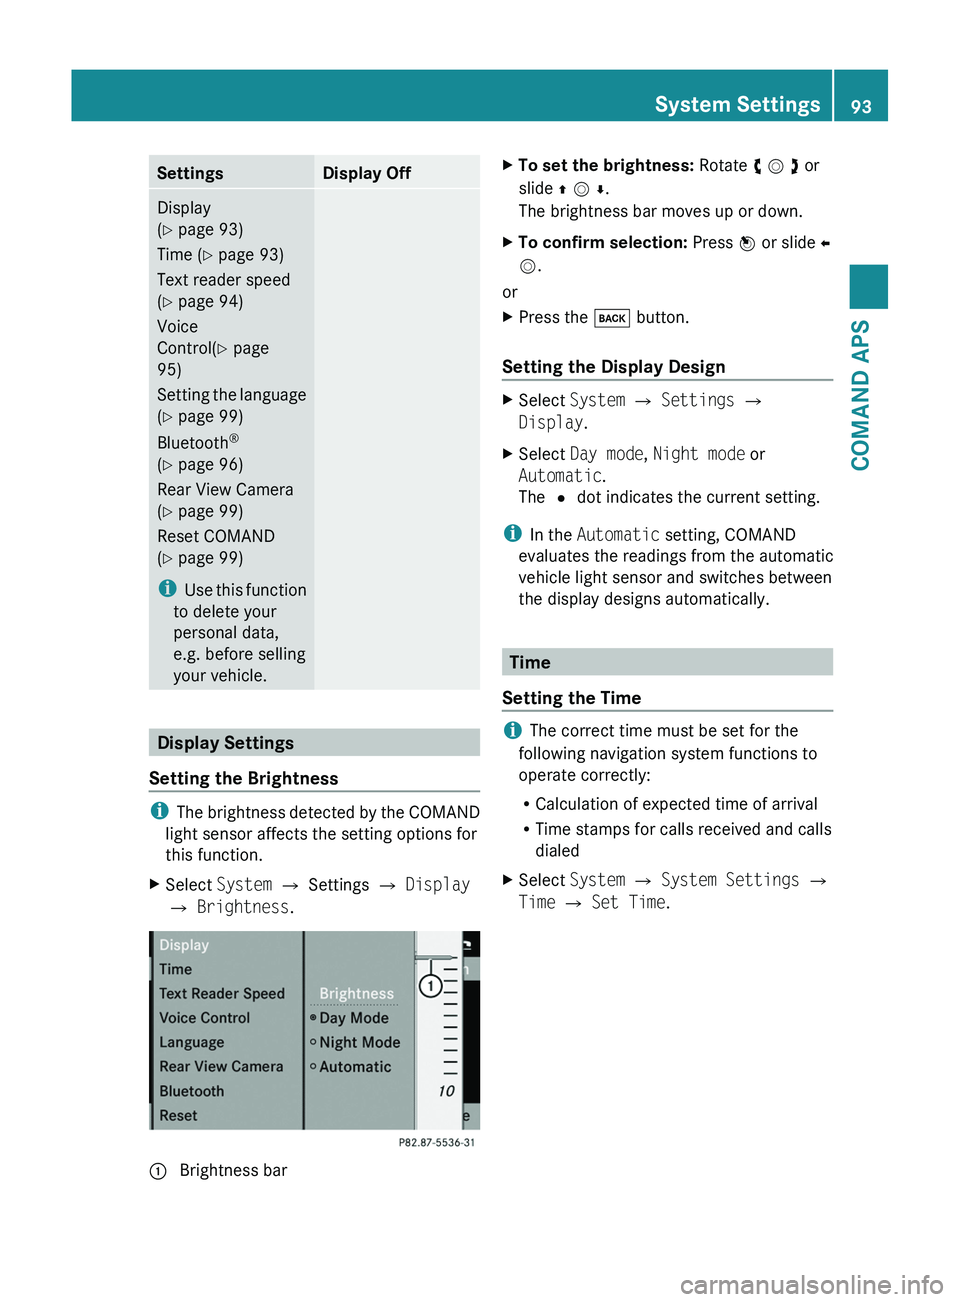
SettingsDisplay OffDisplay
(Y page 93)
Time (Y page 93)
Text reader speed
(Y page 94)
Voice
Control(Y page
95)
Setting the language
(Y page 99)
Bluetooth®
(Y page 96)
Rear View Camera
(Y page 99)
Reset COMAND
(Y page 99)
iUse this function
to delete your
personal data,
e.g. before selling
your vehicle.
Display Settings
Setting the Brightness
iThe brightness detected by the COMAND
light sensor affects the setting options for
this function.
XSelect System £ Settings £ Display
£ Brightness.
1 Brightness barXTo set the brightness: Rotate y m z or
slide q m r.
The brightness bar moves up or down.
XTo confirm selection: Press n or slide o
m.
or
XPress the \000= button.
Setting the Display Design
XSelect System £ Settings £
Display.
XSelect Day mode, Night mode or
Automatic.
The R dot indicates the current setting.
iIn the Automatic setting, COMAND
evaluates the readings from the automatic
vehicle light sensor and switches between
the display designs automatically.
Time
Setting the Time
iThe correct time must be set for the
following navigation system functions to
operate correctly:
RCalculation of expected time of arrival
RTime stamps for calls received and calls
dialed
XSelect System £ System Settings £
Time £ Set Time.
System Settings93COMAND APSBA 197 USA, CA Edition A 2011; 1; 27, en-UShereepeVersion: 3.0.3.52010-03-24T15:31:10+01:00 - Seite 93Z
Page 101 of 436
Rear View Camera
COMAND shows the camera picture on the
display when
Rthe function is switched on in the System
Settings menu and
Rthe vehicle is shifted into reverse gear
As soon as you shift out of reverse gear, the
previous display is shown.
Switching On/Off the Display of the
Rear View Camera
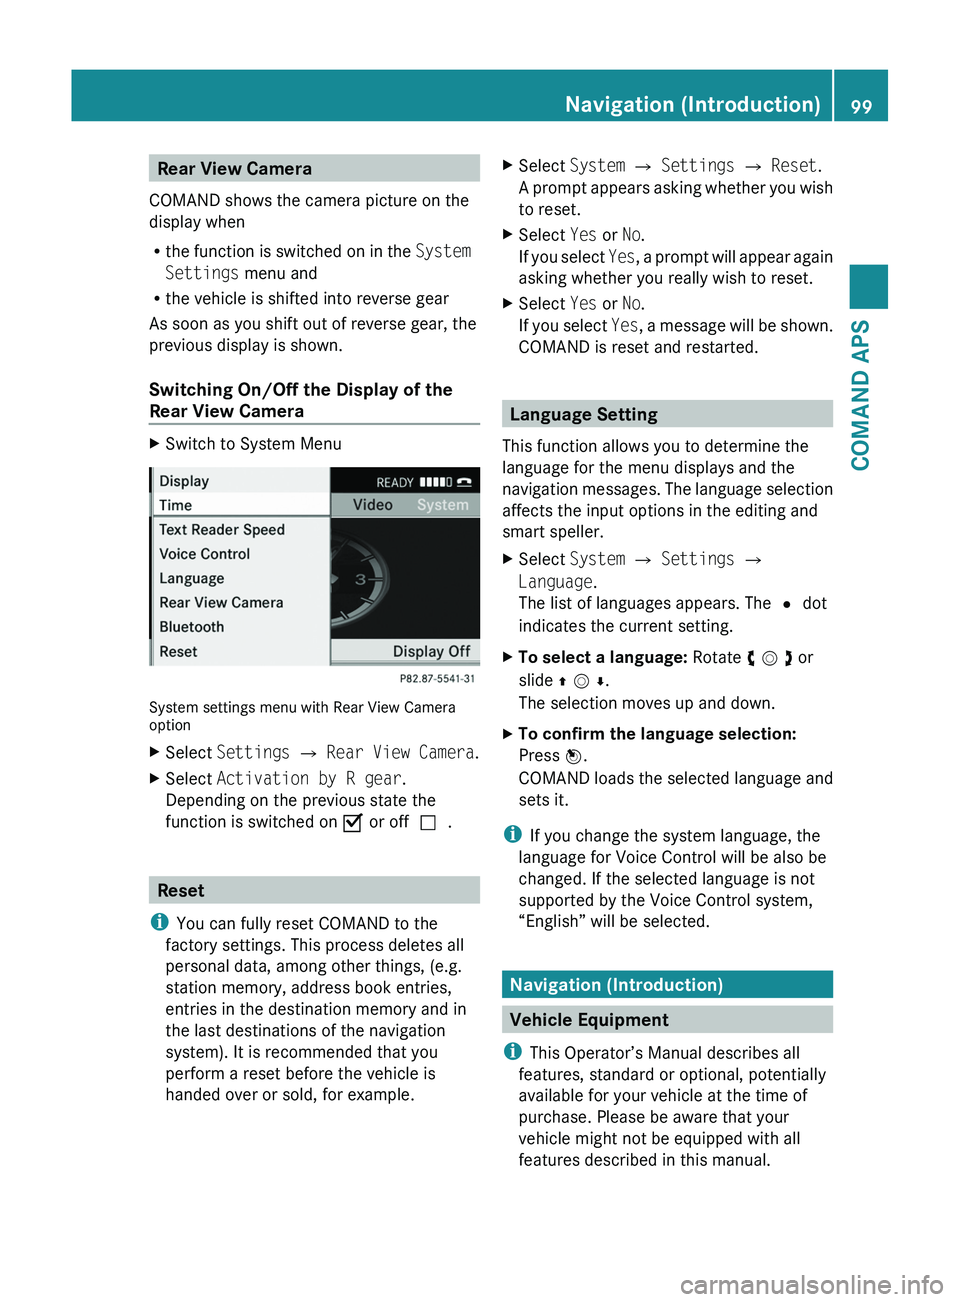
XSwitch to System Menu
System settings menu with Rear View Cameraoption
XSelect Settings £ Rear View Camera.XSelect Activation by R gear.
Depending on the previous state the
function is switched on Ç or offc.
Reset
iYou can fully reset COMAND to the
factory settings. This process deletes all
personal data, among other things, (e.g.
station memory, address book entries,
entries in the destination memory and in
the last destinations of the navigation
system). It is recommended that you
perform a reset before the vehicle is
handed over or sold, for example.
XSelect System £ Settings £ Reset.
A prompt appears asking whether you wish
to reset.
XSelect Yes or No.
If you select Yes, a prompt will appear again
asking whether you really wish to reset.
XSelect Yes or No.
If you select Yes, a message will be shown.
COMAND is reset and restarted.
Language Setting
This function allows you to determine the
language for the menu displays and the
navigation messages. The language selection
affects the input options in the editing and
smart speller.
XSelect System £ Settings £
Language.
The list of languages appears. The R dot
indicates the current setting.
XTo select a language: Rotate y m z or
slide q m r.
The selection moves up and down.
XTo confirm the language selection:
Press n.
COMAND loads the selected language and
sets it.
iIf you change the system language, the
language for Voice Control will be also be
changed. If the selected language is not
supported by the Voice Control system,
“English” will be selected.
Navigation (Introduction)
Vehicle Equipment
iThis Operator’s Manual describes all
features, standard or optional, potentially
available for your vehicle at the time of
purchase. Please be aware that your
vehicle might not be equipped with all
features described in this manual.
Navigation (Introduction)99COMAND APSBA 197 USA, CA Edition A 2011; 1; 27, en-UShereepeVersion: 3.0.3.52010-03-24T15:31:10+01:00 - Seite 99Z