radio MERCEDES-BENZ SLS AMG GT COUPE 2015 C197 Owner's Manual
[x] Cancel search | Manufacturer: MERCEDES-BENZ, Model Year: 2015, Model line: SLS AMG GT COUPE, Model: MERCEDES-BENZ SLS AMG GT COUPE 2015 C197Pages: 290, PDF Size: 6.24 MB
Page 2 of 290
Publication details
Internet
Further information about Mercedes-Benz
vehicles and about Daimler AG can be found
on the following websites:
http://www.mbusa.com (USA only)
http://www.mercedes-benz.ca (Canada
only) Editorial office
© Daimler AG: Not to be reprinted, translated
or otherwise reproduced, in whole or in part,
without written permission from Daimler AG. Vehicle manufacturer
Daimler AG
Mercedesstraße 137
70327S tuttgart
Germany
Symbols
Registered trademarks:
R Bluetooth ®
is ar egistered trademark of
Bluetooth SIG Inc.
R DTS is aregistered trademark of DTS, Inc.
R Dolby and MLP are registered trademarks
of DOLBYL aboratories.
R BabySmart™, ESP ®
and PRE-SAFE ®
are
registered trademarks of Daimler AG.
R HomeLink ®
is ar egistered trademark of
Johnson Controls.
R iPod ®
and iTunes ®
are registered trade-
marks of Apple Inc.
R Logic7 ®
is ar egistered trademark of Har-
man International Industries.
R Microsoft ®
and Windows media ®
are reg-
istered trademarks of Microsoft Corpora-
tion.
R SIRIUS is aregistered trademark of Sirius
XM RadioI nc.
R HD Radioisar egistered trademark of iBiq-
uity Digital Corporation.
R Gracenote ®
is ar egistered trademark of
Gracenote, Inc.
R ZAGATSurvey ®
and related brands are reg-
istered trademarks of ZagatSurvey, LLC.
In this Operator's Manual you will find the fol-
lowing symbols: G
WARNING
Warning notes make you aware of dangers
which could pose athreat to your health or
life, or to the health and life of others. H
Environmental note
Environmental notes provide you with infor-
mation on environmentally aware actions or
disposal.
! Notes on material damage alert you to
dangers that could lead to damage to your
vehicle.
i Practical tips or further information that
could be helpful to you. X
This symbol indicates an instruction
that must be followed.
X Several of these symbols in succes-
sion indicate an instruction with sev-
eral steps.
(Y
page) This symbol tells you where you can
find more information about
atopic.
YY This symbol indicates
awarning or an
instruction that is continued on the
next page.
Dis‐
Dis‐
play play This font indicates
adisplay in the
multifunction display/COMAND dis-
play.
Parts of the software in the vehicle are pro-
tected by copyright ©
2005
The FreeType Project
http://www.freetype.org .All rights
reserved.
As at 11.07.2013
Page 14 of 290
Radio
Selecting astation ......................... 154
see separate operating instructions
Radio-wav ereception/transmis-
sion in the vehicle Declaration of conformity ................ 22
Reading lamp ....................................... 99
Rear spoiler Displa ymessag e............................ 189
Extending/retracting ..................... 210
Problem ......................................... 211
Rear vie wcamera
Cleaning instructions ..................... 228
Function/note s............................. 144
Rear-vie wmirror
Anti-glare (manual) .......................... 90
Dipping (automatic) ......................... 91
Rear windo wdefroster
Problem (malfunction) ................... 113
Switching on/of f........................... 112
Refrigerant (air-conditioning sys-
tem) Important safety notes .................. 284
Refueling
Fuelgauge ....................................... 27
Important safety notes .................. 128
Refueling process .......................... 129
see Fuel
Remote control
Garag edooro pener ....................... 211
Programming (garage door
opener) .......................................... 212
Replacing bulbs
Important safety notes .................. 100
Reporting safety defects .................... 23
Reserve (fuel tank) see Fuel
Reserve fuel
Displa ymessage ............................ 179
Warning lamp ................................. 196
see Fuel
Reversin glamps (display message) .. 175
Roadside Assistance (breakdown) .... 20
Roof see Soft top
Route
see Route guidance (navigation) Route guidanc
e(navigation) ............ 153 S
Safety Childre ninthe vehicl e..................... 51
Chil drestraint systems .................... 51
Occupant Classification System
(OCS) ............................................... 42
Safety system
see Driving safety systems
Seat belts
Beltforce limiters ............................ 50
Cleaning ......................................... 230
Correct usag e.................................. 48
Emergency Tensioning Devices ........ 50
Fastening ......................................... 49
Important safety guideline s............. 47
Releasing ......................................... 49
Safety guideline s............................. 37
Specia lsea tb eltr etractor ............... 53
Warning lamp ................................. 191
Warning lamp (function) ................... 49
Seats
Adjusting (electrically) ..................... 86
Adjusting (manually) ........................ 86
Adjusting lumba rsuppo rt ................ 86
Cleaning the cove r......................... 230
Correct driver' sseatp osition ........... 84
Important safety notes .................... 85
Sea theating problem ...................... 87
Storing settings (memory function) .. 92 Switching AIRSCAR Fon/of f............ 88
Switching sea theating on/of f......... 87
Selecto rlever
Positions ........................................ 121
Sensors (cleaning instructions) ....... 228
Servic einterva ldisplay
Displaying service messages ......... 222
Hiding service messages ............... 222
Note s............................................. 222
Service messages .......................... 222
Servic emenu(on -board computer) .. 157
Servic eproducts
Brake fluid ..................................... 285
Coolant (engine) ............................ 285
Engine oi l....................................... 283
Fue l................................................ 282 12
Index
Page 24 of 290
If you make any changes to the vehicle elec-
tronics, the general operating permit is ren-
dered invalid.
! There is
arisk of damage to the vehicle if:
R the vehicle becomes stuck, e.g. on ahigh
curb or an unpave droad
R you drive too fast over an obstacle ,e.g. a
curb or ahole in the road
R ah eavy object strikes the undercarriage
or parts of the chassis
In situations like this, the body,t he under-
carriage, chassis parts, wheels or tires
could be damaged withou tthe damage
being visible. Components damaged in this way can unexpectedly fail or, in the case of
an accident, no longer withstand the strain
they are designed to.
If the underbody paneling is damaged,
combustible materials such as leaves,
grass or twigs can gather betwee nthe
underbody and the underbody paneling. If
these materials come in contact with hot
parts of the exhaust system, they can catch fire.
In such situations, have the vehicle
checked and repaired immediately at a
qualified specialist workshop. If on con-
tinuing yourj ourney you notice that driving
safety is impaired, pullo ver and stop the
vehicle immediately,p aying attention to
road and traffic conditions. In such cases,
visit aqualified specialist workshop. Declarations of conformity
Vehicl ecomponents whichr eceive
and/or transmit radio waves USA:
"The wireless devices of this vehicle
comply with Part 15 of the FCC Rules. Oper-
ation is subject to the following two condi-
tions: 1) These devices may not cause harm-
ful interference, and 2) These devices must
accept any interference received ,including
interference that may cause undesired oper-
ation. Changes or modifications not expressly approved by the party responsible for com-
pliance could void the user’sa
uthority to
operate the equipment."
Canada: "The wireless devices of this vehicle
comply with Industry Canada license-exempt
RSS standard(s). Operation is subject to the
following two conditions: (1) These devices
may not cause interference, and (2) These
devices must accept any interference, includ- ing interference that may cause undesired
operation of the device." Diagnostic
sconnection
The diagnostics connection is only intended
for the connection of diagnostic equipment at aq ualified specialist workshop. G
WARNING
If you connect equipment to the diagnostics
connection in the vehicle ,itmay affect the
operation of the vehicle systems. As aresult,
the operating safety of the vehicle could be
affected. There is arisk of an accident.
Do not connect any equipment to adiagnos-
tics connection in the vehicle. G
WARNING
Objects in the driver's footwell can restrict the pedalt ravel or obstruct adepressed pedal.
The operating and road safety of the vehicle is
jeopardized. There is arisk of an accident.
Make sure that all objects in the vehicle are
stowed correctly, and that they cannot enter
the driver's footwell .Install the floormats
securel yand as specified in order to ensure
sufficient clearance for the pedals. Do not use loose floormats and do not place floormats on
top of one another.
! If the engine is switched off and equip-
ment on the diagnostics connection is
used,t he starter battery may discharge.
Connecting equipment to the diagnostics
connection can leadtoe missions monitoring
information being reset, for example. This
may leadtot he vehicle failing to meet the22
Introduction
Page 68 of 290
Problems with the SmartKey
Problem
Possible causes/consequences and
0050
0050Solutions You cannot lock or
unlock the vehicle
using the SmartKey. The SmartKey battery is discharged or nearly discharged.
X Point the tip of the SmartKey at the driver's door handle from
close range. Try to unlock or lock the vehicle again.
If this does not work:
X Unlock the vehicle using the mechanical key (Y page 64).
X Check the SmartKey battery and replace it if necessary
(Y page 65). The SmartKey is faulty.
X Lock or unlock the vehicle using the mechanical key
(Y page 64).
X Have the SmartKey checked at aqualified specialist workshop. You have lost
aSmart-
Key. X
Have the SmartKey canceled at an authorized Mercedes-Benz
Center.
X Report the loss immediately to the vehicle insurers.
X If necessary, have the locks changed as well. You have lost the
mechanical key. X
Report the loss immediately to the vehicle insurers.
X If necessary, have the locks changed as well. The engine cannot be
started using KEYLESS-
GO. The SmartKey is in
the vehicle. Ad
oor is open. Therefore, the SmartKey cannot be detected as
easily.
X Close the door and try to start the vehicle again. There is interference from
apowerful source of radio waves.
X Start your vehicle with the SmartKey in the ignition lock. 66
SmartKeyOpening and closing
Page 146 of 290
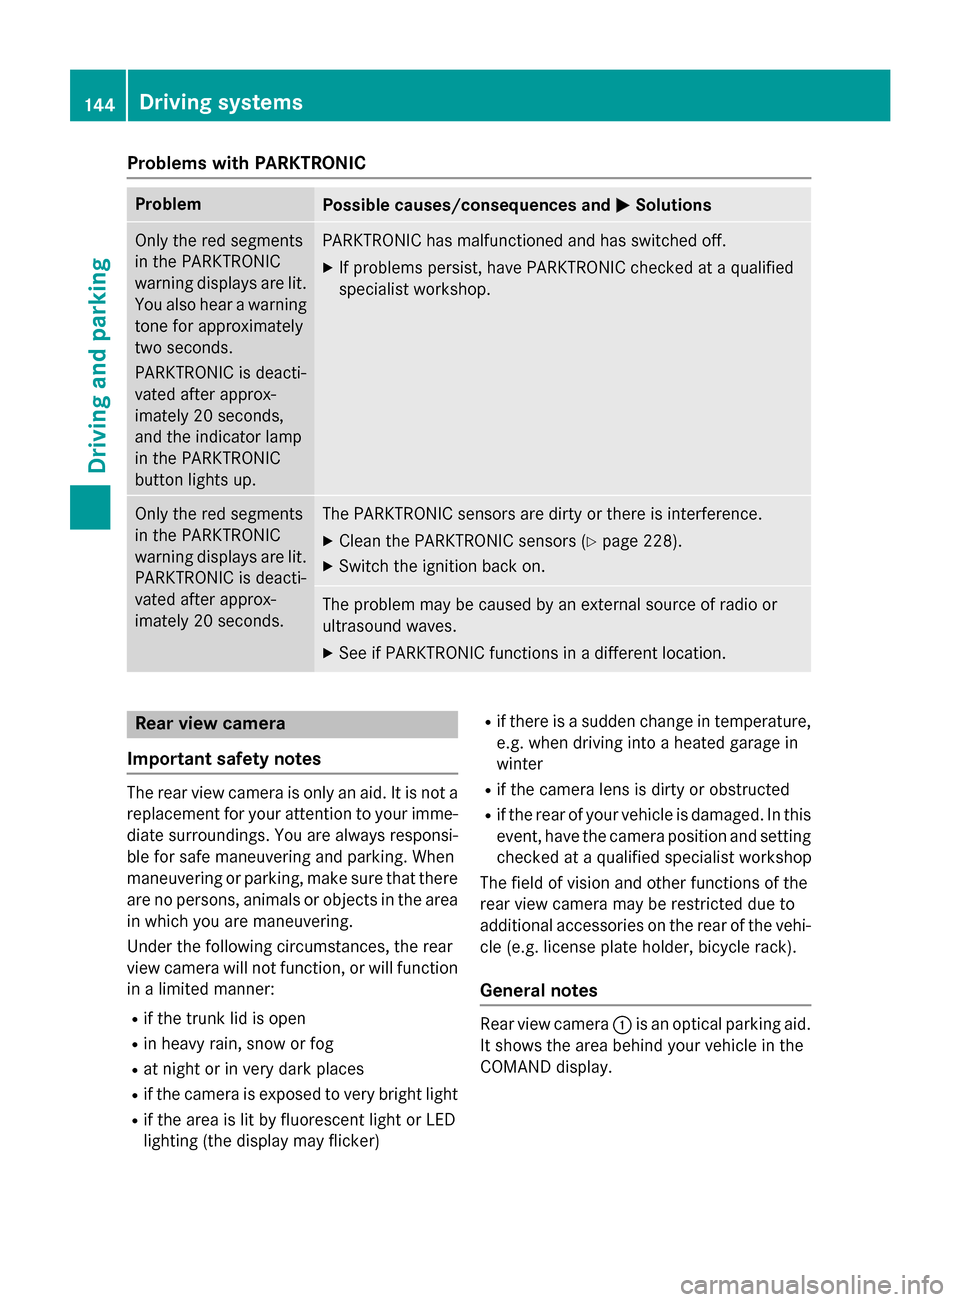
Problems with PARKTRONIC
Problem
Possible causes/consequences and
0050
0050Solutions Only the red segments
in the PARKTRONIC
warning displaysa
re lit.
You also hear awarning
tone for approximately
two seconds.
PARKTRONIC is deacti-
vated after approx-
imately 20 seconds,
and the indicator lamp
in the PARKTRONIC
button lights up. PARKTRONIC has malfunctioned and has switched off.
X If problems persist, have PARKTRONIC checked at aqualified
specialist workshop. Only the red segments
in the PARKTRONIC
warning displaysa
re lit.
PARKTRONIC is deacti-
vated after approx-
imately 20 seconds. The PARKTRONIC sensors are dirty or there is interference.
X Cleant he PARKTRONIC sensors (Y page 228).
X Switch the ignition back on. The problem may be caused by an external source of radio or
ultrasound waves.
X See if PARKTRONIC functions in adifferent location. Rear view camera
Important safety notes The rear view camera is only an aid. It is not a
replacement for your attention to your imme-
diate surroundings. You are always responsi-
ble for safe maneuvering and parking. When
maneuvering or parking, make sure that there are no persons, animals or objectsint he area
in which you are maneuvering.
Under the following circumstances, the rear
view camera will not function, or will function
in alimited manner:
R if the trunk lid is open
R in heavy rain, snow or fog
R at night or in very dark places
R if the camera is exposed to very bright light
R if the area is lit by fluorescent light or LED
lighting (the display may flicker) R
if there is asudden change in temperature,
e.g. when driving into aheated garage in
winter
R if the camera lens is dirty or obstructed
R if the rear of your vehicle is damaged. In this
event, have the camera position and setting checked at aqualified specialist workshop
The field of vision and other functions of the
rear view camera may be restricted due to
additional accessories on the rear of the vehi-
cle (e.g. license plate holder, bicycle rack).
General notes Rear view camera
0043is an optical parking aid.
It shows the area behind your vehicle in the
COMAND display. 144
Driving systemsDriving and parking
Page 156 of 290
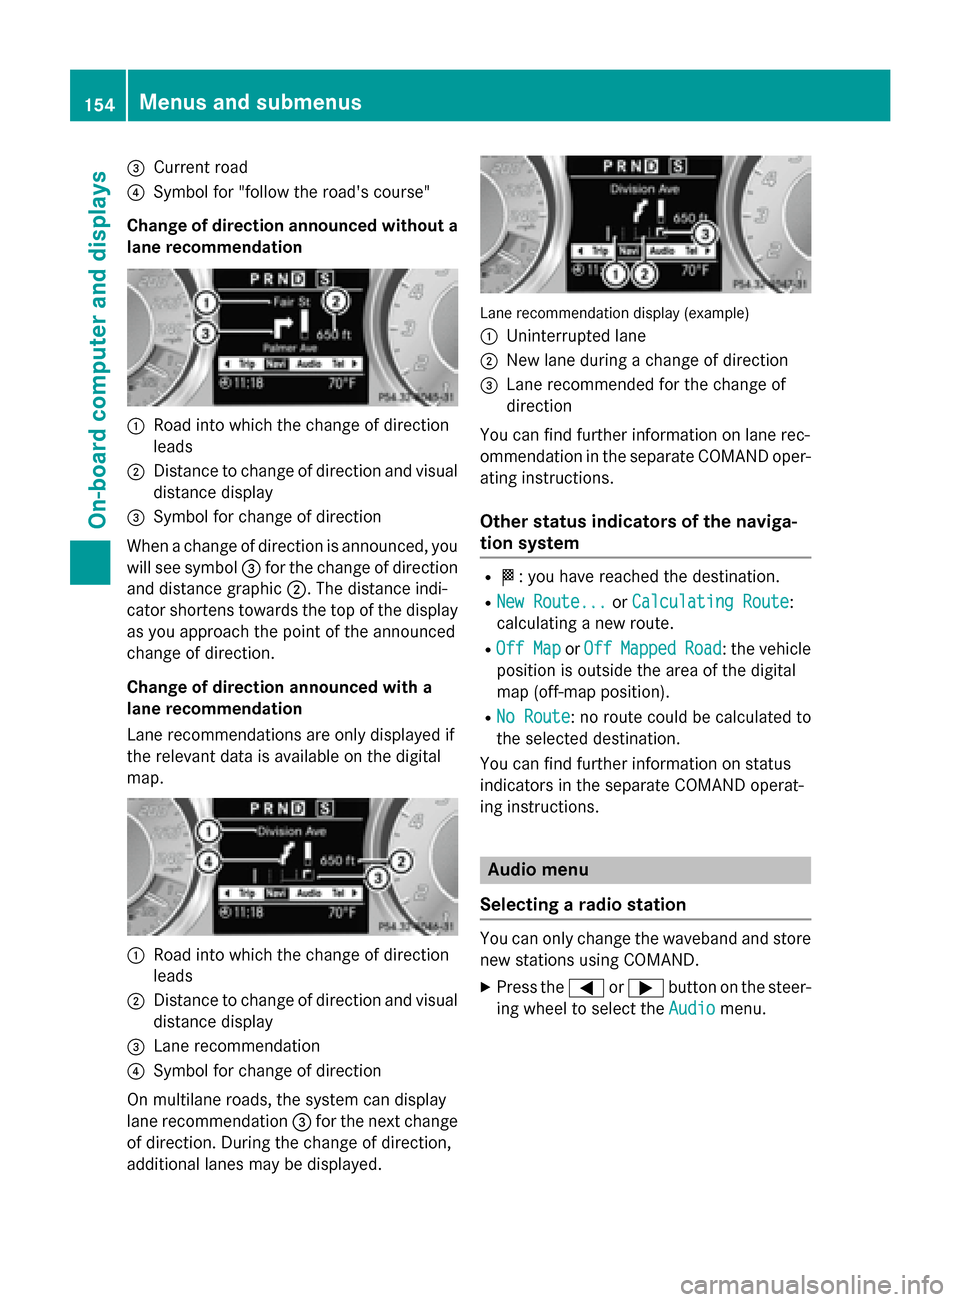
0087
Curren troad
0085 Symbol for "follow th eroad's course"
Change of direction announce dwithout a
lan erecommendation 0043
Road int owhichthe chang eofdirection
leads
0044 Distance to chang eofdirection and visual
distanc edisplay
0087 Symbol for chang eofdirection
When achang eofd irection is announced ,you
will see symbol 0087for th echang eofd irection
and distanc egraphic 0044.The distanc eindi-
cator shorten stow ards th etop of th edisplay
as you approac hthe poin toft heannounced
chang eofdirection.
Change of direction announce dwith a
lan erecommendation
Lan erecommendation sare only displayed if
th er elevan tdataisa vailable on th edigital
map. 0043
Road int owhichthe chang eofdirection
leads
0044 Distance to chang eofdirection and visual
distanc edisplay
0087 Lan erecommendation
0085 Symbol for chang eofdirection
On multilan eroads, th esystem can display
lane recommendation 0087for th enextc hange
of direction .During th echang eofd irection,
additional lane smay be displayed. Lan
erecommendation display (example)
0043 Uninterrupted lane
0044 New lane durin gachang eofd irection
0087 Lan erecommended for th echang eof
direction
You can fin dfurther information on lane rec-
ommendation in th eseparate COMAND oper-
ating instructions.
Other status indicators of th enaviga-
tio ns ystem R
004B:y ou have reached th edestination.
R New Route...
New Route... orCalculating Route
Calculating Route:
calculating anew route.
R Off Map
Off Map orOff
Off Mapped
Mapped Road
Road:the vehicle
position is outside th earea of th edigital
map (off-map position).
R No Route
No Route :noroutecould be calculated to
th es elected destination.
You can fin dfurther information on status
indicators in th eseparate COMAND operat-
ing instructions. Audio menu
Selecting aradio station You can only chang
ethe waveband and store
ne ws tation susingC OMAND.
X Press the 0059or0065 buttononthesteer-
ing wheel to select the Audio
Audiomenu. 154
Menu
sand submenusOn-boar dcomputer and displays
Page 157 of 290
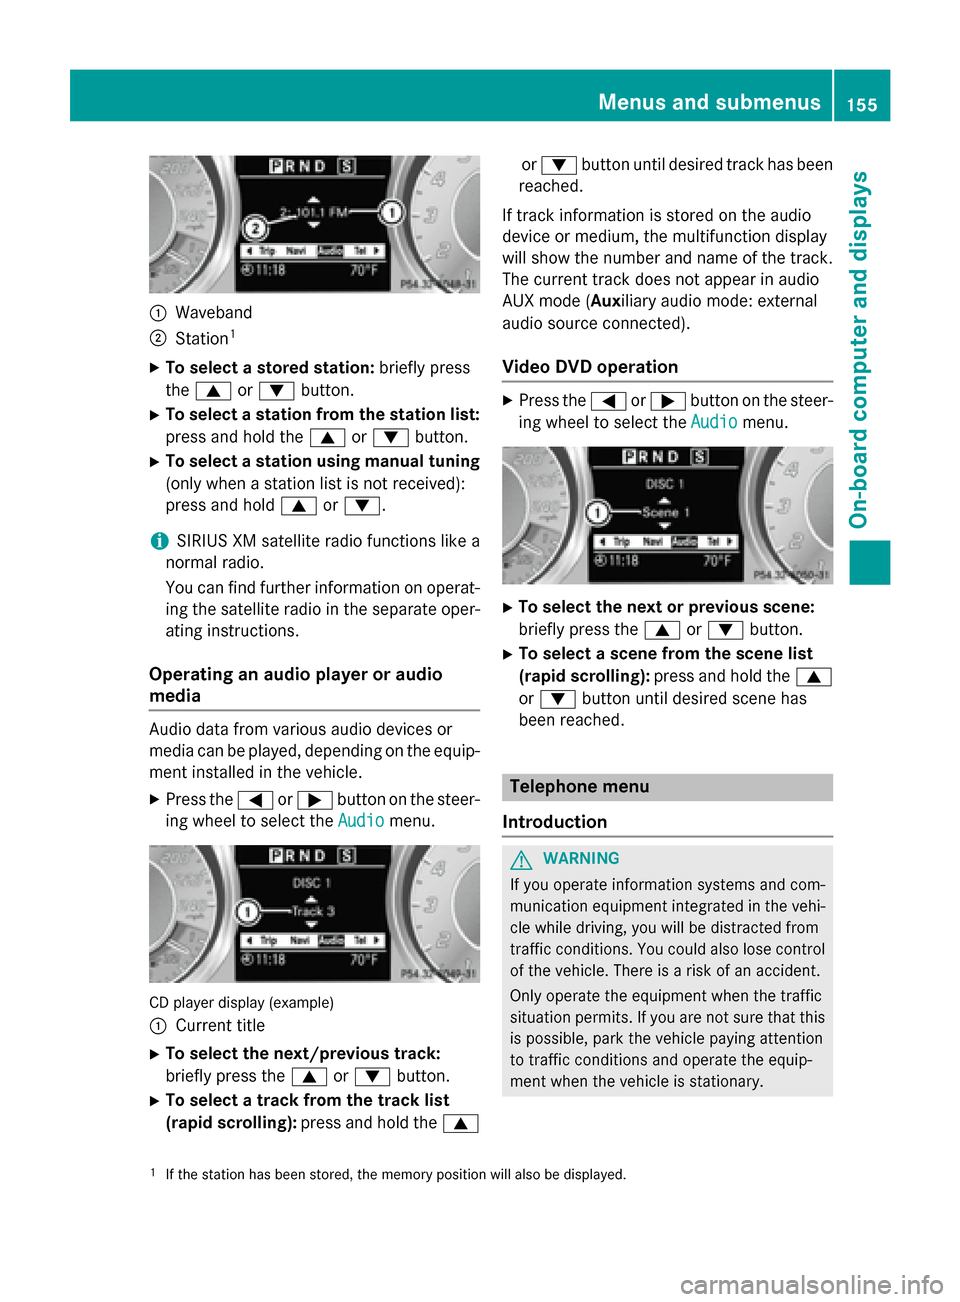
0043
Waveband
0044 Station 1
X To select astored station: briefly press
the 0063 or0064 button.
X To select astation from the station list:
press and hold the 0063or0064 button.
X To select astation using manual tuning
(only when astation list is not received):
press and hold 0063or0064.
i SIRIUS XM satellite radio function
slike a
normal radio.
You can find further information on operat-
ing the satellite radio in the separate oper- ating instructions.
Operating an audio player or audio
media Audio data from various audio devices or
media can be played, depending on the equip-
ment installed in the vehicle.
X Press the 0059or0065 button on the steer-
ing wheel to select the Audio Audiomenu. CD player display (example)
0043
Current title
X To select the next/previous track:
briefly press the 0063or0064 button.
X To select atrack from the track list
(rapid scrolling): press and hold the 0063or
0064 button until desired trac khas been
reached.
If trac kinformation is stored on the audio
device or medium, the multifunction display
will show the number and name of the track. The curren ttrac kdoes not appear in audio
AUX mode (Auxiliary audio mode: external
audio source connected).
Video DVD operation X
Press the 0059or0065 button on the steer-
ing wheel to select the Audio Audiomenu. X
To select the next or previous scene:
briefly press the 0063or0064 button.
X To select ascene from the scene list
(rapid scrolling): press and hold the 0063
or 0064 button until desired scen ehas
been reached. Telephone menu
Introduction G
WARNING
If you operate information systems and com-
munication equipment integrated in the vehi- cle while driving, you will be distracted from
traffic conditions. You could also lose control of the vehicle. There is arisk of an accident.
Only operate the equipment when the traffic
situation permits .Ifyou are not sure that this
is possible, park the vehicle paying attention
to traffic conditions and operate the equip-
ment when the vehicle is stationary.
1 If the station has been stored, the memory position will also be displayed. Menus and submenus
155On-boardcomputer and displays Z
Page 187 of 290
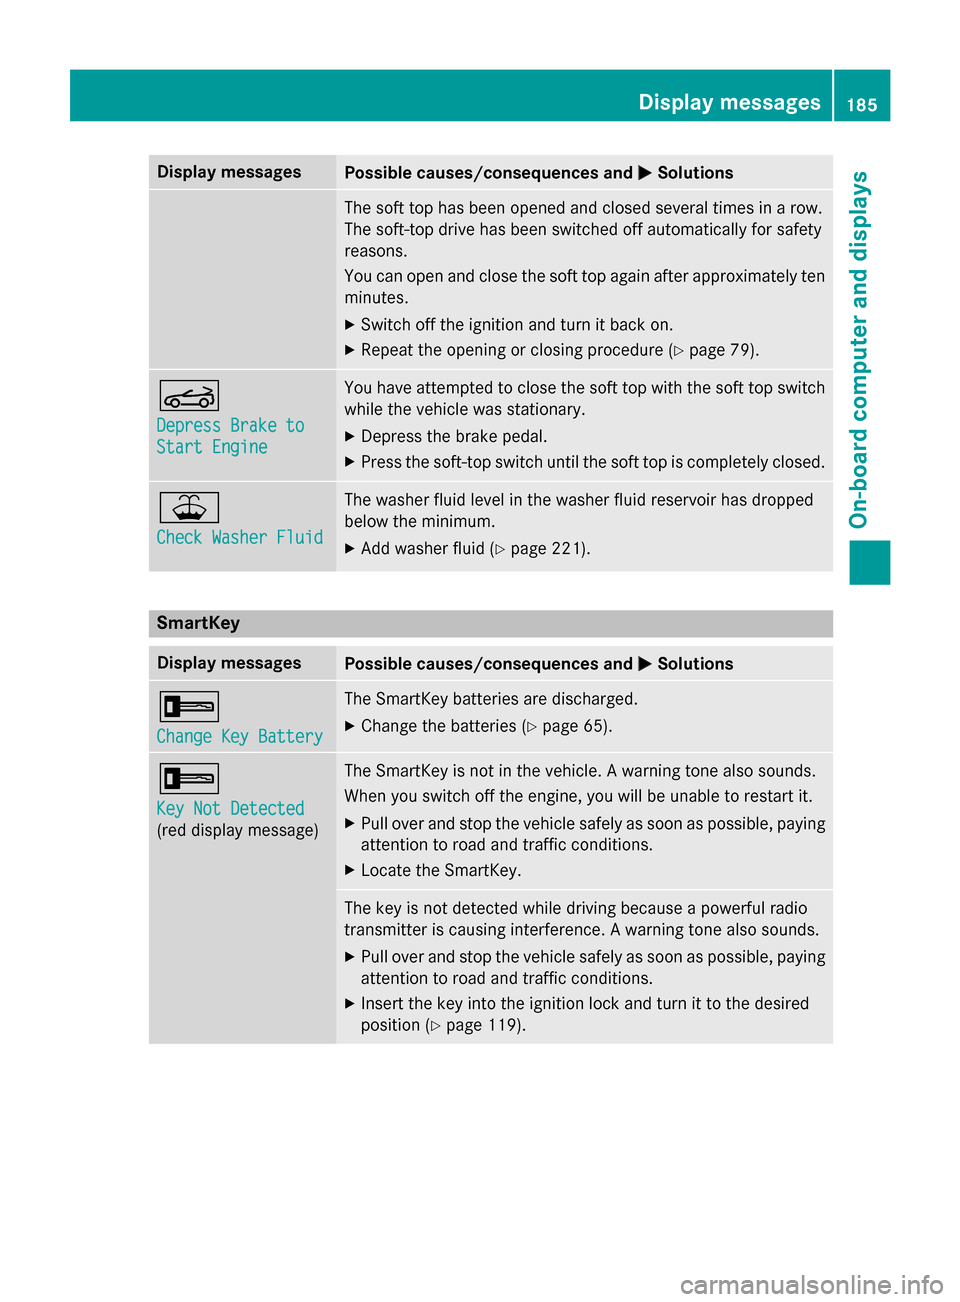
Display messages
Possible causes/consequences and
0050
0050Solutions The sof
ttop has been opened and closed several times in arow.
The soft-to pdrive has been switched of fautomatically fo rsafety
reasons.
You can open and close th esoftt op again after approximately ten
minutes.
X Switc hoffthei gnition and tur nitbacko n.
X Repea tthe openin gorclosingprocedure (Y page 79). 0059
Depres
sBrake to
Depres sBrake to
Start Engine Start Engine You hav
eattempte dtoc lose th esoftt op withthe softtop switch
while th evehicl ewas stationary.
X Depress th ebrak epedal.
X Press th esoft-to pswitch until th esoftt op is completely closed. 00B2
Check Washer Fluid Check Washer Fluid The washer flui
dlevel in th ewasher flui dreservoir has dropped
belo wthe minimum.
X Ad dw asher flui d(Ypage 221). SmartKey
Display messages
Possible causes/consequences and
0050
0050Solutions 0039
Change Key Battery Change Key Battery The SmartKey batterie
sare discharged.
X Change th ebatterie s(Ypage 65). 0039
Key Not Detected Key Not Detected
(re
dd isplay message) The SmartKey is no
tinthevehicle. Awarnin gtonea lso sounds.
Whe nyou switch of fthe engine, you will be unable to restar tit.
X Pull ove rand stop th evehicl esafely as soo naspossible, paying
attention to roa dand traffic conditions.
X Locate th eSmartKey. The ke
yisnotdetecte dwhile drivin gbecause apowerful radio
transmitte riscausin ginterfe rence. Awarnin gtonea lso sounds.
X Pull ove rand stop th evehicl esafely as soo naspossible, paying
attention to roa dand traffic conditions.
X Inser tthe keyintot he ignition loc kand tur nittot hedesired
position (Y page 119). Display
messages
185On-boardcomputer an ddisplays Z
Page 215 of 290
i
Usually, you now have 30 seconds to ini-
tiate the next step.
X Press previouslyp rogramed button0044,0087
or 0085 of the integrated garage door opener
until the door closes.
The rolling code synchronization is then
complete.
Notes on programing the remote control
Canadian radio frequency lawsr equire a
"break" (or interruption) of the transmission
signals after broadcasting for afew seconds.
Therefore, these signals may not last long
enough for the integrated garage door
opener. The signal is not recognized during
programing. Comparable with Canadian law,
some U.S. garage door openers also feature a
"break".
Proceed as follows:
R if you live in Canada
R if you have difficulties programing the
garage door opener (regardless of where
you live) when using the programing steps
X Press and hold one of buttons 0044to0085 on
the integrated garage door opener.
After ashort time, indicator lamp 0043lights
up yellow.
X Release the button.
Indicator lamp 0043flashes yellow.
X Press button 0084of garage door remote
control 0083for two seconds, then release it
for two seconds.
X Press button 0084againf or two seconds.
X Repeatt his sequence on button 0084of
remote control 0083until indicator lamp 0043
lights up green.
If indicator lamp 0043turns red, repeat the
process.
X Continue with the other programing steps
(see above). Problems when programing
If you are experiencing problems programing
the integrated garage door opener on the
rear-view mirror, take note of the following
instructions:
R Check the transmitter frequency of garage
door drive remote control 0083.This can usu-
ally be found on the back of the remote
control.
The integrated garage door opener is com-
patible with devices that have units which
operate in the frequency range of 280 to
433 MHz .
R Replace the batteries in garage door
remote control 0083.This increases the like-
lihood that garage door remote control 0083
will transmit astrong and precise signal to
the integrated garage door opener in the
rear-view mirror.
R When programing, hold remote control 0083
at varying distances and angles from the
button that you are programing. Try various angles at adistance between 2and
12 inches (5to 30 cm) or at the same angle
but at varying distances.
R If another remote control for the same
garage door drive is available,r epeat the
same programing steps with this remote
control. Before performing these steps,
make sure that new batteries have been
installed in garage door drive remote
control 0083.
R Note that some remote controls only trans-
mit for alimited amount of time (the indi-
cator lamp on the remote control goes out). Press button 0084on remote control 0083again
before transmission ends.
R Align the antennac able of the garage door
opener unit. This can improve signal recep- tion/transmission.
Opening/closing the garage door Once programed, the integrated garage door
opener 0083will assume the function of the
garage door system's remote control. Please Features
213Stowage and features Z
Page 245 of 290
R
If the battery is fullyd ischarged, leave the battery that is being used to jump-start connected
for afew minutes before attempting to start. This charges the battery slightly.
R Make sure that the two vehicle sdonot touch.
Make sure that:
R the jumper cablesa re not damaged.
R when the jumper cablesa re connected to the battery, uninsulated sections of the terminal
clamp do not come into contact with other metal sections.
R the jumper cablesc annot come into contact with parts such as the V-belt pulley or the fan.
These parts move when the engine is started and whileitisr unning.
X Press the electric parking brake handle.
X Shift the transmission to Pwith the button in the center console.
X Remove the SmartKey from the ignition lock.
X Switch off all electrical consumers (e.g. radio, blower, etc.).
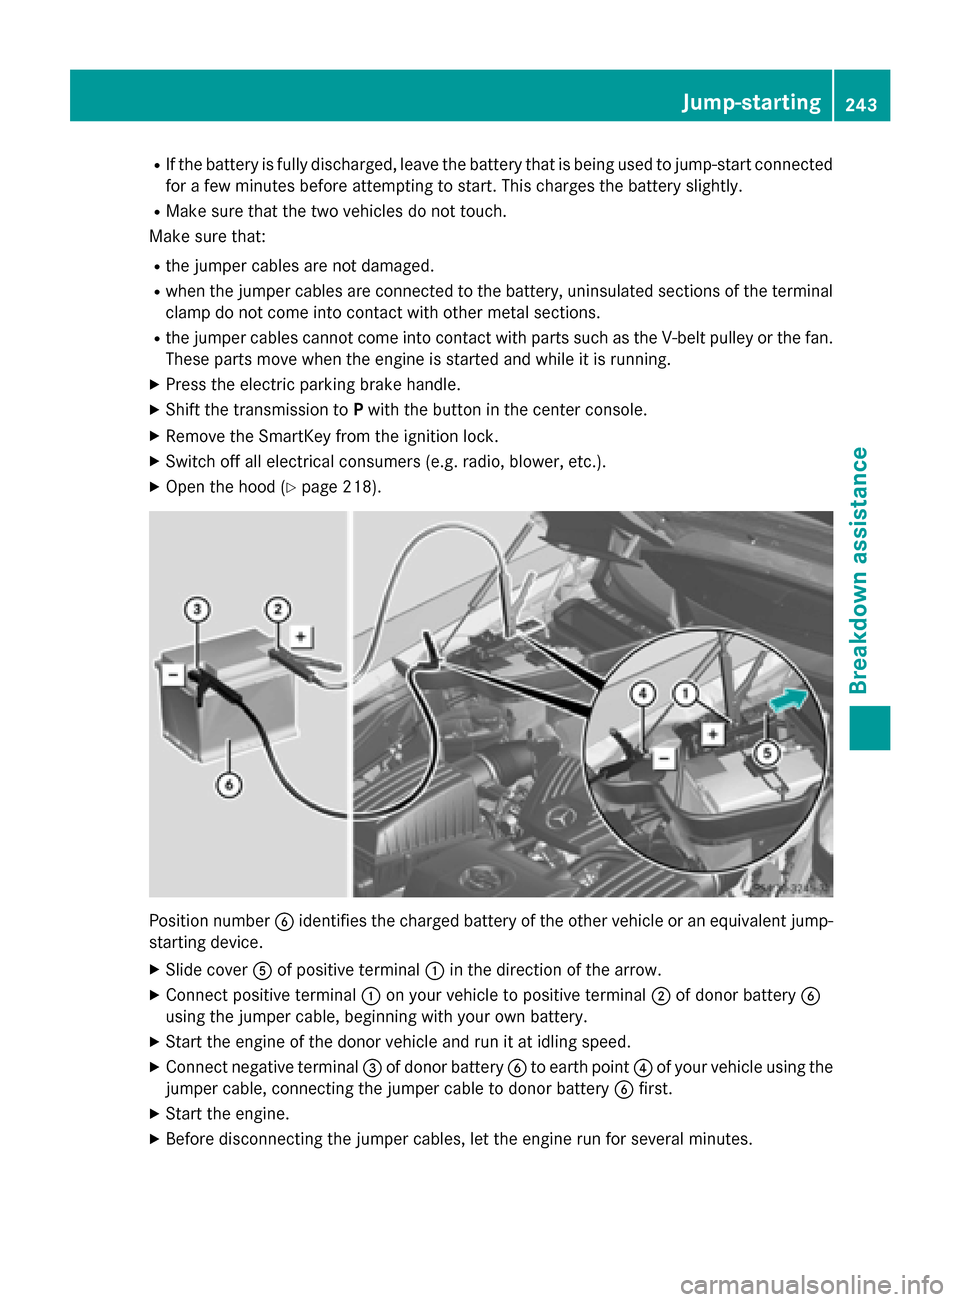
X Open the hood (Y page 218). Positio
nnumber 0084identifie sthe charged battery of the other vehicle or an equivalent jump-
starting device.
X Slide cover 0083of positive terminal 0043in the direction of the arrow.
X Connect positive terminal 0043on yourv ehicle to positive terminal 0044of donor battery 0084
using the jumper cable,b eginning with yourown battery.
X Start the engine of the donor vehicle and run it at idling speed.
X Connect negative terminal 0087of donor battery 0084to earth point 0085of yourv ehicle using the
jumper cable,c onnecting the jumper cable to donor battery 0084first.
X Start the engine.
X Before disconnecting the jumper cables, let the engine run for several minutes. Jump-starting
243Breakdown assistance Z