start stop button MERCEDES-BENZ SLS AMG GT ROADSTER 2015 C197 Owner's Guide
[x] Cancel search | Manufacturer: MERCEDES-BENZ, Model Year: 2015, Model line: SLS AMG GT ROADSTER, Model: MERCEDES-BENZ SLS AMG GT ROADSTER 2015 C197Pages: 290, PDF Size: 6.24 MB
Page 153 of 290
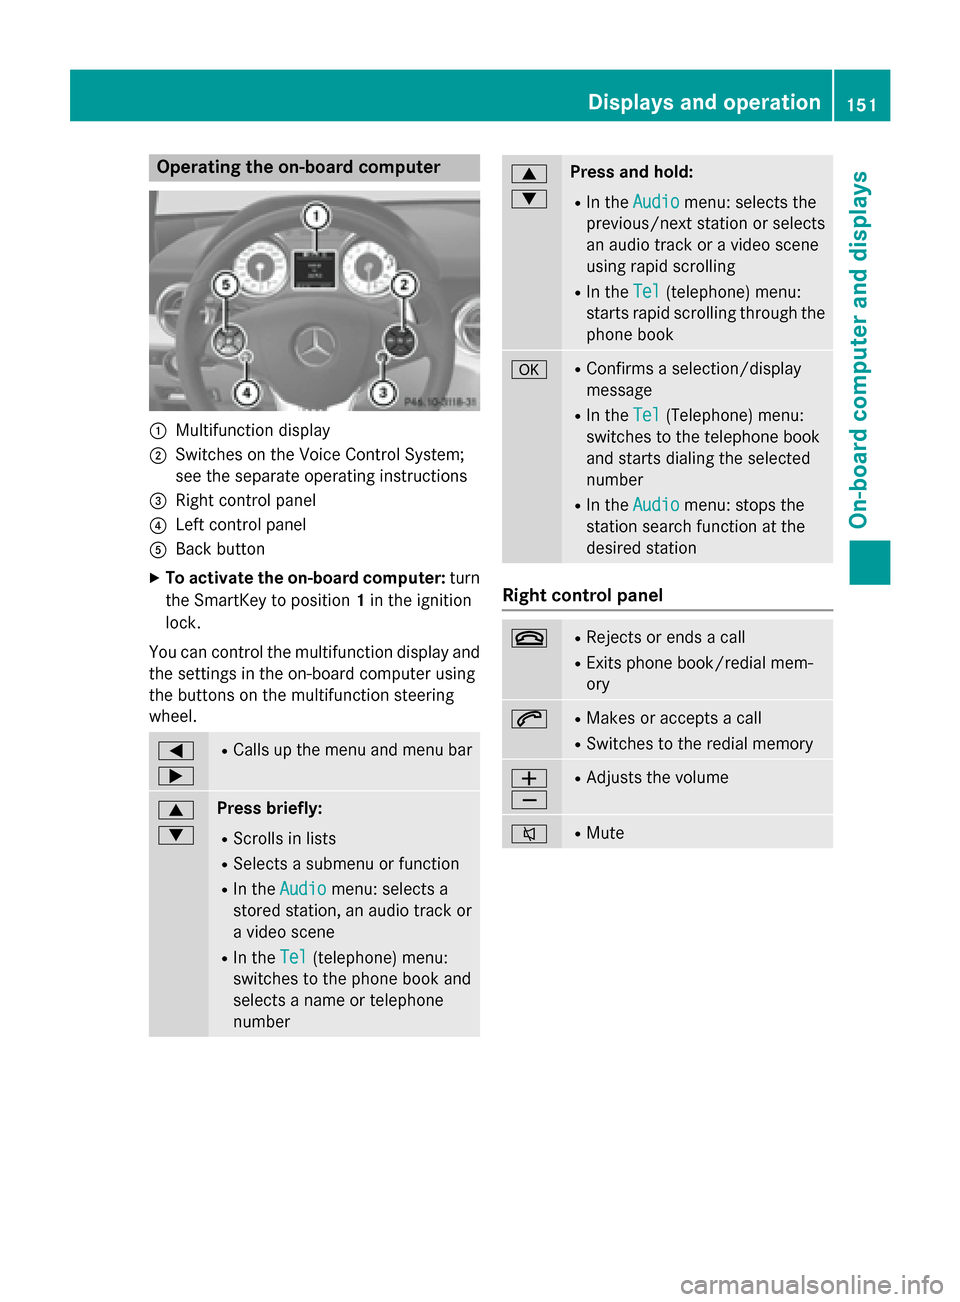
Operating the on-board computer
0043
Multifunction display
0044 Switches on the Voice Control System;
see the separate operatin ginstructions
0087 Right control panel
0085 Left control panel
0083 Back button
X To activate the on-board computer: turn
the SmartKey to position 1in the ignition
lock.
You can control the multifunction display and
the settings in the on-board computer using
the button sonthe multifunction steering
wheel. 0059
0065 R
Calls up the menu and menu bar 0063
0064 Press briefly:
R Scrolls in lists
R Select sasubmenu or function
R In the Audio Audio menu: select sa
stored station, an audio trac kor
av ideo scene
R In the Tel
Tel(telephone) menu:
switches to the phone book and
select saname or telephone
number 0063
0064 Press and hold:
R In the Audio Audio menu: select sthe
previous/next station or selects
an audio trac koravideo scene
using rapid scrolling
R In the Tel Tel(telephone) menu:
start srapid scrollin gthrough the
phone book 0076 R
Confirm saselection/display
message
R In the Tel
Tel(Telephone) menu:
switches to the telephon ebook
and start sdialing the selected
number
R In the Audio
Audio menu: stops the
station search function at the
desired station Right control panel
0076 R
Reject sorendsacall
R Exits phone book/redial mem-
ory 0061 R
Makes or accept sacall
R Switches to the redial memory 0081
0082 R
Adjusts the volume 0063 R
Mute Displays and operation
151On-boardcomputer and displays Z
Page 158 of 290
When telephoning, you must observe the
legal requirement sfor the country in which
you are currently driving.
Function sand displays are dependent on the
optional equipment installed in your vehicle.
You can establish aBluetooth ®
connection to
COMAND (see the separate operating
instructions).
X Switc hont he mobile phone and COMAND.
X Press the 0059or0065 button on the steer-
ing wheel to select the Tel Telmenu.
You will see one of the following display mes- sages in the multifunction display:
R Please Please Enter
EnterPIN
PIN:the mobile phone has
been placed in the mobile phone bracket
and the PIN has not been entered.
X Enter the PIN using the mobile phone,
Voice Control System or COMAND.
The mobile phone will search for anetwork.
In the meantime, the Phone No Service
Phone No Service
display message appears in the multifunc-
tion display.
R Phone Ready
Phone Ready or the name of the network
provider: the mobile phone has found a
network and is ready to receive.
R Phone No Service Phone No Service:t here is no network
available or the mobile phone is searching
for anetwork.
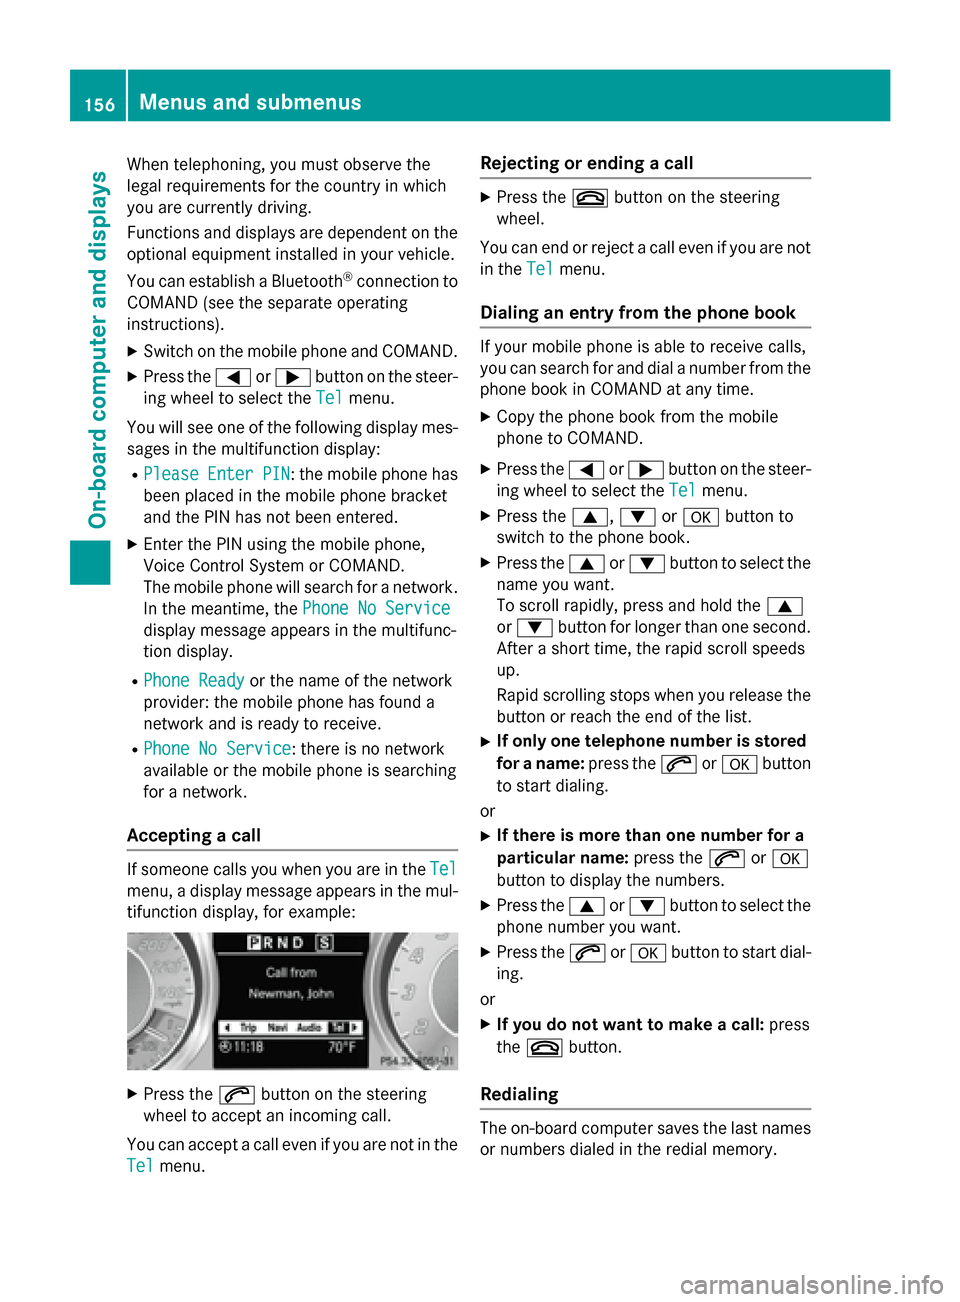
Accepting acall If someon
ecalls you when you are in the Tel Tel
menu, adisplay message appears in the mul-
tifunction display, for example: X
Press the 0061button on the steering
wheel to accept an incoming call.
You can accept acall even if you are not in the
Tel
Tel menu. Rejecting or ending
acall X
Press the 0076button on the steering
wheel.
You can end or rejec tacall even if you are not
in the Tel
Telmenu.
Dialing an entry from the phone book If your mobile phone is able to receive calls,
you can search for and dial
anumber from the
phone book in COMAND at any time.
X Copy the phone book from the mobile
phone to COMAND.
X Press the 0059or0065 button on the steer-
ing wheel to select the Tel Telmenu.
X Press the 0063,0064or0076 button to
switch to the phone book.
X Press the 0063or0064 button to select the
name you want.
To scroll rapidly, press and hold the 0063
or 0064 button for longer than one second.
After ashort time, the rapid scroll speeds
up.
Rapid scrollin gstops when you release the
button or reach the end of the list.
X If only one telephone number is stored
for aname: press the 0061or0076 button
to start dialing.
or
X If ther eismore thano ne number for a
particular name: press the0061or0076
button to display the numbers.
X Press the 0063or0064 button to select the
phone number you want.
X Press the 0061or0076 button to start dial-
ing.
or
X If you do not want to makeac all:press
the 0076 button.
Redialing The on-board computer saves the last names
or numbers dialed in the redial memory. 156
Menus and submenusOn-boar
dcomputer and displays
Page 161 of 290
the exterior lighting goes ou
tafter
60 second s.
If you activate the Locator
Locator Lighting:
Lighting: func-
tion, the following lightu p:
R the parking lamps
R the low-beam headlamps
R the license plate lamp
R the surround lighting in the exterior mirrors
X Press the 0059or0065 button on the steer-
ing wheeltos elect theSettings
Settings menu.
X Press the 0064or0063 button to select the
LIGHTS
LIGHTS submenu.
X Press 0076to confirm.
X Press the 0064or0063 button to select the
Locator Lighting:
Locator Lighting: function.
You wills ee the selected setting: Enabled
Enabled
or Disabled
Disabled.
X Press the 0076button to save the setting.
Deactivating the delayed switch-off tempora-
rily:
X Select key position 0with the Start/Stop
button before leaving the vehicle.
X Select key position 2and then key position
0 again with the Start/Stop button
The delayed shut-off is deactivated.
The delayed shut-off is reactivated the next
time you start the engine.
Activating/deactivating the interio rlight-
ing delayed switch-off
If you select key position 0with the Start/
Stop button when the Light. delay
Light. delay func-
tion is activated, the interior lighting lights up
for approximately 20 seconds if it is dark.
X Press the 0059or0065 button on the steer-
ing wheeltos elect theSettings Settings menu.
X Press the 0064or0063 button to select the
Light
Light submenu.
X Press 0076to confirm.
X Press the 0064or0063 button to select the
Light. delay
Light. delay function.
You wills ee the selected setting: on
onoroff
off.
X Press the 0076button to save the setting. Vehicle Activating/deactivating the automatic
door locking mechanism
If you select the
Automatic Door Lock: Automatic Door Lock:
function, the vehicle is centrally locked above
as peed of around 9mph(15 km/h).
i For further information on the automatic
locking feature, see (Y page 70).
X Press the 0059or0065 button on the steer-
ing wheeltos elect theSettings
Settings menu.
X Press the 0064or0063 button to select the
Vehicle
Vehicle submenu.
X Press the 0076button to confirm.
X Press the 0064or0063 button to select the
Automatic door locks
Automatic door locks function.
You wills ee the selected setting: Enabled
Enabled
or Disabled Disabled.
X Press the 0076button to save the setting.
Convenience Activating/deactivating the EASY-
ENTRY/EXIT feature
G
WARNING
When the EASY-ENTRY/EXIT feature adjusts
the steering wheel, you and other vehicle
occupants –particularly childre n–could
become trapped .There is arisk of injury.
Whilet he EASY-ENTRY/EXIT feature is mak-
ing adjustments, make sure that no one has
any body parts in the sweep of the steering
wheel.
If somebod ybecomes trapped:
R press one of the memory function position
buttons, or
R move the switch for steering wheela djust-
ment in the opposite direction to that in
which the steering wheelism oving.
The adjustment process is stopped.
You can use the Easy
Easy Entry/Exit: Entry/Exit: function
to activate or deactivate the EASY-ENTRY/
EXIT feature (Y page 89). Menus and submenus
159On-board computer and displays Z
Page 163 of 290
X
Press the 0059or0065 button on the steer-
ing wheel to select the AMG AMGmenu.
X Press the 0063button repeatedly until
SETUP is displayed.
or
X Vehicles without AMG Performance
Media: press the AMG button on the center
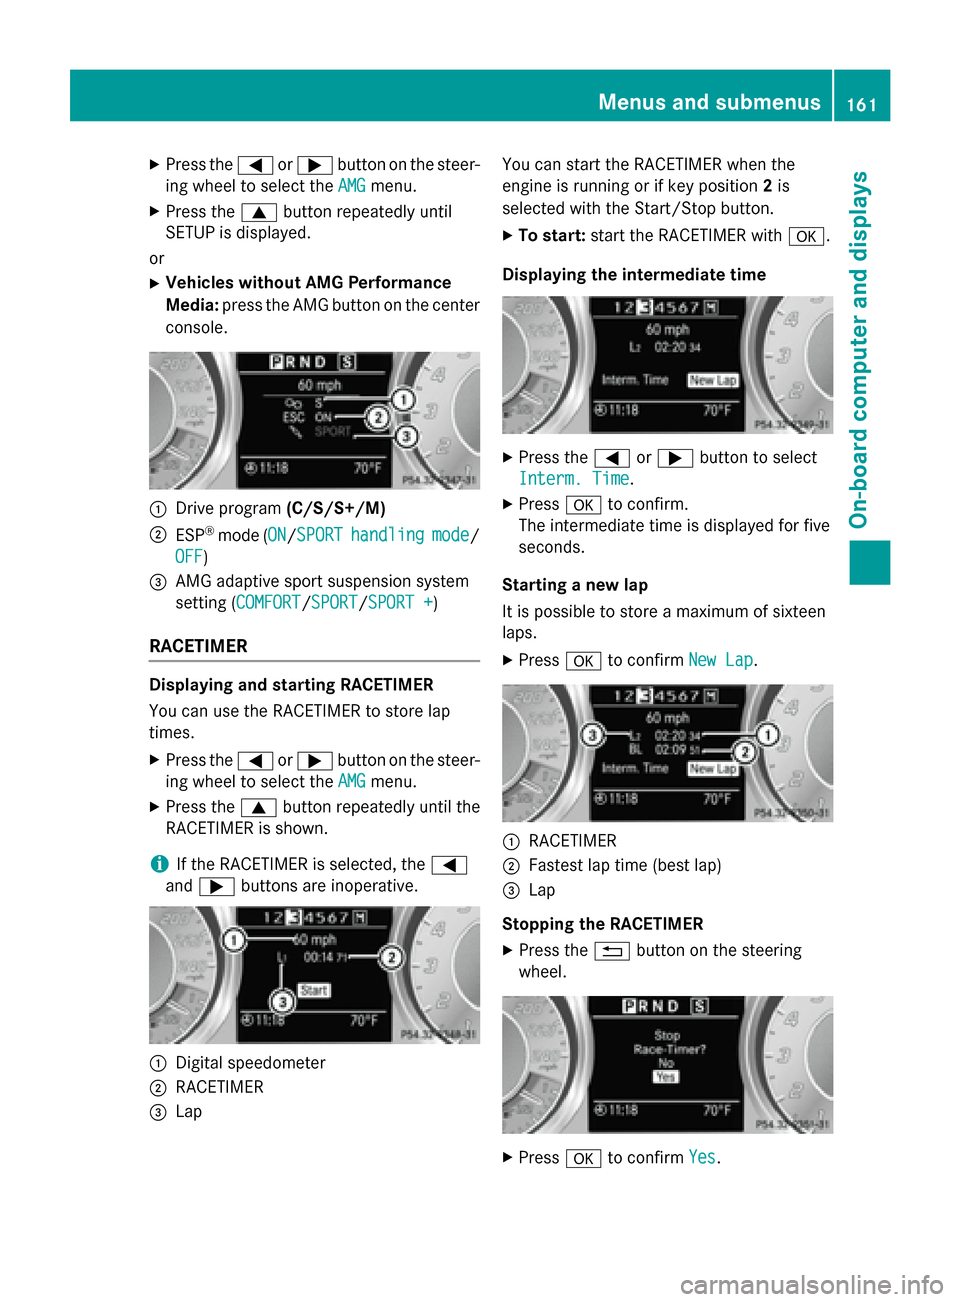
console. 0043
Drive program (C/S/S+/M)
0044 ESP ®
mode (ON ON/SPORTSPORT handling handling mode
mode/
OFF
OFF)
0087 AMG adaptive sport suspension system
setting (COMFORT COMFORT/SPORT SPORT/SPORT +
SPORT +)
RACETIMER Displaying and starting RACETIMER
You can use the RACETIME
Rtostore lap
times.
X Press the 0059or0065 button on the steer-
ing wheel to select the AMG
AMG menu.
X Press the 0063button repeatedly until the
RACETIME Risshown.
i If the RACETIME
Risselected, the 0059
and 0065 button sare inoperative. 0043
Digital speedometer
0044 RACETIMER
0087 Lap You can start the RACETIME
Rwhen the
engine is runnin gorifkey position 2is
selected with the Start/Stop button.
X To start: start the RACETIME Rwith0076.
Displaying the intermediate time X
Press the 0059or0065 button to select
Interm. Time Interm. Time.
X Press 0076to confirm.
The intermediate time is displaye dfor five
seconds.
Starting anew lap
It is possible to store amaximum of sixteen
laps.
X Press 0076to confirm New Lap
New Lap. 0043
RACETIMER
0044 Fastest lap time (best lap)
0087 Lap
Stopping the RACETIMER
X Press the 0038button on the steering
wheel. X
Press 0076to confirm Yes
Yes. Menus and submenus
161On-board computer and displays Z
Page 164 of 290
If you stop the vehicle and select key position
1 with the Start/Stop button, the RACETIMER
interrupts timing. If you select key position 2
or 3with the Start/Stop button and then
press 0076to select START
START,timing is contin-
ued.
Resetting the current lap
X Stop the RACETIMER.
X Press the 0059or0065 button to select
Reset Lap
Reset Lap.
X Press 0076to reset the lap time to "0".
Deleting all laps
If you switch off the engine, the RACETIMER is
reset to "0" after 30 seconds. All lapsa re
deleted.
You cannot delete individuals tored laps. If
you have stopped 16 laps, the current lap
does not have to be reset.
X Resett he current lap.
X Press 0076to confirm Reset
Reset.
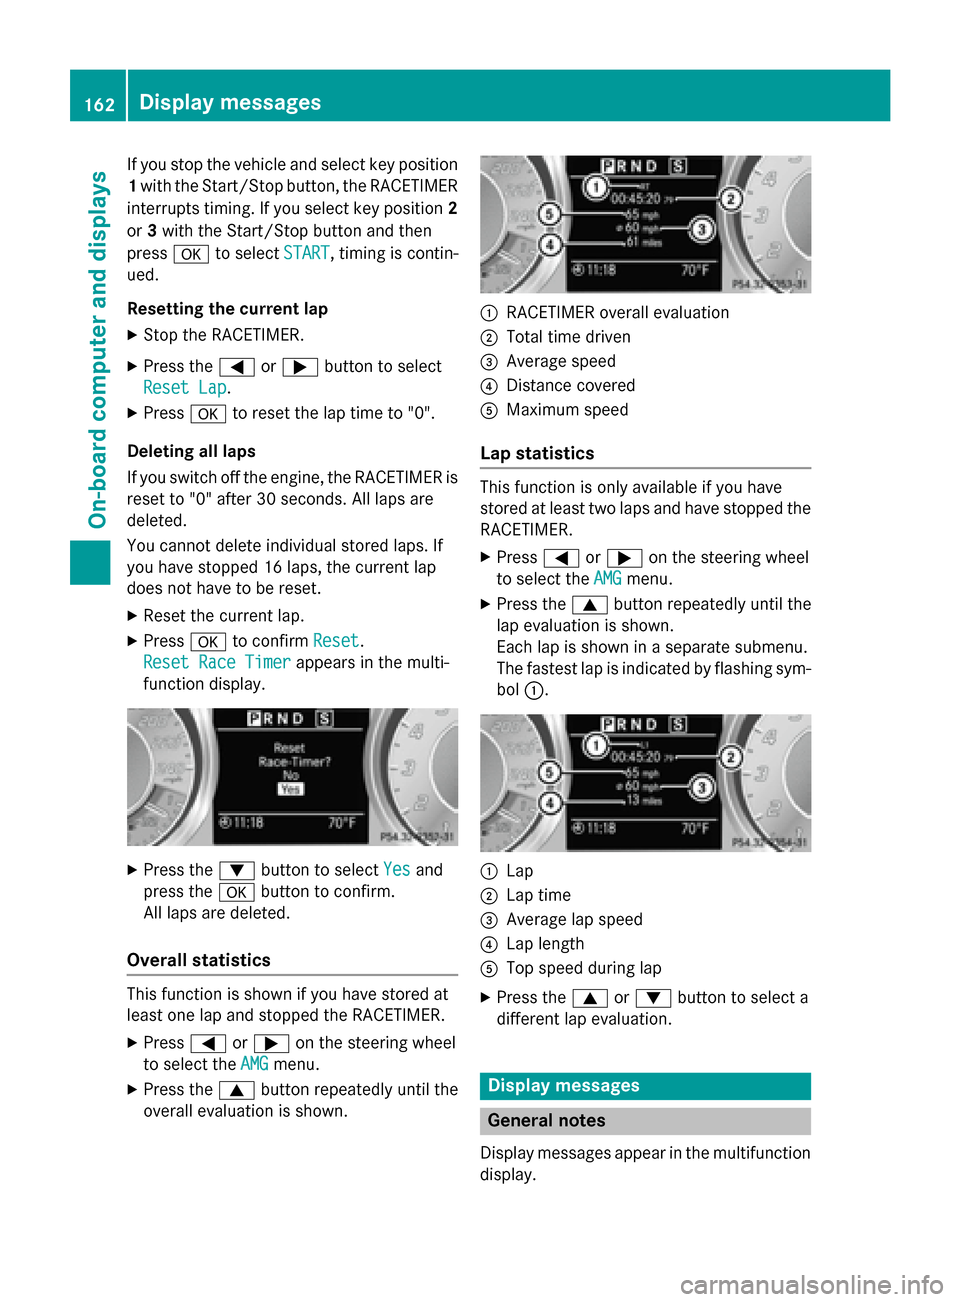
Reset Race Timer Reset Race Timer appears in the multi-
function display. X
Press the 0064button to select Yes
Yesand
press the 0076button to confirm.
All lapsa re deleted.
Overall statistics This function is shown if you have stored at
least one lap and stopped the RACETIMER.
X Press 0059or0065 on the steering wheel
to select the AMG
AMGmenu.
X Press the 0063button repeatedly until the
overal levaluationiss hown. 0043
RACETIMER overal levaluation
0044 Total time driven
0087 Average speed
0085 Distance covered
0083 Maximu mspeed
Lap statistics This function is only available if you have
stored at least two lapsa
nd have stopped the
RACETIMER.
X Press 0059or0065 on the steering wheel
to select the AMG AMGmenu.
X Press the 0063button repeatedly until the
lap evaluationiss hown.
Each lap is shown in aseparate submenu.
The fastest lap is indicated by flashing sym-
bol 0043. 0043
Lap
0044 Lap time
0087 Average lap speed
0085 Lap length
0083 Top speed during lap
X Press the 0063or0064 button to select a
different lap evaluation. Display messages
General notes
Displa ymessages appear in the multifunction
display. 162
Display messagesOn-board computer and displays
Page 205 of 290
Ashtray
i You can remove th
eashtray insert and
use th eresulting compartmen tfor stow-
age.
! The stowage spac
eunder th eashtray is
no th eat resistant .Befor ep lacing lit ciga-
rette sint heashtray, mak esuret hatthe
ashtray is properly engaged. Otherwise, the
stowage spac ecould be damaged. Example: Coupe
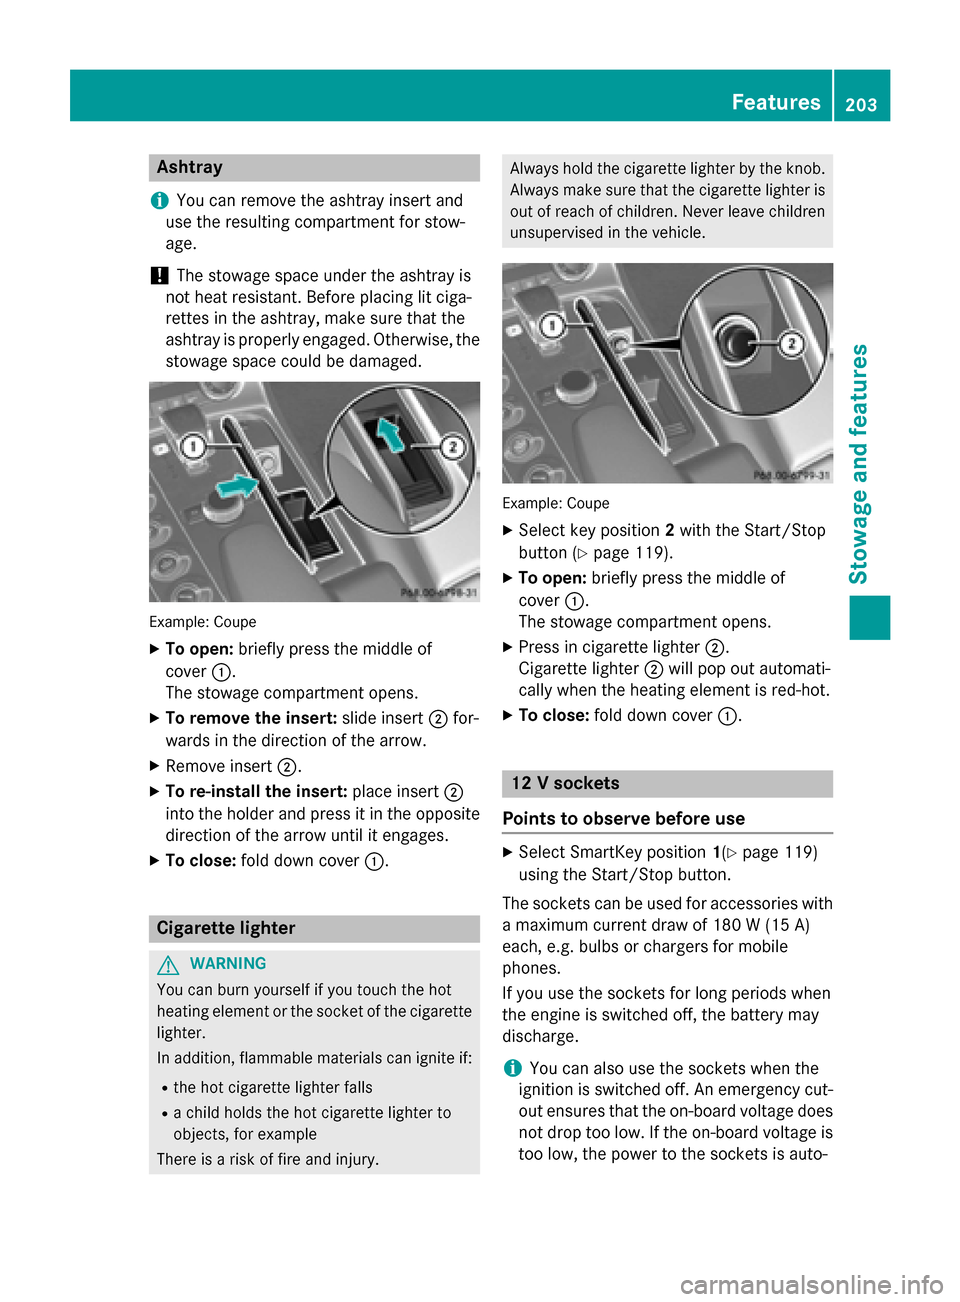
X To open: briefly press th emiddle of
cover 0043.
The stowage compartmen topens.
X To remove th einsert: slide insert 0044for-
wards in th edirection of th earrow.
X Remove insert 0044.
X To re-install th einsert: placeinsert 0044
int ot he holder and press it in th eopposite
direction of th earrow until it engages.
X To close: foldd own cover 0043. Cigarette lighter
G
WARNING
You can burn yourself if you touch th ehot
heating elemen torthesocke tofthecigarette
lighter.
In addition ,flammabl ematerials can ignit eif:
R theh ot cigarette lighte rfalls
R ac hild hold sthe hot cigarette lighte rto
objects ,for example
There is ariskoff irea nd injury. Always hold th
ecigarette lighte rbytheknob.
Always mak esuret hatthe cigarette lighte ris
out of reac hofchildren .Never leav echildren
unsupervised in th evehicle. Example: Coupe
X Selec tkey position 2wit hthe Start/Stop
butto n(Ypage 119).
X To open: briefly press th emiddle of
cover 0043.
The stowage compartmen topens.
X Press in cigarette lighter 0044.
Cigarette lighter 0044will pop out automati-
call ywhen th eheating elemen tisred-hot.
X To close: foldd own cover 0043. 12
Vsockets
Point stoo bserve befor euse X
Selec tSma rtKey position 1(Y page 119)
usin gthe Start/Sto pbutton.
The sockets can be used for accessories with am aximum curren tdraw of 18 0W(15 A)
each, e.g. bulbs or chargers for mobile
phones.
If you use th esockets for lon gperiods when
th ee ngineiss witched off ,the battery may
discharge.
i You can also use th
esockets when the
ignition is switched off .Anemergenc ycut-
out ensures that th eon-bo ard voltag edoes
no td ropt oo low. If th eon-bo ard voltag eis
to ol ow, th epower to th esockets is auto- Features
203Stowage and featu res Z
Page 212 of 290
Extendable rea
rspoiler
The rear spoiler improve sthe handlin gofthe
vehicle .Itadapt sthe vehicle's aerodynamics
to th eoperatin gconditions, dependen tonthe
spee doft hevehicle. Example
:Coupe
i If th
evehicle is equippe dwith AM Gadap-
tiv es por tsuspension system, th ebutton is
in th eswitch strip above th eair condition-
ing control panel.
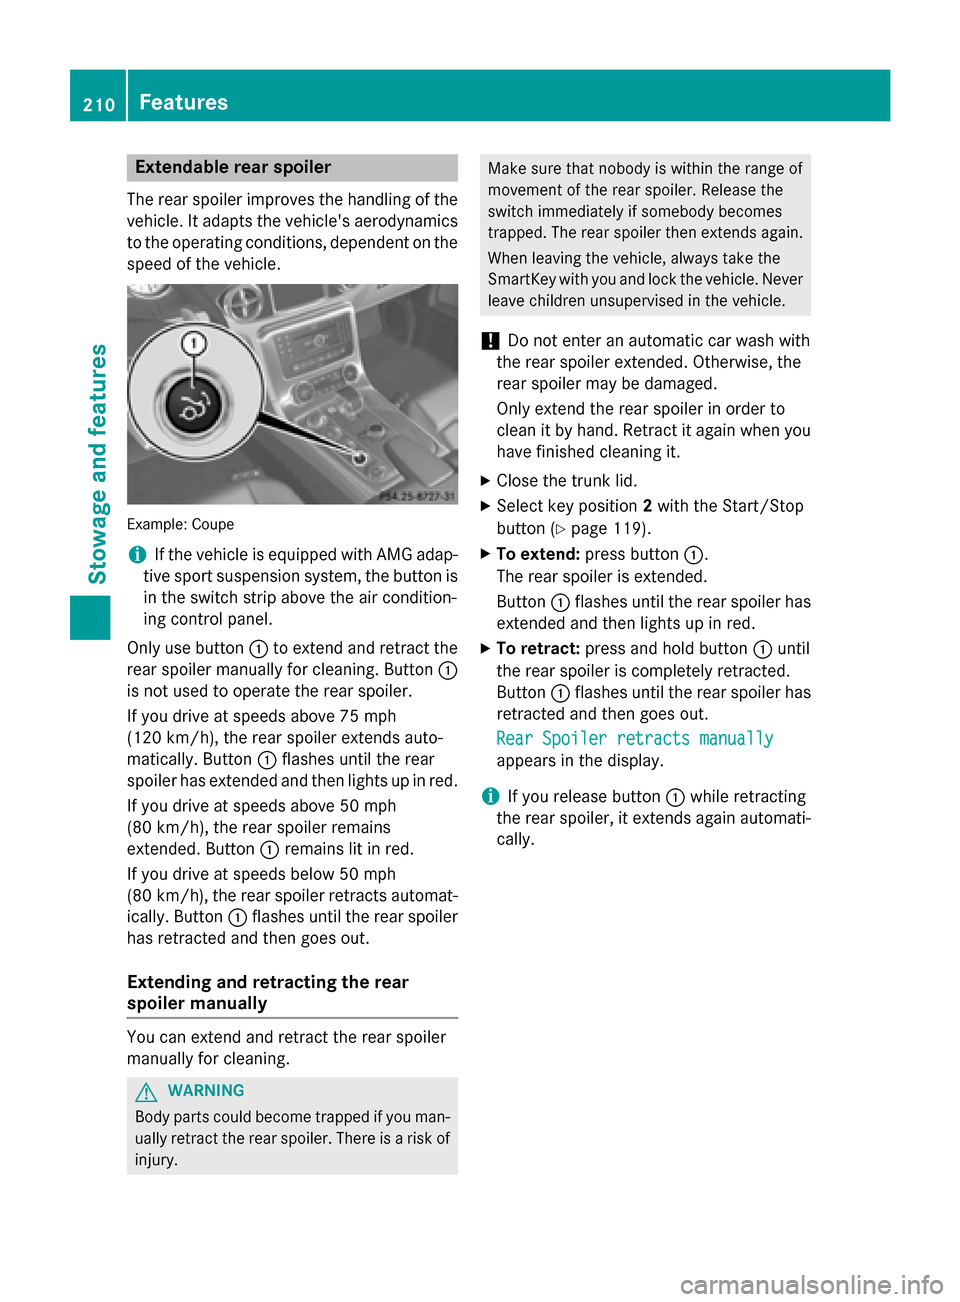
Only use button 0043to exten dand retrac tthe
rear spoiler manually for cleaning. Button 0043
is no tused to operate th erear spoiler.
If you driv eatspeeds above 75 mph
(12 0km/ h),t he rear spoiler extends auto-
matically. Button 0043flashes until the rear
spoiler has extended and then lights up in red.
If you drive at speeds above 50 mph
(8 0k m/ h),t he rear spoiler remains
extended. Button 0043remain slit in red.
If you drive at speeds below 50 mph
(8 0k m/ h),t he rear spoiler retract sautomat-
ically. Button 0043flashes until the rear spoiler
has retracted and then goes out.
Extending and retracting ther ear
spoiler manually You can extend and retract the rear spoiler
manually for cleaning. G
WARNING
Body parts could becom etrappe difyou man-
ually retract the rear spoiler. There is arisk of
injury. Make sure that nobody is within the range of
movement of the rear spoiler. Release the
switc himmediately if somebod ybecomes
trapped. The rear spoiler then extends again.
When leaving the vehicle, always tak ethe
SmartKe ywith you and lock the vehicle. Never
leave children unsupervised in the vehicle.
! Do not enter an automatic car wash with
the rear spoiler extended. Otherwise, the
rear spoiler may be damaged.
Only extend the rear spoiler in order to
clean it by hand. Retrac titagain when you
have finished cleanin git.
X Close the trunk lid.
X Selec tkey position 2with the Start/Stop
button (Y page 119).
X To extend: press button 0043.
The rear spoiler is extended.
Button 0043flashes until the rear spoiler has
extended and then lights up in red.
X To retract: press and hold button 0043until
the rear spoiler is completely retracted.
Button 0043flashes until the rear spoiler has
retracted and then goes out.
Rear Spoiler retracts manually Rear Spoiler retracts manually
appears in the display.
i If you release button
0043while retracting
the rear spoiler, it extends again automati-
cally. 210
FeaturesStowage and features
Page 214 of 290
i
Notes aboutt
he declaration of conformity
can be found here (Y page 22).
USA: FCC ID: CB2HMIHL4
Canada: IC: 279B-HMIHL4
Programming Programing buttons
Pay attention to the "Important safety notes"
(Y page 211). Integrated garaged
oor opener in the rear-view mir-
ror
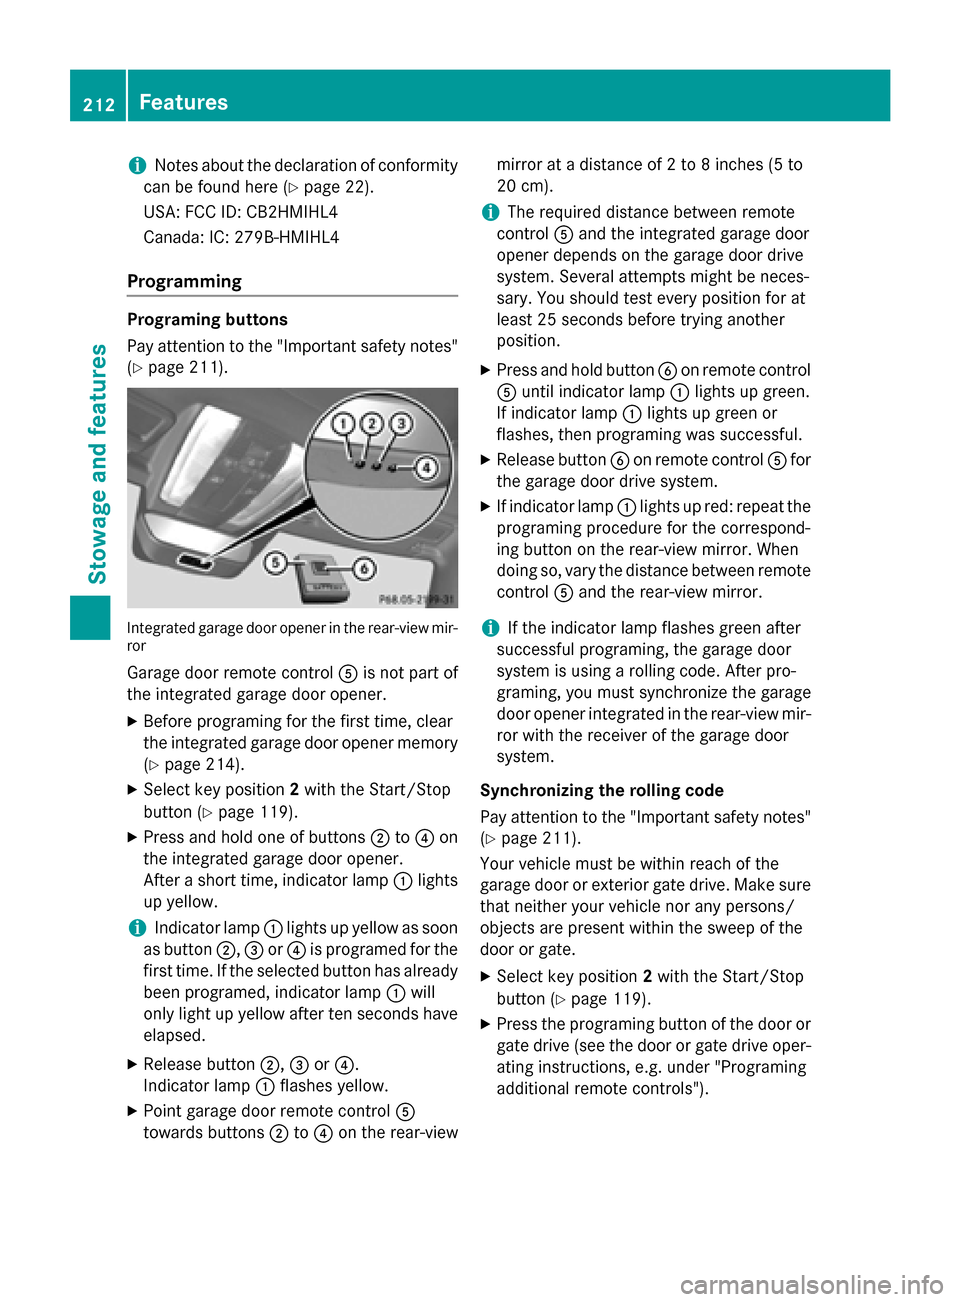
Garage door remote control 0083is not part of
the integrated garaged oor opener.
X Before programing for the first time, clear
the integrated garaged oor opener memory
(Y page 214).
X Select key position 2with the Start/Stop
button (Y page 119).
X Press and hold one of buttons 0044to0085 on
the integrated garaged oor opener.
After ashort time, indicator lamp 0043lights
up yellow.
i Indicator lamp
0043lights up yellow as soon
as button 0044,0087or0085 is programed for the
first time. If the selected button has already been programed ,indicator lamp 0043will
only light up yellow after ten seconds have
elapsed.
X Release button 0044,0087or0085.
Indicator lamp 0043flashesy ellow.
X Point garaged oor remote control 0083
towards buttons 0044to0085 on the rear-view mirror at
adistance of 2to8i nches (5 to
20 cm).
i The required distance between remote
control 0083and the integrated garaged oor
opener depends on the garaged oor drive
system. Several attempts might be neces-
sary. You shouldt est every position for at
least 25 seconds before trying another
position.
X Press and hold button 0084on remote control
0083 until indicator lamp 0043lights up green.
If indicator lamp 0043lights up green or
flashes, then programing was successful.
X Release button 0084on remote control 0083for
the garaged oor drive system.
X If indicator lamp 0043lights up red: repeatt he
programing procedure for the correspond-
ing button on the rear-view mirror. When
doing so, vary the distance between remote
control 0083and the rear-view mirror.
i If the indicator lamp flashesg
reen after
successful programing, the garaged oor
system is using arolling code. After pro-
graming, you must synchronize the garage
door opener integrated in the rear-view mir- ror with the receiver of the garaged oor
system.
Synchronizing the rollingc ode
Pay attention to the "Important safety notes" (Y page 211).
Your vehicle must be within reach of the
garaged oor or exterior gate drive. Make sure
that neither yourv ehicle nor any persons/
objects are present within the sweep of the
door or gate.
X Select key position 2with the Start/Stop
button (Y page 119).
X Press the programing button of the door or
gate drive (see the door or gate drive oper- ating instructions, e.g. under "Programing
additional remote controls"). 212
FeaturesStowagea
nd features
Page 216 of 290
also read th
eoperatin ginstruction sfor the
garag edoor system.
X Select ke yposition 2wit hthe Start/Stop
button.
X Press button 0044,0087or0085 whic hyou have
programed to operate th egarag edoor.
Garage door system wit hafixed code: indi-
cator lamp 0043light supg reen.
Garage door system wit harolling code:
indicator lamp 0043flashes green.
i The transmitte
rwill transmit asignal as
lon gast hebutto nisp ressed. The trans-
mission is halted after amaximum of ten
seconds and indicator lamp 0043light sup
yellow. Press button 0044,0087or0085 again if
necessary.
Clearing th ememory X
Select ke yposition 2wit hthe Start/Stop
button.
X Press buttons 0044and 0085.
The indicator lamp light supyellow.
X Press and hold buttons 0044and 0085until the
indicator lamp turns green.
i Mak
esure that you clear th ememory of
th ei ntegrate dgarag edoor opener before
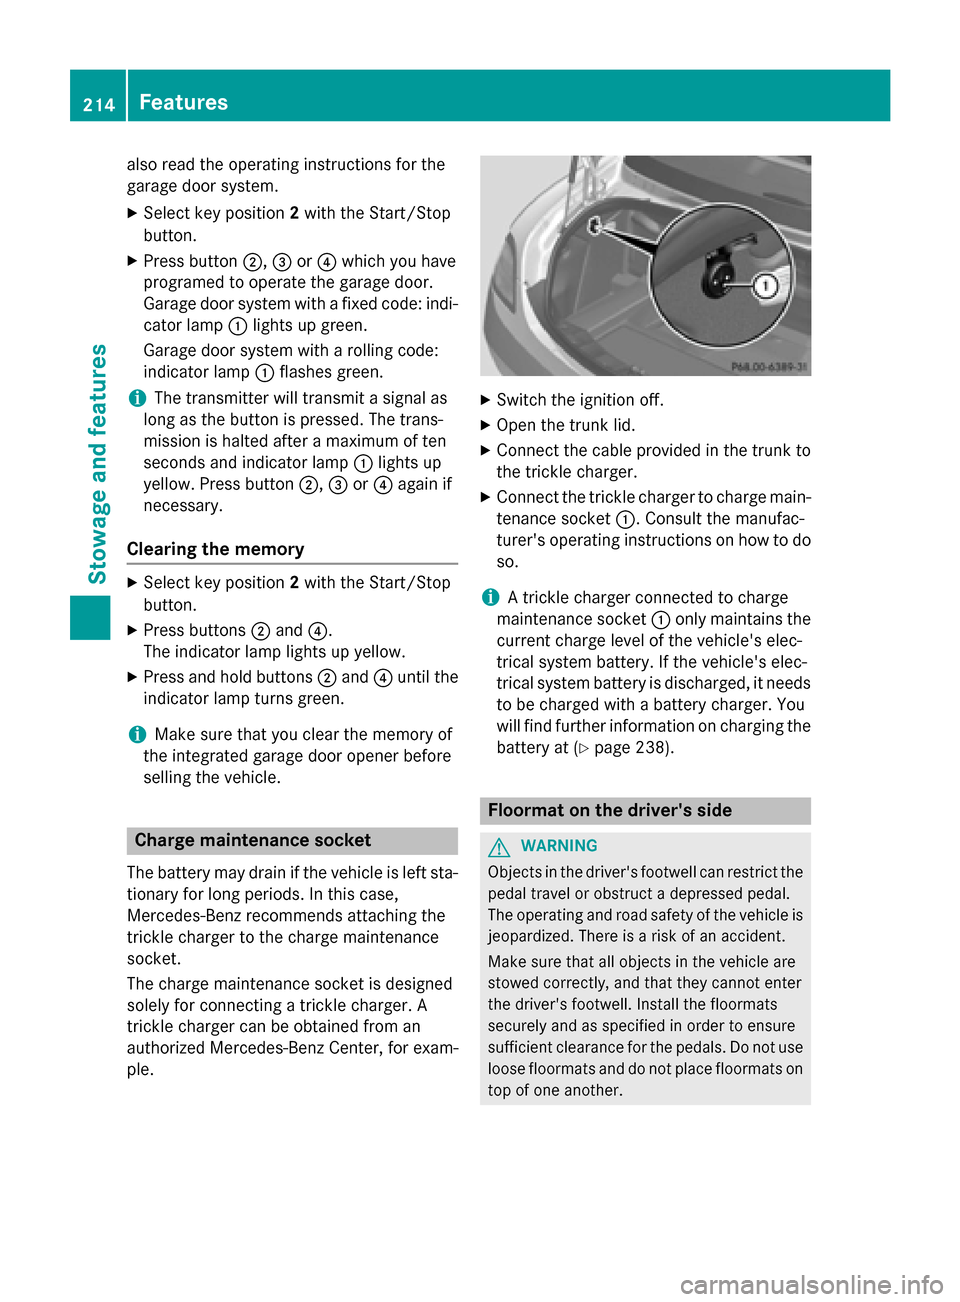
sellin gthe vehicle. Charg
emaintenance socket
The battery may drain if th evehicle is left sta-
tionar yfor lon gperiods. In this case,
Mercedes-Ben zrecommends attaching the
trickle charge rtothecharge maintenance
socket.
The charge maintenance socke tisdesigned
solely for connecting atrickle charger. A
trickle charge rcan be obtaine dfroman
authorized Mercedes-Ben zCenter, for exam-
ple. X
Switch th eignition off.
X Open th etrunk lid.
X Connect th ecabl ep rovide dinthetrunk to
th et rickle charger.
X Connect th etrickle charge rtocharge main-
tenance socket 0043.Consult th emanufac-
turer' soperatin ginstruction sonhow to do
so.
i At
rickle charge rconnected to charge
maintenance socket 0043only maintain sthe
curren tcharge leve lofthevehicle's elec-
trical system battery. If th evehicle's elec-
trical system battery is discharged, it needs
to be charge dwithab attery charger. You
will fin dfurther informatio nonchargin gthe
battery at (Y page 238). Floorma
tonthedriver's side G
WARNING
Object sinthedriver' sfootwell can restrict the
pedal travel or obstruc tadepressed pedal.
The operatin gand road safety of th evehicle is
jeopardized. Ther eisariskofana ccident.
Mak esure that all object sinthevehicle are
stowed correctly, and that they canno tenter
th ed river' sfootwell. Install th efloormats
securely and as specifie dinorder to ensure
sufficient clearance for th epedals .Don otuse
loos efloormats and do no tplac efloormats on
to pofo neanother. 214
FeaturesStowage and features
Page 226 of 290
You can wash the vehicle in an automatic car
wash fro mthe very start.
If the vehicle is very dirty, pre-wash it before
cleaning it in an automatic car wash.
! Never clean your vehicle in
aTouchless
Automatic Car Wash as these use special
cleaning agents. These cleaning agent scan
damage the paintwork or plastic parts.
! When washing your vehicle in
atow-
through car wash, use the SmartKey
instead of the Start/Stop button.
Start the engin eusing the SmartKey.. Move
the transmission to Nwith the E-SELECT
lever .Use the SmartKey to switc hthe
engin eoff again and the nturn the Smart-
Key to position 2.Make sure that you then
leave the SmartKey in position 2.You may
otherwise damage the vehicle, the trans-
missio northe car wash.
Check the transmission position in the
instrumen tcluster.
! Use the E‑SELECT lever to shift the trans-
missio ntoNbefore switching the engine
off .Ify ou open the driver's or front-
passenger door, the transmission remains
in this position for up to 30 minutes if the
SmartKey is in the ignition, even if the
engin eisswitched off .Ifyou do not shift the
transmission to Nusing the E‑SELECT lever
beforehand, it shift sautomatically to park-
ing position Pand lock sthe wheels if the
driver's or front-passenge rdoor is opened
and the engin eisswitched off .This may
damage the vehicle, the transmission or
the car wash.
Observe the information on maneuvering
(Y page 131). !
Before drivin
gintoana utomatic car wash,
make sure that it is suitable for the dimen- sion soft he vehicle. In particular, make
sure that:
R there is enough groun dclearance
betwee nthe vehicle underbody and the
guide rails of the automatic car wash.
R the clearance width of the automatic car
wash is sufficient ,particularly the width
of the guide rails.
R you enter the automatic car wash
straight and in the center of the guide
rails in order to avoid damagin gthe tires
or wheel rims.
Fold in the exterior mirrors befor ethe vehi-
cle is washed. The exterior mirrors could
otherwise be damaged.
! Make sure that:
R the side windows and the roof are com-
pletely closed
R the climat econtrol blower is switched off
R the windshield wiper switc hisatposition
0
The vehicle could otherwise be damaged.
! In portal car washes, the windshield wip-
ers may be move dupthe windshield by the
cleaning brushes when the ignition is
switched off.
Set the Start/Stop button to key position 2
to reset the windshield wipers to their orig-
inal position.
! Preferably use automatic car washes with
adjustable high-pressure pre-cleaning. This corresponds with the specification for the
Cabriolet program. In car washes that use
high water pressures, there is arisk that a
small amount of water may leak int othe
vehicle.
! Cabriolet:
do not treat the vehicle with
hot wax under any circumstances.
After using an automatic car wash, wipe off
wax and drying agent sfromt he windshield
and the wiper blades. This will prevent smears 224
CareMaintenance and care