ECU MERCEDES-BENZ SLS AMG ROADSTER 2012 User Guide
[x] Cancel search | Manufacturer: MERCEDES-BENZ, Model Year: 2012, Model line: SLS AMG ROADSTER, Model: MERCEDES-BENZ SLS AMG ROADSTER 2012Pages: 288, PDF Size: 18.46 MB
Page 75 of 288
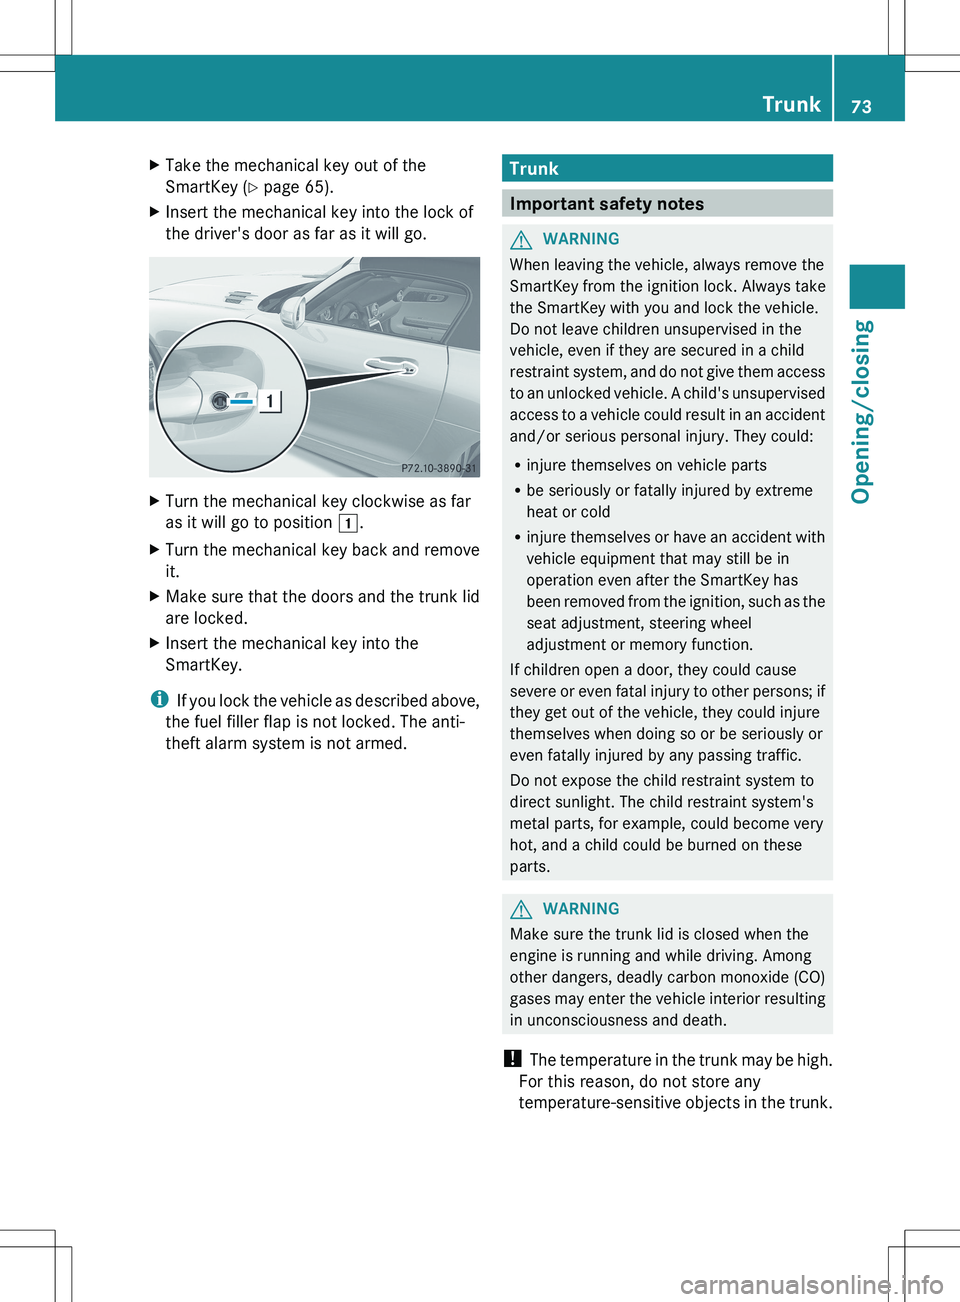
XTake the mechanical key out of the
SmartKey ( Y page 65).XInsert the mechanical key into the lock of
the driver's door as far as it will go.XTurn the mechanical key clockwise as far
as it will go to position 1.XTurn the mechanical key back and remove
it.XMake sure that the doors and the trunk lid
are locked.XInsert the mechanical key into the
SmartKey.
i If you lock the vehicle as described above,
the fuel filler flap is not locked. The anti-
theft alarm system is not armed.
Trunk
Important safety notes
GWARNING
When leaving the vehicle, always remove the
SmartKey from the ignition lock. Always take
the SmartKey with you and lock the vehicle.
Do not leave children unsupervised in the
vehicle, even if they are secured in a child
restraint system, and do not give them access
to an unlocked vehicle. A child's unsupervised
access to a vehicle could result in an accident
and/or serious personal injury. They could:
R injure themselves on vehicle parts
R be seriously or fatally injured by extreme
heat or cold
R injure themselves or have an accident with
vehicle equipment that may still be in
operation even after the SmartKey has
been removed from the ignition, such as the
seat adjustment, steering wheel
adjustment or memory function.
If children open a door, they could cause
severe or even fatal injury to other persons; if
they get out of the vehicle, they could injure
themselves when doing so or be seriously or
even fatally injured by any passing traffic.
Do not expose the child restraint system to
direct sunlight. The child restraint system's
metal parts, for example, could become very
hot, and a child could be burned on these
parts.
GWARNING
Make sure the trunk lid is closed when the
engine is running and while driving. Among
other dangers, deadly carbon monoxide (CO)
gases may enter the vehicle interior resulting
in unconsciousness and death.
! The temperature in the trunk may be high.
For this reason, do not store any
temperature-sensitive objects in the trunk.
Trunk73Opening/closingZ
Page 82 of 288
XPoint the tip of the SmartKey at the driver's
door handle.XTo open: press and hold the % button
on the SmartKey until the soft top is fully
opened.
The Convertible Top in Operation
message appears in the multifunction
display.XTo close: press and hold the & button
on the SmartKey until the soft top is fully
closed.
The Convertible Top in Operation
message appears in the multifunction
display. The soft top and the side windows
close.
Re-locking the soft top
GWARNING
Stop the vehicle at a suitable location as soon
as it is possible to do so safely and lock the
soft top before driving on. You could
otherwise endanger yourself and others.
The soft top is not locked if:
R the Convertible Top in Operation
message appears in the multifunction
display.
R you hear a warning tone for up to ten
seconds when pulling away or while driving.
You can lock the soft top again if it is not
locked fully.
XStop the vehicle immediately, paying
attention to road and traffic conditions.XSelect key position 2 using the Start/Stop
button.XPress the soft-top switch.
Installing/removing the wind screen
GWARNING
You could lose control of the vehicle and
injure yourself or others if you operate the
wind screen while driving.
Install or remove the wind screen only when
the vehicle is stationary.GWARNING
If the wind screen is not properly engaged and
the fastening levers are not folded outwards,
it could become detached while driving. There
is a risk of accident and injury.
Make sure that you push in the wind screen
up to the locking point and then fold the
fastening levers outwards.
! Install or remove the wind screen only
when the soft top is open. You could
otherwise damage the wind screen or the
vehicle interior.
! Mercedes-Benz recommends that you
only use wind screens which have been
tested and approved for Mercedes-Benz
vehicles. This helps to prevent damage to
the vehicle.
The wind screen protects against wind when
driving with the soft top open. It is secured
between the roll bars.
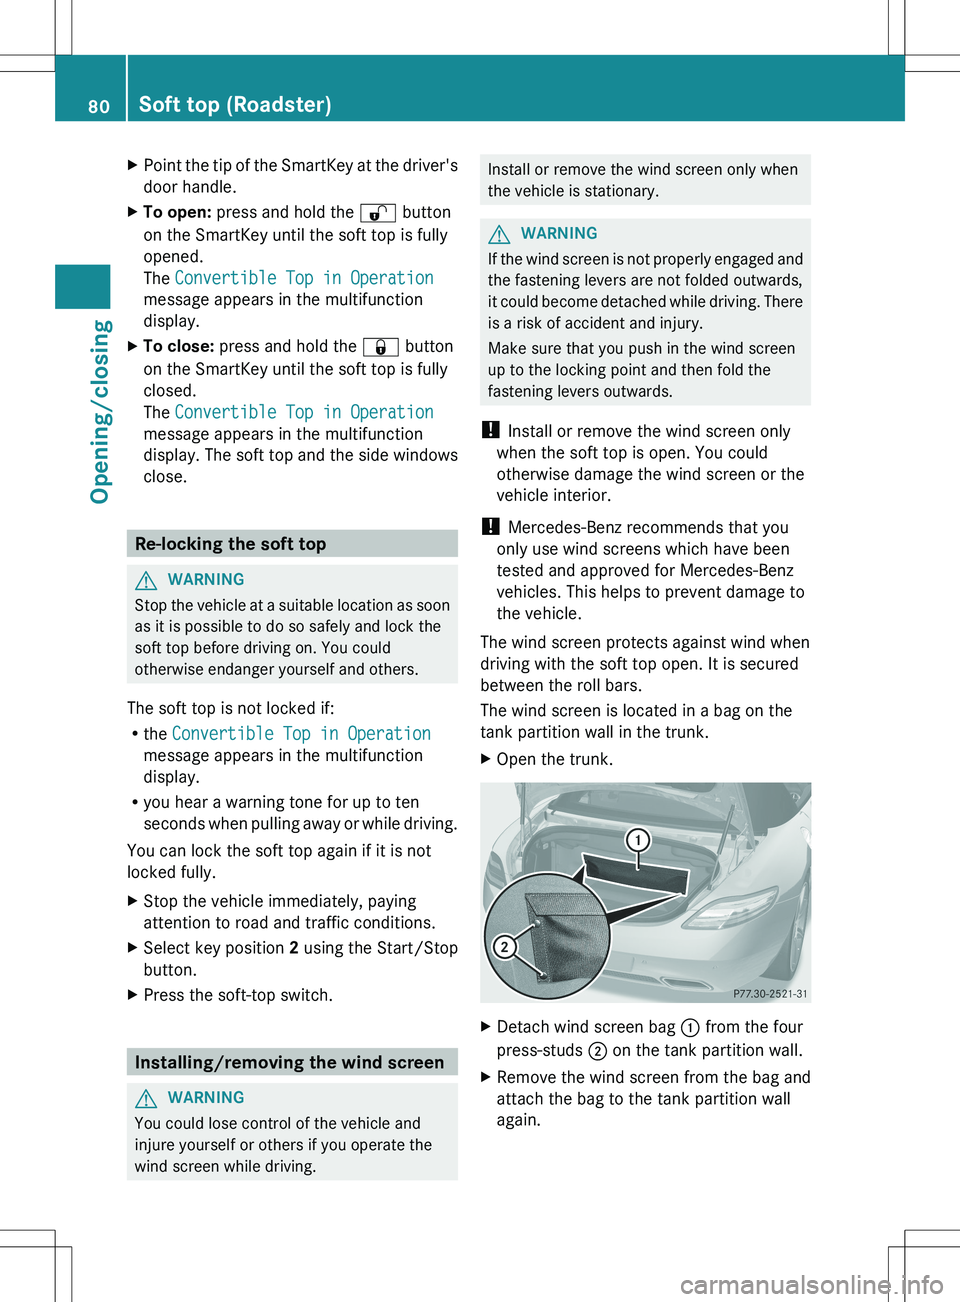
The wind screen is located in a bag on the
tank partition wall in the trunk.
XOpen the trunk.XDetach wind screen bag : from the four
press-studs ; on the tank partition wall.XRemove the wind screen from the bag and
attach the bag to the tank partition wall
again.80Soft top (Roadster)Opening/closing
Page 87 of 288
Seats
Important safety notes
GWARNING
In order to avoid possible loss of vehicle
control, the following must be done before the
vehicle is put into motion:
R seat adjustment
R steering wheel adjustment
R rear-view mirror adjustment
R fastening of seat belts
GWARNING
In order to avoid possible loss of vehicle
control, all seat, head restraint, steering
wheel and rear view mirror adjustments, as
well as fastening of seat belts, must be done
before setting the vehicle in motion.
GWARNING
Do not adjust the driver's seat while driving.
Adjusting the seat while driving could cause
the driver to lose control of the vehicle.
Never travel in a moving vehicle with the seat
backrest in an excessively reclined position as
this can be dangerous. You could slide under
the seat belt in a collision. If you slide under
it, the seat belt would apply force at the
abdomen or neck. This could cause serious or
fatal injuries. The seat backrest and seat belts
provide the best restraint when the wearer is
in a position that is as upright as possible and
seat belts are properly positioned on the
body.
GWARNING
Your seat belt must be adjusted so that you
can correctly fasten your seat belt.
Observe the following points:
R adjust the seat backrest until your arms are
slightly angled when holding the steering
wheel.
R adjust the seat to a comfortable seating
position that still allows you to reach the
accelerator/brake pedal safely. The
position should be as far back as possible
with the driver still able to operate the
controls properly.
R adjust the head restraint so that it is as
close to the head as possible and the center
of the head restraint supports the back of
the head at eye level.
R never place hands under the seat or near
any moving parts while a seat is being
adjusted.
Failure to do so could result in an accident
and/or serious personal injury.GWARNING
The electrically adjustable seats can be
operated at any time. Therefore, do not leave
children unattended in the vehicle, or with
access to an unlocked vehicle. A child's
unsupervised access to a vehicle could result
in an accident and/or serious personal injury.
GWARNING
Children 12 years old and under must be
seated and properly secured in an
appropriately sized infant restraint, toddler
restraint or booster seat recommended for
the size and weight of the child. For additional
information, see section "Children in the
vehicle".
A child's risk of serious or fatal injuries is
significantly increased if the child restraints
are not properly secured in the vehicle and/
or the child is not properly secured in the child
restraint.
! To avoid damage to the seats and the seat
heating, observe the following information:
R do not spill any liquids on the seats. If
liquid is spilled on the seats, dry them as
soon as possible.
R if the seat covers are damp or wet, do not
switch on the seat heating. The seat
heating should also not to be used to dry
the seats.
Seats85Seats, steering wheel and mirrorsZ
Page 116 of 288
Useful information
i This Operator's Manual describes all
models and all standard and optional
equipment of your vehicle available at the
time of publication of the Operator's
Manual. Country-specific differences are
possible. Please note that your vehicle may
not be equipped with all features
described. This also applies to safety-
related systems and functions.
i Please read the information on qualified
specialist workshops ( Y page 21).
Breaking-in notes
The first 1000 miles (1500 km)
The more you look after the engine when it is
new, the more satisfied you will be with its
performance in the future.
R Drive at varying vehicle speeds and engine
speeds for the first 1000 miles (1500 km)
for this reason.
R Do not drive faster than 85 mph
(140 km/h) for the first 1000 miles
(1500 km).
R Only allow the engine to reach a maximum
engine speed of 4,500 rpm briefly.
R Avoid overstraining the vehicle during this
period, e.g. driving at full throttle. Do not
exceed ⅔ of the maximum permitted
engine speed for each gear.
R Select the manual drive program M in good
time.
R Do not carry out a RACE START.
R Do not manually shift to a lower gear to
brake the vehicle.
R If possible, do not depress the accelerator
pedal past the point of resistance
(kickdown).
R Only select the shift range limits 3, 2 or 1
when driving slowly, e.g. in mountainous
terrain.
After 1000 miles (1500 km), you can increase
the engine speed gradually and bring the
vehicle up to full speed.
i You should also observe these breaking-
in notes if your vehicle's engine or
transmission has been replaced.
i Always observe the respective speed
restrictions.
Driving
Important safety notes
GWARNING
Do not keep any objects in the driver's
footwell. If you use a floormat or carpet in the
driver's footwell, make sure that they are
correctly secured and that there is sufficient
clearance for the pedals.
Do not place several floormats on top of one
another.
The objects or floormats could otherwise get
between the pedals in the event of sudden
braking or acceleration. You may then no
longer be able to brake, change gear or
accelerate as intended. This may result in an
accident and injury.
GWARNING
Do not change down for additional engine
braking on a slippery road surface. This could
cause the drive wheels to lose their grip and
the vehicle could skid. This could cause you
to lose control of your vehicle and cause an
accident.
GWARNING
It is dangerous to shift the automatic
transmission out of parking position P or
neutral position N if the engine speed is
higher than idle speed. If your foot is not firmly
on the brake pedal, the vehicle could
accelerate quickly forward or in reverse. You
could lose control of the vehicle and hit
someone or something. Only shift into gear
114DrivingDriving and parking
Page 119 of 288
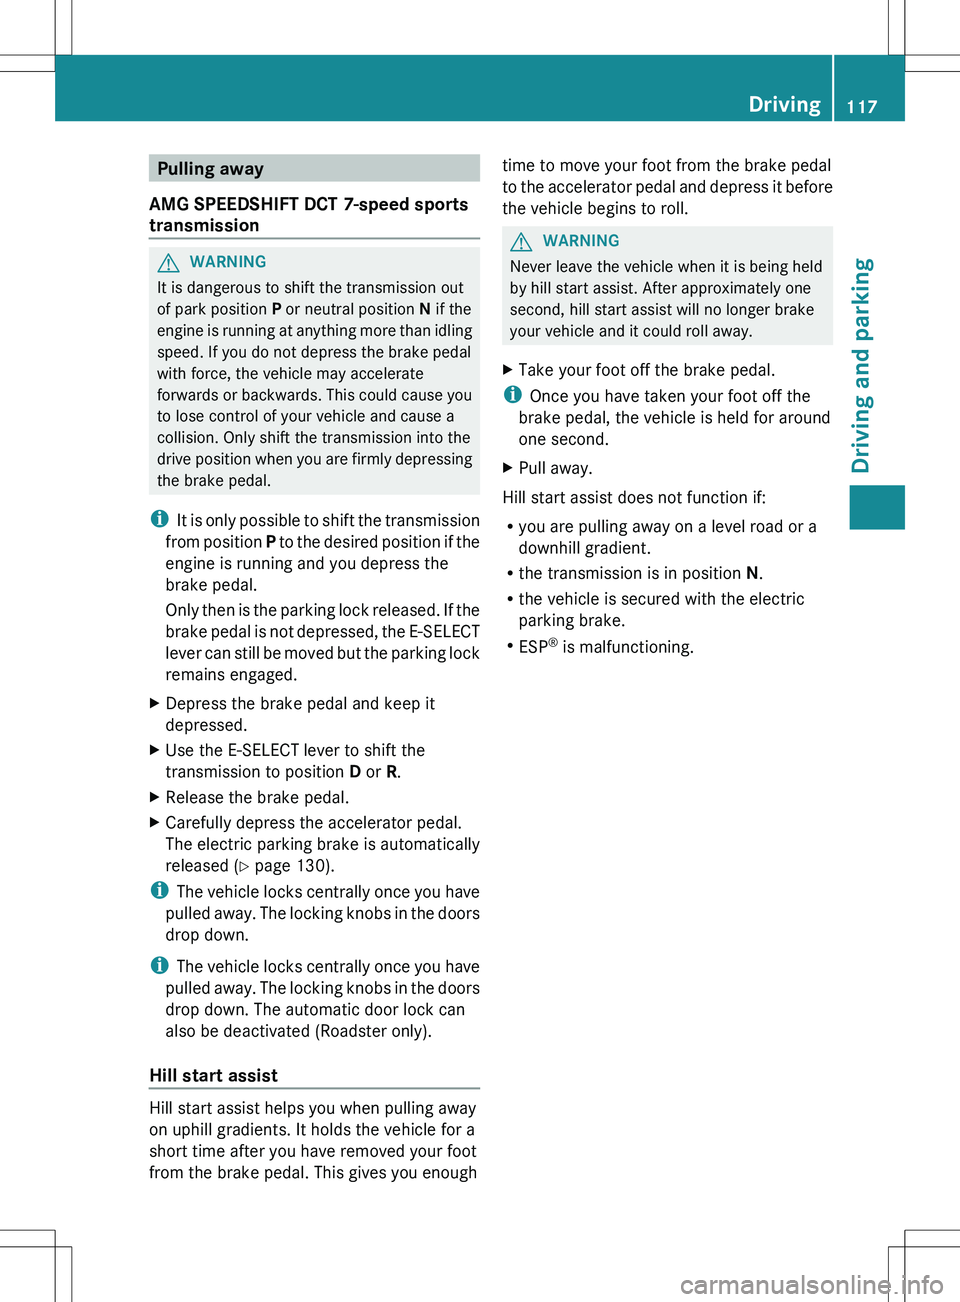
Pulling away
AMG SPEEDSHIFT DCT 7-speed sports
transmissionGWARNING
It is dangerous to shift the transmission out
of park position P or neutral position N if the
engine is running at anything more than idling
speed. If you do not depress the brake pedal
with force, the vehicle may accelerate
forwards or backwards. This could cause you
to lose control of your vehicle and cause a
collision. Only shift the transmission into the
drive position when you are firmly depressing
the brake pedal.
i It is only possible to shift the transmission
from position P to the desired position if the
engine is running and you depress the
brake pedal.
Only then is the parking lock released. If the
brake pedal is not depressed, the E-SELECT
lever can still be moved but the parking lock
remains engaged.
XDepress the brake pedal and keep it
depressed.XUse the E-SELECT lever to shift the
transmission to position D or R.XRelease the brake pedal.XCarefully depress the accelerator pedal.
The electric parking brake is automatically
released ( Y page 130).
i
The vehicle locks centrally once you have
pulled away. The locking knobs in the doors
drop down.
i The vehicle locks centrally once you have
pulled away. The locking knobs in the doors
drop down. The automatic door lock can
also be deactivated (Roadster only).
Hill start assist
Hill start assist helps you when pulling away
on uphill gradients. It holds the vehicle for a
short time after you have removed your foot
from the brake pedal. This gives you enough
time to move your foot from the brake pedal
to the accelerator pedal and depress it before
the vehicle begins to roll.GWARNING
Never leave the vehicle when it is being held
by hill start assist. After approximately one
second, hill start assist will no longer brake
your vehicle and it could roll away.
XTake your foot off the brake pedal.
i Once you have taken your foot off the
brake pedal, the vehicle is held for around
one second.
XPull away.
Hill start assist does not function if:
R you are pulling away on a level road or a
downhill gradient.
R the transmission is in position N.
R the vehicle is secured with the electric
parking brake.
R ESP ®
is malfunctioning.
Driving117Driving and parkingZ
Page 123 of 288
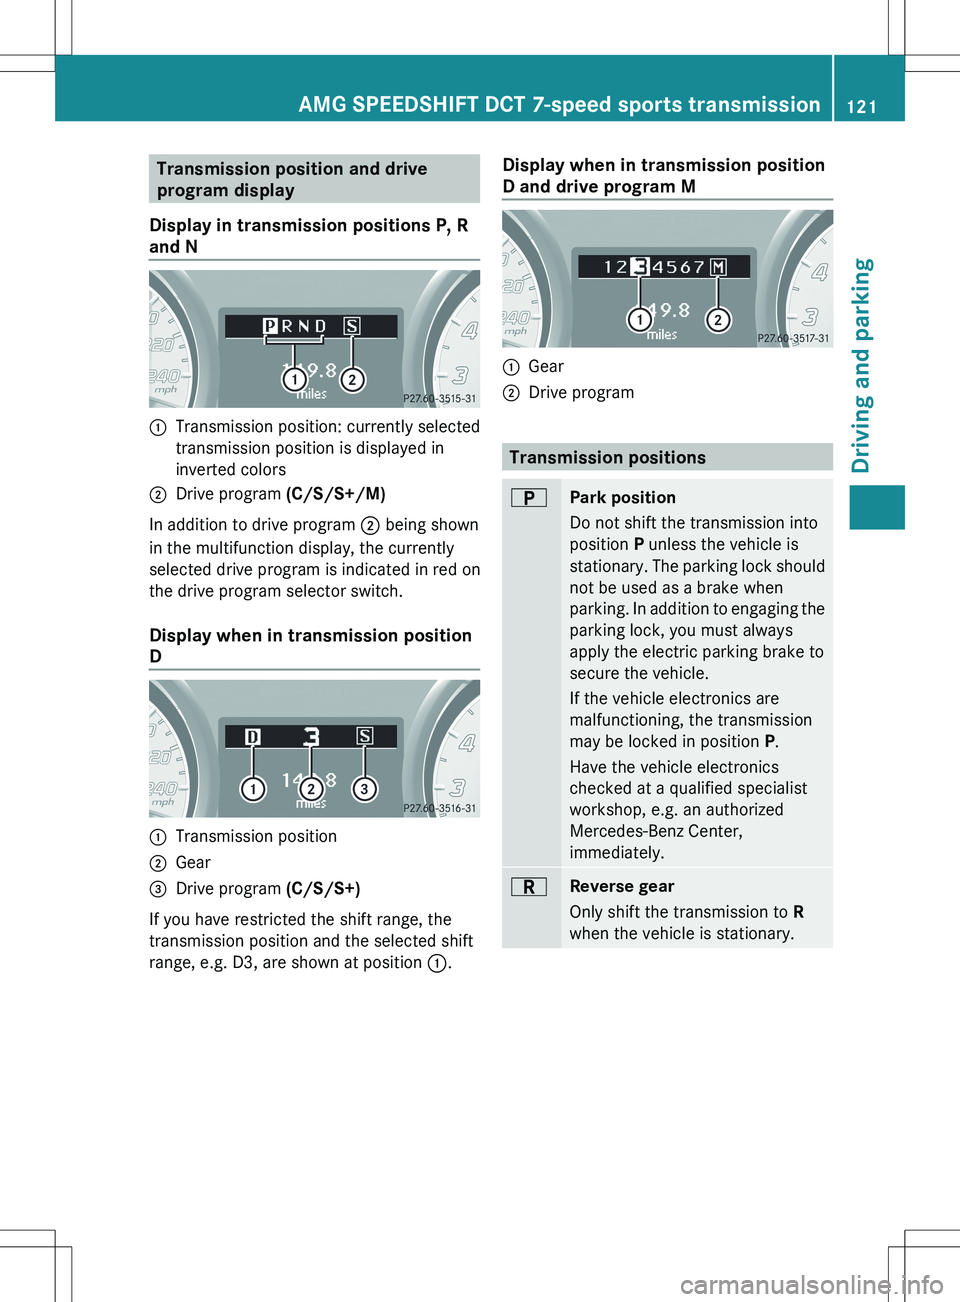
Transmission position and drive
program display
Display in transmission positions P, R
and N:Transmission position: currently selected
transmission position is displayed in
inverted colors;Drive program (C/S/S+/M)
In addition to drive program ; being shown
in the multifunction display, the currently
selected drive program is indicated in red on
the drive program selector switch.
Display when in transmission position
D
:Transmission position;Gear=Drive program (C/S/S+)
If you have restricted the shift range, the
transmission position and the selected shift
range, e.g. D3, are shown at position :.
Display when in transmission position
D and drive program M:Gear;Drive program
Transmission positions
BPark position
Do not shift the transmission into
position P unless the vehicle is
stationary. The parking lock should
not be used as a brake when
parking. In addition to engaging the
parking lock, you must always
apply the electric parking brake to
secure the vehicle.
If the vehicle electronics are
malfunctioning, the transmission
may be locked in position P.
Have the vehicle electronics
checked at a qualified specialist
workshop, e.g. an authorized
Mercedes-Benz Center,
immediately.CReverse gear
Only shift the transmission to R
when the vehicle is stationary.AMG SPEEDSHIFT DCT 7-speed sports transmission121Driving and parkingZ
Page 193 of 288
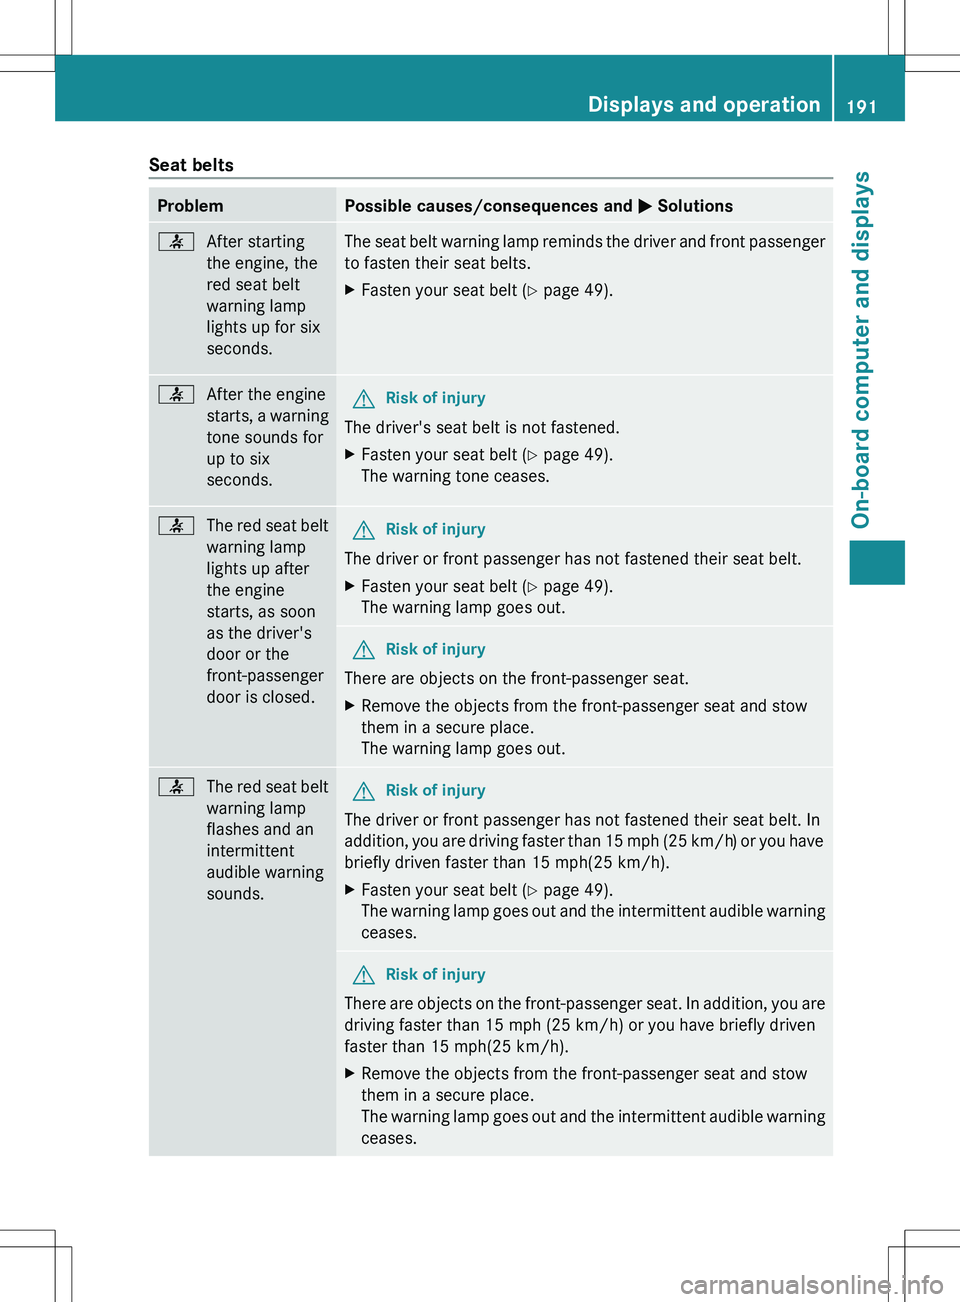
Seat beltsProblemPossible causes/consequences and M Solutions7After starting
the engine, the
red seat belt
warning lamp
lights up for six
seconds.The seat belt warning lamp reminds the driver and front passenger
to fasten their seat belts.XFasten your seat belt ( Y page 49).7After the engine
starts, a warning
tone sounds for
up to six
seconds.GRisk of injury
The driver's seat belt is not fastened.
XFasten your seat belt ( Y page 49).
The warning tone ceases.7The red seat belt
warning lamp
lights up after
the engine
starts, as soon
as the driver's
door or the
front-passenger
door is closed.GRisk of injury
The driver or front passenger has not fastened their seat belt.
XFasten your seat belt ( Y page 49).
The warning lamp goes out.GRisk of injury
There are objects on the front-passenger seat.
XRemove the objects from the front-passenger seat and stow
them in a secure place.
The warning lamp goes out.7The red seat belt
warning lamp
flashes and an
intermittent
audible warning
sounds.GRisk of injury
The driver or front passenger has not fastened their seat belt. In
addition, you are driving faster than 15 mph (25 km/h) or you have
briefly driven faster than 15 mph(25 km/h).
XFasten your seat belt ( Y page 49).
The warning lamp goes out and the intermittent audible warning
ceases.GRisk of injury
There are objects on the front-passenger seat. In addition, you are
driving faster than 15 mph (25 km/h) or you have briefly driven
faster than 15 mph(25 km/h).
XRemove the objects from the front-passenger seat and stow
them in a secure place.
The warning lamp goes out and the intermittent audible warning
ceases.Displays and operation191On-board computer and displaysZ
Page 205 of 288
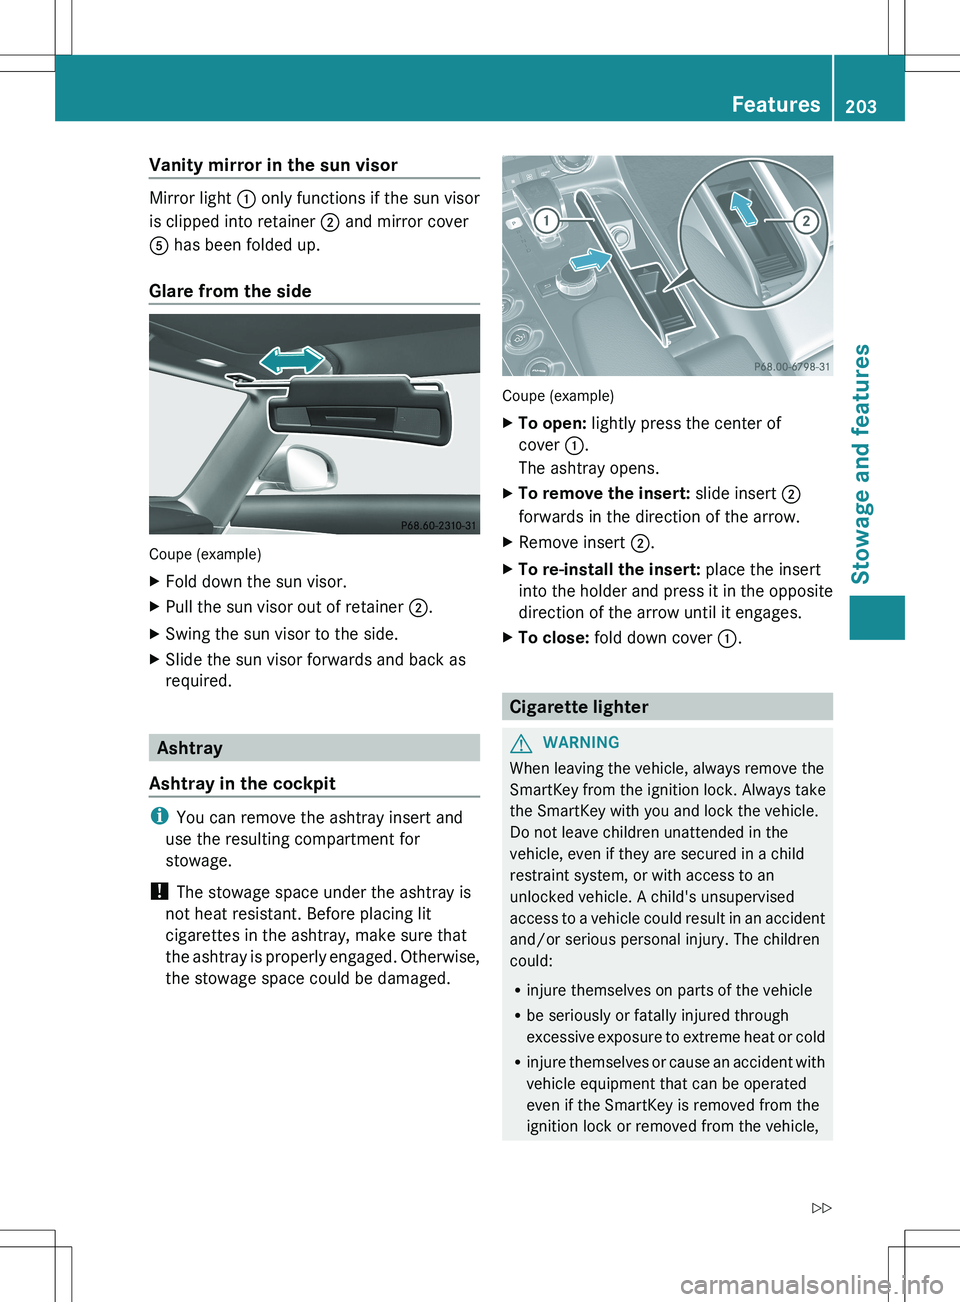
Vanity mirror in the sun visor
Mirror light : only functions if the sun visor
is clipped into retainer ; and mirror cover
A has been folded up.
Glare from the side
Coupe (example)
XFold down the sun visor.XPull the sun visor out of retainer ;.XSwing the sun visor to the side.XSlide the sun visor forwards and back as
required.
Ashtray
Ashtray in the cockpit
i You can remove the ashtray insert and
use the resulting compartment for
stowage.
! The stowage space under the ashtray is
not heat resistant. Before placing lit
cigarettes in the ashtray, make sure that
the ashtray is properly engaged. Otherwise,
the stowage space could be damaged.
Coupe (example)
XTo open: lightly press the center of
cover :.
The ashtray opens.XTo remove the insert: slide insert ;
forwards in the direction of the arrow.XRemove insert ;.XTo re-install the insert: place the insert
into the holder and press it in the opposite
direction of the arrow until it engages.XTo close: fold down cover :.
Cigarette lighter
GWARNING
When leaving the vehicle, always remove the
SmartKey from the ignition lock. Always take
the SmartKey with you and lock the vehicle.
Do not leave children unattended in the
vehicle, even if they are secured in a child
restraint system, or with access to an
unlocked vehicle. A child's unsupervised
access to a vehicle could result in an accident
and/or serious personal injury. The children
could:
R injure themselves on parts of the vehicle
R be seriously or fatally injured through
excessive exposure to extreme heat or cold
R injure themselves or cause an accident with
vehicle equipment that can be operated
even if the SmartKey is removed from the
ignition lock or removed from the vehicle,
Features203Stowage and featuresZ
Page 218 of 288
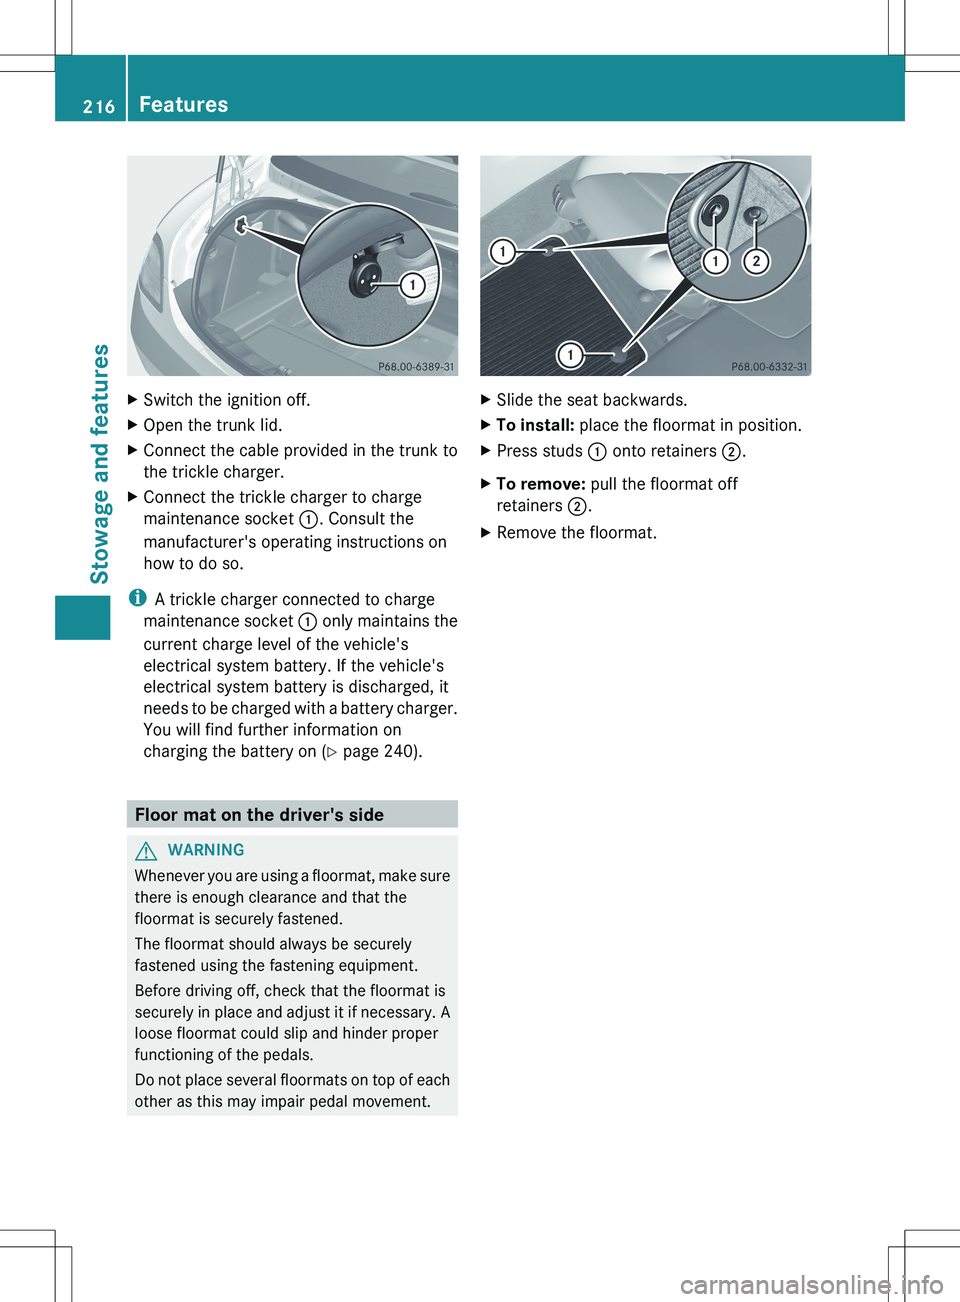
XSwitch the ignition off.XOpen the trunk lid.XConnect the cable provided in the trunk to
the trickle charger.XConnect the trickle charger to charge
maintenance socket :. Consult the
manufacturer's operating instructions on
how to do so.
i A trickle charger connected to charge
maintenance socket : only maintains the
current charge level of the vehicle's
electrical system battery. If the vehicle's
electrical system battery is discharged, it
needs to be charged with a battery charger.
You will find further information on
charging the battery on ( Y page 240).
Floor mat on the driver's side
GWARNING
Whenever you are using a floormat, make sure
there is enough clearance and that the
floormat is securely fastened.
The floormat should always be securely
fastened using the fastening equipment.
Before driving off, check that the floormat is
securely in place and adjust it if necessary. A
loose floormat could slip and hinder proper
functioning of the pedals.
Do not place several floormats on top of each
other as this may impair pedal movement.
XSlide the seat backwards.XTo install: place the floormat in position.XPress studs : onto retainers ;.XTo remove: pull the floormat off
retainers ;.XRemove the floormat.216FeaturesStowage and features
Page 221 of 288
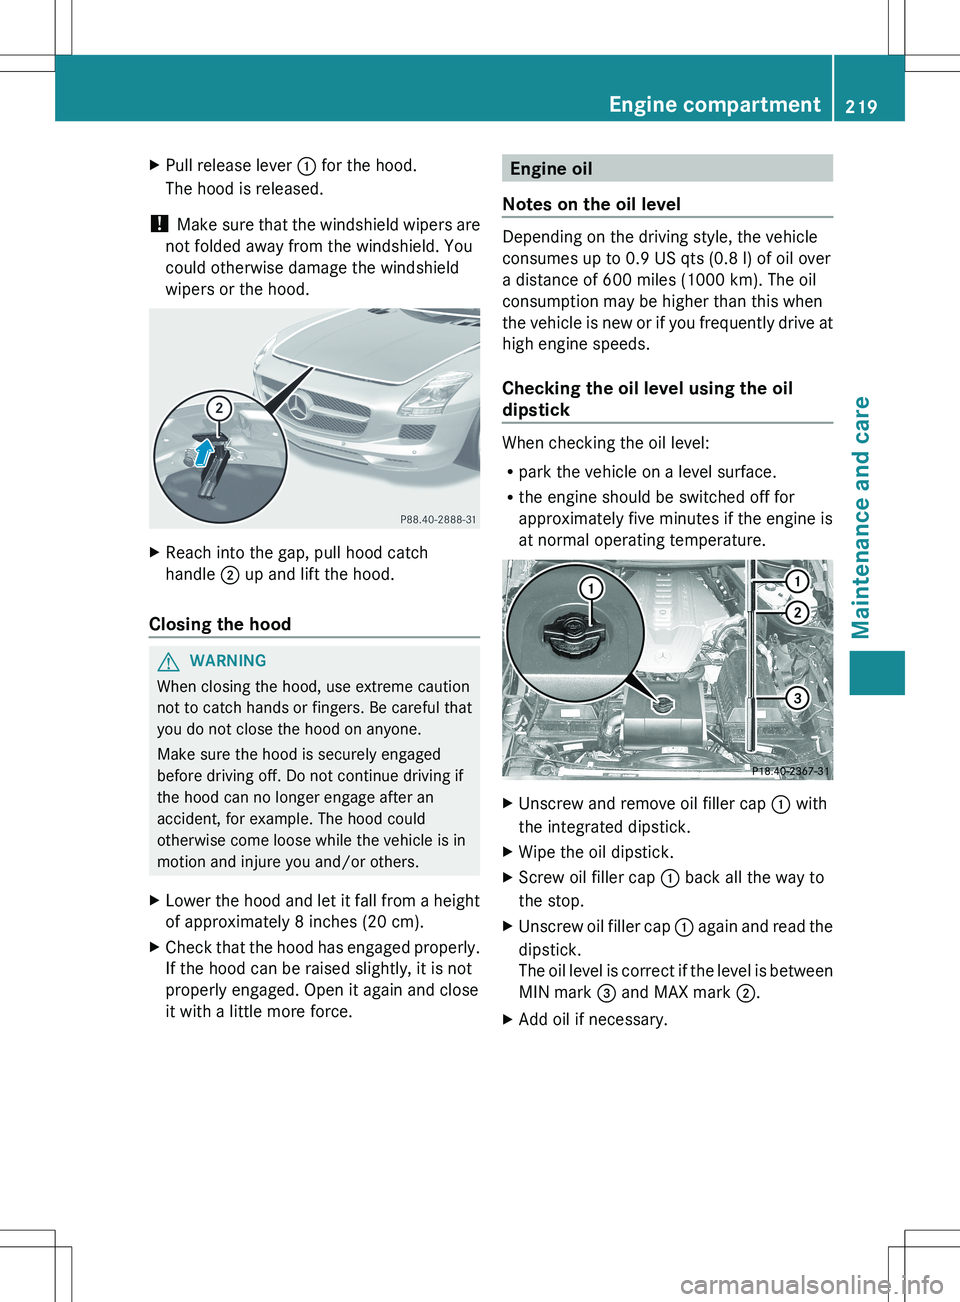
XPull release lever : for the hood.
The hood is released.
! Make sure that the windshield wipers are
not folded away from the windshield. You
could otherwise damage the windshield
wipers or the hood.
XReach into the gap, pull hood catch
handle ; up and lift the hood.
Closing the hood
GWARNING
When closing the hood, use extreme caution
not to catch hands or fingers. Be careful that
you do not close the hood on anyone.
Make sure the hood is securely engaged
before driving off. Do not continue driving if
the hood can no longer engage after an
accident, for example. The hood could
otherwise come loose while the vehicle is in
motion and injure you and/or others.
XLower the hood and let it fall from a height
of approximately 8 inches (20 cm).XCheck that the hood has engaged properly.
If the hood can be raised slightly, it is not
properly engaged. Open it again and close
it with a little more force.Engine oil
Notes on the oil level
Depending on the driving style, the vehicle
consumes up to 0.9 US qts (0.8 l) of oil over
a distance of 600 miles (1000 km). The oil
consumption may be higher than this when
the vehicle is new or if you frequently drive at
high engine speeds.
Checking the oil level using the oil
dipstick
When checking the oil level:
R park the vehicle on a level surface.
R the engine should be switched off for
approximately five minutes if the engine is
at normal operating temperature.
XUnscrew and remove oil filler cap : with
the integrated dipstick.XWipe the oil dipstick.XScrew oil filler cap : back all the way to
the stop.XUnscrew oil filler cap : again and read the
dipstick.
The oil level is correct if the level is between
MIN mark = and MAX mark ;.XAdd oil if necessary.Engine compartment219Maintenance and careZ