mirror MERCEDES-BENZ SLS AMG ROADSTER 2012 Owner's Guide
[x] Cancel search | Manufacturer: MERCEDES-BENZ, Model Year: 2012, Model line: SLS AMG ROADSTER, Model: MERCEDES-BENZ SLS AMG ROADSTER 2012Pages: 288, PDF Size: 18.46 MB
Page 216 of 288
XPress and hold button B on remote control
A until indicator lamp : lights up green.
The programming has been successful if
indicator lamp : lights up or flashes
green.XRelease button ;, = or ? on the
integrated garage door opener and button
B on garage door remote control A.
If indicator lamp : lights up red:
XRepeat the programming operation for the
corresponding button on the rear-view
mirror. When doing so, vary the distance
between remote control A and the rear-
view mirror.
i If the indicator lamp flashes green after
successful programming, the garage door
system is operating on a rolling code. After
programming, you must synchronize the
garage door opener integrated in the rear-
view mirror with the receiver of the garage
door system.
Synchronizing the rolling code
Your vehicle must be within range of the
garage or gate opener drive. Make sure that
neither your vehicle nor any persons/objects
are present within the sweep of the door or
gate.
Observe the safety notes when performing
the rolling code synchronization
( Y page 212).
XTurn the SmartKey to position 2 in the
ignition lock.XPress the programming button of the door
or gate drive (see the door or gate drive
operating instructions, e.g. under
"Programming of additional remote
controls").
i Usually, you now have 30seconds to
initiate the next step.
XPress the previously programmed
button ;, = or ? of the integratedgarage door opener repeatedly until the
door starts to move.
The rolling code synchronization is then
complete.
Notes on programming the remote
control
Canadian radio frequency laws require a
"break" (or interruption) of the transmission
signals after broadcasting for a few seconds.
Therefore, these signals may not last long
enough for the integrated remote control. The
signal is not recognized during programming.
Comparable with Canadian law, some U.S.
garage door openers are designed to "time-
out" in the same manner.
Proceed as follows:
R if you live in Canada.
R if you have difficulties programming the
garage door opener (regardless of where
you live) when using the programming
steps.
XPress and hold one of the buttons ;
to ? on the integrated garage door
opener.
Indicator lamp : starts to flash yellow
after a short period.XRelease the switch.XPress button B of garage door remote
control A for two seconds, then release it
for two seconds.XPress button B again for two seconds.XRepeat this sequence on button B of
remote control A until indicator lamp :
lights up green.
Repeat the process if indicator lamp :
turns red.XContinue with the other programming
steps (see above).214FeaturesStowage and features
Page 217 of 288
Problems when programming
If you are experiencing problems
programming the integrated garage door
opener on the rear-view mirror, take note of
the following instructions:
R Check remote control frequency of garage
door drive remote control A. This is
usually located on the back of the remote
control.
The integrated garage door opener is
compatible with devices that have units
which operate in the frequency range of
280 to 390 MHz.
R Change the batteries in garage door remote
control A. This increases the likelihood
that garage door remote control A will
send a strong and precise signal to the
integrated garage door opener in the rear-
view mirror.
R When programming, hold remote control
A at varying distances and angles from the
button which you are programming. Try
various angles at a distance of between 2
to 12 inches (5 to 30 cm) or at the same
angle but at varying distances.
R if another remote control for the same
garage door drive is available, repeat the
same programming steps with this remote
control. Before performing these steps,
make sure that new batteries have been
installed in garage door drive remote
control A.
R note that some remote controls only
transmit for a limited amount of time (the
indicator lamp on the remote control goes
out). Press button B on remote control
A before transmission ends.
R align the antenna cable of the garage door
opener unit. This can improve signal
reception/transmission.
Opening/closing the garage door
After it has been programmed, the integrated
garage door opener performs the function of
the garage door system remote control.
Please also read the operating instructions
for the garage door system.XTurn the SmartKey to position 2 in the
ignition lock.XPress one of the buttons ;, = or ?;
whichever one is programmed to operate
the garage door.
Garage door system with a fixed code:
indicator lamp : lights up green.
Garage door system with a rolling code:
indicator lamp : flashes green.
i
The transmitter will transmit a signal for
as long as the button is pressed. The
transmission is halted after a maximum of
ten seconds and indicator lamp : flashes
yellow. Press button ;, = or ? again if
necessary.
Clearing the memory of the integrated
garage door opener on the rear-view
mirror
XTurn the SmartKey to position 2 in the
ignition lock.XPress buttons ; and ?.
The indicator lamp lights up yellow.XPress and hold buttons ; and ? until the
indicator lamp turns green.
i Make sure that you clear the memory of
the integrated garage door opener before
selling the vehicle.
Charge maintenance socket
The battery may drain if the vehicle is left
stationary for long periods. In this case,
Mercedes-Benz recommends attaching the
trickle charger to the charge maintenance
socket.
The charge maintenance socket is designed
solely for connecting a trickle charger. A
trickle charger can be obtained from an
authorized Mercedes-Benz Center, for
example.
Features215Stowage and featuresZ
Page 226 of 288
SmartKey to position 2. Make sure that you
then leave the SmartKey in position 2. You
may otherwise damage the vehicle, the
transmission or the car wash.
Check the transmission position in the
instrument cluster.
! Use the E-SELECT lever to shift the
transmission to N before switching the
engine off. If you open the driver's or front-
passenger door, the transmission remains
in this position for up to 30 minutes if the
SmartKey is in the ignition, even if the
engine is switched off. If you do not shift
the transmission to N using the E-SELECT
lever beforehand, it shifts automatically to
parking position P and locks the wheels if
the driver's or front-passenger door is
opened and the engine is switched off. This
may damage the vehicle, the transmission
or the car wash.
Observe the information on maneuvering
( Y page 129).
! Before driving into an automatic car wash,
make sure that it is suitable for the
dimensions of the vehicle. In particular,
make sure that:
R there is enough ground clearance
between the vehicle underbody and the
guide rails of the automatic car wash.
R the clearance width of the automatic car
wash is sufficient, particularly the width
of the guide rails.
R you enter the automatic car wash
straight and in the center of the guide
rails in order to avoid damaging the tires
or wheel rims.
Fold in the exterior mirrors before the
vehicle is washed. The exterior mirrors
could otherwise be damaged.
! Make sure that:R
the side windows are fully closed.
R the ventilation/heating is switched off
(the OFF button has been pressed/the
airflow control is set to position 0).
R that the windshield wiper switch is in
position 0.
Otherwise, the vehicle might be damaged.
! In portal car washes, the windshield
wipers may be moved up the windshield by
the cleaning brushes when the ignition is
switched off.
Set the Start/Stop button to key position
2 to reset the windshield wipers to their
original position.
! Vehicles with a matte finish:
Do not use wash programs with a hot wax
treatment under any circumstances.
After using an automatic car wash, wipe off
wax and drying agents from the windshield
and the wiper blades. This will prevent smears
and reduce wiping noises caused by residue
on the windshield.
Power washersGWARNING
Using power washers with circular-jet nozzles
(dirt grinders) may cause damage to the
vehicle, in particular to the tires.
Using damaged tires results in an increased
risk of accident. A sudden loss of tire pressure
while you are driving may cause you to lose
control of your vehicle, cause an accident and
injure yourself and others.
! Maintain a minimum distance of
11.8 in (30 cm) between the vehicle and the
power washer nozzle. Information about
the correct distance is available from the
equipment manufacturer.
Move the power washer nozzle around
when cleaning your vehicle.
224CareMaintenance and care
Page 244 of 288
Mercedes-Benz recommends that you do not
carry out work on batteries yourself, e.g.
removing or charging. Always have this work
performed at a qualified specialist workshop,
e.g. an authorized Mercedes-Benz Center.
i If the battery power supply has been
interrupted, e.g. if the battery has been
reconnected, you must reset the function
for automatically folding the exterior
mirrors in/out by folding the mirrors out
once ( Y page 90).
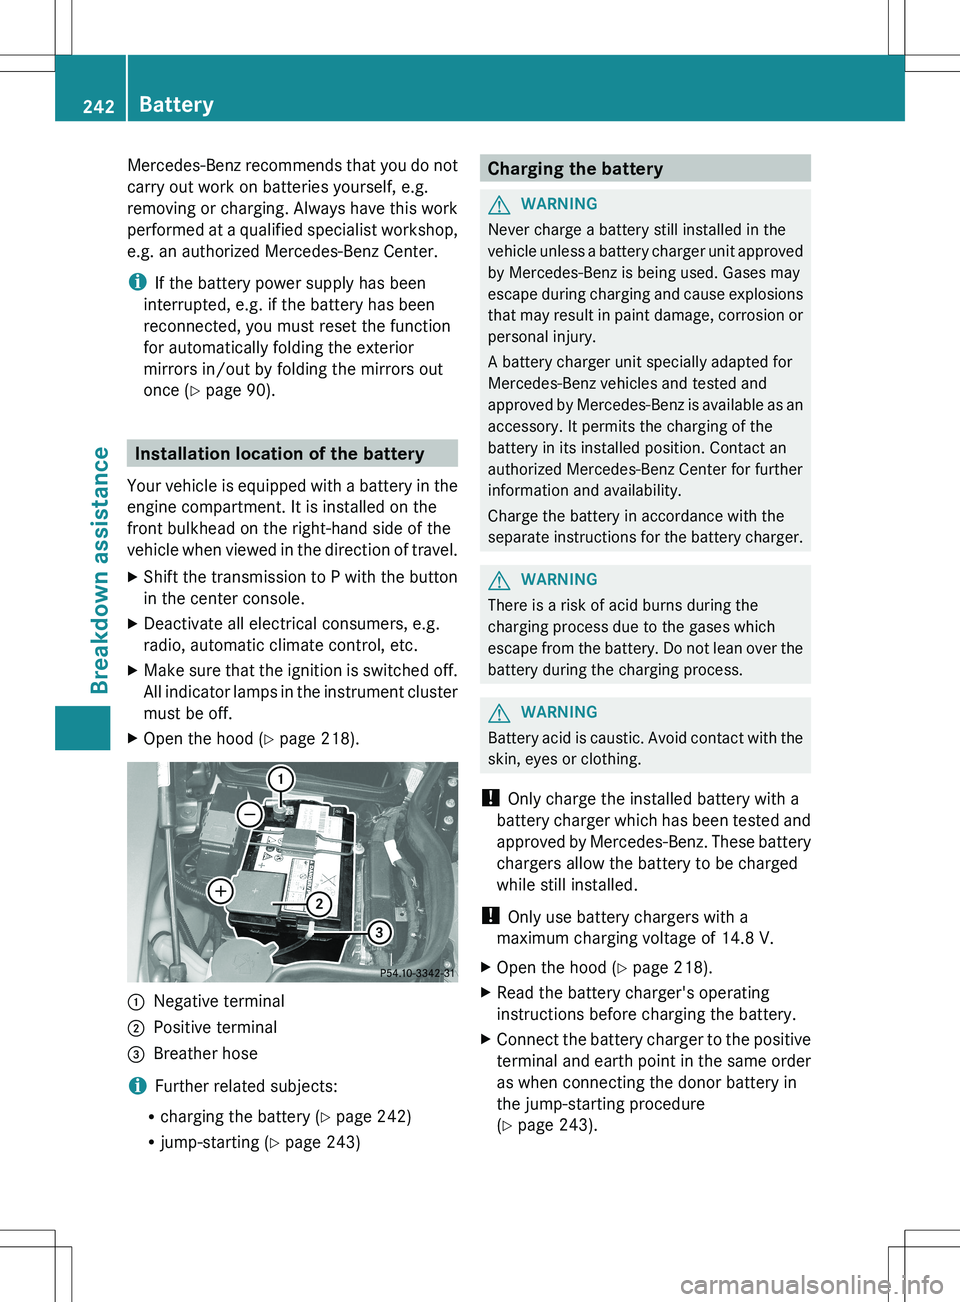
Installation location of the battery
Your vehicle is equipped with a battery in the
engine compartment. It is installed on the
front bulkhead on the right-hand side of the
vehicle when viewed in the direction of travel.
XShift the transmission to P with the button
in the center console.XDeactivate all electrical consumers, e.g.
radio, automatic climate control, etc.XMake sure that the ignition is switched off.
All indicator lamps in the instrument cluster
must be off.XOpen the hood ( Y page 218).:Negative terminal;Positive terminal=Breather hose
i Further related subjects:
R charging the battery ( Y page 242)
R jump-starting ( Y page 243)
Charging the batteryGWARNING
Never charge a battery still installed in the
vehicle unless a battery charger unit approved
by Mercedes-Benz is being used. Gases may
escape during charging and cause explosions
that may result in paint damage, corrosion or
personal injury.
A battery charger unit specially adapted for
Mercedes-Benz vehicles and tested and
approved by Mercedes-Benz is available as an
accessory. It permits the charging of the
battery in its installed position. Contact an
authorized Mercedes-Benz Center for further
information and availability.
Charge the battery in accordance with the
separate instructions for the battery charger.
GWARNING
There is a risk of acid burns during the
charging process due to the gases which
escape from the battery. Do not lean over the
battery during the charging process.
GWARNING
Battery acid is caustic. Avoid contact with the
skin, eyes or clothing.
! Only charge the installed battery with a
battery charger which has been tested and
approved by Mercedes-Benz. These battery
chargers allow the battery to be charged
while still installed.
! Only use battery chargers with a
maximum charging voltage of 14.8 V.
XOpen the hood ( Y page 218).XRead the battery charger's operating
instructions before charging the battery.XConnect the battery charger to the positive
terminal and earth point in the same order
as when connecting the donor battery in
the jump-starting procedure
( Y page 243).242BatteryBreakdown assistance
Page 286 of 288
The water in the engine cooling system must
meet minimum requirements, which are
usually satisfied by normal drinking water. If
you are unsure about the water quality,
contact an authorized Mercedes-Benz
Center.
Windshield/headlamp cleaning
system
GWARNING
Washer solvent/antifreeze is highly
flammable. Do not spill washer solvent/
antifreeze on hot engine parts, because it may
ignite and burn. You could be seriously
burned.
Use MB SummerFit windshield washer
concentrate at temperatures above freezing:
XMix 1 part MB SummerFit to 100 parts
water (1.34 fl oz[40 ml] to 1 gal[4.0 l]
water).
Use freely available premixed windshield
washer concentrate at temperatures below
freezing:
XMix 1 part MB SummerFit to 100 parts
windshield washer concentrate
(1.34 fl oz[40 ml] to 1 gal[4.0 l] windshield
washer concentrate).
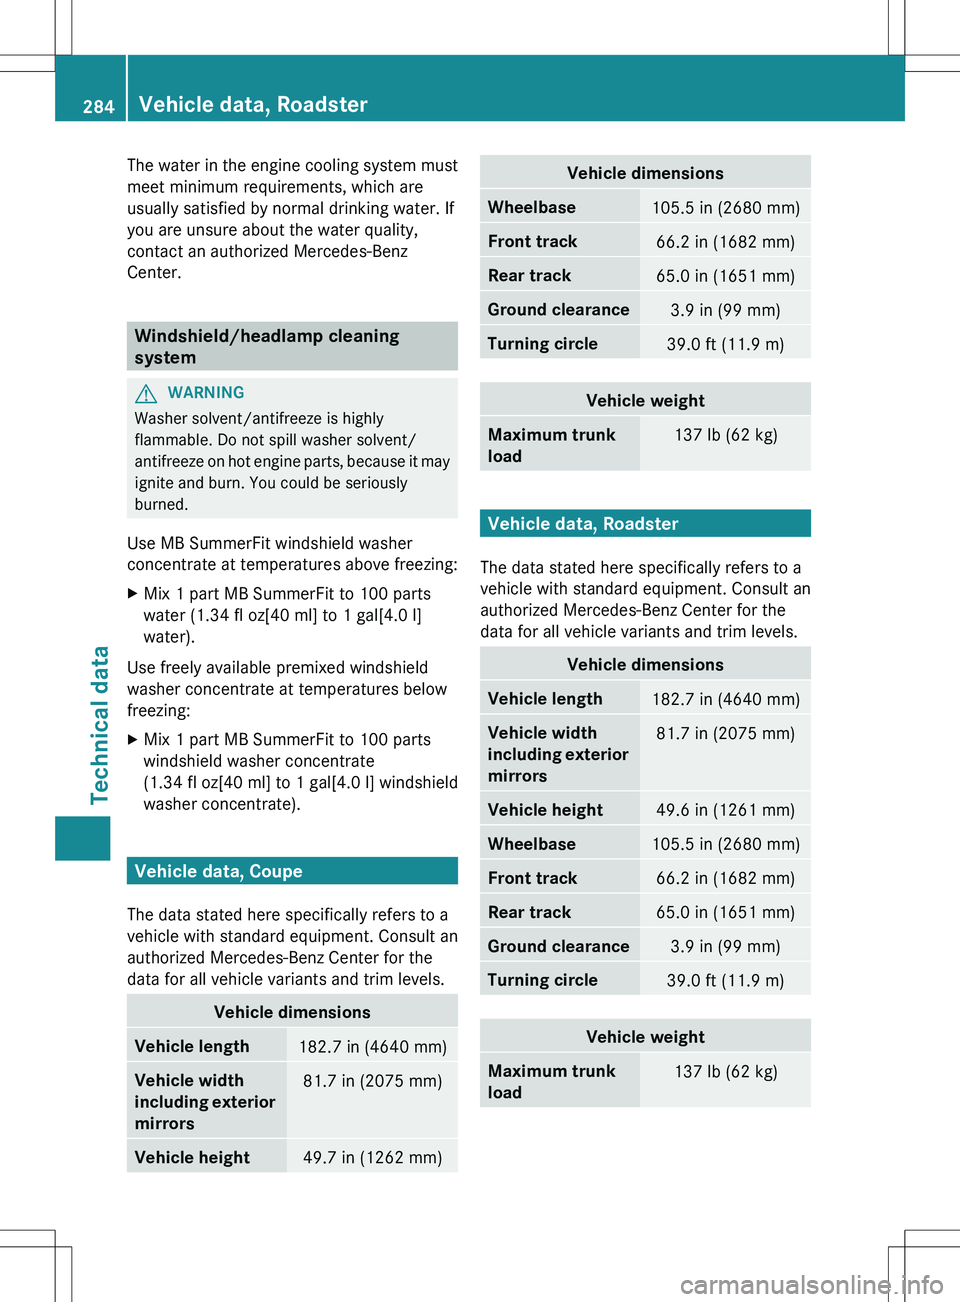
Vehicle data, Coupe
The data stated here specifically refers to a
vehicle with standard equipment. Consult an
authorized Mercedes-Benz Center for the
data for all vehicle variants and trim levels.
Vehicle dimensionsVehicle length182.7 in (4640 mm)Vehicle width
including exterior
mirrors81.7 in (2075 mm)Vehicle height49.7 in (1262 mm)Vehicle dimensionsWheelbase105.5 in (2680 mm)Front track66.2 in (1682 mm)Rear track65.0 in (1651 mm)Ground clearance3.9 in (99 mm)Turning circle39.0 ft (11.9 m)Vehicle weightMaximum trunk
load137 lb (62 kg)
Vehicle data, Roadster
The data stated here specifically refers to a
vehicle with standard equipment. Consult an
authorized Mercedes-Benz Center for the
data for all vehicle variants and trim levels.
Vehicle dimensionsVehicle length182.7 in (4640 mm)Vehicle width
including exterior
mirrors81.7 in (2075 mm)Vehicle height49.6 in (1261 mm)Wheelbase105.5 in (2680 mm)Front track66.2 in (1682 mm)Rear track65.0 in (1651 mm)Ground clearance3.9 in (99 mm)Turning circle39.0 ft (11.9 m)Vehicle weightMaximum trunk
load137 lb (62 kg)284Vehicle data, RoadsterTechnical data