change key battery MERCEDES-BENZ SLS AMG ROADSTER 2012 Owners Manual
[x] Cancel search | Manufacturer: MERCEDES-BENZ, Model Year: 2012, Model line: SLS AMG ROADSTER, Model: MERCEDES-BENZ SLS AMG ROADSTER 2012Pages: 288, PDF Size: 18.46 MB
Page 61 of 288
mode message appears in the multifunction
display.XTo deactivate SPORT handling mode:
briefly press button :.
The M warning lamp in the instrument
cluster goes out. ESP ®
is activated.
EBD (electronic brake force
distribution)
Observe the "Important safety notes" section
( Y page 56).
EBD monitors and controls the brake
pressure on the rear wheels to improve
driving stability while braking.
GWARNING
If the EBD malfunctions, the brake system will
still function with full brake boost. However,
the rear wheels could lock up during
emergency braking situations, for example.
You could lose control of the vehicle and
cause an accident.
Adapt your driving style to the changed
driving characteristics.
ADAPTIVE BRAKE
Observe the "Important safety notes" section
( Y page 54).
ADAPTIVE BRAKE enhances braking safety
and offers increased braking comfort. In
addition to the braking function, ADAPTIVE
BRAKE also features the hill start assist
function ( Y page 117). For further
information, see Driving tips ( Y page 133).
Anti-theft systems
Immobilizer
The immobilizer prevents your vehicle from
being started without the correct SmartKey.
When leaving the vehicle, always take the
SmartKey with you and lock the vehicle. The
engine can be started by anyone with a valid
SmartKey that is left inside the vehicle.XTo activate with KEYLESS-GO: switch the
engine off and open the driver's door.XTo activate with the SmartKey: remove
the SmartKey from the ignition lock.XTo deactivate: switch on the ignition.
i
The immobilizer is always deactivated
when you start the engine.
In the event that the engine cannot be
started when the starter battery is fully
charged, the immobilizer may be faulty.
Contact an authorized Mercedes-Benz
Center or call 1-800-FOR-MERCedes (in
USA) or 1-800-387-0100 (in Canada).
ATA (anti-theft alarm system)
A visual and audible alarm is triggered if the
alarm system is armed and you open:
R a door
R the trunk lid
R the hood
R Roadster: the glove box
R Roadster: a compartment in the center
console
R the vehicle with the mechanical key
The alarm is not switched off, even if you
close the open door that has triggered it, for
example.
Anti-theft systems59SafetyZ
Page 67 of 288
When it is dark, the surround lighting also
comes on if it is activated in the on-board
computer ( Y page 158).
You can also set an audible signal to confirm
that the vehicle has been locked or unlocked.
The audible signal can be activated and
deactivated using the on-board computer
( Y page 159).XTo unlock centrally: press the %
button.
If you do not open the vehicle within
approximately 40 seconds of unlocking:
R the vehicle is locked again.
R the anti-theft alarm system is armed again.
XTo lock centrally: press the & button.
Changing the settings of the locking
system
You can change the setting of the locking
system in such a way that only the driver's
door and the fuel filler flap are unlocked. This
is useful if you frequently travel on your own.
XTo change the setting: press and hold
down the % and & buttons
simultaneously for approximately six
seconds until the battery check lamp
( Y page 66) flashes twice.
The SmartKey now functions as follows:
XTo unlock the driver's door: press the
% button once.XTo unlock centrally: press the %
button twice.XTo lock centrally: press the & button.
Restoring the factory settings
XPress the % and & buttons
simultaneously for approximately six
seconds until the battery check lamp
flashes twice.Mechanical key
General notes
If the vehicle can no longer be locked or
unlocked with the SmartKey, use the
mechanical key.
If you use the mechanical key to unlock and
open the driver's door, the anti-theft alarm
system will be triggered ( Y page 59).
There are several ways to turn off the alarm:
XPress the % or & button on the
SmartKey.
or
XInsert the SmartKey into the ignition lock.XTo unlock the fuel filler flap: insert the
SmartKey into the ignition lock.
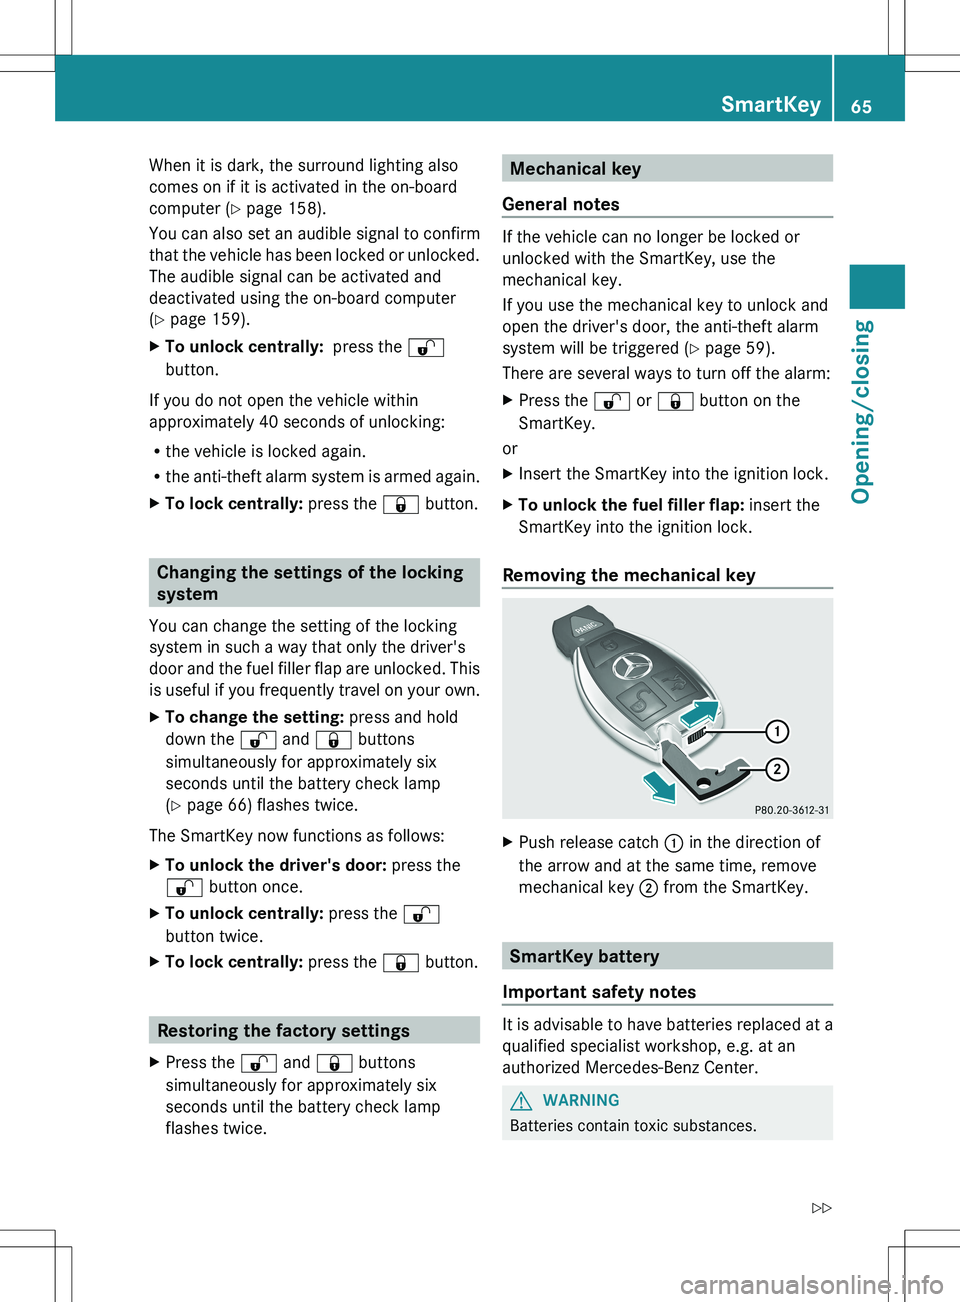
Removing the mechanical key
XPush release catch : in the direction of
the arrow and at the same time, remove
mechanical key ; from the SmartKey.
SmartKey battery
Important safety notes
It is advisable to have batteries replaced at a
qualified specialist workshop, e.g. at an
authorized Mercedes-Benz Center.
GWARNING
Batteries contain toxic substances.
SmartKey65Opening/closingZ
Page 69 of 288
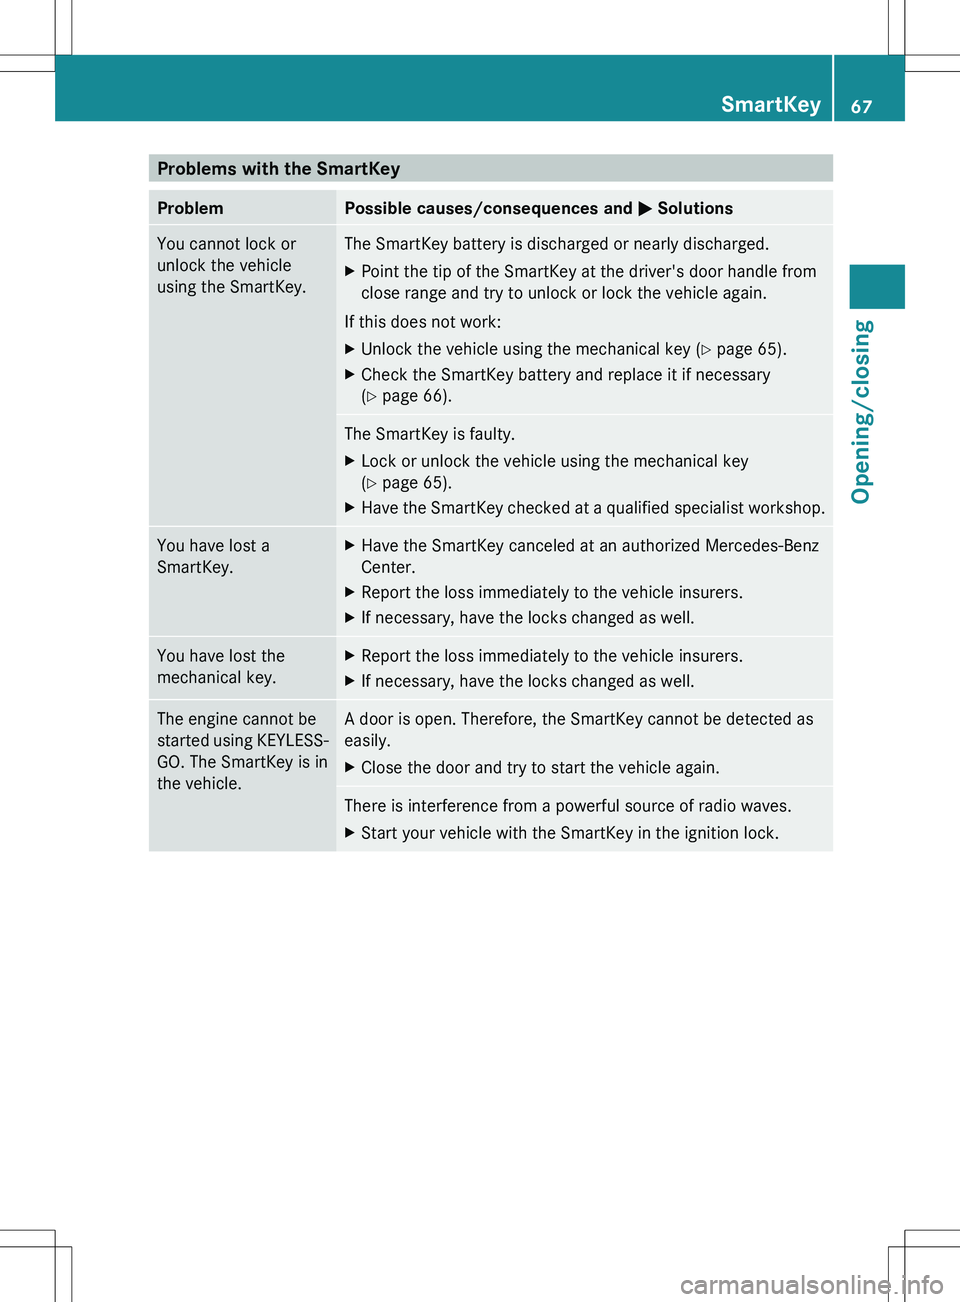
Problems with the SmartKeyProblemPossible causes/consequences and M SolutionsYou cannot lock or
unlock the vehicle
using the SmartKey.The SmartKey battery is discharged or nearly discharged.XPoint the tip of the SmartKey at the driver's door handle from
close range and try to unlock or lock the vehicle again.
If this does not work:
XUnlock the vehicle using the mechanical key ( Y page 65).XCheck the SmartKey battery and replace it if necessary
( Y page 66).The SmartKey is faulty.XLock or unlock the vehicle using the mechanical key
( Y page 65).XHave the SmartKey checked at a qualified specialist workshop.You have lost a
SmartKey.XHave the SmartKey canceled at an authorized Mercedes-Benz
Center.XReport the loss immediately to the vehicle insurers.XIf necessary, have the locks changed as well.You have lost the
mechanical key.XReport the loss immediately to the vehicle insurers.XIf necessary, have the locks changed as well.The engine cannot be
started using KEYLESS-
GO. The SmartKey is in
the vehicle.A door is open. Therefore, the SmartKey cannot be detected as
easily.XClose the door and try to start the vehicle again.There is interference from a powerful source of radio waves.XStart your vehicle with the SmartKey in the ignition lock.SmartKey67Opening/closingZ
Page 187 of 288
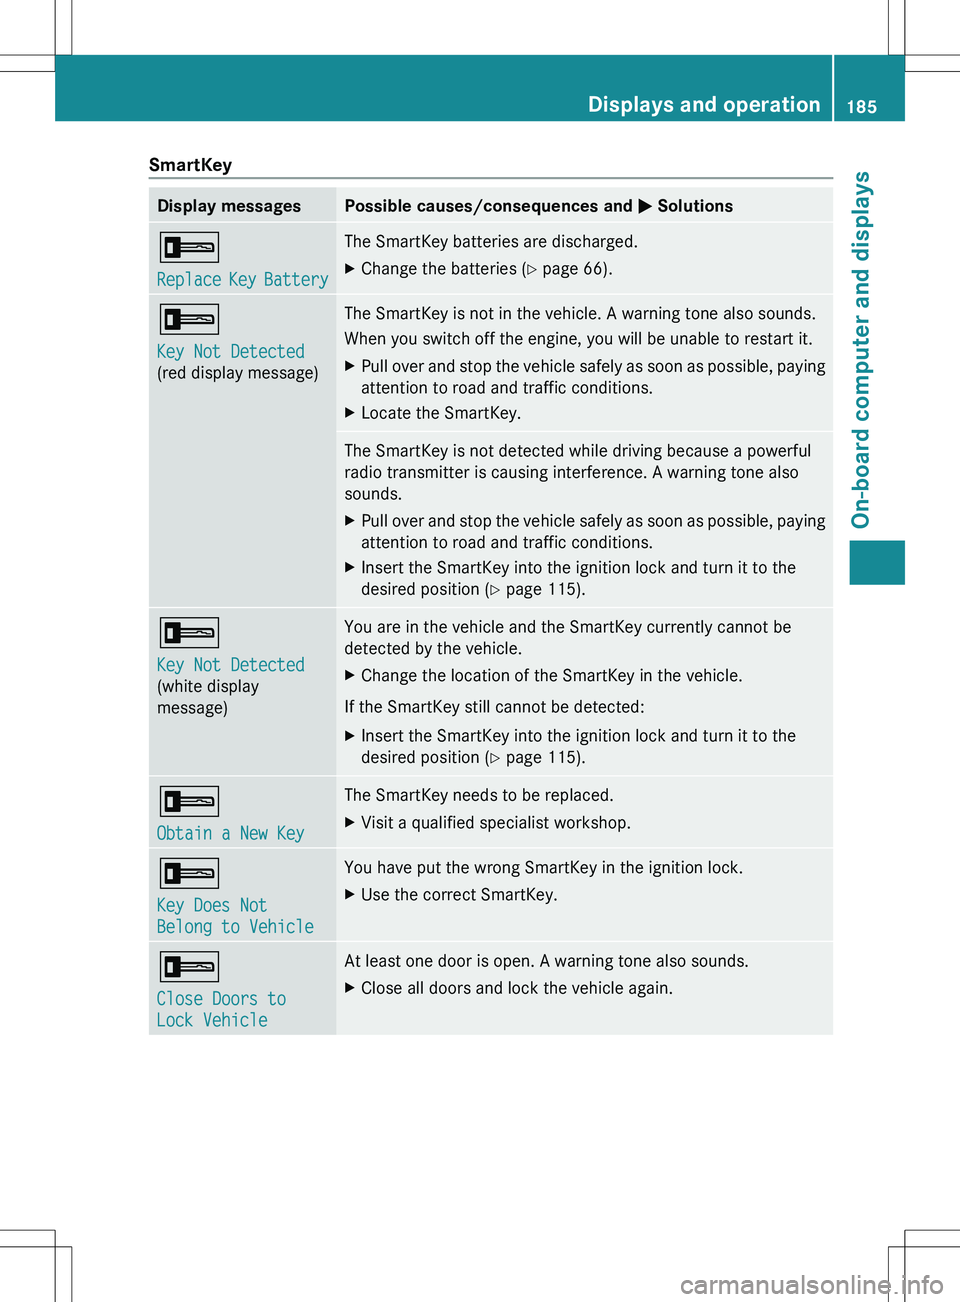
SmartKeyDisplay messagesPossible causes/consequences and M Solutions+
Replace Key BatteryThe SmartKey batteries are discharged.XChange the batteries ( Y page 66).+
Key Not Detected
(red display message)The SmartKey is not in the vehicle. A warning tone also sounds.
When you switch off the engine, you will be unable to restart it.XPull over and stop the vehicle safely as soon as possible, paying
attention to road and traffic conditions.XLocate the SmartKey.The SmartKey is not detected while driving because a powerful
radio transmitter is causing interference. A warning tone also
sounds.XPull over and stop the vehicle safely as soon as possible, paying
attention to road and traffic conditions.XInsert the SmartKey into the ignition lock and turn it to the
desired position ( Y page 115).+
Key Not Detected
(white display
message)You are in the vehicle and the SmartKey currently cannot be
detected by the vehicle.XChange the location of the SmartKey in the vehicle.
If the SmartKey still cannot be detected:
XInsert the SmartKey into the ignition lock and turn it to the
desired position ( Y page 115).+
Obtain a New Key The SmartKey needs to be replaced.XVisit a qualified specialist workshop.+
Key Does Not
Belong to VehicleYou have put the wrong SmartKey in the ignition lock.XUse the correct SmartKey.+
Close Doors to
Lock VehicleAt least one door is open. A warning tone also sounds.XClose all doors and lock the vehicle again.Displays and operation185On-board computer and displaysZ
Page 217 of 288
Problems when programming
If you are experiencing problems
programming the integrated garage door
opener on the rear-view mirror, take note of
the following instructions:
R Check remote control frequency of garage
door drive remote control A. This is
usually located on the back of the remote
control.
The integrated garage door opener is
compatible with devices that have units
which operate in the frequency range of
280 to 390 MHz.
R Change the batteries in garage door remote
control A. This increases the likelihood
that garage door remote control A will
send a strong and precise signal to the
integrated garage door opener in the rear-
view mirror.
R When programming, hold remote control
A at varying distances and angles from the
button which you are programming. Try
various angles at a distance of between 2
to 12 inches (5 to 30 cm) or at the same
angle but at varying distances.
R if another remote control for the same
garage door drive is available, repeat the
same programming steps with this remote
control. Before performing these steps,
make sure that new batteries have been
installed in garage door drive remote
control A.
R note that some remote controls only
transmit for a limited amount of time (the
indicator lamp on the remote control goes
out). Press button B on remote control
A before transmission ends.
R align the antenna cable of the garage door
opener unit. This can improve signal
reception/transmission.
Opening/closing the garage door
After it has been programmed, the integrated
garage door opener performs the function of
the garage door system remote control.
Please also read the operating instructions
for the garage door system.XTurn the SmartKey to position 2 in the
ignition lock.XPress one of the buttons ;, = or ?;
whichever one is programmed to operate
the garage door.
Garage door system with a fixed code:
indicator lamp : lights up green.
Garage door system with a rolling code:
indicator lamp : flashes green.
i
The transmitter will transmit a signal for
as long as the button is pressed. The
transmission is halted after a maximum of
ten seconds and indicator lamp : flashes
yellow. Press button ;, = or ? again if
necessary.
Clearing the memory of the integrated
garage door opener on the rear-view
mirror
XTurn the SmartKey to position 2 in the
ignition lock.XPress buttons ; and ?.
The indicator lamp lights up yellow.XPress and hold buttons ; and ? until the
indicator lamp turns green.
i Make sure that you clear the memory of
the integrated garage door opener before
selling the vehicle.
Charge maintenance socket
The battery may drain if the vehicle is left
stationary for long periods. In this case,
Mercedes-Benz recommends attaching the
trickle charger to the charge maintenance
socket.
The charge maintenance socket is designed
solely for connecting a trickle charger. A
trickle charger can be obtained from an
authorized Mercedes-Benz Center, for
example.
Features215Stowage and featuresZ
Page 247 of 288
vehicle with a tow rope or tow bar. Observe
the following notes.GWARNING
If the brake system is malfunctioning, you
must use a rigid tow bar to tow the vehicle.
Before towing away, make sure that the
steering can be moved and is not locked.
If there is a malfunction in the power supply
or the vehicle's electrical system, you must
not tow the vehicle.
GWARNING
The following can occur if the vehicle is towed:
R the engine may not start.
R the on-board electronics may fail.
R the battery voltage may drop too much.
In these cases, the rear axle will be locked.
As a result, you might lose control of the
vehicle, cause an accident and injure yourself
and others.
! Use the SmartKey instead of the Start/
Stop button when towing the vehicle.
Start the engine and keep it running. Turn
the SmartKey to position 2 in the ignition.
Set the transmission to N using the E-
SELECT lever. Make sure that you then
leave the SmartKey in position 2.
Check the transmission position in the
instrument cluster.
! Make sure that the electric parking brake
is released. If the electric parking brake is
faulty, visit a qualified specialist workshop.
Mercedes-Benz recommends that you use
an authorized Mercedes-Benz Center for
this purpose.
! When towing, pull away slowly and
smoothly. If the tractive power is too high,
the vehicles could be damaged.
! Only secure the tow rope or tow bar at the
towing eyes. Otherwise, the vehicle could
be damaged.
! Do not use the towing eye for recovery,
as this could damage the vehicle. If in
doubt, recover the vehicle with a crane.
! You may only tow the vehicle a maximum
distance of 30 miles (50 km). A towing
speed of 30 mph (50 km/h) must not be
exceeded.
For towing distances over 30 miles
(50 km), the vehicle must loaded onto a
transporter.
! Do not tow with sling-type equipment.
This could damage the vehicle.
! Tow-starting the vehicle is not permitted.
The transmission may otherwise be
damaged.
Also observe the following notes:
R if the engine does not start, try jump-
starting it ( Y page 243). Tow-starting the
vehicle is not permitted.
R if it is not possible to jump-start the vehicle,
have it transported to the nearest qualified
specialist workshop, e.g. an authorized
Mercedes-Benz Center.
R if the transmission has been damaged,
have the vehicle transported to the nearest
qualified specialist workshop, e.g. an
authorized Mercedes-Benz Center.
Observe the display messages in the
instrument cluster.
Installing/removing the towing eye
Installing the towing eye
XTake the towing eye and the wheel
wrench 17
out of the wheel-change tool kit
( Y page 232).
The bracket for the removable towing eye is
in the bumper at the front. It is located under
the cover.
17 Not included in the scope of delivery.Towing and tow-starting245Breakdown assistanceZ