clock MERCEDES-BENZ SLS AMG ROADSTER 2012 Owners Manual
[x] Cancel search | Manufacturer: MERCEDES-BENZ, Model Year: 2012, Model line: SLS AMG ROADSTER, Model: MERCEDES-BENZ SLS AMG ROADSTER 2012Pages: 288, PDF Size: 18.46 MB
Page 74 of 288
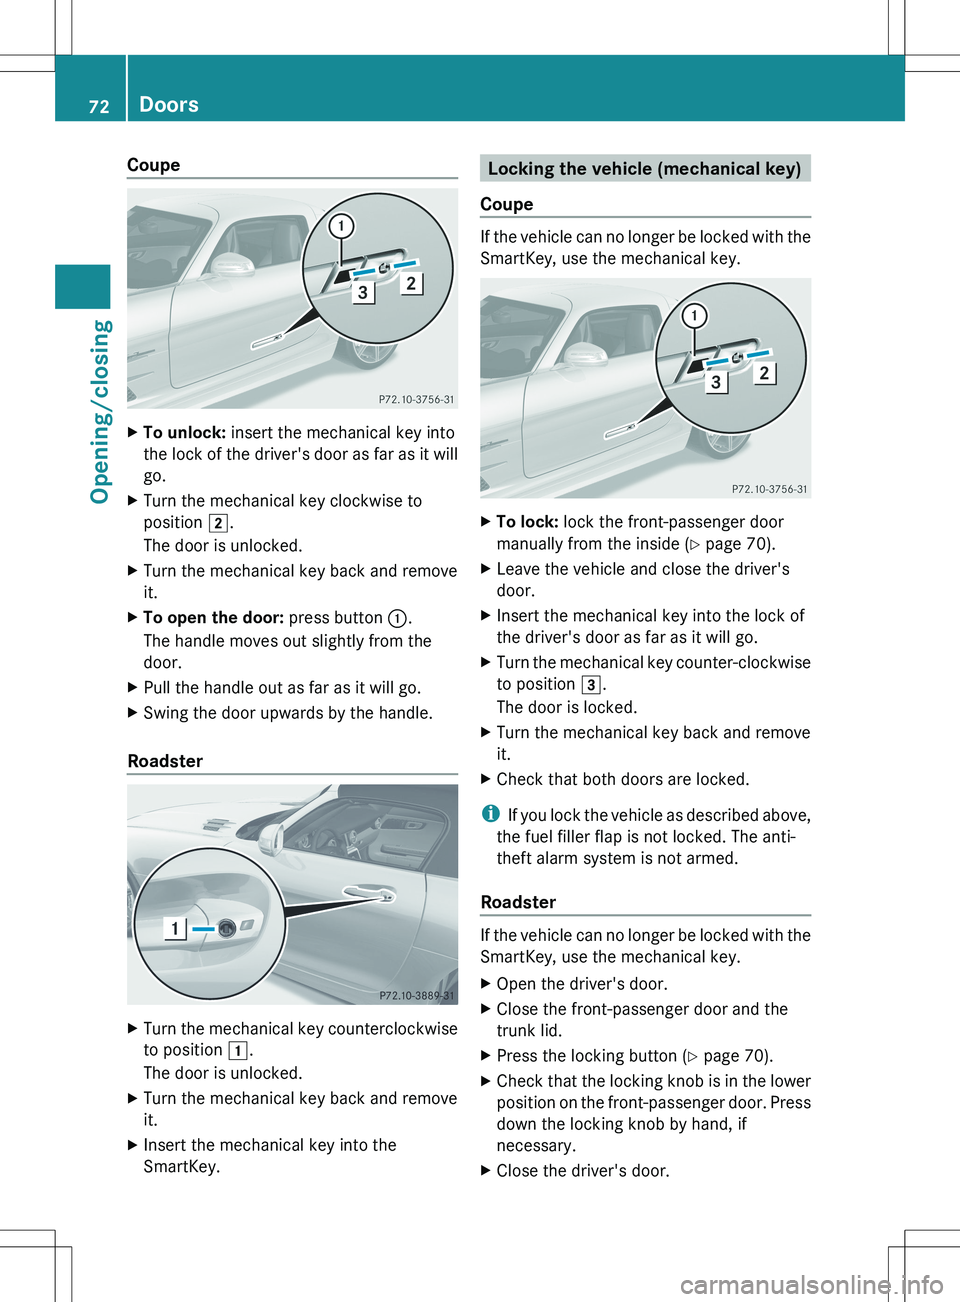
CoupeXTo unlock: insert the mechanical key into
the lock of the driver's door as far as it will
go.XTurn the mechanical key clockwise to
position 2.
The door is unlocked.XTurn the mechanical key back and remove
it.XTo open the door: press button :.
The handle moves out slightly from the
door.XPull the handle out as far as it will go.XSwing the door upwards by the handle.
Roadster
XTurn the mechanical key counterclockwise
to position 1.
The door is unlocked.XTurn the mechanical key back and remove
it.XInsert the mechanical key into the
SmartKey.Locking the vehicle (mechanical key)
Coupe
If the vehicle can no longer be locked with the
SmartKey, use the mechanical key.
XTo lock: lock the front-passenger door
manually from the inside ( Y page 70).XLeave the vehicle and close the driver's
door.XInsert the mechanical key into the lock of
the driver's door as far as it will go.XTurn the mechanical key counter-clockwise
to position 3.
The door is locked.XTurn the mechanical key back and remove
it.XCheck that both doors are locked.
i If you lock the vehicle as described above,
the fuel filler flap is not locked. The anti-
theft alarm system is not armed.
Roadster
If the vehicle can no longer be locked with the
SmartKey, use the mechanical key.
XOpen the driver's door.XClose the front-passenger door and the
trunk lid.XPress the locking button ( Y page 70).XCheck that the locking knob is in the lower
position on the front-passenger door. Press
down the locking knob by hand, if
necessary.XClose the driver's door.72DoorsOpening/closing
Page 75 of 288
XTake the mechanical key out of the
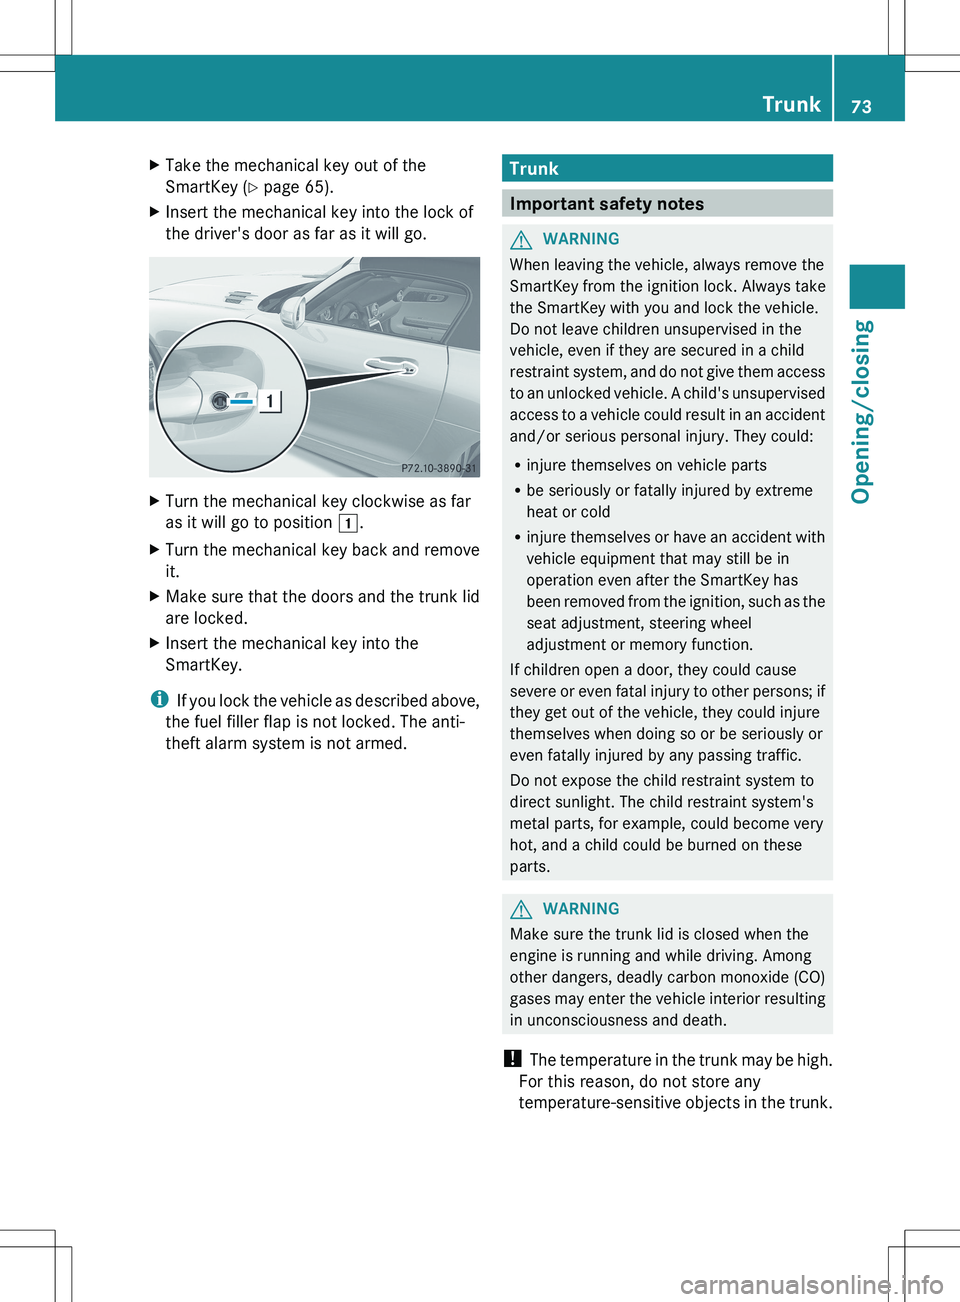
SmartKey ( Y page 65).XInsert the mechanical key into the lock of
the driver's door as far as it will go.XTurn the mechanical key clockwise as far
as it will go to position 1.XTurn the mechanical key back and remove
it.XMake sure that the doors and the trunk lid
are locked.XInsert the mechanical key into the
SmartKey.
i If you lock the vehicle as described above,
the fuel filler flap is not locked. The anti-
theft alarm system is not armed.
Trunk
Important safety notes
GWARNING
When leaving the vehicle, always remove the
SmartKey from the ignition lock. Always take
the SmartKey with you and lock the vehicle.
Do not leave children unsupervised in the
vehicle, even if they are secured in a child
restraint system, and do not give them access
to an unlocked vehicle. A child's unsupervised
access to a vehicle could result in an accident
and/or serious personal injury. They could:
R injure themselves on vehicle parts
R be seriously or fatally injured by extreme
heat or cold
R injure themselves or have an accident with
vehicle equipment that may still be in
operation even after the SmartKey has
been removed from the ignition, such as the
seat adjustment, steering wheel
adjustment or memory function.
If children open a door, they could cause
severe or even fatal injury to other persons; if
they get out of the vehicle, they could injure
themselves when doing so or be seriously or
even fatally injured by any passing traffic.
Do not expose the child restraint system to
direct sunlight. The child restraint system's
metal parts, for example, could become very
hot, and a child could be burned on these
parts.
GWARNING
Make sure the trunk lid is closed when the
engine is running and while driving. Among
other dangers, deadly carbon monoxide (CO)
gases may enter the vehicle interior resulting
in unconsciousness and death.
! The temperature in the trunk may be high.
For this reason, do not store any
temperature-sensitive objects in the trunk.
Trunk73Opening/closingZ
Page 77 of 288
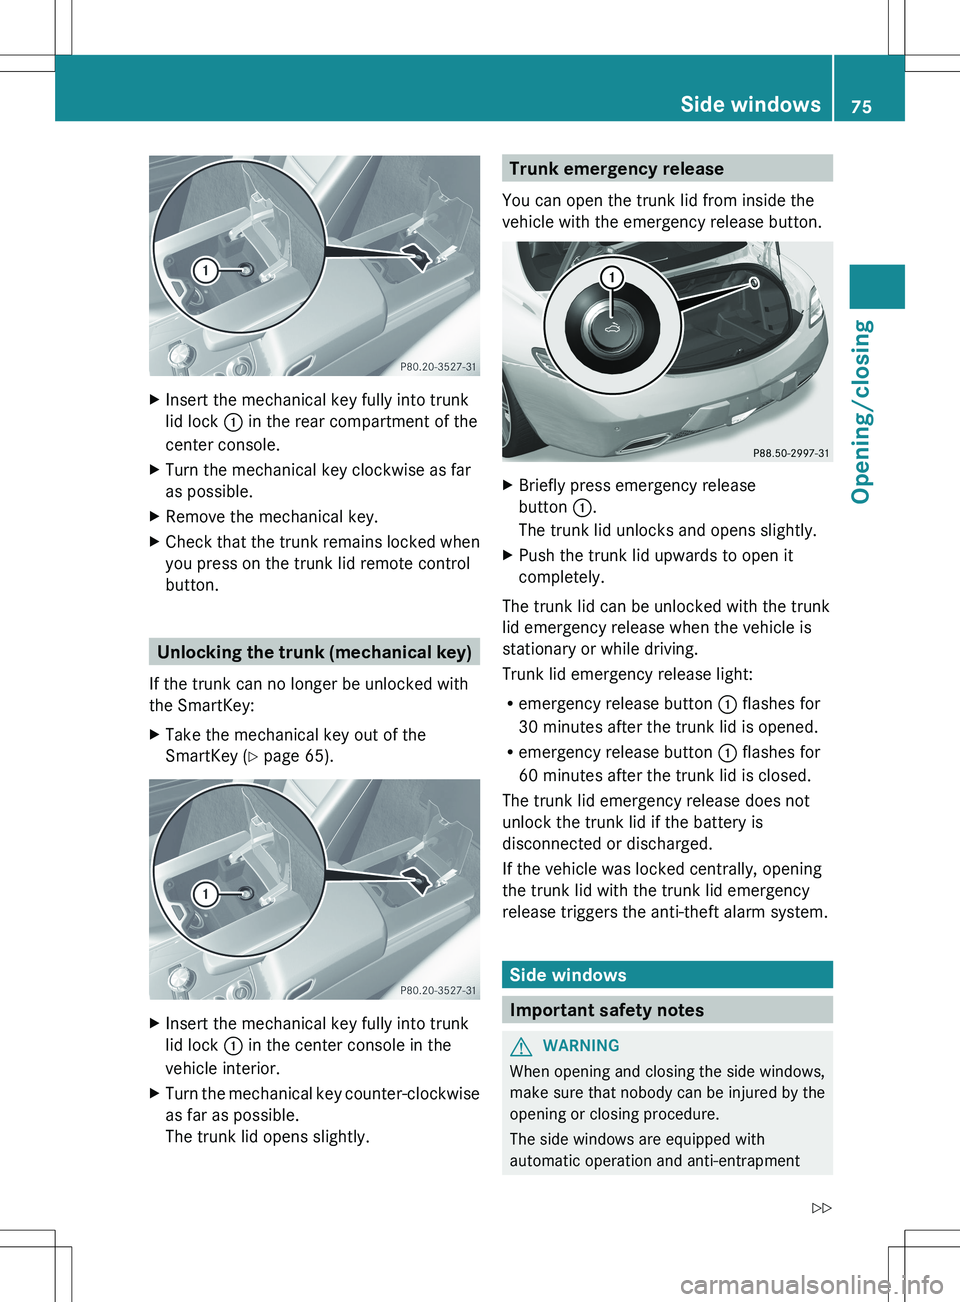
XInsert the mechanical key fully into trunk
lid lock : in the rear compartment of the
center console.XTurn the mechanical key clockwise as far
as possible.XRemove the mechanical key.XCheck that the trunk remains locked when
you press on the trunk lid remote control
button.
Unlocking the trunk (mechanical key)
If the trunk can no longer be unlocked with
the SmartKey:
XTake the mechanical key out of the
SmartKey ( Y page 65).XInsert the mechanical key fully into trunk
lid lock : in the center console in the
vehicle interior.XTurn the mechanical key counter-clockwise
as far as possible.
The trunk lid opens slightly.Trunk emergency release
You can open the trunk lid from inside the
vehicle with the emergency release button.XBriefly press emergency release
button :.
The trunk lid unlocks and opens slightly.XPush the trunk lid upwards to open it
completely.
The trunk lid can be unlocked with the trunk
lid emergency release when the vehicle is
stationary or while driving.
Trunk lid emergency release light:
R emergency release button : flashes for
30 minutes after the trunk lid is opened.
R emergency release button : flashes for
60 minutes after the trunk lid is closed.
The trunk lid emergency release does not
unlock the trunk lid if the battery is
disconnected or discharged.
If the vehicle was locked centrally, opening
the trunk lid with the trunk lid emergency
release triggers the anti-theft alarm system.
Side windows
Important safety notes
GWARNING
When opening and closing the side windows,
make sure that nobody can be injured by the
opening or closing procedure.
The side windows are equipped with
automatic operation and anti-entrapment
Side windows75Opening/closingZ
Page 109 of 288
Condensation may drip from the underside of
the vehicle when it is in cooling mode.
Activating/deactivatingXTo activate: press the ¿ button.
The indicator lamp in the ¿ button lights
up.XTo switch off: press the ¿ button.
The indicator lamp in the ¿ button goes
out. The cooling with air dehumidification
function has a delayed switch-off feature.
Problems with the cooling with air
dehumidification function
When you press the ¿ button, the
indicator lamp in the button flashes three
times or remains off. You can no longer switch
on the cooling with air dehumidification
function.
XConsult a qualified specialist workshop.
Setting climate control to automatic
GWARNING
If you switch off the cooling function, the
vehicle will not be cooled when weather
conditions are warm. The windows can fog up
more quickly. Window fogging may impair
visibility and endanger you and others.
In automatic mode, the set temperature is
controlled automatically. The system
automatically regulates the temperature of
the dispensed air, the airflow and the air
distribution.
Automatic mode will achieve optimal
operation if cooling with air dehumidification
is also activated. If desired, cooling with air
dehumidification can be deactivated.
XSelect key position 2 with the Start/Stop
button.XSet the desired temperature.XTo activate: press the à button.
The indicator lamp in the à button lights
up. Automatic air distribution and airflow
are activated.XTo switch off: press the à button.
The indicator lamp in the à button goes
out. Automatic air distribution and airflow
are deactivated.
Setting the temperature
Different temperatures can be set for the
driver's and front-passenger sides.
XSelect key position 2 with the Start/Stop
button.XTo increase/reduce: turn controls : and
D clockwise or counter-clockwise
( Y page 105).
Only change the temperature setting in
small increments. Start at 72 ‡ (22 †).
Setting the air distribution
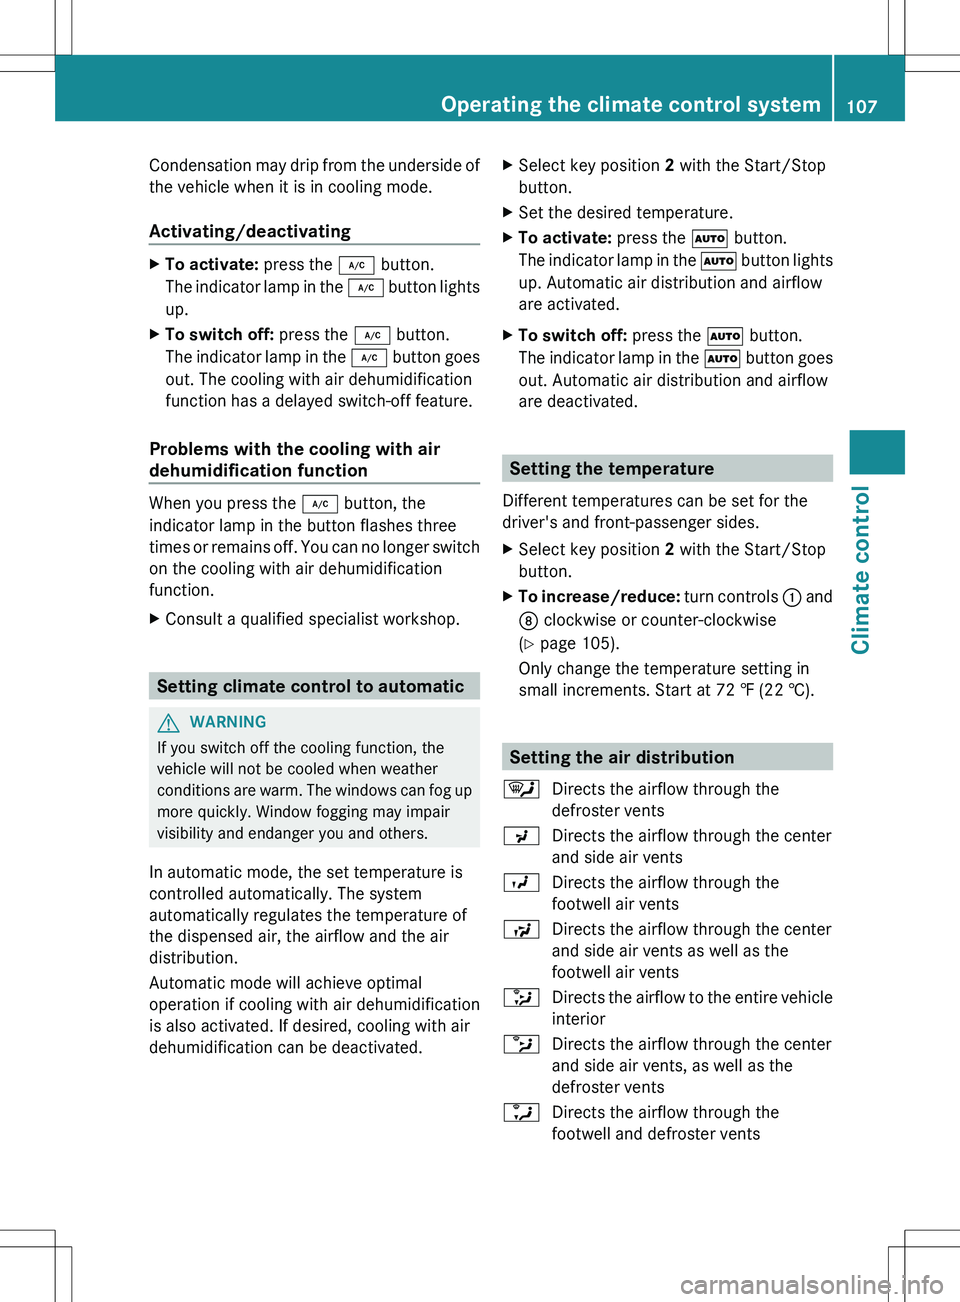
¯Directs the airflow through the
defroster ventsPDirects the airflow through the center
and side air ventsODirects the airflow through the
footwell air ventsSDirects the airflow through the center
and side air vents as well as the
footwell air vents_Directs the airflow to the entire vehicle
interiorbDirects the airflow through the center
and side air vents, as well as the
defroster ventsaDirects the airflow through the
footwell and defroster ventsOperating the climate control system107Climate controlZ
Page 110 of 288
XSelect key position 2 with the Start/Stop
button.XPress the _ button repeatedly until the
desired symbol appears in the display.
The indicator lamp in the à button goes
out. Automatic control is deactivated and
the air distribution is controlled according
to the selected setting.
Setting the airflow
XSelect key position 2 with the Start/Stop
button.XTo increase/reduce: press the K or
I button.
Switching the mono function on/off
The MONO function is only available in
vehicles for Canada.
You can use the MONO function to adopt the
temperature and air distribution settings on
the driver's side for the front-passenger side.
XPress the º button.
The indicator lamp in the º button lights
up or goes out.
Defrosting the windshield
i You should only select the defrosting
function until the windshield is clear again.
XSelect key position 2 with the Start/Stop
button.XTo activate: press the ¬ button.
The indicator lamp in the ¬ button lights
up.
The system automatically switches to the
following functions:
R cooling with air dehumidification on
R high airflow 7
R high temperature 7R
air distribution to the windshield and
front side windows
R air-recirculation mode offXTo switch off: press the ¬ button.
The indicator lamp in the ¬ button goes
out. The previously selected settings come
into effect again. The cooling with air
dehumidification function remains on. Air-
recirculation mode remains deactivated.
or
XPress the à button.
The indicator lamp in the ¬ button goes
out. Airflow and air distribution are set to
automatic mode.
or
XTurn controls : or D clockwise or
counter-clockwise ( Y page 105).
or
XPress the K or I button.
Switching maximum cooling MAX
COOL on/off
The MAX COOL function is only available in
vehicles for the USA.
MAX COOL is only operational when the
engine is running.
When you activate MAX COOL, climate
control switches to the following functions:
R maximum cooling
R maximum airflow
R air-recirculation mode on
XTo activate: press the Ù button.
The indicator lamp in the button lights up.XTo deactivate: press the Ù button
again.
The indicator lamp in the button goes out.
The previously selected settings come into
effect again.
i To deactivate MAX COOL press the ^,
à , or ¬ button.
7
Depending on the outside temperature.108Operating the climate control systemClimate control
Page 126 of 288
Rthe vehicle is stationary and the brake
pedal is depressed (left foot).
R the transmission is set to D.
Activating RACE STARTXDepress the brake pedal with your left foot
and keep it depressed.XTurn the drive program selector switch
clockwise ( Y page 122) until the RS
indicator on the switch lights up in red.
The RACE START Confirm: Paddle UP
Cancel: Paddle DOWN message appears
in the multifunction display.
i If the conditions for activation are not
fulfilled, RACE START is canceled. The
RACE START Not Possible message
appears in the multifunction display.
XTo cancel: pull the left-hand steering wheel
paddle shifter (DOWN) ( Y page 123).
The multifunction display shows the RACE
START Canceled message.XTo confirm: pull the right-hand steering
wheel paddle shifter (UP) ( Y page 123).
The RACE START Available Depress
gas pedal message appears in the
multifunction display.
i If you do not depress the accelerator
pedal within a few seconds, RACE START is
canceled. The multifunction display shows
the RACE START Canceled message.
XFully depress the accelerator pedal.
The engine speed is increased.
The RACE START Release brake to
start. message appears in the
multifunction display.
i If you do not release the brake pedal
within a few seconds, RACE START is
canceled. The multifunction display shows
the RACE START Canceled message.
XTake your foot off the brake pedal while
keeping the accelerator pedal fully
depressed.
The vehicle pulls away at maximum
acceleration.The RACE START Active message appears
in the multifunction display.
RACE START is deactivated once a speed of
approximately 50 km/h is reached. Drive
program S+ is activated. SPORT handling
mode remains switched on.
RACE START is immediately deactivated if
you take your foot off the accelerator pedal
during RACE START or if the conditions for
activation are no longer met. The RACE
START Not Possible or RACE START
Canceled message appears in the
multifunction display.
i After using it several times in short
succession, RACE START will be
unavailable until a certain distance has
been driven.
Automatic drive program
Drive program C is characterized by the
following:
R comfort-oriented engine and transmission
settings
R optimal fuel consumption resulting from
the transmission shifting up sooner
R the vehicle pulling away more gently in
forward and reverse gears, unless the
accelerator pedal is depressed fully
R increased sensitivity; this improves driving
stability on slippery road surfaces, for
example
R the transmission shifting up sooner; this
results in the vehicle being driven at lower
engine speeds and the wheels being less
likely to spin
Drive programs S and S+ are characterized
by the following:
R sporty engine and transmission settings
R the transmission shifting up later and
shifting down dynamically
124AMG SPEEDSHIFT DCT 7-speed sports transmissionDriving and parking
Page 130 of 288
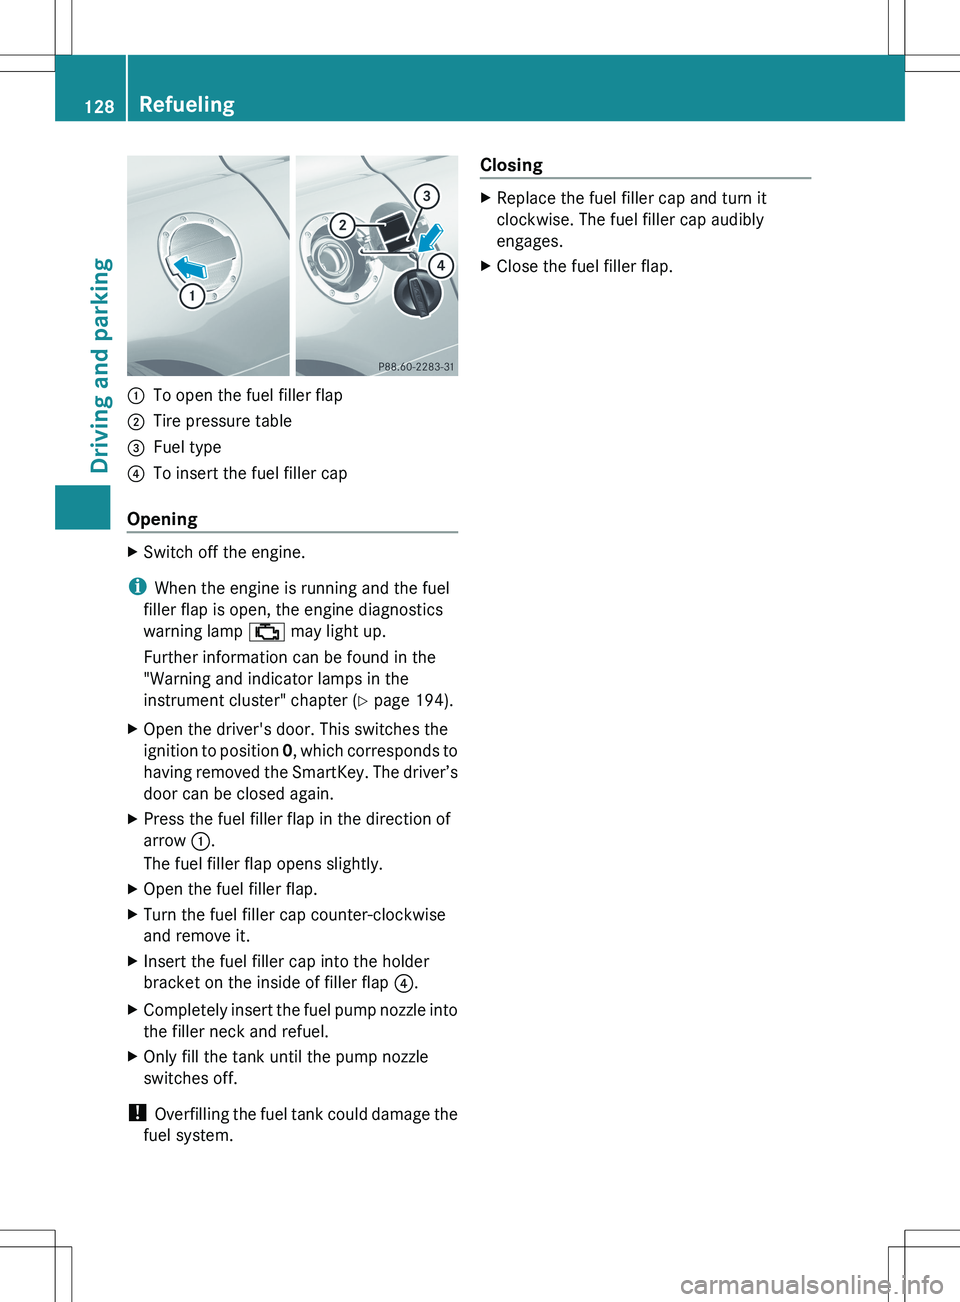
:To open the fuel filler flap;Tire pressure table=Fuel type?To insert the fuel filler cap
Opening
XSwitch off the engine.
iWhen the engine is running and the fuel
filler flap is open, the engine diagnostics
warning lamp ; may light up.
Further information can be found in the
"Warning and indicator lamps in the
instrument cluster" chapter ( Y page 194).
XOpen the driver's door. This switches the
ignition to position 0, which corresponds to
having removed the SmartKey. The driver’s
door can be closed again.XPress the fuel filler flap in the direction of
arrow :.
The fuel filler flap opens slightly.XOpen the fuel filler flap.XTurn the fuel filler cap counter-clockwise
and remove it.XInsert the fuel filler cap into the holder
bracket on the inside of filler flap ?.XCompletely insert the fuel pump nozzle into
the filler neck and refuel.XOnly fill the tank until the pump nozzle
switches off.
! Overfilling the fuel tank could damage the
fuel system.
ClosingXReplace the fuel filler cap and turn it
clockwise. The fuel filler cap audibly
engages.XClose the fuel filler flap.128RefuelingDriving and parking
Page 202 of 288
Useful information
i This Operator's Manual describes all
models and all standard and optional
equipment of your vehicle available at the
time of publication of the Operator's
Manual. Country-specific differences are
possible. Please note that your vehicle may
not be equipped with all features
described. This also applies to safety-
related systems and functions.
i Please read the information on qualified
specialist workshops ( Y page 21).
Stowage areas
Stowage space
Important safety notes
GWARNING
To help avoid personal injury during a collision
or sudden maneuver, exercise care when
storing objects in the vehicle. Put luggage or
cargo in the trunk if possible.
Keep compartment lids closed. This will help
to prevent stored objects from being thrown
about and injuring vehicle occupants during
R braking
R vehicle maneuvers
R an accident
Stowage compartments in the front
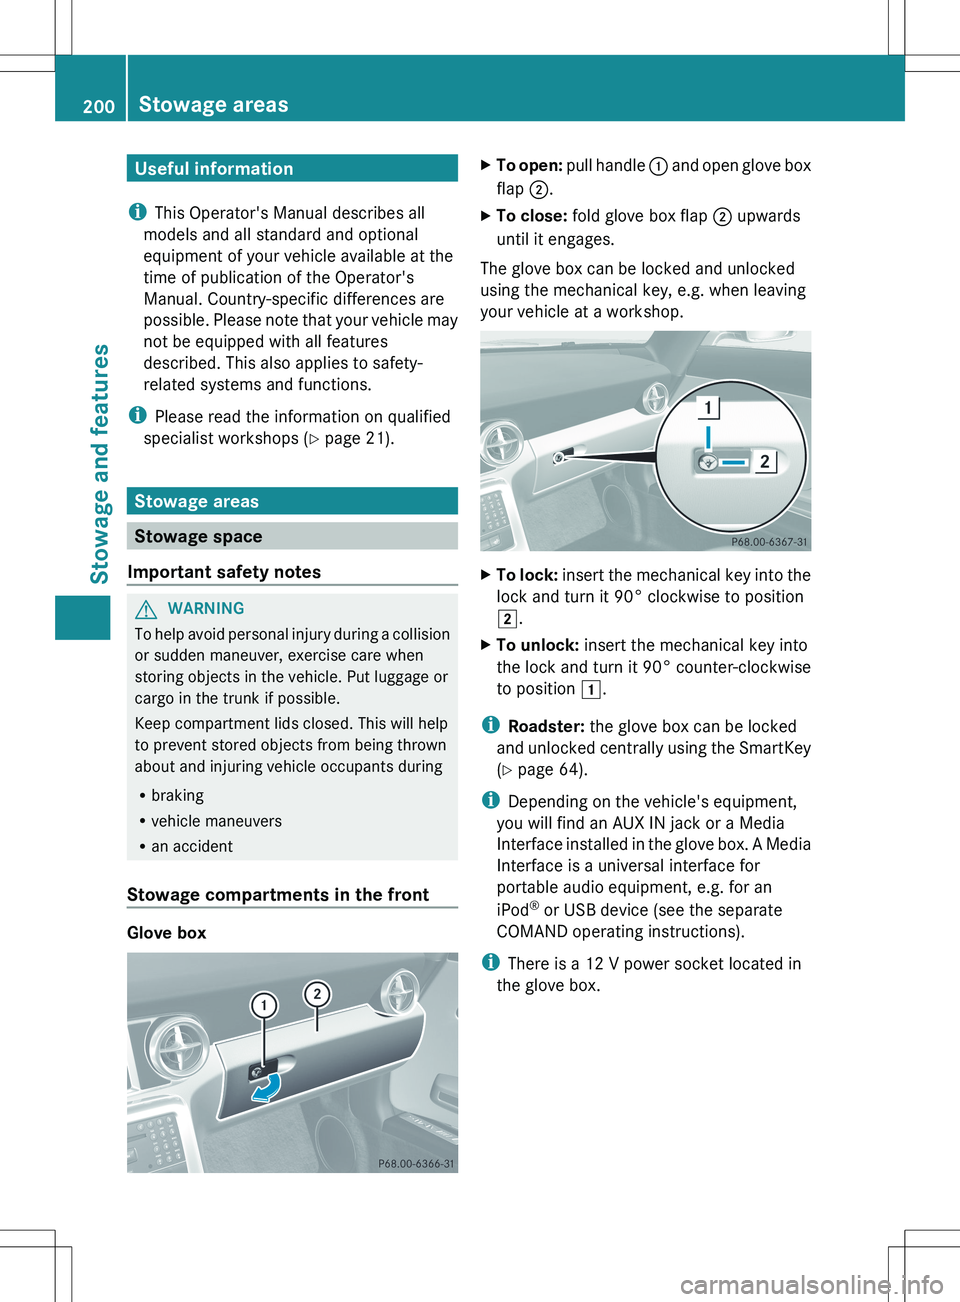
Glove box
XTo open: pull handle : and open glove box
flap ;.XTo close: fold glove box flap ; upwards
until it engages.
The glove box can be locked and unlocked
using the mechanical key, e.g. when leaving
your vehicle at a workshop.
XTo lock: insert the mechanical key into the
lock and turn it 90° clockwise to position
2 .XTo unlock: insert the mechanical key into
the lock and turn it 90° counter-clockwise
to position 1.
i
Roadster: the glove box can be locked
and unlocked centrally using the SmartKey
( Y page 64).
i Depending on the vehicle's equipment,
you will find an AUX IN jack or a Media
Interface installed in the glove box. A Media
Interface is a universal interface for
portable audio equipment, e.g. for an
iPod ®
or USB device (see the separate
COMAND operating instructions).
i There is a 12 V power socket located in
the glove box.
200Stowage areasStowage and features
Page 222 of 288
Adding engine oilHEnvironmental note
When adding oil, take care not to spill any. If
oil enters the soil or waterways, it is harmful
to the environment.
! Use only engine oils and oil filters that
have been approved for vehicles equipped
with a service system. A list of the engine
oils and oil filters tested and approved in
accordance with the Mercedes-Benz
Specifications for Service Products can be
called up by visiting http://
www.mbusa.com (USA only). More
information about tested and approved
engine oils and oil filters is available from
any authorized Mercedes-Benz Center.
Damage to the engine or exhaust system is
caused by the following:
R using engine oils and oil filters which
have not been specifically approved for
the service system.
R replacing the engine oil or oil filter after
the replacement interval required by the
service system has elapsed
R using engine oil additives.
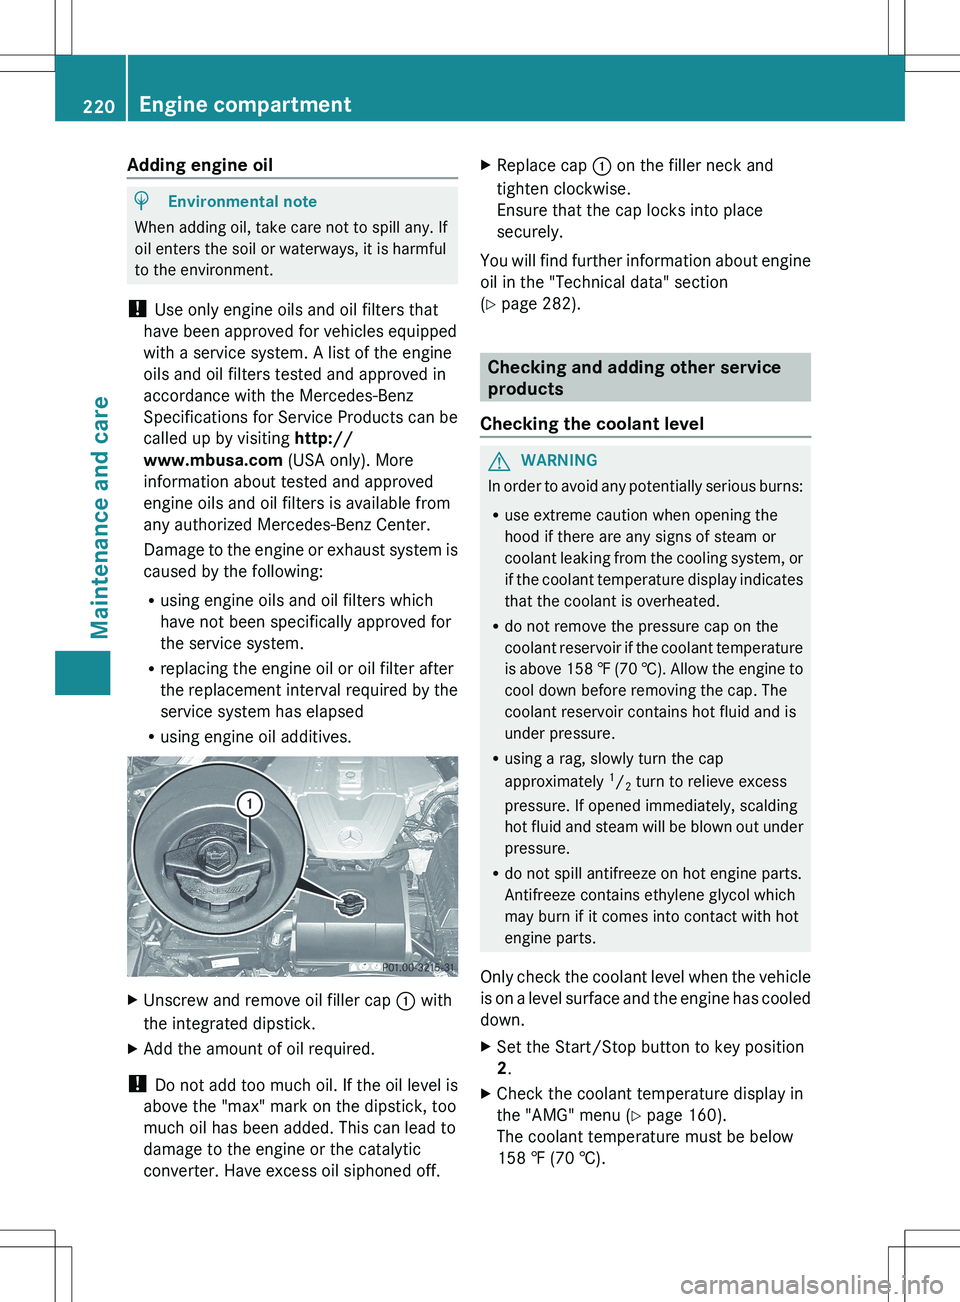
XUnscrew and remove oil filler cap : with
the integrated dipstick.XAdd the amount of oil required.
! Do not add too much oil. If the oil level is
above the "max" mark on the dipstick, too
much oil has been added. This can lead to
damage to the engine or the catalytic
converter. Have excess oil siphoned off.
XReplace cap : on the filler neck and
tighten clockwise.
Ensure that the cap locks into place
securely.
You will find further information about engine
oil in the "Technical data" section
( Y page 282).
Checking and adding other service
products
Checking the coolant level
GWARNING
In order to avoid any potentially serious burns:
R use extreme caution when opening the
hood if there are any signs of steam or
coolant leaking from the cooling system, or
if the coolant temperature display indicates
that the coolant is overheated.
R do not remove the pressure cap on the
coolant reservoir if the coolant temperature
is above 158 ‡ (70 †). Allow the engine to
cool down before removing the cap. The
coolant reservoir contains hot fluid and is
under pressure.
R using a rag, slowly turn the cap
approximately 1
/ 2 turn to relieve excess
pressure. If opened immediately, scalding
hot fluid and steam will be blown out under
pressure.
R do not spill antifreeze on hot engine parts.
Antifreeze contains ethylene glycol which
may burn if it comes into contact with hot
engine parts.
Only check the coolant level when the vehicle
is on a level surface and the engine has cooled
down.
XSet the Start/Stop button to key position
2 .XCheck the coolant temperature display in
the "AMG" menu ( Y page 160).
The coolant temperature must be below
158 ‡ (70 †).220Engine compartmentMaintenance and care
Page 223 of 288
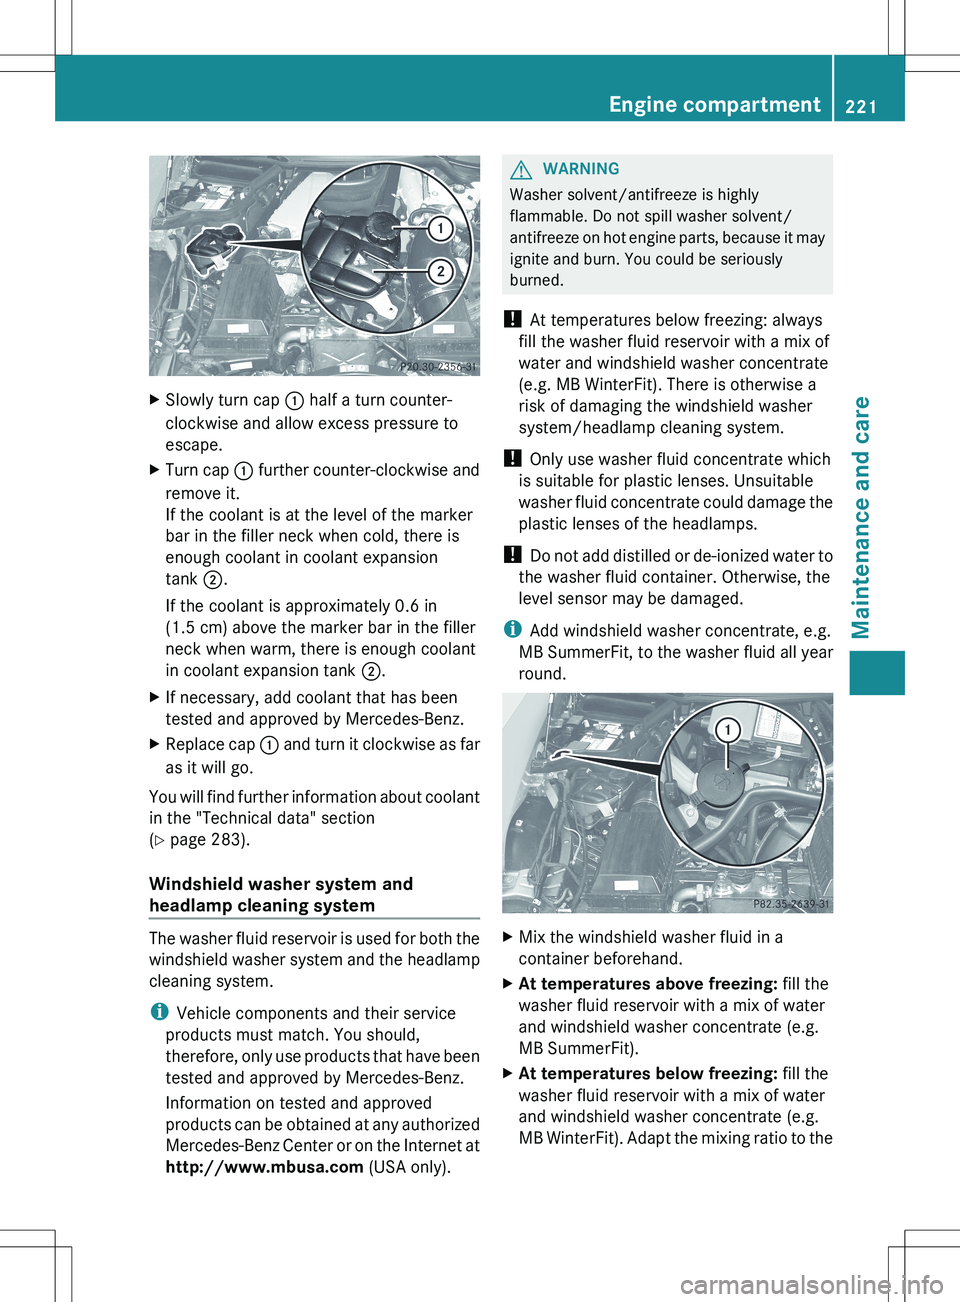
XSlowly turn cap : half a turn counter-
clockwise and allow excess pressure to
escape.XTurn cap : further counter-clockwise and
remove it.
If the coolant is at the level of the marker
bar in the filler neck when cold, there is
enough coolant in coolant expansion
tank ;.
If the coolant is approximately 0.6 in
(1.5 cm) above the marker bar in the filler
neck when warm, there is enough coolant
in coolant expansion tank ;.XIf necessary, add coolant that has been
tested and approved by Mercedes-Benz.XReplace cap : and turn it clockwise as far
as it will go.
You will find further information about coolant
in the "Technical data" section
( Y page 283).
Windshield washer system and
headlamp cleaning system
The washer fluid reservoir is used for both the
windshield washer system and the headlamp
cleaning system.
i Vehicle components and their service
products must match. You should,
therefore, only use products that have been
tested and approved by Mercedes-Benz.
Information on tested and approved
products can be obtained at any authorized
Mercedes-Benz Center or on the Internet at
http://www.mbusa.com (USA only).
GWARNING
Washer solvent/antifreeze is highly
flammable. Do not spill washer solvent/
antifreeze on hot engine parts, because it may
ignite and burn. You could be seriously
burned.
! At temperatures below freezing: always
fill the washer fluid reservoir with a mix of
water and windshield washer concentrate
(e.g. MB WinterFit). There is otherwise a
risk of damaging the windshield washer
system/headlamp cleaning system.
! Only use washer fluid concentrate which
is suitable for plastic lenses. Unsuitable
washer fluid concentrate could damage the
plastic lenses of the headlamps.
! Do not add distilled or de-ionized water to
the washer fluid container. Otherwise, the
level sensor may be damaged.
i Add windshield washer concentrate, e.g.
MB SummerFit, to the washer fluid all year
round.
XMix the windshield washer fluid in a
container beforehand.XAt temperatures above freezing: fill the
washer fluid reservoir with a mix of water
and windshield washer concentrate (e.g.
MB SummerFit).XAt temperatures below freezing: fill the
washer fluid reservoir with a mix of water
and windshield washer concentrate (e.g.
MB WinterFit). Adapt the mixing ratio to theEngine compartment221Maintenance and careZ