automatic transmission MERCEDES-BENZ SLS COUPE 2010 Owners Manual
[x] Cancel search | Manufacturer: MERCEDES-BENZ, Model Year: 2010, Model line: SLS COUPE, Model: MERCEDES-BENZ SLS COUPE 2010Pages: 361, PDF Size: 6.32 MB
Page 19 of 361
Tone settings
Trebl eand bass ............................... 68
Total distance recorder ....................233
Tow-away protection ..........................49
Towing ........................................ 339, 341
Towing eye Fitting ............................................ 341
Removing ....................................... 341
Town
Entering ........................................... 94
Traffic announcements on ...............164
Traffic jam function ........................... 117
Traffic Programme Switching traffic announcements
on/off ............................................ 164
Transferring acall (convenience
telephone) .......................................... 146
Transmission oil Temperature gauge (on-board
computer) ...................................... 241
Transmission output (maximum)
Telephone/two-way radio ..............347
Transport (vehicle) ............................341
Trim strips Cleaning ......................................... 285
Trip computer
On-board computer .......................232
Trip meter .......................................... 233
Resetting (on-board computer) ......234
True Image™ ........................................ 68
Turn signal Display message ............................ 300
Two-way radio
Installatio n..................................... 347
Type identification plate
see Vehicle identification plate ......348
Tyre grip ............................................. 278
Tyre pressure ..................................... 272
Calling up (on-board computer) .....273
Display message ............................ 304
Tyre pressure monitor
Warning lamp ................................. 311
Tyres
Direction of rotatio n...................... 272
General notes ................................ 270
Technical data ............................... 354
Tyre tread .......................................... .272 U
Unladen weight ................................. 352
Unlocking Emergency unlocking ..................... 322
Updating
Map software ................................... 89
Upshift indicator ............................... 229
USB devices Connecting to the Media Inter-
face ............................................... 184
Folders and playlists ......................187
Using the telephone ..........................144
Multi-function steering wheel ..........62 V
Variable Speedtronic ........................246
vCards Receiving ....................................... 137
Vehicle
Emergency unlocking ..................... 322
Individual settings (on-board com-
puter) ............................................. 238
Leaving parked up .........................321
Towing ........................................... 341
Transporting .................................. 341
Unlocking (key ).............................. 200
Vehicle battery .................................. 334
Vehicle dimensions ...........................352
Vehicle electronics ...........................346
Vehicle identification number
(VIN) ................................................... 348
Vehicle identification plate ..............348
Vehicle position Saving ...................................... 83, 127
Vehicle tool kit .................................. 288
Vehicle weights ................................. 352
Video DVD Fast forward/rewind ..................... .194
Operation ....................................... 190
Pause function ............................... 195
Picture settings .............................. 195
Selecting a film/title ..................... .195
Selecting a scene/chapter ............195
Stop function ................................. 194
Video mode
Automatic picture shutoff ..............190 16
Index BA 197 ECE RE 2010/6a; 1; 2, en-GB
sabbae uV ersion: 3.0.3.6
2010-05-07T14:19:43+02:00 - Seite 16
Page 50 of 361
brakes are applied again, the brake lamps
light up continuously. The hazard warning
lamps switch off automatically if you travel
faster than 10 km/ h.You can also switch off
the hazard warning lamps using the hazard
warning switch button (Y page 216).ESP
®
(Electronic Stability Program)
You can selec tbetween the three following
states of ESP ®
:
R ESP ®
is activated.
R ESP ®
Sport is activated.
R ESP ®
is deactivated.
ESP ®
is activated as soon as you start the
engine. When ESP ®
Sport is activated, the
0005 warning lamp lights up in the instrument
panel. When ESP ®
is deactivated, the 0001
and 0002 warning lamps light up in the instru-
ment panel.
Characteristics of ESP ®ESP
®
monitors driving stability and traction,
i.e. power transmission between the tyres
and the road surface.
If ESP ®
detects that the vehicle is deviating
from the direction desired by the driver, one
or more wheels are braked to stabilise the
vehicle. If necessary, the engine output is also
modified to keep the vehicle on the desired
course within physical limits. ESP ®
assists
the driver when pulling away on wet or slip-
pery roads. ESP ®
can also stabilise the vehi-
cle during braking.
When ESP ®
intervenes, the 0002warning
lamp flashes in the instrument panel. G
Risk of accident
If the 0002 warning lamp in the instrument
cluster flashes, proceed as follows: R
do not deactivate ESP ®
under any circum-
stances
R only depress the accelerator pedal as far as
necessary when pulling away
R adapt your driving style to suit the prevail-
ing road and weather conditions
Otherwise, the vehicle could go into a skid.
ESP ®
cannot reduce the risk of an acciden tif
you drive too fast. ESP ®
cannot override the
laws of physics.
i Only use wheels with the recommended
tyre sizes. Only then will ESP ®
function
properly.
ESP ®
is activated automatically when the
engine is running .Inthe following situations,
it may be better to activate ESP ®
Sport or
deactivate ESP ®
:
R when using snow chains
R in deep snow
R on sand or gravel G
Risk of accident
Activate ESP ®
as soon as the situations
described above no longer apply.O therwise,
ESP ®
will only be able to stabilise the vehicle
to a limited degree if the vehicle starts to skid
or if a wheel starts to spin.
Characteristics of ESP ®
Sport ESP
®
Sport raises the interventio nthreshold
for stabilising the vehicle. This allows for a
sportier driving style on designated race cir-
cuits and may in certain situations improve
the traction in comparison with ESP ®
.
If you activate ESP ®
Sport:
R ESP ®
only improves driving stability to a
limited degree.
R engine torque is only restricted to a limited
degree and the drive wheels are able to
spin. The spinning wheels produce a cut-
ting effect for better traction. Driving safety systems
47Safety
BA 197 ECE RE 2010/6a; 1; 2, en-GB
sabbaeu Version: 3.0.3.6 2010-05-07T14:19:43+02:00 - Seite 47 Z
Page 224 of 361
i
Observe the notes on the first 1500 km
when running-in the vehicle (Y page 266).
! During a cold start with low engine oil
temperatures (below 0†), the maximum
engine speed is restricted in order to pro-
tect the engine. To protect the engine and
maintain smooth engine operation, avoid
driving at full throttle when the engine is
cold.
X Depress the brake pedal and keep it
depressed.
X Use the selector lever to shift the trans-
mission to position Dor R.
X Release the brake pedal.
X Carefully depress the accelerato rpedal.
The electric parking brake is automatically
released (Y page 221).
i The vehicle locks centrally once you have
pulled away. The locking knobs in the doors
drop down.
Hill start assist Hill start assist helps you when pulling away
on uphill gradients. It holds the vehicle for a
short time after you have removed your foot
from the brake pedal. This gives you enough
time to move your foot from the brake pedal
to the accelerator pedal and depress it before
the vehicle begins to roll. G
Risk of accident
Never leave the vehicle when it is held by hill
start assist. After approximately one second,
hill start assist will no longer brake your vehi-
cle and it could roll away.
X Take your foot off the brake pedal.
i Once you have taken your foot off the
brake pedal, the vehicle is held for around
one second.
X Pull away. Hill start assist does not function if:
R
you are pulling away on a level road or a
downhill gradient.
R the transmission is in position N.
R the vehicle is secured with the electric
parking brake.
R ESP ®
is malfunctioning. Parking
G
Risk of accident
Never leave children unsupervised in the vehi-
cle. They might release the electric parking
brake. This could lead to aserious or fatal
accident. G
Risk of fire
Make sure that the exhaust system does not
under any circumstances come into contact
with flammable materials such as dry grass or
petrol. Do not park the vehicle on dry grass-
land or harvested grain fields. The material
could otherwise ignite and set the vehicle on
fire.
To ensure that the vehicle is secured against
rolling away unintentionally:
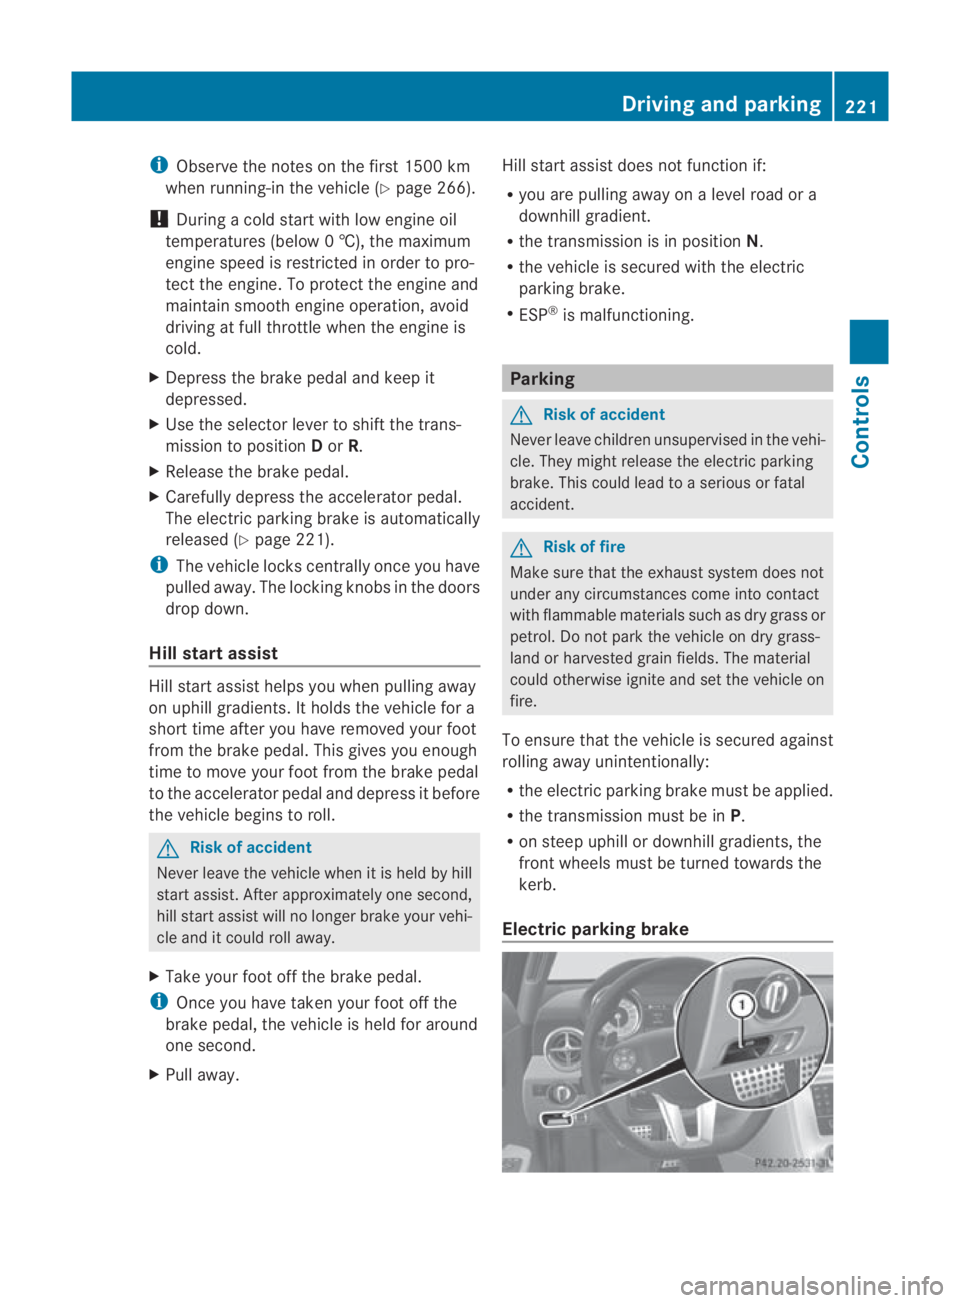
R the electric parking brake must be applied.
R the transmission must be in P.
R on steep uphill or downhill gradients, the
fron twheels must be turned towards the
kerb.
Electric parking brake Driving and parking
221Controls
BA 197 ECE RE 2010/6a; 1; 2, en-GB
sabbaeu Version: 3.0.3.6 2010-05-07T14:19:43+02:00 - Seite 221 Z
Page 225 of 361
Applying the electric parking brake
X Push handle 0001.
The red 0009indicator lamp in the instru-
men tcluster lights up.
i The electric parking brake can also be
applied when the key is in position 0.
Releasing the electric parking brake man-
ually
X Pull handle 0001.
The red 0009indicator lamp in the instru-
men tcluster goes out.
The electric parking brake can only be
released when the ignition is switched on
using the Start/Stop button (Y page 202).
Releasing the electric parking brake auto-
matically
The electric parking brake is released auto-
matically when the following conditions are
simultaneously fulfilled:
R the engine is running.
R the transmission is in position Dor R.
R the bonnet is closed.
R your seat belt is fastened.
R you depress the accelerator pedal.
If the transmission is in position R, the boot
lid must be closed.
For the parking brake to be released auto-
matically if your seat belt is not fastened, the
following conditions must be fulfilled:
R the driver's door is closed.
R you shift out of Por you have previously
driven faster than 3 km/h.
Emergency braking with the electric park-
ing brake
The vehicle can also be braked during an
emergency using the electric parking brake.
X While driving, push the handle of the elec-
tric parking brake (Y page 221).
i The vehicle is braked as long as you keep
the handle of the electric parking brake
pressed. The longer the electric parking brake handle is depressed, the greater the
braking force.
The red 0009indicator lamp flashes in the
instrument cluster during braking. The
Release parking brake message appears
in the multifunction display and a warning
tone sounds.
When the vehicle has been braked to a stand-
still, the electric parking brake is engaged. Switching off the engine
G
Risk of accident
If the engine is not running, there is no power
assistance for the steerin gand brakes. Steer-
ing and braking then requires significantly
greater effort.
As a result, you might lose control of the vehi-
cle, cause an accident and injure yoursel fand
others.
Therefore, do not switch off the engine while
you are driving.
! Do not open the doors until the vehicle
has come to a standstill .Atlow speeds,
park position Pwill otherwise be engaged
automatically. This can damage the trans-
mission.
i Observe the display messages in the
instrument cluster.
Using KEYLESS-GO X
Use the button on the centre console to
shift the transmission to P.
X Press the Start/Stop button (Y page 202).
The engine stops and all the indicator
lamps in the instrument cluster go out
(Y page 229).
i If you switch the engine off with the trans-
mission in position Ror D, the transmission
automatically shifts to N.
If you set the selector lever to Nbefore
switching off the engine, the transmission
remains in Nfor approximately 30 minutes. 222
Driving and parkingControls
BA 197 ECE RE 2010/6a; 1; 2, en-GB
sabbaeu
Version: 3.0.3.6 2010-05-07T14:19:43+02:00 - Seite 222
Page 226 of 361
If you open the driver's or front-passenger
door during this period, the transmission
automatically shifts to
P.
i The engine can be turned off while the
vehicle is in motion by pressing and holding
the Start/Stop button for three seconds.
Using the key !
Do not remove the key while the vehicle
is in motion. At low speeds, park position
P will otherwise be engaged automatically.
This can damage the transmission.
X Use the button on the centre console to
shift the transmission to P.
X Turn the key to position 0in the ignition
lock (Y page 203) and remove it.
The immobiliser/parking lock is activated.
i If you set the selector lever to Nbefore
switching off the engine, the transmission
remains in Nfor approximately 30 minutes.
While the key is in the ignition lock, the
transmission remains in Neven if you open
the driver's or front-passenger door. AMG SPEEDSHIFT DCT7
-speedsports
transmission Notes on the transmission
G
Ris
kofa ccident
Do no tchange down for additional engine
braking on a slippery road surface. This could
cause the drive wheels to lose their grip and
the vehicle could skid. This could cause you
to lose control of your vehicle and cause an
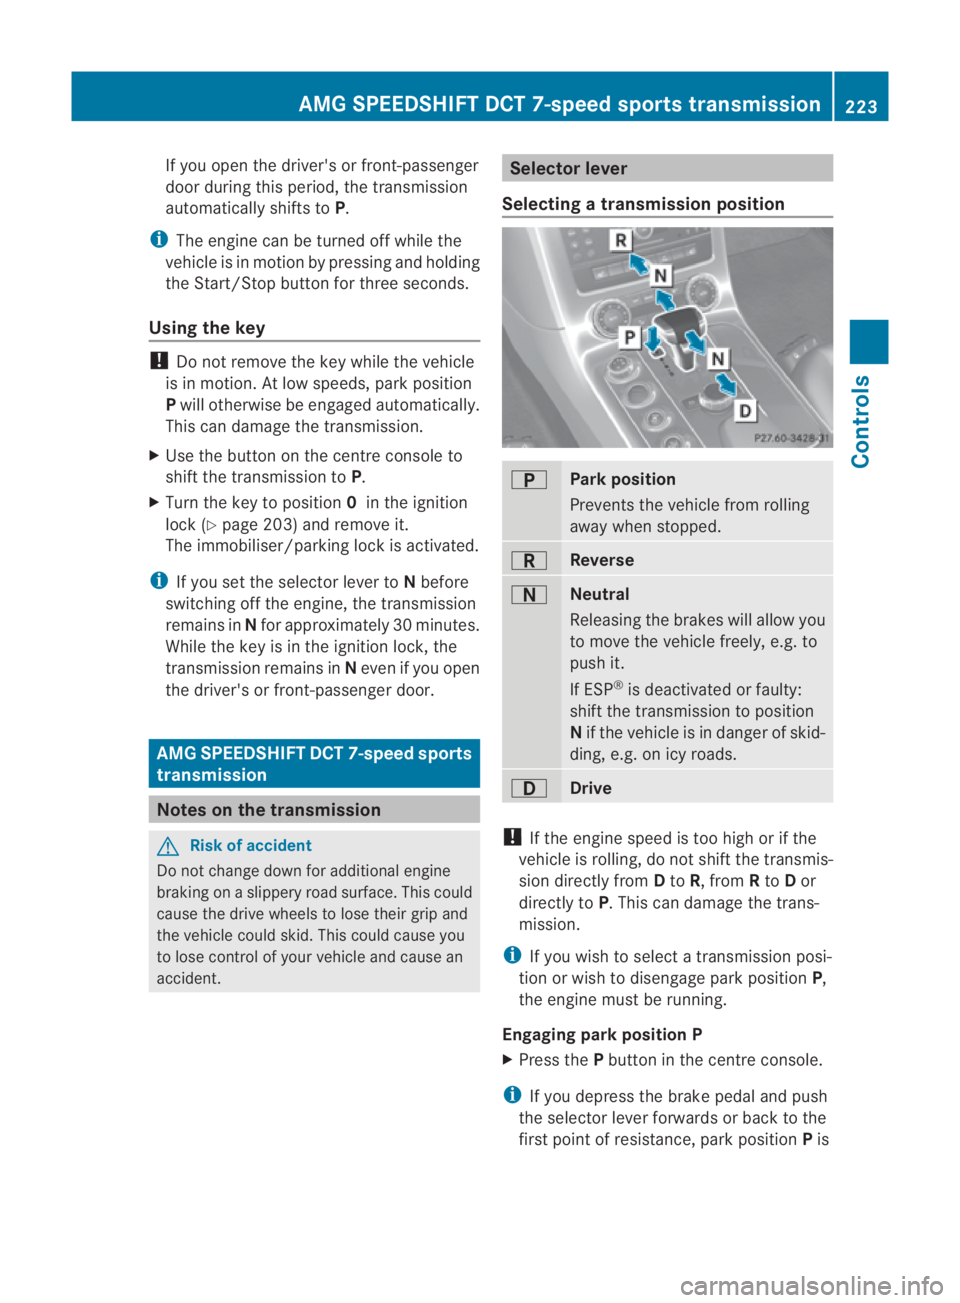
accident. Selector lever
Selecting atransmission position 0002
Park position
Prevents the vehicle fro
mrolling
away when stopped. 0003
Reverse
0001
Neutral
Releasing the brakes will allow you
to move the vehicle freely, e.g. to
push it.
If ESP
®
is deactivated or faulty:
shift the transmission to position
N if the vehicle is in danger of skid-
ding, e.g. on icy roads. 0008
Drive
!
If the engine speed is too high or if the
vehicle is rolling, do not shift the transmis-
sion directly from Dto R, from Rto Dor
directly to P.This can damage the trans-
mission.
i If you wish to select a transmission posi-
tion or wish to disengage park position P,
the engine must be running.
Engaging parkp osition P
X Press the Pbutton in the centre console.
i If you depress the brake pedal and push
the selector lever forwards or back to the
first poin tofresistance, park position Pis AMG SPEEDSHIF
TDCT 7-speed sports transmission
223Controls
BA 197 ECE RE 2010/6a; 1; 2, en-GB
sabbaeuV ersion: 3.0.3.6
2010-05-07T14:19:43+02:00 - Seite 223 Z
Page 227 of 361
disengaged. The transmission shifts to neu-
tral N.
To shift directly from Pto R:
X Depress the brake pedal and push the
selector lever forwards past the first
point of resistance.
To shift directly from Pto D:
X Depress the brake pedal and push the
selector lever back past the first point
of resistance.
Engaging par kposition P automatically
If you switch off the engine using the Start/
Stop button and open the driver's or front-
passenger door, the transmission automati-
cally engages park position P.
Shifting to neutral N
X Push the selecto rlever forwards or back to
the first point of resistance.
i If you set the selector lever to Nbefore
switching off the engine, the transmission
remains in Nfor approximately 30 minutes.
If you open the driver's or front-passenger
door during this period, the transmission
automatically shifts to P.Ifthe key is in the
ignition lock and you open the driver's or
front-passenger door, the transmission
remains in N.
Engaging reverse gear R
X Push the selector lever forwards past the
first point of resistance.
Engaging transmission position D
X Push the selector lever back past the first
point of resistance.
Changing gears
The transmission shifts into individual gears
automatically .This automatic gearshifting
behaviouri s determined by:
R drive position D
R the selected drive program (C/S/S+)
R the position of the accelerator pedal R
the road speed
R a shift range restriction, if selected
Driving tips Shift point
The shift points primarily depend on:
R
the position of the accelerator pedal
Little throttle: early upshifts; high throttle:
late upshifts
R the driving dynamics
Ad ynamic driving style with high longitudi-
nal and lateral acceleration delays the shift
points.
Double-clutch function
Whe nshifting down, the double-clutch func-
tion is active regardless of the currently selec-
ted drive program. The double-clutch function
reduces load change reactions and is condu-
cive to a sporty driving style. The sound gen-
erated by the double-clutchf unction depends
on the drive program selected.
Kickdown
i Kickdown is no tavailable in manual drive
program M.
Use kickdown for maximum acceleration.
X Depress the accelerator pedal beyond the
pressure point.
Depending on the selected drive program,
the transmission shifts to the lowest gear
allowing ideal acceleration. Driving programs
Program selector switch The progra
mselecto rswitch allows you to
choose fro marange of different transmission
configurations. 224
AMG SPEEDSHIFTD
CT 7-speed sports transmissionControls
BA 197 ECE RE 2010/6a; 1; 2, en-GB
sabbaeuV ersion: 3.0.3.6
2010-05-07T14:19:43+02:00 - Seite 224
Page 230 of 361
gram
S+is activated. ESP ®
Sport remains
activated.
RACE START is immediately deactivated if
you take your foot off the accelerator pedal
during RACE START or if the conditions for
activation are no longer met. The RACE
START not possible orRACE START can‐
celled message appears in the multifunction
display.
i After using it several times in short suc-
cession, RACE START will be unavailable
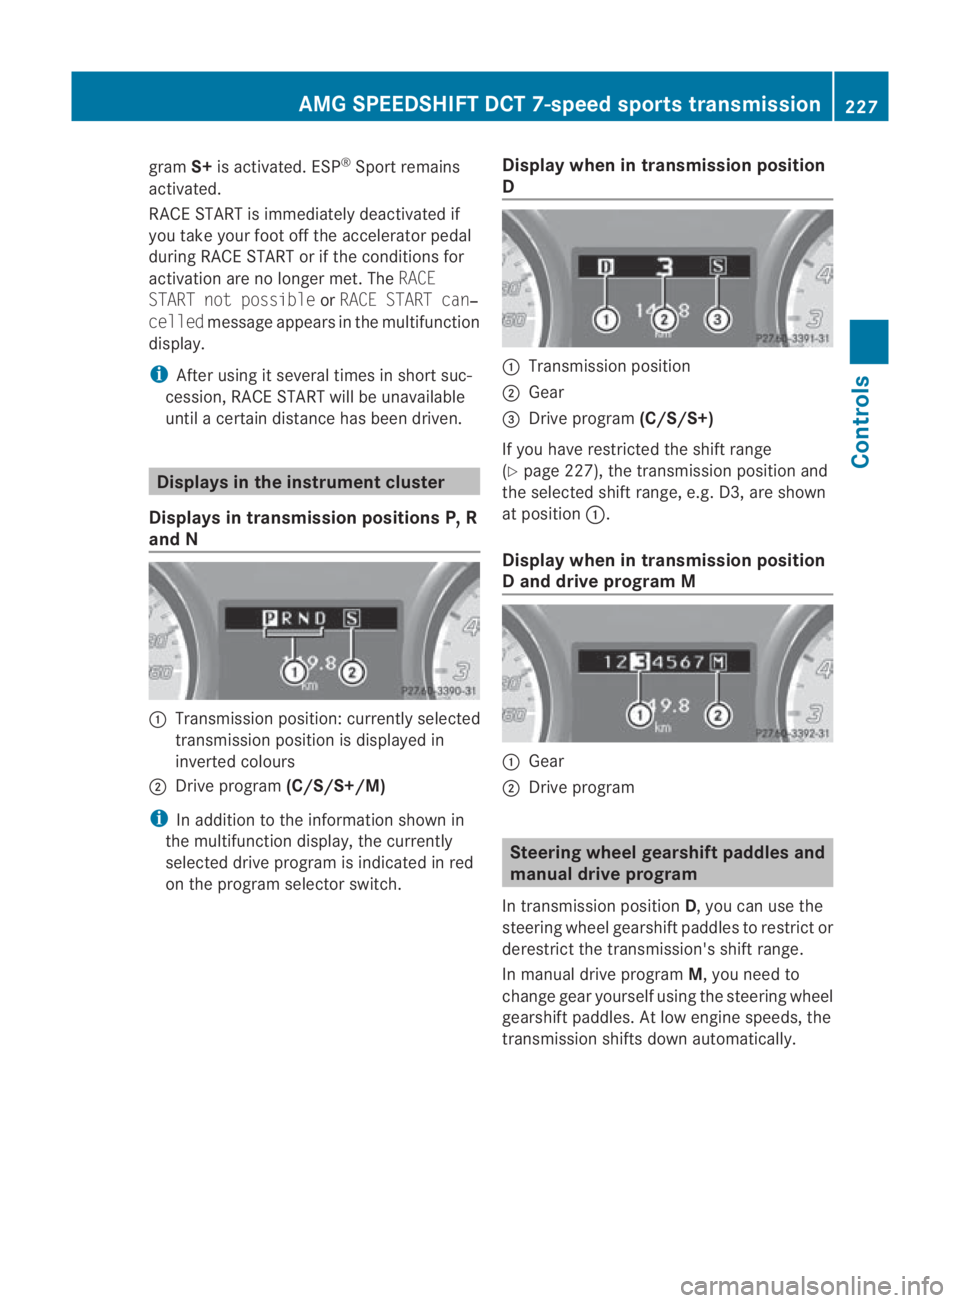
until a certain distance has been driven. Displays in the instrument cluster
Displays in transmission positions P, R
and N 0001
Transmission position: currently selected
transmission position is displayed in
inverted colours
0002 Drive program (C/S/S+/M)
i In addition to the information shown in
the multifunction display, the currently
selected drive program is indicated in red
on the program selector switch. Display when in transmission position
D 0001
Transmission position
0002 Gear
0015 Drive program (C/S/S+)
If you have restricted the shift range
(Y page 227), the transmission position and
the selected shift range, e.g. D3, are shown
at position 0001.
Display when in transmission position
D and drive program M 0001
Gear
0002 Drive program Steering wheel gearshift paddles and
manual drive program
In transmission position D, you can use the
steering wheel gearshift paddles to restrict or
derestric tthe transmission's shift range.
In manual drive program M, you need to
change gear yourself using the steering wheel
gearshift paddles. At low engine speeds, the
transmission shifts down automatically. AMG SPEEDSHIFT DCT 7-speed sports transmission
227Controls
BA 197 ECE RE 2010/6a; 1; 2, en-GB
sabbaeuVersion: 3.0.3.6 2010-05-07T14:19:43+02:00 - Seite 227 Z
Page 232 of 361
Manual drive program
In manual drive program
M, you need to
change geary ourself using the steering wheel
gearshift paddles (Y page 228). At low engine
speeds, the transmission shifts down auto-
matically.
! In manual drive program M, the transmis-
sion does not shift up automatically even
when the engine limiting speed for the cur-
rent gear is reached. When the engine lim-
iting speed is reached, the fuel supply is cut
to prevent the engine from overrevving.
Always make sure that the engine speed
does not reach the red area of the rev coun-
ter and observe the upshift indicator. There
is otherwise a risk of engine damage.
X To activate the manual drive program:
turn the program selector switch until M
appears in the instrument cluster's multi-
function display.
M lights up in red on the program selector
switch.
X To deactivate the manual drive pro-
gram: turn the selector switch and select
another drive program.
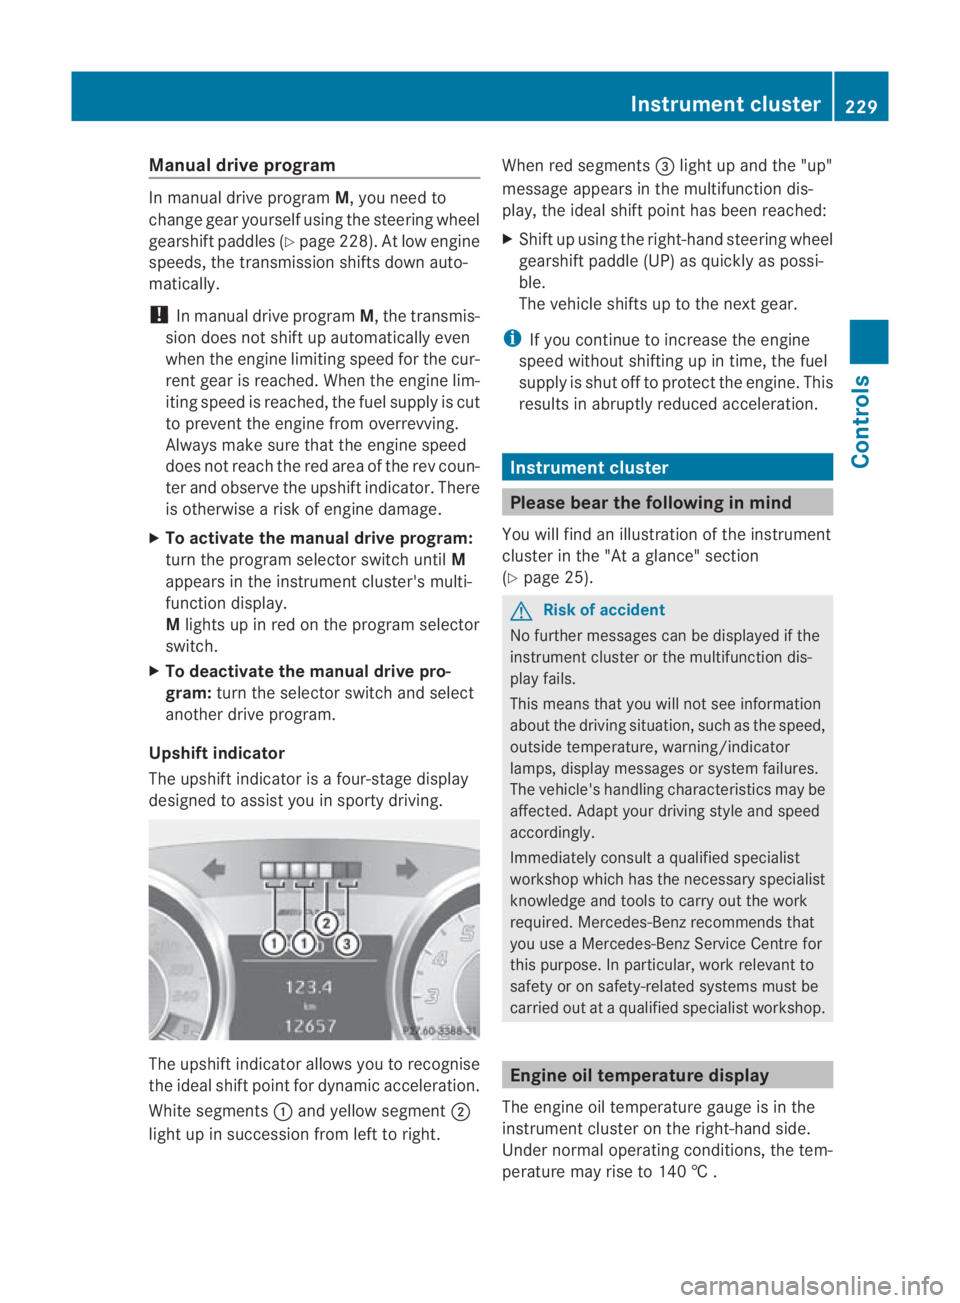
Upshift indicator
The upshift indicator is a four-stage display
designed to assist you in sporty driving. The upshift indicator allows you to recognise
the ideal shift point for dynamic acceleration.
White segments
0001and yellow segment 0002
light up in succession from left to right. When red segments
0015light up and the "up"
message appears in the multifunction dis-
play, the ideal shift point has been reached:
X Shift up using the right-hand steering wheel
gearshift paddle (UP) as quickly as possi-
ble.
The vehicle shifts up to the next gear.
i If you continue to increase the engine
speed without shifting up in time, the fuel
supply is shut off to protec tthe engine. This
results in abruptly reduced acceleration. Instrument cluster
Please bear the following in mind
You will find an illustration of the instrument
cluster in the "At a glance" section
(Y page 25). G
Risk of accident
No further messages can be displayed if the
instrument cluster or the multifunction dis-
play fails.
This means that you will not see information
about the driving situation, such as the speed,
outside temperature, warning/indicator
lamps, display messages or system failures.
The vehicle's handling characteristics may be
affected. Adapt your driving style and speed
accordingly.
Immediately consult a qualified specialist
workshop which has the necessary specialist
knowledge and tools to carry out the work
required. Mercedes-Ben zrecommends that
you use a Mercedes-Benz Service Centre for
this purpose. In particular, work relevant to
safety or on safety-related systems must be
carried out at a qualified specialist workshop. Engine oil temperature display
The engine oil temperature gauge is in the
instrument cluster on the right-hand side.
Under normal operating conditions, the tem-
perature may rise to 140 † . Instrument cluster
229Controls
BA 197 ECE RE 2010/6a; 1; 2, en-GB
sabbaeu Version: 3.0.3.6 2010-05-07T14:19:43+02:00 - Seite 229 Z
Page 248 of 361
Setting
aspeed X
Press the cruise control lever to the pres-
sure point up 0001for a highe rspeed or
down 0014for a lower speed.
X Keep the cruise control lever pressed until
the desired speed is reached.
X Release the cruise control lever.
The new speed is stored.
i Cruise control is not deactivated if you
depress the accelerator pedal. For exam-
ple, if you accelerate briefly to overtake,
cruise control adjusts the vehicle's speed
to the last speed stored after you have fin-
ished overtaking.
Making adjustments in 1 km/h incre-
ments X
Press the cruise control lever to the pres-
sure point, up 0001for a higher speed or
down 0014for a lower speed.
The last speed stored is increased or
reduced.
Making adjustments in 10 km/h incre-
ments X
Briefly press the cruise control lever
beyond the pressure point, up 0001for a
higher speed or down 0014for a lower speed.
The last speed stored is increased or
reduced.
Deactivating cruise control There are several ways to deactivate cruise
control:
X
Briefly press the cruise control lever for-
wards 0013.
or
X Brake or
X
Briefly press the cruise control lever in the
direction of arrow 0012.
Variable SPEEDTRONIC is selected. LIM
indicator lamp 0002in the cruise contro llever
lights up.
Cruise control is automatically deactivated if:
R you press the electric parking brake han-
dle.
R you are driving at less than 30 km/h.
R ESP ®
intervenes or you deactivate ESP ®
.
R you shift the transmission to Nwhile the
vehicle is in motion.
If cruise control is deactivated, you will hear
a warning tone. The “Cruise control
off” message is displayed in the multifunc-
tion display for approximately five seconds.
i The last speed stored is cleared when you
switch off the engine. SPEEDTRONIC
SPEEDTRONIC brakes automatically so that
you do not exceed the set speed. On long and
steep downhill gradients, especially if the
vehicle is laden, you must select shift range
1, 2or 3in good time. By doing so, you will
make use of the brakin geffect of the engine,
which relieves the load on the brake system
and prevents the brakes from overheating
and wearing too quickly. If you need addi-
tional braking, depress the brake pedal
repeatedly rather than continuously. G
Risk of accident
Never depress the brake peda lcontinuously
while the vehicle is in motion, e.g. never cause
the brakes to rub by applying constant slight
pedal pressure. This causes the brake system
to overheat, increases the braking distance
and can lead to the brakes failing completely. G
Risk of accident
Do not change down for additional engine
braking on a slippery road surface. This could Driving systems
245Controls
BA 197 ECE RE 2010/6a; 1; 2, en-GB
sabbaeu Version: 3.0.3.6 2010-05-07T14:19:43+02:00 - Seite 245 Z
Page 252 of 361
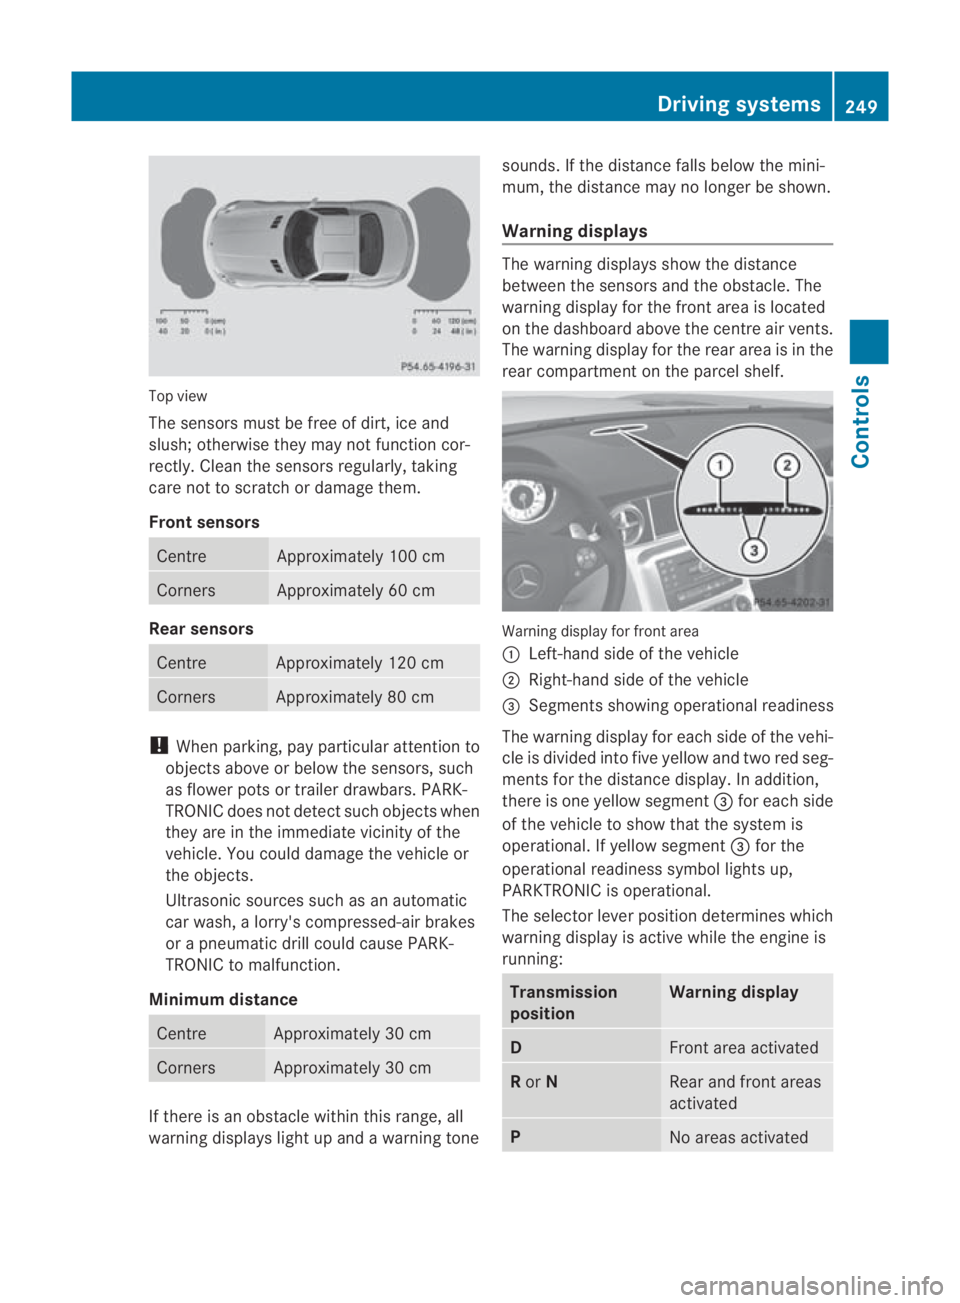
Top view
The sensors must be free of dirt, ice and
slush; otherwise they may not function cor-
rectly. Clean the sensors regularly, taking
care not to scratch or damage them.
Front sensors Centre Approximately 100 cm
Corners Approximately 60 cm
Rear sensors
Centre Approximately 120 cm
Corners Approximately 80 cm
!
When parking, pay particular attention to
objects above or below the sensors, such
as flower pots or trailer drawbars. PARK-
TRONIC does not detect such objects when
they are in the immediate vicinity of the
vehicle. You could damage the vehicle or
the objects.
Ultrasonic sources such as an automatic
car wash, a lorry's compressed-air brakes
or a pneumatic drill could cause PARK-
TRONIC to malfunction.
Minimum distance Centre Approximately 30 cm
Corners Approximately 30 cm
If there is an obstacle within this range, all
warning displays light up and a warning tone sounds. If the distance falls below the mini-
mum, the distance may no longer be shown.
Warning displays The warning displays show the distance
between the sensors and the obstacle. The
warning display for the front area is located
on the dashboard above the centre air vents.
The warning display for the rear area is in the
rear compartment on the parcel shelf.
Warning display for front area
0001
Left-hand side of the vehicle
0002 Right-hand side of the vehicle
0015 Segments showing operational readiness
The warning display for each side of the vehi-
cle is divided into five yellow and two red seg-
ments for the distance display .Inaddition,
there is one yellow segment 0015for each side
of the vehicle to show that the system is
operational. If yellow segment 0015for the
operational readiness symbol lights up,
PARKTRONIC is operational.
The selector lever position determines which
warning display is active while the engine is
running: Transmission
position Warning display
D
Front area activated
R
or N Rear and front areas
activated
P
No areas activatedDriving systems
249Controls
BA 197 ECE RE 2010/6a; 1; 2, en-GB
sabbaeu Version: 3.0.3.6 2010-05-07T14:19:43+02:00 - Seite 249 Z