oil pressure MERCEDES-BENZ SLS COUPE 2010 Owners Manual
[x] Cancel search | Manufacturer: MERCEDES-BENZ, Model Year: 2010, Model line: SLS COUPE, Model: MERCEDES-BENZ SLS COUPE 2010Pages: 361, PDF Size: 6.32 MB
Page 19 of 361
Tone settings
Trebl eand bass ............................... 68
Total distance recorder ....................233
Tow-away protection ..........................49
Towing ........................................ 339, 341
Towing eye Fitting ............................................ 341
Removing ....................................... 341
Town
Entering ........................................... 94
Traffic announcements on ...............164
Traffic jam function ........................... 117
Traffic Programme Switching traffic announcements
on/off ............................................ 164
Transferring acall (convenience
telephone) .......................................... 146
Transmission oil Temperature gauge (on-board
computer) ...................................... 241
Transmission output (maximum)
Telephone/two-way radio ..............347
Transport (vehicle) ............................341
Trim strips Cleaning ......................................... 285
Trip computer
On-board computer .......................232
Trip meter .......................................... 233
Resetting (on-board computer) ......234
True Image™ ........................................ 68
Turn signal Display message ............................ 300
Two-way radio
Installatio n..................................... 347
Type identification plate
see Vehicle identification plate ......348
Tyre grip ............................................. 278
Tyre pressure ..................................... 272
Calling up (on-board computer) .....273
Display message ............................ 304
Tyre pressure monitor
Warning lamp ................................. 311
Tyres
Direction of rotatio n...................... 272
General notes ................................ 270
Technical data ............................... 354
Tyre tread .......................................... .272 U
Unladen weight ................................. 352
Unlocking Emergency unlocking ..................... 322
Updating
Map software ................................... 89
Upshift indicator ............................... 229
USB devices Connecting to the Media Inter-
face ............................................... 184
Folders and playlists ......................187
Using the telephone ..........................144
Multi-function steering wheel ..........62 V
Variable Speedtronic ........................246
vCards Receiving ....................................... 137
Vehicle
Emergency unlocking ..................... 322
Individual settings (on-board com-
puter) ............................................. 238
Leaving parked up .........................321
Towing ........................................... 341
Transporting .................................. 341
Unlocking (key ).............................. 200
Vehicle battery .................................. 334
Vehicle dimensions ...........................352
Vehicle electronics ...........................346
Vehicle identification number
(VIN) ................................................... 348
Vehicle identification plate ..............348
Vehicle position Saving ...................................... 83, 127
Vehicle tool kit .................................. 288
Vehicle weights ................................. 352
Video DVD Fast forward/rewind ..................... .194
Operation ....................................... 190
Pause function ............................... 195
Picture settings .............................. 195
Selecting a film/title ..................... .195
Selecting a scene/chapter ............195
Stop function ................................. 194
Video mode
Automatic picture shutoff ..............190 16
Index BA 197 ECE RE 2010/6a; 1; 2, en-GB
sabbae uV ersion: 3.0.3.6
2010-05-07T14:19:43+02:00 - Seite 16
Page 30 of 361
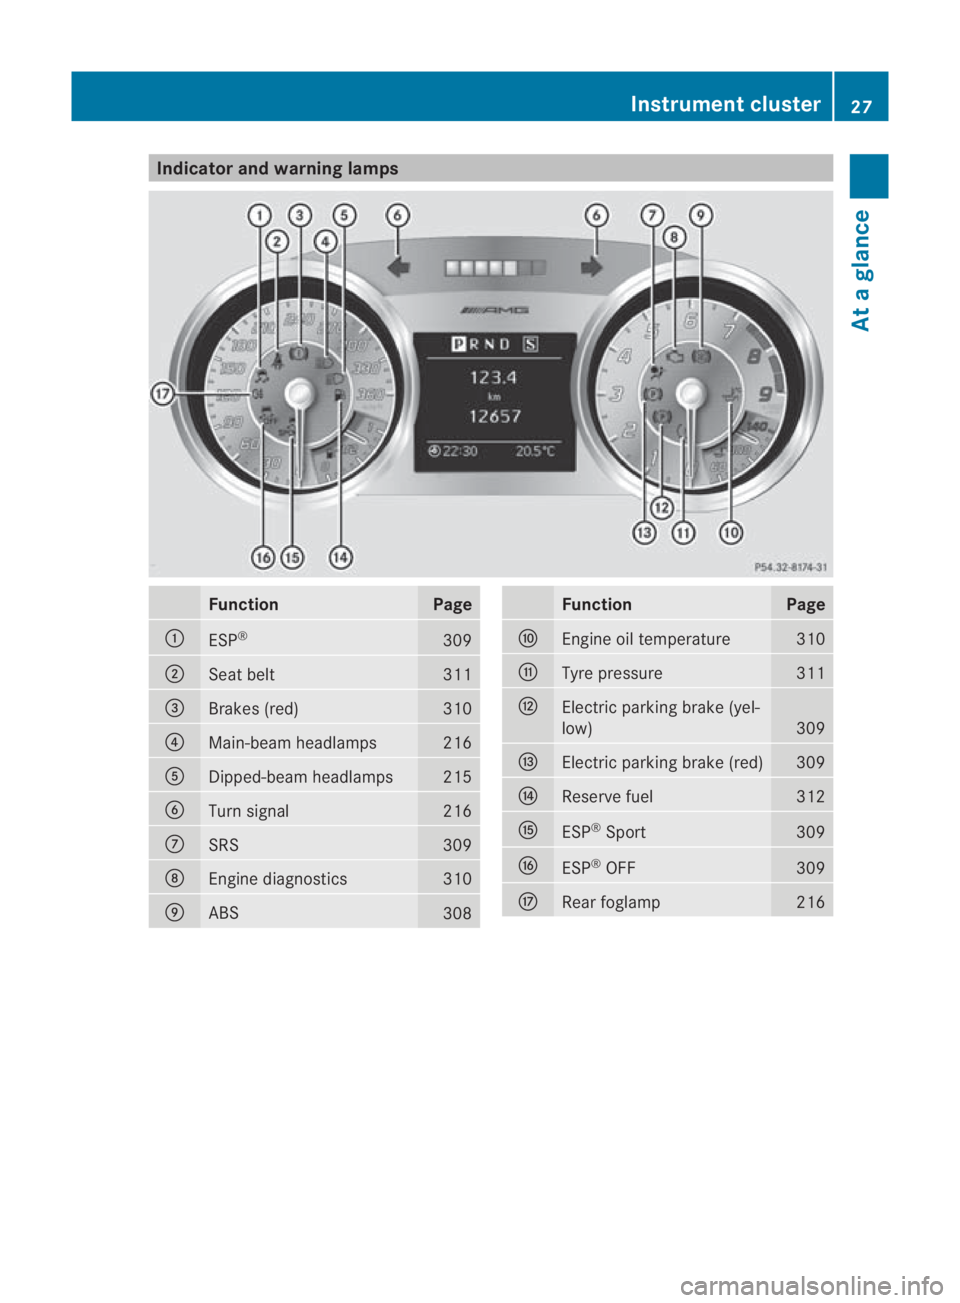
Indicator and warning lamps
Function Page
0001
ESP
® 309
0002
Seat belt 311
0015
Brakes (red) 310
0014
Main-beam headlamps 216
0012
Dipped-beam headlamps 215
0013
Turn signal 216
000A
SRS 309
000B
Engine diagnostics 310
000C
ABS
308 Function Page
000D
Engine oil temperature 310
000E
Tyre pressure 311
000F
Electric parking brake (yel-
low)
309
0010
Electric parking brak
e(red) 309
0011
Reserve fuel 312
0016
ESP
®
Sport 309
0017
ESP
®
OFF 309
0018
Rearf
oglamp 216Instrument cluster
27At a glance
BA 197 ECE RE 2010/6a; 1; 2, en-GB
sabbaeu Version: 3.0.3.6 2010-05-07T14:19:43+02:00 - Seite 27
Page 274 of 361
wheels which have been approved by
Mercedes-Ben
zspecifically for your vehi-
cle. These tyres have been specially adap-
ted for use with the driving safety systems,
such as ABS or ESP ®
.Ify ou use other tyres
and wheels, Mercedes-Benz cannot accept
any responsibility for damage that may
result from this. Further information about
tyres, wheels and approved combinations
can be obtained from any Mercedes-Benz
Service Centre.
If you use tyres other than those tested and
recommended for Mercedes-Benz vehi-
cles, characteristics such as handling, vehi-
cle noise emissions and fuel consumption
may be adversely affected. In addition, the
wheels may come into contact with the
body or axle components when heavily loa-
ded or when driving with snow chains. This
could result in damage to the tyres or the
vehicle.
! Retreaded tyres are neither tested nor
recommended by Mercedes-Benz, since
previous damage cannot always be detec-
ted on retreaded tyres. As a result,
Mercedes-Benz cannot guarantee vehicle
safety if retreaded tyres are fitted. Do not
fit used tyres if you have no information
about their previous usage. G
Risk of accident
Tyres, wheels or accessories which have not
been approved by Mercedes-Benz for your
vehicle or are not used as they should be, can
impair driving safety. As a result, you could
cause an accident .Before purchasing and
using them, enquire about their suitability,
legal stipulations and factory recommenda-
tions at a Mercedes-Benz Service Centre.
Modification work on the brake system and
wheels is not permitted, nor is the use of
spacer plates or brake dust shields. This inva-
lidates the General Operating Permit for the
vehicle. Notes on selecting, fitting and replacing
tyres R
Only fit tyres and wheels of the same type
and make.
R Only fit tyres of the correct size onto the
wheels.
R After fitting new tyres, run them in at mod-
erate speeds for the first 100 km as they
only reach their full performance after this
distance.
R Fit new tyres on the front wheels first if
tyres of the same size are required on the
fron tand rea rwheels.
R Replace the tyres after six years at the lat-
est, regardless of wear. This also applies to
the collapsible emergency spare wheel* 17
.
R Do not drive with tyres which have too little
tread depth, as this significantly reduces
the traction on wet roads (aquaplaning).
! Store tyres that are not being used in a
cool, dry and preferably dark place. Protect
the tyres against oil, grease, petrol and die-
sel.
Notes on regularly inspecting wheels
and tyres R
Regularly check the wheels and tyres of
your vehicle for damage (e.g. cuts, punctu-
res, tears, bulges on tyres and deformation,
cracks or severe corrosion on wheels), at
least every 14 days, as well as after driving
off-road or on rough roads. Damaged
wheels can cause a loss of tyre pressure.
R Regularly check the tyre tread depth and
the condition of the tread across the whole
width of the tyre (Y page 272). If neces-
sary, turn the front wheels to full lock in
order to inspect the inner side of the tyre
surface.
R All wheels must have a valve cap to protect
the valve against dirt and moisture. Do not
fit anything onto the valve (such as tyre
pressure monitoring systems) other than
17 Only for certain countries. Tyres and wheels
271Operation
*optional
BA 197 ECE RE 2010/6a; 1; 2, en-GB
sabbaeu
Version: 3.0.3.6 2010-05-07T14:19:43+02:00 - Seite 271 Z
Page 285 of 361
High-pressure cleaners
G
Risk of accident
Using high-pressure cleaners with circular-jet
nozzles (dirt grinders) may cause damage to
the vehicle, in particula rto the tyres.
Using damaged tyres results in an increased
risk of accident. A sudden loss of tyre pres-
sure while you are driving may cause you to
lose control of your vehicle, cause an accident
and injure yourself and others.
! Observe the instructions issued by the
equipment manufacturer concerning the
distance to be maintained between the
nozzle of the high-pressure cleaner and the
vehicle (at least 30 cm).
Move the high-pressure cleaner nozzle
around when cleaning your vehicle.
Do not aim directly at any of the following:
R tyres
R door joint
R electrical components
R battery
R connectors
R exterior lighting
R seals
R trim elements
Damaged seals or electrical components
can lead to leaks or failures.
Cleaning the wheels !
Do not use acidic wheel cleaning products
to remove brake dust. This could damage
wheel bolts and brake components.
! Do not park the vehicle for a long period
of time directly after cleaning, especially if
the wheels have just been cleaned with a
wheel cleaner. Wheel cleaners could cause
rapid corrosion of the brake discs and
brake pads/linings. After cleaning, park
the vehicle when it is at normal operating
temperature. Matt finish* Your vehicle is lacquered with a clear matt
finish. To avoid damage to the finish by
improper handling, observe the following
instructions.
!
Under no circumstances should you pol-
ish the vehicle. Polishing will make the
paintwork shine.
! Never use paint cleaner, buffing or pol-
ishing products such as gloss preserver
(wax). These products are only suitable for
high-gloss surfaces. Their use on vehicles
with matt finish leads to considerable sur-
face damage (shiny, spotted areas).
If wax comes into contact with the painted
surface by accident, remove it immediately
with commercially available petroleum
ether. Do so carefully and do not apply too
much pressure to the painted surface.
Ensure that no resinous, greasy or oily sub-
stances come into contact with the paint,
as these can leave a residue. If such sub-
stances do come into contact with the pain-
ted surface accidentally, remove these
immediately with commercially available
petroleum ether. Do so carefully and do not
apply too much pressure to the painted
surface.
Tar stains or marks on the painted surface
can be removed with a commercially avail-
able tar remover. Do so carefully and do not
apply too much pressure to the painted
surface.
Always have paintwork repairs carried out
at a qualified specialist workshop, e.g. a
Mercedes-Benz Service Centre.
! Do not affix stickers to the painted sur-
face. Adhesive residue could damage the
paintwork.
i Of the Mercedes-Benz care products, use
only insect remover and car shampoo. 282
CareOperation
*o
ptional
BA 197 ECE RE 2010/6a; 1; 2, en-GB
sabbaeu
Version: 3.0.3.6 2010-05-07T14:19:43+02:00 - Seite 282
Page 287 of 361
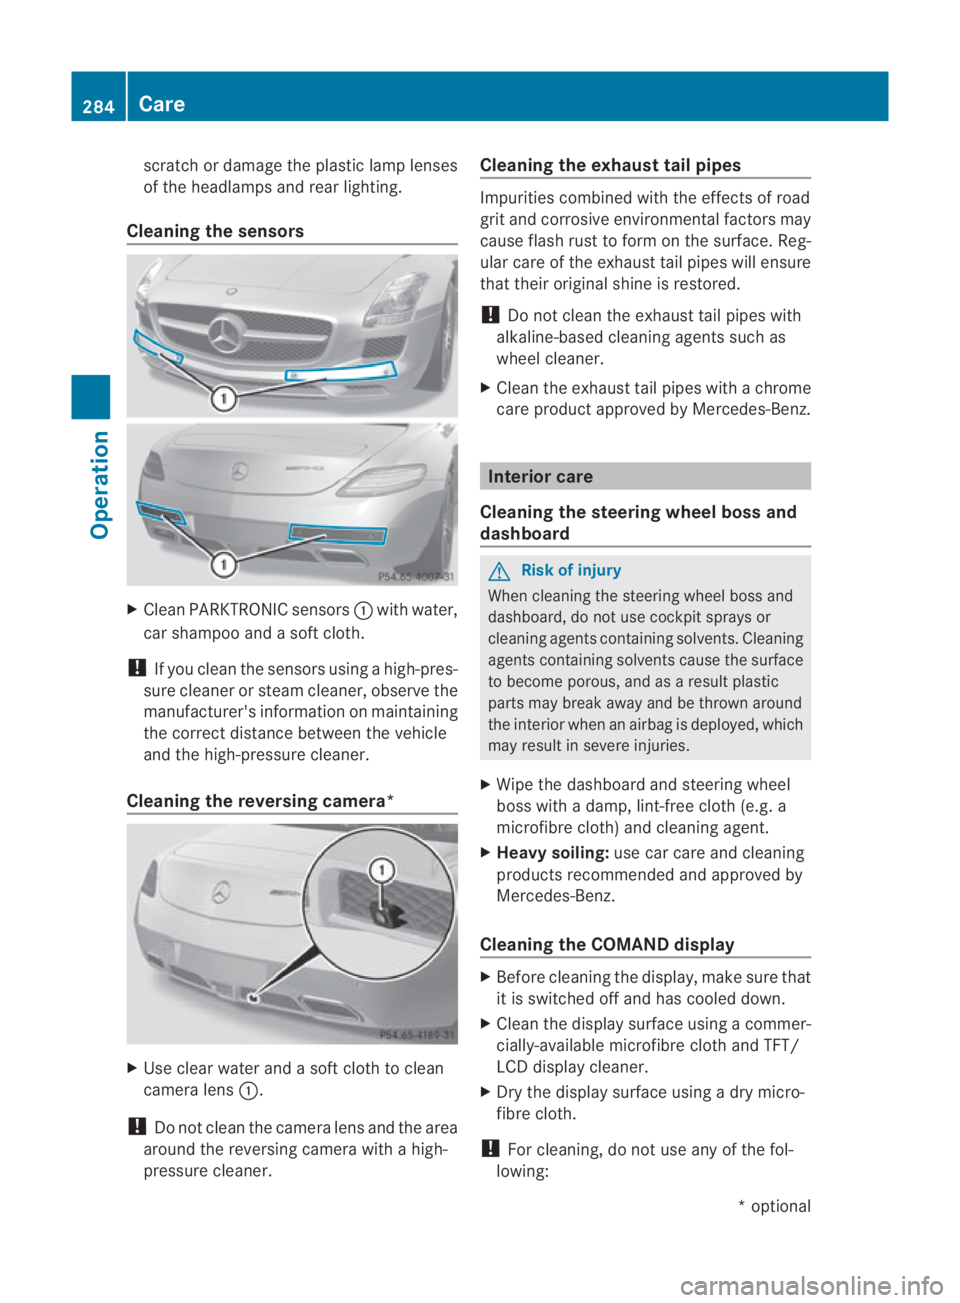
scratch or damage the plastic lamp lenses
of the headlamps and rear lighting.
Cleaning the sensors X
CleanP ARKTRONIC sensors 0001with water,
car shampoo and a sof tcloth.
! If you clean the sensors using a high-pres-
sure cleaner or steam cleaner, observe the
manufacturer' sinformation on maintaining
the correct distance between the vehicle
and the high-pressure cleaner.
Cleaning the reversing camera* X
Use clear water and a sof tcloth to clean
camera lens 0001.
! Do not clean the camera lens and the area
around the reversing camera with a high-
pressure cleaner. Cleaning the exhaust tail pipes Impurities combined with the effects of road
grit and corrosive environmental factors may
cause flash rust to for monthe surface. Reg-
ular care of the exhaust tail pipes will ensure
that their original shine is restored.
! Do not clean the exhaust tail pipes with
alkaline-based cleaning agents such as
wheel cleaner.
X Cleant he exhaust tail pipes with a chrome
care product approved by Mercedes-Benz. Interior care
Cleaning the steering wheel boss and
dashboard G
Risk of injury
When cleaning the steering wheel boss and
dashboard, do not use cockpit sprays or
cleaning agents containing solvents. Cleaning
agents containing solvents cause the surface
to become porous, and as aresult plastic
parts may break away and be thrown around
the interior when an airbag is deployed, which
may result in severe injuries.
X Wipe the dashboard and steerin gwheel
boss with a damp, lint-free cloth (e.g. a
microfibre cloth) and cleaning agent.
X Heavy soiling: use car care and cleaning
products recommended and approved by
Mercedes-Benz.
Cleaning the COMAND display X
Before cleaning the display, make sure that
it is switched off and has cooled down.
X Cleant he display surface using a commer-
cially-available microfibre cloth and TFT/
LCD display cleaner.
X Dry the display surface using a dry micro-
fibre cloth.
! For cleaning, do not use any of the fol-
lowing: 284
CareOperation
*o
ptional
BA 197 ECE RE 2010/6a; 1; 2, en-GB
sabbaeu
Version: 3.0.3.6 2010-05-07T14:19:43+02:00 - Seite 284
Page 288 of 361
R
alcohol-based solvents or petrol
R abrasive cleaning agents
R commercially-available household clean-
ing agents
These may damage the display surface. Do
no te xert pressure when cleaning the dis-
play surface as this ma ylead to irreversible
damage.
Cleaning the seat covers !
Do not use microfibre cloths to clean gen-
uine leather covers, as these are too
aggressive and, if used often, may damage
the cover.
! Clean genuine leather cover swith a damp
cloth, the nwipe the covers down with a dry
cloth. Make sure that the leathe rdoes not
become soaked. Only use leather care
agents that have been tested and approved
by Mercedes-Benz. You can obtain these
from any Mercedes-Benz Service Centre.
i Note that regular care is essential to
ensure that the quality (both appearance
and comfort) of the covers is retained over
time.
Cleaning the plastic trim !
Do not affix to plastic surfaces:
R stickers
R films
R scented oil bottles or similar items
You can otherwise damage the plastic.
! Ensure that cosmetics, insect repellent
and suntan lotion do not come into contact
with the vehicle's trim. This will protec tthe
vehicle's high-quality trim and help retain
its overall appearance.
X Wipe the plastic trim with a damp, lint-free
cloth (e.g. a microfibre cloth).
X Heavy soiling: use car care and cleaning
products recommended and approved by
Mercedes-Benz. Cleaning trim strips X
Wipe the trim strips with a damp, lint-free
cloth (e.g. a microfibre cloth).
X Heavy soiling: use car care and cleaning
products recommended and approved by
Mercedes-Benz. Care
285Operation
BA 197 ECE RE 2010/6a; 1; 2, en-GB
sabbaeu Version: 3.0.3.6 2010-05-07T14:19:43+02:00 - Seite 285 Z
Page 305 of 361
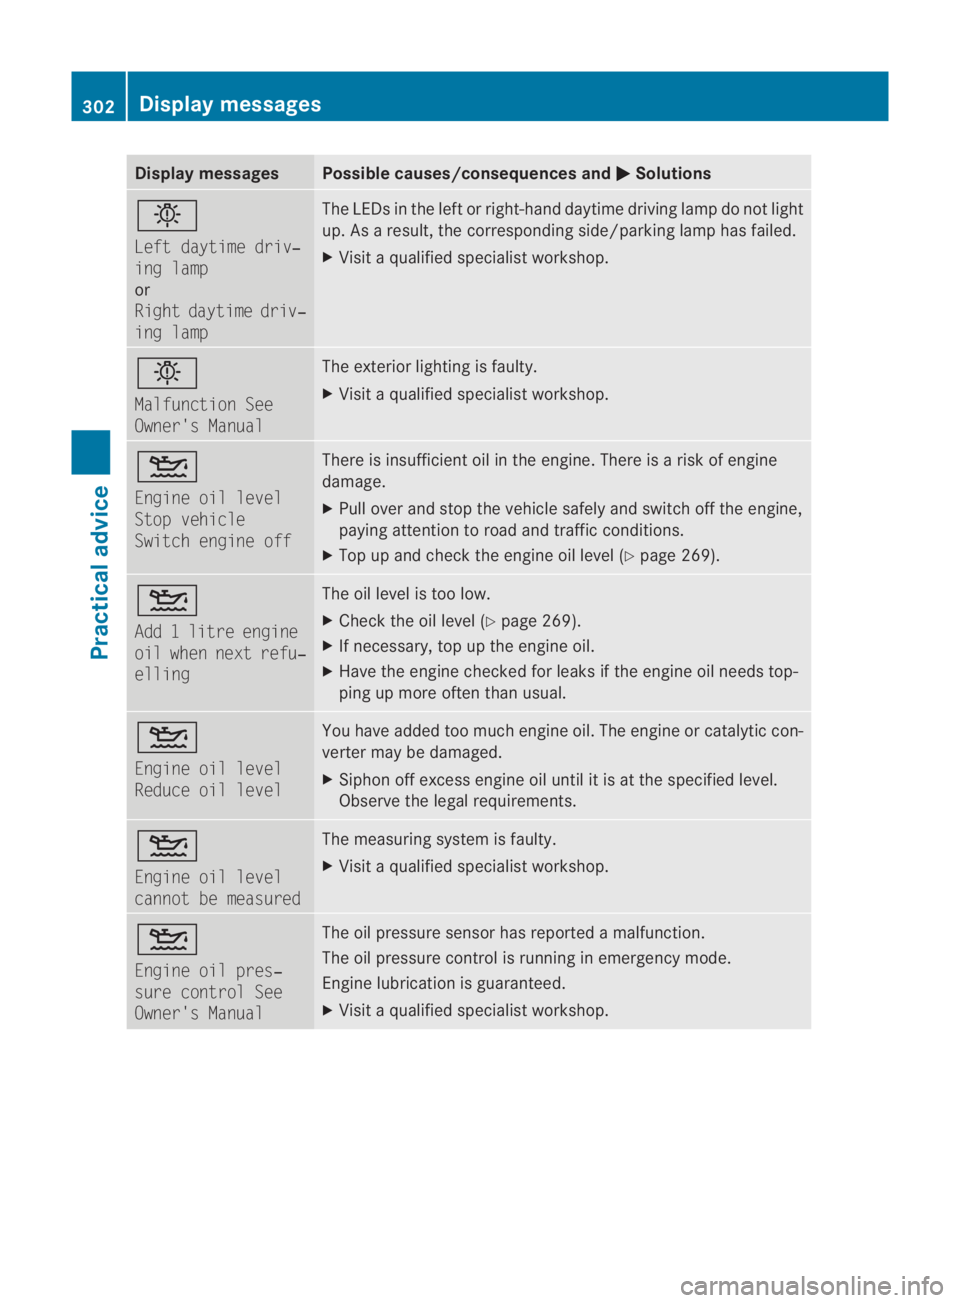
Display messages Possible causes/consequences and
0003 Solutions
0006
Left daytime driv‐
ing lamp
or
Right daytime driv‐
ing lamp The LEDs in the lef
torright-hand daytime driving lamp do not light
up. As a result, the corresponding side/parking lamp has failed.
X Visit a qualified specialist workshop. 0006
Malfunction See
Owner's Manual The exterior lighting is faulty.
X
Visit a qualified specialist workshop. 0002
Engine oil level
Stop vehicle
Switch engine off There is insufficient oil in the engine. There is a risk of engine
damage.
X
Pull over and stop the vehicle safely and switch off the engine,
paying attention to road and traffic conditions.
X Top up and chec kthe engine oil level (Y page 269).0002
Add 1 litre engine
oil when next refu‐
elling The oil level is too low.
X
Check the oil level (Y page 269).
X If necessary, top up the engine oil.
X Have the engine checked for leaks if the engine oil needs top-
ping up more often than usual. 0002
Engine oil level
Reduce oil level You have added too much engine oil. The engine or catalytic con-
verter may be damaged.
X
Siphon off excess engine oil until it is at the specified level.
Observe the legal requirements. 0002
Engine oil level
cannot be measured The measuring system is faulty.
X
Visit a qualified specialist workshop. 0002
Engine oil pres‐
sure control See
Owner's Manual The oil pressure sensor has reported a malfunction.
The oil pressure control is running in emergency mode.
Engine lubrication is guaranteed.
X Visit a qualified specialist workshop. 302
Display messagesPractical advice
BA 197 ECE RE 2010/6a; 1; 2, en-GB
sabbaeu
Version: 3.0.3.6 2010-05-07T14:19:43+02:00 - Seite 302