battery replacement MERCEDES-BENZ SPRINTER 2006 Service Manual
[x] Cancel search | Manufacturer: MERCEDES-BENZ, Model Year: 2006, Model line: SPRINTER, Model: MERCEDES-BENZ SPRINTER 2006Pages: 2305, PDF Size: 48.12 MB
Page 20 of 2305
Compres SO Accel (Compressor Shut Off - Due
To Acceleration)
The Engine Control Module transmits this data. A
status of9YES9indicates that the compressor shut
off because of an acceleration request. A status of
9NO9indicates that there is no acceleration request.
If shut off due to an acceleration request, the
compress will switch on again after 20 seconds. In
addition, the original acceleration request can no
longer exist for the ECM to acknowledge a subse-
quent request. In the event of a CAN Bus commu-
nication failure,9NO9is displayed as a substitute
value.
Compres SO W/E-Off (Compressor Shut Off -
Due to Emergency Off)
The Engine Control Module transmits this data. A
status of9YES9indicates that the compressor shut
off because of an emergency off request. A status of
9NO9indicates that there is no emergency off re-
quest. In the event of a CAN Bus communication
failure, the last stored value is displayed as a
substitute value.
Auxiliary Fan
The ATC Module transmits this data. A status of
9ON9indicates that the auxiliary fan is operational.
A status of9OFF9indicates that the auxiliary fan is
not operational. The Auxiliary Fan normally oper-
ates when refrigerant head pressure exceeds 290
PSI and coolant temperature exceeds 221ÉF. In the
event of a CAN Bus communication failure, 257ÉF is
displayed for coolant temperature (in Sensors) and
the Auxiliary Fan will run continuously.
Light PB CTRL Module
This input displays a status of9Bright9for positive
dimmer switch operation and9Dimmed9for nega-
tive dimmer switch operation. In the event of a CAN
Bus communication failure,9Bright9is displayed.
3.3.2 CABIN HEATER MODULE (CHM) &
HEATER BOOSTER MODULE (HBM)
3.3.2.1 SYSTEM DESCRIPTION
WARNING: NEVER OPERATE THE HEATER
IN AN ENCLOSED AREA THAT DOES NOT
HAVE EXHAUST VENTILATION FACILITIES.
ALWAYS VENT THE HEATER'S EXHAUST
WHEN OPERATING THE HEATER. REFER TO
(VENTING THE HEATER'S EXHAUST(
BELOW FOR PROPER EXHAUST VENTING
INSTRUCTIONS. FAILURE TO FOLLOW
THESE INSTRUCTIONS CAN RESULT IN
PERSONAL INJURY OR DEATH.
WARNING: ALLOW THE HEATER ASSEMBLY TO
COOL BEFORE PERFORMING A COMPONENT
INSPECTION/REPAIR/REPLACEMENT. FAILURE
TO FOLLOW THESE INSTRUCTIONS CAN
RESULT IN PERSONAL INJURY OR DEATH.
WARNING: ALWAYS DISCONNECT THE
VEHICLE'S BATTERY PRIOR TO
PERFORMING ANY TYPE OF WORK ON THE
HEATER ASSEMBLY. FAILURE TO FOLLOW
THESE INSTRUCTIONS CAN RESULT IN
PERSONAL INJURY OR DEATH.
WARNING: NEVER ATTEMPT TO REPAIR THE
HEATER ASSEMBLY OR ANY OF ITS
INTERNAL COMPONENTS. ALWAYS
PERFORM HEATER COMPONENT
REPLACEMENT IN ACCORDANCE WITH THE
SERVICE INFORMATION. FAILURE TO
FOLLOW THESE INSTRUCTIONS CAN
RESULT IN PERSONAL INJURY OR DEATH.
CAUTION: Always Perform The Heater
Pre-Test (In The Diagnostic Procedures) Prior
To Performing Any Other Test On The Heater
For The Test Result To Be Valid.
NOTE: Do not disconnect the vehicle's
battery or the heater's main power-supply
while the heater is in operation or in
run-down mode. Failure to follow these
instructions may result in excess emissions
from the heater.
NOTE: Failure to prime the Dosing Pump
after draining the fuel line will prevent heater
activation during the first attempt to start the
unit. This may also set a Diagnostic Trouble
Code (DTC) in the control unit's memory. Do
not perform the Dosing Pump Priming
Procedure if an attempt was made to start the
heater without priming the Dosing Pump
first. This will put excess fuel in the heater
module and cause smoke to emit from the
heater's exhaust pipe when heater activation
occurs.
NOTE: Waxed fuel can obstruct the fuel line
and reduce flow. Check for the appropriate
winter grade fuel and replace as necessary.
The Cabin Heater Assembly and Heater Booster
Assembly are supplemental type heaters designed
to pre-heat the engine's coolant in order to supply
the vehicle's occupants with heat prior to the engine
7
GENERAL INFORMATION
Page 83 of 2305
TEST ACTION APPLICABILITY
2WARNING: NEVER OPERATE THE HEATER IN AN ENCLOSED AREA
THAT DOES NOT HAVE EXHAUST VENTILATION FACILITIES. ALWAYS
VENT THE EXHAUST WHEN OPERATING THE HEATER. FAILURE TO
FOLLOW THESE INSTRUCTIONS CAN RESULT IN PERSONAL INJURY
OR DEATH.
WARNING: ALLOW THE HEATER ASSEMBLY TO COOL BEFORE PER-
FORMING A COMPONENT INSPECTION/REPAIR/REPLACEMENT. FAIL-
URE TO FOLLOW THESE INSTRUCTIONS CAN RESULT IN PERSONAL
INJURY OR DEATH.
NOTE: The heater's control unit will store up to five DTCs in its memory.
NOTE: If the heater's control unit detects a new fault in the system, one that
is not already stored in its memory, it will clear the oldest of the five stored
DTCs, and it will store the new fault's DTC.
NOTE: If the heater's control unit detects a reoccurrence of a stored fault,
it will overwrite that fault's DTC with the most recent occurrence.
Turn the ignition on.
Verify that the Cabin Heater or Heater Booster is switched off.
Set the blend control to the max heat position and the mode control to the floor
position.
With the DRBIIIt, record and erase the Cabin Heater or Heater Booster Module's
DTCs.
Start the engine. Allow the engine to idle.
With the DRBIIIt, monitor for Cabin Heater Module or Heater Booster Module DTCs
while performing the following step.
NOTE: Do not disconnect the vehicle's battery or the heater's main power
supply while the heater is in operation or in run-down mode. Failure to
follow these instructions can result in excess emissions from the heater
during heater operation.
Switch the Cabin Heater or Heater Booster on. If operable, allow the heater to run
through at least one cycle of operation (approximately 10 minutes), and then switch
the heater off.
Does the DRBIIItdisplay any DTCs?All
Ye s!If the Heater In Lockout Mode DTC is present, record and erase
DTCs before performing any diagnostic procedures. Return to the
symptom list and choose the symptom(s).
Perform HEATER VERIFICATION TEST - VER 1.
No!Go To 3
70
CABIN HEATER
A. HEATER PRE-TEST ÐContinued
Page 86 of 2305
TEST ACTION APPLICABILITY
2WARNING: NEVER OPERATE THE HEATER IN AN ENCLOSED AREA
THAT DOES NOT HAVE EXHAUST VENTILATION FACILITIES. ALWAYS
VENT THE EXHAUST WHEN OPERATING THE HEATER. FAILURE TO
FOLLOW THESE INSTRUCTIONS CAN RESULT IN PERSONAL INJURY
OR DEATH.
WARNING: ALLOW THE HEATER ASSEMBLY TO COOL BEFORE PER-
FORMING A COMPONENT INSPECTION/REPAIR/REPLACEMENT. FAIL-
URE TO FOLLOW THESE INSTRUCTIONS CAN RESULT IN PERSONAL
INJURY OR DEATH.
Turn the ignition off.
NOTE: Check connectors - Clean/repair as necessary.
Disconnect the Cabin Heater harness connector.
Remove the Circulation Pump Relay from the relay center.
Measure the resistance of the Circulation Pump Relay High Side Control circuit
between the Cabin Heater harness connector and the relay center (Circulation Pump
Relay connector terminal 86).
Is the resistance below 5.0 ohms?All
Ye s!Go To 3
No!Repair the Circulation Pump Relay High Side Control circuit for
an open.
Perform HEATER VERIFICATION TEST - VER 1.
3WARNING: NEVER OPERATE THE HEATER IN AN ENCLOSED AREA
THAT DOES NOT HAVE EXHAUST VENTILATION FACILITIES. ALWAYS
VENT THE EXHAUST WHEN OPERATING THE HEATER. FAILURE TO
FOLLOW THESE INSTRUCTIONS CAN RESULT IN PERSONAL INJURY
OR DEATH.
Turn the ignition off.
Reconnect the Cabin Heater harness connector.
Install a substitute relay in place of the Circulation Pump Relay.
Turn the ignition on.
Verify that the Cabin Heater is switched off.
Set the blend control to the max heat position and the mode control to the floor
position.
With the DRBIIIt, erase the Cabin Heater Module's DTCs.
Start the engine. Allow the engine to idle.
With the DRBIII, monitor for Cabin Heater Module DTCs while performing the
following step.
NOTE: Do not disconnect the vehicle's battery or the heater's main power
supply while the heater is in operation or in run-down mode. Failure to
follow these instructions can result in excess emissions from the heater
during heater operation.
Switch the Cabin Heater on. If necessary, allow the heater to run through at least one
cycle of operation (approximately 10 minutes), and then turn the heater off.
Turn the engine off.
Does the DRBIIItdisplay: CIRC PUMP CONTROL OPEN?All
Ye s!Replace the Cabin Heater Assembly in accordance with the
Service Information. Reinstall the original Circulation Pump
Relay.
Perform HEATER VERIFICATION TEST - VER 1.
No!Replace the original Circulation Pump Relay in accordance with
the Service Information.
Perform HEATER VERIFICATION TEST - VER 1.
73
CABIN HEATER
CIRC PUMP CONTROL OPEN ÐContinued
Page 94 of 2305
Symptom:
DOSING PUMP SHORTED
POSSIBLE CAUSES
DOSING PUMP SHORTED TO GROUND
DOSING PUMP CONTROL CIRCUIT SHORTED TO GROUND CIRCUIT
DOSING PUMP CONTROL CIRCUIT SHORTED TO GROUND
CABIN HEATER OR HEATER BOOSTER CONTROL UNIT
TEST ACTION APPLICABILITY
1WARNING: NEVER OPERATE THE HEATER IN AN ENCLOSED AREA
THAT DOES NOT HAVE EXHAUST VENTILATION FACILITIES. ALWAYS
VENT THE EXHAUST WHEN OPERATING THE HEATER. FAILURE TO
FOLLOW THESE INSTRUCTIONS CAN RESULT IN PERSONAL INJURY
OR DEATH.
WARNING: ALLOW THE HEATER ASSEMBLY TO COOL BEFORE PER-
FORMING A COMPONENT INSPECTION/REPAIR/REPLACEMENT. FAIL-
URE TO FOLLOW THESE INSTRUCTIONS CAN RESULT IN PERSONAL
INJURY OR DEATH.
CAUTION: DO NOT PERFORM THIS TEST UNLESS DIRECTED HERE BY
THE HEATER PRE-TEST. ALWAYS PERFORM THE HEATER PRE-TEST
PRIOR TO PERFORMING ANY OTHER TEST FOR THE RESULT TO BE
VALID.
Turn the ignition off.
NOTE: Check connectors - Clean/repair as necessary.
Disconnect the Dosing Pump harness connector.
Turn the ignition on.
Verify that the Cabin Heater or Heater Booster is switched off.
Set the blend control to the max heat position and the mode control to the floor
position.
With the DRBIIIt, erase the Cabin Heater or Heater Booster Module's DTCs.
Start the engine. Allow the engine to idle.
With the DRBIII, monitor for Cabin Heater or Heater Booster Module DTCs while
performing the following step.
NOTE: Do not disconnect the vehicle's battery or the heater's main power
supply while the heater is in operation or in run-down mode. Failure to
follow these instructions can result in excess emissions from the heater
during heater operation.
Switch the Cabin Heater or Heater Booster on. If necessary, allow the heater to run
through at least one cycle of operation (approximately 10 minutes), and then switch
the heater off.
Turn the engine off.
Does the DRBIIItdisplay: DOSING PUMP HIGH OR OPEN?All
Ye s!Replace the Dosing Pump in accordance with the Service Infor-
mation.
Perform HEATER VERIFICATION TEST - VER 1.
No!Go To 2
81
CABIN HEATER
Page 95 of 2305
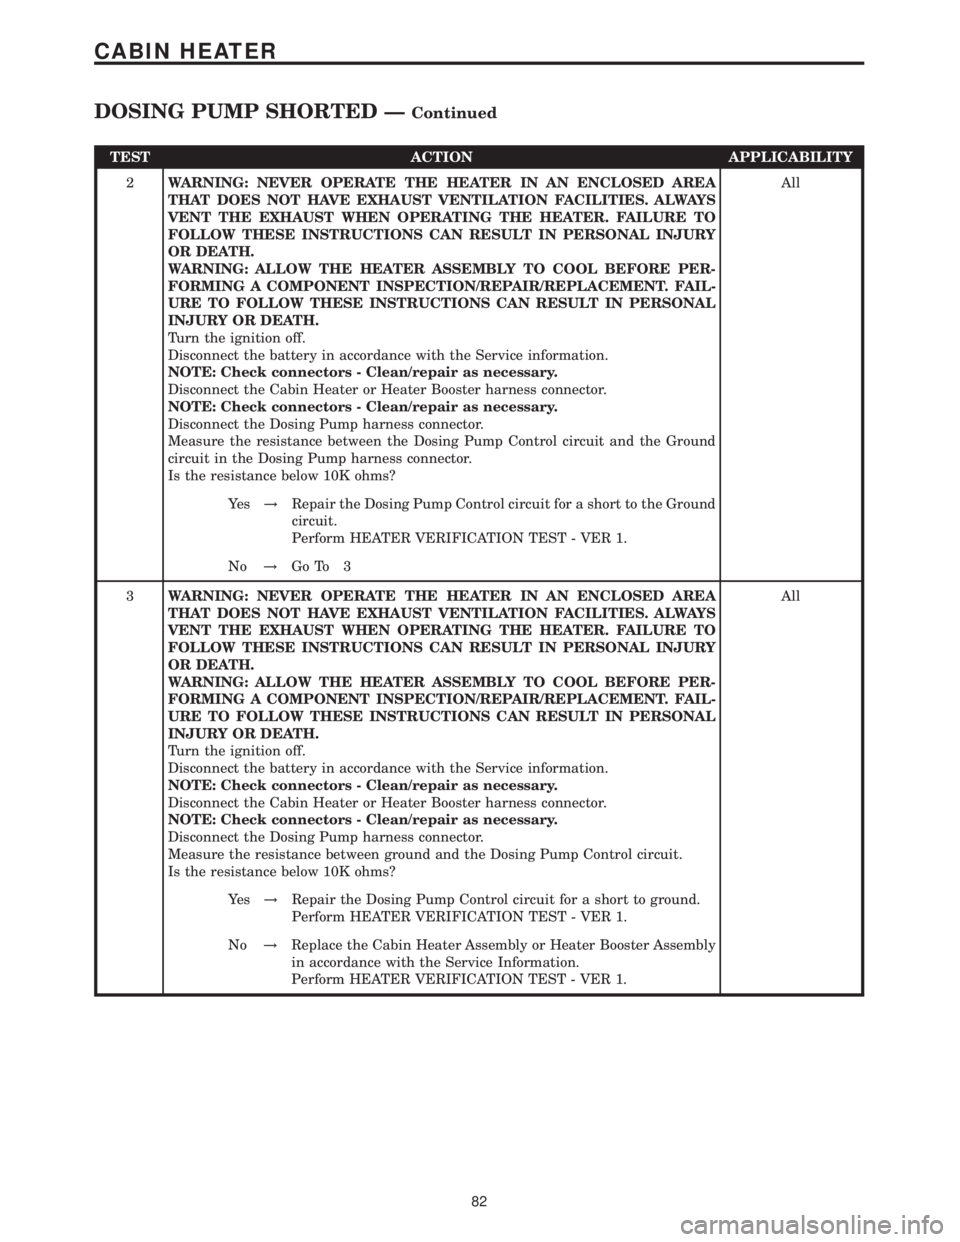
TEST ACTION APPLICABILITY
2WARNING: NEVER OPERATE THE HEATER IN AN ENCLOSED AREA
THAT DOES NOT HAVE EXHAUST VENTILATION FACILITIES. ALWAYS
VENT THE EXHAUST WHEN OPERATING THE HEATER. FAILURE TO
FOLLOW THESE INSTRUCTIONS CAN RESULT IN PERSONAL INJURY
OR DEATH.
WARNING: ALLOW THE HEATER ASSEMBLY TO COOL BEFORE PER-
FORMING A COMPONENT INSPECTION/REPAIR/REPLACEMENT. FAIL-
URE TO FOLLOW THESE INSTRUCTIONS CAN RESULT IN PERSONAL
INJURY OR DEATH.
Turn the ignition off.
Disconnect the battery in accordance with the Service information.
NOTE: Check connectors - Clean/repair as necessary.
Disconnect the Cabin Heater or Heater Booster harness connector.
NOTE: Check connectors - Clean/repair as necessary.
Disconnect the Dosing Pump harness connector.
Measure the resistance between the Dosing Pump Control circuit and the Ground
circuit in the Dosing Pump harness connector.
Is the resistance below 10K ohms?All
Ye s!Repair the Dosing Pump Control circuit for a short to the Ground
circuit.
Perform HEATER VERIFICATION TEST - VER 1.
No!Go To 3
3WARNING: NEVER OPERATE THE HEATER IN AN ENCLOSED AREA
THAT DOES NOT HAVE EXHAUST VENTILATION FACILITIES. ALWAYS
VENT THE EXHAUST WHEN OPERATING THE HEATER. FAILURE TO
FOLLOW THESE INSTRUCTIONS CAN RESULT IN PERSONAL INJURY
OR DEATH.
WARNING: ALLOW THE HEATER ASSEMBLY TO COOL BEFORE PER-
FORMING A COMPONENT INSPECTION/REPAIR/REPLACEMENT. FAIL-
URE TO FOLLOW THESE INSTRUCTIONS CAN RESULT IN PERSONAL
INJURY OR DEATH.
Turn the ignition off.
Disconnect the battery in accordance with the Service information.
NOTE: Check connectors - Clean/repair as necessary.
Disconnect the Cabin Heater or Heater Booster harness connector.
NOTE: Check connectors - Clean/repair as necessary.
Disconnect the Dosing Pump harness connector.
Measure the resistance between ground and the Dosing Pump Control circuit.
Is the resistance below 10K ohms?All
Ye s!Repair the Dosing Pump Control circuit for a short to ground.
Perform HEATER VERIFICATION TEST - VER 1.
No!Replace the Cabin Heater Assembly or Heater Booster Assembly
in accordance with the Service Information.
Perform HEATER VERIFICATION TEST - VER 1.
82
CABIN HEATER
DOSING PUMP SHORTED ÐContinued
Page 97 of 2305
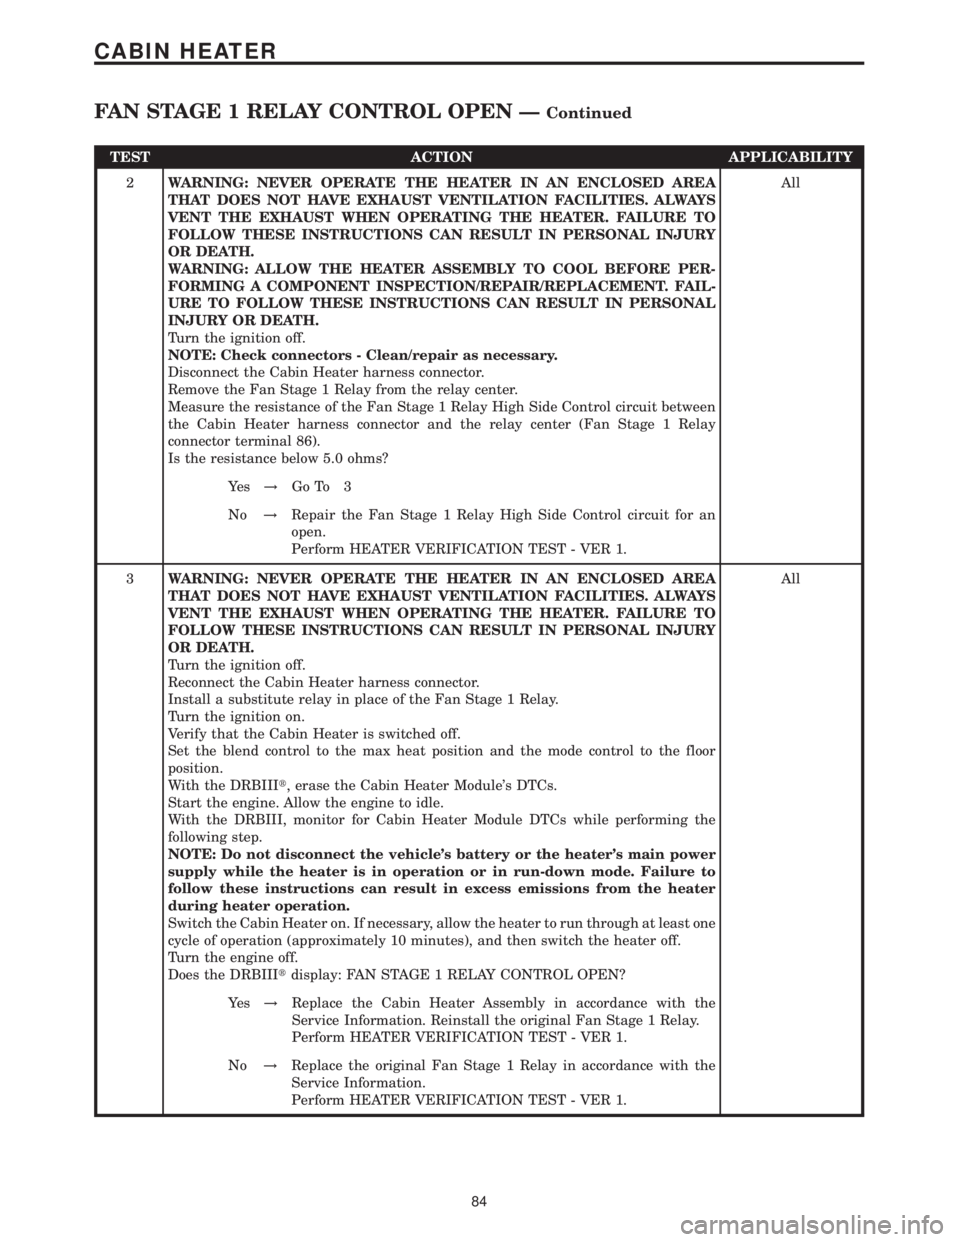
TEST ACTION APPLICABILITY
2WARNING: NEVER OPERATE THE HEATER IN AN ENCLOSED AREA
THAT DOES NOT HAVE EXHAUST VENTILATION FACILITIES. ALWAYS
VENT THE EXHAUST WHEN OPERATING THE HEATER. FAILURE TO
FOLLOW THESE INSTRUCTIONS CAN RESULT IN PERSONAL INJURY
OR DEATH.
WARNING: ALLOW THE HEATER ASSEMBLY TO COOL BEFORE PER-
FORMING A COMPONENT INSPECTION/REPAIR/REPLACEMENT. FAIL-
URE TO FOLLOW THESE INSTRUCTIONS CAN RESULT IN PERSONAL
INJURY OR DEATH.
Turn the ignition off.
NOTE: Check connectors - Clean/repair as necessary.
Disconnect the Cabin Heater harness connector.
Remove the Fan Stage 1 Relay from the relay center.
Measure the resistance of the Fan Stage 1 Relay High Side Control circuit between
the Cabin Heater harness connector and the relay center (Fan Stage 1 Relay
connector terminal 86).
Is the resistance below 5.0 ohms?All
Ye s!Go To 3
No!Repair the Fan Stage 1 Relay High Side Control circuit for an
open.
Perform HEATER VERIFICATION TEST - VER 1.
3WARNING: NEVER OPERATE THE HEATER IN AN ENCLOSED AREA
THAT DOES NOT HAVE EXHAUST VENTILATION FACILITIES. ALWAYS
VENT THE EXHAUST WHEN OPERATING THE HEATER. FAILURE TO
FOLLOW THESE INSTRUCTIONS CAN RESULT IN PERSONAL INJURY
OR DEATH.
Turn the ignition off.
Reconnect the Cabin Heater harness connector.
Install a substitute relay in place of the Fan Stage 1 Relay.
Turn the ignition on.
Verify that the Cabin Heater is switched off.
Set the blend control to the max heat position and the mode control to the floor
position.
With the DRBIIIt, erase the Cabin Heater Module's DTCs.
Start the engine. Allow the engine to idle.
With the DRBIII, monitor for Cabin Heater Module DTCs while performing the
following step.
NOTE: Do not disconnect the vehicle's battery or the heater's main power
supply while the heater is in operation or in run-down mode. Failure to
follow these instructions can result in excess emissions from the heater
during heater operation.
Switch the Cabin Heater on. If necessary, allow the heater to run through at least one
cycle of operation (approximately 10 minutes), and then switch the heater off.
Turn the engine off.
Does the DRBIIItdisplay: FAN STAGE 1 RELAY CONTROL OPEN?All
Ye s!Replace the Cabin Heater Assembly in accordance with the
Service Information. Reinstall the original Fan Stage 1 Relay.
Perform HEATER VERIFICATION TEST - VER 1.
No!Replace the original Fan Stage 1 Relay in accordance with the
Service Information.
Perform HEATER VERIFICATION TEST - VER 1.
84
CABIN HEATER
FAN STAGE 1 RELAY CONTROL OPEN ÐContinued
Page 103 of 2305
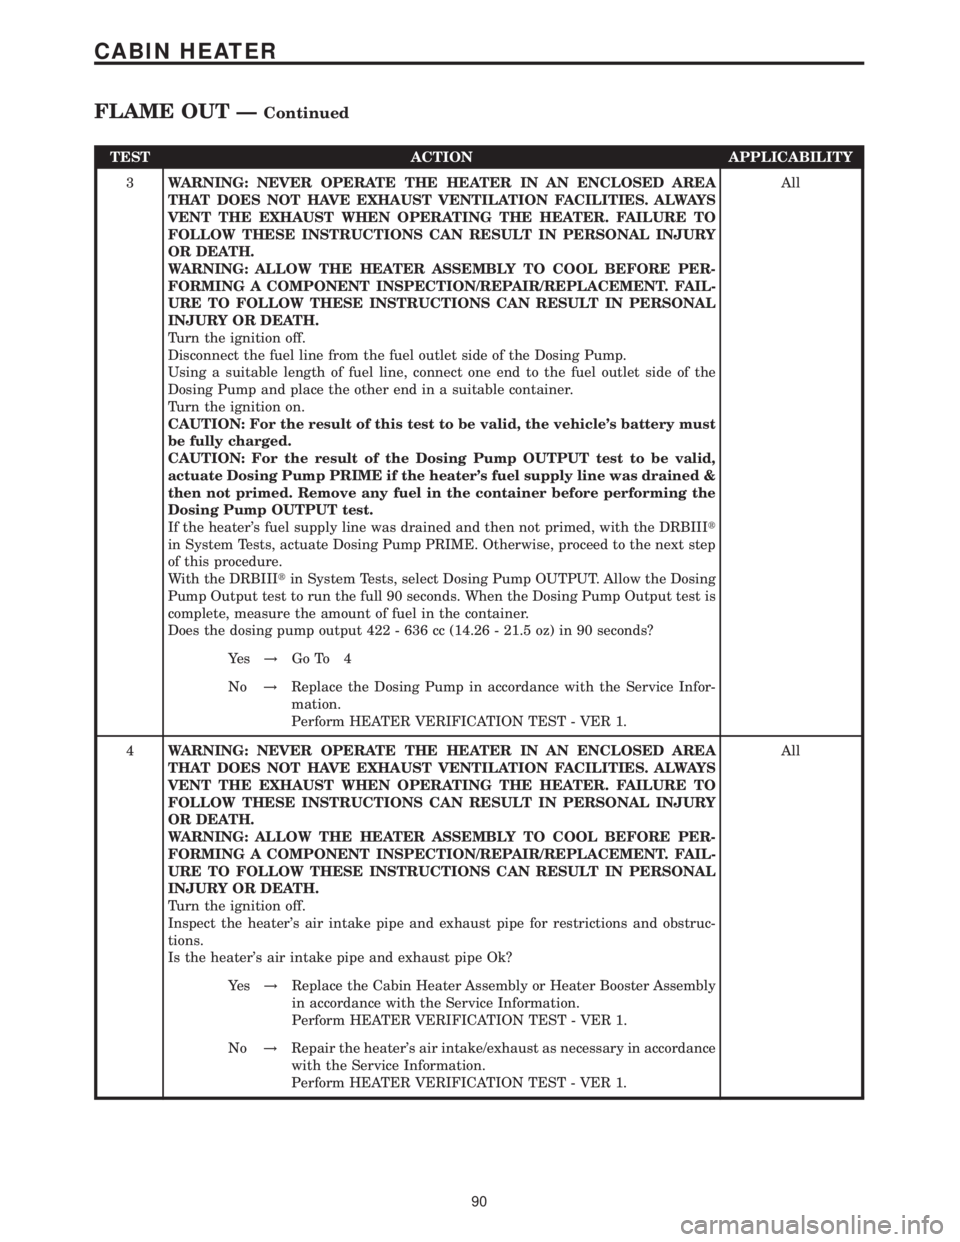
TEST ACTION APPLICABILITY
3WARNING: NEVER OPERATE THE HEATER IN AN ENCLOSED AREA
THAT DOES NOT HAVE EXHAUST VENTILATION FACILITIES. ALWAYS
VENT THE EXHAUST WHEN OPERATING THE HEATER. FAILURE TO
FOLLOW THESE INSTRUCTIONS CAN RESULT IN PERSONAL INJURY
OR DEATH.
WARNING: ALLOW THE HEATER ASSEMBLY TO COOL BEFORE PER-
FORMING A COMPONENT INSPECTION/REPAIR/REPLACEMENT. FAIL-
URE TO FOLLOW THESE INSTRUCTIONS CAN RESULT IN PERSONAL
INJURY OR DEATH.
Turn the ignition off.
Disconnect the fuel line from the fuel outlet side of the Dosing Pump.
Using a suitable length of fuel line, connect one end to the fuel outlet side of the
Dosing Pump and place the other end in a suitable container.
Turn the ignition on.
CAUTION: For the result of this test to be valid, the vehicle's battery must
be fully charged.
CAUTION: For the result of the Dosing Pump OUTPUT test to be valid,
actuate Dosing Pump PRIME if the heater's fuel supply line was drained &
then not primed. Remove any fuel in the container before performing the
Dosing Pump OUTPUT test.
If the heater's fuel supply line was drained and then not primed, with the DRBIIIt
in System Tests, actuate Dosing Pump PRIME. Otherwise, proceed to the next step
of this procedure.
With the DRBIIItin System Tests, select Dosing Pump OUTPUT. Allow the Dosing
Pump Output test to run the full 90 seconds. When the Dosing Pump Output test is
complete, measure the amount of fuel in the container.
Does the dosing pump output 422 - 636 cc (14.26 - 21.5 oz) in 90 seconds?All
Ye s!Go To 4
No!Replace the Dosing Pump in accordance with the Service Infor-
mation.
Perform HEATER VERIFICATION TEST - VER 1.
4WARNING: NEVER OPERATE THE HEATER IN AN ENCLOSED AREA
THAT DOES NOT HAVE EXHAUST VENTILATION FACILITIES. ALWAYS
VENT THE EXHAUST WHEN OPERATING THE HEATER. FAILURE TO
FOLLOW THESE INSTRUCTIONS CAN RESULT IN PERSONAL INJURY
OR DEATH.
WARNING: ALLOW THE HEATER ASSEMBLY TO COOL BEFORE PER-
FORMING A COMPONENT INSPECTION/REPAIR/REPLACEMENT. FAIL-
URE TO FOLLOW THESE INSTRUCTIONS CAN RESULT IN PERSONAL
INJURY OR DEATH.
Turn the ignition off.
Inspect the heater's air intake pipe and exhaust pipe for restrictions and obstruc-
tions.
Is the heater's air intake pipe and exhaust pipe Ok?All
Ye s!Replace the Cabin Heater Assembly or Heater Booster Assembly
in accordance with the Service Information.
Perform HEATER VERIFICATION TEST - VER 1.
No!Repair the heater's air intake/exhaust as necessary in accordance
with the Service Information.
Perform HEATER VERIFICATION TEST - VER 1.
90
CABIN HEATER
FLAME OUT ÐContinued
Page 114 of 2305
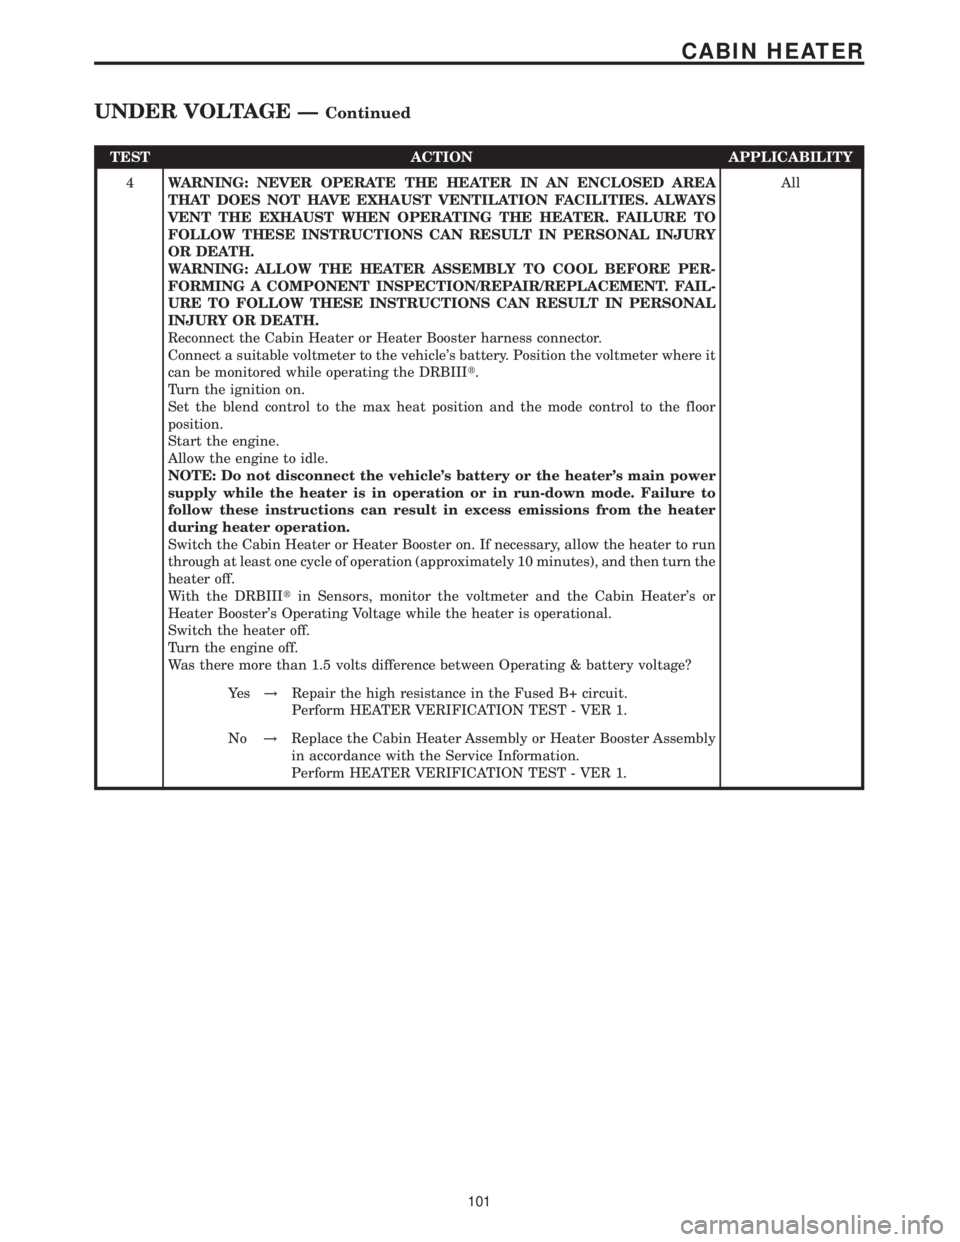
TEST ACTION APPLICABILITY
4WARNING: NEVER OPERATE THE HEATER IN AN ENCLOSED AREA
THAT DOES NOT HAVE EXHAUST VENTILATION FACILITIES. ALWAYS
VENT THE EXHAUST WHEN OPERATING THE HEATER. FAILURE TO
FOLLOW THESE INSTRUCTIONS CAN RESULT IN PERSONAL INJURY
OR DEATH.
WARNING: ALLOW THE HEATER ASSEMBLY TO COOL BEFORE PER-
FORMING A COMPONENT INSPECTION/REPAIR/REPLACEMENT. FAIL-
URE TO FOLLOW THESE INSTRUCTIONS CAN RESULT IN PERSONAL
INJURY OR DEATH.
Reconnect the Cabin Heater or Heater Booster harness connector.
Connect a suitable voltmeter to the vehicle's battery. Position the voltmeter where it
can be monitored while operating the DRBIIIt.
Turn the ignition on.
Set the blend control to the max heat position and the mode control to the floor
position.
Start the engine.
Allow the engine to idle.
NOTE: Do not disconnect the vehicle's battery or the heater's main power
supply while the heater is in operation or in run-down mode. Failure to
follow these instructions can result in excess emissions from the heater
during heater operation.
Switch the Cabin Heater or Heater Booster on. If necessary, allow the heater to run
through at least one cycle of operation (approximately 10 minutes), and then turn the
heater off.
With the DRBIIItin Sensors, monitor the voltmeter and the Cabin Heater's or
Heater Booster's Operating Voltage while the heater is operational.
Switch the heater off.
Turn the engine off.
Was there more than 1.5 volts difference between Operating & battery voltage?All
Ye s!Repair the high resistance in the Fused B+ circuit.
Perform HEATER VERIFICATION TEST - VER 1.
No!Replace the Cabin Heater Assembly or Heater Booster Assembly
in accordance with the Service Information.
Perform HEATER VERIFICATION TEST - VER 1.
101
CABIN HEATER
UNDER VOLTAGE ÐContinued
Page 259 of 2305
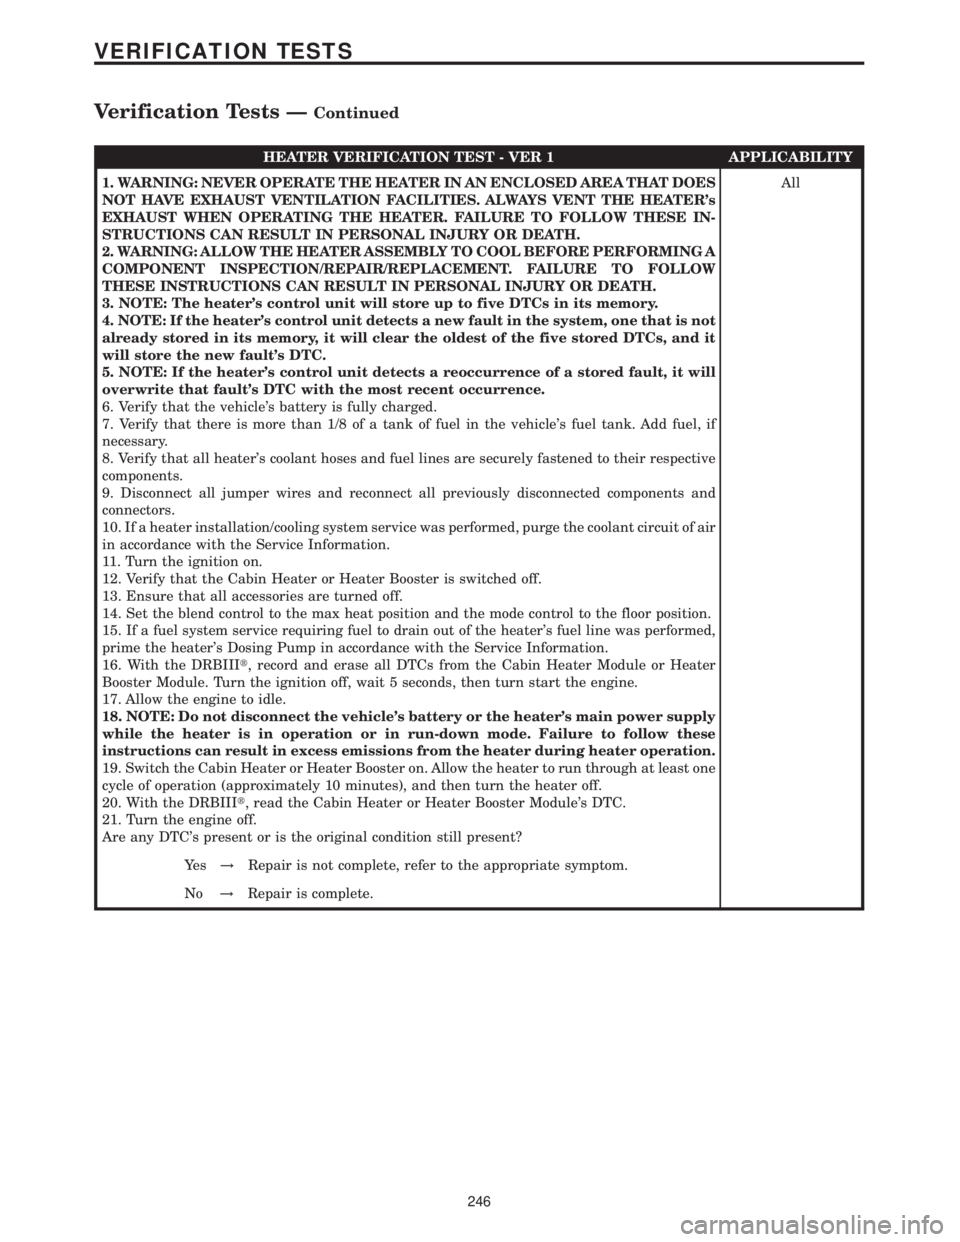
HEATER VERIFICATION TEST - VER 1 APPLICABILITY
1. WARNING: NEVER OPERATE THE HEATER IN AN ENCLOSED AREA THAT DOES
NOT HAVE EXHAUST VENTILATION FACILITIES. ALWAYS VENT THE HEATER's
EXHAUST WHEN OPERATING THE HEATER. FAILURE TO FOLLOW THESE IN-
STRUCTIONS CAN RESULT IN PERSONAL INJURY OR DEATH.
2. WARNING: ALLOW THE HEATER ASSEMBLY TO COOL BEFORE PERFORMING A
COMPONENT INSPECTION/REPAIR/REPLACEMENT. FAILURE TO FOLLOW
THESE INSTRUCTIONS CAN RESULT IN PERSONAL INJURY OR DEATH.
3. NOTE: The heater's control unit will store up to five DTCs in its memory.
4. NOTE: If the heater's control unit detects a new fault in the system, one that is not
already stored in its memory, it will clear the oldest of the five stored DTCs, and it
will store the new fault's DTC.
5. NOTE: If the heater's control unit detects a reoccurrence of a stored fault, it will
overwrite that fault's DTC with the most recent occurrence.
6. Verify that the vehicle's battery is fully charged.
7. Verify that there is more than 1/8 of a tank of fuel in the vehicle's fuel tank. Add fuel, if
necessary.
8. Verify that all heater's coolant hoses and fuel lines are securely fastened to their respective
components.
9. Disconnect all jumper wires and reconnect all previously disconnected components and
connectors.
10. If a heater installation/cooling system service was performed, purge the coolant circuit of air
in accordance with the Service Information.
11. Turn the ignition on.
12. Verify that the Cabin Heater or Heater Booster is switched off.
13. Ensure that all accessories are turned off.
14. Set the blend control to the max heat position and the mode control to the floor position.
15. If a fuel system service requiring fuel to drain out of the heater's fuel line was performed,
prime the heater's Dosing Pump in accordance with the Service Information.
16. With the DRBIIIt, record and erase all DTCs from the Cabin Heater Module or Heater
Booster Module. Turn the ignition off, wait 5 seconds, then turn start the engine.
17. Allow the engine to idle.
18. NOTE: Do not disconnect the vehicle's battery or the heater's main power supply
while the heater is in operation or in run-down mode. Failure to follow these
instructions can result in excess emissions from the heater during heater operation.
19. Switch the Cabin Heater or Heater Booster on. Allow the heater to run through at least one
cycle of operation (approximately 10 minutes), and then turn the heater off.
20. With the DRBIIIt, read the Cabin Heater or Heater Booster Module's DTC.
21. Turn the engine off.
Are any DTC's present or is the original condition still present?All
Ye s!Repair is not complete, refer to the appropriate symptom.
No!Repair is complete.
246
VERIFICATION TESTS
Verification Tests ÐContinued
Page 723 of 2305
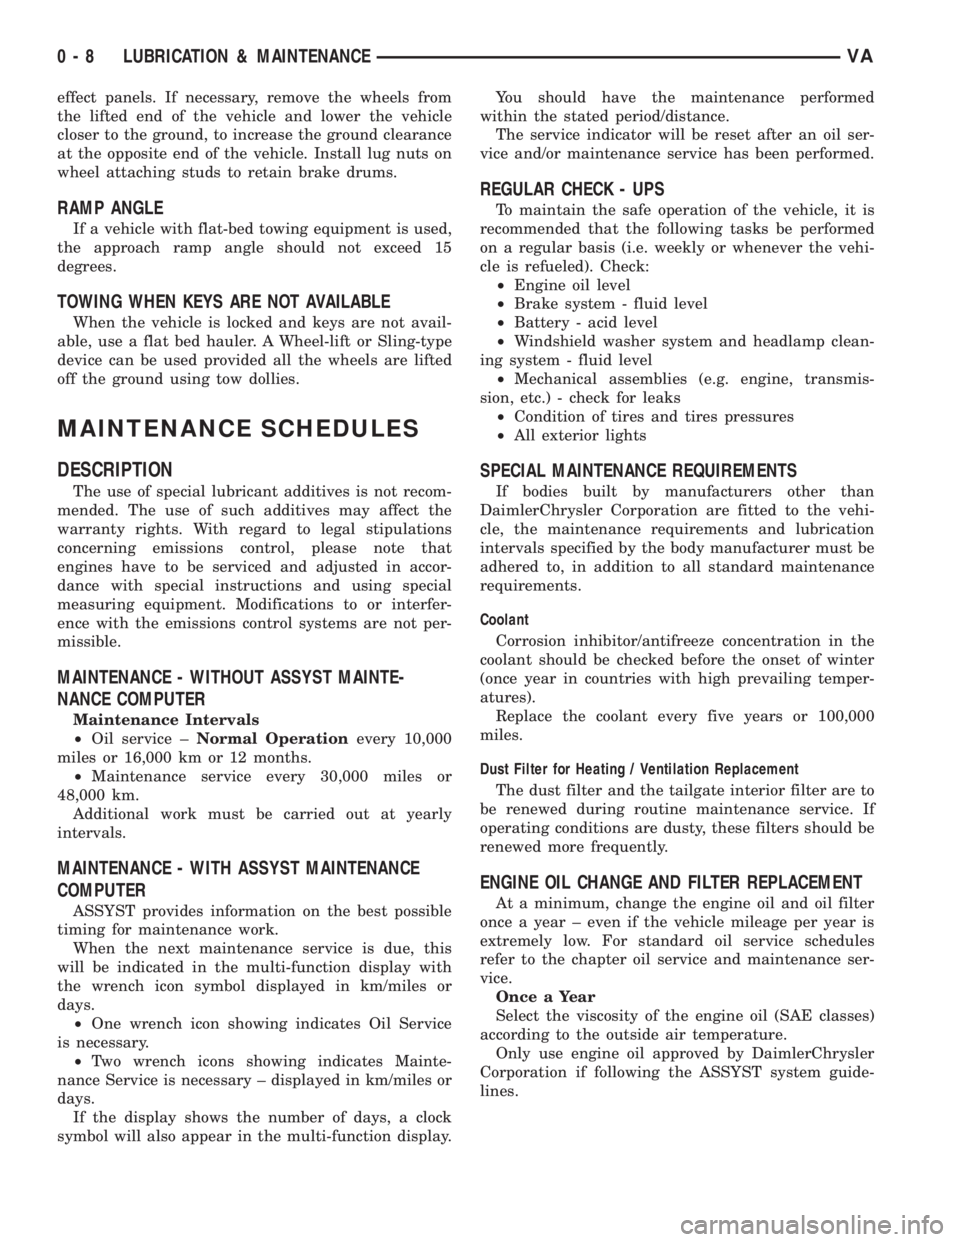
effect panels. If necessary, remove the wheels from
the lifted end of the vehicle and lower the vehicle
closer to the ground, to increase the ground clearance
at the opposite end of the vehicle. Install lug nuts on
wheel attaching studs to retain brake drums.
RAMP ANGLE
If a vehicle with flat-bed towing equipment is used,
the approach ramp angle should not exceed 15
degrees.
TOWING WHEN KEYS ARE NOT AVAILABLE
When the vehicle is locked and keys are not avail-
able, use a flat bed hauler. A Wheel-lift or Sling-type
device can be used provided all the wheels are lifted
off the ground using tow dollies.
MAINTENANCE SCHEDULES
DESCRIPTION
The use of special lubricant additives is not recom-
mended. The use of such additives may affect the
warranty rights. With regard to legal stipulations
concerning emissions control, please note that
engines have to be serviced and adjusted in accor-
dance with special instructions and using special
measuring equipment. Modifications to or interfer-
ence with the emissions control systems are not per-
missible.
MAINTENANCE - WITHOUT ASSYST MAINTE-
NANCE COMPUTER
Maintenance Intervals
²Oil service ±Normal Operationevery 10,000
miles or 16,000 km or 12 months.
²Maintenance service every 30,000 miles or
48,000 km.
Additional work must be carried out at yearly
intervals.
MAINTENANCE - WITH ASSYST MAINTENANCE
COMPUTER
ASSYST provides information on the best possible
timing for maintenance work.
When the next maintenance service is due, this
will be indicated in the multi-function display with
the wrench icon symbol displayed in km/miles or
days.
²One wrench icon showing indicates Oil Service
is necessary.
²Two wrench icons showing indicates Mainte-
nance Service is necessary ± displayed in km/miles or
days.
If the display shows the number of days, a clock
symbol will also appear in the multi-function display.You should have the maintenance performed
within the stated period/distance.
The service indicator will be reset after an oil ser-
vice and/or maintenance service has been performed.
REGULAR CHECK - UPS
To maintain the safe operation of the vehicle, it is
recommended that the following tasks be performed
on a regular basis (i.e. weekly or whenever the vehi-
cle is refueled). Check:
²Engine oil level
²Brake system - fluid level
²Battery - acid level
²Windshield washer system and headlamp clean-
ing system - fluid level
²Mechanical assemblies (e.g. engine, transmis-
sion, etc.) - check for leaks
²Condition of tires and tires pressures
²All exterior lights
SPECIAL MAINTENANCE REQUIREMENTS
If bodies built by manufacturers other than
DaimlerChrysler Corporation are fitted to the vehi-
cle, the maintenance requirements and lubrication
intervals specified by the body manufacturer must be
adhered to, in addition to all standard maintenance
requirements.
Coolant
Corrosion inhibitor/antifreeze concentration in the
coolant should be checked before the onset of winter
(once year in countries with high prevailing temper-
atures).
Replace the coolant every five years or 100,000
miles.
Dust Filter for Heating / Ventilation Replacement
The dust filter and the tailgate interior filter are to
be renewed during routine maintenance service. If
operating conditions are dusty, these filters should be
renewed more frequently.
ENGINE OIL CHANGE AND FILTER REPLACEMENT
At a minimum, change the engine oil and oil filter
once a year ± even if the vehicle mileage per year is
extremely low. For standard oil service schedules
refer to the chapter oil service and maintenance ser-
vice.
Once a Year
Select the viscosity of the engine oil (SAE classes)
according to the outside air temperature.
Only use engine oil approved by DaimlerChrysler
Corporation if following the ASSYST system guide-
lines.
0 - 8 LUBRICATION & MAINTENANCEVA