height MERCEDES-BENZ SPRINTER 2010 MY10 Operator’s Manual
[x] Cancel search | Manufacturer: MERCEDES-BENZ, Model Year: 2010, Model line: SPRINTER, Model: MERCEDES-BENZ SPRINTER 2010Pages: 292, PDF Size: 6.75 MB
Page 70 of 292
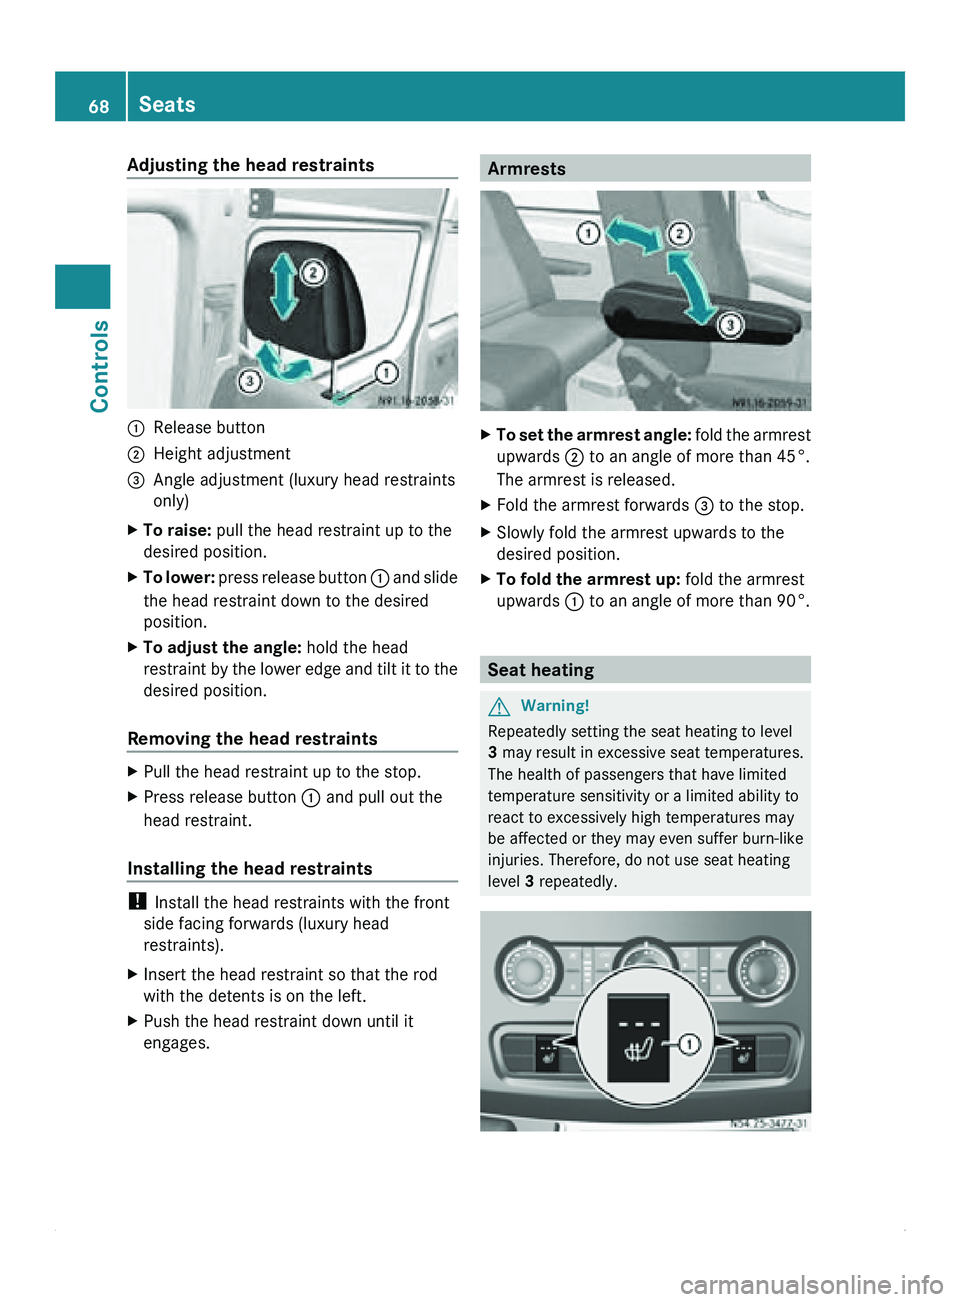
Adjusting the head restraints
0046
Release button
0047 Height adjustment
008A Angle adjustment (luxury head restraints
only)
X To raise: pull the head restraint up to the
desired position.
X To lower: press release button
0046 and slide
the head restraint down to the desired
position.
X To adjust the angle: hold the head
restraint by the
lower edge and tilt it to the
desired position.
Removing the head restraints X
Pull the head restraint up to the stop.
X Press release button 0046 and pull out the
head restraint.
Installing the head restraints !
Install the head restraints with the front
side facing forwards (luxury head
restraints).
X Insert the head restraint so that the rod
with the detents is on the left.
X Push the head restraint down until it
engages. Armrests
X
To set the armrest angle: fold the
armrest
upwards 0047 to an angle of more than 45°.
The armrest is released.
X Fold the armrest forwards 008A to the stop.
X Slowly fold the armrest upwards to the
desired position.
X To fold the armrest up: fold the armrest
upwards 0046 to an angle of more than 90°. Seat heating
G
Warning!
Repeatedly setting the seat heating to level
3 may result in excessive seat temperatures.
The health of passengers that have limited
temperature sensitivity or a limited ability to
react to excessively high temperatures may
be affected or they may even suffer burn-like
injuries. Therefore, do not use seat heating
level 3 repeatedly.68
Seats
Controls
Page 71 of 292
The three red indicator lamps in button 0046
show the activated heating level
1 to 3.
The system automatically switches down
from level 3
to level 2 after approximately five
minutes.
The system automatically switches down
from level 2 to level 1 after approximately ten
minutes.
! When you leave your seat, do not place
anything on the seat and switch off the seat
heating. Do not switch the seat heating on
when the seat is not occupied, e.g. when
driving without a co-driver. The seat
heating may otherwise overheat, causing
damage to the seat.
At level 1, the seat heating remains in
continuous operation.
X To switch on: make sure
that the key is in
position 1 in the ignition lock.
X Press button 0046 repeatedly until the
desired heating level is set.
X To switch off: press button 0046 repeatedly
until all indicator lamps go out. Steering wheel
G
Warning
Only adjust the steering wheel when the
vehicle is stationary. Only drive with the
steering wheel locked in position.
An incorrectly secured steering wheel could
make it more difficult to steer the vehicle
safely since the steering wheel could move
unexpectedly when turned. This could result
in you losing control of the vehicle and
causing an accident, thereby endangering
yourself and others. G
Warning
Never leave children unsupervised in the
vehicle. They could
become trapped if they try
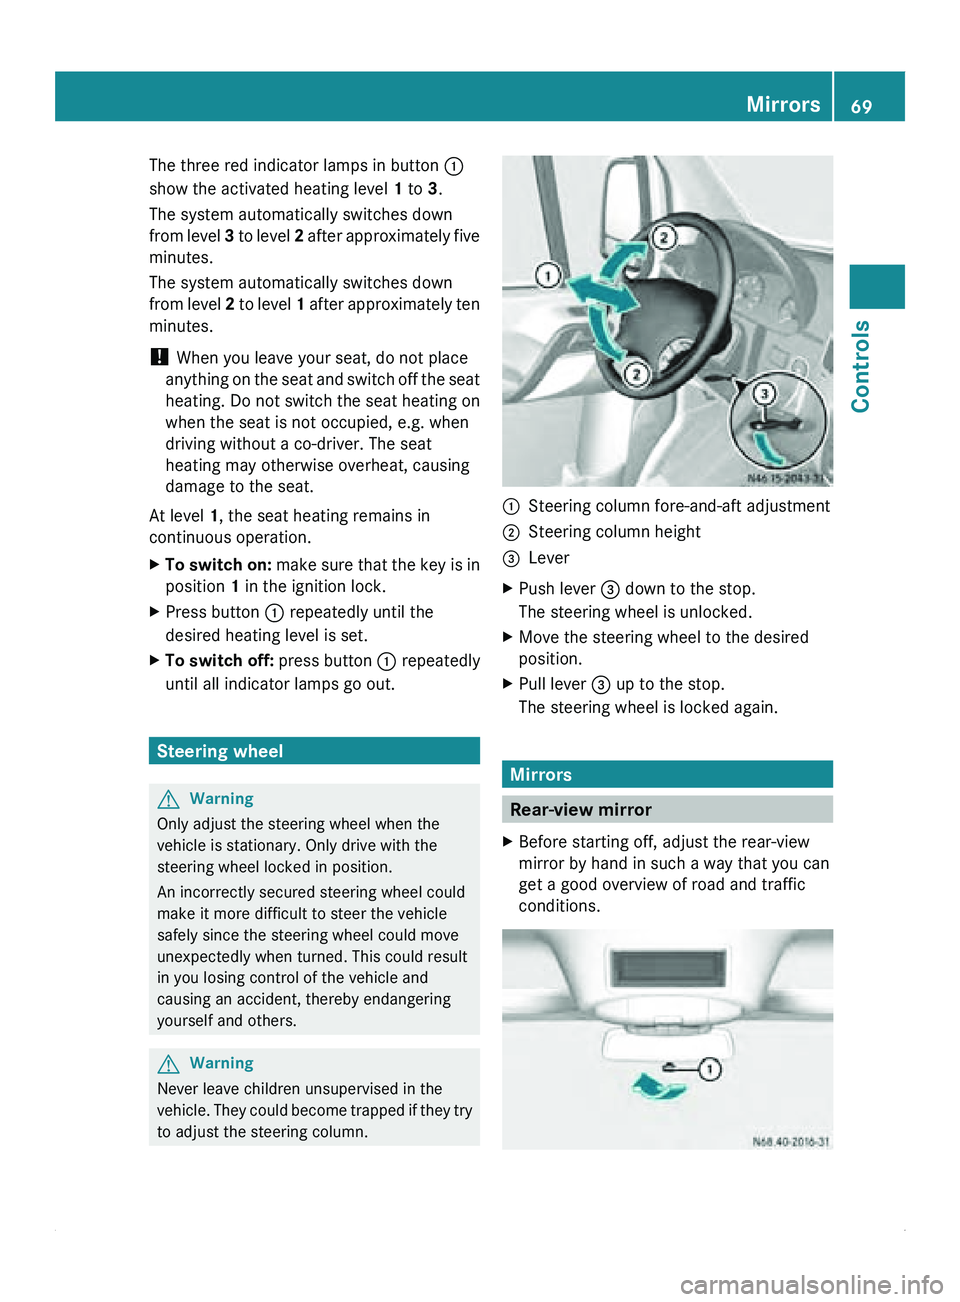
to adjust the steering column. 0046
Steering column fore-and-aft adjustment
0047 Steering column height
008A Lever
X Push lever 008A down to the stop.
The steering wheel is unlocked.
X Move the steering wheel to the desired
position.
X Pull lever 008A up to the stop.
The steering wheel is locked again. Mirrors
Rear-view mirror
X Before starting off, adjust the rear-view
mirror by hand in such a way that you can
get a good overview of road and traffic
conditions. Mirrors
69
Controls Z
Page 142 of 292
Before driving off-road
X
If the surface demands it, temporarily
deactivate acceleration skid control (ASR)
when pulling away ( Y
page 49).
X Safely stow or secure any items of luggage
or loads ( Y page 144).
i We recommend that you additionally
carry a shovel and a recovery rope with
shackle in the vehicle.
After driving off-road G
Warning
Damage caused to the vehicle when driving
off-road may cause consequential damage,
the failure of mechanical assemblies as well
as accidents. Clean and inspect the vehicle
after any off-road use. Repair any damage
before using the vehicle again.
X Activate the acceleration skid control
system (ASR) ( Y page 49).
X Clean the vehicle (Y page 165).
X Check the vehicle for damage. Transport by rail
Transporting your vehicle by rail may be
subject to certain restrictions or require
special measures to be taken in some
countries due to varying tunnel heights and
loading standards.
You may obtain information about this from
any authorized Sprinter Dealer. Fuel consumption
Fuel consumption depends on:
R the vehicle version
R the style of driving
R the operating conditions
R the type or quality of the fuel used The vehicle will use more fuel than usual in
the following situations:
R
at very low temperatures
R in city traffic
R on short trips
R when towing a trailer
R in mountainous terrain
Observe the advice in the "Protection of the
environment" section to keep fuel
consumption low .
The following components of the different
vehicle versions influence fuel consumption:
R tire sizes, tire tread, tire pressure, tire
condition
R body
R drive unit gear ratios
R additional equipment (e.g. air-conditioning
system, auxiliary heating system).
Details concerning fuel consumption are
recorded in the on-board computer; use the
steering wheel buttons to call up the Trip
computer menu (Y page 85). DEF consumption
Depending on the vehicle version, the DEF
consumption of:
R a Cargo Van/Passenger Van is
approximately 2322 MPG
(0.10 l/100 km)
R a Chassis Cab
is approximately 1720 MPG
(0.14 l/100 km)
In each case, the stated consumption figure
is a mean value between urban and extra-
urban driving cycles. The consumption figure
does not refer to a specific vehicle, but is
provided for the purposes of comparison
between different vehicle types.
DEF consumption, like fuel consumption, is
very dependent on the driving style and the
operating conditions. This means that the real
consumption figures during operation of your
vehicle may deviate from those stated. 140
Driving tips
Operation
Page 171 of 292
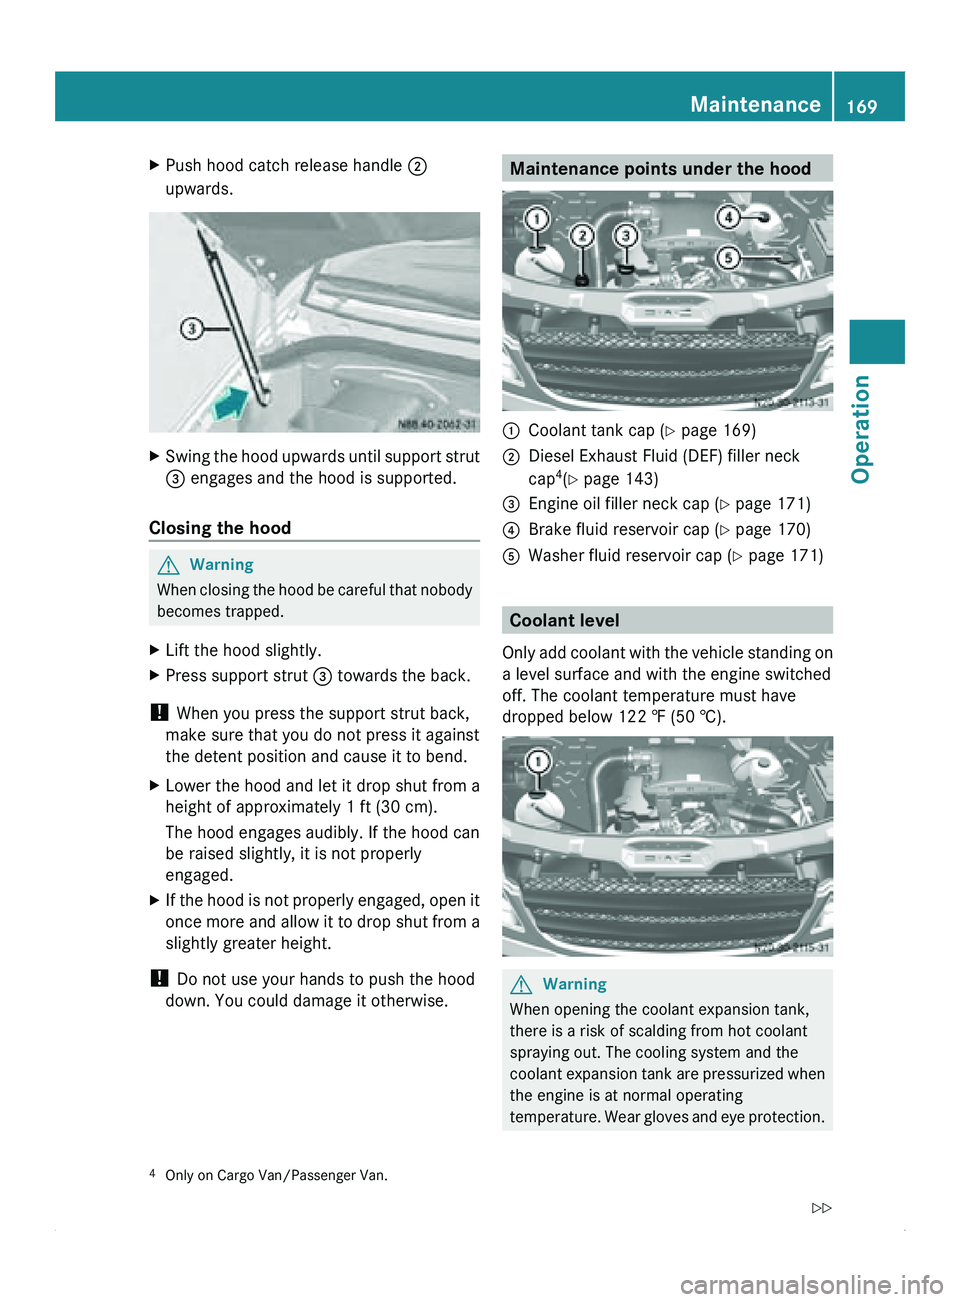
X
Push hood catch release handle 0047
upwards. X
Swing the hood upwards until support strut
008A engages and the hood is supported.
Closing the hood G
Warning
When closing the hood be careful that nobody
becomes trapped.
X Lift the hood slightly.
X Press support strut 008A towards the back.
! When you press the support strut back,
make sure that you do not press it against
the detent position and cause it to bend.
X Lower the hood and let it drop shut from a
height of approximately 1 ft (30 cm).
The hood engages audibly. If the hood can
be raised slightly, it is not properly
engaged.
X If
the hood is not properly engaged, open it
once more and
allow it to drop shut from a
slightly greater height.
! Do not use your hands to push the hood
down. You could damage it otherwise. Maintenance points under the hood
0046
Coolant tank cap (Y page 169)
0047 Diesel Exhaust Fluid (DEF) filler neck
cap 4
(Y page 143)
008A Engine oil filler neck cap (Y page 171)
0088 Brake fluid reservoir cap (Y page 170)
0086 Washer fluid reservoir cap (Y page 171) Coolant level
Only add coolant
with the vehicle standing on
a level surface and with the engine switched
off. The coolant temperature must have
dropped below 122 ‡ (50 †). G
Warning
When opening the coolant expansion tank,
there is a risk of scalding from hot coolant
spraying out. The cooling system and the
coolant expansion tank
are pressurized when
the engine is at normal operating
temperature. Wear gloves and eye protection.
4 Only on Cargo Van/Passenger Van. Maintenance
169
Operation
Z
Page 268 of 292
i
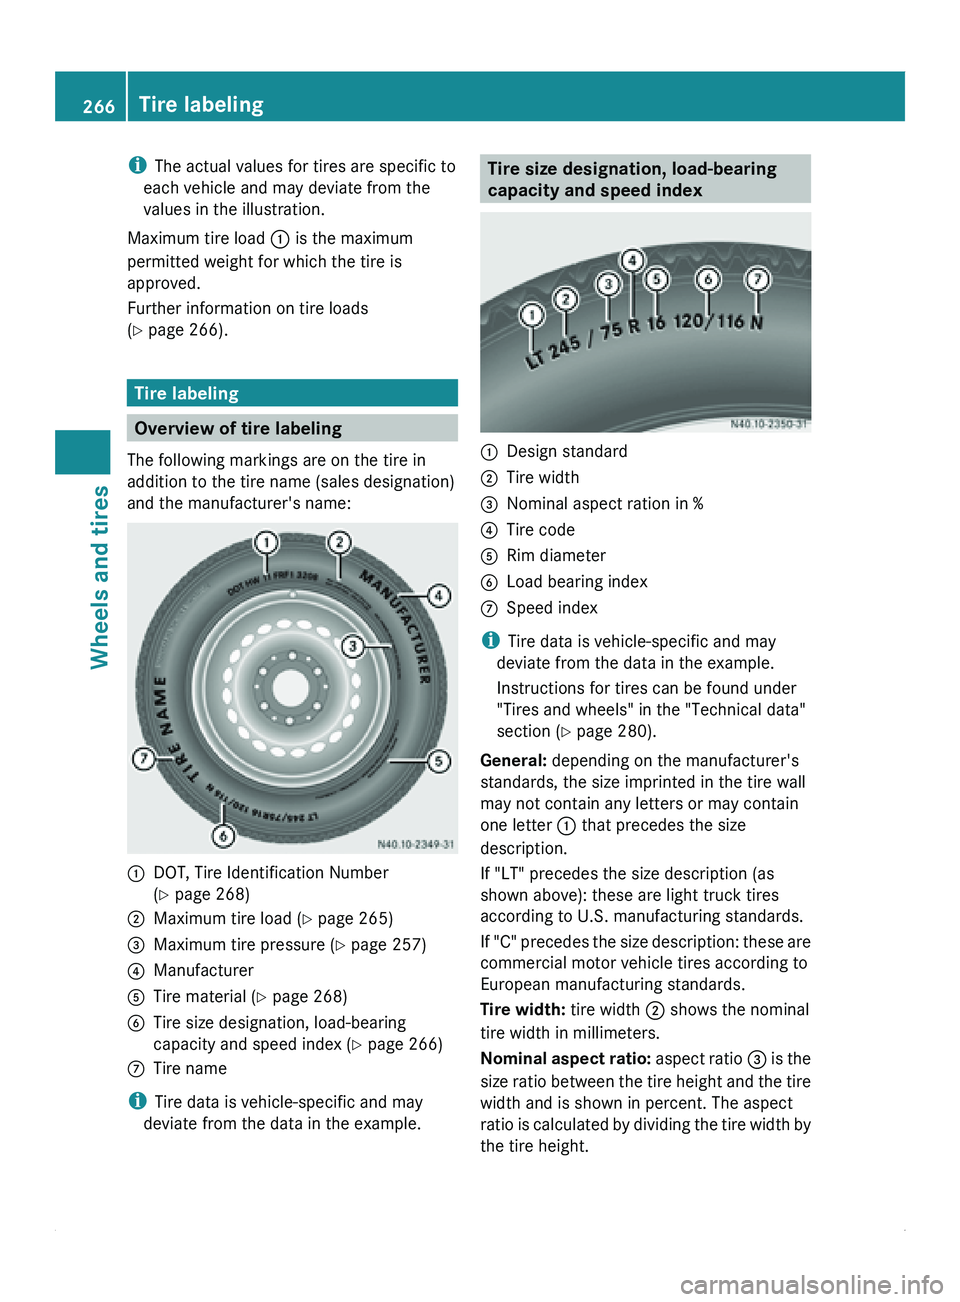
The actual values for tires are specific to
each vehicle and may deviate from the
values in the illustration.
Maximum tire load 0046 is the maximum
permitted weight for which the tire is
approved.
Further information on tire loads
(Y page 266). Tire labeling
Overview of tire labeling
The following markings are on the tire in
addition to the tire name (sales designation)
and the manufacturer's name: 0046
DOT, Tire Identification Number
(Y page 268)
0047 Maximum tire load ( Y page 265)
008A Maximum tire pressure (Y page 257)
0088 Manufacturer
0086 Tire material ( Y page 268)
0087 Tire size designation, load-bearing
capacity and speed index (
Y page 266)
006E Tire name
i Tire data is vehicle-specific and may
deviate from the data in the example. Tire size designation, load-bearing
capacity and speed index
0046
Design standard
0047 Tire width
008A Nominal aspect ration in %
0088 Tire code
0086 Rim diameter
0087 Load bearing index
006E Speed index
i Tire data is vehicle-specific and may
deviate from the data in the example.
Instructions for tires can be found under
"Tires and wheels" in the "Technical data"
section ( Y page 280).
General: depending on the manufacturer's
standards, the size imprinted in the tire wall
may not contain any letters or may contain
one letter 0046 that precedes the size
description.
If "LT" precedes the size description (as
shown above): these are light truck tires
according to U.S. manufacturing standards.
If "C"
precedes
the size description: these are
commercial motor vehicle tires according to
European manufacturing standards.
Tire width: tire width 0047 shows the nominal
tire width in millimeters.
Nominal aspect ratio: aspect ratio 008A is the
size ratio between the tire height and the tire
width and is shown in percent. The aspect
ratio is calculated by dividing the tire width by
the tire height. 266
Tire labeling
Wheels and tires
Page 272 of 292
Maximum weight of the laden vehicle
The maximum weight is the sum of the
unladen weight of the vehicle, the weight of
the accessories, the maximum load and the
weight of the
optional equipment installed at
the factory. Kilopascal (kPa)
Metric unit for tire pressure. 6.9 kPa is
equivalent to
1 psi. Another tire pressure unit
is bar. 100 kilopascal (kPa) is equivalent to
1 bar. Unladen weight
The weight of a vehicle with standard
equipment including the maximum filling
capacity of fuel, oil, and coolant. It also
includes the air-conditioning system and
optional equipment if these are installed on
the vehicle, but does not include passengers
or luggage. Maximum tire load
The maximum tire load in kilograms or
pounds is the maximum weight for which a
tire is approved. Maximum permissible tire pressure
Maximum permissible tire pressure for one
tire. Maximum load on one tire
Maximum load on one tire. This is calculated
by dividing the
maximum axle load of one axle
by two. PSI (Pounds per square inch)
Standard unit of measurement for tire
pressure. Aspect ratio
Relationship between tire
height and width in
percent. Tire pressure
Pressure inside the tire applying an outward
force to every square inch of the tire's
surface. Tire pressure is specified in pounds
per square inch
(psi), in kilopascal (kPa) or in
bar. Tire pressure should only be corrected
when the tires are cold. For this, the vehicle
must have been stationary for at least three
hours or not have traveled more than 1.6 km
(1 mile) in this time. Tire tread
The part of the tire that comes into contact
with the road. Tire bead
The tire bead ensures that the tire sits
securely on the
wheel. There are several steel
wires in the bead to prevent the tire from
coming loose from the wheel rim. Sidewall
The part of
the tire between the tread and the
tire bead. Weight of optional extras
The combined weight
of those optional extras
that weigh more than the replaced standard
part and more than 2.3 kilograms (5 lbs).
These optional extras, such as a roof rack or 270
Definition for tires and loading
Wheels and tires