key MERCEDES-BENZ SPRINTER 2010 MY10 Operator’s Manual
[x] Cancel search | Manufacturer: MERCEDES-BENZ, Model Year: 2010, Model line: SPRINTER, Model: MERCEDES-BENZ SPRINTER 2010Pages: 292, PDF Size: 6.75 MB
Page 57 of 292
Locking and unlocking manually
Using the central locking button, you can
centrally lock/unlock
either
the entire vehicle
or just the sliding doors and rear doors from
the inside. X
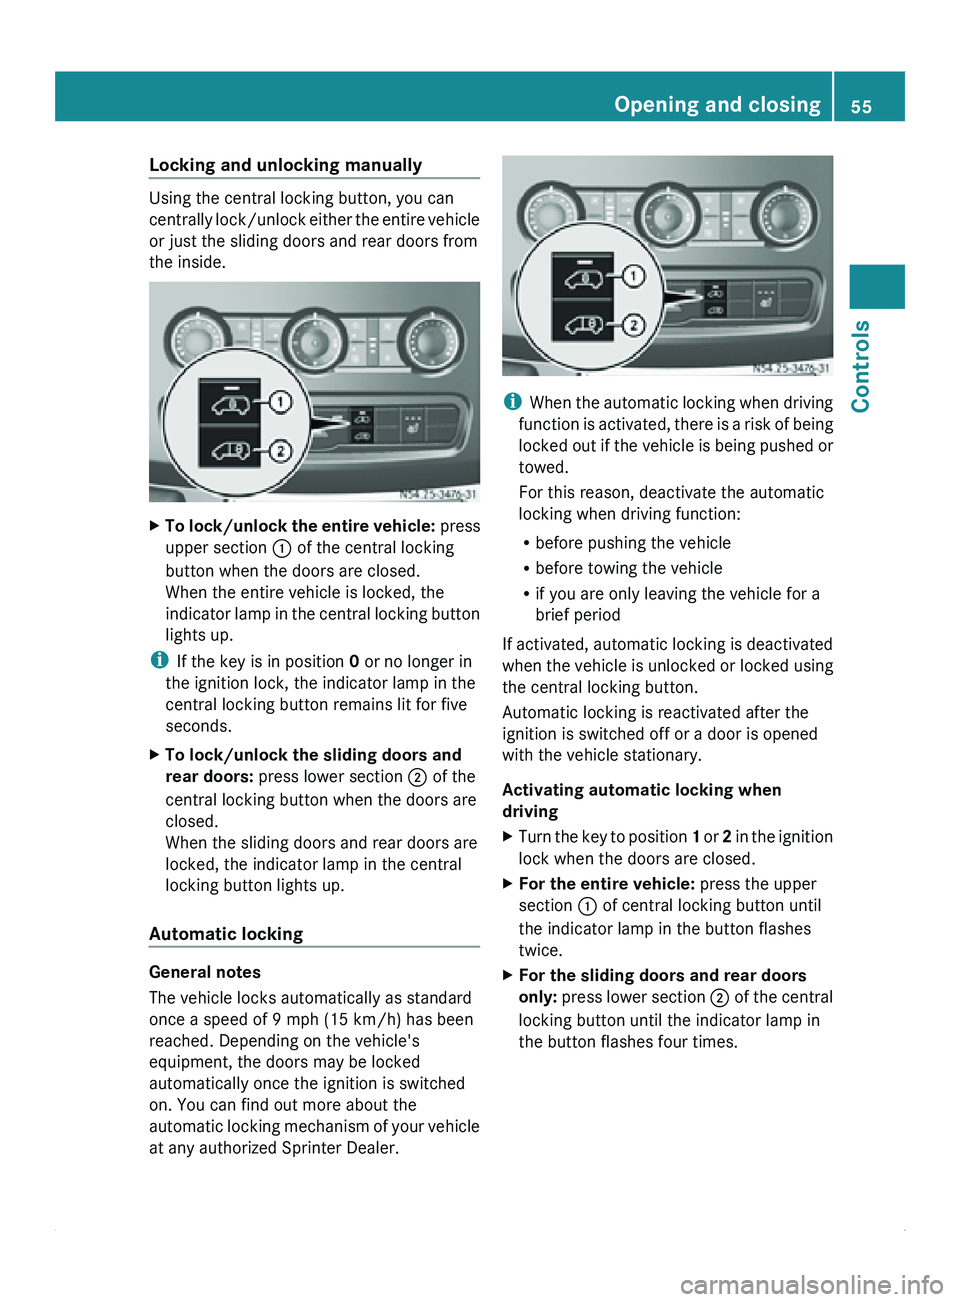
To lock/unlock the entire vehicle: press
upper section 0046 of the central locking
button when the doors are closed.
When the entire vehicle is locked, the
indicator lamp in
the central locking button
lights up.
i If the key is in position 0 or no longer in
the ignition lock, the indicator lamp in the
central locking button remains lit for five
seconds.
X To lock/unlock the sliding doors and
rear doors: press lower section 0047 of the
central locking button when the doors are
closed.
When the sliding doors and rear doors are
locked, the indicator lamp in the central
locking button lights up.
Automatic locking General notes
The vehicle locks automatically as standard
once a speed of 9 mph (15 km/h) has been
reached. Depending on the vehicle's
equipment, the doors may be locked
automatically once the ignition is switched
on. You can find out more about the
automatic locking
mechanism
of your vehicle
at any authorized Sprinter Dealer. i
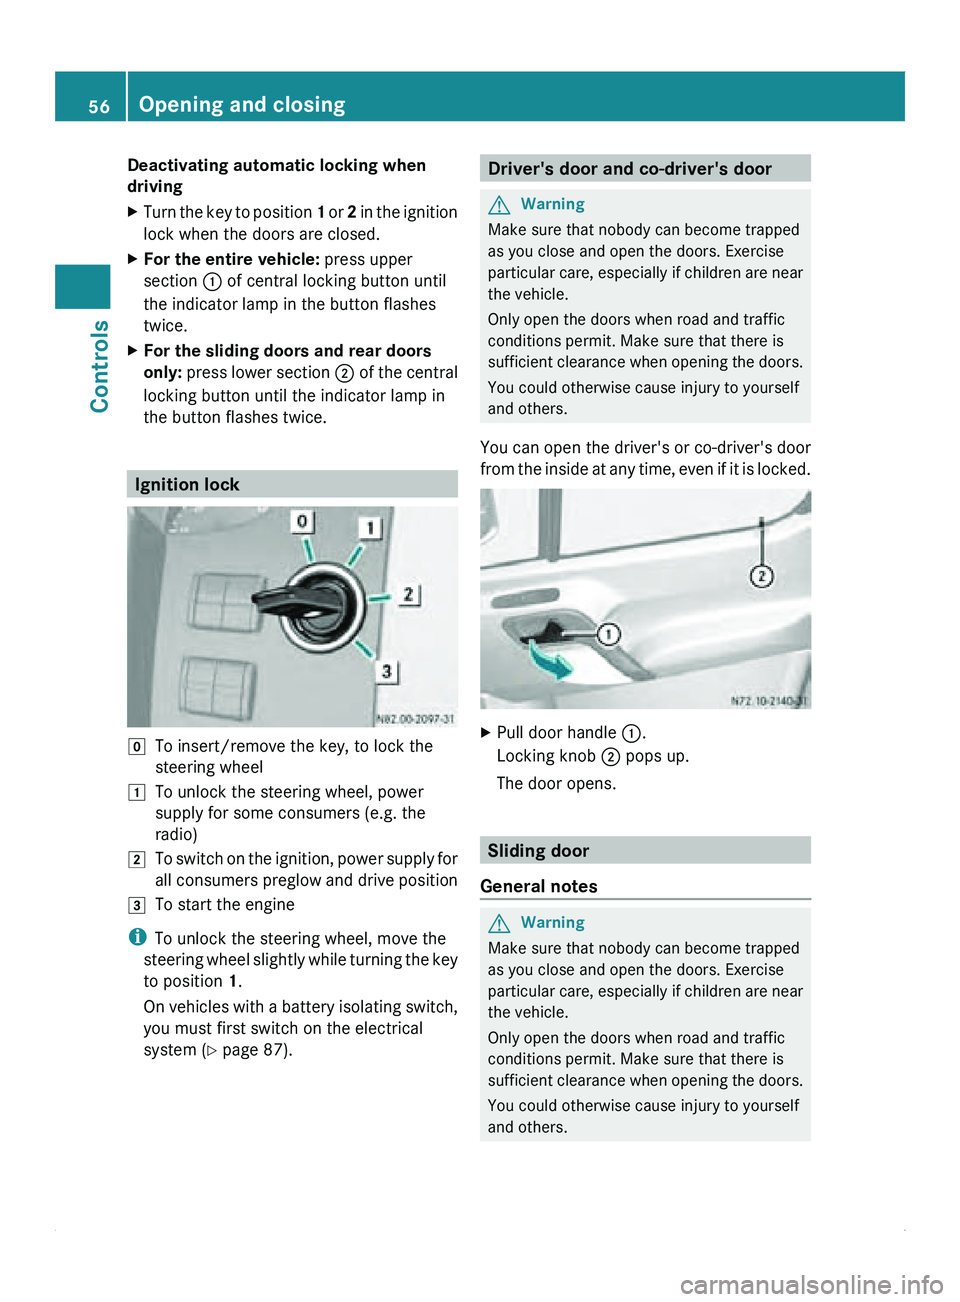
When the automatic
locking when driving
function is activated, there is a risk of being
locked out if the vehicle is being pushed or
towed.
For this reason, deactivate the automatic
locking when driving function:
R before pushing the vehicle
R before towing the vehicle
R if you are only leaving the vehicle for a
brief period
If activated, automatic locking is deactivated
when the vehicle is unlocked or locked using
the central locking button.
Automatic locking is reactivated after the
ignition is switched off or a door is opened
with the vehicle stationary.
Activating automatic locking when
driving
X Turn the key to position 1 or 2
in the ignition
lock when the doors are closed.
X For the entire vehicle: press the upper
section 0046 of central locking button until
the indicator lamp in the button flashes
twice.
X For the sliding doors and rear doors
only: press lower
section 0047 of the central
locking button until the indicator lamp in
the button flashes four times. Opening and closing
55
Controls Z
Page 58 of 292
Deactivating automatic locking when
driving
X
Turn the key to position 1 or 2 in the ignition
lock when the doors are closed.
X For the entire vehicle: press upper
section 0046 of central locking button until
the indicator lamp in the button flashes
twice.
X For the sliding doors and rear doors
only:
press lower section 0047 of the central
locking button until the indicator lamp in
the button flashes twice. Ignition lock
005D
To insert/remove the key, to lock the
steering wheel
004A To unlock the steering wheel, power
supply for some consumers (e.g. the
radio)
004B To switch on the ignition, power supply for
all consumers preglow and drive position
004C To start the engine
i To unlock the steering wheel, move the
steering wheel slightly while turning the key
to position 1.
On vehicles with a battery isolating switch,
you must first switch on the electrical
system (Y page 87). Driver's door and co-driver's door
G
Warning
Make sure that nobody can become trapped
as you close and open the doors. Exercise
particular care, especially if children are near
the vehicle.
Only open the doors when road and traffic
conditions permit. Make sure that there is
sufficient clearance when opening the doors.
You could otherwise cause injury to yourself
and others.
You can open the driver's or co-driver's door
from the inside at any time, even if it is locked. X
Pull door handle 0046.
Locking knob 0047 pops up.
The door opens. Sliding door
General notes G
Warning
Make sure that nobody can become trapped
as you close and open the doors. Exercise
particular care, especially if children are near
the vehicle.
Only open the doors when road and traffic
conditions permit. Make sure that there is
sufficient clearance when opening the doors.
You could otherwise cause injury to yourself
and others. 56
Opening and closing
Controls
Page 62 of 292
Before driving off, make sure that the partition
sliding door is closed and that the lock is
engaged. G
Warning
Make sure that nobody can become trapped
as you close the partition sliding door.
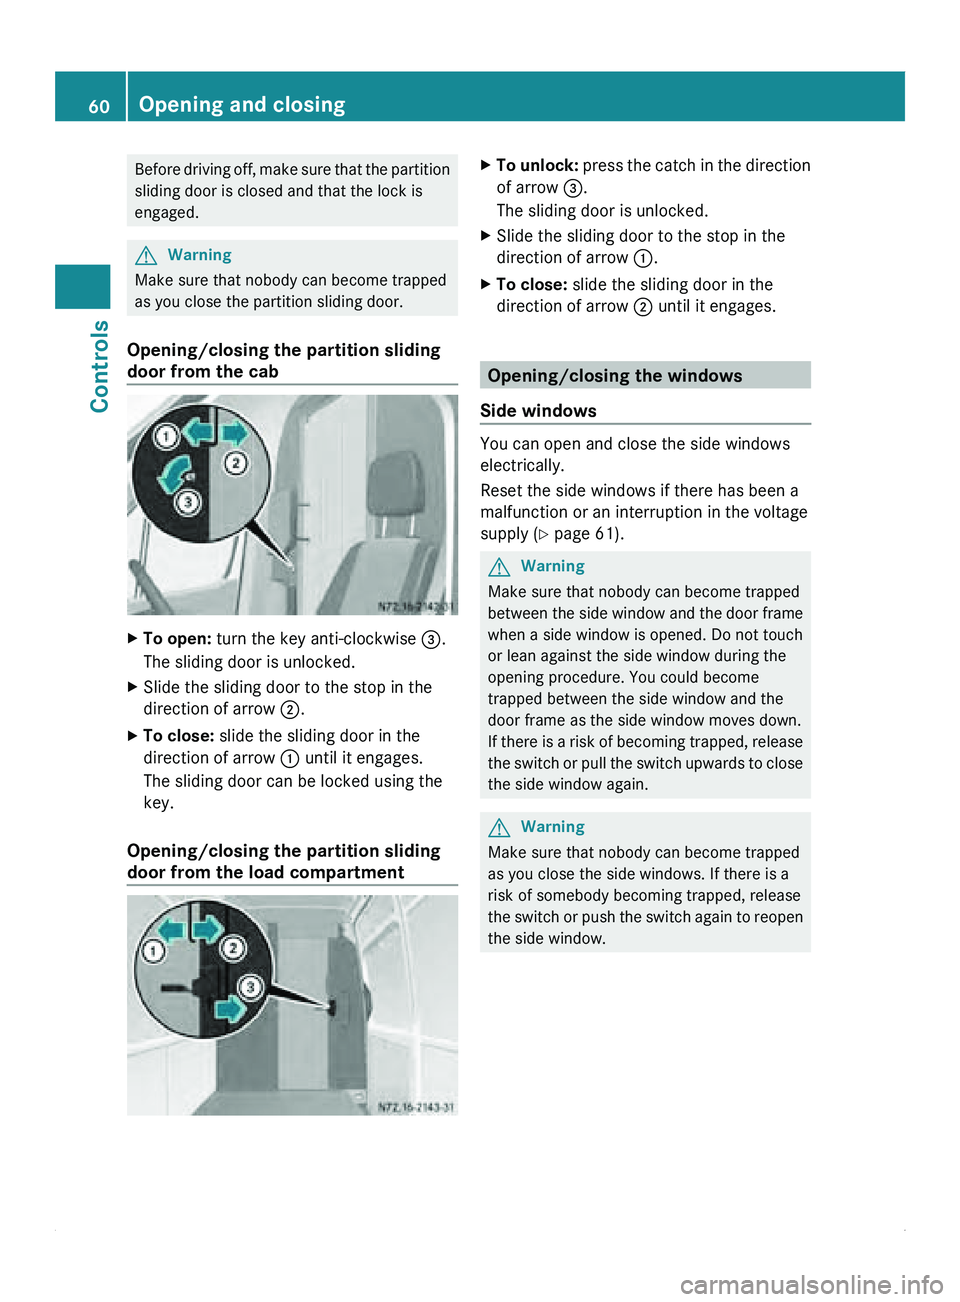
Opening/closing the partition sliding
door from the cab X
To open: turn the key anti-clockwise 008A.
The sliding door is unlocked.
X Slide the sliding door to the stop in the
direction of arrow 0047
.
X To close: slide the sliding door in the
direction of arrow 0046 until it engages.
The sliding door can be locked using the
key.
Opening/closing the partition sliding
door from the load compartment X
To unlock: press the catch in the direction
of arrow 008A.
The sliding door is unlocked.
X Slide the sliding door to the stop in the
direction of arrow 0046.
X To close: slide the sliding door in the
direction of arrow 0047 until it engages. Opening/closing the windows
Side windows You can open and close the side windows
electrically.
Reset the side windows if there has been a
malfunction or an interruption in the voltage
supply (
Y page 61). G
Warning
Make sure that nobody can become trapped
between the side window and the door frame
when a side window is opened. Do not touch
or lean against the side window during the
opening procedure. You could become
trapped between the side window and the
door frame as the side window moves down.
If there is a risk of becoming trapped, release
the switch or pull the switch upwards to close
the side window again. G
Warning
Make sure that nobody can become trapped
as you close the side windows. If there is a
risk of somebody becoming trapped, release
the switch or push the switch again to reopen
the side window. 60
Opening and closing
Controls
Page 63 of 292
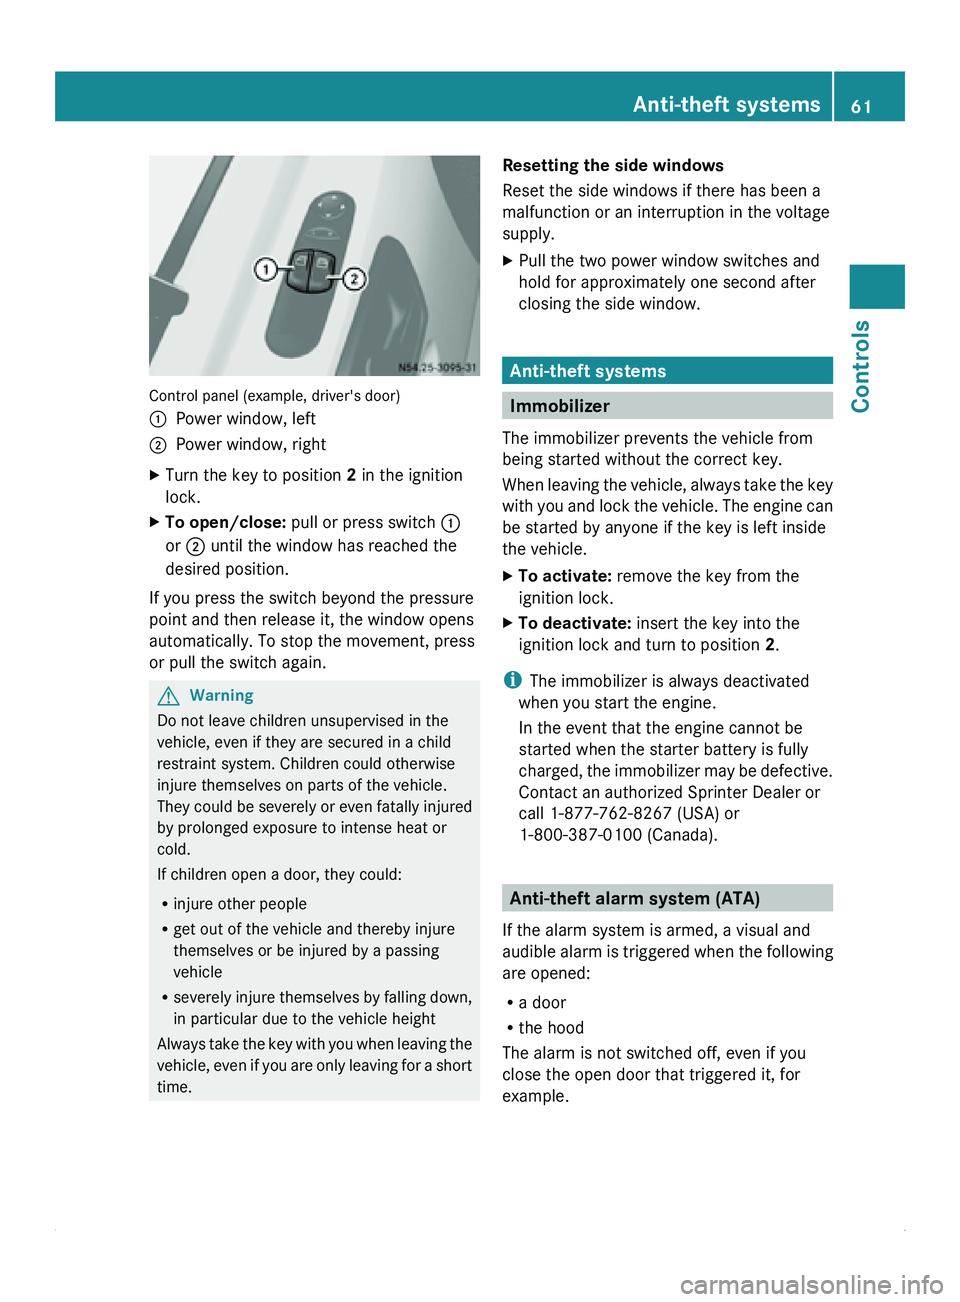
Control panel (example, driver's door)
0046
Power window, left
0047 Power window, right
X Turn the key to position 2 in the ignition
lock.
X To open/close: pull or press switch 0046
or 0047 until the window has reached the
desired position.
If you press the switch beyond the pressure
point and then release it, the window opens
automatically. To stop the movement, press
or pull the switch again. G
Warning
Do not leave children unsupervised in the
vehicle, even if they are secured in a child
restraint system. Children could otherwise
injure themselves on parts of the vehicle.
They could be
severely or even fatally injured
by prolonged exposure to intense heat or
cold.
If children open a door, they could:
R injure other people
R get out of the vehicle and thereby injure
themselves or be injured by a passing
vehicle
R severely injure themselves by falling down,
in particular due to the vehicle height
Always take the key with you when leaving the
vehicle, even if you are only leaving for a short
time. Resetting the side windows
Reset the side windows if there has been a
malfunction or an interruption in the voltage
supply.
X
Pull the two power window switches and
hold for approximately one second after
closing the side window. Anti-theft systems
Immobilizer
The immobilizer prevents the vehicle from
being started without the correct key.
When leaving the
vehicle, always take the key
with you and lock the vehicle. The engine can
be started by anyone if the key is left inside
the vehicle.
X To activate: remove the key from the
ignition lock.
X To deactivate: insert the key into the
ignition lock and turn to position 2.
i The immobilizer is always deactivated
when you start the engine.
In the event that the engine cannot be
started when the starter battery is fully
charged, the immobilizer
may be defective.
Contact an authorized Sprinter Dealer or
call 1-877-762-8267 (USA) or
1-800-387-0100 (Canada). Anti-theft alarm system (ATA)
If the alarm system is armed, a visual and
audible alarm is
triggered when the following
are opened:
R a door
R the hood
The alarm is not switched off, even if you
close the open door that triggered it, for
example. Anti-theft systems
61
Controls Z
Page 64 of 292
X
To arm: close all doors.
X Lock the vehicle using the 0037 button on
the key.
The indicator lamp in the upper central
locking button ( Y
page 55) flashes.
X To deactivate: unlock the
vehicle using the
0036 button on the remote control.
The indicator lamp in the upper central
locking button (Y page 55) goes out.
i Cargo van and passenger van only:
Unless you open
a door within 40 seconds
after unlocking the vehicle:
R the vehicle will be locked again.
R the anti-theft alarm system will be re-
armed.
i The alarm system will be triggered if the
vehicle was previously locked with the key
and is then unlocked from the inside.
X To stop the alarm: insert the key into the
ignition lock.
or
X Press the 0036 button on the remote
control.
The alarm is switched off. Tow-away alarm
A visual and audible alarm is triggered if the
inclination of the vehicle changes when tow-
away protection is armed.
i The alarm signal
is triggered, for example
if the vehicle is being jacked up on one side,
shortly before the wheel leaves the ground.
Tow-away protection is automatically armed
approximately 20 seconds after you lock the
vehicle.
Tow-away protection is automatically
deactivated when you unlock the vehicle.
Deactivate tow-away protection if the vehicle
is being transported or loaded onto another
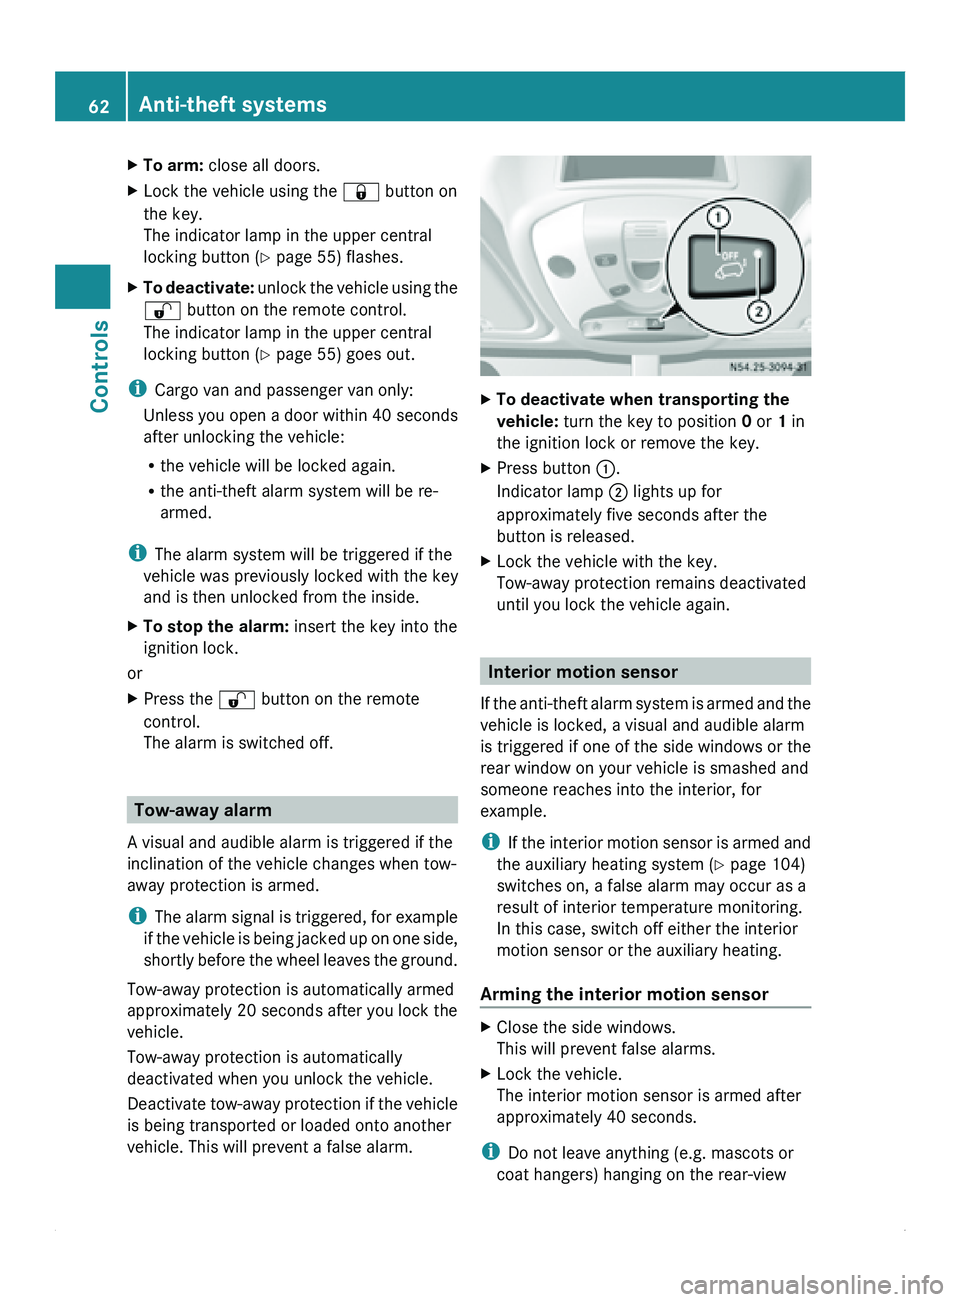
vehicle. This will prevent a false alarm. X
To deactivate when transporting the
vehicle: turn the key to position 0 or 1 in
the ignition lock or remove the key.
X Press button 0046.
Indicator lamp 0047 lights up for
approximately five seconds after the
button is released.
X Lock the vehicle with the key.
Tow-away protection remains deactivated
until you lock the vehicle again. Interior motion sensor
If the anti-theft
alarm system is armed and the
vehicle is locked, a visual and audible alarm
is triggered if one of the side windows or the
rear window on your vehicle is smashed and
someone reaches into the interior, for
example.
i If the interior motion sensor is armed and
the auxiliary heating system (Y page 104)
switches on, a false alarm may occur as a
result of interior temperature monitoring.
In this case, switch off either the interior
motion sensor or the auxiliary heating.
Arming the interior motion sensor X
Close the side windows.
This will prevent false alarms.
X Lock the vehicle.
The interior motion sensor is armed after
approximately 40 seconds.
i Do not leave anything (e.g. mascots or
coat hangers) hanging on the rear-view 62
Anti-theft systems
Controls
Page 65 of 292
mirror or on the grab handles on the
headliner. This will prevent a false alarm.
Deactivating the interior
motion sensorDeactivate the interior motion sensor if
people or
animals
remain in the vehicle or you
are having the vehicle transported, e.g. by
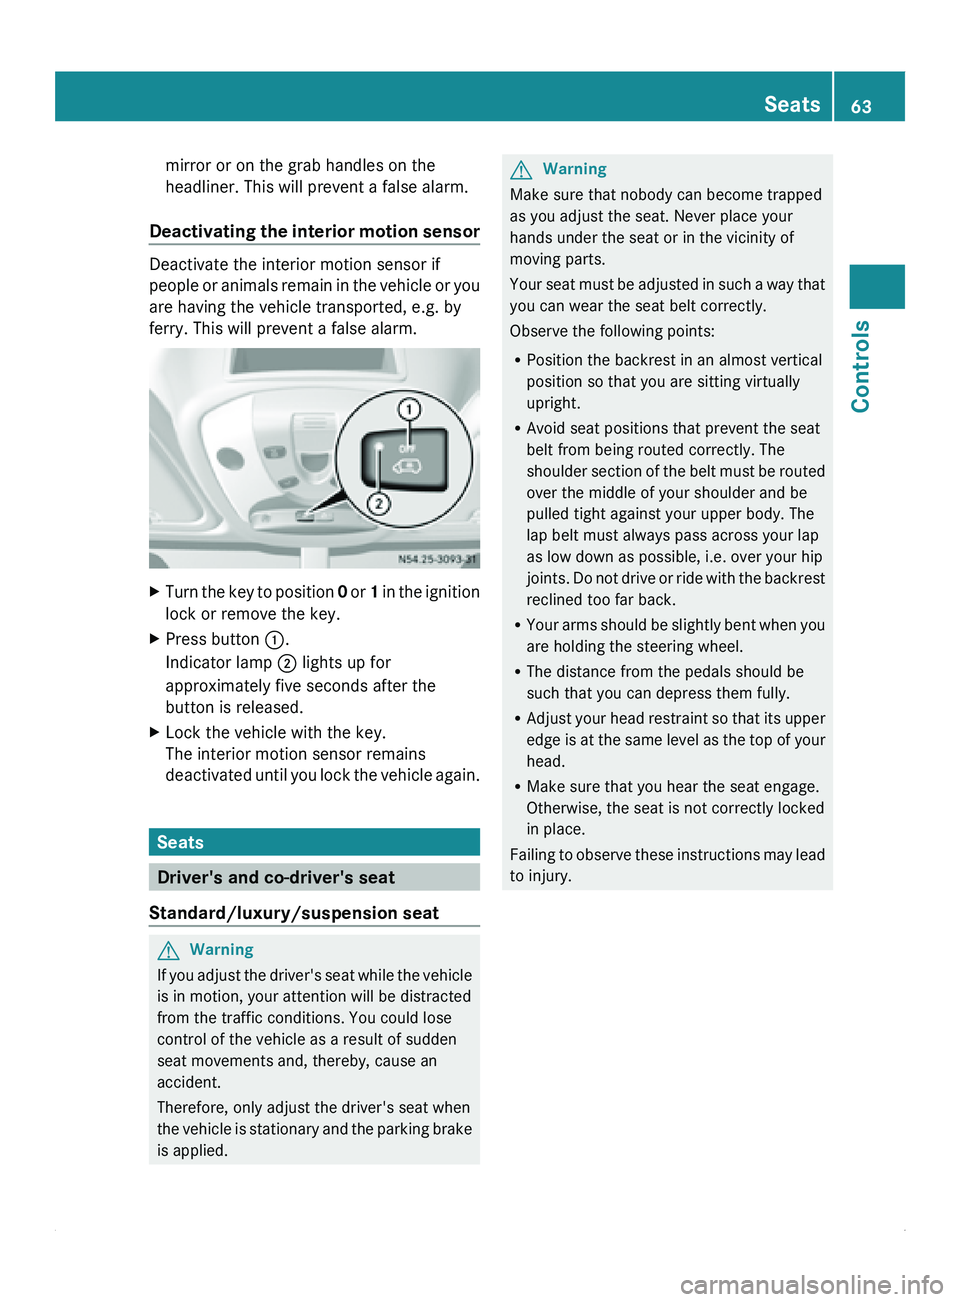
ferry. This will prevent a false alarm. X
Turn the key to position 0 or 1
in the ignition
lock or remove the key.
X Press button 0046.
Indicator lamp 0047 lights up for
approximately five seconds after the
button is released.
X Lock the vehicle with the key.
The interior motion sensor remains
deactivated until
you
lock the vehicle again.Seats
Driver's and co-driver's seat
Standard/luxury/suspension seat G
Warning
If you adjust the driver's seat while the vehicle
is in motion, your attention will be distracted
from the traffic conditions. You could lose
control of the vehicle as a result of sudden
seat movements and, thereby, cause an
accident.
Therefore, only adjust the driver's seat when
the vehicle is
stationary and the parking brake
is applied. G
Warning
Make sure that nobody can become trapped
as you adjust the seat. Never place your
hands under the seat or in the vicinity of
moving parts.
Your seat must
be adjusted in such a way that
you can wear the seat belt correctly.
Observe the following points:
R Position the backrest in an almost vertical
position so that you are sitting virtually
upright.
R Avoid seat positions that prevent the seat
belt from being routed correctly. The
shoulder section of the belt must be routed
over the middle of your shoulder and be
pulled tight against your upper body. The
lap belt must always pass across your lap
as low down as possible, i.e. over your hip
joints. Do not drive or ride with the backrest
reclined too far back.
R Your arms should be slightly bent when you
are holding the steering wheel.
R The distance from the pedals should be
such that you can depress them fully.
R Adjust your head restraint so that its upper
edge is at the same level as the top of your
head.
R Make sure that you hear the seat engage.
Otherwise, the seat is not correctly locked
in place.
Failing to observe these instructions may lead
to injury. Seats
63
Controls Z
Page 69 of 292
Installing two-seat or three-seat rear
benches
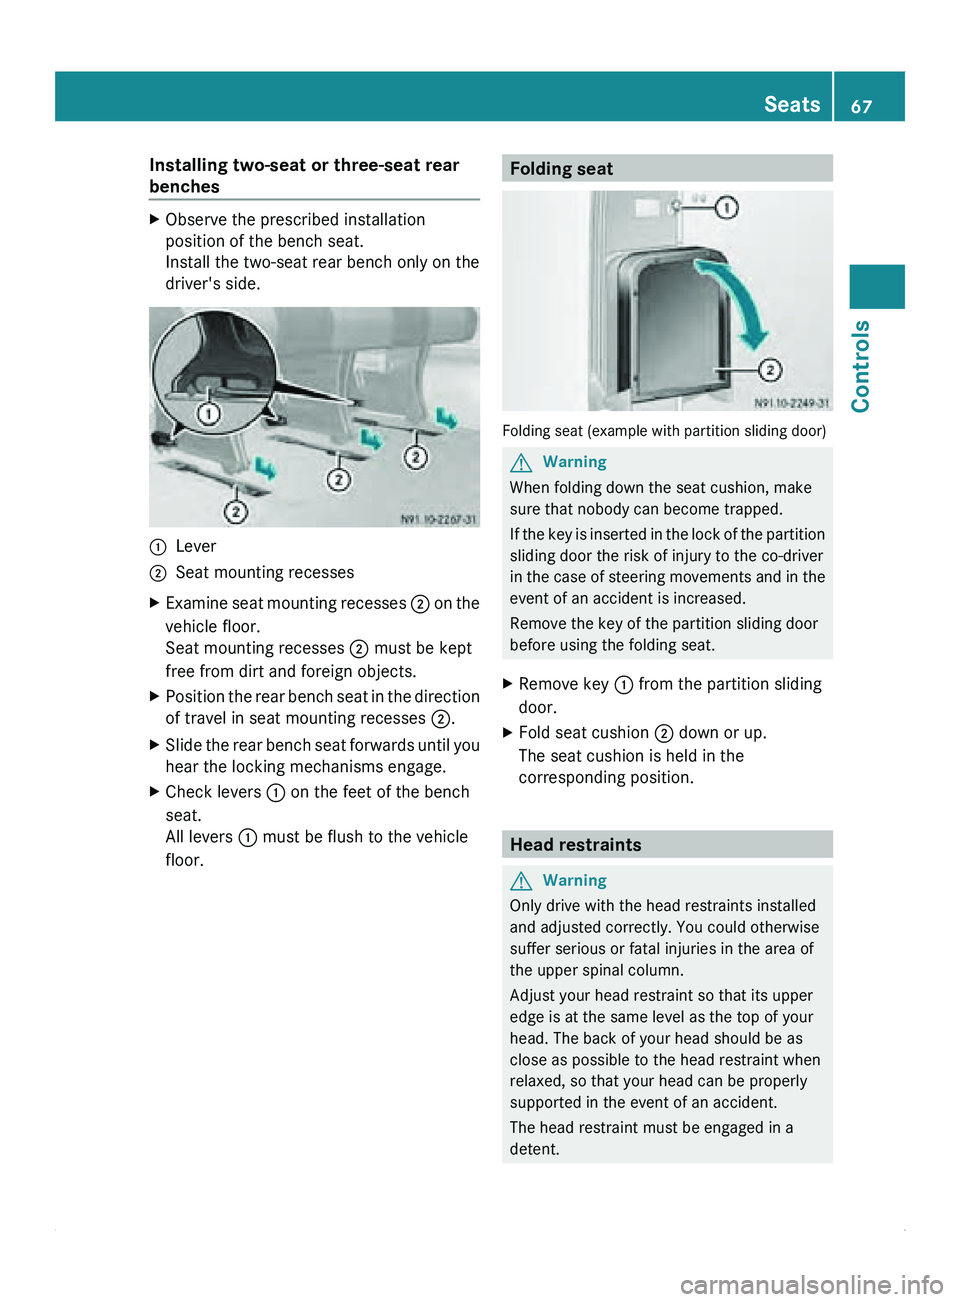
X
Observe the prescribed installation
position of the bench seat.
Install the two-seat rear bench only on the
driver's side. 0046
Lever
0047 Seat mounting recesses
X Examine seat mounting recesses 0047 on
the
vehicle floor.
Seat mounting recesses 0047
must be kept
free from dirt and foreign objects.
X Position the rear bench seat in the direction
of travel in seat mounting recesses 0047.
X Slide the rear bench seat forwards until you
hear the locking mechanisms engage.
X Check levers 0046 on the feet of the bench
seat.
All levers 0046 must be flush to the vehicle
floor. Folding seat
Folding seat (example with partition sliding door)
G
Warning
When folding down the seat cushion, make
sure that nobody can become trapped.
If the key
is inserted in the lock of the partition
sliding door the risk of injury to the co-driver
in the case of steering movements and in the
event of an accident is increased.
Remove the key of the partition sliding door
before using the folding seat.
X Remove key 0046 from the partition sliding
door.
X Fold seat cushion 0047 down or up.
The seat cushion is held in the
corresponding position. Head restraints
G
Warning
Only drive with the head restraints installed
and adjusted correctly. You could otherwise
suffer serious or fatal injuries in the area of
the upper spinal column.
Adjust your head restraint so that its upper
edge is at the same level as the top of your
head. The back of your head should be as
close as possible to the head restraint when
relaxed, so that your head can be properly
supported in the event of an accident.
The head restraint must be engaged in a
detent. Seats
67
Controls Z
Page 71 of 292
The three red indicator lamps in button 0046
show the activated heating level
1 to 3.
The system automatically switches down
from level 3
to level 2 after approximately five
minutes.
The system automatically switches down
from level 2 to level 1 after approximately ten
minutes.
! When you leave your seat, do not place
anything on the seat and switch off the seat
heating. Do not switch the seat heating on
when the seat is not occupied, e.g. when
driving without a co-driver. The seat
heating may otherwise overheat, causing
damage to the seat.
At level 1, the seat heating remains in
continuous operation.
X To switch on: make sure
that the key is in
position 1 in the ignition lock.
X Press button 0046 repeatedly until the
desired heating level is set.
X To switch off: press button 0046 repeatedly
until all indicator lamps go out. Steering wheel
G
Warning
Only adjust the steering wheel when the
vehicle is stationary. Only drive with the
steering wheel locked in position.
An incorrectly secured steering wheel could
make it more difficult to steer the vehicle
safely since the steering wheel could move
unexpectedly when turned. This could result
in you losing control of the vehicle and
causing an accident, thereby endangering
yourself and others. G
Warning
Never leave children unsupervised in the
vehicle. They could
become trapped if they try
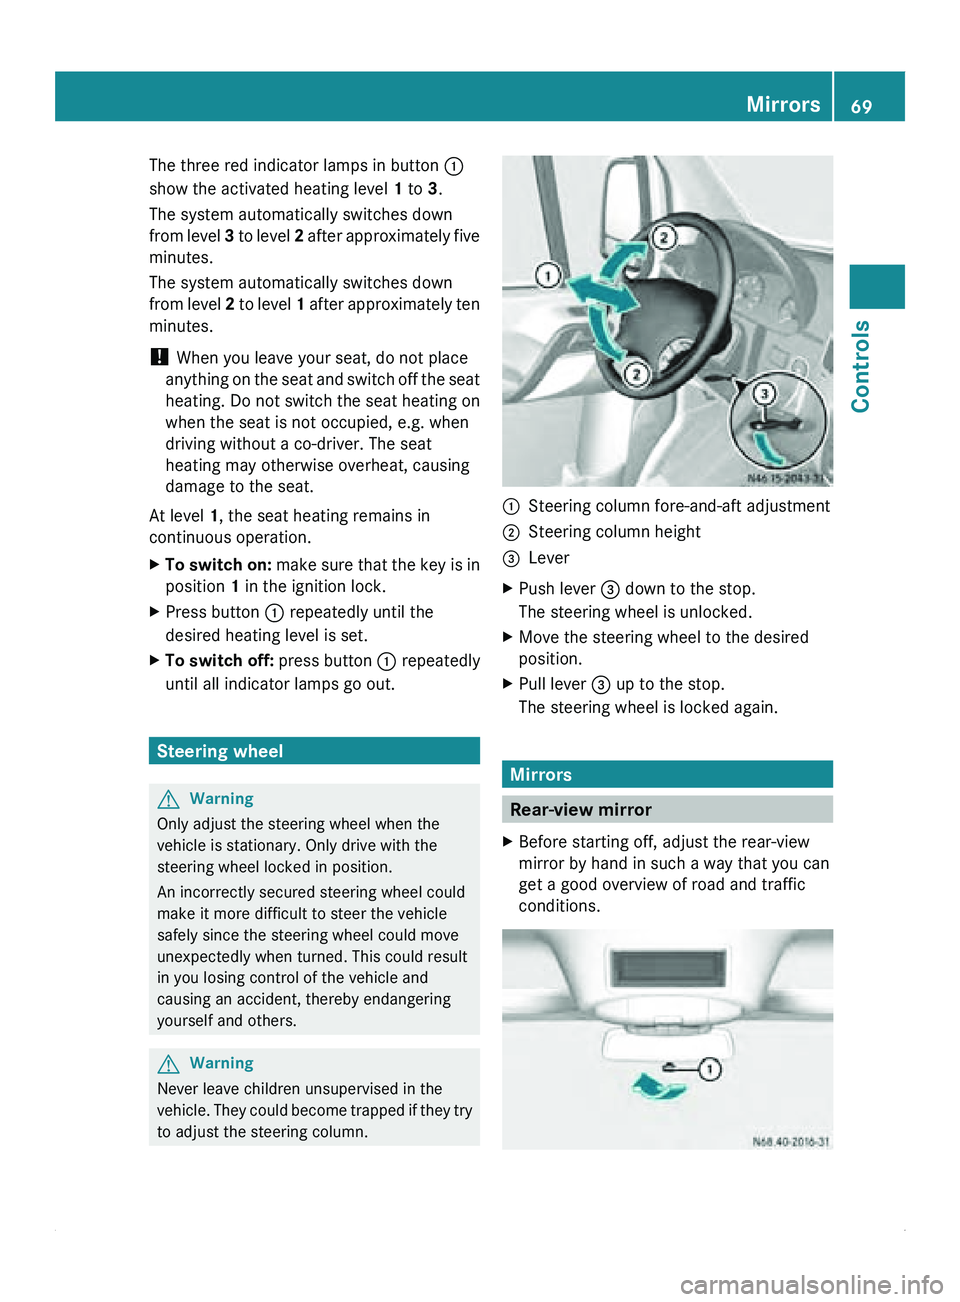
to adjust the steering column. 0046
Steering column fore-and-aft adjustment
0047 Steering column height
008A Lever
X Push lever 008A down to the stop.
The steering wheel is unlocked.
X Move the steering wheel to the desired
position.
X Pull lever 008A up to the stop.
The steering wheel is locked again. Mirrors
Rear-view mirror
X Before starting off, adjust the rear-view
mirror by hand in such a way that you can
get a good overview of road and traffic
conditions. Mirrors
69
Controls Z
Page 72 of 292
X
Anti-glare mode: push anti-glare lever 0046
in the direction of the arrow. Exterior mirrors
Important safety notes G
Warning
The additional mirrors in the exterior mirrors
reduce the size
of the image. The objects are
actually closer than they appear. You could
cause an accident if you only observe the
traffic through the additional mirrors.
Therefore, pay particular attention to traffic
behind you when maneuvering or passing
using the main mirror in the exterior mirrors
also and, if necessary, the rear-view mirror.
Adjusting manually X
Before starting off, manually adjust the
exterior mirrors in
such a way that you can
get a good overview of road and traffic
conditions.
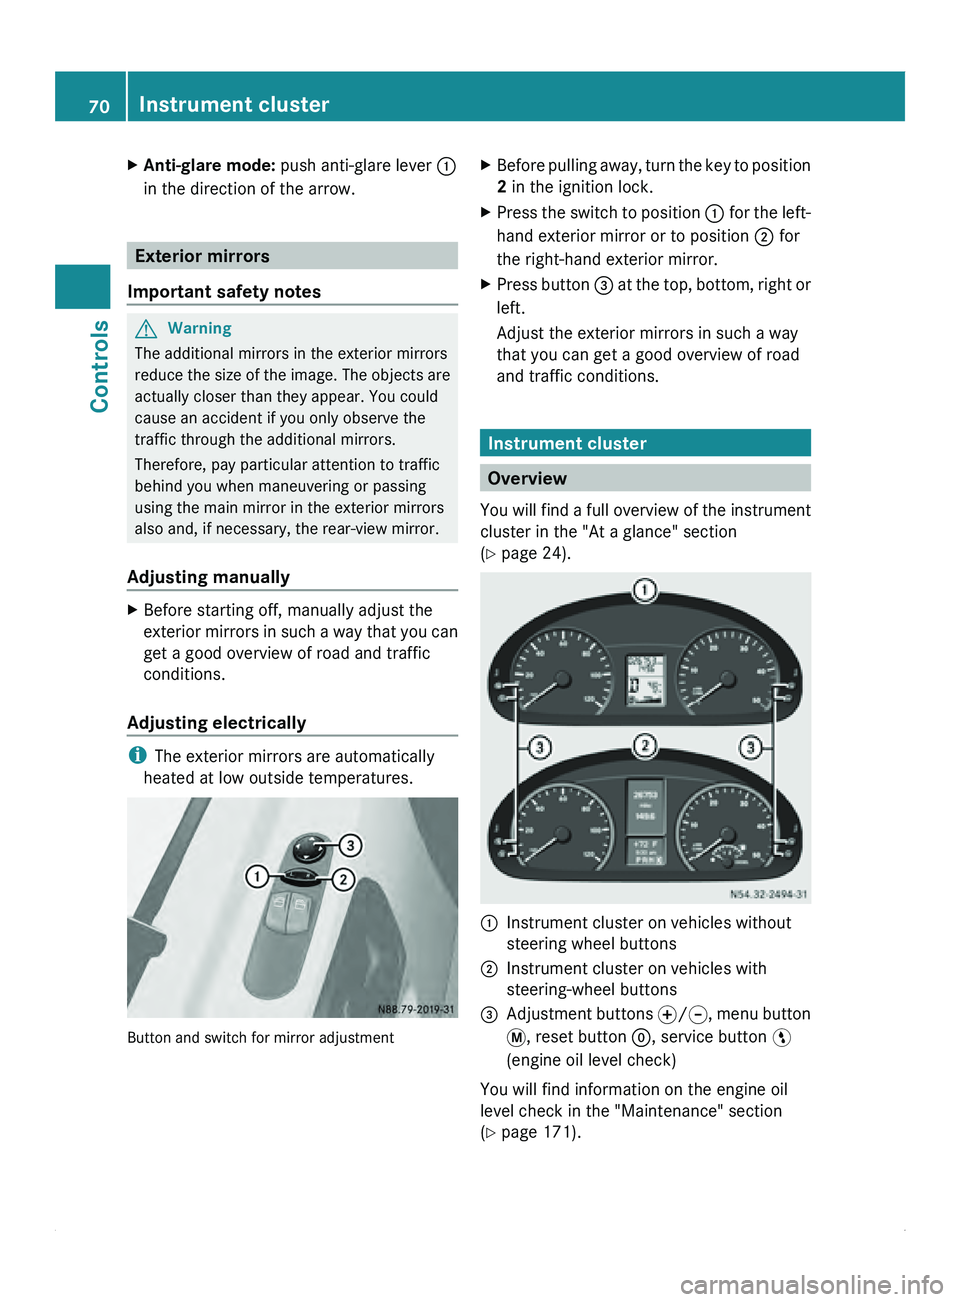
Adjusting electrically i
The exterior mirrors are automatically
heated at low outside temperatures. Button and switch for mirror adjustment X
Before pulling away, turn the key to position
2 in the ignition lock.
X Press the switch to position 0046 for the
left-
hand exterior mirror or to position 0047 for
the right-hand exterior mirror.
X Press button 008A at
the
top, bottom, right or
left.
Adjust the exterior mirrors in such a way
that you can get a good overview of road
and traffic conditions. Instrument cluster
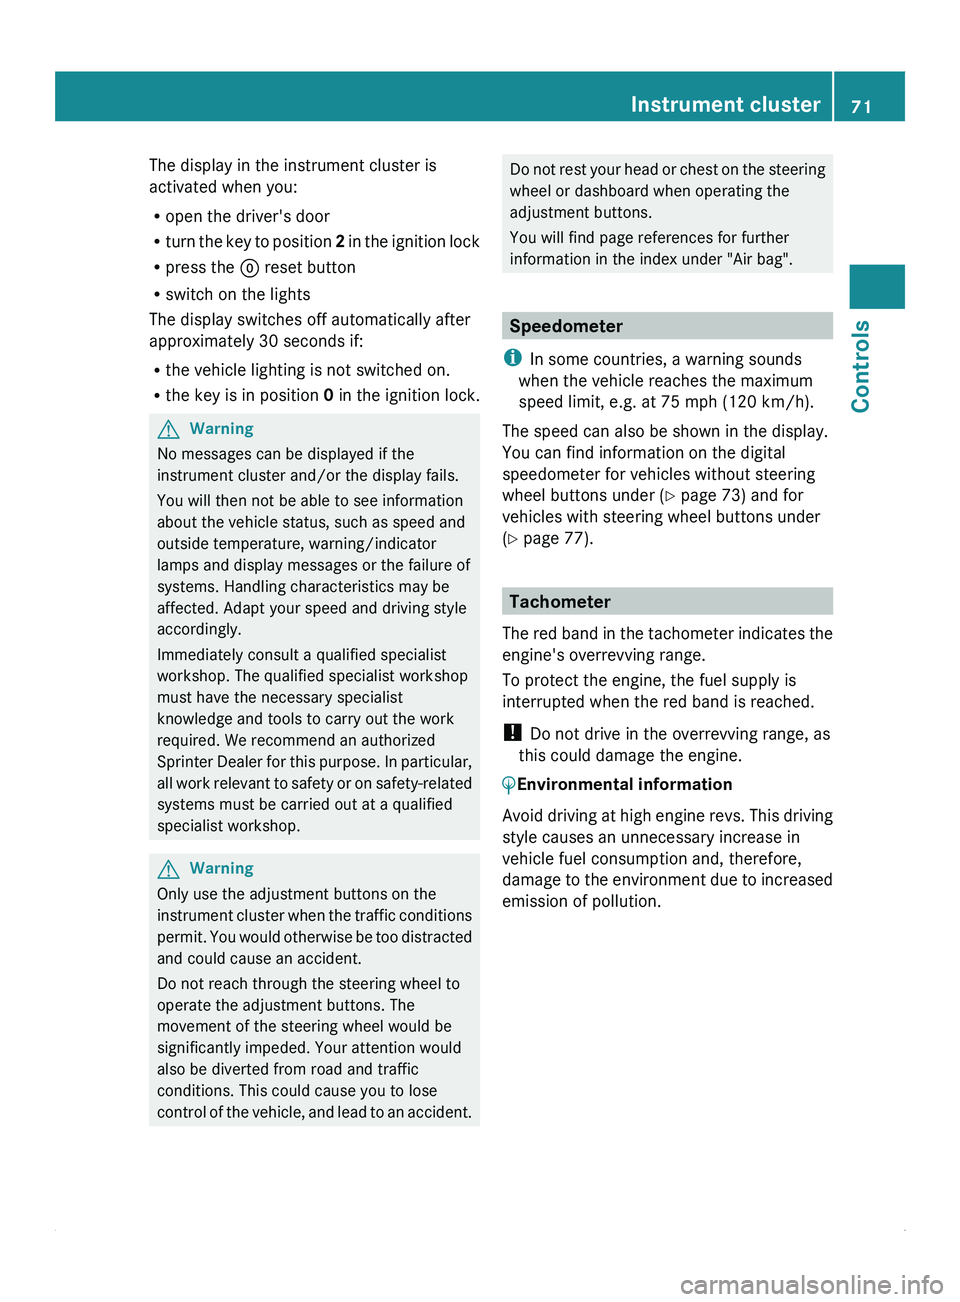
Overview
You will find
a full overview of the instrument
cluster in the "At a glance" section
(Y page 24). 0046
Instrument cluster on vehicles without
steering wheel buttons
0047 Instrument cluster on vehicles with
steering-wheel buttons
008A Adjustment buttons 0069/006A, menu button
007B
, reset button 0048, service button 00A4
(engine oil level check)
You will find information on the engine oil
level check in the "Maintenance" section
(Y page 171). 70
Instrument cluster
Controls
Page 73 of 292
The display in the instrument cluster is
activated when you:
R
open the driver's door
R turn the key
to position 2 in the ignition lock
R press the 0048 reset button
R switch on the lights
The display switches off automatically after
approximately 30 seconds if:
R the vehicle lighting is not switched on.
R the key is in position 0 in the ignition lock.G
Warning
No messages can be displayed if the
instrument cluster and/or the display fails.
You will then not be able to see information
about the vehicle status, such as speed and
outside temperature, warning/indicator
lamps and display messages or the failure of
systems. Handling characteristics may be
affected. Adapt your speed and driving style
accordingly.
Immediately consult a qualified specialist
workshop. The qualified specialist workshop
must have the necessary specialist
knowledge and tools to carry out the work
required. We recommend an authorized
Sprinter Dealer for
this purpose. In particular,
all work relevant to safety or on safety-related
systems must be carried out at a qualified
specialist workshop. G
Warning
Only use the adjustment buttons on the
instrument cluster when
the traffic conditions
permit. You would otherwise be too distracted
and could cause an accident.
Do not reach through the steering wheel to
operate the adjustment buttons. The
movement of the steering wheel would be
significantly impeded. Your attention would
also be diverted from road and traffic
conditions. This could cause you to lose
control of the vehicle, and lead to an accident. Do not rest your head or chest on the steering
wheel or dashboard when operating the
adjustment buttons.
You will find page references for further
information in the index under "Air bag".
Speedometer
i In some countries, a warning sounds
when the vehicle reaches the maximum
speed limit, e.g. at 75 mph (120 km/h).
The speed can also be shown in the display.
You can find information on the digital
speedometer for vehicles without steering
wheel buttons under ( Y page 73) and for
vehicles with steering wheel buttons under
(Y page 77). Tachometer
The red band
in the tachometer indicates the
engine's overrevving range.
To protect the engine, the fuel supply is
interrupted when the red band is reached.
! Do not drive in the overrevving range, as
this could damage the engine.
0040Environmental information
Avoid driving at high engine revs. This driving
style causes an unnecessary increase in
vehicle fuel consumption and, therefore,
damage to the
environment due to increased
emission of pollution. Instrument cluster
71
Controls Z