key MERCEDES-BENZ SPRINTER 2010 MY10 Operator’s Manual
[x] Cancel search | Manufacturer: MERCEDES-BENZ, Model Year: 2010, Model line: SPRINTER, Model: MERCEDES-BENZ SPRINTER 2010Pages: 292, PDF Size: 6.75 MB
Page 95 of 292
lights on/off separately, depending on the
position of the central control switch.
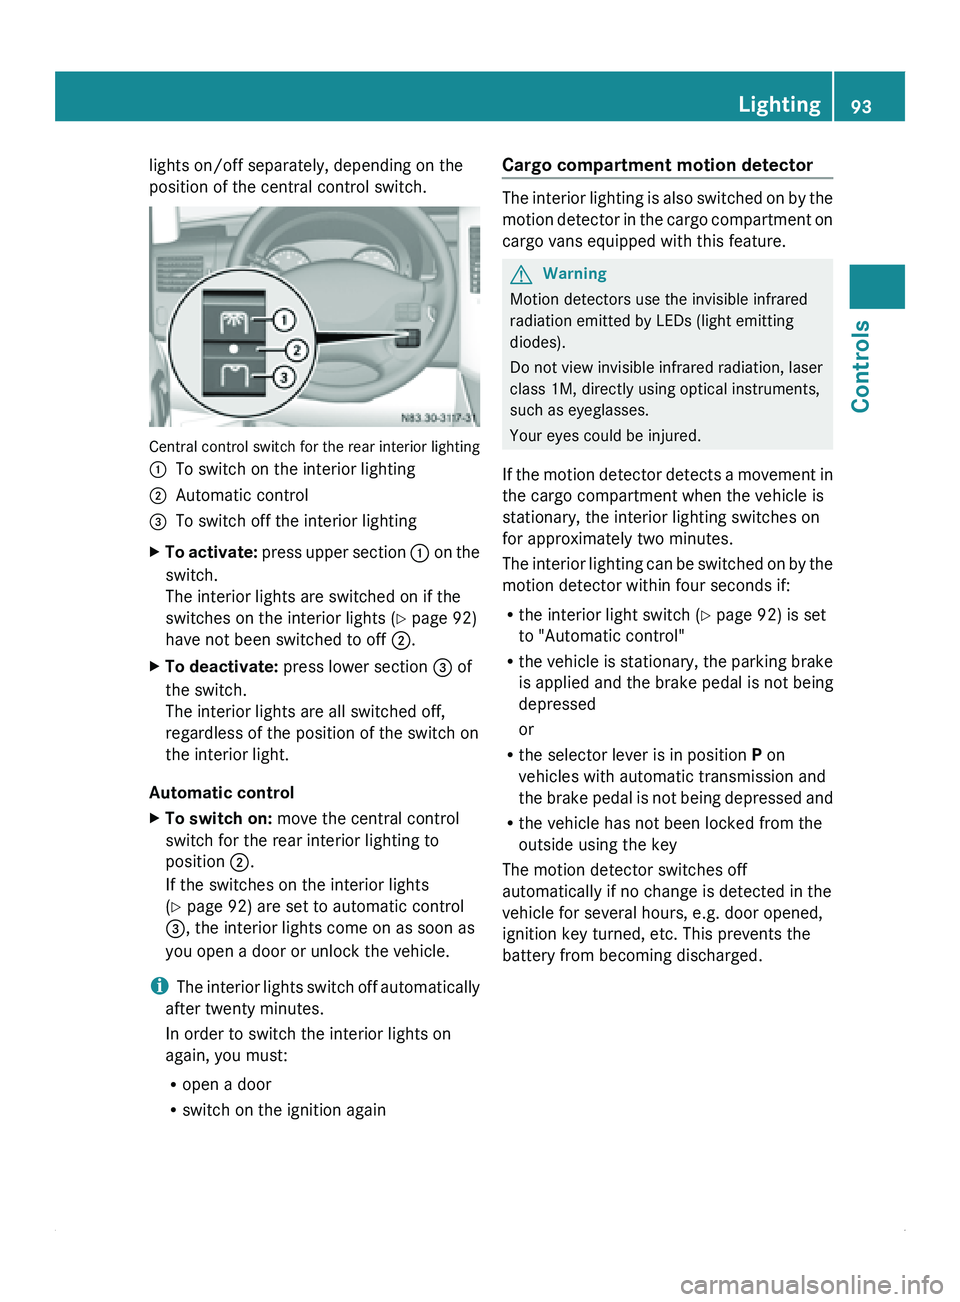
Central control switch for the rear interior lighting
0046
To switch on the interior lighting
0047 Automatic control
008A To switch off the interior lighting
X To activate: press
upper section 0046 on the
switch.
The interior lights are switched on if the
switches on the interior lights (Y page 92)
have not been switched to off 0047.
X To deactivate: press lower section 008A of
the switch.
The interior lights are all switched off,
regardless of the position of the switch on
the interior light.
Automatic control
X To switch on: move the central control
switch for the rear interior lighting to
position 0047.
If the switches on the interior lights
(Y page 92) are set to automatic control
008A, the interior lights come on as soon as
you open a door or unlock the vehicle.
i The interior
lights
switch off automatically
after twenty minutes.
In order to switch the interior lights on
again, you must:
R open a door
R switch on the ignition again Cargo compartment motion detector The interior lighting is also switched on by the
motion detector
in
the cargo compartment on
cargo vans equipped with this feature. G
Warning
Motion detectors use the invisible infrared
radiation emitted by LEDs (light emitting
diodes).
Do not view invisible infrared radiation, laser
class 1M, directly using optical instruments,
such as eyeglasses.
Your eyes could be injured.
If
the motion detector detects a movement in
the cargo compartment when the vehicle is
stationary, the interior lighting switches on
for approximately two minutes.
The interior lighting can be switched on by the
motion detector within four seconds if:
R the interior light switch (Y page 92) is set
to "Automatic control"
R the vehicle is stationary, the parking brake
is applied and the brake pedal is not being
depressed
or
R the selector lever is in position P on
vehicles with automatic transmission and
the brake pedal is not being depressed and
R the vehicle has not been locked from the
outside using the key
The motion detector switches off
automatically if no change is detected in the
vehicle for several hours, e.g. door opened,
ignition key turned, etc. This prevents the
battery from becoming discharged. Lighting
93
Controls Z
Page 96 of 292
Good visibility
Windshield wipers
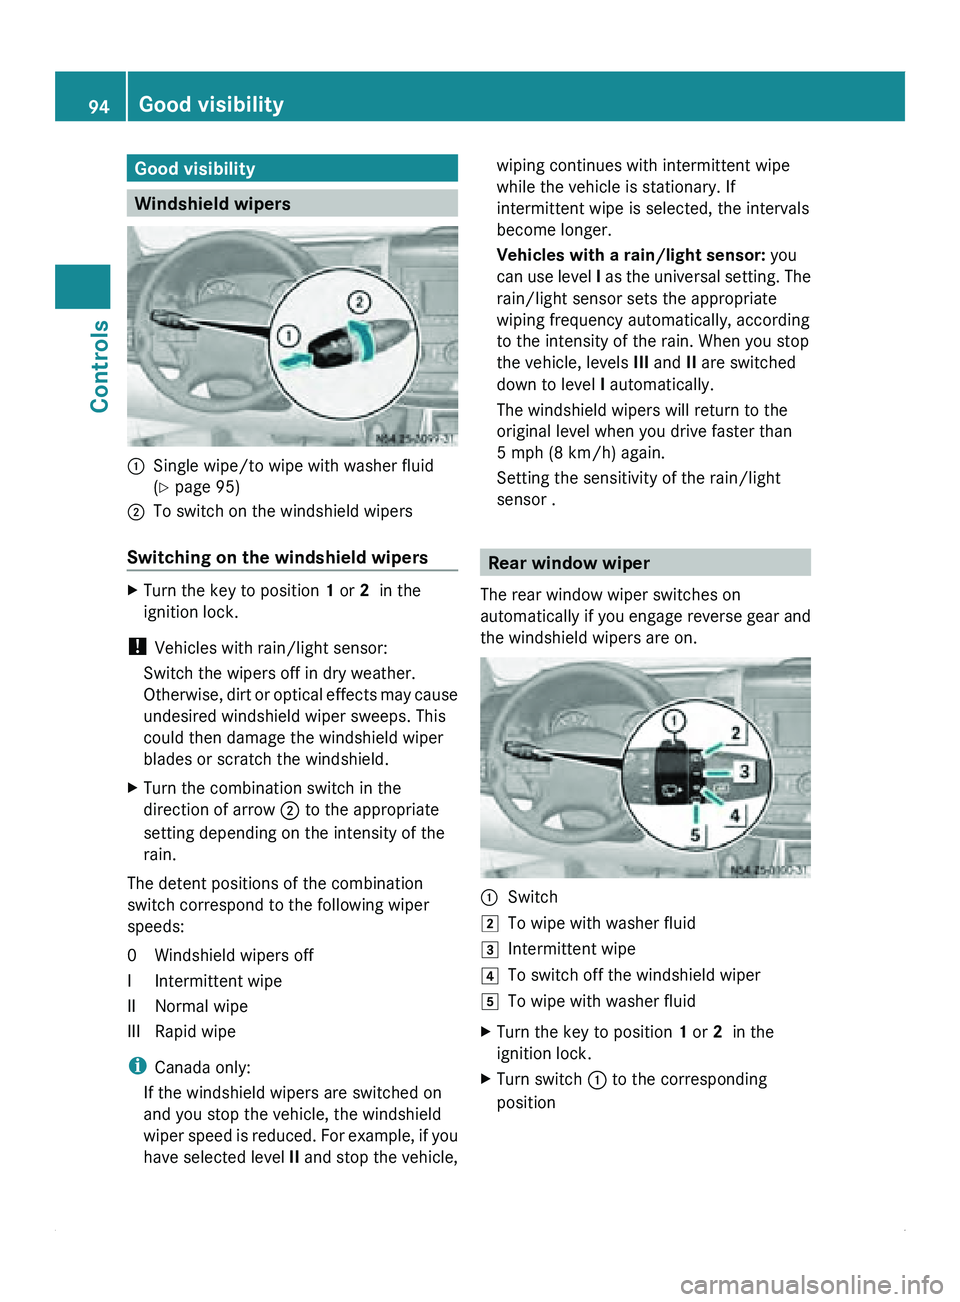
0046
Single wipe/to wipe with washer fluid
(Y page 95)
0047 To switch on the windshield wipers
Switching on the windshield wipers X
Turn the key to position 1 or 2 in the
ignition lock.
! Vehicles with rain/light sensor:
Switch the wipers off in dry weather.
Otherwise, dirt or
optical effects may cause
undesired windshield wiper sweeps. This
could then damage the windshield wiper
blades or scratch the windshield.
X Turn the combination switch in the
direction of arrow 0047 to the appropriate
setting depending on the intensity of the
rain.
The detent positions of the combination
switch correspond to the following wiper
speeds:
0 Windshield wipers off
I Intermittent wipe
II Normal wipe
III Rapid wipe
i Canada only:
If the windshield wipers are switched on
and you stop the vehicle, the windshield
wiper speed is
reduced. For example, if you
have selected level II and stop the vehicle, wiping continues with intermittent wipe
while the vehicle is stationary. If
intermittent wipe is selected, the intervals
become longer.
Vehicles with a rain/light sensor:
you
can use level I as
the universal setting. The
rain/light sensor sets the appropriate
wiping frequency automatically, according
to the intensity of the rain. When you stop
the vehicle, levels III and II are switched
down to level I automatically.
The windshield wipers will return to the
original level when you drive faster than
5 mph (8 km/h) again.
Setting the sensitivity of the rain/light
sensor . Rear window wiper
The rear window wiper switches on
automatically if you
engage reverse gear and
the windshield wipers are on. 0046
Switch
004B To wipe with washer fluid
004C Intermittent wipe
004D To switch off the windshield wiper
004E To wipe with washer fluid
X Turn the key to position 1
or 2 in the
ignition lock.
X Turn switch 0046 to the corresponding
position94
Good visibility
Controls
Page 108 of 292
X
To switch off the auxiliary heating: press
the 0086
switch.
or
X Turn the key to position 0 in the ignition
lock.
The red indicator lamp in the switch goes
out.
The auxiliary heating operates for about
another two minutes
and then switches off
automatically.
Selecting a switch-on time You can use the on-board computer to define
up to
three
switch-on times, one of which can
be selected.
On-board computer without steering
wheel buttons
X Turn the SmartKey to position 2 in the
ignition lock.
X Press the 0086 switch.
The 0086 symbol in the display flashes.
or
X Press the 007B menu button on the
instrument cluster repeatedly until the
0086 symbol flashes in the display.
X Use the 0069 or 006A
buttons on the instrument
cluster to select switch-on time 1 to 3
The switch-on time selected is displayed.
X Wait 10 seconds for the standard display to
appear.
The switch-on time is selected. The yellow
indicator lamp in the 0086 switch comes
on.
If you have not preselected a switch-on time
and --:-- is
shown
in the display, this means
that automatic switch-on mode is
deactivated. The yellow indicator lamp in the
0086 switch goes out.
i If you turn the key to position 0 in the
ignition lock, the yellow indicator lamp in
the 0086 switch goes off after 30 minutes. The red indicator lamp in the
0086 switch
comes on when the auxiliary heating
switches on.
On-board computer with steering wheel
buttons
X Turn the SmartKey to position 2 in the
ignition lock.
X Press the 0086 switch.
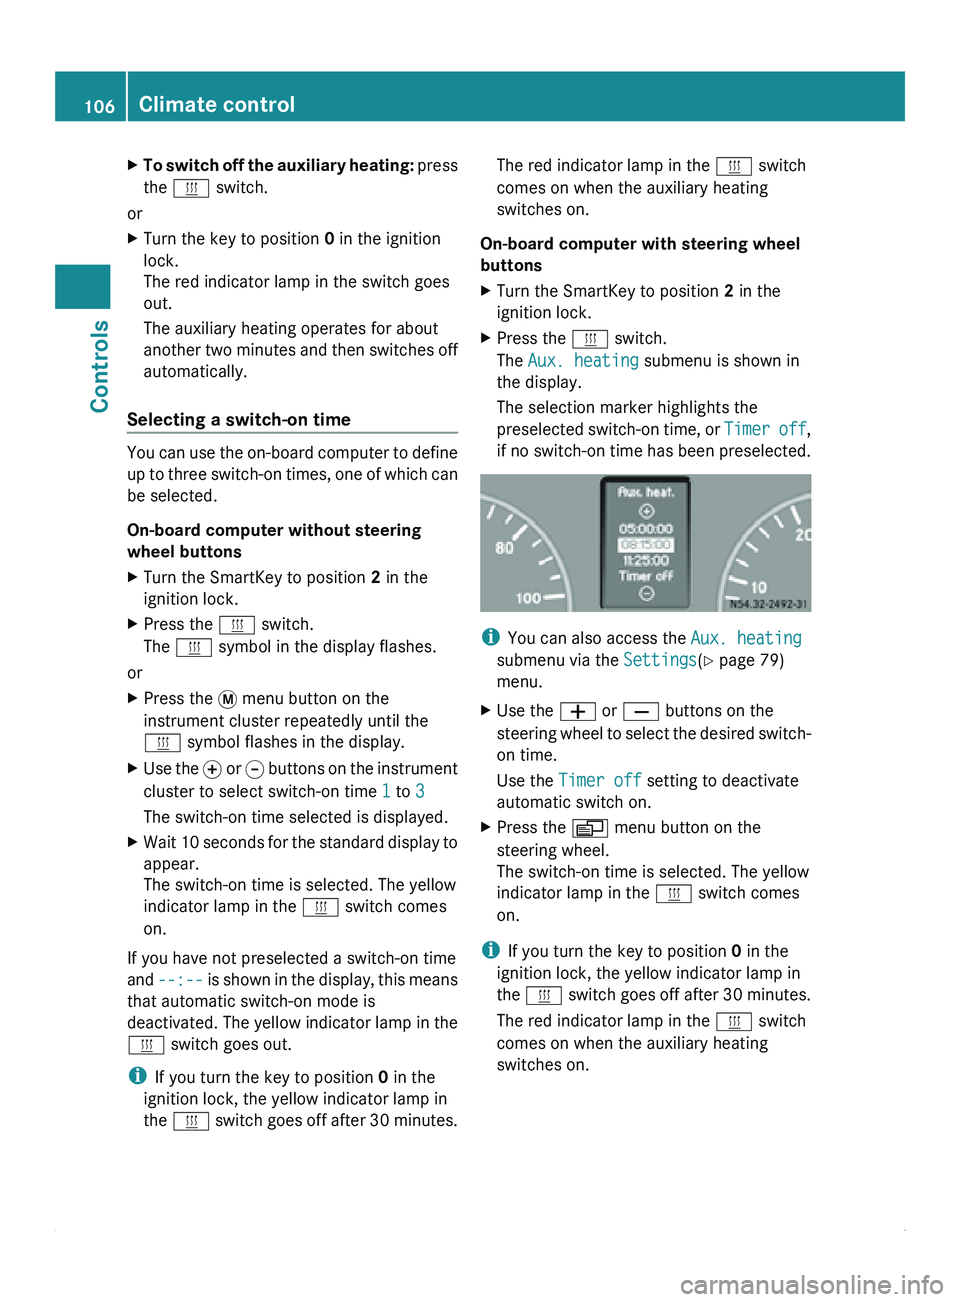
The Aux. heating submenu is shown in
the display.
The selection marker highlights the
preselected switch-on
time,
or Timer off,
if no switch-on time has been preselected. i
You can also access the Aux. heating
submenu via the Settings(Y page 79)
menu.
X Use the 005A or 005B buttons on the
steering wheel
to
select the desired switch-
on time.
Use the Timer off setting to deactivate
automatic switch on.
X Press the 0059 menu button on the
steering wheel.
The switch-on time is selected. The yellow
indicator lamp in the 0086 switch comes
on.
i If you turn the key to position 0 in the
ignition lock, the yellow indicator lamp in
the 0086 switch goes
off after 30 minutes.
The red indicator lamp in the 0086 switch
comes on when the auxiliary heating
switches on. 106
Climate control
Controls
Page 110 of 292
Roof ventilator in the cargo
compartment
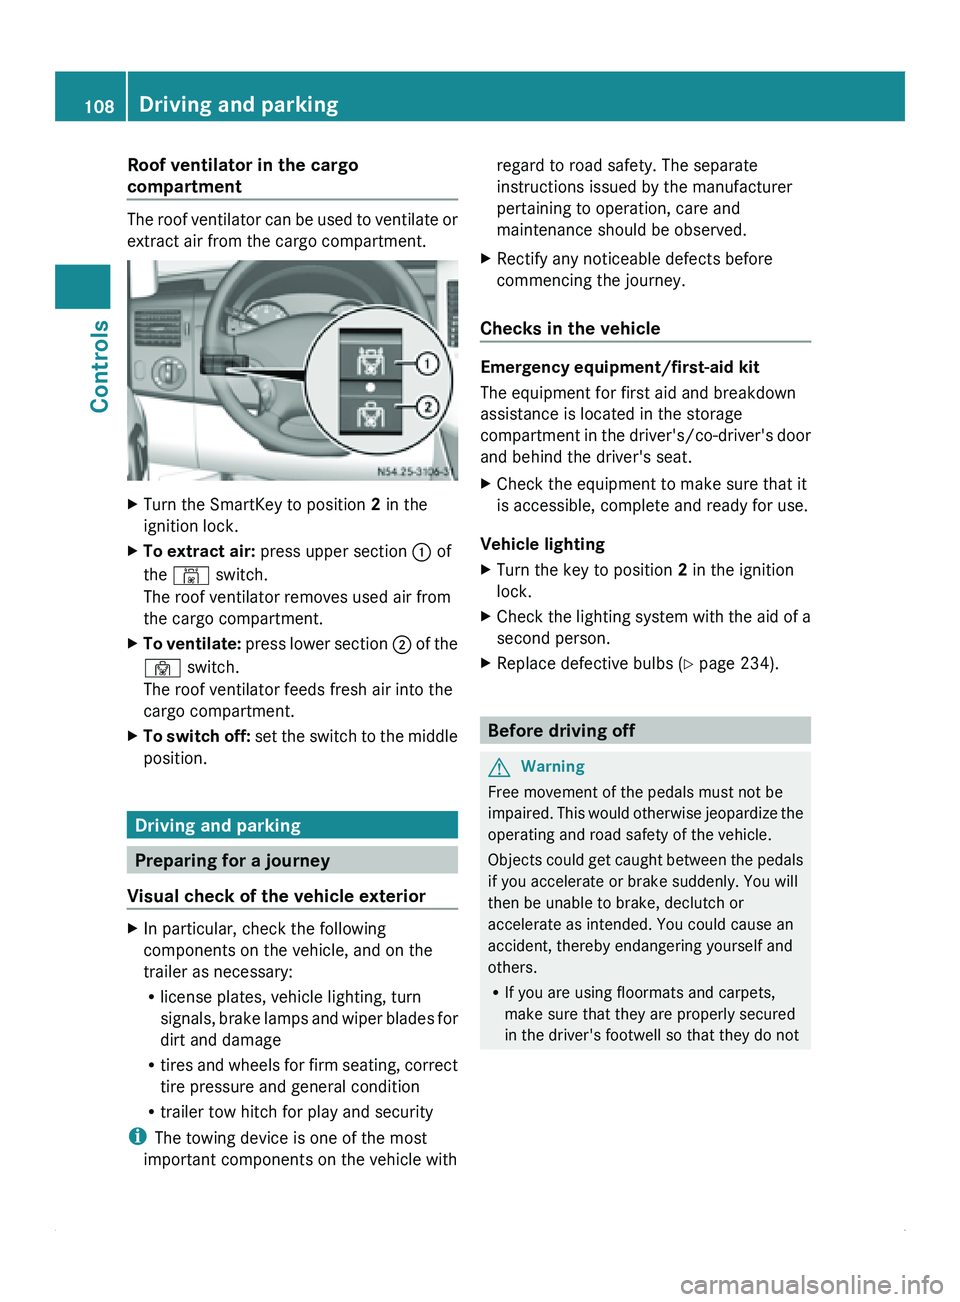
The roof ventilator can be used to ventilate or
extract air from the cargo compartment.
X
Turn the SmartKey to position 2 in the
ignition lock.
X To extract air: press upper section 0046 of
the 00B4 switch.
The roof ventilator removes used air from
the cargo compartment.
X To ventilate: press lower section 0047 of the
00B3 switch.
The roof ventilator feeds fresh air into the
cargo compartment.
X To switch off: set the
switch to the middle
position. Driving and parking
Preparing for a journey
Visual check of the vehicle exterior X
In particular, check the following
components on the vehicle, and on the
trailer as necessary:
R
license plates, vehicle lighting, turn
signals, brake lamps
and wiper blades for
dirt and damage
R tires and wheels for firm seating, correct
tire pressure and general condition
R trailer tow hitch for play and security
i The towing device is one of the most
important components on the vehicle with regard to road safety. The separate
instructions issued by the manufacturer
pertaining to operation, care and
maintenance should be observed.
X Rectify any noticeable defects before
commencing the journey.
Checks in the vehicle Emergency equipment/first-aid kit
The equipment for first aid and breakdown
assistance is located in the storage
compartment in
the
driver's/co-driver's door
and behind the driver's seat.
X Check the equipment to make sure that it
is accessible, complete and ready for use.
Vehicle lighting
X Turn the key to position 2 in the ignition
lock.
X Check the lighting system with the aid of a
second person.
X Replace defective bulbs ( Y page 234). Before driving off
G
Warning
Free movement of the pedals must not be
impaired. This would
otherwise jeopardize the
operating and road safety of the vehicle.
Objects could get caught between the pedals
if you accelerate or brake suddenly. You will
then be unable to brake, declutch or
accelerate as intended. You could cause an
accident, thereby endangering yourself and
others.
R If you are using floormats and carpets,
make sure that they are properly secured
in the driver's footwell so that they do not108
Driving and parking
Controls
Page 112 of 292
Starting the engine
X
Turn the key to position 2 in the ignition
lock.
The 0028 preglow indicator lamp in the
instrument cluster lights up.
X When the 0028 preglow indicator lamp
goes out, turn the key to position 3 in the
ignition lock and release it as soon as the
engine is running.
i You can start
the engine without preglow
when the engine is warm.
i Depending on the equipment installed,
the vehicle either automatically locks
centrally after switching on the ignition or
after pulling away. The locking knobs in the
doors drop down.
You can open the doors from the inside at
any time.
Automatic door locking can be deactivated
(Y page 55). Driving off
G
Warning
Do not downshift for additional engine
braking on a
slippery road surface. This could
cause the drive wheels to lose their grip and
the vehicle could skid. You could lose control
of the vehicle and cause an accident.
i After pulling away or switching on the
ignition, the vehicle automatically locks
centrally. The locking knobs in the doors
drop down.
You can open the doors from the inside at
any time.
Automatic door locking can be deactivated
(Y page 55). X
Depress the brake pedal and keep it
depressed.
The selector lever lock is released.
X Release the parking brake ( Y page 112).
The 0066 indicator lamp in the instrument
cluster goes out.
X Move the selector lever to position D or R.
i On vehicles with a reverse warning
feature, a warning signal sounds when
reverse gear is
engaged to alert other road
users.
! Only shift into reverse gear when the
vehicle is stationary. You could otherwise
damage the transmission.
X Release the brake pedal.
X Carefully depress the accelerator pedal. General driving tips
Steering G
Warning
Do not switch off the engine while the vehicle
is in motion.
There is no
power assistance for the steering
or the service brake when the engine is not
running.
Steering and braking require significantly
more effort and you could lose control of the
vehicle and cause an accident as a result.
! Do not hold the steering wheel at full
steering angle for a long time, e.g. when
turning or maneuvering.
The hydraulic pump could be damaged if
the hydraulic fluid temperature increases.
Overrun cut-off If you take your foot off the accelerator pedal,
the diesel fuel supply is cut off in overrun
mode when the
engine speed is out of the idle
speed control range. 110
Driving and parking
Controls
Page 114 of 292
On gradients steeper than 15%:
R
secure an unladen
vehicle at the front axle,
e.g. using a wheel chock or similar object.
R additionally, secure a laden vehicle at the
rear axle, e.g. using a wheel chock or similar
object. G
Warning
Make sure that the exhaust system does not
under any circumstances come into contact
with easily ignitable
material such as dry grass
or gasoline. Do not park the vehicle on dry
grassland or harvested grain fields.
Otherwise, the flammable material may ignite
and set the vehicle on fire. G
Warning
Only remove the key from the ignition lock
when the vehicle is stationary, since you
cannot steer the vehicle with the key
removed.
Never leave children unsupervised in the
vehicle. They could
release the parking brake.
This could lead to a serious or fatal accident.
! When the vehicle is parked, always
remove the key to prevent the battery from
becoming discharged.
On vehicles with a battery isolating switch,
switch off the power supply if the vehicle is
to be out of use for a longer period of time. G
Warning
You must use the parking lamps to enable
your vehicle to
be recognized on public roads
when it is dark. You can also use reflective
night parking signs in built-up areas.
Observe legal requirements.
X Stop the vehicle.
X Shift the automatic transmission to
position P.
X Apply the parking brake.
i On steep slopes, turn the front wheels
towards the curb. !
If the coolant temperature is very high,
e.g. after driving on mountain roads, leave
the engine running at idle speed for about
two minutes before turning it off.
This allows the coolant temperature to
return to normal.
X To switch off the engine: turn the key to
position 0 in the ignition lock and remove
it.
The immobilizer is activated.
X Switch on the parking lamps if necessary.
X On uphill or downhill gradients, secure the
vehicle additionally against rolling away at
the axle with
the heaviest load, e.g. by using
a wheel chock or similar object.
Use the wheel chock (Y page 183) for this
purpose. Brakes
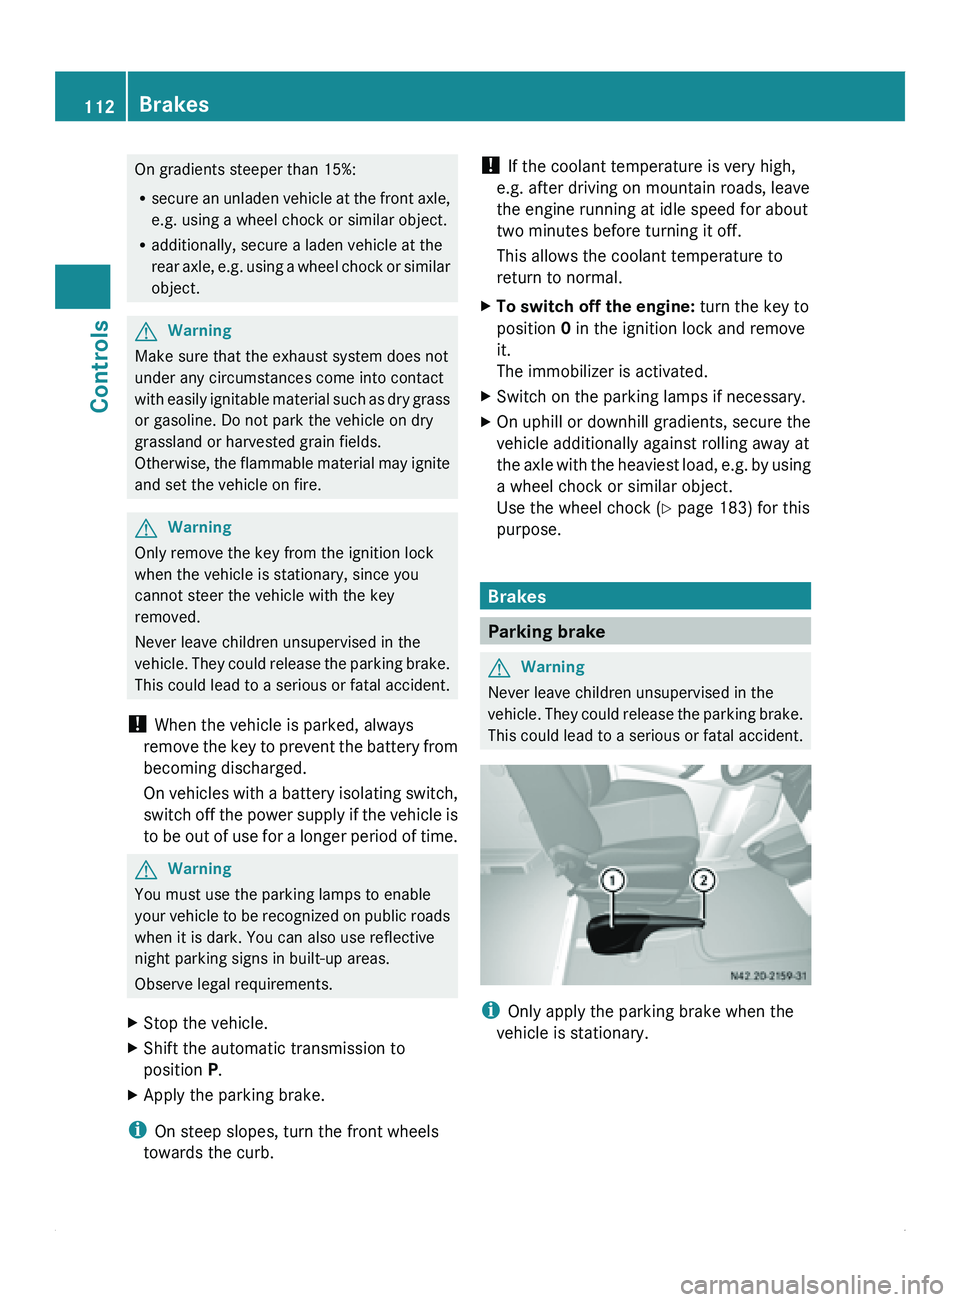
Parking brake
G
Warning
Never leave children unsupervised in the
vehicle. They could
release the parking brake.
This could lead to a serious or fatal accident. i
Only apply the parking brake when the
vehicle is stationary. 112
Brakes
Controls
Page 116 of 292
Selector lever positions
0045
Park position
This prevents the vehicle from
rolling away when stopped. Only
move the selector lever to
P when
the vehicle is stationary.
You can only
remove the key when
the selector lever is in position P.
The selector lever is locked in
position P when the key is
removed. 0046
Reverse gear
Only move the selector lever to R
when the vehicle is stationary. 0044
Neutral
No power is transmitted from the
engine to the drive wheels.
Releasing the
brakes
will allow you
to move the vehicle freely, e.g. by
pushing or towing.
Do not move the selector lever to
N while driving. The automatic
transmission could otherwise be
damaged.
If ASR is deactivated or ESP ®
has
malfunctioned: only move the
selector lever to N if the vehicle is
in danger of skidding, e.g. on icy
roads. 003A
Drive
The automatic transmission
changes gear
automatically.
All five
forward gears are available. Touchshift
When the selector lever is in position D
, you
can perform gearshifts yourself.
X To shift down: press the selector lever to
the left towards D–.
The automatic transmission shifts to the
next gear down, depending on the gear currently engaged. This will also restrict the
shift range. G
Warning
Do not change down for additional engine
braking on a
slippery road surface. This could
cause the drive wheels to lose their grip and
the vehicle could skid.
i The automatic transmission does not shift
down if you press the selector lever
towards D– while traveling at too high a
speed. The engine could otherwise overrev.
X To shift up:
briefly press
the selector lever
to the right towards D+.
The automatic transmission shifts to the
next gear up, depending on the current
gearshift program. This also extends the
shift range.
X To derestrict the shift range: press and
hold the selector lever towards D+ until D
is shown once more in the display.
The automatic transmission
shifts from the
current shift range directly to D.
X To select the optimum shift range: press
and hold the selector lever to the left
towards D–
.
The automatic transmission will shift to a
range which allows easy acceleration and
deceleration. To do this, the automatic
transmission will shift down one or more
gears. Shift ranges
When the selector lever is in position D
you
can restrict or derestrict the shift range for
the automatic transmission.
X Press the selector lever briefly to the right
towards D+ or left towards D–.
The set shift
range is shown in the display.
i If the maximum
engine speed for the shift
range is reached and you depress the
accelerator pedal, the automatic 114
Automatic transmission
Controls
Page 122 of 292
immediate surroundings when parking and
maneuvering. You could otherwise endanger
yourself and others.
G
Warning
Make sure that no persons or animals are in
the maneuvering range. Otherwise, they
could be injured.
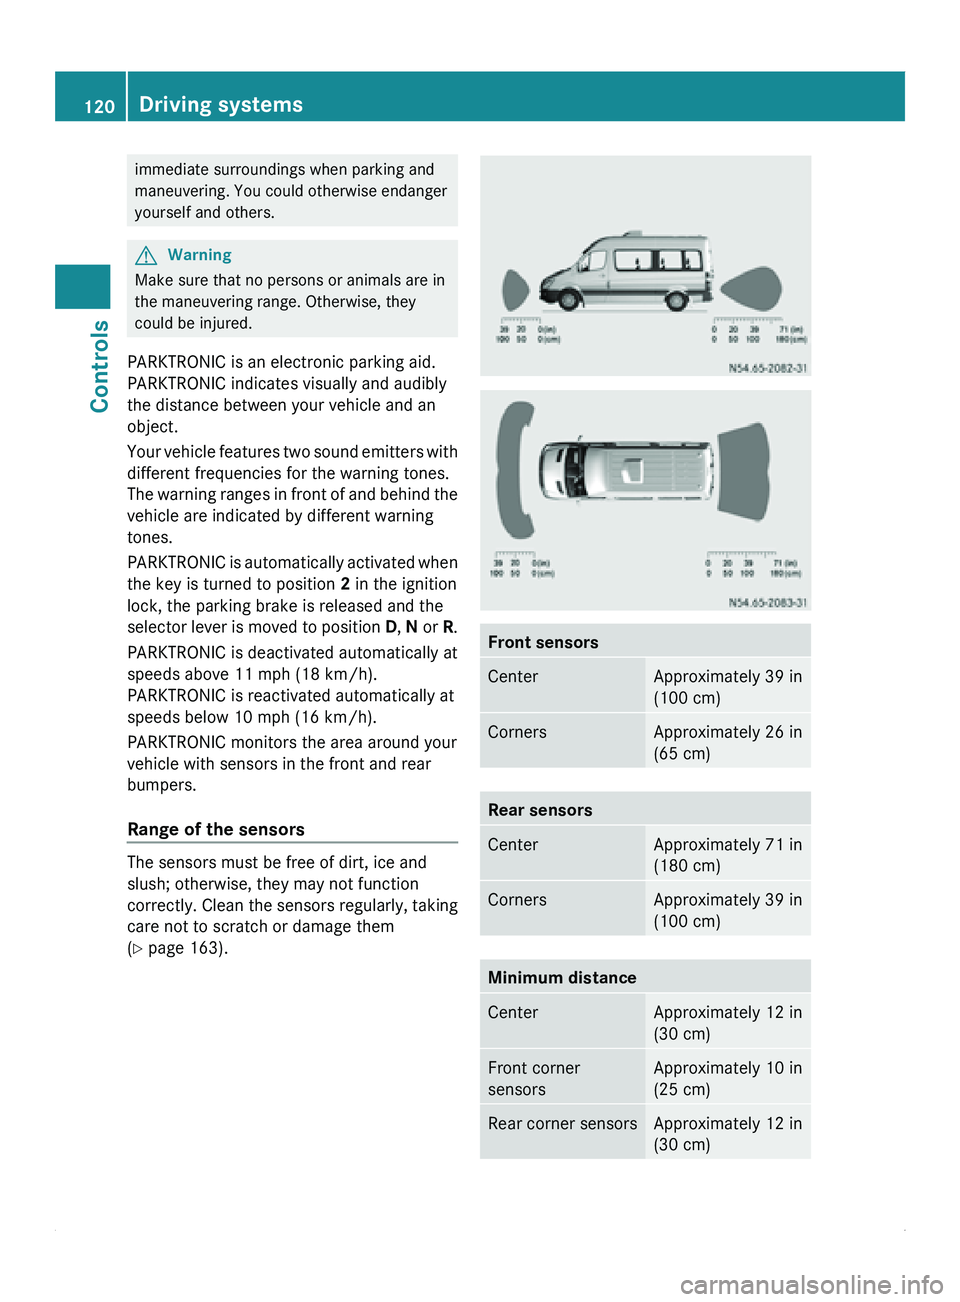
PARKTRONIC is an electronic parking aid.
PARKTRONIC indicates visually and audibly
the distance between your vehicle and an
object.
Your vehicle features
two sound emitters with
different frequencies for the warning tones.
The warning ranges in front of and behind the
vehicle are indicated by different warning
tones.
PARKTRONIC is automatically activated when
the key is turned to position 2 in the ignition
lock, the parking brake is released and the
selector lever is moved to position D, N or R.
PARKTRONIC is deactivated automatically at
speeds above 11 mph (18 km/h).
PARKTRONIC is reactivated automatically at
speeds below 10 mph (16 km/h).
PARKTRONIC monitors the area around your
vehicle with sensors in the front and rear
bumpers.
Range of the sensors The sensors must be free of dirt, ice and
slush; otherwise, they may not function
correctly. Clean
the
sensors regularly, taking
care not to scratch or damage them
(Y page 163). Front sensors
Center Approximately 39 in
(100 cm)
Corners Approximately 26 in
(65 cm)
Rear sensors
Center Approximately 71 in
(180 cm)
Corners Approximately 39 in
(100 cm)
Minimum distance
Center Approximately 12 in
(30 cm)
Front corner
sensors Approximately 10 in
(25 cm)
Rear corner sensors Approximately 12 in
(30 cm)120
Driving systems
Controls
Page 131 of 292
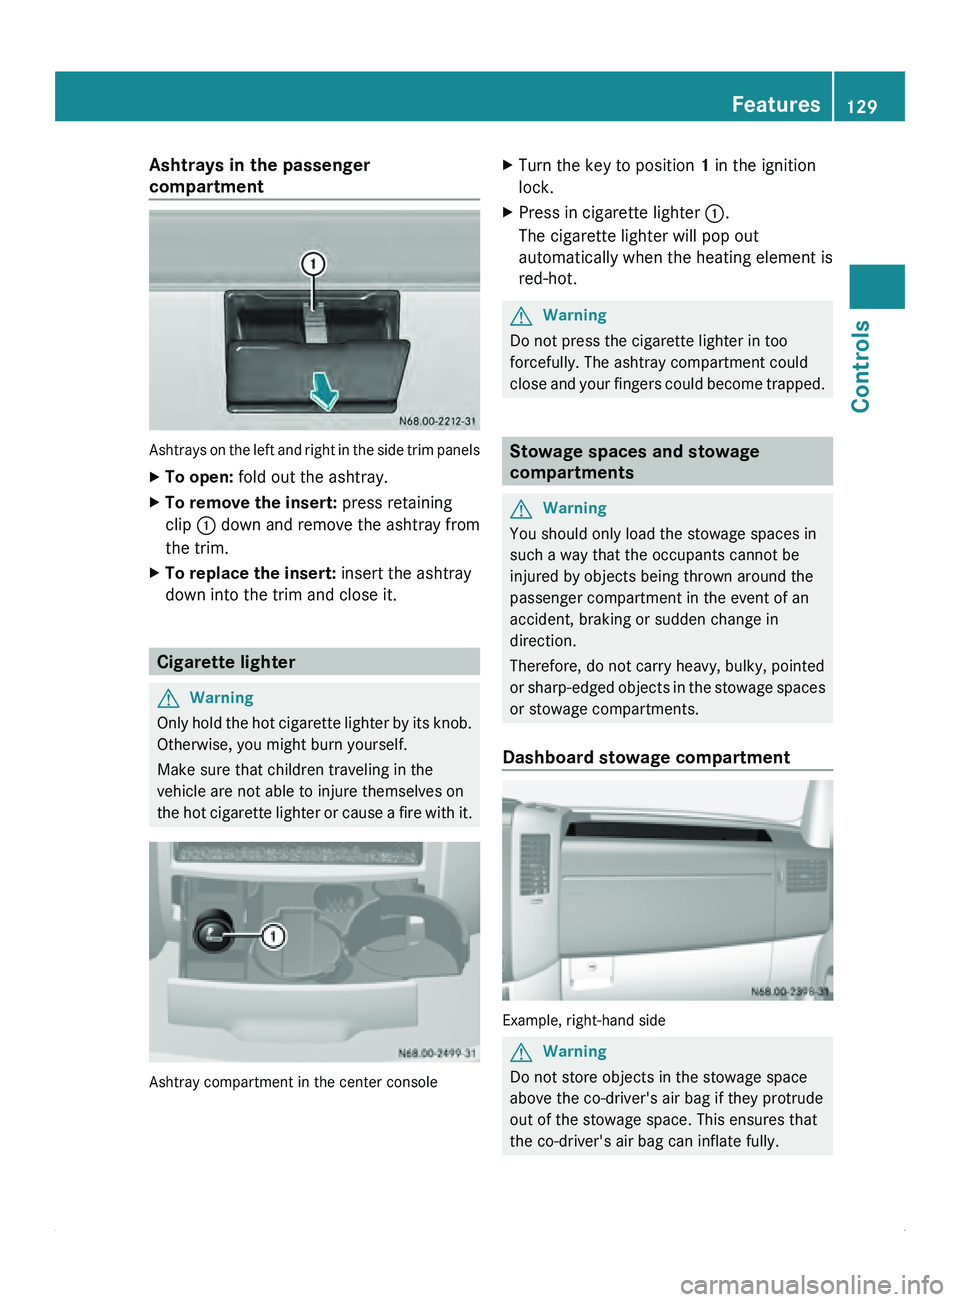
Ashtrays in the passenger
compartment
Ashtrays on the left and right in the side trim panels
X
To open: fold out the ashtray.
X To remove the insert: press retaining
clip 0046 down and
remove the ashtray from
the trim.
X To replace the insert: insert the ashtray
down into the trim and close it. Cigarette lighter
G
Warning
Only hold the hot cigarette lighter by its knob.
Otherwise, you might burn yourself.
Make sure that children traveling in the
vehicle are not able to injure themselves on
the hot cigarette
lighter or cause a fire with it.Ashtray compartment in the center console X
Turn the key to position 1 in the ignition
lock.
X Press in cigarette lighter 0046.
The cigarette lighter will pop out
automatically when the heating element is
red-hot. G
Warning
Do not press the cigarette lighter in too
forcefully. The ashtray compartment could
close and your
fingers could become trapped. Stowage spaces and stowage
compartments
G
Warning
You should only load the stowage spaces in
such a way that the occupants cannot be
injured by objects being thrown around the
passenger compartment in the event of an
accident, braking or sudden change in
direction.
Therefore, do not carry heavy, bulky, pointed
or sharp-edged objects
in the stowage spaces
or stowage compartments.
Dashboard stowage compartment Example, right-hand side
G
Warning
Do not store objects in the stowage space
above the co-driver's air bag if they protrude
out of the stowage space. This ensures that
the co-driver's air bag can inflate fully. Features
129
Controls Z
Page 133 of 292
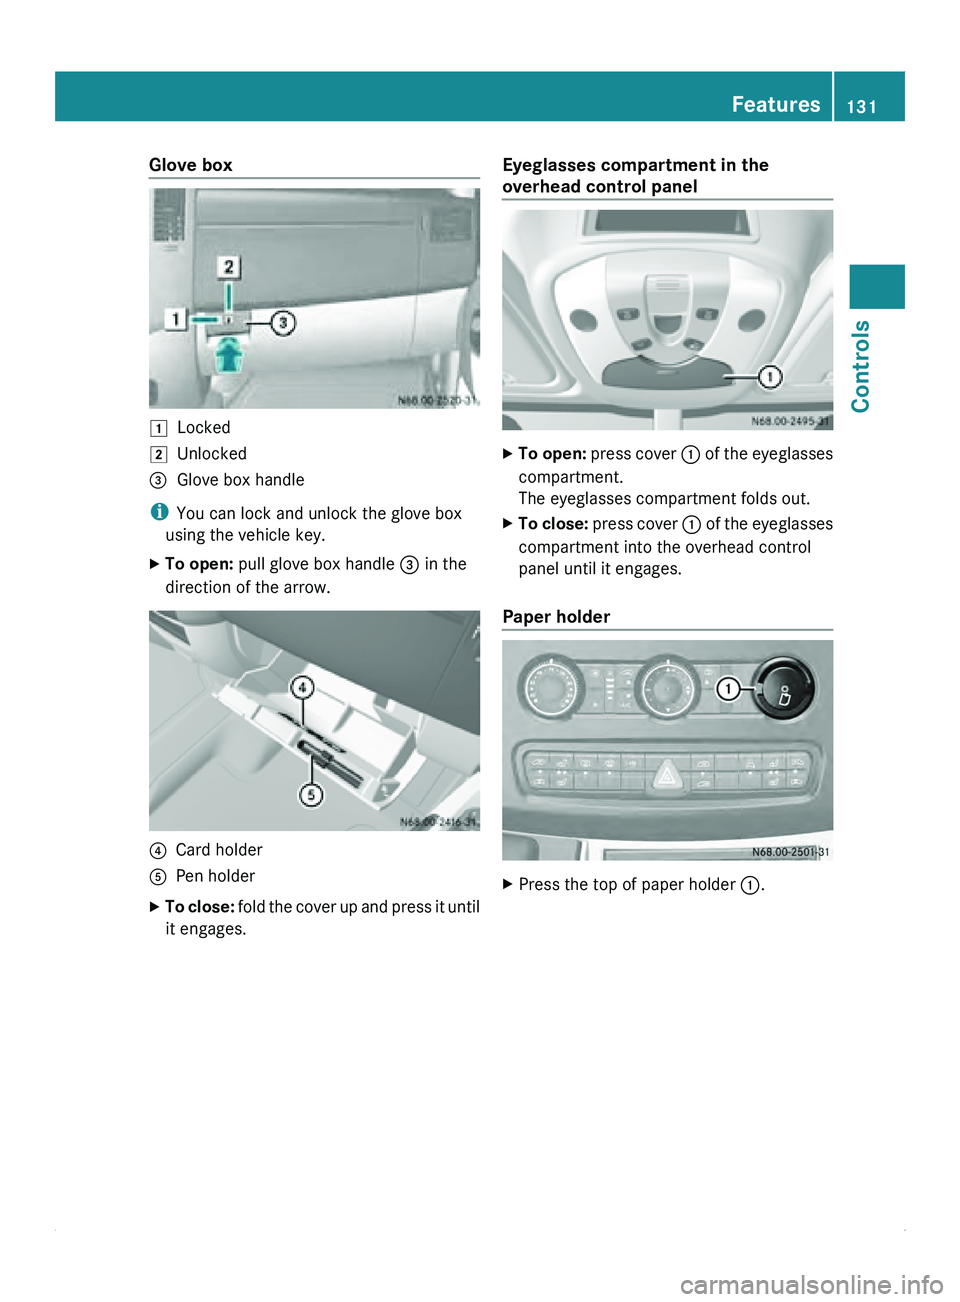
Glove box
004A
Locked
004B Unlocked
008A Glove box handle
i You can lock and unlock the glove box
using the vehicle key.
X To open: pull glove box handle 008A in the
direction of the arrow. 0088
Card holder
0086 Pen holder
X To close: fold the cover up and press it until
it engages. Eyeglasses compartment in the
overhead control panel X
To open: press cover 0046 of the eyeglasses
compartment.
The eyeglasses compartment folds out.
X To close: press cover 0046
of the eyeglasses
compartment into the overhead control
panel until it engages.
Paper holder X
Press the top of paper holder 0046. Features
131
Controls Z