spare tire MERCEDES-BENZ SPRINTER 2011 MY11 Operator’s Manual
[x] Cancel search | Manufacturer: MERCEDES-BENZ, Model Year: 2011, Model line: SPRINTER, Model: MERCEDES-BENZ SPRINTER 2011Pages: 292, PDF Size: 6.75 MB
Page 17 of 292
Troubleshooting
Automatic transmission .................214
Driving systems
............................. 215
Turn signals ......................................... 90
Changing bulbs .............. 235, 236, 237
Two-way radio
Installation ..................................... 277U
Unlocking With button ...................................... 55
With key ........................................... 52V
Vehicle Assemblies .................................... 174
Cleaning ......................................... 162
Dimensions .................................... 280
Electronics
..................................... 276
Individual settings (vehicles with
steering wheel buttons) ................... 78
Loading .......................................... 261
Towing ........................................... 248
Tow-starting ................................... 248
Transporting .................................. 250
Weights .......................................... 280
Vehicle identification number .......... 277
Vehicle identification plates ............277
Vehicle key Malfunction .................................... 217
Vehicle tool kit .................................. 182
Voltage supply Fuses ............................................. 239W
Warning and indicator lamp Diesel Exhaust Fluid (DEF) ............. 190
Warning and indicator lamps .............24
PARKTRONIC ................................. 215
Seat belt ........................................ 196
Warning lamp .................................... 183
Warning tones ................................... 212
Warning triangle ................................ 183
Washer fluid Display message ............................ 208
Indicator lamp ................................
196Topping up .....................................
171
Wiping with ...................................... 95
Wheel
Changing ....................................... 229
Rim size ......................................... 280
Spare wheel ................................... 185
Wheel chock
...................................... 229
Wheel nuts/wheel bolts Retightening .................................. 233
Tightening torque ........................... 232
Wheels
Changing/replacing .......................271
Checking ........................................ 253
Storing ........................................... 273
Wheel size/tire size ....................... 280
Window curtain air bag ....................... 41
Windows
Cleaning ......................................... 162
Cleaning the windshield ................. 163
Washing system ....................... 95, 171
Windshield
Cleaning ......................................... 163
Windshield heater ............................... 95
windshield heating Malfunction .................................... 211
Windshield washer fluid
Indicator lamp ................................ 196
Windshield wipers ............................... 94
Malfunction .................................... 219
Rain/light sensor ............................. 94
Replacing the wiper blades ............ 174
Setting the sensitivity (vehicles
with steering wheel buttons and
rain/light sensor) ............................. 84
Winter diesel ..................................... 154
Winter operation ....................... 153, 254
Winter tires M+S tires ....................................... 254
Working speed governor (ADR) ........ 117 X
Xenon headlamps see Bi-Xenon headlamps
Index
15
Page 51 of 292
G
Warning
Never switch off ASR when you see the
0067 warning lamp
flashing in the instrument
cluster. In this case proceed as follows:
R when driving off, apply as little throttle as
possible.
R while driving, ease off the accelerator
pedal.
R adapt your speed and driving style to the
prevailing road conditions.
Failure to observe these guidelines could
cause the vehicle to skid. ESP ®
cannot
prevent accidents resulting from excessive
speed.
If, taking tires, cargo load and gradient into
consideration, the surface driven on still
provides insufficient traction, you may
experience difficulties in pulling away despite
ASR.
Vehicles without steering-wheel buttons:
the 003D indicator lamp in the instrument
cluster lights up when you switch on the
ignition. It goes out when the engine is
running.
Activating/deactivating ASR G
Warning
ASR should
not be switched off during normal
driving other than in the circumstances
described below. Deactivating
the system will
reduce vehicle stability in driving maneuvers.
Do not switch off ASR when a spare wheel is
mounted.
ASR is activated automatically when the
engine is running.
It may be best to deactivate ASR briefly in the
following situations:
R when using snow chains
R in deep snow
R on sand or gravel If you deactivate ASR:
R
the engine's torque
is no longer limited and
the drive wheels can spin. The spinning of
the wheels results in a cutting action, which
provides better grip.
R brake intervention will continue to improve
traction where a drive wheel begins to spin,
e.g. if only the side of the road is slippery.
The wheel will be braked to increase
traction under such circumstances.
R active brake intervention by ESP ®
to
increase driving stability remains active. G
Warning
Even with ASR deactivated, ESP ®
remains
active and continues to perform brake
interventions where this is necessary to
improve driving stability. The 0067 warning
lamp flashes.
With ASR deactivated, there is an increased
risk of your vehicle's brake system
overheating and suffering damage due to
prolonged application. A
hot brake system will
also result in increased stopping distance.
Therefore, only deactivate ASR when
absolutely necessary. X
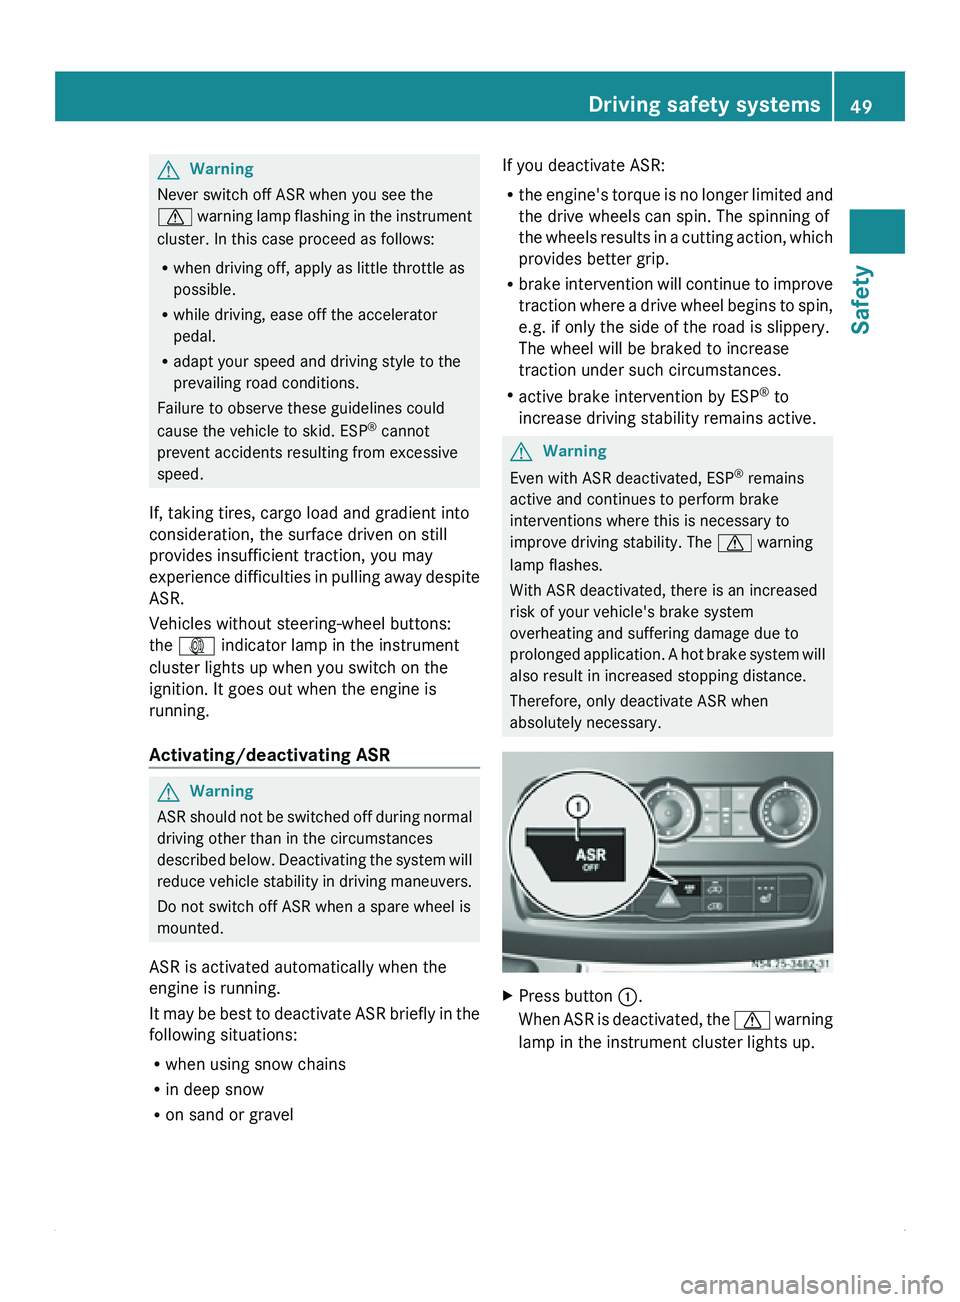
Press button 0046
.
When ASR is
deactivated, the 0067 warning
lamp in the instrument cluster lights up. Driving safety systems
49
Safety Z
Page 187 of 292
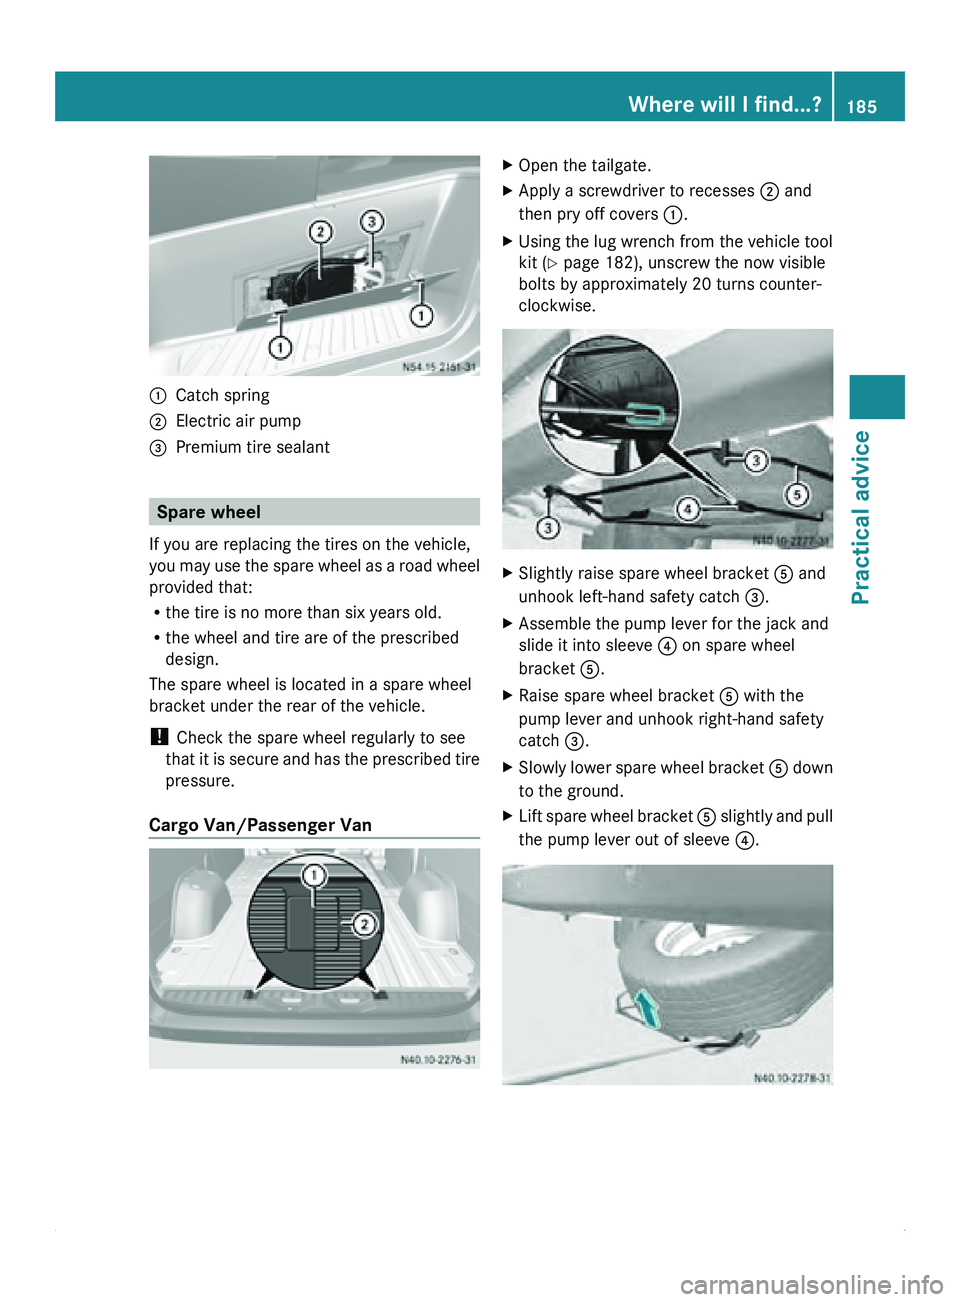
0046
Catch spring
0047 Electric air pump
008A Premium tire sealant Spare wheel
If you are replacing the tires on the vehicle,
you may use
the spare wheel as a road wheel
provided that:
R the tire is no more than six years old.
R the wheel and tire are of the prescribed
design.
The spare wheel is located in a spare wheel
bracket under the rear of the vehicle.
! Check the spare wheel regularly to see
that it is secure and has the prescribed tire
pressure.
Cargo Van/Passenger Van X
Open the tailgate.
X Apply a screwdriver to recesses 0047 and
then pry off covers 0046.
X Using the lug wrench from the vehicle tool
kit ( Y page 182), unscrew the now visible
bolts by approximately 20 turns counter-
clockwise. X
Slightly raise spare wheel bracket 0086 and
unhook left-hand safety catch 008A.
X Assemble the pump lever for the jack and
slide it into sleeve 0088 on spare wheel
bracket 0086.
X Raise spare wheel bracket 0086 with the
pump lever and unhook right-hand safety
catch 008A.
X Slowly lower spare wheel bracket 0086 down
to the ground.
X Lift spare
wheel bracket 0086 slightly and
pull
the pump lever out of sleeve 0088. Where will I find...?
185
Practical advice Z
Page 201 of 292
Display messages
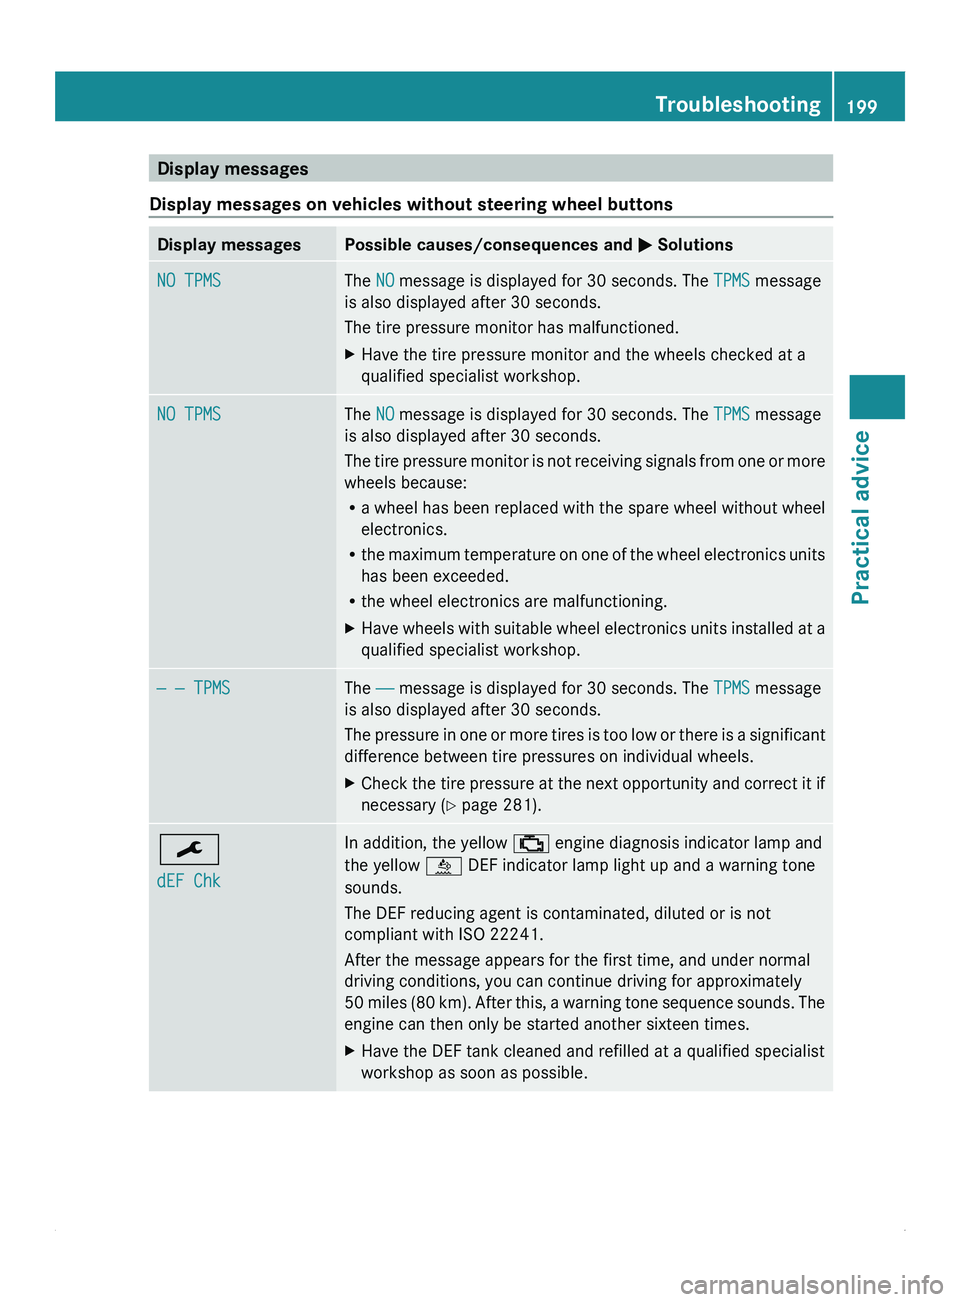
Display messages on vehicles without steering wheel buttons Display messages Possible causes/consequences and
0050 SolutionsNO TPMS The NO message is displayed for 30 seconds. The
TPMS message
is also displayed after 30 seconds.
The tire pressure monitor has malfunctioned.
X Have the tire pressure monitor and the wheels checked at a
qualified specialist workshop. NO TPMS The NO message is displayed for 30 seconds. The
TPMS message
is also displayed after 30 seconds.
The tire pressure
monitor is not receiving signals from one or more
wheels because:
R a wheel has been replaced with the spare wheel without wheel
electronics.
R the maximum temperature on one of the wheel electronics units
has been exceeded.
R the wheel electronics are malfunctioning.
X Have wheels with suitable wheel electronics units installed at a
qualified specialist workshop. — — TPMS The ——
message is displayed for 30 seconds. The
TPMS message
is also displayed after 30 seconds.
The pressure in
one or more tires is too low or there is a significant
difference between tire pressures on individual wheels.
X Check the tire pressure at the next opportunity and correct it if
necessary ( Y page 281). 009B
dEF Chk In addition, the yellow
00BB engine diagnosis indicator lamp and
the yellow 00E4
DEF indicator lamp light up and a warning tone
sounds.
The DEF reducing agent is contaminated, diluted or is not
compliant with ISO 22241 .
After the message appears for the first time, and under normal
driving conditions, you can continue driving for approximately
50 miles
(80 km). After this, a warning tone sequence sounds. The
engine can then only be started another sixteen times.
X Have the DEF tank cleaned and refilled at a qualified specialist
workshop as soon as possible. Troubleshooting
199
Practical advice Z
Page 205 of 292
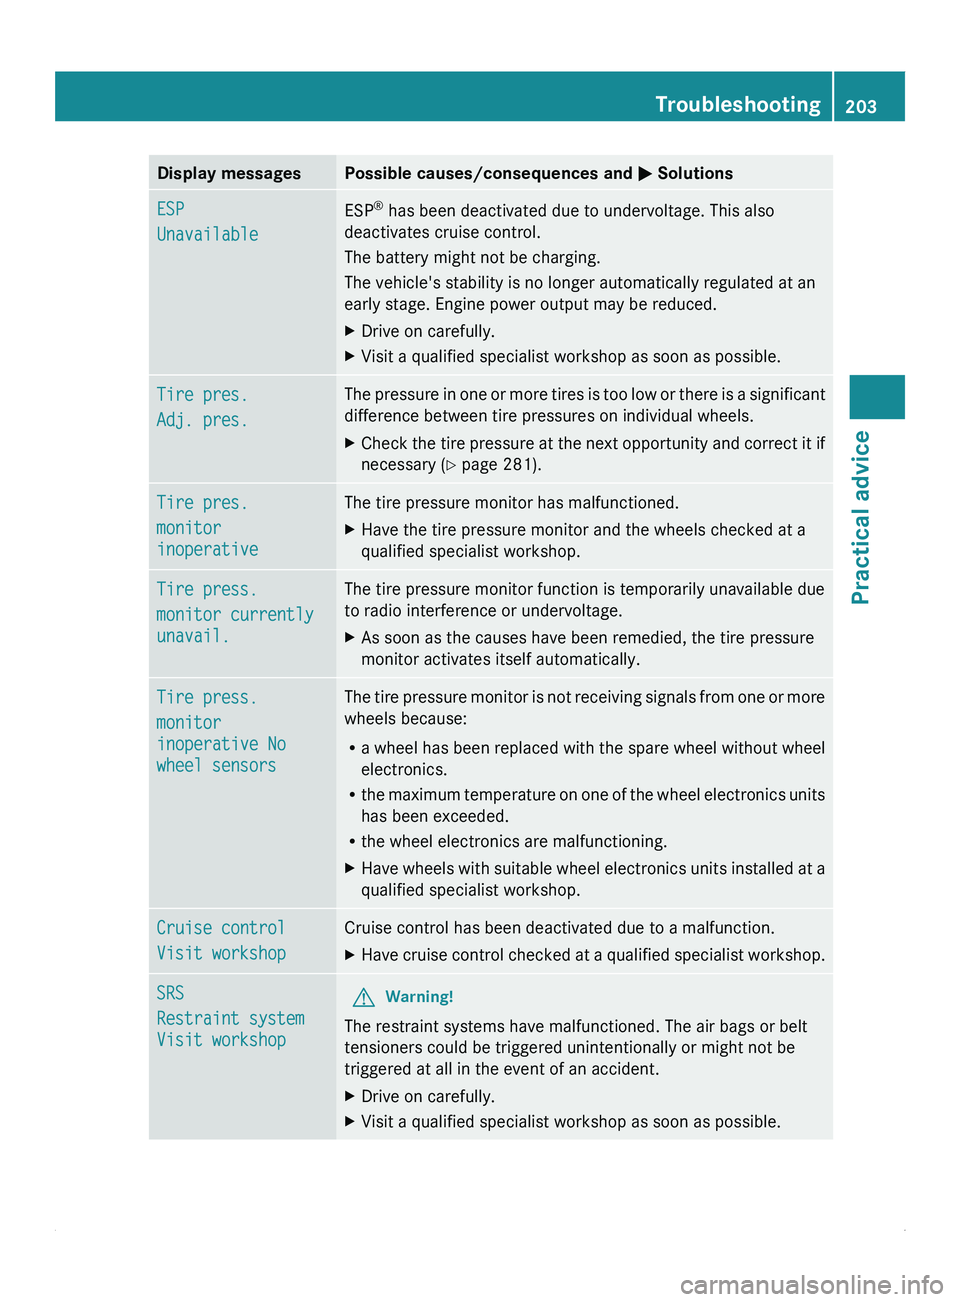
Display messages Possible causes/consequences and
0050 SolutionsESP
Unavailable
ESP
®
has been deactivated due to undervoltage. This also
deactivates cruise control.
The battery might not be charging.
The vehicle's stability is no longer automatically regulated at an
early stage. Engine power output may be reduced.
X Drive on carefully.
X Visit a qualified specialist workshop as soon as possible. Tire pres.
Adj. pres. The pressure in one or more tires is too low or there is a significant
difference between tire pressures on individual wheels.
X
Check the tire pressure at the next opportunity and correct it if
necessary ( Y page 281). Tire pres.
monitor
inoperative The tire pressure monitor has malfunctioned.
X
Have the tire pressure monitor and the wheels checked at a
qualified specialist workshop. Tire press.
monitor currently
unavail. The tire pressure monitor function is temporarily unavailable due
to radio interference or undervoltage.
X
As soon as the causes have been remedied, the tire pressure
monitor activates itself automatically. Tire press.
monitor
inoperative No
wheel sensors The tire pressure monitor is not receiving signals from one or more
wheels because:
R
a wheel has
been replaced with the spare wheel without wheel
electronics.
R the maximum temperature on one of the wheel electronics units
has been exceeded.
R the wheel electronics are malfunctioning.
X Have wheels with suitable wheel electronics units installed at a
qualified specialist workshop. Cruise control
Visit workshop Cruise control has been deactivated due to a malfunction.
X
Have cruise control checked at a qualified specialist workshop. SRS
Restraint system
Visit workshop
G
Warning!
The restraint systems have malfunctioned. The air bags or belt
tensioners could be triggered unintentionally or might not be
triggered at all in the event of an accident.
X Drive on carefully.
X Visit a qualified specialist workshop as soon as possible. Troubleshooting
203
Practical advice Z
Page 223 of 292
Engine
Draining the fuel filter
If the 00BA
indicator lamp lights up, you must
drain the fuel filter.
! When the 00BA indicator lamp lights up,
drain the fuel filter with water separator
immediately. Otherwise, the engine may be
damaged.
0040Environmental note
When handling, storing and disposing of
diesel and diesel mixtures, please observe
the relevant regulations.
To this end, have the fuel filter with water
separator drained at a qualified specialist
workshop which
has
the necessary specialist
knowledge and tools to carry out the work
required, e.g. an authorized Sprinter Dealer.
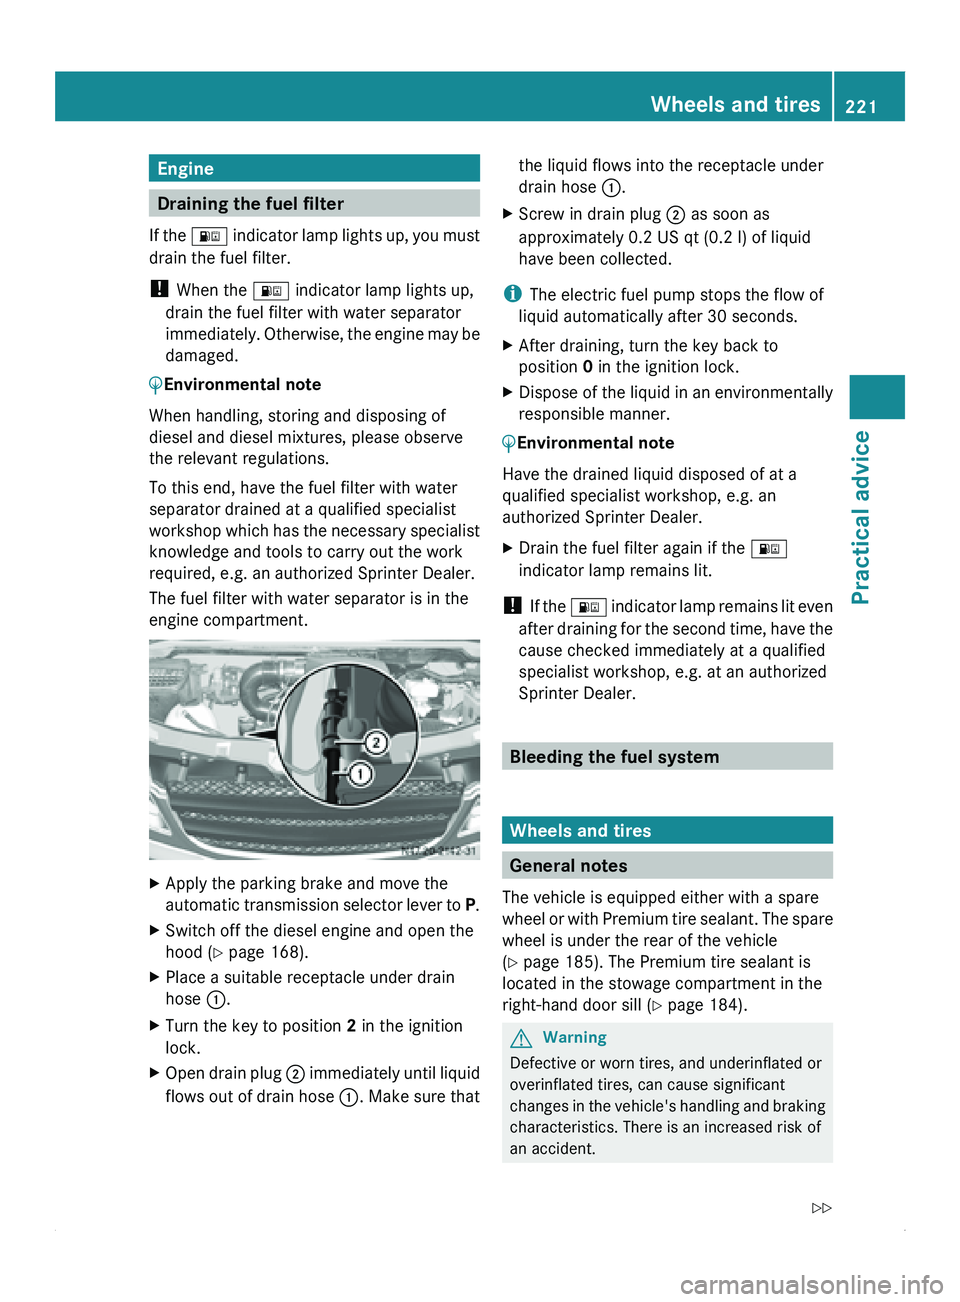
The fuel filter with water separator is in the
engine compartment. X
Apply the parking brake and move the
automatic
transmission selector
lever to P.
X Switch off the diesel engine and open the
hood ( Y page 168).
X Place a suitable receptacle under drain
hose 0046.
X Turn the key to position 2 in the ignition
lock.
X Open drain plug 0047
immediately until
liquid
flows out of drain hose 0046. Make sure that the liquid flows into the receptacle under
drain hose
0046.
X Screw in drain plug 0047 as soon as
approximately 0.2 US qt (0.2 l) of liquid have been collected.
i The electric fuel pump stops the flow of
liquid automatically after 30 seconds.
X After draining, turn the key back to
position
0 in the ignition lock.
X Dispose of the liquid in an environmentally
responsible manner.
0040Environmental note
Have the drained liquid disposed of at a
qualified specialist workshop, e.g. an
authorized Sprinter Dealer.
X Drain the fuel filter again if the 00BA
indicator lamp remains lit.
! If the
00BA
indicator lamp remains lit even
after draining for the second time, have the
cause checked immediately at a qualified
specialist workshop, e.g. at an authorized
Sprinter Dealer. Bleeding the fuel system
Wheels and tires
General notes
The vehicle is equipped either with a spare
wheel or with
Premium tire sealant. The spare
wheel is under the rear of the vehicle
(Y page 185). The Premium tire sealant is
located in the stowage compartment in the
right-hand door sill ( Y page 184). G
Warning
Defective or worn tires, and underinflated or
overinflated tires, can cause significant
changes in the
vehicle's handling and braking
characteristics. There is an increased risk of
an accident. Wheels and tires
221
Practical advice
Z
Page 224 of 292
Replace the tires, including the spare wheel,
at least every six years. They should be
replaced regardless of the degree of tread
wear. Check the tire pressure on the spare
wheel at regular intervals.
If you replace
a tire, we also recommend that
you replace the tire valve. G
Warning!
Only for vehicles without a tire pressure
monitor:
For safety reasons, we recommend that you
only use tire valves manufactured by
Schrader. These have been tested for use on
your vehicle.
Use only tire valves of type:
R TR 600 for the vehicle types 2500
R TR 418 for the vehicle types 3500
Using other tire inflation valves or valves
made by other manufacturers can result in
tire pressure loss and thereby impair the
operating safety of the vehicle.
You will find safety-relevant information on
tires and wheels in the "Tires and wheels"
section ( Y page 252).Preparing the vehicle
X Stop the vehicle as far away as possible
from traffic and
on a level, firm and non-slip
surface.
X Switch on the hazard warning lamps.
X Apply the parking brake.
X Move the selector lever of the automatic
transmission to position P.
X Any passengers should leave the vehicle,
ensuring that they are not endangered as
they do so.
X Place the warning triangle or hazard
warning lights at a suitable distance.
Observe legal requirements. Using tire sealant
You can use
the Premium tire sealant to seal
small punctures, particularly those in the tire
tread. Tire sealant can be used at outside
temperatures down to –22 ‡ (–30 †). G
Warning
Smoking, fire
and naked flames are prohibited
when handling tire sealant. Avoid creating
sparks. The tire
sealant could otherwise ignite
and cause a fire. G
Warning
Your safety is at particular risk and the tire
sealant is unable to repair a tire in the
following situations:
R if there are cuts or punctures in the tire
larger than 0.23 inches (6 mm)
R if the rim is damaged
R if you have driven with very low tire
pressures or with flat tires
Do not drive any further. Consult a qualified
specialist workshop which
has the necessary
specialist knowledge and tools to carry out
the work required.
For this reason, we recommend an authorized
Sprinter Dealer. In particular, work relevant to
safety or on safety-related systems must be
carried out at a qualified specialist workshop.
X Prepare the vehicle as described
(Y page 222).
X Before using Premium tire sealant, you
should stop the
vehicle so that the damage
on the tire is at the bottom.
X It is beneficial to the sealing process if you
remove the foreign body that has pierced
the tire, e.g. a screw or a nail.
X Remove the Premium tire sealant, the
accompanying "max. 50 mph" ("max.
80 km/h") sticker and the tire inflation
compressor from the stowage222
Wheels and tires
Practical advice
Page 231 of 292
G
Warning
If the minimum tire pressure of 43.5 psi
(3 bar) still cannot
be achieved, the tire is too
badly damaged.
Do not drive any further. Consult a qualified
specialist workshop which has the necessary
specialist knowledge and tools to carry out
the work required.
For this reason, we recommend an authorized
Sprinter Dealer. In particular, work relevant to
safety or on safety-related systems must be
carried out at a qualified specialist workshop.
0040Environmental note
Have the used tire sealant disposed of at a
qualified specialist workshop, e.g. an
authorized Sprinter Dealer.
! Have the tire sealant bottle replaced
every eight years at a qualified specialist
workshop, e.g. an authorized Sprinter
Dealer. Changing a
wheel in the event of a flat
tire G
Warning
To avoid the risk of serious or even fatal injury
and to avoid damage to the vehicle, observe
the following:
R the vehicle's jack is intended only to raise
the vehicle for
a short time when changing
a wheel.
R position the jack on the appropriate jacking
point only. Make sure that the jack is
correctly positioned under the jacking point
before raising the vehicle.
R the jack must be placed on a firm, flat
surface.
R before raising the vehicle, you should also
secure it against rolling away, e.g. by
placing chocks under the wheels. Never
release the parking brake while the vehicle
is raised. R
make sure that the distance between the
underside
of the
tires and the ground does
not exceed 1.2 in (3 cm). The vehicle could
otherwise slip off the jack or tip over.
R never place your hands or feet under the
raised vehicle.
R never start the engine, and prevent other
jolts or vibrations while the vehicle is
raised. The vehicle could otherwise slip off
the jack.
Preparing to change a wheel X
Prepare the vehicle as described
(Y
page 222).
X Secure the vehicle against rolling away
using chocks or similar items.
Use the chock ( Y
page 183) to do so. G
Warning
The vehicle
could slip off the jack on uphill and
downhill gradients.
To avoid the risk of causing serious or even
fatal injury or damage to the vehicle, do not
change wheels on uphill and downhill
gradients.
On a level road:
X Place chocks in front of and behind the
wheel which is diagonally opposite the
wheel you wish to change.
X Take the vehicle tool kit and the jack from
the footwell on the co-driver's side
(Y page 182).
X Remove the spare wheel from the spare
wheel bracket ( Y page 185).
X On wheels with wheel bolts, remove the
hub cap.
X Assemble the lug wrench extension using
the middle rod
and the rod with the largest
diameter from the three-piece jack pump
lever.
X Starting with the middle rod, slide the lug
wrench extension as far as it will go onto
the lug wrench. Wheels and tires
229
Practical advice Z
Page 233 of 292
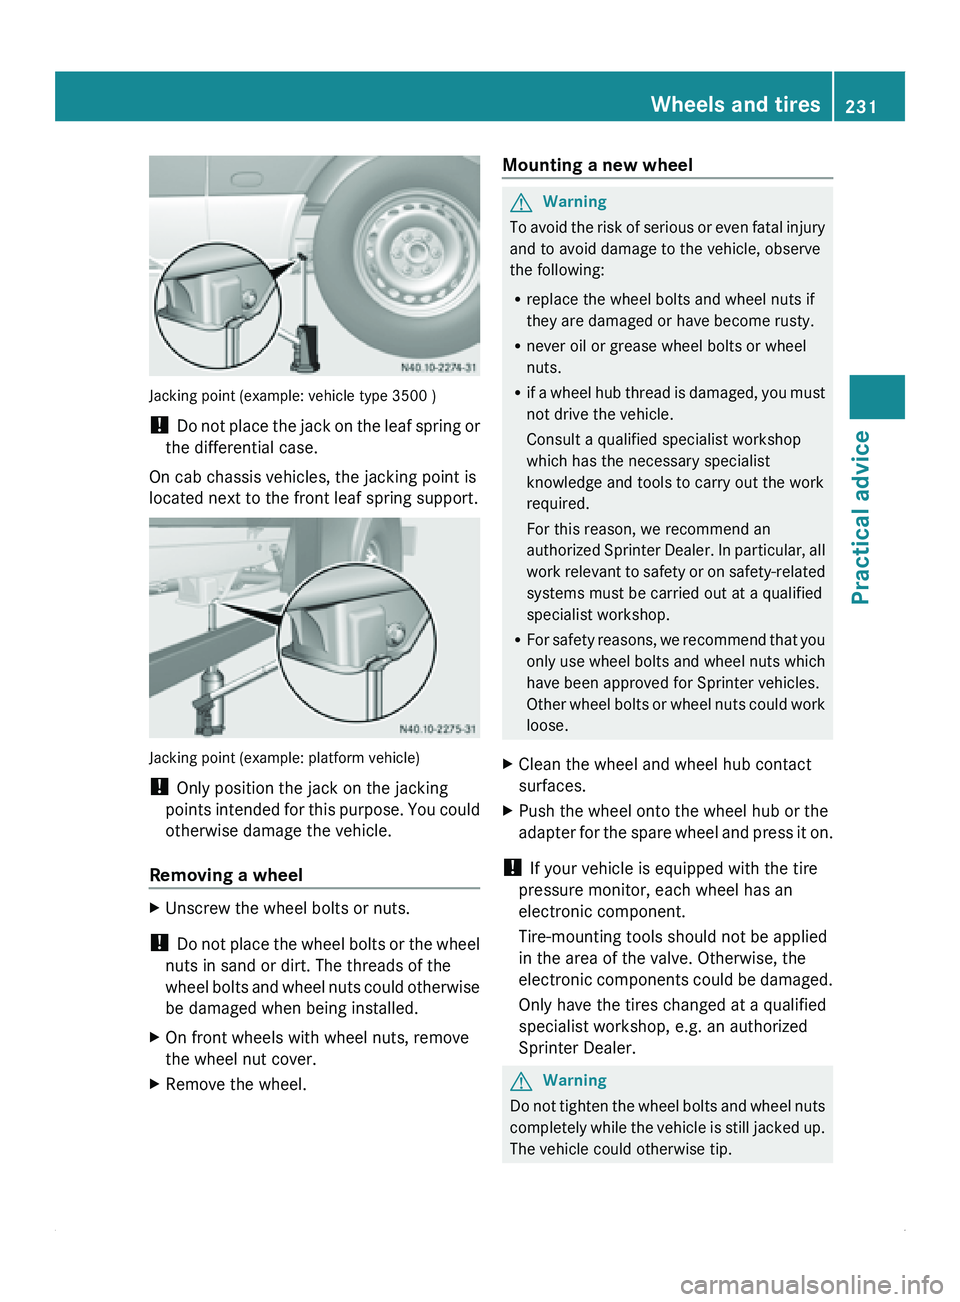
Jacking point (example: vehicle type 3500 )
!
Do not place
the jack on the leaf spring or
the differential case.
On cab chassis vehicles, the jacking point is
located next to the front leaf spring support. Jacking point (example: platform vehicle)
!
Only position the jack on the jacking
points intended for
this purpose. You could
otherwise damage the vehicle.
Removing a wheel X
Unscrew the wheel bolts or nuts.
! Do not place
the wheel bolts or the wheel
nuts in sand or dirt. The threads of the
wheel bolts and wheel nuts could otherwise
be damaged when being installed.
X On front wheels with wheel nuts, remove
the wheel nut cover.
X Remove the wheel. Mounting a new wheel G
Warning
To avoid the risk of serious or even fatal injury
and to avoid damage to the vehicle, observe
the following:
R replace the wheel bolts and wheel nuts if
they are damaged or have become rusty.
R never oil or grease wheel bolts or wheel
nuts.
R if a wheel
hub thread is damaged, you must
not drive the vehicle.
Consult a qualified specialist workshop
which has the necessary specialist
knowledge and tools to carry out the work
required.
For this reason, we recommend an
authorized Sprinter Dealer. In particular, all
work relevant to safety or on safety-related
systems must be carried out at a qualified
specialist workshop.
R For safety reasons, we recommend that you
only use wheel bolts and wheel nuts which
have been approved for Sprinter vehicles.
Other wheel bolts or wheel nuts could work
loose.
X Clean the wheel and wheel hub contact
surfaces.
X Push the wheel onto the wheel hub or the
adapter for the
spare wheel and press it on.
! If your vehicle is equipped with the tire
pressure monitor, each wheel has an
electronic component.
Tire-mounting tools should not be applied
in the area of the valve. Otherwise, the
electronic components could
be damaged.
Only have the tires changed at a qualified
specialist workshop, e.g. an authorized
Sprinter Dealer. G
Warning
Do not tighten the wheel bolts and wheel nuts
completely while the
vehicle is still jacked up.
The vehicle could otherwise tip. Wheels and tires
231
Practical advice Z
Page 234 of 292
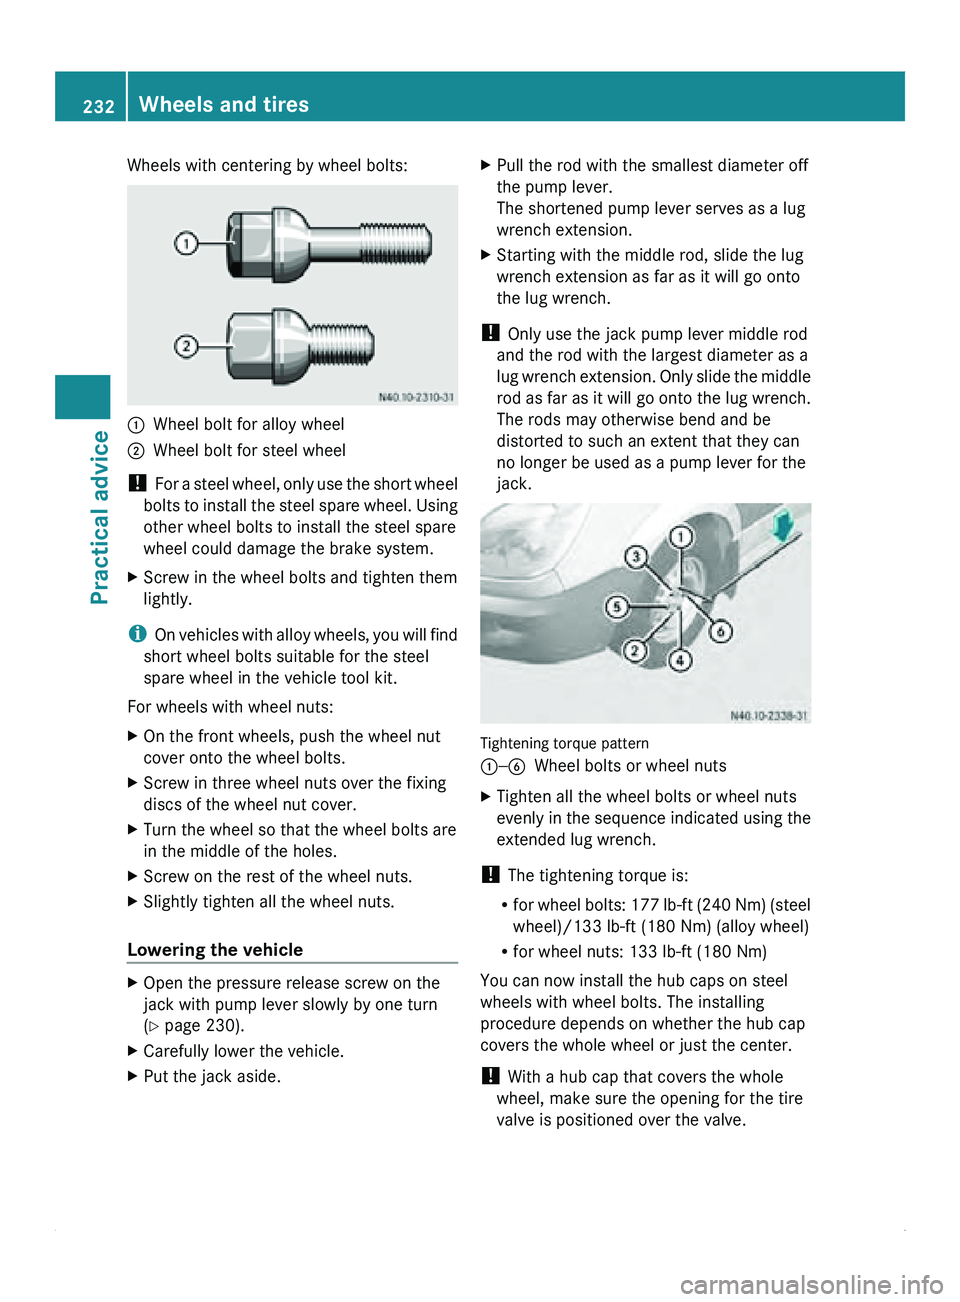
Wheels with centering by wheel bolts:
0046
Wheel bolt for alloy wheel
0047 Wheel bolt for steel wheel
! For a
steel
wheel, only use the short wheel
bolts to install the steel spare wheel. Using
other wheel bolts to install the steel spare
wheel could damage the brake system.
X Screw in the wheel bolts and tighten them
lightly.
i On vehicles with
alloy wheels, you will find
short wheel bolts suitable for the steel
spare wheel in the vehicle tool kit.
For wheels with wheel nuts:
X On the front wheels, push the wheel nut
cover onto the wheel bolts.
X Screw in three wheel nuts over the fixing
discs of the wheel nut cover.
X Turn the wheel so that the wheel bolts are
in the middle of the holes.
X Screw on the rest of the wheel nuts.
X Slightly tighten all the wheel nuts.
Lowering the vehicle X
Open the pressure release screw on the
jack with pump lever slowly by one turn
(Y page 230).
X Carefully lower the vehicle.
X Put the jack aside. X
Pull the rod with the smallest diameter off
the pump lever.
The shortened pump lever serves as a lug
wrench extension.
X Starting with the middle rod, slide the lug
wrench extension as far as it will go onto
the lug wrench.
! Only use the jack pump lever middle rod
and the rod with the largest diameter as a
lug wrench extension.
Only slide the middle
rod as far as it will go onto the lug wrench.
The rods may otherwise bend and be
distorted to such an extent that they can
no longer be used as a pump lever for the
jack. Tightening torque pattern
0046—0087
Wheel bolts or wheel nuts
X Tighten all the wheel bolts or wheel nuts
evenly in the
sequence indicated using the
extended lug wrench.
! The tightening torque is:
R for wheel bolts:
177 lb-ft (240 Nm) (steel
wheel)/133 lb-ft (180 Nm) (alloy wheel)
R for wheel nuts: 133 lb-ft (180 Nm)
You can now install the hub caps on steel
wheels with wheel bolts. The installing
procedure depends on whether the hub cap
covers the whole wheel or just the center.
! With a hub cap that covers the whole
wheel, make sure the opening for the tire
valve is positioned over the valve. 232
Wheels and tires
Practical advice